(Updated May 2020)
Facebook has for a few years, been able to allow Facebook Pages and WhatsApp Buttons to be connected via the advertising platform. Customers can connect the WhatsApp functionality to their Facebook page.
The monetization of Whatsapp by Facebook has taken another step. Now advertisers can include a button that is actually connected to an organic post that has been boosted.
This enables users to contact them via the new messaging App.
Since November 2016, Facebook has always had a click to messenger, which has been very, very popular. When customers see an advertiser or a company’s Ad on Facebook and they click on the messenger button, it lets them connect and communicate with that particular company’s page through instant messages.
I am not surprised that this has happened. When Facebook purchased Whatsapp a few years ago for over $19 billion dollars, people were asking questions. Was it worth the investment or not? What Facebook are essentially doing is connecting both of the audiences together so that that communication can stay consistent across both of the businesses.
People are saying that the combining of Facebook Pages and WhatsApp Buttons is going to ease the process of launching communications between people and their brands. This will ultimately eliminate several unnecessary steps.
Currently, Facebook is saying that there are over 1,000,000 facebook pages that already include their Whatsapp numbers in their posts.
Clearly, Facebook wants to increase this more. Facebook know that people already use Whatsapp to communicate with small businesses and it’s a very fast, convenient way to stay in touch. So by adding Facebook Pages and WhatsApp Buttons in their Facebook ads, they should see an increase in engagement.
Businesses can actually now make it even easier for people to learn about their products, set up an appointment, or even use their service.
Here are the steps that we will breakdown for you on how to link facebook page to whatsapp
1. Go to your Facebook page settings and find the WhatsApp tab
2. Connect your WhatsApp phone number to facebook and “send code”
3. Verify the code facebook sends you
4. How to add whatsapp button on facebook page
5. Make sure it works
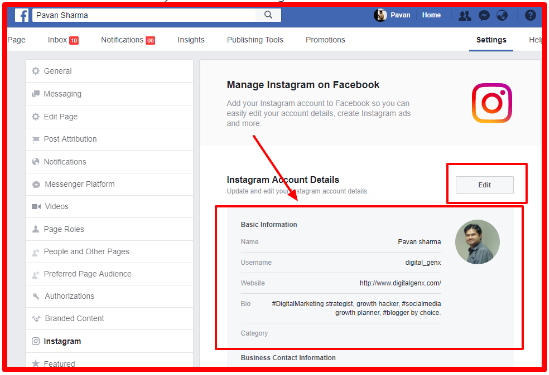
You need to log in as an admin to your facebook page and head over to settings. On the left hand sode, you will see the Whatsapp tab…go ahead and click on it.
Step 2: Connect your WhatsApp phone number to facebook and “send code”
Find your country area code and add that…then grab your whatsApp number..usually its your normal mobile/ cell phone number and enter that into the phone number field.
Enter the code that facebook sends you into the popup window
Once you have confirmed the numbers, you have the ability to add it to your facebook page…
So, once its done, you can see it on your WhatsAPP tab…
That is all there is to it… one final piece, check it out on the homepage of your facebook page…
People need to add the businesses’ WhatsApp number to their contacts list to initiate the conversation. This will stop them getting spammed by businesses who want to spam people. Once they do so, the messenger app opens up with a default message expressing interest. This can be edited by users before being sent. Advertisers will be able to gauge their results from some analytics that Facebook will measure.
Have you seen Facebook Pages and WhatsApp Buttons being used on facebook yet? I would love to know in the comments below.
Spread the love
How can you connect your Facebook page to the WhatsApp business app? What are the advantages? Here you’ll get step-by-step instructions on how to set it up and valuable tips for the right interaction between Facebook and WhatsApp Business.
Having a dialogue with your followers, customers, or fans has several advantages. Your content may be brilliant – but the consumer often finds himself acting as a silent observer. And in most cases, he remains that way. If you get into a conversation with them, you tie them much more strongly to your brand and content.
To drive traffic from your Facebook page to your WhatsApp Business account, you should not miss out on linking your apps.
💡 Companies that already use a WhatsApp Business API – or would like to use one in the future – can of course also connect their Facebook page to WhatsApp Business.
Get to know more about it in a Live Demo with one of our Messenger experts and feel free to ask us all your questions.
Here’s what you’ll find out in this post:
WhatsApp Business gives you advanced features compared to the regular WhatsApp version, which is primarily intended for personal use. This includes a product catalog, a company page and the labeling of conversations for a better overview.
The free app is especially useful for small businesses with fewer than 5 employees and self-employed people. In these cases, less traffic can be expected and the handling and GDPR hurdle is therefore easier to overcome.
For larger companies and enterprises, however, a WhatsApp Business API in conjunction with an official business solution provider such as MessengerPeople by Sinch is recommended.
In contrast to the free WhatsApp Business app, you can handle data with the API in a GDPR-compliant manner. It’s also possible to connect WhatsApp to your in-house CRM platform and make life easier for your customer support team. Also for companies that plan for a lot of requests or manage multiple departments or locations, a WhatsApp Business API in conjunction with an official business solution provider is an enormous help. Greater efficiency is the keyword here.
You can find a comprehensive insight into the topic in our article “WhatsApp Business for Companies – Everything you need to know!“.

Now you have linked your Facebook page with WhatsApp.
After connecting your Facebook page to the WhatsApp Business app, you can, for example, add a “Send a message” button to your organic posts or run Facebook Ads that start a conversation on WhatsApp with a swipe or click – so-called Click-to-WhatsApp Ads.
Example of a Click-to-WhatsApp ad to start a dialogue with your customers.
In addition to the Click-to-WhatsApp Ads that you can easily run on Facebook, you also have the option to make your WhatsApp account visible to your customers on Facebook.
You can either display your phone number in the header of your Facebook page or show a “WhatsApp button”. Through this button, the users can start a WhatsApp Chat with your company with one click.
This is how you can embed the button into your Facebook page.
The WhatsApp button and the phone number are displayed.
This is how the WhatsApp button will appear on the Facebook page:
What’s useful about the WhatsApp button is that it remains clearly visible even while scrolling through posts:
The Age of Conversational has already begun in many countries around the world. In many places, people have been surfing, shopping, and getting information using Messenger for a long time. Not only in China (WeChat) have messengers long been used along the entire customer journey to serve everyday customer needs.
WhatsApp is the messenger with by far the largest user base worldwide (over 2 billion users) and is already successfully used by numerous companies along the entire customer journey.
Combining Facebook and WhatsApp Business, you can use your social media communication to break the contact barrier with your customers. Let them participate in your company and use your WhatsApp Business app to engage in conversations with them.
Remember, if you have more than 100 requests on your WhatsApp channel every day, this amount won’t be manageable with a WhatsApp Business account.
The topic of GDPR also plays a major role here. WhatsApp Business does not offer support for data privacy compliant handling of your chats. Using a WhatsApp Business API is essential for exactly such cases.
Here you can read about the differences between the individual variants of WhatsApp accounts and in this article you’ll learn about the advantages and disadvantages of the WhatsApp Business app.
Our “Messenger Communication Platform” is your starting point for customer communication via WhatsApp and other relevant messaging apps. Deep integration with Chatlayer by Sinch allows you to create AI-driven virtual assistants that don’t feel like chatbots, and use them for any channel you want.
With the combined powers of Chatlayer and MessengerPeople, you can…
👨⚖️ … use WhatsApp and other messaging apps in a fully GDPR-compliant way for your customer service.
🚀… start immediately and without any IT effort – even from your home office!
💻… Manage and reply all messages centrally – no matter from which messaging app they were sent.
↔ … assign tickets to responsible colleagues manually or automatically via auto-routing
🤖 … start with simple automation and take it to the next level with Conversational AI
💕 … use integrations to your existing customer management software / CRM to drive personalized customer experience
💰 … use the No. 1 communication channel effectively and at fair prices and without a set-up fee for maximum personal digital consulting!
You can get a first impression of our product here:
👉Tip: Schedule a live demo for the Messenger Communication Platform now. We will guide you through the product via web demo and give you expert tips as well as answers to all your questions.
Anil Soeyuenmez
Hi, I'm Anil. I am a Junior Content Marketing Manager, interested in Tech and an enthusiast when it comes to words and writing. I love to play and study Chess (but I'm not too good at it), I am crazy about Martial Arts and addicted to Food and Travelling.
Content:
If you want to add a WhatsApp button to your Facebook page or profile, you just need to follow a few steps to add a WhatsApp number that opens in the app or on the web to start a chat.
You can simply add an API link with a target number or check WhatsApp on your Facebook to display a WhatsApp button on your profile or page.
You can even add a whatsapp button to the Facebook market and the article will help you in that case too.
To add a WhatsApp number to your Facebook profile, first go to edit profile , just select WhatsApp and add the API link with the number in the Social Links section. You have to make it public to make it visible to all people from your Facebook profile and now when someone clicks on the whatsapp icon it will be redirected to the chat.
To add whatsapp number to facebook page first you need to go to page settings and from there just find whatsapp button and go to very and then verify whatsapp with verification code and this button will show on facebook page.
In this article, I will explain the methods to help you add a WhatsApp number or button to display on your profile, and it can be done in a few steps.
If you want to add a WhatsApp number to your Facebook profile, you need to add a WhatsApp social network link and save it to your profile. To help you with these steps, just follow these steps:
1. First, setting up WhatsApp.
First of all, you need to create a profile on your WhatsApp or, if you already have one, continue.
2. Add WhatsApp to your Facebook profile.
Linking a WhatsApp button to a Facebook page greatly helps you grow your business and also improves your ability to communicate with customers around the world.
If you want to add a WhatsApp button to your Facebook page, you just need to verify WhatsApp by following a few steps.
1. Link to Facebook
2. Enter your WhatsApp number.
3. Code check
4. Add button
If you want to add a WhatsApp link or option to a specific post, you can do so from a Facebook ad in a few simple steps:
1. Opening a message on Facebook
2. Select the WhatsApp button.
3. Setting up
You can even list whatsapp number in Facebook marketplace to get more attention and leads directly, but make sure it's allowed by Facebook, otherwise you might have to fix Facebook marketplace issues first.
That's all you need to do.
Totals:
This article describes all the methods to help you add WhatsApp on any side of your Facebook, be it a Facebook page, profile or marketplace.
With 2can Showcase, you can sell your products on Facebook and Instagram in one click, as well as promote them in Stories. This is possible thanks to the Data Feed in 2can Showcase.
A data feed is a file with detailed information about products that are published in your 2can Showcase. There are several types of feeds in 2can Cloud. Which one to use depends on your goals. At the same time, the attributes and characteristics of goods for different feeds are the same. Below you can find instructions on how to generate formats (XML RSS/ATOM) and XML (YML), as well as how and where to use them.
XML feed (RSS/ATOM) is a file with detailed information about products published in your 2can Showcase. Information about each item that is added to such a file contains the required fields:
By default, your country is pulled up in the manufacturer field. You can change the "manufacturer" field and enter the required name!
An XML data feed (RSS/ATOM) is used to synchronize your product range with the Facebook Shop and Instagram Shopping catalog.
How do I create a data feed for a Facebook directory?
First, you need to register in your 2can Cloud Personal Account, if you have not already done so, we have detailed registration instructions in our Support Center. You can generate an XML data feed (RSS/ATOM) for Facebook Shop and Instagram Shopping from your Personal Account:
Upload a new data feed to the facebook catalog:
First, go to your Facebook Business account, if you don't have one yet, create a new one by following the instructions from Facebook:
How to use Facebook Business Suite?
How to create a data feed for the Instagram shopping catalog?
You can also promote on Instagram your products published in 2can Showcase. By simply turning on Instagram Shopping, it will allow you to attract additional people's attention to your products, as well as better customize your advertising by adding product tags to posts in the feed and even Instagram stories.
First you need to create an Instagram store. Then explore all the features of Instagram Shopping. Once you've created an Instagram store, you can connect it to your Facebook product catalog. For this:
Done, now you can publish already created products from your Facebook catalog to Instagram shopping.
Please note that in order for the products to be displayed correctly in Instagram Shopping, check for errors or errors in the Products> Issues section!
If you use the free domain of the Start 2can showcase (for example, shop.2canonline.com) or connected your domain to the Start site, you can verify the domain using the meta tag.
If you use your own domain, you can also verify it using DNS. To do this, instead of confirming via a meta tag, select the method "Update the DNS TXT record with your domain registrar" and follow the instructions on Facebook.
What is a data feed (YML) and why is it needed?
Today, sellers use the usual XLS (Excel file) and CSV formats to upload goods to trading platforms (marketplaces). However, it is preferable to create a YML (Yandex Market Language) document because it provides a number of advantages. For example, it allows you to automate the process of updating commodity items and their characteristics. We have added the ability in 2can Cloud to generate a Price List from your product range in the YML (Yandex Market Language) format. Now you can upload products using YML to such sites as: vk, classmates, Yula, etc.
How to generate YML (Yandex Market Language) data feed?
To get started, you need to register in your 2can Cloud Personal Account, if you have not done so yet, we have detailed registration instructions in our Support Center. You can generate a YML (Yandex Market Language) data feed from your Personal Account:
Usage example:
You can use the Multimarket (marketplace platform) as a platform.
Synchronize product catalog 2can Showcase with WhatsApp business