Your bio is an essential element of your profile on Instagram. Although it is limited to 150 characters, it is one of the three things that other Instagram users have to look at to gauge whether they want to follow you or not. Of course, the other two things are your username and your most recent selection of posts and stories.
One common technique used to increase the visual appeal of your bio and make it “pop” is to center or reposition the bio text. Centering/repositioning the text means inserting spaces on each line so that the overall effect is to make your bio look centered, indented, or stylish on the screen when someone looks at it.
Word-processing programs like Microsoft Word include automatic centering features that let you select a block of text and hit a button, and poof, it is instantly centered. Instagram, unfortunately, does not have this functionality. However, centering your bio is quite simple, and in this article, you’ll see a simple technique to get your bio displaying where you want it.
While you’re typing your bio on an iPhone or Android device, one handy feature is the character count that displays in the lower right-hand corner of the text box. The count shows you how many characters are left in your allowance of 150.
The PC version does not appear to include a character count feature.
Spaces count against the character limit, including nonbonding spaces—more on that later.
Yes, the spaces used to format your text count against the 150-character limit.
In the Instagram Bio text box, you’ll want to add spaces to the left-hand side of each row of text that you want to center or position differently. If your text strings are relatively short, adding about nine spaces to the left of each row will put your text near the center of the screen on most phones. You’ll want to add more or less space depending on if your text strings are longer or shorter. You’re going to run into one problem, though. Instagram insists on left-justifying every line in your bio. That means that each line starts with the first visible character, not spaces.
The only way to get your Instagram Bio lines to the center or appear where you want them to is to use nonbinding spaces. There’s no need to go into technicalities, but these gaps are essentially coded differently in HTML and will let you bypass the line glitch in Instagram’s code.
Nonbinding spaces prevent whitespace and two-part text such as “liquid-based” and “T & T Disks,” for example, from separating into the current row and next row, yet they serve as spacers in this particular case.
Nonbinding spaces used for copy/paste functionality in your Instagram Bio are not creatable in a text app, note-taker, or document creator. Sure, MS Word and Google Docs have a way to insert nonbinding/nonbreaking spaces, but it won’t work for your Bio unless you copy it from HTML, which uses “ ” (excluding the quotes) as the code. Don’t bother viewing source code or using the “Inspect element” to see the “ ” characters. They often appear as blank spaces, ironically.
Anyways, editing your Instagram Bio is simple. Using a PC is best so you can easily copy/paste the nonbreaking spaces. Still, it is also possible on Android and iPhone because we incorporated the nonbreaking spaces in the steps below, so your smartphone or tablet can easily copy them as well. Regardless, with a couple of clicks or taps, you can position your bio any way you want, including centering it. Here’s how.
 Tap the “blue checkmark” in the upper-right section to save your changes.
Centering isn’t the only type of text formatting that can give your bio some visual flair. For example, you can stagger your bio by increasing the indent on each successive line. For example:
Good Example:
Bad Example:
Notice that the second example tiered less fluidly because the last line was too short. Also, it doesn’t highlight the contact information in the same way that a centered bio would.
Think about what you want your followers and potential followers to take away from your bio, how your bio reads, and what information you’d like to highlight.
Sometimes, your profile is better served by not having a centered bio, which comes with downsides, including:
 Bios have a 150 character limit and spaces count toward that limit.
Overall, centering or staggering your bio on Instagram can definitely help make your profile stand out in the crowd. Whether you’re looking to help show off your contact information or want to make your bio look more attractive, centering and staggering text on Instagram is surprisingly easy.
Most of the bios on Instagram are left aligned but there are few people who prefer centering their BIO for creative purposes. In this guide, I will show you how to center BIO on Instagram using Spaces as well as Line breaks.
This can be done in two ways. Both are simple and easy to do.
I prefer the first one as it is very convenient while writing captions for my Instagram posts.
Table of Contents
Follow this procedure for both the ways described below.
{⠀⠀⠀⠀⠀⠀⠀⠀⠀}
Paste these spaces before each line of text.
I am sure everyone who uses a smartphone has a Notes app (Sometimes also called as Memo). This is a stock app which comes along with the phone.
Step 1:
You just need to open the notes app. Create a new Note.
Step 2:
Paste your BIO and Add spaces to it.
Step 3:
Copy the whole BIO from the notes by selecting ALL (including Spaces)
Step 4:
Open Instagram App and go to Edit Profile.
Step 5:
In BIO section, paste the Text.
Depending on how many spaces you have added. This will center bio on Instagram. If not, just go back to Notes and Adjust the Spaces as you like.
This is actually the recommended way to center bio on Instagram.
I have another way of centering your BIO. It is just creating a shortcut for adding spaces. This can be very useful when you want to add spaces in your captions. People generally use it to hide weird hashtags that they use in the caption field.
I found this cool mobile app that makes it super easy to create line breaks and center instagram bio automatically for you.
Checkout their website: Click here
Download on Google Play: Click here
Download on App Store: Click here
 Using Personal Dictionary Option
Centering bio is easy if you have spaces given above. Just copy them and paste them in BIO!
I know you wouldn’t want to visit my blog every time, you want to add these spaces. I have a tutorial for automating this process too:
This is a bit lengthy process but you have to do it ONCE ONLY. Below screenshots are from Android phone.
Step 1:
Go to the Settings app. Scroll down to find Additional Settings.
Step 2:
Go to Languages and input.
Step 3:
Select your current keyboard. Here, I use android so I have Gboard by default.
Step 4:
Choose the Keyboard and then select Dictionary.
Step 5:
Choose Personal Dictionary.
Step 6:
Choose Add.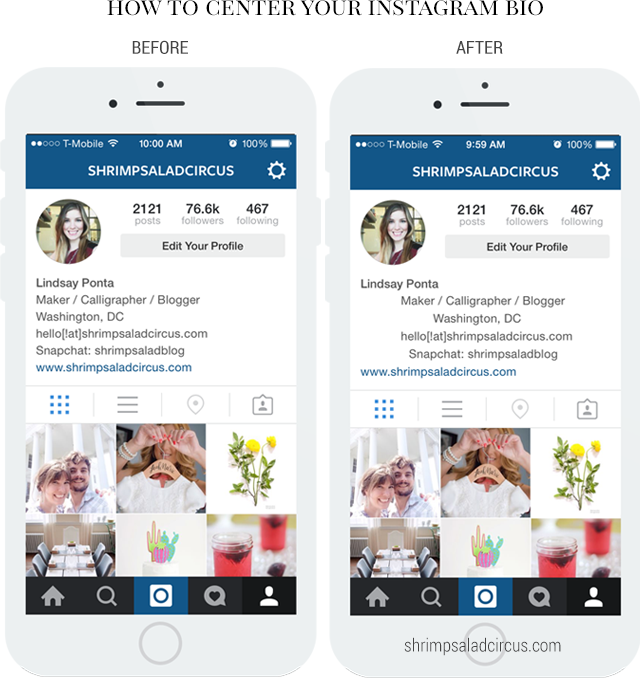 Inside “Type a Word” add the spaces I provided you above. Paste the spaces without curly brackets in it.
Step 7:
Add shortcut to the spaces. Here I have added ssss so that whenever I type ssss, it will suggest me those spaces to add. You can add your own custom text.
Make sure the text is not meaningful, else it will show you suggestions for that word when you type anything.
Step 8:
Click on SAVE and you are ready to rock!
You can go to notes and check by typing ssss whether it suggests the SPACES or not.
This is how you center bio on Instagram. If you have any difficulties in centering your bio, let me know through comments!
Also Read:
How to add Line Breaks in Instagram Captions? {Formatting TIP}
350+ Best Instagram Captions for Photos and Selfies!
What's better than a well-made website? High-quality site with reliable protection. Stay tuned as I uncover some of the best security practices for your WordPress website. They don't…
The brainchild of Comcast Cable Communications, LLC, renamed Xfinity, is one of America's leading telecommunications companies providing a wide range of services under its own brand. Their internet services are scattered across broad categories such as…
Puzzles such as Wordle are enthusiastically played by people. The love for these games is justified by their unique and addictive daily puzzles that keep the player on their toes. Lately these puzzles…
Windows
Call of Duty Vanguard has become the top rated and most played game due to the unique visuals and power each player gets. However, a few developer errors hinder the player...
Windows
If you're starting a software/application development project and don't know which git clients or git GUIs are best for you, here are the 14 best git tools for you . Software…
The PlayStation 4 has been one of the most popular consoles among gamers. But some users are facing the problem of Playstation 4 ce error 42555 1. This error appears whenever you try to…
Have you enabled h4 on your site and don't know how to check it? HTTP3 or h4 is the latest HTTP protocol developed by the IETF. It is still in draft and is expected to…
GeoGuessr is a popular educational game launched in 2013 that allows players to fully test their geographic knowledge. You probably already know everything there is to know about this if…
Typically, most of the restaurant management software available on the market today is enriched with features such as invoicing, CRM, inventory and inventory, as well as reporting and analytics. So…
So…
Modern Tezos NFT Marketplace offers high-speed Proof-of-Stake delegated transactions through its decentralized applications and smart contract network. The blockchain ecosystem is the perfect place for those who are looking for a secondary source of income. You…
WebSocket is a two-way communication protocol that uses a single TCP connection to send/receive data. Technically, WebSocket provides full duplex communication between the server and the client, which allows data to be transmitted in real time.…
Here are 28 Terraform Live Interview Questions and Answers listing and explaining important commands that are often asked in interviews. The rise of the cloud has opened up many opportunities…
Creating a well thought out plan is an essential part of the content writing process.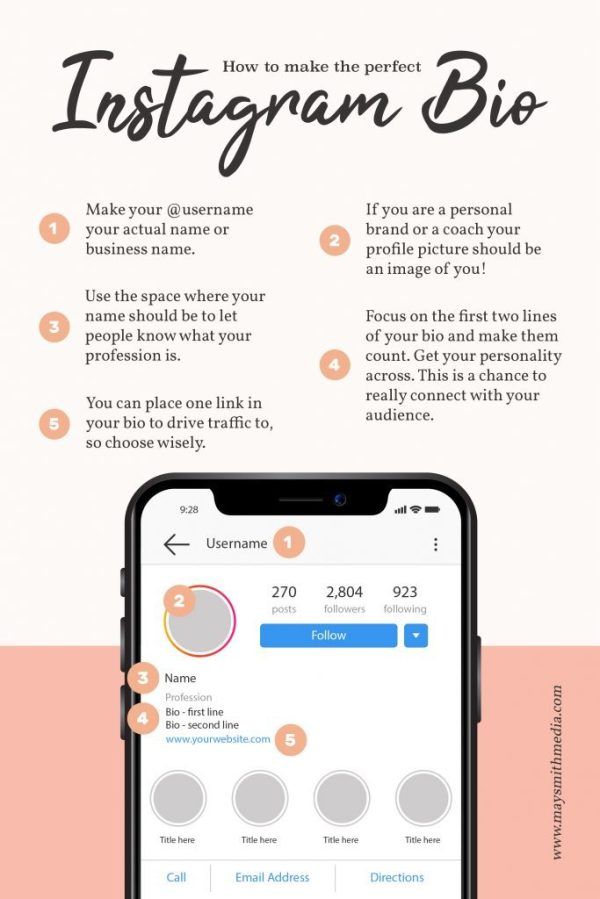 With content path generators, the task becomes simple and fast. Let's say you're a blogger who needs to regularly create content for your website,…
Roblox appeared in 2006 and now it has become one of the most popular gaming platforms. If you are a gaming enthusiast, Roblox might not be a new term for you as it offers…
The Amazon Echo is a Bluetooth smart speaker developed by Amazon. It is connected to the Alexa personal assistant service. You can control the speaker with this voice assistant feature. However, there are many...
DNSmasq can be used to cache DNS queries for Linux distributions. however, this can be a little tricky. The DNS cache works to speed up the DNS lookup procedure, which resolves a website's domain name into a related…
Windows
It's very easy to take a screenshot of any image, entire page or part of the screen in Windows 11. You can either use different default keyboard shortcuts, or use the help of applications such as Greenshot or ...
Morse code is a method of encoding a message using dots, dashes, and spaces. It is widely used for clandestine transmission of messages. You may have seen the use of Morse code in many marine scenes…
Smartphone apps have evolved over the years and can now benefit your health and well-being. This article is about hearing aid applications that can restore sound to your ears...
Are you experiencing computer performance issues when using Google Chrome for web research? This article offers you a step by step guide on how to reduce Chrome's memory usage. According to a recent survey conducted by the company…
One of the first things a person sees when they visit your Instagram profile is your bio. As the saying goes, "first impression is last impression", your Instagram bio creates an image of you. So why not do it well?
In this post, we are going to tell you some cool Instagram bio hacks and tips to improve your profile.
A bio is a short description where you tell people about yourself. Although the total number of characters in the biography is limited to 160, you can still play with it and make it beautiful.
Excited? Let's start.
Also Read : How to stop Facebook page notifications from flooding your profile
When you enter text in the Instagram bio and press the Enter (Return) key to change the line, it does not affect the bio. Bio does not preserve line breaks.
Then how do people get such a biography?
Well, there is always a way.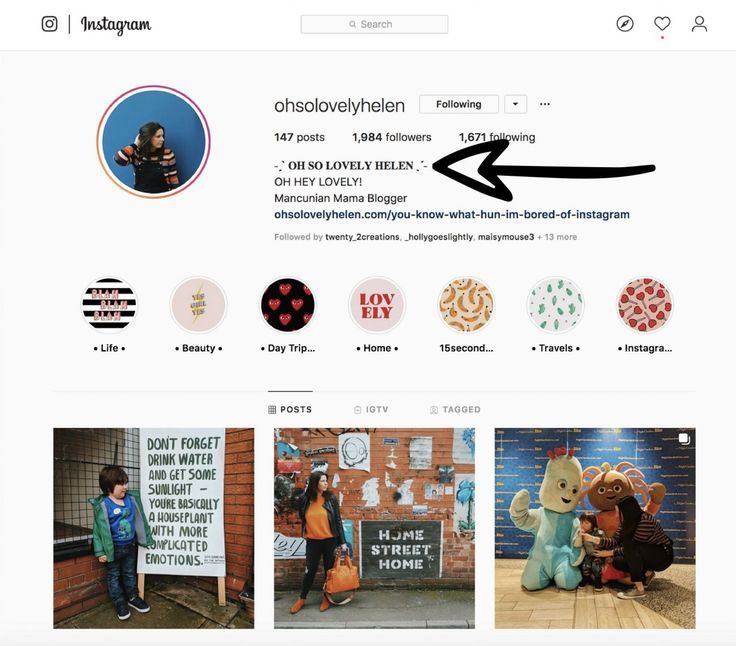 There is a simple workaround that allows you to add line breaks to your Instagram bio. Here's what you need to do:
Step 1: Write your bio with line breaks in some apps other than Instagram app like any note app or even WhatsApp and Facebook.
Step 2: Select all the text and copy it. Then paste the copied text into the Instagram biography section provided in the Edit Profile section and save it.
Congratulations! You have successfully created a clean bio.
Note . Although the Instagram app supports line breaks, the Instagram website will not display line breaks. The biography will appear in its original format without line breaks.
There are two ways to do this. The first method aims to change the alignment to suit your needs, while the second allows you to center your Instagram bio.
To have different alignment for each line of your Instagram bio, you must use line breaks as above. You need to enter multiple spaces before each line to format the biography of your choice.
You will have to copy and paste the biography several times to check its alignment. Once you are satisfied, save it.
Also Read: How to Get Rid of Blocked Instagram Activities
To center your bio, follow these steps:
Step 1: Copy the spaces *⠀⠀⠀⠀⠀⠀⠀* between the two stars, including the stars.
Step 2: Open the Instagram app and go to the biography section. Paste the places you copied above into the bio section of Instagram and start writing your bio after the second star.
Once you're done, remove the stars. Please be careful to only remove stars and not spaces. Save your bio and it will keep all the formatting.
Hello! You can also use the first method to center your bio.
In addition to using spaces and line breaks to change your bio, you can also change the font and add emoticons to your Instagram bio. However, please remember that this is not 2005, so don't over-dramatize the bio font.
If you want to write on Instagram in different fonts, follow these steps:
Step 1: Open one of these sites:
Step 2: Enter the text whose font you want to change in the Text field. In the second field, you will see text written in different fonts. Copy the font you like.
Step 3: Open Instagram and paste the text you copied in step 2 into the bio section. Save it.
While you can use your phone's keypad to add emoji to your Instagram bio, adding other characters isn't easy. To decorate your Instagram profile with symbols, open this website and copy the symbols you want. Then open Instagram and add them to your profile.
Check out: Top 7 Large Button Keyboard Apps for Android
If you want to add Sarahah, Facebook, Twitter or link to your brand on Instagram, you can easily do it through your Instagram profile settings. To add a link, do the following:
Step 1 . Open the Instagram app on your phone and click the Edit Profile button.
Step 2 . On the Edit Profile screen, add a link in the Website section and save it.
Every Instagram user has wanted to add multiple links to their bios at least once.