If you know anything about Instagram, you know that it lets you put all sorts of filters on your photos. But filters aren't the only photo-editing tools that Instagram offers.
Here's a quick guide on how to add both filters and effects to your Instagram posts.
How to use filters on InstagramFilters are basic overlays that change the colors and shading of your photos. Some might make the picture brighter, while others might strengthen the shadows. Some remove all the color completely, giving your photo a grayscale makeover.
You can use filters when you're posting a photo or video to your feed, or when you're adding to your Instagram Story.
To use filters on a post, tap the plus sign icon at the top of your homepage or profile, then tap Post. Select the photo or video you want to upload and tap Next in the top-right.
You'll be brought to a page where you can add all sorts of preset filters to your photo. Tap any of the filters to overlay them on the post, and then tap the filter again to manage how strong it is. And if you don't like any of the available filters, you can tap Edit in the bottom-right to make your own.
When you're done, tap Next in the top-right to save your filtered post.
The same photo, with (right) and without (left) a filter. Instagram; William Antonelli/Insider
 Adding filters to your Story is simpler, but doesn't give you as much control. First, make a Story, either by taking a new picture/video or by uploading something from your phone's camera roll. When you're on the preview page that lets you add stickers and text, swipe left or right to switch between about a dozen different filters.
How to use effects on InstagramEffects are very different from filters. While filters just change the colors, effects add entirely new aspects, from stickers to animations. If you've ever used effects on TikTok, these are the same thing.
Also unlike filters, you can only use effects when you're making a Story, a Reels video, or when you're using Instagram Live.
To do it, open Instagram and swipe right to turn on the camera. At the bottom of the screen, next to the record button, you should see some circular icons with designs inside. These are all effects, and you can tap any of them to put them on your post.
Two recommended effects on Instagram. Instagram; William Antonelli/InsiderIf you don't like the effects you're offered, scroll to the far-right of the list and tap the Browse effects bubble. You'll get a full library of all the effects on Instagram, which you can scroll through or search from.
Quick tip: Some augmented reality (AR) effects that scan your surroundings aren't available if you're living in Illinois or Texas, due to local laws about AR on social media.
You can only use one effect at a time, and you can't combine them with filters.
William Antonelli
Tech Reporter for Insider Reviews
William Antonelli (he/she/they) is a writer, editor, and organizer based in New York City. As a founding member of the Reference team, he helped grow Tech Reference (now part of Insider Reviews) from humble beginnings into a juggernaut that attracts over 20 million visits a month. Outside of Insider, his writing has appeared in publications like Polygon, The Outline, Kotaku, and more. He's also a go-to source for tech analysis on channels like Newsy, Cheddar, and NewsNation. You can find him on Twitter @DubsRewatcher, or reach him by email at [email protected].
Read moreRead less
Aug 30, 2022• Proven solutions
With the new Instagram update, many individuals have noticed that the layout has become a bit complex. Similarly, the feature to apply filters has also become complicated, making the users wonder how to use filters on Insta? If you are experiencing the same issue, then don't worry! You have strolled upon the right article. In this article, you'll discover how to use Instagram filters on feed posts, stories, and reels. So, make sure to skim through the whole article to apply filters on Instagram successfully.
The Instagram filter is a valuable tool that enables you to alter your picture with a single click by making relevant adjustments to the photo on Instagram. The feature for the Instagram filter was released in 2011 with a few basic choices for filtering your image. It provides the user with multiple ways to edit a picture with more excellent quality, an extra border, and even some significant tilt-shift effects. Because of the easy and friendly layout of Instagram, it is much easier for the user to apply filters. And, it is better to keep your application updated as Instagram is constantly releasing new layouts for the convenience of its users.
This feature, although user-friendly, might be confusing for some. That is why we will show you how to enhance your posts and stories in a few simple steps.
With the easy layout provided by Instagram, it is incredibly easy to edit your pictures. Specifically, talking about adding filters to a photo or video on the Instagram story is probably the easiest thing to do on Instagram, and it does not even take much time. Adding filters to your photo or video can take a maximum of five minutes to do so.
Following are the steps to add filters to a photo and video on Instagram Story, so you no longer have to worry about how to use filters on Insta. Make sure you follow every step so you can successfully get the job done.
Step 1: Select or Capture a Photo/Video
The initial step is to open your camera on Instagram and swipe up to select an existing picture/video or capture a photo/video to apply a filter.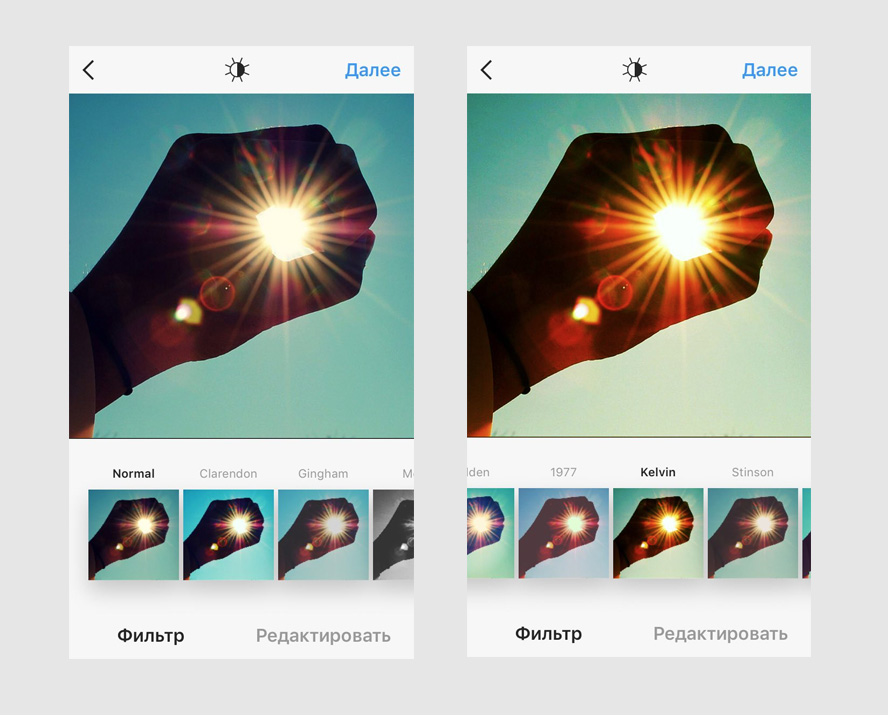
Note: Another way to add an existing picture is to tap on the bottom left corner, where you can see the photo gallery icon. Next, tap on the image you want to apply the filter on.
Step 2: Tap on a Filter
Now that you have selected a photo, an editing screen will be displayed on your device. Tap on a specific filter of your choice by swiping through the effects displayed on the editing screen to add effects to your existing picture/video.
Note: If you do not like the effects displayed on the screen, browse other filters by tapping on the search option.
Step 3: Add the Picture/Video to Story
Tap on Done once you have chosen a filter. And then, add the picture/video to your Instagram story by clicking on the icon labeled Your Story.
Applying filters to your Instagram posts is just as easy as adding filters to an Instagram story. Adding filters to your posts can make your profile look more attractive and thus improve engagement. Though the method is different for both cases, they have the same effect. Applying filters to your posts can enhance their quality and result in more likes and comments.
Follow the steps given below to add filters to your Instagram post or carousel post effortlessly.
Step 1: Tap on the Plus Icon
The initial step is to tap on the Plus icon at the bottom of the screen. Then select an existing picture or capture a photo for further editing.
Note: For a carousel post, long press on a picture and select other pictures you want to add to your Instagram post.
Step 2: Tap on Next Post
Next, tap on the Next icon present at the top right corner to apply filters to your photo. Then tap on the specific picture you want to apply a filter on and tap on a filter to add it. You can even further edit by tapping on the option to Edit at the bottom right corner.
Note: If you tap on the filter for the second time, an option to control the filter's intensity will be shown. Adjust it accordingly to your preference.
Step 3: Share your Post
Once you are done with all the relevant editing needed, tap on the Done. A screen will be displayed to add a caption and location. Once you have completed editing your photo, tap on the Share option at the top right corner.
Instagram Reels are very similar to TikTok videos, with the iconic feature of uploading entertaining short fifteen-second videos as Instagram Reels. Instagram reels are one of the most prominent features of the new updated version of the Instagram Application.
This method is quite similar to that of applying filters to Instagram stories. For your ease, we have listed a step-by-step guide below to add filters on Instagram reels.
Step 1: Go to Create Mode
Tap on the camera icon on the top left corner of the screen. And then, tap on the Reels option to go to Instagram reels create mode.
Note: Another way to create an Instagram Reel is to go to the reels explore page and tap on the camera icon present at the top right corner of the screen.
Step 2: Tap on the Smiley Face Icon
Next, tap on the Smiley Face Icon to add filters. Choose from the variety of available filters. Then tap on the chosen filter to apply it to your Instagram reel.
Step 3: Start Recording
Once you are done selecting the desired filter for your Instagram reel, start recording. After the recording is done, you will notice the filter added to the whole Instagram reel you just shot.
Instagram is a great application that offers a wide range of filters to its users. Even though it's a great feature and very beneficial for the users to choose among the variety, it can be annoying to skim through the long list to find a specific filter. For that sole reason, Instagram provides the user with the option to hide certain filters or rearrange them to find a filter of your preference easily.
The steps below are a guide to organizing the filters for your Instagram Post/Reels/Feed.
Step 1: Tap on Manage Option
The initial step is to select or capture a photo/video. Go to the filters screen and scroll to the end of the list to tap on the Manage option. It is a settings option specifically for the filters feature.
Step 2: Rearrange or Hide Filters
For rearranging your filters, hold and drag the three lines on the left side of the specified filter to wherever you want it to be. As for hiding a specific filter, tap on the circle present at the right side of the filter. When the tick sign disappears and the color of the title of the filter fades, it means that the filter has been hidden.
Note: Another way to rearrange or hide filters is to do it from the filters screen. Long press on the specified filter and drag it to the position you want it to be. And drop the filter on the Drag to hide option to hide the selected filter. You can always turn off this feature from the manage menu.
Step 3: Tap Done
Once you have made the required adjustments, tap on the Done option present at the top right corner of the screen. And you are done rearranging the filters!
Conclusion
For many individuals, using Instagram might not be as easy as it is for the new generation. It could be because some individuals find the layout to be a bit complicated, which might be the reason why they are not able to apply filters.
But don't panic! In this article, we have talked about the nitty-gritty on how to use filters on Insta. And that's about it on how to use filters on Instagram.
Even though keeping the application updated is crucial, it is also essential to follow each step thoroughly to add filters to your Instagram Post/Feed/Story effortlessly. You won't face any issue if you follow the steps exactly as mentioned.
Shanoon Cox
Shanoon Cox is a writer and a lover of all things video.
Follow @Shanoon Cox
Despite the fact that Instagram filters have moved from the status of innovations to the status of must-haves, the number of cool cases on the Ukrainian market is still not that big.
This is mainly due to the fact that filters are subject to the same production standards that apply to other communication tools - posts, banner ads or packaging. We forget that the main success driver of this tool is consumers and, as a result, Instagram filters need to be created not according to the rules of the brand, but according to the rules of its target audience. nine0003
In this article, together with the CEO and co-founder of the FFFACE Instagram filter studio Dmitry Kornilov , we will analyze 10 main mistakes when creating this tool in the format of funny bad advice.
Expectation:
In order for the filter to work, it is desirable to place the logo in the face area. Ideally, if branding completely covers the face, then all Stories from users will be in the same style. nine0003
Reality:
Branding is built into every Story created through the Instagram filter by default! Yes, yes, in the upper left corner it says: this filter created your brand. At the same time, this inscription is also an active link to your account, that is, even if your filter does not have branding, it is still there.
Instagram did this so that, on the one hand, the tool would benefit businesses, and on the other hand, so that consumers would not have to blush in front of their feed for the "logo on the forehead.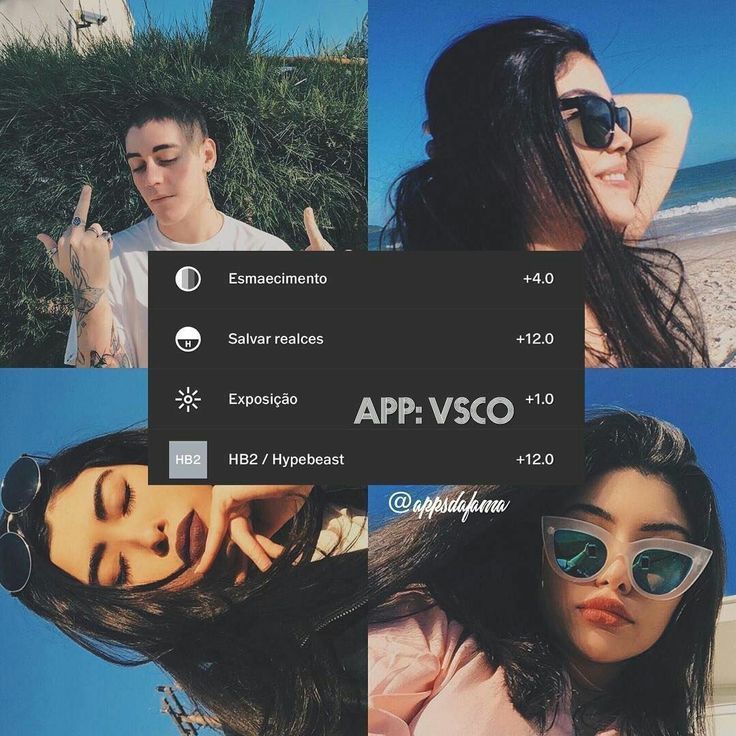 " nine0003
Here is an example of an effect that looks more natural and still communicates with the product:
FFFACE filter for Samsung - https://www.instagram.com/ar/661364068020551
Coverage - 1.7 million contacts
Expectation:
Reality:
One of the main motivations for a user who shoots Stories with an Instagram filter is the desire to look prettier or cooler in order to get attention. In general, when creating content, a person does not think about who the mask manufacturer is, but evaluates whether the mask will make him more attractive in the eyes of followers. If your Instagram filter fulfills this goal, then the user can become more loyal to your brand and even subscribe so as not to miss new filters that will help him look better in the future. nine0003
FFFACE CREATION FFFACE Wondermilk.me-https://www.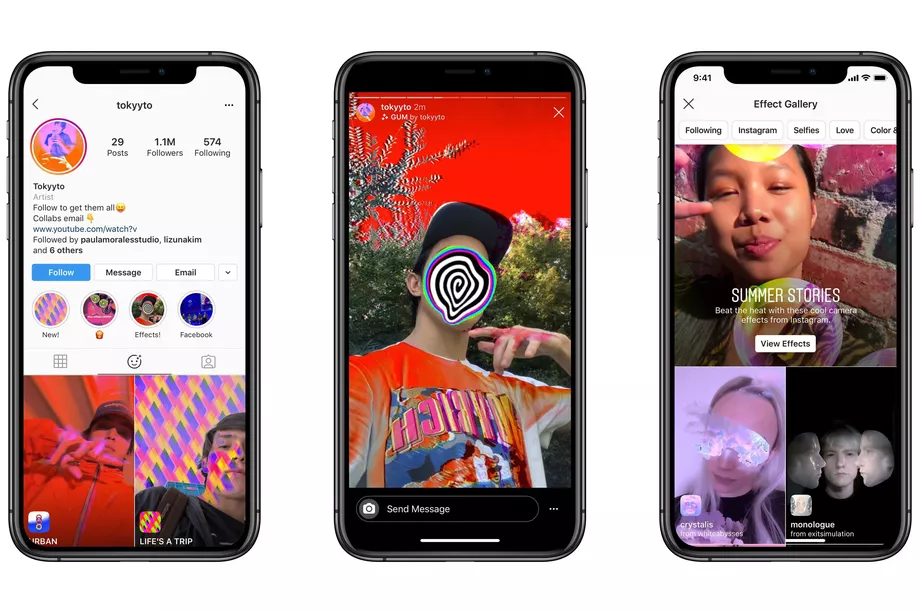 instagram.com/ar/68989863551885835/
Contacts
Expectation:
The Instagram filter should include all the functionality of the promo/app/website, it should reproduce each of the communication steps:
As a result, in order to use the filter, the user needs to perform only 5 simple steps, hold down the record button, blink 10 times, open his mouth and make first a long and then a short tap on the screen.
*We could not find a reference for such a filter, but it is available. It is difficult to find just because no one uses such filters and they are buried in brand accounts. Nevertheless, technical specifications for such filters are still slipping through.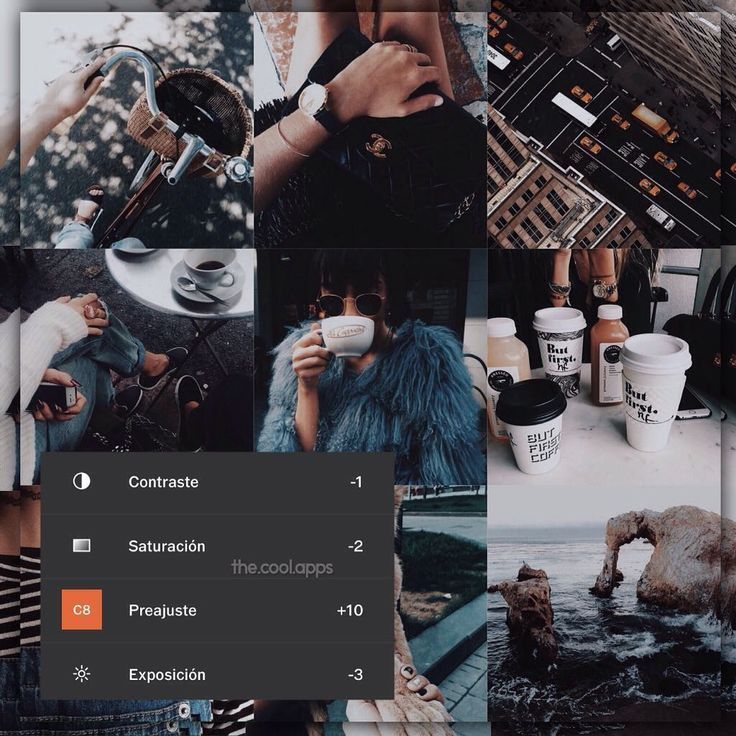 nine0034
Reality:
People don't want to bother creating Stories, your filter should "work" immediately after opening, so that the user just needs to start recording. You can add additional functionality, but the main action should work intuitively, for example: press the record button to start.
FFFACE filter for Beeline – https://www.instagram.com/ar/186588799285572
Coverage – 1.3 million contacts
Waiting:
Let's add color correction, nice 3D models, face plastic and particles and see what happens.
Reality:
There are many masks. So much so that the mere fact of its presence does not surprise anyone, including even exceptionally beautiful visual effects. The combo works - visual + idea, which help to form not just a beautiful design composition, but an image with an idea:
FFFACE filter for Pepsi - https://www. instagram.com/ar/401183534195833
More than 10 mentions of the project in the press and on TV, total coverage of 5 million contacts
.90 Instagram filters 5 exist outside the information field, seasonality does not matterExpectation:
You can ignore what is happening in the world. As soon as you publish the mask, everyone will run to use it, regardless of what is happening outside the window. nine0003
Reality:
Instagram filters help a person to join the current trend, beat a seasonal mood or meme, and also express their attitude to current events.
For example, Dreamtown was the first to launch a filter with beautiful protective masks and got cool metrics on the situation:
FFFACE filter for Dreamtown – https://www.instagram.com/ar/1174477899567400
3 coverage 3 million contacts
Expectation:
Surely people will want to know the answer to the question: “Why do I thank the couriers?”
Reality:
Guessing is only suitable for answering questions that REALLY excite the brand's audience.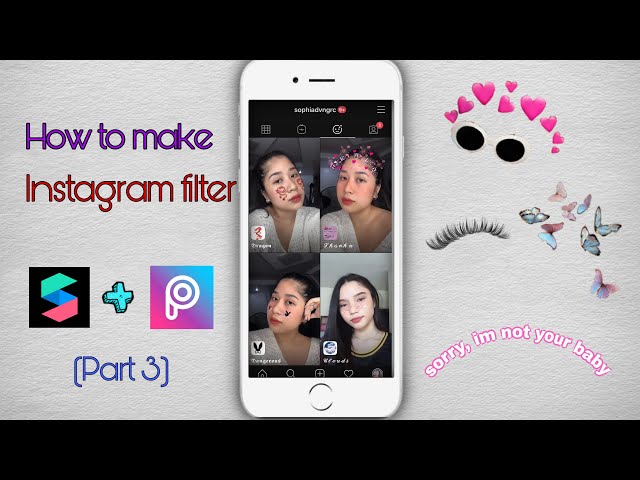 For example, Silpo's audience really wants to get a New Year's prediction after a viral activity with predictions in checks. nine0003
FFFACE filter for Silpo-https://www.instagram.com/ar/434088447509040
Coverage-250 thousand Contacts
A brand of chips needs to crunch chips, when promoting a brand of chocolate, you need to drink tea with chocolate, an auto brand must show someone behind the wheel, and a brand of diapers - well, you understand.
Reality:
There are no official rules for branded creatives, and they certainly don't always have to be product creatives. It is worth starting from the mood of your communication in general and the insights of the target audience. As mentioned in the first paragraph, even if your filter does not show the brand obviously, it will still always be there, in the upper left corner.
Can Privatbank just run a filter with Pavel Zibrov? YES!
Privatbank filter – https://www. instagram.com/ar/671072543387006
Reach - N/A
Waiting:
Reality:
You won't believe it, but there are people who don't watch your Stories feed, and there are those who don't read posts. In addition, most people learn about your mask not from your account, but from the Stories of your followers. Therefore, make sure you:
Example of correct filter start:
View this post on Instagram
nine0002 Posted by UAnimals (@uanimals.official)
Expectation:
Let's launch and come what may!
Reality:
The Instagram filter is part of a communication funnel that generates content from users to promote the brand/communication platform/digital activation/Instagram account. It should be built into the overall digital ecosystem and contribute to solving real problems. nine0003
For example, with the help of a filter for Luxoptica, it was possible to make sales for more than 500 thousand UAH.
Expectation:
Content is another matter, here you can and should post it every day, and also run a lot of advertising.
Reality:
Instagram filters are the same content, only content that is self-reproducing with the help of your audience. Look carefully, it even appears in the profile as content in the form of a video preview. Try to look at it this way and it becomes clear that Instagram filters will only work properly if they are fully in sync with your communications strategy and the rest of your content plan. nine0003
For lovers of numbers, you can do this exercise:
Most likely, the masks won. Still wondering if you need them? nine0003
April 20, 2013 Photo Android
Instagram* allows you to create masterpieces from not the best photos using retouching and filters. What each of the 40 filters of the service gives and how best to use them, you will learn from the Lifehacker guide.
There are 23 filters enabled by default in the application. To connect the rest, at the end of the list with filters, click "Management" (Android) or "Settings" (iOS). In the menu that opens, check the box next to the filters you need. nine0003
does One of Instagram's most popular filters*, originally only available for videos. Brightens and intensifies colors.
When you want to make a picture brighter or make objects in the foreground stand out. Great for pictures of animals and children.
Also previously only used for video. Slightly blurs the image, creating a slight "fading" effect. If the photo is dark, this filter will give it a yellowish tone. If light, it will make the image brighter, as if shrouded in a romantic haze.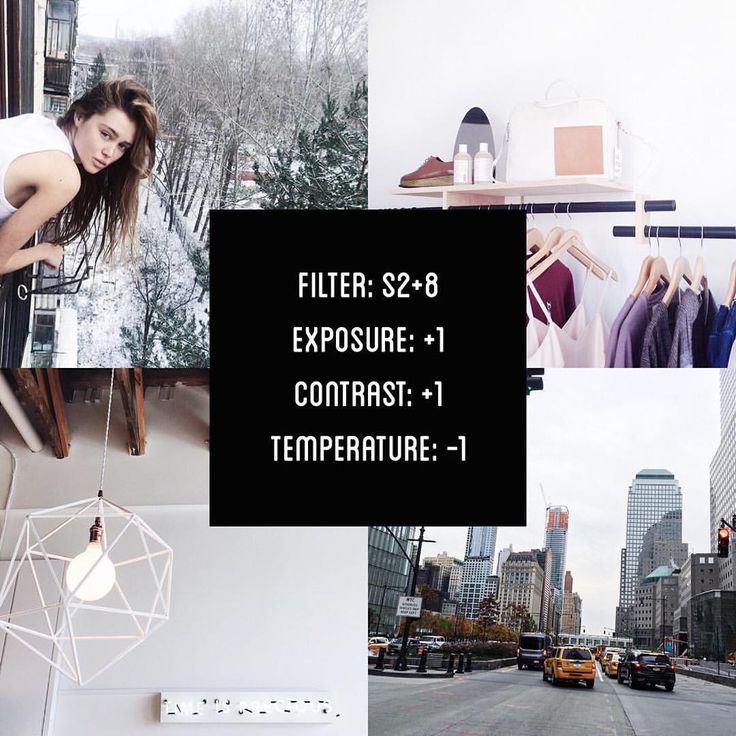 nine0003
When you want to take a photo in vintage style. Hipsters love him.
does A black and white version of the previous filter, only Moon emphasizes the shadows a bit more.
When you want to "age" a photo. Works great with portraits.
Brightens the image. Makes all colors except red more vibrant. nine0003
For outdoor landscapes and portraits. The filter well emphasizes the beauty of tanned skin, green grass and blue sky. Also good for food photos.
One of the vintage Instagram* filters. Brightens the image and reduces the saturation of colors, which creates an antique effect.
In portrait photography, especially if the model has problematic skin: Reyes handles light retouching. nine0003
does Enhances colors, making them richer and deeper. Brightens yellow, orange and red.
For editing pictures taken on city streets.
does Creates a yellow mask, thereby reducing the saturation of other colors.
When you want to give an image an antique and romantic effect. Works well with pictures taken in natural light.
does Adds saturation by brightening the center and removing unnecessary shadows.
Good for portraits as it can hide some skin imperfections. Looks good in pictures taken in nature, where there is a lot of green and blue. Also often used for food photos. nine0003
does Adds contrast to a photo by making warm tones lighter and cool tones darker. Emphasizes shadows and highlights.
For street scenery, building and sunset photography. It can also give an interesting effect to black and white shots.
does Softens colors slightly, making them more pastel. Reduces contrast and creates a hazy effect. nine0003
Good for autumn cityscapes and retro portraits.
does Adds brightness, highlights greens and yellows.
For beach photography. Not recommended for portraits as it can give the skin an unnatural tone.
does Adds more light: the closer to the center of the image, the lighter. And the darker the original, the greater the effect.
When you want to age a photo a little. Perfectly emphasizes the beauty of autumn landscapes.
Darkens the edges, brightening the center of the picture.
When you want to draw attention to the subject in the center of the frame. Works well with light saturated photos.
does Adds nice soft lighting.
Best for close-ups of people.
does It shifts the tones towards the blue end of the spectrum and gives the photo a colder look. nine0003
Suitable for photographing buildings and monuments, as well as winter landscapes.
Does Makes a photograph look like it was taken in the 1980s.
Quite a versatile filter as it brings colors to life in photos. Use it if you want to take an old school photo.
Quite intense filter that makes the picture much brighter, gives warm tones.
Can be used both indoors and outdoors. Doesn't work very well with close-up portraits, but good for shooting fashionable looks.
Similar to Rise: soft tones, bright center. But, unlike Rise, it makes the picture richer and deeper. nine0003
Another hipster favorite filter. Best suited for photos taken in nature.
does Not only makes a photo black and white, but also gives it a matte effect.
For portraits and close-ups.
Makes the photo brighter and more saturated, emphasizes the shadows. nine0003
Ideal for food photography. But it can also be used for landscapes depicting a forest or lawn.
Turns a color image into black and white.
Basic monochrome Instagram* filter. Use it if you want to take a black and white photo that has a lot of light and deep shadows. Pretty versatile, but especially good for portraits and nature shots. nine0003
does Similar to Lo-Fi, but the colors are warmer and less dramatic.
If you want to enhance colors, but not to the same extent as with Lo-Fi. Good for processing natural landscapes.
does Gives the image a pinkish tint while brightening the entire image.
Like Valencia, suitable for vintage photography.
does Slightly lightens the image and washes out colors.
If you are taking portraits or taking pictures on the beach. But in general, it can give any picture a little nostalgic look.
does Evens out skin tone. Adds a yellowish tint for an antique effect. nine0003
Portraits, portraits and more portraits!
does Brightens the center of the image.
Best for portraits and other shots where there is a lot of light. The latest Walden is slightly aging.
does Softens tones, adds yellow, and due to the sepia effect makes the picture slightly faded. nine0003
When you want to take a retro shot with slightly darkened edges. Looks good on thematic staged photographs.
does A rich gray filter that increases exposure and contrast.
If you want to see what your portrait would look like a hundred years ago. It also emphasizes the beauty of sea and winter landscapes. nine0003
Emphasizes reds while making the picture brighter and slightly faded. This is what photos looked like in the late 1970s.
Instantly age photos. It looks especially good in pictures taken on the beach, where there is a lot of sun glare.
does Brings pictures to life and shine, as if bathed in summer sunshine. nine0003
If you want a photo to evoke a warm, pleasant feeling. Great for shots where there is a lot of natural light. For example, for photos taken at sunrise or sunset.
does Due to the predominance of purple and brown colors, it makes the picture a little smoky.
When you want to make an image look creepy. It is better not to use for portraits, unless, of course, these are photos from Halloween. nine0003
does Another filter referring to photographs from the 1980s. It adds redness and light in the center while darkening the edges.
Ideal for summer beach photos and picnics.
does Darkens the image, emphasizes the shadows, adds a little yellow tint.
Good for architectural shots, giving an interesting effect to blue skies and green lawns.
 Ginza
Ginza
does Gives photos a warm glow.
Use it for landscapes, including urban scenery. Also suitable for portraits and fashion shots.
does Performs a function similar to auto-correction in photo editors: equalizes brightness, contrast. Gives pictures a glossy effect. nine0003
Able to transform any photo.
does Increases contrast while blurring highlights.
The filter does not work well with images of the night sky, but on the contrary, it gives zest to well-lit landscapes. In close-up portraits, it helps to emphasize the look.
Brings out green tones.
Can be overlaid on nature photos.