Wondering how to get verified on Instagram? There’s a lot more to it than just clicking on a link. But we’re here to walk you through it.
It’s not exactly easy to stand out on Instagram. After all, there are more than 1 billion active users on the platform.
There’s a decent chance that there’s someone with your exact name (or brand name) on the platform. So, how can you stand out from impostors and get yourself noticed?
By getting the coveted blue checkmark that means you’re verified on Instagram. It lets people know that you’re legit and that you have value to an audience. But if it were easy, everyone would do it. And it would lose most of its meaning.
Keep reading to learn about the exact steps you need to follow to get verified on Instagram.
Free download: Professionally designed, fully customizable Instagram ad templates. Click and get them now!
Having the blue verification checkmark badge added to your Instagram account means that you’re considered someone of interest on the social platform.
In Instagram’s own words, verification signals “authenticity and notability.” It also means that you’ve cleared something of a high bar. The verified badge means that Instagram considers an account to “represent a well-known, highly searched-for person, brand or entity.”
When you see the blue check, Instagram wants you to know you’re following an authentic account. Not a fan account or a fake one.
But it’s also important to know that being verified doesn’t equal an endorsement from Instagram. It also doesn’t mean that your content will show up more on the platform than posts from non-verified accounts.
As mentioned above, the main reason that Instagram verification is important is to distinguish accounts that Instagram deems valuable in the public eye from those that aren’t.
Essentially, Instagram verification allows users to easily find the accounts they’re more likely to be looking for. Sometimes, that means the platform has to act fairly quickly as it seeks to verify accounts that might have recently gone viral or are a big part of what people in their community are talking about.
Take Indian actor Emraan Hashmi, who saw his song “Lut Gaye” blow up this year, and who quickly received his blue checkmark badge from Instagram.
Anyone! Well, kind of.
Technically, anyone and everyone with:
… can apply to be Instagram verified.
There are no cut and dried regulations you must hit to get verified. Facebook states — somewhat enigmatically — that accounts applying for verification must be authentic, complete, unique and notable. There is no defined minimum number of followers an account has to have to apply.
But Instagram is looking for people and brands that are highly sought after — on social media and in real life.
Feel like trying your luck? Here’s an easy-to-follow guide to apply to be verified on Instagram.
Log into your account, visit your profile page, and open the drop-down menu in the top right corner. From there, navigate to Settings.
Hit Account and then Request Verification.
Finally, all that’s left is to fill out the application and send it.
Note: Lying about personal details or falsifying proof can lead to losing your badge or even getting your account deleted. Be honest.
And never use a third-party service to apply for verification. In all likelihood, this is a scam.
Make sure you also consider these things when filling out each field:
 Your followers may know you by your initials rather than your full last name. For business accounts, just type your company name.
Once you’ve filled everything out and chosen your category, you need to upload a photocopy of your ID.
Choose the file, upload it, and your application is ready to send. Click the send button to finalize your application.
All that’s left to do is wait. There is no definitive deadline on when Instagram will definitely respond to you. But if you get rejected, you won’t be able to apply again for 30 days.
Unless you’re George Clooney suddenly deciding to break your social media lull, there’s usually a good amount of work to be done before you can moonwalk your way to the blue badge.
So we’ve included 5 tips to help you boost your chances of getting that verification mark.
Don’t just apply for verification when you have 30 followers and five random posts on your account.
The badge itself isn’t automatically going to turn you into a successful Instagram influencer.
Just because technically you could apply (you only need one post) doesn’t mean you should.
Yes, an Instagram verification badge greatly improves the legitimacy of your profile or brand. You want it ASAP.
But before you apply, you should do everything you can to make sure it’s as worthy of verification as possible:
 Literally, in Mastercard’s case.)
If romantic comedies have taught us anything, it’s that romantic interests only care about you when someone else starts showing interest.
A big following and notoriety on Facebook, YouTube and TikTok, for example, can only reflect well on you when Instagram reviews your case.
Here are some ways that you can stand out a bit on those platforms and build a following.
Barstool Sports has never been afraid of controversy, and their recent power ranking of the best female singers of all time was no different.
Power Ranking the Top 10 Female Singers of All Time pic.twitter.com/tQJOHnhl6I
— Barstool Sports (@barstoolsports) November 16, 2021
Now, there are a lot of things to argue about on this list. For example: what makes Barstool Sports any kind of authority on female singers? And, uh, Mariah ahead of Whitney?? JoJo ahead of Aretha and Beyonce??
But that’s exactly why it has 19,000 Quote Tweets on Twitter. And one of the more interesting (and debatable) calls is at number 10.
In that spot, Barstool anointed social media star Addison Rae one of the top 10 singers of all time. They put her in the same conversation as Beyonce and Whitney Houston. So it’s not a surprise that her inclusion on the list garnered plenty of media attention.
No doubt that this type of slightly controversial exposure introduced many people to Addison Rae who hadn’t previously heard of her.
This is both about the actual content of your posts as well as how the posts are executed.
In terms of the latter, we’ve already gone over some of the basics. But another trick that can help maximize your posts is the use of hashtags.
Hashtags can help increase your reach and connect to trends. But it’s important to only use hashtags that are relevant to the niche you’re trying to establish. Here are some of the more popular hashtags going around that you can use for your benefit.
A smart practice to establish yourself is to create a hashtag for your personal account or brand and encourage followers to use it.
Here, the Seattle Seahawks football team cheekily use the hashtag #BlueFriday to encourage support for their team.
View this post on Instagram
A post shared by Seattle Seahawks (@seahawks)
Another key way to maximize your account is to make sure you’re posting at times that will deliver the most eyeballs.
The absolute best time to post on Instagram may surprise you.
You can go a step further and pin down your own custom best time to post. Hootsuite’s Best Time to Publish feature analyzes your past performance to show you data for the best times to post on each of your social platforms.
Finally, you need to stay active and use Instagram to its fullest potential.
Nelly Furtado once famously asked why all good things come to an end. In this case, they don’t necessarily have to, but they can.
Getting verified isn’t an appointment for life, like the Supreme Court. Here are some things to keep in mind if you want to keep that blue checkmark.
While building up your other social accounts is a good idea, you should never use Instagram to cross-promote them.
Don’t ask your followers on Instagram to follow you anywhere else. Instagram doesn’t look kindly at “add me” links to other profiles. And while it’s not 100% confirmed that a TikTok or Twitter link in your bio will cost you your verification badge, you’ll be better off using a link tree to promote your off-Instagram presence.
Make sure to follow Instagram’s Terms of Use as well as the platform’s Community Guidelines.
Some of the things that may result in your badge being taken away include transferring or selling your badge, using your bio, profile picture, or Instagram name to market or promote other services, and so on.
By building your presence on multiple social media platforms, posting at the best times and staying active on Instagram, you boost your chances of getting verified.
But at the end of the day, whether you get it or not comes down to the split-second decision of a Facebook employee.
If you don’t get it on your first application, focus on building and growing your presence on the platform. You don’t need a blue check to succeed on Instagram.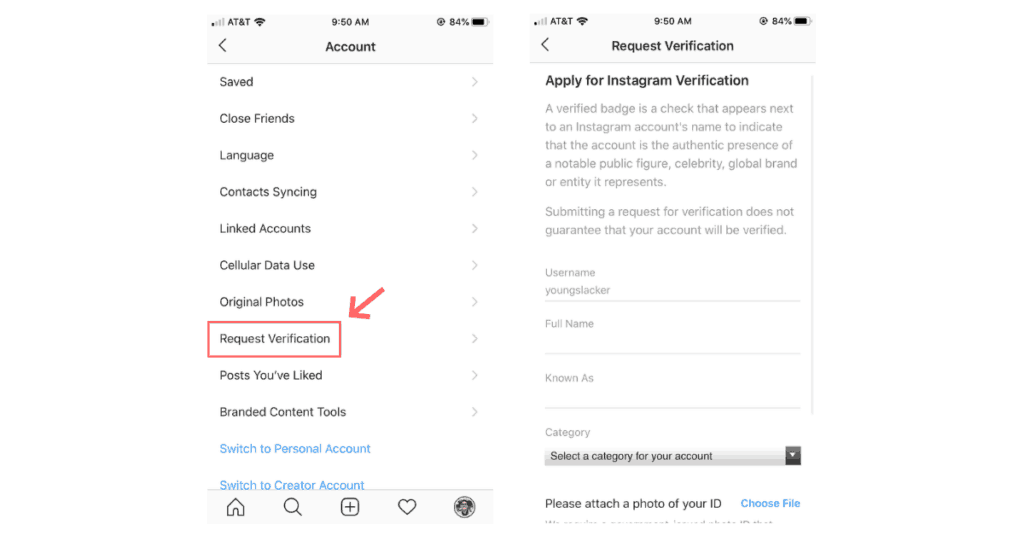
For many businesses, working their way toward being verified on social media is a monumental step in the life of their business.
While you can always increase your advertising budget to generate more leads, Instagram verification is one of the elusive social media status symbols you can’t buy, which as a result makes it highly coveted and immensely valuable.
A study revealed that 73.4% of Instagram accounts that had more than one million followers had a verified badge. Out of the next group down (100,000 to one million followers), 22.4% were verified accounts. When studying accounts with between 1,000 and 5,000 followers, only 0.87% were verified.
Put simply, being verified on Instagram can have a significant effect on your brand’s image in the public eye.
This guide will walk you through everything you need to know on how to get verified on Instagram, including the verification process, how to request verification, and more.
Shortcuts ✂️
Free Webinar:
How to Grow and Monetize Your Instagram Account
A free workshop with field-tested Instagram marketing tips. Learn how to grow your Instagram audience and monetize it with an online store.
Register now
An Instagram verified badge is a blue checkmark next your profile name. The check proves the account is owned by a public figure like a celebrity or brand.
As a business on Instagram, one question you may ask yourself is, “How do I get my account verified?” Most social media services have some kind of “verification” process for getting the almighty blue checkmark on your profile:
Data suggests that the majority of bigger Instagram accounts are verified.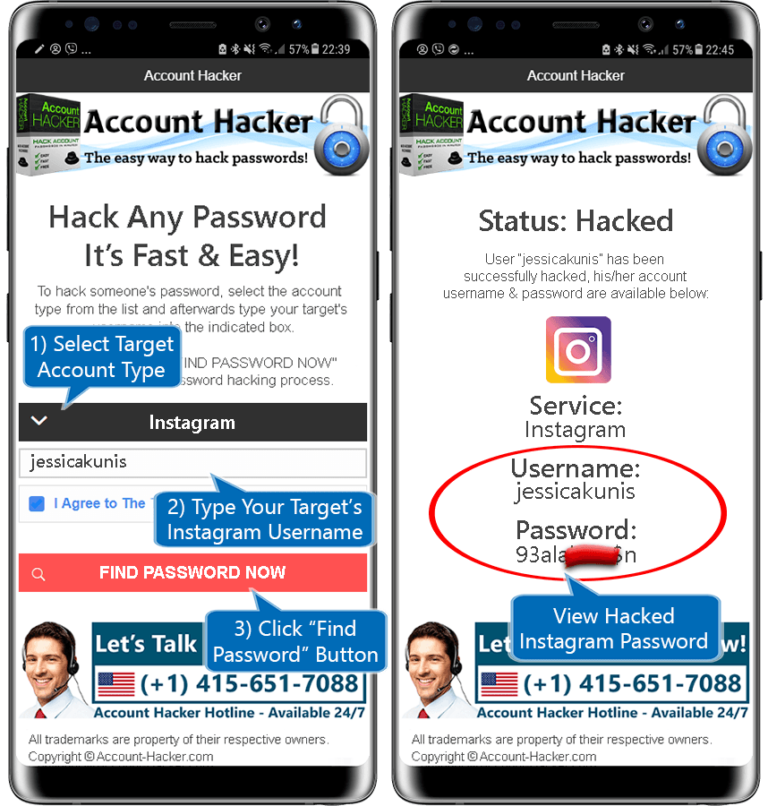 As you grow your Instagram profile, you’ll want to get verified to stand out from the competition. Verified accounts are generally seen as more trustworthy than unverified ones and have a 30% higher engagement rate, on average.
Other reasons to get verified include:
Having a verified Instagram account, means you’re more likely to attract new followers directly from search results (in the Instagram app) and increase brand awareness.
With all of those great benefits, you’re probably thinking that getting verified is going to be pretty difficult. But is it? Let’s take a look.
The good news is that applying to be verified on Instagram is super easy (as you’ll see in the tutorial below). The not so great news is that actually getting approved can be difficult.
It’s no secret how Instagram verifies accounts. It’s guidelines state the eligibility requirements your account must meet:
 You’ll need official business documents and ID to prove it.
 Those are on top of the basic rules of following community guidelines and Instagram’s terms of use. As bonus good news, these criteria also mean you don’t have to have a certain number of followers to get verified—you could request verification as soon as you sign up and complete your profile.
Open the Instagram app and head to your profile. Once you’re on your profile page, tap on the hamburger icon (three lines) in the top-right corner and select Settings. On your settings page, toward the bottom, you’ll see the option to Request Verification. Tap it and you’re ready for step 2.
From there, you’ll need to fill in details about your business such as:
Photo courtesy of: Unsplash Here you can link to other verified social media accounts if you have them, news or press releases your brand is featured in, your website, or other (non-promotional) links you feel might be relevant.
 Once you’ve filled in the verification application details, hit Submit and congrats: you’ve sent off your request.
Photo courtesy of: PexelsGenerally within about 30 days, Instagram will notify you in your Activity feed whether your application was successful or not. If so, you’ll get the Instagram verification badge right away.
Before you go ahead and submit your application for the coveted blue badge, keep in mind the following tips that will help improve your chances of getting a verified Instagram account:
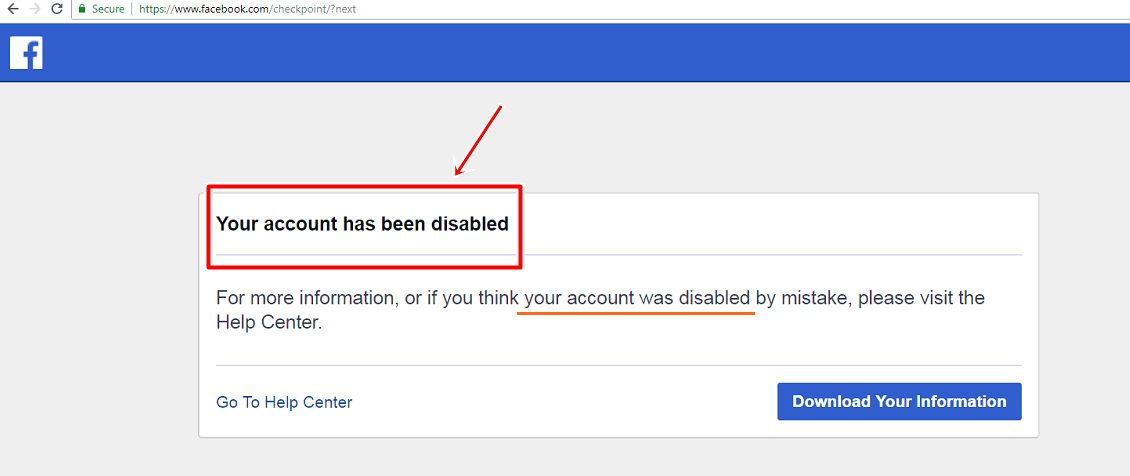
Under no circumstances does Instagram let users buy, sell, or otherwise transfer their verified badge. If you see an account that advertises the ability to get you one either for free or for a “small fee,” like the one below, don’t fall for the scam.
Use Instagram responsibly. Don’t try shady tactics like buying badges, followers, likes, or comments. Otherwise, you could find your account banned.
Don’t buy Instagram followers. Focus on the genuine, organic growth of your account. It’s easy to tell when someone buys followers because their account will have lots of followers but low engagement. These “followers” are often bots or inactive accounts, so they don’t interact with your brand. The lack of engagement means your posts won’t show up on the explore pages or in your audiences feeds.
It's better to have 1,000 engaged fans than 10,000 followers when you want to optimize for sales.
Gretta van Riel, in an edited excerpt from the course Grow Your Business with Instagram
Although your follower count doesn’t matter when it comes to verification, a highly engaged following can help.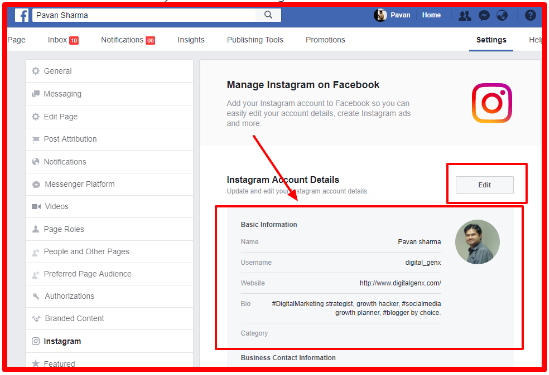 Some ways to get more Instagram followers include:
Instagram followers are more than just a number, they are your community. Even if you don’t get verified, real followers will help increase traffic to your site, make more sales, and build influence in your space.
All verified accounts have one thing in common: complete profiles. Each of them has a concise and punchy Instagram bio, a strong profile photo, an external link (to either their website or a Linktree, linking to multiple sites), and well-designed Story Highlights.
Sure, the Instagram profile has the same structure for every account. But each Instagram bio—the small summary underneath the username—is unique. Users look at your bio when deciding whether or not to follow you on Instagram, so you have to make it count.
The bios of verified accounts accomplish a number of things:
A strong profile can make a good first impression on behalf of your brand and convince people to follow you.
As long as your brand is consistent, only posting your own content—content that is safe for public viewing—you’re most likely already following the community guidelines and ticking this box for verification.
Though to be more specific, Instagram has given a short version of what the community guidelines cover:
We want Instagram to continue to be an authentic and safe place for inspiration and expression.Help us foster this community. Post only your own photos and videos, and always follow the law. Respect everyone on Instagram; don’t spam people or post nudity.
No matter if you’re a global brand or the average Joe, Instagram can (and does) punish accounts that don’t follow these basic guidelines.
Team up with a PR agent or agency, or even a journalist, who can help you get your name out there. Some agencies also have access to Facebook’s Media Partner Support tools, where they can submit requests and get accounts verified through the portal.
To get publicity, you’ll need to do things considered newsworthy. What’s deemed newsworthy depends on your niche, but here are a few ideas to get you started:
Getting involved in activities outside of your brand is how you build awareness and get into media outlets. When the Instagram verification team checks to see if you are notable, they’ll find you in these news channels.
Even if you follow all of the tips above, there’s still a chance Instagram won’t approve your application. So what happens then? Try a few of the following actions:
As simple as it sounds, it’s worth double-checking the four main requirements we saw earlier: authentic, unique, complete, and notable.
Make sure you have the most appropriate business document to prove authenticity. Be sure to remove/delete any old accounts you might have set up. Compare your level of profile completeness to those who are already verified.
Lastly, do a Google search on your brand. If you don’t see any mentions of it outside of your own website, that could be the issue.
If your verification request gets rejected by Instagram, all is not lost. You can apply again after 30 days. Be patient though—repeated applications within 30 days will mean the request will be canceled.
Give yourself that month to figure out ways of improving your chances using the tips above rather than hope you’ll get approved in the following 30 days without making any changes.
If you still can’t get approved for a blue check, there are other ways to show your brand’s authenticity without it.
Instagram recommends linking your account to your official website, Facebook page, YouTube channel. Another way to show your authenticity is by creating video content of you or your team behind the scenes.
Showing how your business looks day-to-day is a great way to gain trust, but also follows the recommendations of multiformat content to grow followers.
Getting the verification badge on Instagram (or any social media for that matter) is a big milestone for your business.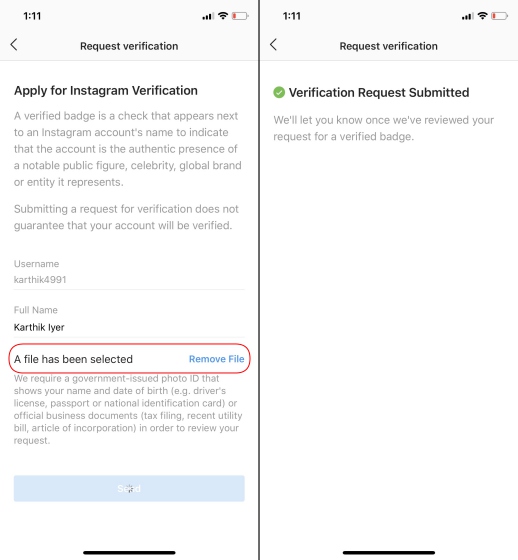 It proves your account is worth watching and engaging with. However, all the benefits come with a challenge—it can be hard to get approved.
Getting the basics right matters, and so does building your brand outside of your immediate social bubble. Following the tips in this guide will help you toward fulfilling those requirements.
That said, verified or not, making money on Instagram is still possible by funneling traffic to your ecommerce store, setting up an Instagram shop, becoming a brand affiliate, and more.
Illustration by Dan Page
An individual person or small business can get verified on Instagram. The profile must represent a real person or business, and it must be the only legitimate Instagram account representing you or your business.
Instagram doesn’t give an official number needed for verification. One study found that accounts with as few as 1,000 followers had verification badges. It also found that the more followers an account has, the more likely they are to have a verification badge.
The verification application is free through the Instagram app. There are businesses you can pay to help you through the process of getting verified, but that’s not recommended.
September 7, 2018 Technologies
The coveted blue tick is now much easier to obtain.
For a long time, it was quite difficult to verify an Instagram* account, thereby protecting it from forgery. The service itself should have paid attention to you and put a blue checkmark next to your name. Now the company has greatly simplified this process.
Recently, Instagram* announced a number of security updates for accounts. Now you can check if the name of a large account changed when it was created and if it has ads. But the main thing is that now everyone can apply for confirmation. nine0003
This has a number of advantages. For example, it becomes possible to embed ads in stories. In addition, the comments of verified users are displayed above the rest.
If you have 100 followers, you are unlikely to get a blue tick. But if you are, for example, a novice entrepreneur, then you have every chance. True, for this you will have to provide a document confirming your identity.
To verify your account, you need to go to the application settings and click "Request confirmation". The feature is not yet available to everyone, but it will reach everyone in the coming weeks. nine0003 instagram*-press.com
In general, the account requirements are as follows:
Download
Price: Free
Download
Price: Free
Read also 🧐
*Activities of Meta Platforms Inc.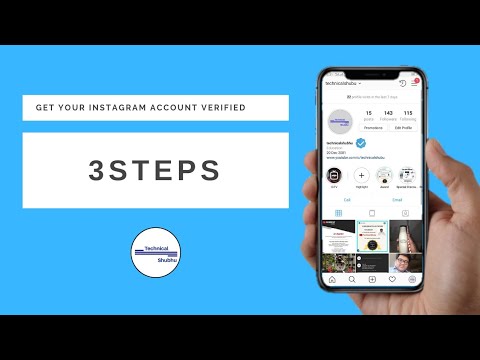 and its social networks Facebook and Instagram are prohibited in the territory of the Russian Federation.
Ilkhom
Chakkanbaev, Internet marketer
SeopulsesIn this guide, Internet advertising specialist Ilkhom Chakkanbaev describes in detail how an Instagram business account is useful, how to create it and why link it to Facebook Ads. nine0003
Instagram is not only a popular social network, but also an excellent channel for business promotion. If you plan to run ads on Instagram, we recommend adding an account to Facebook Ads - this will give you more opportunities for promotion and analytics.
Instagram has two types of pages: a personal profile and a business account. Unlike a standard personal page, in a business account you can:

This way you can access statistics or run ads. In addition, it will be possible to:
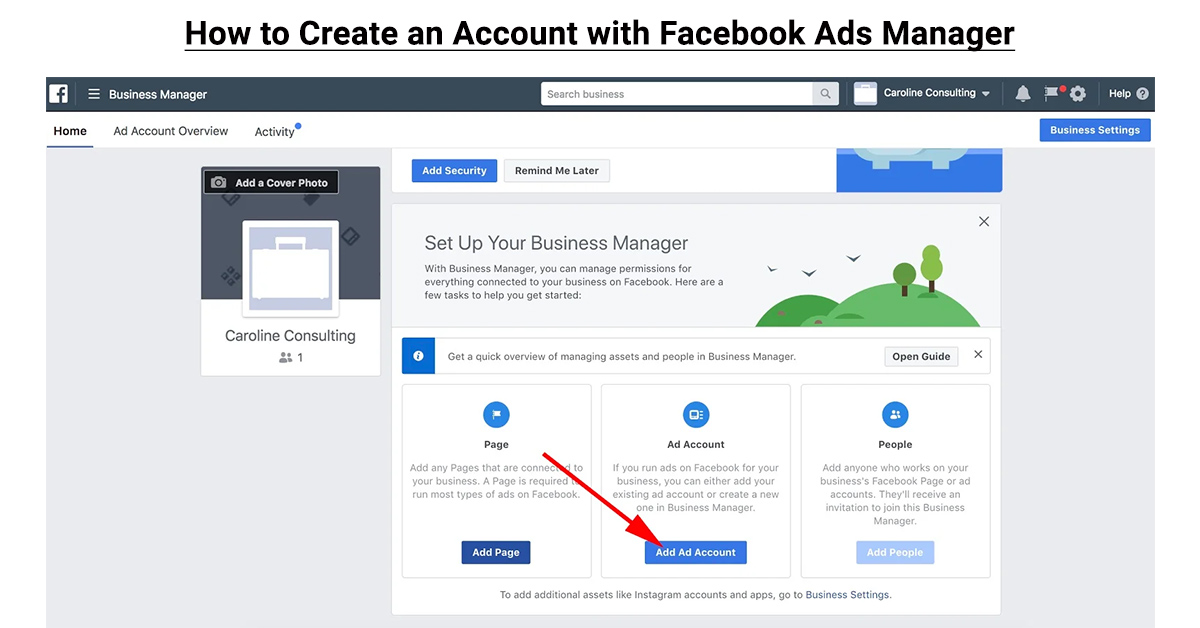
First, make sure you're the administrator of your Facebook Business Page. You can do this in the "My Pages" tab. If you do not have access to the page you need, request it from the owner. nine0003
Let's walk through how to create a business page in Facebook Ads and a business account in Instagram, and then we'll tell you how to link an account.
If you already have one, skip this step.
You will then enter the page editing mode. Here you need to specify the name of the company, its scope and description of the activity.
The next step is to set up the page. nine0003
Upload a profile photo. Try to choose a good one - it will help you form the image of the company.
Add a cover photo. The cover occupies the top of the page and helps to tell users about the brand, as well as increase engagement. Therefore, the photo must be of high quality and look good on various devices.
Whatever you have added will be reflected in the preview on the right side of the screen.
Read more about creating a business page in the article. nine0003
To do this, in your Instagram profile, enter the settings in the main menu. Then select "Account" from the drop-down menu.
Switch to a professional account or create a new one.
Select the area in which your company is most relevant. You can also enable the display of the selected category in your profile.
Specify the contacts by which the user will contact you. nine0003
At the next step, you can immediately link your account to Facebook Ads. Below we will tell you how to do this if you skipped this step.
Now your account has received new features: you can edit it, run promotions in it and view statistics.
There are two ways to do this: via Facebook or Instagram.
Find the Settings tab in the left menu, then select Instagram and click Connect Account. nine0003
Then, in the window that appears, sign up for an Instagram account.
You're done - your accounts are now linked.
This option is convenient if you want to link accounts via your mobile phone.
Enter Instagram menu and then settings.
In your account settings, select 'Publish to other apps'.
Specify the application you want to link the account to. In our case, this is Facebook. nine0003
Select the account you want to link. Facebook Ads will offer to add it to the "Account Center" - there you can manage accounts and publish posts simultaneously on both Facebook and Instagram. At this stage, you do not need to configure anything further.
Only one Instagram account can be linked to Facebook Ads. If an incorrect profile is linked or a business account is closed or blocked for any reason, then it must be unlinked. You can do this on Facebook: select Instagram in the settings and disable your account. nine0003
Now you can synchronize the page with another profile.