Réseaux Sociaux
0 19.478 3 minutes de lecture
Apparemment, tous les réseaux sociaux qui existent dans le monde veulent se perpétuer dans le temps et plutôt qu’évoluer, ils veulent ajouter ou posséder les mêmes fonctions et attributs. Qu’il s’agisse de partager des histoires ou de partager des images et des vidéos.
Nous n’avons plus de mal à croire que cela puisse se faire sur n’importe quel réseau social. Mais comment télécharger ou publier des photos et des vidéos en même temps sur Facebook.
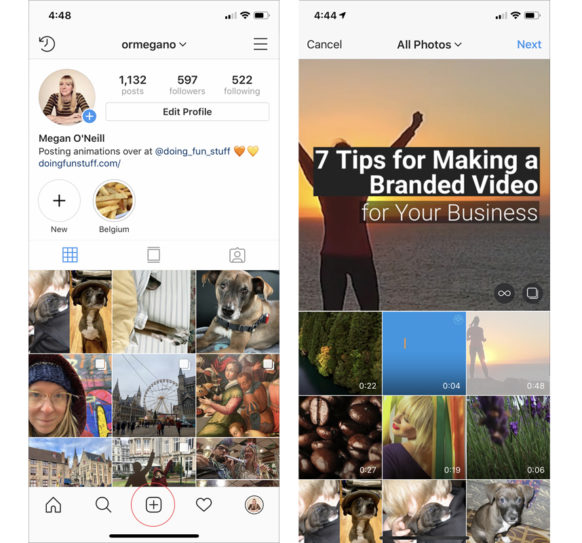
Cette même question, nous nous sommes posées il y a quelque temps, mais en faisant référence à un autre réseau social bien connu appelé Instagram. Où nous nous sommes demandé comment télécharger plusieurs images dans la même histoire, mais cela peut être fait de la même manière en utilisant Facebook . Ensuite, nous allons expliquer très brièvement comment faire cela.
Il est bien connu que la publication de ce type de contenu, sur les réseaux sociaux comme Facebook , ne se fait pas uniquement par des personnes qui souhaitent simplement partager avec des amis . C’est l’un des supports publicitaires les plus utilisés au monde. Puisque presque tout le monde, pour ne pas tout dire, fait partie d’au moins un réseau social.
C’est pour cette raison que des millions de personnes se voient confier la tâche d’apprendre à réaliser ces œuvres graphiques spectaculaires pour les publier et ainsi promouvoir leur site Internet. Et plus encore, la quête constante de devenir viral sur les réseaux sociaux est un autre atout pour rendre ces publications de plus en plus impressionnantes.
Ensuite, nous allons vous montrer plusieurs façons de télécharger ou de publier des photos et des vidéos sur Facebook. Pour commencer, nous allons nous connecter à notre compte, puis nous pouvons procéder de deux manières. Nous pouvons d’abord aller sur la page d’accueil et mettre à jour notre statut . Pendant ce temps, nous pouvons ajouter une photo en faisant un clip sur l’icône de l’ appareil photo ou nous pouvons faire un clip sur Ajouter une photo / vidéo.
L’une ou l’autre des deux méthodes nous amènera à nos archives où se trouvent les photos que nous voulons choisir et partager avec des amis. Après avoir sélectionné la photo, nous faisons un clip dans Open, cette même procédure peut être effectuée si, au contraire, je souhaite télécharger une vidéo. Cela fonctionnera de la même manière dans les deux cas.
La vidéo commencera à être téléchargée sur Facebook, pendant que vous attendez, vous pouvez commenter la photo. Une fois la photo téléchargée et la rédaction de votre commentaire terminée, vous devez appuyer sur le bouton Publier . Une fois que cela est fait, la photo sera publiée et peut être vue par tous vos amis et ils peuvent faire des commentaires, ajouter des likes et vous pouvez faire de même.
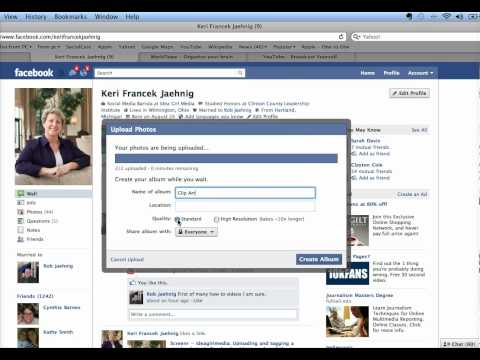
Pour utiliser cette option, nous devons créer un album photo, mais d’abord nous allons sur Facebook et mettons à jour notre statut. Nous aurons deux options qui sont Télécharger des photos / vidéo et Créer un album photo. De plus, si vous appuyez sur le bouton photos, vous pouvez créer l’album photo, dans les deux cas, c’est la même chose.
Nous faisons un clip dans l’option Créer un album photo et cela nous mènera à nos images que nous avons enregistrées sur l’ordinateur. Je sélectionne toutes les images ou photos que je souhaite télécharger sur le réseau social, puis je crée un clip dans Open . Après cela, nous verrons une fenêtre dans laquelle les images et diverses options sont téléchargées.
Avec ces options, vous allez d’abord donner un nom à l’album, ensuite décrire brièvement le sujet des photographies, en troisième lieu où elles ont été prises. Cela vous donne également la possibilité de marquer n’importe quel ami qui apparaît sur la photo. L’option de création d’un album partagé et l’option de modification de la résolution apparaissent également.
Une autre option que vous pouvez ajouter et modifier est la date et l’option pour choisir avec qui vous souhaitez partager les photos. Si vous cliquez sur ce bouton, trois options apparaîtront, Public, qui peuvent être vues par tous ceux qui entrent dans votre profil. Amis, seuls vos amis les verront. Seulement moi, ils ne peuvent être vus que par toi.
Et il ne reste plus qu’à faire un clip sur le bouton Publier et votre album photo est prêt et sera vu par les personnes que vous avez choisies dans les paramètres.
report this adIs your Facebook account a photographic trip down memory lane? Did you frequently end a night out in the late aughts by uploading hundreds of photos to the social network?
Perhaps you'd like to wipe these questionable snaps from your Facebook account while preserving them in a more private location. Lucky for you, a built-in Facebook tool helps you easily transfer photos and videos to any of five external services: Google Photos, Dropbox, Koofr, Photobucket, and Backblaze B2.
By housing your files in one of these services, you can view them on any device and download them to your computer or mobile phone. And if you ever delete your Facebook account, those photos and videos are still available on the service of your choice. Let’s look at your options.
To use Google Photos (iOS(Opens in a new window) and Android(Opens in a new window)), you’ll need a Google Account. Most Android devices should already have the app downloaded. Whether you’re in the app or on the web, Google Photos allows you to view images by photos and albums, or by ones suggested for you. Open Google Photos(Opens in a new window) to see what photos and videos are already stored there.
Transferring your photos and videos works the same from the Facebook website and app, though the initial steps to access the feature differ./cdn.vox-cdn.com/uploads/chorus_asset/file/12803103/facebook-ios7-redesign.1419979915.jpg) On the web, click the down arrow in the upper right and select Settings & Privacy and then Settings. From the app, click the hamburger icon and go to Settings & Privacy > Settings.
On the web, click the down arrow in the upper right and select Settings & Privacy and then Settings. From the app, click the hamburger icon and go to Settings & Privacy > Settings.
At the Settings screen, go to Your Facebook Information (Your Information in the mobile app) and select Transfer a Copy of Your Information. Enter your Facebook password at the next screen and click Continue.
Under Common Destinations, choose Google Photos as the destination. Open Choose what to transfer and choose what media should be included in the transfer. You can select only photos, only videos, only specific date ranges, or only specific albums or videos. After making your selections, click Next.
Click Connect to pick the Google Account you wish to use, then sign in if prompted. The first time you do this, you’ll have to grant Facebook access to your Google Photos library. Click Continue. You’re then taken back to Facebook and asked to confirm the transfer.
Click Confirm Transfer to initiate the transfer. You may be prompted to retype your Facebook password. The transfer of your photos or videos kicks off. At the same time, you’ll receive an email confirming the transfer. If you wish to stop the transfer for any reason, click the Stop button. Otherwise, just hang tight and let it continue.
After the process finishes, a notification appears in Facebook, and you’ll receive an email confirming the transfer. Open your Google Photos page and go to the Albums section. You should now see several new albums for the imported Facebook photos, including Timeline photos, mobile uploads, and profile pictures.
Open a specific album to see its photos and videos. After these initial files have been transferred, you can repeat the process to move the other set of files. So if you transferred your photos, you can then transfer your videos, or vice versa.![]()
If you wish to use Dropbox for the transfer, sign into your account to view any existing photos and videos already stored there. Open Settings & Privacy > Settings in Facebook and select Your Facebook Information (Your Information in the mobile app) and choose Transfer a Copy of Your Information.
Pick Dropbox from the list of options then open Choose what to transfer to pick what media should be included in the transfer. You can select only photos, only videos, only specific date ranges, or only specific albums or videos.
Sign into your Dropbox account if prompted and select Allow to give Facebook the necessary permissions for Dropbox. Click Start transfer.
Go back to Dropbox, open a folder called Apps, and then choose a subfolder called Facebook Data Transfer. That will contain two additional subfolders, one called Photo Transfer and the other Video Transfer. Browse each of those folders for your transferred photos and videos.
Though not as well known as services like Google Photos and Dropbox, Koofr(Opens in a new window) is a file storage service based in Europe but available around the world. You get 2GB of storage for free with the ability to get more by referring friends to the service and by upgrading to any of the many paid tiers. As a bonus to users, Koofr allows you to store up to 15GB of Facebook photos and videos beyond your account quota.
After you’ve set up an account on the Koofr website, return to Facebook and open Settings & Privacy > Settings. Go to Your Facebook Information (Your Information in the mobile app) and choose Transfer a Copy of Your Information. Select Koofr as the destination, then open Choose what to transfer to pick what media should be included in the transfer.
Sign into your Koofr account if prompted and allow the necessary permissions. Click the Confirm Transfer button and wait for the transfer to complete. Go to Koofr and open a folder called Data Transfer. Check for the transferred photos or videos across that folder and its subfolders.
Photobucket(Opens in a new window) is a photo storage site that requires a paid subscription. After a free 21-day trial subscription, your choices include a 25GB plan at $6 a month or $65 a year, a 250GB plan at $8 a month or $87 a year, and an unlimited plan at $13 a month or $141 a year.
After you’ve set up an account, return to Facebook and open Settings & Privacy > Settings. Go to Your Facebook Information (Your Information in the mobile app) and choose Transfer a Copy of Your Information. Click Next, then click the button for Choose destination and select Photobucket from the list.
You can then choose what media will be transferred over. You can select only photos, only videos, only specific date ranges, or only specific albums or videos. Sign into your Photobucket account if prompted and allow the necessary permissions. Click the Confirm Transfer button and wait for the transfer to complete.
After the transfer is done, sign into Photobucket. Depending on what you opted to transfer, you’ll see a folder for Facebook photos and a folder for Facebook videos. Look through the folders to see the transferred files.
Backblaze B2(Opens in a new window) is an enterprise-grade file storage and backup service designed for businesses but also available to consumers. The first 10GB of storage are free. If you need more, you pay as you go depending on the amount of data you upload, both initially and on a monthly basis.
After creating an account, you’ll need to set up a bucket to serve as a container for your online files. Return to Facebook and open Settings & Privacy > Settings. Go to Your Facebook Information (Your Information in the mobile app) and choose Transfer a Copy of Your Information. Click Next, then click Choose destination and choose Backblaze B2 from the list.
You must then enter the Key ID and Application Key created from your Backblaze B2 account. You’ll find those at the App Key section at your Backblaze account page(Opens in a new window). Click Next and then confirm the transfer.
After the transfer is finished, return to your Backblaze B2 account page. Click Browse files, select your bucket, and then look for a folder named facebook-data-transfer-[random sequence of numbers]. Open that folder to a subfolder called Photo Transfer or Video Transfer to see the transferred files.
Beyond transferring your photos and videos to a new service, you can download your Facebook data directly. You can then store and upload it anywhere you wish. To do this, open Settings & Privacy > Settings and go to Your Facebook Information (Your Information in the mobile app). Click Download Your Information.
Review the criteria at the top to choose the format (HTML is the default), pick the quality (High, Medium, or Low), and select a specific date range. Leave all the content types selected. Scroll to the bottom of the page and click the Request a download button.
You’ll receive an email notifying you when the files have been generated. Return to the Your Facebook Information page, select the heading for Available Files, and click the Download button. Retype your Facebook password if requested and then confirm the download.
Save the generated ZIP file to your computer, then unzip the file. Open the extracted index.html file to see thumbnails of the downloaded photos and videos. You can then drill through all the extracted folders to find and view the specific files.
You can view your saved photos and videos under the Posts category. Click the Your photos or Your videos to see your saved media and find the files you wish to view.
Sign up for Tips & Tricks newsletter for expert advice to get the most out of your technology.
This newsletter may contain advertising, deals, or affiliate links. Subscribing to a newsletter indicates your consent to our Terms of Use and Privacy Policy. You may unsubscribe from the newsletters at any time.
Thanks for signing up!
Your subscription has been confirmed. Keep an eye on your inbox!
Sign up for other newsletters
Social networks
0 19. 424 3 minutes to read
Apparently, all social networks in the world want to keep themselves over time and instead of evolving, they want to add or have the same features and attributes. Whether it's sharing stories or sharing photos and videos.
We no longer find it hard to believe that this can be done on any social network. Corn how to upload or post photos and videos at the same time on Facebook.
We asked ourselves the same question some time ago, but in relation to another well-known social network called Instagram. Where we wondered how to upload multiple images in the same story, but it can be done the same way using Facebook . In the following, we will explain very briefly how to do this.
It is common knowledge that posting this type of content on social media is liked Facebook , not only people who just want to Share with friends do. It is one of the most widely used advertising media in the world. Since almost everyone, to put it mildly, is a member of at least one social network.
It is for this reason that millions of people have been commissioned to learn how to create these impressive graphic works in order to publish them and thus promote their website. And yet, the constant quest to go viral. social networks is another asset that makes these posts all the more impressive.
Next, we will show you several ways to upload or post photos and videos on Facebook. First we are going to log into our account and then we can do it in two ways. First, we can go to the home page and update our status to . Meanwhile, we can add a photo by making a clip on icon camera or we can make a clip on Add photo/video.
Either of these two methods will take us to our archive where the photos we want to select and share with friends are located.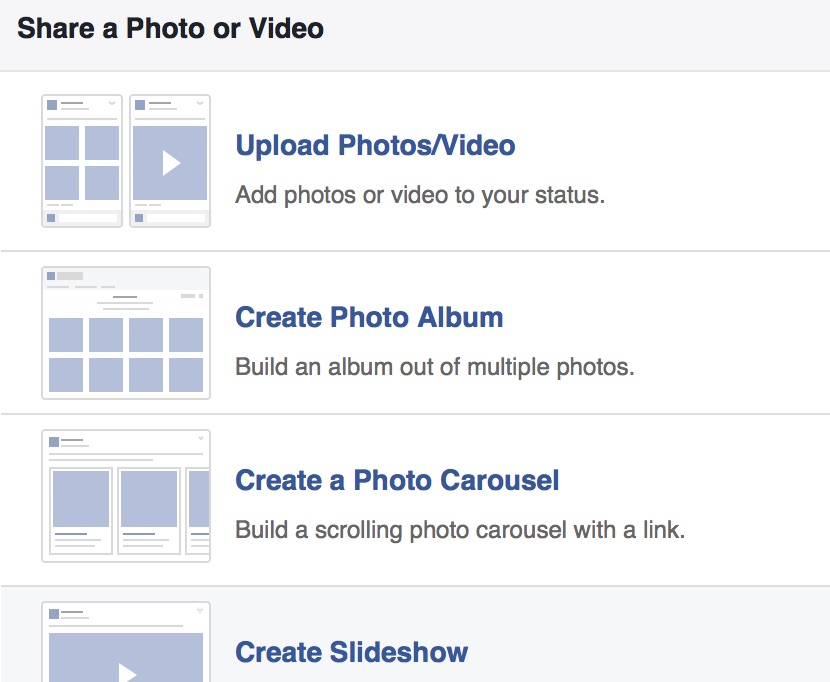 After choosing a photo, we make a clip in Open, the same procedure can be performed if, on the contrary, I want to upload video. In both cases it will work the same way.
The video will start uploading to Facebook, while you wait, you can comment on the photo. After the photo has been uploaded and your comment has been written, you must press the button publish . Once this is done, the photo will be published and all your friends can see it, and they can comment, add likes, and you can do the same.
To use this option, we need to create a photo album, but first we will go to Facebook and update our status. We will have two options: Upload a photo/video and create a photo album. What's more, if you click the photo button, you can create a photo album, in both cases it will be the same. nine0003
Making a clip in variant Create a photo album and this will take us to our images that we have saved on the computer. I select all the images or photos I want to upload to the social network, then create a clip in Open . After that, we will see a window in which images and various options are loaded.
With these options you will first give the title of the album, then briefly describe the subject of the photographs, and thirdly, where they were taken. It also gives you the option to tag any friend that appears in the photo. There is also the option to create a shared album and the ability to change the resolution. nine0003
Another option you can add and edit is the date and the ability to choose who you want to share the photos with. If you click on this button, three options will appear: "Public", which can be seen by anyone who logs into your profile. Friends, only your friends will see them. Only me, only you see them.
And all that's left is make a clip on the "Publish" button and your photo album is ready and the people you selected in the settings will see them. nine0003
Live Photo consists of a 12MP JPEG image which includes 1.5 seconds before and after the still image. So you can record a short video to briefly tell your fans what is going on with this picture. When you record Live Photo on iPhone, you can record video and audio to get Apple Live Photo. Later, you can share Live Photos on Facebook, Messenger, Twitter, Tumblr and many more apps. nine0003
How to post Live Photos on Facebook
There are two main ways to post Live Photos on Facebook. You can capture a live video using the iPhone Camera app and then share it on Facebook. Well, it is also supported to extract the second 3 video clip as Facebook Live Photo. Anyway, if you want to post a Live Photo on Facebook, here is the complete tutorial you are looking for.
To take a Live Photo on iPhone within 3 seconds, you need to keep your hand steady. Thus, quite often enough live photos are taken until the perfect one is obtained. Compared to photos on iPhone, Live Photos take up more storage space. Don't forget to delete the ones you don't need to free up space on your iPhone. Now let's read together to post Facebook live photos in 2019year.
Step 1 Take a Live Photo
Turn on your iPhone. Launch the Camera app. Click on the round icon that looks like diffuse rings on top. When it turns yellow, it means iPhone Live Photo is turned on. You can now take Live Photos on iPhone.
Step 2 Edit iPhone Live Photo
Launch the Photos app. Tap and hold on a file to view live photos. You can edit live photo with loop, bounce and long exposure effects. For more details, you can check the iPhone Live Photos Guide. nine0003
Step 3 Select your favorite Live Photo
Open the Facebook application. Create a new post as usual. Select the Photo/Video option. Find and select the live photo you want to post to Facebook. Make sure the Live icon is activated at the bottom. This is the main reason why live photo tracking doesn't work on Facebook.
Step 4 Post Live Photos to Facebook
Click "Post" to upload Live Photos to Facebook. To view Live Photos on Facebook, you can directly tap and hold on a specific file. nine0003
What if you want to share your favorite part of a movie or TV show on Facebook? You can also share photos on Facebook. During this time, you can run Apeaksoft Video Converter Ultimate to get a one-stop solution.
The built-in video editor offers basic video editing tools. Later, you can convert the video clip to GIF format. What's more, you can improve video quality with the entry-level video enhancer. This is a good alternative to posting Live Photos on Facebook. Well, you can turn Live Photo into GIF here too. nine0003
Apeaksoft Video Converter Ultimate
Download for WinDownload for Mac
Step 1 Free download, install and run iPhone video editor, drag and drop video to the main interface.
Step 2 Click "Crop" on the top toolbar. You can extract any part of a video clip using the clipper. Set start and end time freely. In addition, if necessary, you can merge several video clips into a file.
Step 3 You can click "Edit" to access all the video editing tools at the top. Later, expand the "Profile" list at the bottom. You can set the output format from "Apple iPhone" category. nine0003
Step 4 Click "Settings" next to "Profile" to configure profile settings. Finally, click "Convert" to convert the video to GIF. You can post a GIF to Facebook from your iPhone or computer. GIF file size must not exceed 15 MB.
If you want to transfer all your live photos from iPhone to computer, don't miss Apeaksoft iPhone Transfer , This is a good way to free up iPhone storage space. You can also upload Live Photos to Facebook from your Windows or Mac computer.
Well, as the name suggests, Apeaksoft iPhone Transfer is capable of transferring all kinds of files from iPhone to another location. Thus, transferring iPhone significant photos, live photos, videos and other files from iPhone to computer with iPhone Transfer is a simple task.
iPhone transfer