Share This Post, Help Others, and Earn Credits!
Etsy is a great platform for selling handmade goods, vintage items, and creative goods. If you're an Etsy seller, then you know that one of the best ways to promote your shop is through Instagram. By linking your Etsy shop to your Instagram account, you can reach a wider audience and drive more traffic to your shop.
There are a few different ways that you can link your Etsy shop to your Instagram account. The most popular method is to use the Instagram Shop feature. This feature allows you to tag products in your Instagram posts and link them directly to your Etsy shop.
If you're not using the Instagram Shop feature, then you can still link your Etsy shop to your Instagram account by including a link in your bio. When you include a link in your bio, be sure to use a URL shortener so that it doesn't take up too much space. You can also use an Etsy banner in your bio.
No matter which method you choose, linking your Etsy shop to your Instagram account is a great way to promote your business and reach a wider audience. So, if you're an Etsy seller, be sure to take advantage of this marketing opportunity.
In this article, we will go through things you need to know.
Let's dive right in.
Instagram shopping is a feature that allows businesses to tag products in their posts and Stories, making it easy for customers to learn more about and purchase those products without leaving Instagram.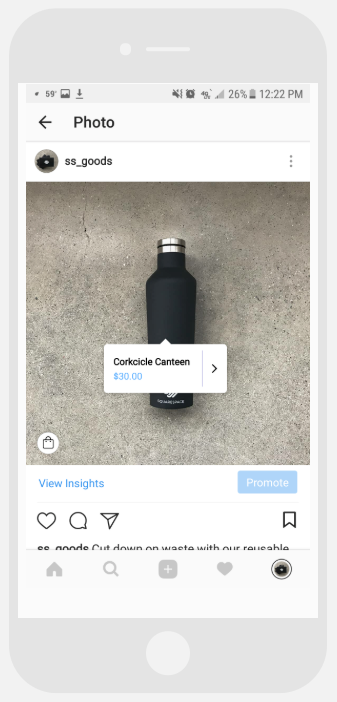 When customers tap on a tagged product, they'll see a "Shop Now" button that takes them to the product page on your website so they can complete the purchase.
To add your Etsy products to the Catalog, you first need to connect your Etsy shop to a Facebook Page. To do this, go to your business settings on Etsy and click on the "Connect to Facebook" button. Once you've connected your Etsy shop to a Facebook Page, you can begin adding products to the Catalog.
To add a product to the Catalog, go to the Facebook Page that's connected to your Etsy shop and click on the "Shop" tab. From there, click on the "+ Add Product" button and select the Etsy product you'd like to add. Once you've added a product, you can edit the product details and add a product image.
Once you've added your Etsy products to the Catalog, you can start tagging them in your Instagram posts and Stories. To tag a product in a post, click on the "Tag Products" button while creating a new post. From there, select the products you'd like to tag and click "Done."
To tag a product in a Story, click on the "Tag Products" button while creating a new Story. From there, select the products you'd like to tag and click "Done."
If you're new to Instagram shopping, the best way to get started is to connect your Etsy shop to a Facebook Page and add your products to the Catalog. Once you've done that, you can start tagging your products in your posts and Stories.
The first step to setting up Instagram shopping is linking your Etsy shop to a Facebook Page. To do this, go to your business settings on Etsy and click on the "Connect to Facebook" button. Once you've connected your Etsy shop to a Facebook Page, you can begin adding products to the Catalog.
Once you've added your products to the Catalog, you can start tagging them in your Instagram posts and Stories. To tag a product in a post, click on the "Tag Products" button while creating a new post. From there, select the products you'd like to tag and click "Done."
To tag a product in a Story, click on the "Tag Products" button while creating a new Story. From there, select the products you'd like to tag and click "Done."
There are a few things you can do to increase the reach of your Instagram posts and Stories. First, make sure you're using relevant hashtags so that your posts and Stories appear in relevant searches. Second, use Instagram ads to promote your posts and Stories to a wider audience. And third, consider partnering with influencers who can promote your products to their followers.
The first step to setting up Instagram shopping is linking your Etsy shop to a Facebook Page. To do this, go to your business settings on Etsy and click on the "Connect to Facebook" button. Once you've connected your Etsy shop to a Facebook Page, you can begin adding products to the Catalog.
To add a product to the Catalog, go to the Facebook Page that's connected to your Etsy shop and click on the "Shop" tab. From there, click on the "+ Add Product" button and select the Etsy product you'd like to add. Once you've added a product, you can edit the product details and add a product image.
To tag a product in a post, click on the "Tag Products" button while creating a new post. From there, select the products you'd like to tag and click "Done."
To tag a product in a Story, click on the "Tag Products" button while creating a new Story. From there, select the products you'd like to tag and click "Done."
Instagram shopping is a great way to showcase your products and increase your reach. To get started, connect your Etsy shop to a Facebook Page and add your products to the Catalog. Once you've done that, you can start tagging your products in your posts and Stories.
If you're looking to get started with print-on-demand, Topbubbleindex is the perfect place to begin. We offer all the digital marketing tools you need to be successful, and we're committed to keeping them free forever. Below, you'll find a few of the free tools we offer to help you get ahead of the competition and make sales easily.
And still counting! If you're still not impressed, try the Topbubbleindex tools for free. Don't hesitate to contact us for suggestions, complaints, or just feedback. We are always working on to keep the Topbubbleindex better.
(Note: Please bear in mind that this post was published on the 2nd of July 2021 and that since then Etsy and/or Facebook/Instagram might have made changes to the way things work. Hopefully this post will still point you in the right direction though. Thanks for reading!)
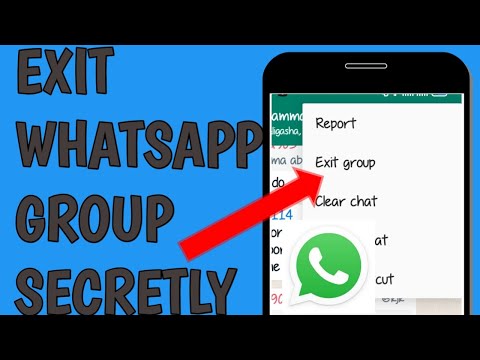
I did it! After about a year and a half of trying (on and off) to link my Etsy shop to my Instagram in order to tag products in my posts I finally succeeded!
I remember the frustration, the tears, the discouragement, feeling like an idiot for not being able to figure it out, and while this is still fresh in my mind I want to help you smash that beast too, because no one deserves to struggle with something this silly.
This, my friend, is the post I wish I’d found on the internet!
Make sure your Instagram account is set up as a business account.
If you don’t have one already, create a Facebook page for your business and create an account / sign in on business.facebook.com.
In Facebook Business Manager go to: Business Settings > Domains > click ‘Add’ > enter your Etsy shop name following the format: yourshopname. etsy.com (for example mine is camillemedinadesigns.etsy.com) > click ‘Add’.
Copy the meta-tag line (see screenshot below).
5. In a new tab, open your Etsy Shop Manager (the backend where you can see your stats, orders, etc.) > Settings > Facebook Shops > paste the meta-tag that you copied on Facebook Business Manager
6. Go back to your Facebook Business Manager tab. You should now be able to see the status ‘Verified’ next to your Etsy shop name.
7. Add products to your Facebook catalogue. You can do this directly from your Facebook business page or on the Facebook Business Suite website > Commerce > Catalogue > Items > Add Items.
You can simply copy the information from your Etsy listing here.
⚠ When you copy and paste your listing url, replace the beginning with yourshopname. etsy.com, like the domain you entered on Facebook Business Manager earlier! (So for example: yourshopname.etsy.com/listing/123456789/this-is-your-product-name)
This is part of what I was doing wrong (and the part that took me a year to figure out!) and I only figured it out when I compared one of friends’ listings with one of mine.
8. Go to your Instagram profile: Settings > Business > Shopping > Website and enter your domain like you entered it on Facebook Business Manager (so: yourshopname.etsy.com) and tap Select. You should see a line saying ‘In Review’ under your domain name.
9. It could take a few minutes to a few days but once your domain is accepted it will move under the ‘Current Website’ section and you will be able to start tagging your products on your images!
10. BONUS: I’ve recently learned that you can also tag products directly IN your Instagram posts: type in @ and you should have a screen appear asking you to choose between People or Products. Find your product* and voilà!
*You will have to make sure that you update your Facebook catalogue with your latest products every time because unlike Shopify, Etsy doesn’t currently have a way to sync all your products to your Facebook catalogue.
I hope you’ve found this post helpful!
If so, I’d really appreciate it if you could share it with another maker you know who’s struggling with this. And why not subscribe to my newsletter? You’ll become part of my inner circle and will receive a dose of joy, inspiration and motivation in between work emails!
tags: etsy, etsy shop, etsy instagram integration, tagging products on instagram posts, tagging products, facebook shop, instagram shop, step by step tutorial, instagram shop tutorial
categories: HOW TO'S
Elena
Sergeeva Targeted advertising specialistAccording to Facebook Ads, 70% of users learn about new products from Instagram.
To help sellers promote them, Instagram created the Instagram Shopping tool, which became available in Russia in March 2021. We will tell you why to connect this tool and how to set it up.
Instagram Shopping is a tool that allows you to tag products in your posts and Stories. Instagram takes information about products from the catalog that the seller uploads.
The profile with the option enabled looks like this:
There is a bag icon on the photo, which means that if you open a post, goods will be marked in it. Source: COSSeveral items can be noted in the photo. When clicking on shopping tags, users will see the price and description of the product, and will also be able to follow the link and place an order on the site.
In addition to prices and the products themselves, the user also sees additional information about them: in the description, you can specify the composition of the fabric, size, available colors, etc.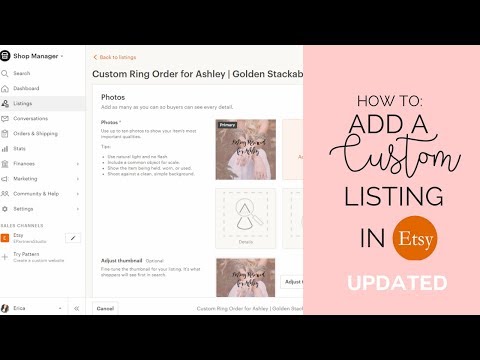 The user can also view the item from different angles in the gallery or learn about other products of the online store All this without leaving Instagram.
To get to the catalog with goods, you need to click on the "View store" button. Inside the store, products can be grouped into thematic collections, such as new arrivals or gifts.
US residents can pay for items within the app using Facebook Pay. In other countries, including Russia, this option is not yet available: users follow the link on the product to an external site and pay for the order there.
 You can't post items on your personal profile. How to set up a business account on Instagram, we tell in the instructions.
Log in to Commerce Manager, also found in your ad account.
The system prompts you to create a shop or catalog. The store is a single storefront for Instagram and Facebook, which is available to companies with physical goods. To promote products on Instagram, click Add Catalog. Choose the type of catalog depending on the subject of your business, e-commerce is suitable for online stores.
In the next step, you need to configure the parameters and method for loading products. From the drop-down list, select the advertising account to which the catalog will be linked.
You can create a catalog yourself - by uploading a spreadsheet or by connecting a pixel - or through integration with one of the partner platforms. In the second case, the goods will be loaded from an existing online store.
Click the "Create" button - the catalog is ready.
Important : the catalog must contain exact prices and information about the availability of each item. In addition, the rules for returning goods must also be indicated - on the store's website or in the Instagram account.
To proceed with product creation, select the desired catalog in Commerce Manager and then click Add Products.
Add products using one of the following methods:

If you choose to download manually, a form will open. In it you need to add the name of the product, its description, images, link to the site and price. The system will tell you which data is not required.
After completing the form and uploading, the products will appear in your catalog.
Inside the catalog, products can be grouped into collections: for example, by subject, season, upcoming holidays, etc. Collections help sellers to get to the user's interests more accurately, and users to quickly select goods.
You can create not only the standard collections, but also those that will attract more attention, such as "Top 10 coats" or "Gifts for best friends".
You can combine products into groups manually or using filters, for example, if there are a lot of products.
At the final stage, specify the name of the collection and click the "Create" button.
After creating a product catalog, you need to send an account for verification. The verification may take several days.
To add a catalog to Instagram, go to the "Settings" section in the application and select the "Company" tab.
Then click "Set up Instagram Shopping" and follow the prompts.
If the catalog passes the check, a "Purchases" section will appear in your Instagram account. Once your account is approved, turn on Instagram Shopping. To do this, in the "Purchases" section, select the product catalog that you want to connect, and click "Finish".
To tag an item in a post, start posting as usual - add a photo and post text, and then follow these steps:
You can also mark the product in Stories. To do this:
Up to 5 products can be tagged in one photo, up to 20 in total in the gallery. In Stories, a sticker is added to only one product, but you can change its color and text.
Instagram Shopping will increase sales and user engagement in your account. The product catalog can be used not only to familiarize subscribers with the assortment, but also to set up targeted advertising on Facebook and Instagram.
We especially recommend this tool for e-commerce: the user immediately sees the price and all information about the product. True, if a product or service involves preliminary communication with the client and a long transaction cycle, then the published price may scare the user away. Therefore, before using Instagram Shopping, consider whether the tool suits your product and the behavior of your target audience.
15+ systems in one service, tools to simplify the work with advertising, closing documents and support at every stage
Try eLama
So, on to the third instruction on how to open an Etsy store. Today we are talking about how to list products on Etsy so that buyers can find them. Here we will consider this issue from two sides: purely technical placement and textual content of the description itself.
Let's start placing a new product in our KvitkaBags store.
In the Your Shop tab, select Listings, Add a listing.
A window for adding a product opens. And here I would like to note that on the right side near each item there are tips and comments from Etsy, be sure to read them, especially at the beginning they will be very useful.
The first thing we see is the addition of photos (Photos). Everything is very simple here - click on the plus sign and add your photos. And the tip on the right says that photos can be added in JPG, PNG or GIF formats, the photo width is recommended at least 570 pixels.
The first photo will be the Primary. it is her buyers who will see it immediately, and all the rest only when they open the product and study it in more detail. It is this first photo that is your main sales tool, if, among the list of other similar products, this photo does not attract the attention of a potential buyer, if he does not want to cash in on it right away, then he will not even see other photos and product descriptions.
Once again, I want to pay special attention to the quality of photos. Yes, I know that everyone has already written a million times that photos should be beautiful, that it is photos that sell your product in the first place, and then descriptions and everything else.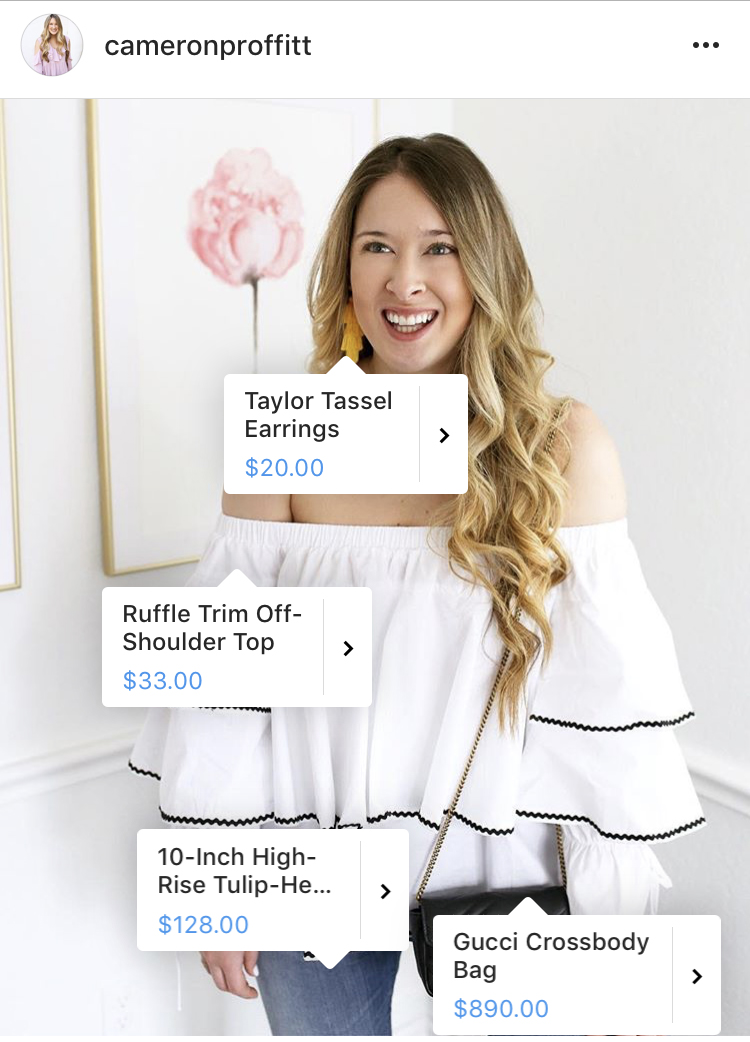 But still I repeat! If the photo is not attractive (dark, dull, with a sharp shadow, etc.), then the potential buyer will not even open your product, i.e. the description does not come at all! Photos must be "delicious"! 🙂 I do not pretend that my photos are super beautiful and professional. To be honest, I make them on the phone, and then improve them with the help of simple manipulations that I learned myself.
To confirm my words, I will tell you a real story from our experience. We had Voloshka's clutch. When we just made it, I, as usual, took a picture of it with my phone. But... due to the peculiarities of the beads used on it, I could not manage to make the photos such that they conveyed all its beauty, no matter how hard I tried... But we still posted it on our pages on social networks and on Etsy. And so he lay with us for a couple of months, and no one paid attention to him ... And then a photographer took a picture of him for us and we replaced the photos. And what do you think, we sold it within a week, and during the next month we made two more on order 🙂 That's it.![]()
Now let's focus on the main photo of the product. Under it there is such a button Adjust thumbnail . Using this function, you can (and should) select the desired fragment of the main photo. The fact is that the photo itself can be rectangular, and the miniature of it, which the buyer sees at the first moment, is square. By holding the left mouse button on the photo, we can move it to the right, left, up and down. And there is also a slider that changes the size of the photo. Those. place the thumbnail so that your product is not cut off at first glance, and click Save
Next, go to section Listing details .
Title, or title. And this is where things get interesting :). Names like this do not work here: Bird of Paradise Handbag (that's how I named this bag for myself). The problem is that only I know about this name, but a potential buyer is unlikely to look for a Bird of Paradise handbag, right? If I were looking for such a handbag for myself, then most likely I would have asked something like “ small flower shoulder bag» . Those. The product name should primarily contain keywords or phrases to search for your product. I hope I explained clearly 🙂
What can be a key phrase or word, where to look for them? This can be not only the name of the immediate product (bag, or sweater, or headband, or dress, etc.), but also the color, style, pattern, model, material, method of use, etc. You need to think about exactly how potential buyers will search for your product, or rather, what request of buyers, your product can answer. Arrange a small brainstorming session, ask loved ones to help you. The result of such brainstorming should be a list of keywords and phrases for this product.
In different sources, I met several spellings of Title. Some people say that you need to choose ONE key phrase, for example, for my handbag it could be Floral crossbody bag , and write only that and that's it, nothing else. Others say that you need to write the maximum number of keywords and phrases for which potential buyers can find it. For example: Floral cross body bag, shoulder bag, small purse with metal chaine, casual bag, handbag, small crossbody bag, floral small messenger bag .
I choose something in between. first I write a more detailed name, and then if there are still characters, mohe to add a couple of tags.
Which spelling you choose is up to you, of course 🙂
Then we answer the questions:
- Who made this one?: you personally, members of your team or other people or organizations. (I did, I did 🙂
- What is it?: finished product or materials and tools for creativity (A finished product - finished product)
- When was the product made? If you will make the product only on order, choose Made to order . If the product is ready, then choose when exactly the product was made.
Next, go to the category selection ( Category ) to which your product belongs. Browse all possible categories and choose the one that suits you the most. In some stores on Etsy, I saw that the same product is listed several times in different categories if several categories fit.
Price. Everything is clear here. If not all, then read this article on the site How to determine the price of a handmade product.
Quantity. Here, too, everything is clear. I just want to note that $ 0.2 is charged for the placement of each unit of production. If we choose 2, then accordingly 0.4 $ will be included in your account at the end of the month. If you have free placements, then 2 free placements will be charged accordingly.
Product type ( Type ), physical or digital.
Description ( Description ). Let's stop in more detail. There are only two main recommendations here:
- be sure to use your keywords and phrases in the description, which we identified at the very beginning;
- Description must be DESCRIPTIVE. Yes, a tautology ... But that's exactly what it is. You need to remember that your description and photos are the only contact of your product with a potential buyer. If he sees a not very beautiful photo and the description is something like this: 12x15x2.5 cm (this is about my handbag :). Then I can absolutely tell you that most likely he will not buy anything ...
The description should begin with the most attractive to the buyer very short paragraph, which MUST contain your keywords and phrases. Also, the description should contain answers to questions about what color the product is, what size it is, what material it is made of, how to care for it, etc. Put yourself in the buyer's shoes, what questions you might have about the product, what would you like to know before making a purchase. You can also tell what inspired you to create this or that product or talk about your experience of using it.
Let's move on. If you are ready to fulfill the wishes of the client from the category “the same, but with mother-of-pearl buttons”, then check the box Custom . By this you confirm that you are ready to manufacture a similar product according to the individual order of the buyer.
Section or Product categories in your store. In your store, you can select up to 15 of these categories or product groups. You can create a category right here when creating a new product.
Next we have a very interesting and useful section Variations. If a product can have any variations, this is the right time to describe them. For example, the handbag that I am now describing may have different colors of lining. If, for example, your product is clothing, then here you just indicate the possible size options. There is already a whole list of possible variations. If none of the proposed options is suitable, add your own option ( Add a new property ).
In the section that opens, in the empty box, enter the option option, press Add . Thus, we enter all our options. If, depending on the selected option, the price of the product changes (for example, this often happens with clothes of different sizes), then click on Add pricing and set prices for each option.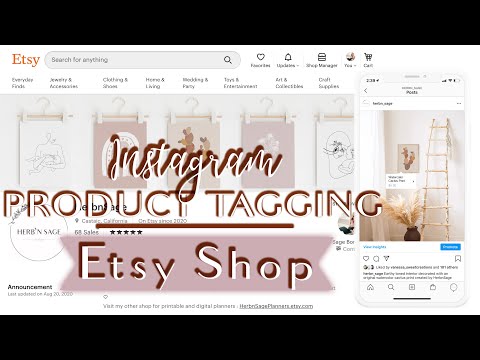
If there are several types of variations for the product (for example, the size and material of the product), then add one more type of variation below ( Add a variation ).
If later, some product option is no longer available for sale, then you will need to uncheck this option in the In stock column. Then your buyers will be able to choose only among the remaining options, but they will see all the others. An example can be seen in our Italian travel wallet. Variation - Fabric (Fabric), options - Red, Olive green, Purple. And we see that Purple is not available now (out of stock), for example, this fabric is over 🙂
I hope this has been sorted out and we move on to the no less burning issue Shipping or Delivery. To begin with, I will describe my experience of sending parcels, their cost and interaction with Ukrposhta.
I will answer the most frequently asked questions in order:
Which service to send?
Personally, I sent only with the help of UkrPoshta. At the very beginning, I asked well-known postal services about foreign shipments, but their prices were much higher than UkrPoshta.
How much does shipping cost?
On the website of Ukrposhta there is a section Service Calculator . With this calculator, you can accurately calculate the cost of sending. Therefore, you can safely use this calculator.
So, it all depends on the weight of the package. My goods are not very heavy, so I send Small package (up to 2 kg), Air .
A few words about interaction with UkrPoshta. From my own experience, I can say that depending on the branch, the shipping price may vary slightly. This is due to the fact that in some branches, employees of UkrPoshta consider some additional services.
Now we proceed directly to filling in section Shipping . Choose the country where we ship from. The time during which the goods will be sent to the buyer ( Processing time ). If the goods are ready for shipment, this period will naturally be shorter. If the product is made to order, choose the period during which the product will be manufactured and sent to the buyer.
Well, the cost of sending, if they buy one of this product, or if they buy something else with it.
And go to the last section Search terms .
Window Tags . Here we enter all our keywords and phrases. Think about what other queries your customers might have, help them find your product! Here you have a total of 13 tags (keywords or phrases) that you can use.
Not using all 13 possible tags is a crime!
Let me remind you again. This can be not only the name of the immediate product (bag, or sweater, or headband, or dress, etc.), but also the color, style, pattern, model, material, method of use, etc. And I also want to draw your attention to the fact that you should not use as a key phrase (tag) the name of the category to which you attributed your product at the very beginning of the description.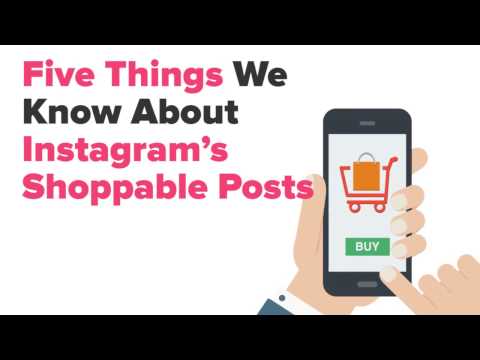 The name of the categories is automatically included in the list of keywords for the product and they will be added automatically in addition to these 13, so there is no need to waste precious tags on them. But! you can add some clarification to the category name and then it will be a good tag.
I also recommend that you look at what tags your colleagues use in successful stores with a similar theme. Also, try entering your tag in the Etsy search engine, and see what comes up as search suggestions. For example, here is a list of hints that drop out when you enter the word crossbody (for my handbag).
And if bag is added to this request, then there will be such hints. We can choose those that fit the product and add them as tags.
You can tell and show a lot more about tags and search queries, and I tell all this on the course “Upgrade your Etsy store”. You can learn more about it here
And the last information about the product: materials, for what occasion it is suitable, style and for whom this product is. All of this information is optional, but if any of this applies to a product, be sure to select the appropriate category!
Product description is ready, click button 9 in the lower right corner0029 Publish to publish a new item in the store. If you haven't finished the product description and need to break, save a draft, which you can then return to and finish ( Save as draft ).
And even after publication, any product can (and SHOULD!) be edited. If you enter the product description, there will be several active buttons at the top above the photos. And the first one is Edit (Edit). By clicking on it, you can make any adjustments to the product.
That's all! I hope I was able to answer the question of how to list items on Etsy and some others too.
Etsy shop, part 1 - How to open, what to look for.
Etsy shop, part 2 - How to accept payments for your products
And I invite you to our closed group on Facebook Create your own business!
This group was created for mutual assistance in promotion, and there you can always ask a question and get answers from many experienced masters.