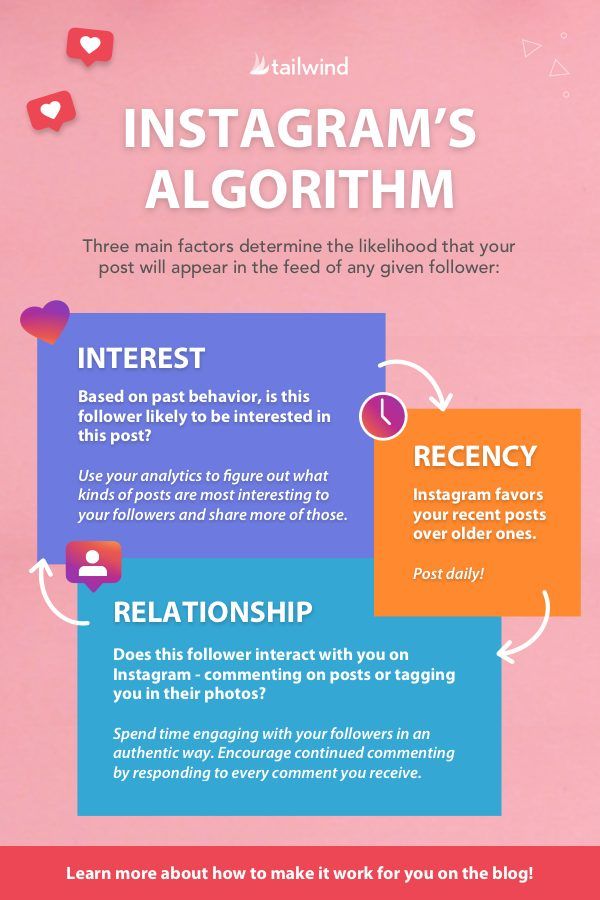
Instagram has a feature to make it easier for your followers and prospective customers to get in touch with you on social media: a dedicated contact button!
This button has the power to turn into multiple call to action buttons, like “call” “email” and “contact.” That gives you complete control over how your followers and prospective customers can interact with your business!
We’ll explain how to add a contact button to your Instagram, how to customize it for your existing account, and all the tips and tricks you need to know for each of the CTA buttons below!
Instagram Contact Button BasicsIf you’re wondering how to get the contact button on Instagram, you’re not alone! Finding and editing this feature just takes a little digging into your profile settings. You’ll also need an Instagram business account!
To edit the contact button, simply go to your profile, select “Edit Profile” and tap the “Contact Options” under the Public Business Information section.
If you have multiple preferred communication lines, you can add all of them to pop up on a menu under the “Contact” action button on your Instagram profile.
If you prefer to have a specific call-to-action, you can set up an “Email” or “Call Now” button!
Having your contact information right at your followers’ fingertips can keep them from getting frustrated while trying to find a way to communicate with you!
Here’s how to add the various Contact action buttons on Instagram.
How to Add the Email Button on InstagramIf email works best for your business, you can create an Instagram button for email specifically.
While you’re busy at your computer, your customers can click your Instagram email button from right inside the Instagram app, and you can email clients quickly!
Here’s how to set your Contact button to say “Email”:
When you have only one form of contact listed, your Instagram contact button will change to reflect that method of communication. In this case, the button will now read “Email.”
Wondering how to add call on Instagram? The steps are actually super easy.
If you’d like your customers or followers to have a direct “Call” button, navigate to your Instagram profile > Edit Profile > Contact Options. Then add your phone number and remove email and physical address from your contact options.
With only one form of contact listed, the Instagram contact button on your profile will now read “Call.”
This is especially handy for followers wondering how to call people on Instagram.
When you have multiple contact options hidden under the contact us button, they might not realize that the option is there, and might never reach out. 😢
How to Remove Call from Instagram Business Contact OptionsIf phone calls just aren’t your thing, you can also remove that click to call button. (Phew) 😅
This works similarly to setting up either the Email or Call button. Just go back into your “Contact Options” and remove your phone number. After you hit save, it will no longer show on your profile – ta-da! ✨
In fact, you can hide all of your contact options easily by going to Edit Profile > Profile Display > Display Contact Info.
This handy toggle switch allows you to hide your contact details at any time, or show them! Just toggle the switch and tap Done.
You can change this any time on your Instagram business profile!
Have you tested out all the contact options available for your business profile? Try testing this feature if you have more than one contact option. This will help you find the right fit for your followers!
Let us know if you have any questions below, we read every comment and are happy to help!

No credit card required
Instagram Marketing • Jul 21, 2021
Do you want to add your business email address, phone number or physical location to your Instagram profile? Have you added contact options but they’re not showing up on your profile page? You don’t want to lose out on business because it was difficult for people to find contact details or physical store locations, or because of broken links. A bad link can be the difference between making a sale or losing a potential customer. Creating a system that guides potential customers to the information they need in a user-friendly way is vital for the growth and success of your business through social media.
You can display contact information if you have a professional Instagram account. If you currently have a personal Instagram account, check out our guide to switch to a professional account - Instagram guides you through the process and it’s free!
Here’s our guide to adding contact options and making sure they are displayed on your Instagram profile…
3. Scroll to the ‘Public business information’ section and tap ‘Contact options’.
Select ‘Contact options’ from the ‘Public business information’ section4. Here you can fill in your business email, phone number and physical address. Note: Physical locations may not show up if you have a creator account. Try switching to a professional business account if you wish to add a physical address to your contact info.
Enter the business information that makes sense for your Instagram profile5. Once you have filled in the information, make sure you press ‘Done’ and ‘Save’ in the top right-hand corner.
6. Navigate back to ‘Public business information’ and tap ‘Profile display’.
7. Here you can toggle whether or not to display your category label and contact info. Press ‘Done’ in the top right-hand corner when you are happy with your settings.
8. Look once again at the options under ‘Public business information’. Tap ‘Action buttons’.
9. Here you can add additional action buttons suitable to your business needs. Note: Action buttons may only appear if you connect your business Instagram account to a Facebook page.
10. When you are finished adding, updating and displaying your business contact information, select ‘Done’ in the top right-hand corner.
We hope this guide helps you set up and display your business contact information on Instagram, so that you can offer great customer service to the people who mean the most to your business. This is just one more way to ensure your business success through social media.
You can view and track clicks on all your contact buttons with Minter.io. This helps you notice peaks and trends alongside actions and content which encourages clicks, making it easy for you to replicate techniques that encourage more traffic to these buttons in future posts. The more clicks, the more potential customers are getting in touch with your brand, so it’s an important metric to track for your business. Keep track of your progress with Minter.io - the social media analytics tool for every smart business.
Get the latest posts delivered right to your inbox.
Your email address
Now check your inbox and click the link to confirm your subscription.
Please enter a valid email address
Oops! There was an error sending the email, please try later.
Author of the article:
Maria, Instagram setup expert
Reading time:
6 minutes
2774
possible through the section: "Personal Information". Or look among the latest messages: was there a registration letter there. E-mail connection is necessary not only for owners of personal accounts, but also for those who manage a business page.
Content
Expert opinion
Maria
An expert on setting up and new features on Instagram.
Ask a question
When registering, users are encouraged to add not only a phone number, but also an e-mail address. Such measures were introduced to further protect the account and the owner always had the option of how to restore in case of loss of the phone.
If the owner has forgotten what email he specified when registering an account, just go to the settings:
Through this tab, you can see which email was connected earlier and edit it.
The second option is how to see your email address:
Further, the user can copy or, as with mobile, change to another. But in order to change your address, you need the old email to be active and available.
If you need to change your email address, this is available through the sections for editing personal information.
How to use:
To connect a new one, you need to check the correct spelling of the old one and its relevance. For example, if the mail service that provides mailboxes is already inactive or deleted, it is possible to change the data by contacting technical support.
There is a way to get the code by phone number. Linking Instagram to another mail is possible if the owner has all account protection tools enabled. Or, if you replace the email address through the section: "Personal information" - confirmation from the old mailbox will not come in handy.
How to edit account information:
Further, all news and mailing will be redirected to a new mailbox. The only drawback of this method is that if third parties have control over the page, they will also be able to change the registration data.
Therefore, connecting several protection methods will secure photos, correspondence and other information about the owner.
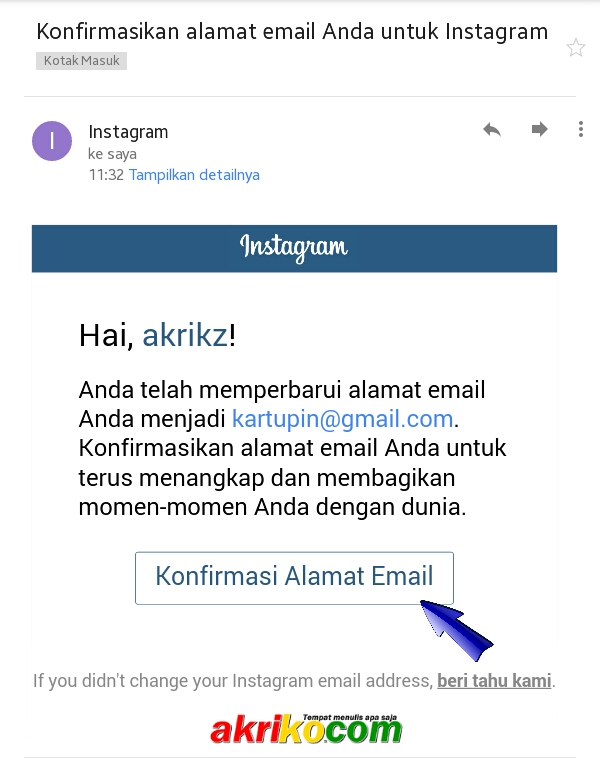
If the user sent a request to change the email, but the email never appeared.
There may be several reasons why this happened:
Another possibility why the message may not appear is that it ended up in the Spam folder.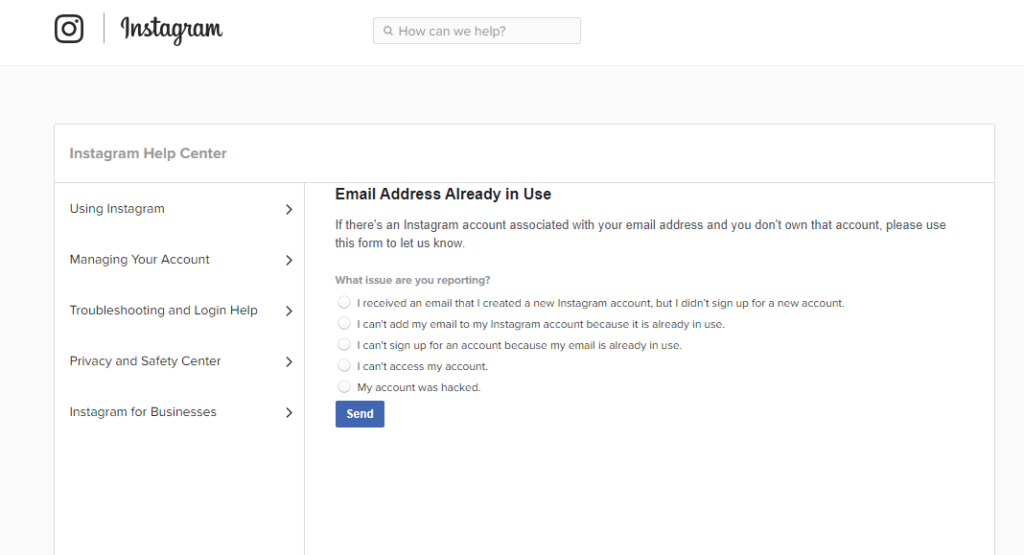 Therefore, in order to confirm a new email on Instagram, the user needs to go to the new attached email service and see all the folders.
By linking Instagram to another mail, the user will additionally secure his page. For example, if the phone number is lost or it is no longer valid, it is possible to restore the account via email.
Other reasons why you need to connect mail:
If the account owner wants to pass verification, then you need to send a message with the application through the attached email.
The same if you want to create a page with the status "Business" or "Author". The owner simply confirms that he wants to use this particular address to connect to Facebook.
For commercial profiles, adding personal information and contact methods is an opportunity to promote your services faster and get more customers.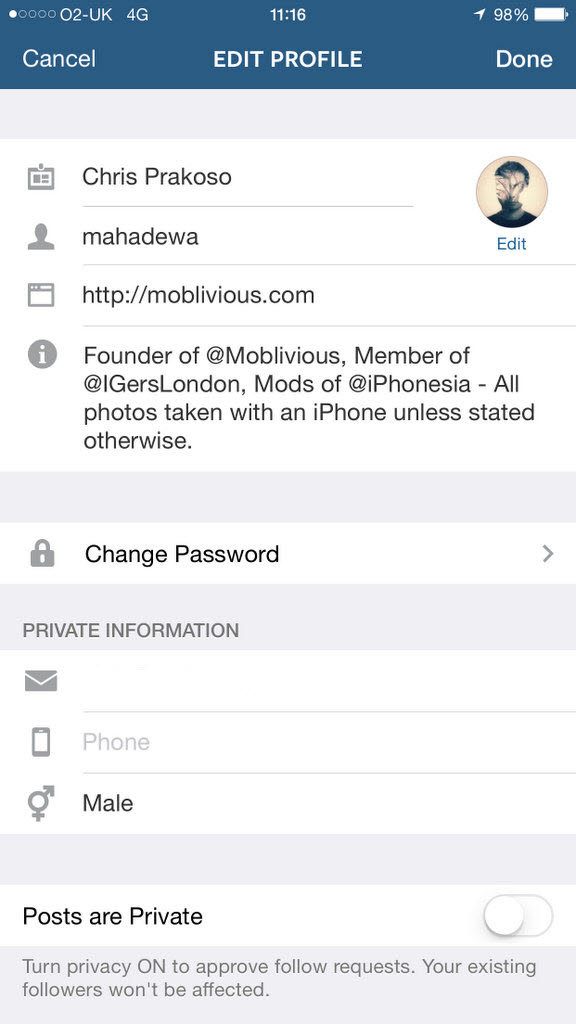 If it is inconvenient for the contact to use the phone number, he can go to email and use it.
The first way to specify email:
The second option is to specify in an already existing business profile:
By providing contact details, the page owner can get new customers or receive messages in this way. But it is not recommended to indicate your personal email in the section, as it will be available to all visitors to the page.
Did the article help? Rate
A user can link Instagram to mail during registration. Changing e-mail or adding a new e-mail box, if the page was created by phone number, is allowed later through the application on the phone or in the browser on the PC.
Table of contents
To tie a new mailbox to the Profile in the Institutional. , in profile settings. This action is performed via phone or computer. To complete the operation, you will need access to the mail to confirm the attachment of the box to the account.
To link Instagram to mail after registering via phone, you need:

Expert opinion
Lika Toropova
I spend a lot of time on social networks, my favorite is Instagram
Now the email box is attached to the user profile and can be used to recover the password.
To link an account to mail via a computer, you need:
Now the user, when re-entering the profile page, will see that the email is linked to the account.
You can find out which email is attached to Instagram in your profile settings on Android or iPhone, as well as via PC. Here you can also change the box to another, if necessary.
Instruction for computer:
Now you can go back to your Instagram account page to see if the box has appeared in the personal information section.
To link Instagram to another mail on Android, you need:
As you can see, the process of changing mail to a new one does not differ significantly from the initial binding of e-mail to a profile.
Changing your mailbox to another on the iPhone looks like this: