4 min
Telegram is the famous cloud-based mobile and desktop messaging app with a focus on security and speed. In today’s blog post we’re going to talk about the Telegram webhook, how to set one up and how to use Telegram webhooks with other tools.
In this post, you’ll learn all about Telegram webhooks, and how to create them and use them with other tools.
Ready, Steady, Go!
The Telegram Webhook allows different applications and platforms to communicate and share data through the use of messages.
This communication occurs in real-time and is accomplished through the use of a Webhook Uniform Resource Locator (URL).
Using a Telegram Webhook Integration lets you share useful data with other third-party applications.
Creating webhooks is really easy.
Firstly, setting up a Telegram webhook is really easy.
Moreover, here is what Telegram offers in terms of APIs for developers:
Finally, here are the steps to follow to create a Telegram webhook:
Moreover, you can learn more details about setting up Telegram Webhooks and the BOT API.
Firstly, using ta Telegram Webhook has lots of benefits:
Firstly, it’s important to remember that Telegram offers two different API solutions for developers.
For this example, we’re going to be using the Bot API. Learn more about the Telegram API options. Domotz is a network monitoring software and we also have an integration with Telegram. You can use a Telegram webhook to create a contact channel on Domotz to receive network and device events as alerts on Telegram.
Domotz is able to send alerts directly to Telegram. This is pretty unique if compared to other network monitoring software.
Setting up the Domotz and Telegram webhook integration is super fast and easy.
Set up your first Telegram webhook in Domotz. This will alert you of all the events that you want to monitor.
To learn more about the creation of the Telegram bot API token and how to obtain a Telegram Chat ID you should read our user guide!
In case you’re interested in learning more about webhooks.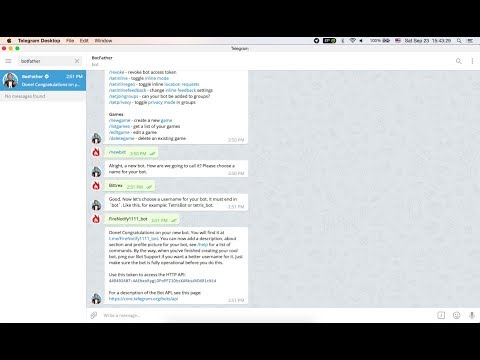 We thought it would be useful to cover what exactly webhooks are and where they came from.
The term “webhook” was coined by Jeff Lindsay in 2007 from the computer programming term hook. It has been gaining popularity over the years, and it is an important concept on the journey of a programmer.
A webhook is one of a few ways in which web applications can communicate with each other. In other words, it’s a way to automatically send messages or information between other web applications It allows users to send real-time data from one application to another mainly whenever a given event occurs.
In web development, a webhook is a method of augmenting or also altering the behavior of a web page or web application with custom callbacks. The format is usually JSON. The request is done as an HTTP POST request.
We can also say that webhooks are “user-defined HTTP callbacks”.
Firstly, go to Github and drop a URL in a dedicated textbox (for their code post webhook).
Now, when you post your code to Github, it will HTTP POST to your chosen URL with details about the code post.
Moreover, let’s try another example, using an online purchase. When you receive a message from your credit card app, that is app integration in action.
Webhooks today offer a lot of value as an instant notification mechanism.
Have specific events you care about?
Use a webhook for those events and you’ll have the power and flexibility to integrate that event stream into your life.
Before we better understand how Telegram webhooks work, let’s define the word “event”.
Events are human triggered actions on an app.
For example, sending messages to someone when a specific alert is triggered.
Data is attached to each of these events. On Telegram, when you send a message to a bot, the time stamp, your user ID, your message ID and your message are all part of the data that gets generated.
If you are looking for an easy way to communicate with other applications, the Telegram webhook is for you.
For instance, you can use the Telegram webhook with Domotz to receive alerts about network and device events from Domotz.
Learn more about our network monitoring software.
Or read other helpful articles on what is SNMP, finding your SNMP OIDs and how to draw a network topology diagram.
Share via Social Networks
← Network configuration backup and restore - Backup switch configs Best Network Monitoring Tools for MSPs and Integrators →
Asked
Modified 1 month ago
Viewed 42k times
I'm developing a Telegram bot, and I want to set the webhook to my domain's URL. I've already generated a self-signed certificate following the Telegram's guide. However, I'm not able to set the webhook. I've searched previous answers and found this one, but it doesn't work to me. Can anybody explain me how to upload the SSL certificate and set the webhook?
https://api.telegram.org/bot{my_bot_token}/setWebhook?url={url_to_send_updates_to} For instance:
https://api.telegram.org/bot123456:ABC-DEF1234ghIkl-zyx57W2v1u123ew11/setWebhook?url=https://www.example.com
https://api.telegram.org/bot{my_bot_token}/setWebhook?url= response:
{"ok":true,"result":true,"description":"Webhook was deleted"} https://api.telegram.org/bot{my_bot_token}/getWebhookInfo I created a file on my server for conveniently setting up telegram webhooks.
You can use the same file on your server.
This should be on the same server from which you wish to run the Telegram Bot
<html> <head> <title>Set Webhooks</title> <link rel="stylesheet" href="https://cdnjs.cloudflare.com/ajax/libs/font-awesome/4.7.0/css/font-awesome.min.css" /> <link rel="stylesheet" href="https://cdnjs.cloudflare.com/ajax/libs/bulma/0.6.0/css/bulma.min.css" /> <script src="https://unpkg.com/vue/dist/vue.js"></script> </head> <body> <div> <div> <form :action="set_webhook" method="post" enctype="multipart/form-data"> <label>Enter your Token</label> <p> <input type="text" v-model="token" /> </p> <label>Enter your Host</label> <p> <input type="text" v-model="host" /> </p> <label>Enter your Port</label> <p> <input type="text" v-model="port" /> </p> <input type="hidden" name="url" v-model="bot_url"> <label>Maximum Connections?</label> <p> <input type="text" name="max_connections" value="100" /> </p> <br/> <p>{{ bot_url }}</p> <br/> <label>Enter your Certificate</label> <p> <input type="file" name="certificate" /> </p> <br/> <div> <p> <button name="submit">Set Webhook</button> </p> <br/> <p> <a :href="get_webhook_info" target="_blank">Get Webhook Info</a> </p> </div> </div> </div> <script> new Vue({ el: '#app', data: { token: 'xxx', port: 88, host: 'your-server.
com', }, computed: { get_webhook_info: function () { return 'https://api.telegram.org/bot' + this.token + '/getwebhookinfo' }, set_webhook: function () { return 'https://api.telegram.org/bot' + this.token + '/setwebhook' }, bot_url: function () { return 'https://' + this.host + ':' + this.port + '/' + this.token } } } ) </script> </body> </html>
.pem is enabled on your webserverYou will get a successful result:
{"ok":true,"result":true,"description":"Webhook was set"} 2
this is the correct one
<html> <head> <title>Set Webhooks</title> <link rel="stylesheet" href="https://cdnjs.cloudflare.com/ajax/libs/font-awesome/4.7.0/css/font-awesome.min.css" /> <link rel="stylesheet" href="https://cdnjs.cloudflare.com/ajax/libs/bulma/0.6.0/css/bulma.min.css" /> <script src="https://unpkg.com/vue@3/dist/vue.global.js"></script> </head> <body> <div> <div> <form :action="set_webhook" method="post" enctype="multipart/form-data"> <label>Enter your Token</label> <p> <input type="text" v-model="token" /> </p> <label>Enter your Host</label> <p> <input type="text" v-model="host" /> </p> <label>Enter your Port</label> <p> <input type="text" v-model="port" /> </p> <input type="hidden" name="url" v-model="bot_url"> <label>Maximum Connections?</label> <p> <input type="text" name="max_connections" value="100" /> </p> <br/> <p>{{ bot_url }}</p> <br/> <label>Enter your Certificate</label> <p> <input type="file" name="certificate" /> </p> <br/> <div> <p> <button name="submit">Set Webhook</button> </p> <br/> <p> <a :href="get_webhook_info" target="_blank">Get Webhook Info</a> </p> </div> </div> </div> <script> const { createApp } = Vue Vue.
createApp({ el: '#app', data() { return { token: 'xxx', port: 88, host: 'your-server.com', } }, computed: { get_webhook_info: function () { return 'https://api.telegram.org/bot' + this.token + '/getwebhookinfo' }, set_webhook: function () { return 'https://api.telegram.org/bot' + this.token + '/setwebhook' }, bot_url: function () { return 'https://' + this.host + ':' + this.port + '/' + this.token } } } ).mount('#app') </script> </body> </html>
1
Sign up using Google
Sign up using Facebook
Sign up using Email and Password
Required, but never shown
Required, but never shown
Bot registration takes place without any necessary skills, by interacting with the "Father of Bots" @BotFather.
The sequence of actions for creating any bot is the same:
Open @BotFather and run it (Start). In the list of suggested commands, select: , click on this command, or enter it manually in the message field. You will be prompted to specify what the bot will be called, in the future the name of the bot can be changed . Enter a name in the message entry field. Next, you will be prompted to enter a name by which the bot will be available to users. Write the name using the Latin alphabet, numbers and underscores. Another important condition is that the name must end with "bot". You can also capitalize "Bot", or "_bot" or "_Bot". nine0003 /newbot - create a new bot
If everything went without comment from @BotFather , then as a result you will be displayed on the Token API screen, if you don’t use it right away, then you can write it down somewhere. You can also request it again if you forgot or lost it. You can edit the bot from @BotFather, to do this, request a list of your bots , select the desired bot from the list and then, if necessary, you can edit its information, for this, select 9 in the bot menu0009 /mybots Edit Bot :
Name - Bot name
About - What can this bot do? (displayed when opening a bot in the middle of the screen)
Description - Description (available when viewing the Bot profile)
Botpic - Picture - Bota logo
9000 - Set call in the dialogue with the bot command ) /
Please note that it is not possible to change the bot name (@) in the settings.
* * *
There are two mutually exclusive ways to get updates for the bot - Regardless of which option you choose, you will get JSON-serialized objects (WIKI) as the result. In the case of In the case of For myself, I chose WebHook, because I don’t have to load the server with constant checking for updates, they will come by themselves, all that remains is to process them and send the planned reaction in response. If you decide to stop at getUpdates, then read an article about a good tool. * * * There is a special method for setting WebHook If your file structure matches, and you have a domain name and an SSL certificate installed, then assign a webHook using this URL: Paste it into the address bar of the browser and go, if everything went without errors, on the screen you will get the following information: This means that everything went well and WebHook is set. Now you can safely start working on the implementation of the bot. * * * Also, together with the parameter of max_Connections-the maximum permitted number of simultaneous stupids for WEBHOOOK The default is 40. allowed_updates - you can pass the types of updates that the bot will receive. By default, the subscription goes to all updates. nine0003 certificate - public key certificate to check the root certificate used, if you have a self-written certificate, for example. If it is necessary to reassign webHook, then you need to call the To remove the webHook and go to and getUpdates webHook. Incoming updates are stored on the Telegram server until the bot receives them, but they will not be stored for longer than 24 hours. nine0003 method you will need to set up periodic removal (for example, 1 time per second) from the Telegram server updates (data received from user interaction with the bot - messages, pictures ...). getUpdates updates will be delivered to you by the Bot API at the specified address as soon as they become available. If, in response, the API receives the status of processing its request not 200 OK, but another, for example, 500 (server error), then the updates will hang and will periodically knock on you, and calm down only if the status 200 OK is received in response. webHook  nine0003
 Set WebHook
. We just need in parameter setWebHook pass the web address where the data sent by the Telegram Bot API will be processed. Let's say that you have the same hosting as mine, and the file url , which lies in the directory index.php in the root of the site, will be responsible for the operation of the bot. bots public_html |__cgi-bin |__bots |__index.php <-- handler file |__index.html
https://api.
 telegram.org/botYOUR_TOKEN/setwebhook?url=https://YOUR_DOMAIN/bots/index.php
 {"ok":true,"result":true,"description":"Webhook was set"} WebHook 9 advanced settings0075
In the method URL , you can transfer: SetWebhook

method again and specify the new address of the data handler from the Bot API as the value of the setWebHook url parameter. getUpdates use the deleteWebhook , no parameters are required.
To get the current state of the webHook, use the getWebhookInfo method , you don't need to pass any parameters.
Methods are called using:
https://api.telegram.org/bot YOUR_TOKEN/METHOD_NAME
All package 9 code examples0009 python-telegram-bot start a Telegram bot with Updater.start_polling() . It uses the Telegram API getUpdates method to get new messages for the bot.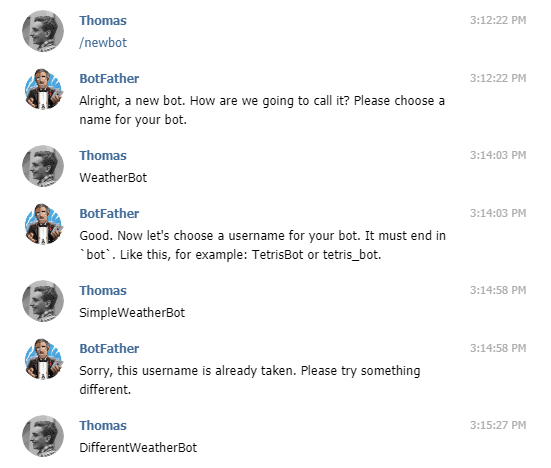 This is quite normal for small bots and testing, but if the bot is popular and receives/sends a lot of traffic, then this approach can slow down the response time of the bot.
Polling a Telegram server via a webhook is a useful technology for automating the process of communication with users. As a rule, this functionality is used to save resources for sending / receiving updates to both your own server and Telegram servers. nine0003
The difference between polling and webhook is:
polling (via .get_updates method) periodically connects to Telegram servers to check for new updates or send processed messages. Webhook is the URL that is passed to the Telegram API. Every time a new update for the bot arrives, the Telegram server sends this update to the specified URL. Messages are sent in the same way. nine0040 webhook ; webhook ; webhook ; webhook on Heroku; nginx with one domain/port for all bots; haproxy with one subdomain per bot; nine0040 
webhook . An SSL certificate is required.
All communication with Telegram servers must be encrypted with HTTPS using SSL. In the case of connection polling , the Telegram servers take care of traffic encryption, but if messages are sent/received via Webhook, then the client/bot should take care of encryption. nine0003
There are two ways to do this :
To generate a self-signed SSL certificate using openssl , run the following command in a terminal:
$ openssl req -newkey rsa:2048 -sha256 -nodes -keyout private.key -x509 -days 3650 -out cert.pem nine0143
The openssl utility
will ask for some details. Make sure you enter the correct FQDN or IP address! If the server has a domain, enter the fully qualified domain name (for example,sub.example.com). If the server has only an IP address, enter its IP address instead of the domain. If an invalid FQDN or IP address is entered, then the bot will not receive any updates from Telegram, and there will be no errors!
webhook . The python-telegram-bot library provides a built-in HTTP server based on http.server.HTTPServer . An implementation of HTTPServer , which is tightly integrated into the telegram.ext extension module and can be started with Updater.start_webhook . This web server also takes care of decrypting HTTPS traffic.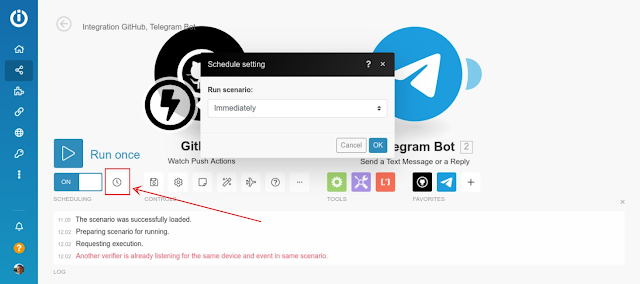 This is the easiest way to set up a webhook.
However, this solution has a limitation. Telegram currently only supports four webhook ports: 443, 80, 88, and 8443. As a result, you can run a maximum of four bots on the same domain/IP address. nine0003
If this is not a problem, then you can use the code below or similar to start the bot with a webhook. The listening address must be either '0.0.0.0' or, if not allowed, the server's public IP address. The port can be one of 443, 80, 88, or 8443. For url_path , it is recommended to use a bot token so that no one can send fake updates to the bot. The key and certificate must contain the path to the files that you created earlier. Argument webhook_url should be the actual webhook url. When substituting a fully qualified URL, use the protocol https:// , specify the domain or IP address that was set as the FQDN of the generated certificate, and the correct port and URL path.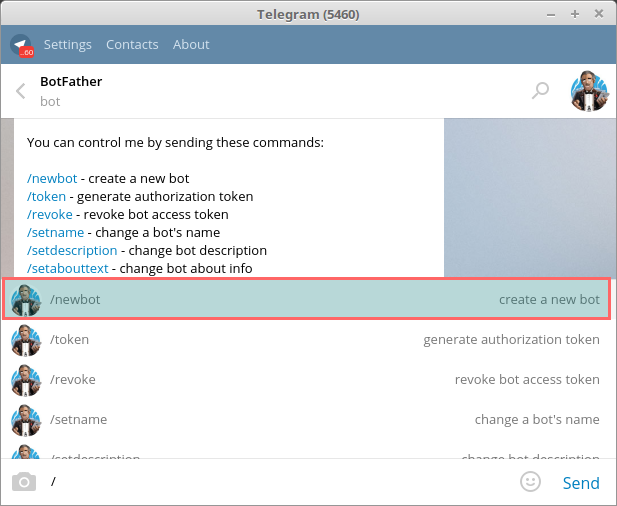
updater.start_webhook(listen='0.0.0.0', port=8443, url_path='TOKEN', key='private key', cert='cert.pem', webhook_url='https://example.com:8443/TOKEN') nine0143Reverse proxy + built-in server
webhook.To solve this problem, you can use a reverse proxy such as
nginxorhaproxy, or you can also useHeroku.In this model, the reverse proxy (
nginx) listens on the public IP address, accepts all webhook requests, and forwards them to the correct instance of the locally running webhook servers built intopython-telegram-bot. The reverse proxy also performs SSL termination, i.e. decrypts the HTTPS connection, so the webhook servers receive the already decrypted traffic. These servers can run on any port, not just the four ports allowed by Telegram, as Telegram server only connects directly to the reverse proxy server.nine0003
Depending on which proxy is being used, the implementation will look slightly different. Several possible settings are listed below.
Using
webhookon Heroku.On Heroku, webhooks can be used on a free plan, because it will automatically manage downtime. A reverse proxy will be configured for the Heroku user and a runtime will be created. From this environment, you will need to extract the port that the bot should listen on. Heroku manages SSL on the proxy side, so you don't need to create a certificate yourself. nine0003
import os TOKEN="TOKEN" PORT = int(os.environ.get('PORT', '8443')) updater = Updater(TOKEN) # add handlers updater.start_webhook(listen="0.0.0.0", port=PORT, url_path=TOKEN, webhook_url="https://.herokuapp.com/" + TOKEN) updater.idle() Using
nginxwith the same domain/port for all botsAll bots set their URL to the same domain and port but with a different
Noteurl_path.The server built into
python-telegram-botusually starts atlocalhostor 127.0.0.1, the port can be anything.: If there is no domain associated with the server, then
example.comcan be replaced with an IP address.Sample code for starting the bot:
updater.start_webhook( listen='127.0.0.1', port=5000, url_path='TOKEN1', webhook_url='https://example.com/TOKEN1', cert=open('cert.pem', 'rb') ) nine0143Configuration example for
nginxwith two configured bots (important parts of the config are shown):server { listen 443 ssl; server_name example.com; ssl_certificate cert.pem; ssl_certificate_key private.key; location /TOKEN1 { proxy_pass http://127.0.0.1:5000/TOKEN1/; } location /TOKEN2 { proxy_pass http://127.0.0.1:5001/TOKEN2/; } }Using
haproxywith one subdomain per bot.nine0075
With this approach, each bot is assigned its own subdomain. If the server has a domain
example.com, then you can create subdomains for example:bot1.example.com,bot2.example.com, etc. You will need one certificate for each bot with the FQDN set to the corresponding subdomain. The server built intopython-telegram-botusually starts atlocalhostor 127.0.0.1, the port can be anything. nine0003Note : You must have a domain associated with the server's IP address.
Sample code for starting the bot:
updater.start_webhook( listen='127.0.0.1', port=5000, url_path='TOKEN', webhook_url='https://bot1.example.com/TOKEN, cert=open('cert_bot1.pem', 'rb') )Configuration example for
haproxywith two configured bots (reduced to the important parts of the config) . Again, the FQDN of both certificates must match the value ofssl_fc_sni.In addition, files
.pemare the combined filesprivate.keyandcert.pem.frontend public-https bind 0.0.0.0:443 ssl crt cert_key_bot1.pem crt cert_key_bot2.pem option httpclose use_backend bot1 if { ssl_fc_sni bot1.example.com } use_backend bot2 if { ssl_fc_sni bot2.example.com } backend bot1 http mode option redispatch server bot1.example.com 127.0.0.1:5000 check inter 1000 backend bot2 http mode option redispatch server nine0143Tailor-made solution built on streams.
It is not necessary to use the Embedded Web Server. If you choose to go this route, you should not use the
Updaterclass. Extension moduletelegram.exthas been developed with this option in mind, so classDispatchercan be used to receive/send and filter/sort messages. True, some things will have to be done manually.Setting part called once:
from queue import Queue from threading import Thread from telegram import bot from telegram.