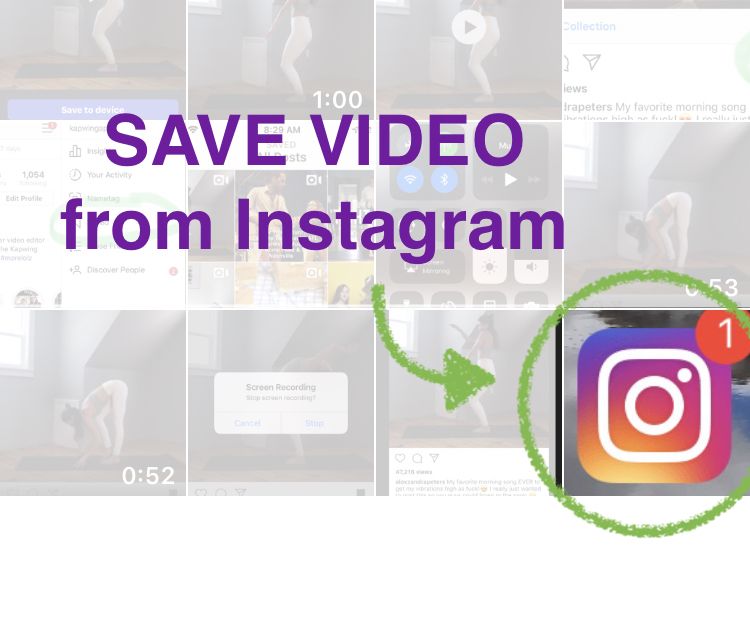
Apart from Instagram‘s Story, Posts, and IGTV, the Live video feature has recently gained tremendous popularity. Using this feature, you can instantly interact with all your followers from a single screen. If you’ve missed watching one, then worry not for we have listed 3 ways to save live video on Instagram or download it later for replay. Meanwhile, you should learn to schedule a live video on Instagram.
Also, Read | How to Stop Instagram Live Notifications for One Person
Table of Contents
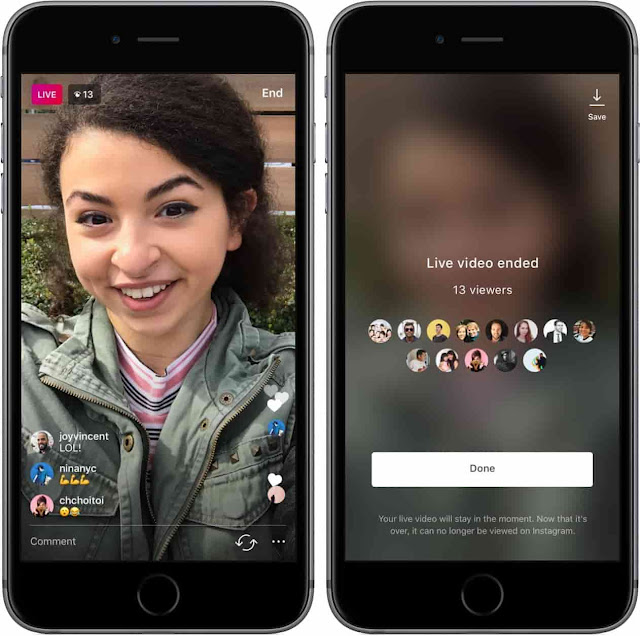
Instagram offers you the capability to save your Live Instagram session directly to your device or your Instagram profile by sharing it as a video post. If you’ve hosted a live Instagram video on your profile and wish to save or rewatch it later, then you need to follow these simple steps to achieve the same.

Now that you’ve learned to save your own Instagram Live using the app, it is time to save the live video of someone else on Instagram. With that being said, let’s look at two different methods to download someone else’s live video on Instagram.
One of the most effective ways to save someone else’s live Instagram session is to record it using the Screen Recorder app. While most smartphones come pre-equipped with a screen recording tool, you can also try some third-party Android apps to record screens on your device. Follow these easy steps to quickly record someone else’s live Instagram session.

The second method to download someone else’s Instagram Live is to use certain third-party Android apps to download it by pasting the live video link. Follow these steps to achieve the same.

That’s it. You’ve successfully saved someone else’s live Instagram video to your device.
If you have missed joining the live Instagram video session of someone you were interested in, you can follow these steps to replay and view it using their profile. Do note that for this trick to work, the host must have shared his live session on their Instagram profile. Usually, when Instagram Live ends, the host gets an option to share it on their profile using a video post. Follow these steps to save their live video using this simple trick.
Now that you’ve learned to save yours or someone else’s Instagram Live video, you should learn to watch someone’s Instagram Story without them knowing about it. Follow this detailed guide to watching someone’s Instagram Story Secretly.
That’s a wrap for the 3 best ways to save your or someone else’s live Instagram video and download it later for replay. If this article has helped you in downloading or rewatching the live video then, hit the Like button and share this read among your friends to assist them while using Instagram. Stay tuned for more jaw-dropping reads.
You can also follow us for instant tech news at Google News or for tips and tricks, smartphones & gadgets reviews, join GadgetsToUse Telegram Group, or for the latest review videos subscribe GadgetsToUse Youtube Channel.
Pocket-lint is supported by its readers. When you buy through links on our site, we may earn an affiliate commission. Learn more
Elyse Betters, US News Editor
·
Instagram/Pocket-lintWhy you can trust Pocket-lint
(Pocket-lint) - Instagram began letting users stream live videos last year, but it didn't let them save broadcasts.
But the app has now updated, finally allowing users to download broadcasts to their phones once they've concluded. Twitter's Periscope and even Facebook's own Live have long let users save videos, so this new update helps brings Instagram's Live Videos more in line with them. Live videos will continue to disappear from the app when you’re done - only now you can hold onto your video and re-watch it later.
Here's how the new feature works.

It may take a minute for a live video to save to your phone, especially for longer videos. Also, you’ll only be able to save video - not comments, likes, or any interactions, and your live video will no longer be available in Instagram.
The ability to save Instagram Live Videos is rolling out now, with in the latest version of Instagram for iOS and Android.
Check out Instagram's blog post and Help hub for more information.
Writing by Elyse Betters.
Sections Instagram Apps
Capturing Live Photos on the iPhone is fun and exciting, but when it comes to posting them to Instagram or Facebook, the whole live aspect disappears.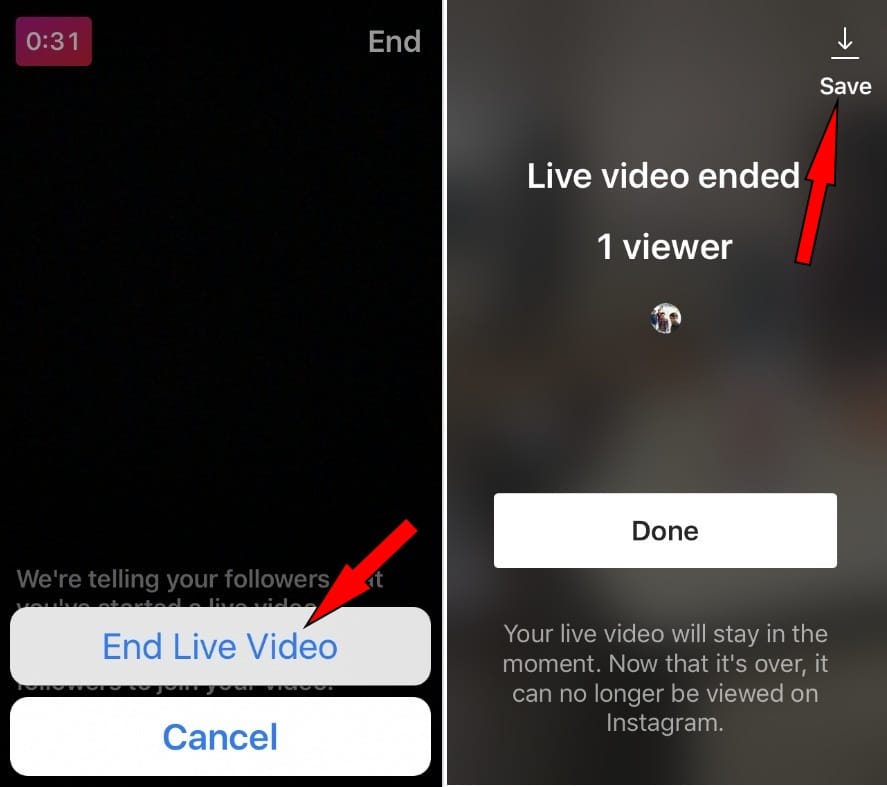 Of course, if you took a moving rather than a static picture, then you want to publish it in the same form. Below we will tell you how to do it.
| Apple in Telegram and YouTube. Subscribe! |
♥ RELATED: A fun trick with panoramic mode on the iPhone.
If you have an iPhone 6s or later, you can take Live Photos directly from the Camera app. Live Photos in iOS is a cross between a static photo and a dynamic video, creating a "moving" image. This allows viewers to expand their perception of your images.
Instagram is one of the worst major platforms when it comes to live photo support. But now, thanks to updates and clever non-standard methods, it is possible to add this feature to your profile.
Here's how to post Live Photo on your Instagram.
♥ BY TOPIC: How to hide unnecessary application pages from the home screen on iPhone and iPad.
1. Open the Photos application, go to the Albums tab and select the Photo Live Photos section.
0020 , press the button Select in the upper right corner. Select multiple Live Photos and click the three dots button in the lower right corner . In the menu that appears, select item "Save as video" .
If you need to publish only one Live Photos on Instagram (post, story or rils), then select it, click the button with three dots in the upper right corner . In the menu that appears, select item "Save as Video" .
Note: you need to use "clean" Live Photos without applying effects (Loop, Pendulum, etc.).
3. The Photos application will create a video from the selected Live Photos .
4. Open the Instagram app. Click the plus sign on the top menu of the application. In the window that appears, select the format of the content to be created: Video Reels , Publication or History .
5. Select the resulting Live Photos video you created earlier.
Add Video to the RILS:
Add Video to Storis:
6. Follow the screen instructions to add effects, signatures, information on the location, note people, note, note people exchange through social networks, etc.
7. Share the created video from Live Photos to Instagram.
♥ RELATED: How to listen to YouTube music in the background on a locked iPhone or iPad.
See also:
Please rate article
Average rating / 5.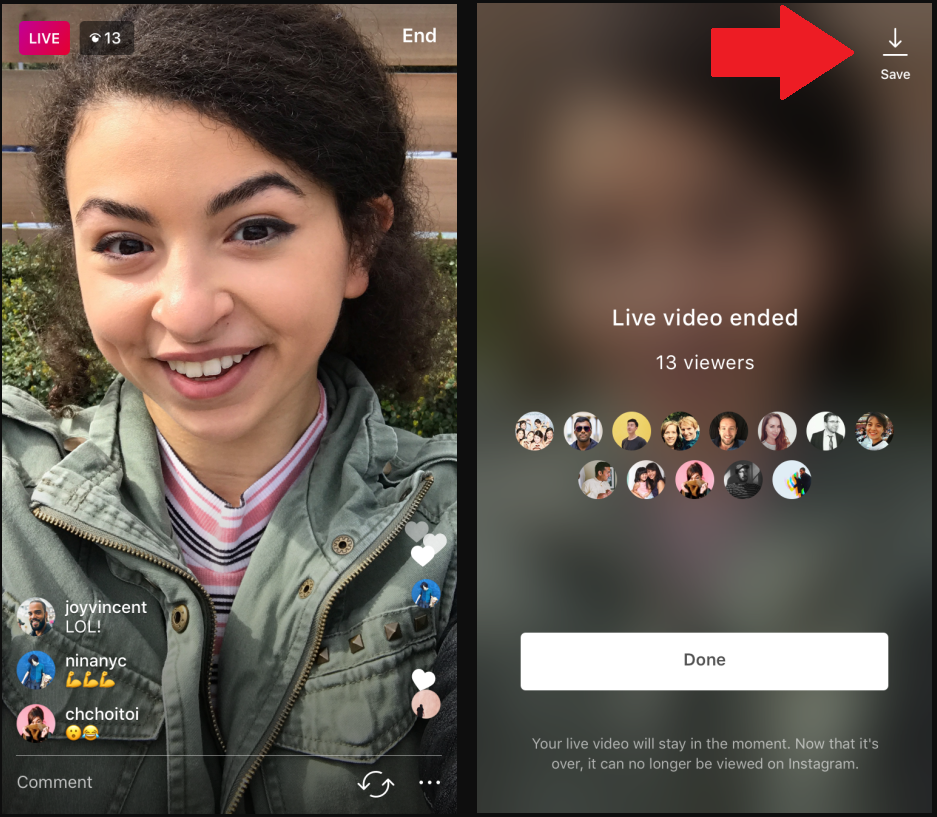 Number of ratings:
No ratings yet. Rate first.
Capturing Live Photos on iPhone is fun and exciting, but when it comes to posting them to Instagram or Facebook, it’s all “ the living aspect disappears. Of course, if you took a moving rather than a static picture, then you want to publish it in the same form. Below we will tell you how to do it.
If you have an iPhone 6s or later, you can take Live Photos directly from the Camera app. Live Photos in iOS is a cross between a static photo and a dynamic video, creating a "moving" image. This allows viewers to expand their perception of your images.
Instagram is one of the worst major platforms when it comes to live photo support. But now, thanks to updates and clever non-standard methods, it is possible to add this feature to your profile.
Here's how to post a Live Photo on your Instagram.
1. Open the Photos app, go to the Albums tab, select the Live Photos section, and click the Select button in the upper right corner.
2. Select one or more Live Photos and click the Share button in the lower left corner. Select "Save as Video" from the menu that appears.
Note: you need to use "clean" Live Photos without applying effects (Loop, Pendulum, etc.).
3. The Photos app will create a video from the selected Live Photos(s).
4. Open the Instagram app. Click the plus sign in the app's bottom menu. Select the resulting Live Photos video you created earlier.
5. Click "Next" in the upper right corner. Add a caption to your video. You can also add location information here, tag people, share via social media, and more.
6. Click Share.
1. Open Instagram and tap the camera icon in the top left corner of the screen to open the Stories section.
2. On the history screen, scroll down your bottom menu to Boomerang. This option is also represented as an infinity icon in the pop-up menu on the left.
3. Click the box in the lower left corner to select the video created from Live Photos in the previous instruction
or record a new looped video by touching the white circle in the bottom menu.
4. Add text or edit your live photo as you see fit.
5. Press the oblong white Recipients button in the lower right corner.
6. Choose where you want to send your Live Photo. This could be your Story, Close Friends, or someone you follow. Here you can add information about your location or share a picture through social networks.
7. You can click Cancel to stop this action, or click the blue Done link at the bottom of the screen.
Posting live photos to Instagram or Facebook is easy. In order to see a moving picture published on a social network, it is not at all necessary to have an iPhone, since it will no longer be a photo, but a video.
There are several ways to post Live Photos to Instagram without losing any of the liveliness, but we'll look at one of them using Google's Motion Stills app. With Motion Stills, you can edit Live Photos and convert them into videos and GIFs. In addition, the application is equipped with a wonderful image stabilization feature.
1. Take a Live Photo and save it to Photos.
2. Download Motion Stills by Google from the App Store on your iPhone.
3. Open the app and select the photo you want to post and edit it if necessary.
4. Press the arrow.
5. Select the Share option from the pop-up menu.
6. Tap Save Video to save your Live Photos to the Photos app, or tap Instagram if you want to post the photo to social media right away.
7. Open Instagram or Facebook and publish a post and click on "OK".
That's all you need to do to get "live" photos to appear on Instagram and/or Facebook.