Tired of posting on Instagram from your phone? Wondering how to post on Instagram from your PC or Mac instead?
You’ve come to the right place. Posting on Instagram from your desktop can save you time and offer more flexibility in what you can upload (such as edited videos and images).
And you can do it without having to upload them onto your phone first.
Below we’ve outlined three different ways to post on Instagram from your computer.
How to post on Instagram from your computer
Method 1: How to post on Instagram from your computer using Hootsuite
Method 2: How to post on Instagram from a PC or Mac
Method 3: How to post on Instagram from your computer using Creator Studio
How to post an Instagram Story from desktop
How to post an Instagram carousel post from desktop
How to edit an Instagram post from desktop
Bonus: Download a free checklist that reveals the exact steps a fitness influencer used to grow from 0 to 600,000+ followers on Instagram with no budget and no expensive gear.
Below, you’ll find ways to post on Instagram from your PC or Mac. We’ll also show you how to post via Hootsuite which works on either operating system.
If you’re more of a visual learner, watch this video from our pals at Hootsuite Labs to see how easy it can be:
You can schedule feed posts, Stories, carousel posts, and Instagram ads with Hootsuite.
The instructions below will walk you through the process of posting to your Instagram feed. We cover Instagram Stories and carousels a little further down in this article.
To post on Instagram from a PC or Mac using Hootsuite, follow these steps:
 Alternatively, you can also Schedule for later if you want it to post at a different time.
 For a quick summary of how to post on Instagram from Hootsuite, watch this video:
Voila! Posting photos and videos to Instagram from PC or Mac is that easy.
Method 2: How to post on Instagram from a PC or MacAs of October 2021, all Instagram users can create and publish feed posts from the browser version of the app.
To post on Instagram from your desktop computer (PC or Mac), follow these simple steps:
 A Create new post window will pop up.
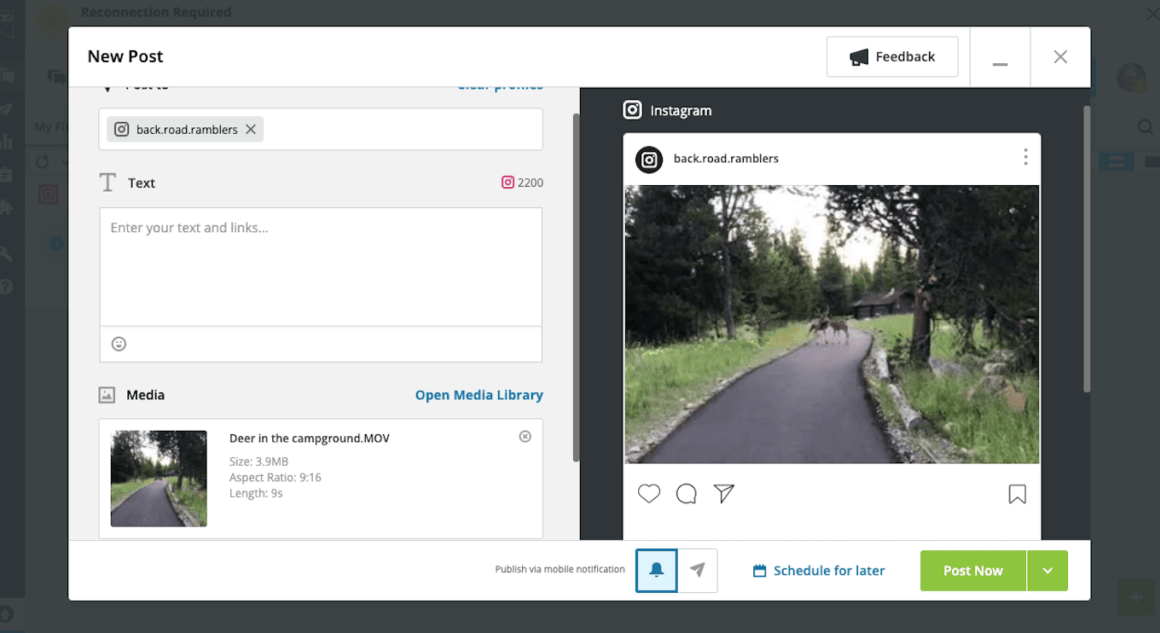
And that’s it!
At the moment, only feed posts can be created and published directly from Instagram on desktop. Keep reading to find out how to post Instagram Stories from a PC or Mac computer.
If Instagram is your social network of choice and you don’t mind not having all your social networks in one dashboard, Creator Studio could be a good option for you.
Note that when using Creator Studio, you can post and schedule all types of posts other than Instagram Stories.
How to post on Instagram using Creator Studio:

You can post an Instagram Story from your computer using a third-party social media management tool like Hootsuite. Just follow the steps outlined in this short video:
Or, read our step-by-step article on how to post an Instagram Story from your computer.
If you don’t have Hootsuite, you can post an Instagram Story from your PC or Mac through the following steps:
You’re done! It’s practically the same steps as if you were using the Instagram app on a mobile device.
#1 Social Media Tool
Create. Schedule. Publish. Engage. Measure. Win.
Start free 30-day trial
With Hootsuite, you can also create and easily publish carousel posts (with up to 10 images or videos) directly to Instagram. Here’s how.
1. Go to Planner and tap New post to launch Compose.
2. Select the Instagram account you want to publish to.
3. Include your caption in the Text box.
4. Go to Media and tap Select files to upload. Select all the images you want to include in your carousel. All selected images should appear under Media.
5. Use the yellow Schedule button to select a date and time to publish your post.
6. Tap Schedule. The post will show up in your Planner at the time you have scheduled it for.
That’s it! Your post will go live on the date and time you selected.
How to edit an Instagram post from desktopHootsuite Compose allows you to edit any image directly on your dashboard before you post it. Unfortunately, you won’t be able to edit the image once it’s posted.
Follow these steps to edit:
 This brings up Hootsuite Composer’s edit tool. It allows you to customize the aspect ratio of your image to fit practically any social media platform’s image metrics. From the sidebar, you also have the ability to add filters, adjust lighting and focus, add text and stickers, and use the brush too.
Voila! You just edited your image from your desktop.
Post to Instagram from your PC or Mac using Hootsuite. Save time, grow your audience, and measure your performance alongside all your other social channels. Try it free today.
Get Started
Easily publish and schedule Instagram posts from your computer with Hootsuite. Save time and get results.
Try it for Free
Want to how to post on Instagram from PC or Desktop? This step-by-step guide gives you 11 different methods for posting on Instagram from PC. Let’s get started!
When Instagram first launched in 2010, it only allowed users to post photos from their mobile devices through the Instagram app. Since then, Instagram users have been searching for options to post on Instagram from PC.
If you’re wondering “how can I post pictures on Instagram from my computer?”, we’ll cover 11 different options to post on Instagram from your computer in this article, with updates for 2022. In addition, we’ll list the pros and cons of using each tool to post on Instagram so you can choose the best option for you.
There are 6 ways to use a laptop or desktop computer and Windows or Mac to create IG posts photos and videos on Instagram.
You can grow your Instagram by planning your posts ahead of time. Using an Instagram scheduler lets you:
Hopper HQ lets you focus on content quality. With features such as bulk content creation and scheduling ahead of time, all from your desktop.
Hopper HQ is a company founded in 2014 tailored for brands, agencies, and creators to grow on Instagram. They also have an outstanding live chat to help you on the go.
You can schedule and post on Instagram from PC with the Hopper HQ desktop app. Hopper HQ allows you to visually plan and schedule your social media campaigns automatically with tailored insights, all from your computer. Scheduling your posts saves you precious time that you can use to focus on other aspects of your growth.
1. Create an account at HopperHQ.com
After logging in to your new account, you are greeted with a visual dashboard with four sections:
When you Log in to Hopper HQ from your desktop computer, you will see the Hopper HQ Dashboard | How to post on Instagram from PC.In the left corner, you can see your Instagram handle. You can add other social networks too, such as LinkedIn, Facebook, and Twitter accounts (Stay tuned for more social networks soon 👀)
From the menu, you can create and manage your feed posts, calendar, analytics, and settings.
View your scheduled and drafted posts ready to be posted on Instagram.
Look at your Instagram feed posts, exactly how they will appear on your IG profile once published.
2. Create posts and upload Instagram photos, videos, stories, and reels
In the top-left corner, click “create posts” and you are taken to a window where you can upload 50 photos or video posts at once directly from your desktop browser in one swoop.
Take a look at the video uploading photos from Unsplash. As a result, fill your calendar in seconds.
3. Edit your Images
If your images are not in the correct Instagram size dimensions, a pop-up alert will take you to the photo editor with pre-set dimensions for portrait and landscape photos, and apply any filters or edits.
Add frames, text, stickers, and more to get your images looking their best from your desktop with Hopper HQ.4. Write captions and schedule your first comment with hashtags
Once you’ve made your edits, you can write captions (including emojis) for all uploads, and schedule the first comment where you will add all your hashtags.
Here is the best part, you can choose between Post Now or Schedule a time in the future.
If you decide you want to publish the same post to another social network then, you can choose to send it to multiple platforms at the same time. This includes Instagram, Facebook, Twitter, LinkedIn, and more social networks coming very soon in 2022.
Hopper HQ Dashboard to schedule IG posts | How to post on Instagram from PC (Windows or Mac)5. Drag and drop grid planner
Once all your photos and video posts are in the dashboard, you can easily make changes by dragging and dropping the posts. The Instagram Grid Planner displays an accurate view of what your IG feed will look like.
Using drag and drop option to move posts | How to post on Instagram from your Windows or Mac6. Calendar View
Hopper HQ also includes a calendar view in a clean and aesthetic arrangement.
7. Monitor your social media analytics
User-friendly Analytics to measure the success of your content and stay informed about your audience demographics!
Hopper HQ Analytics Dashboard, to keep track of your growth. | How to post to Instagram from PC and Mac.
Hopper HQ allows uploading up to 50 high resolution pictures or video clips while editing your posts in bulk.
Hopper HQ works on a subscription basis by the number of social accounts sets. Pricing starts at $19 monthly or $16 monthly if paying annually for 1 set of social accounts.
1 social set = 1 Instagram account, 1 Facebook account, 1 Linkedin account, 1 Twitter account.
If you are an agency or you manage multiple accounts, there is a bulk discount. 🎉
Pros and cons of using an Instagram scheduler tool to post on Instagram from PCA set of accounts include 1 Instagram + 1 Facebook + 1 Twitter + 1 LinkedIn, but if you are an agency or you manage multiple accounts, there is a bulk discount.
 Additionally, we recently launched Instagram Story scheduling AND Instagram reels scheduling.
Hopper HQ does far more than post to your Instagram from PC or desktop. It is a complete social media management tool built to automate and manage Instagram and other social networks to scale. It offers a visually appealing dashboard with an easy-to-use drag and drop interface, resulting in an attractive grid and consistent Instagram aesthetic in no time.
| 🚫 Free | ✅ Hashtag Tool |
|---|---|
| ✅ Photo AND Video Posts | ✅ First Comments |
| ✅ Instagram Stories & Reels | ✅ Editing Tools |
| ✅Carousel Posts | ✅ Filters |
| ✅ Windows | ✅ Cropping |
| ✅ Mac | ✅ Tag Images |
| ✅ Bulk Upload | ✅ Tag Locations |
| ✅ Captions | ✅ Multiple Accounts |
| ✅ Feed Grid Preview | ✅ Bulk Edit |
This method changes the user agent on your browser for posting on Instagram from PC (Mac or Windows) and does not require a website or software download, plus it’s free to use. Here are the ways to use it, explained depending on your favourite operating system!
How to change the user agent in Google Chrome when using Mac?
1. Open the Developer Tools Window.
Changing the view of your browser to see as your mobile device but from your PC and Mac.2. The console will open. Then, by clicking this icon, you can change the view to a mobile device.
3. In this drop-down menu, select a mobile model from the list of devices. This will change the browser’s view to a mobile screen, and the upload button will appear.
Tip: if it does not appear straight away, navigate to a different page and come back, or refresh.
4. The upload button will automatically open your computer’s files. Select a photo. You then have the option to rotate and also to zoom out.
How to post on Instagram from PC or Mac.5. You have a range of Instagram filters available, although not the editing tools. When you’re ready, press next as you would on mobile.
6. Add a caption and location on the review page. Thereafter, click share, and the post will be published on your profile!
7. Additionally, publish to your profile using the Share button in the top right-hand corner!
How to change the user agent in Google Chrome from Windows?
If you are running Chrome, click on the ‘three dots’ icon on the top right section of your browser. Despite it for windows, actually works in Mac too. Find the steps explained.
(1) Click on ‘More tools’ and pick “Developer tools”.
(2) Go to the “Toggle Device Toolbar” option in the console window.
How to post on Instagram from PC or Mac.(3) Go up to the dropdown to pick a mobile device user agent and set the user agent to the mobile device that you wish.
(4) After that, launch IG on the browser.
How to post on Instagram while using a PC or Mac.Thereafter, you can click the + button to start posting photos or videos on Instagram from your desktop or laptop computer.
How to change the User-Agent in Safari from Mac?
This is a handy quick fix if your photos are ready to go on your desktop or USB and you don’t have time to transfer them to your phone. While this is relatively simple and free, there are many limitations.
Check out this in-depth guide where David Coleman explains “what the user agent is.”
Option 3: The Inspect methodTo post to Instagram using the Inspect method, open your browser’s search bar and type Instagram.com
Use the right-click and select Inspect; subsequently, a code screen should appear where then you can select Toggle Devices. Now, you can follow the instructions above.
Pros and cons of using the inspect method to post on Instagram from PCThis is a quick and easy way to post to Instagram from any browser.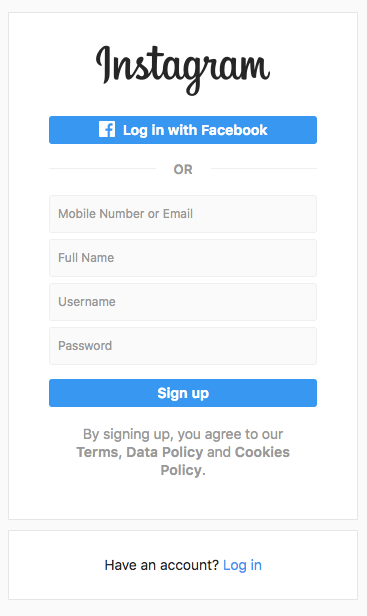 Nonetheless, this method has limitations like editing your videos and photos, scheduling in advance or managing multiple IG accounts.
With Instagram’s latest update, everyone can post from PC whether with Mac or Windows; therefore, allowing to upload Instagram posts from the web version of Instagram (Not the mobile app).
Visit the Instagram website and log in with your credentials. Once inside, click the + icon in the upper-right corner of the menu bar (next to the Messenger icon). Here, you can edit the photos, and add your caption, for instance. In addition to changing location, Alt text, and advanced settings.
Publish your Instagram Post while using your PC or Mac.Pros and cons of using the Instagram web version to post on Instagram from PC The Instagram web app allows users to add captions, locations, tags, and hashtags. Additionally, this is an option that’s easily accessible from any browser (Safari, Google Chrome, Bing, etc.)
Using the Instagram web version is beneficial if you are looking to upload one picture on the go or see your Instagram feed on a bigger screen. However, you can’t upload Instagram Stories and there is no scheduler!
Bottom line: limited and difficult to scale your Instagram account.
In August 2019, Facebook launched the option to post to Instagram on their Creator Studio platform. Consequently, users with a business Instagram profile can link to their business Facebook page and can publish posts from a desktop.
Connect to business Creator Studio by using your Facebook credentials. Then, go to the Instagram section (Instagram – camera icon) and click on it.
Introduce your Facebook Credentials using the Creator Studio to publish your photo and video posts.Pros and cons of using Facebook Creator Studio to post on Instagram from PCThis is a great free alternative to posting on Instagram from computer. However, it is limiting if you’re managing Instagram content in batch, as it is time-consuming to find workarounds.
Option 6: Using other third-party tools to post on Instagram from PCHow to post to Instagram while using a PC or Mac.
Using other tools created by independent developers is another way to create Instagram posts from PC. Keep reading for an overview of some other programs available online.
Bluestacks is an Android emulator that allows Android applications to run on PCs running Microsoft Windows and macOS. All you need is a Google account, after that, you can download a version of the Instagram Android app;
Bluestacks requires you to download an app to your computer, find their webpage, type Instagram in the search bar and click Install from their App Center. Log in and you’re ready to post on Instagram from PC.
Pros and cons of using Bluestacks to post on Instagram from PC

The verdict
BlueStacks lets you post on Instagram from your Windows or Mac PC but with limitations on working with multiple accounts and scheduling posts in advance.
Using Deskgram lets you post on Instagram from your Mac PC, as well as view comments and likes, just like the mobile app.
You need to download the app on your computer. Drag to the applications folder and upload your photos and videos to Instagram from Mac and you’re all set to use it.
Pros and cons of using Deskgram to post on Instagram from PC
The verdict
Deskgram’s $2. 99 monthly price seems fair for unlimited use on one device, but don’t forget it’s limited to use just on Mac.
This Instagram Uploader was developed by Eltima Software and, like Deskgram, works only with Mac.
You need to download Uplet to your desktop, drag it to the Applications folder and upload your photos and videos to Instagram from your Mac.
Pros and cons of using Uplet to post on Instagram from PC
The verdict
The license cost ranges from $19.95 to $49, paid as a one-time fee. Despite covering the basic options, there are some drawbacks, such as the need to download an application, lack of some features, and it only works with Apple computers.
This Google Chrome extension lets you use Instagram as you would on your cell phone. As revealed by their website in a disclaimer, this Chrome extension is not an official app from Instagram, but from independent developers.
Install the Instagram extension by searching it on the Chrome web store. Thereafter, you click on the extension icon, you will be prompted to sign in to Instagram again, allowing you to post from your PC as you would on mobile.
Pros and cons of using the DMI Chrome extension to post on Instagram from PC
The verdict
The extension allows you to send direct messages to other Instagram users, view photos, follow links from others just like the web version of Instagram. It does, however, have its limitations when it comes to uploading videos.
Whether you’re using Windows or Mac, you have plenty of options to post on Instagram from PC. Your method of choice will depend on what you’re looking to achieve; do you just want the ability to post on Instagram from computer? Or are you looking for a tool that you can use to upload, edit, and schedule multiple posts from PC?
In conclusion, based on your goals and individual needs, you’ll be able to decide on the best option for you.
Do you have a touchscreen Windows 10 computer? Find out how to post to Instagram directly from it!
We make your page interesting and encourage subscribers to look at your page or website more often for shopping
Fresh posts regularly
Get our book "Content marketing in social networks: How to get into the head of subscribers and fall in love with your brand.
Subscribe to the newsletter and get a book as a gift!
Instagram was created as a mobile application, and you can only officially upload photos from your phone. In some cases, it is convenient only from a computer: the pictures were taken on the camera, long text is uncomfortable to type on a small screen, low Internet connection speed. Special services and programs have already found a way to publish posts on Instagram through a computer. Before you start, you need to know a few rules.
Instagram rewards mobile app users. Trying to post photos from your computer can result in various problems. Including, account blocking for downloading from third-party services. Most of them require personal login information: password and login.
Sometimes you need to confirm by phone. The developers have created a complex system to avoid spam and automated actions: cheat likes, comments, etc. You may even need to change your password.
The site uses spam filters to block too active accounts. When the number of likes, posts or comments exceeds 150 units per hour, the corresponding buttons become unavailable.
Be extremely careful when transferring personal information to suspicious tools, scammers can hide behind them. Consider how to post on Instagram from a computer and what programs can help with this.
Browser is the easiest way to post from a computer. All you need is a modern version. Consider the actions on an example, Firefox.
And then select the device:
Browser download advantages:
One of the shortcomings is the lack of a media content scheduler.
BlueStacks is a handy program that can be downloaded from the main page of the official website. This is an emulator that can fully recreate the functionality of Android on a personal computer. It weighs a lot, it can slow down. Free and contains ads. At first, you will have to get used to how to post on Instagram in BlueStacks from a computer.
After installation, go to the application and click on the gear. You will be prompted to register a Google account or open an existing one. Log in and start searching Instagram. Install it by clicking the appropriate button, similar to a mobile download of the program. Now the social network will be available in the mobile version on the monitor screen. You can create a desktop shortcut.
To upload a photo, it will be enough to drag it into the emulator window, which will display a list of applications to send. Select Instagram. All processing functions are available to you: filters, cropping. Add text, hashtags, tag people, and post your first post from your computer. All actions by analogy with a mobile application.
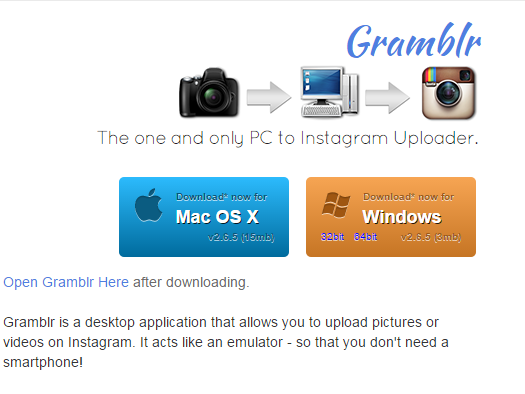
Another solution to write and post on Instagram from a computer is Gramblr. When launched, it asks for a password and login from the account. The function of the program is to download a photo and a caption to the text. The set of filters is limited to the standard ones, there is cropping to a square. You need to add text, tags and send the entry. The tool also provides a history of published publications and is able to download on a schedule. It is important that the computer is turned on when posting.
Instaposting is a free service that does not even require registration.
How to add a post to Instagram using Instaposting from a computer:
The tool also allows you to download posts with videos in mp4 format.
Flume is implemented only for Mac OS operating system and supports all Instagram tools. However, add from computer features are only available in the Pro version after a subscription. The app was originally on the Mac App Store. Due to a violation of the rules of the social network, it was withdrawn, but users continue to work with older versions of this program.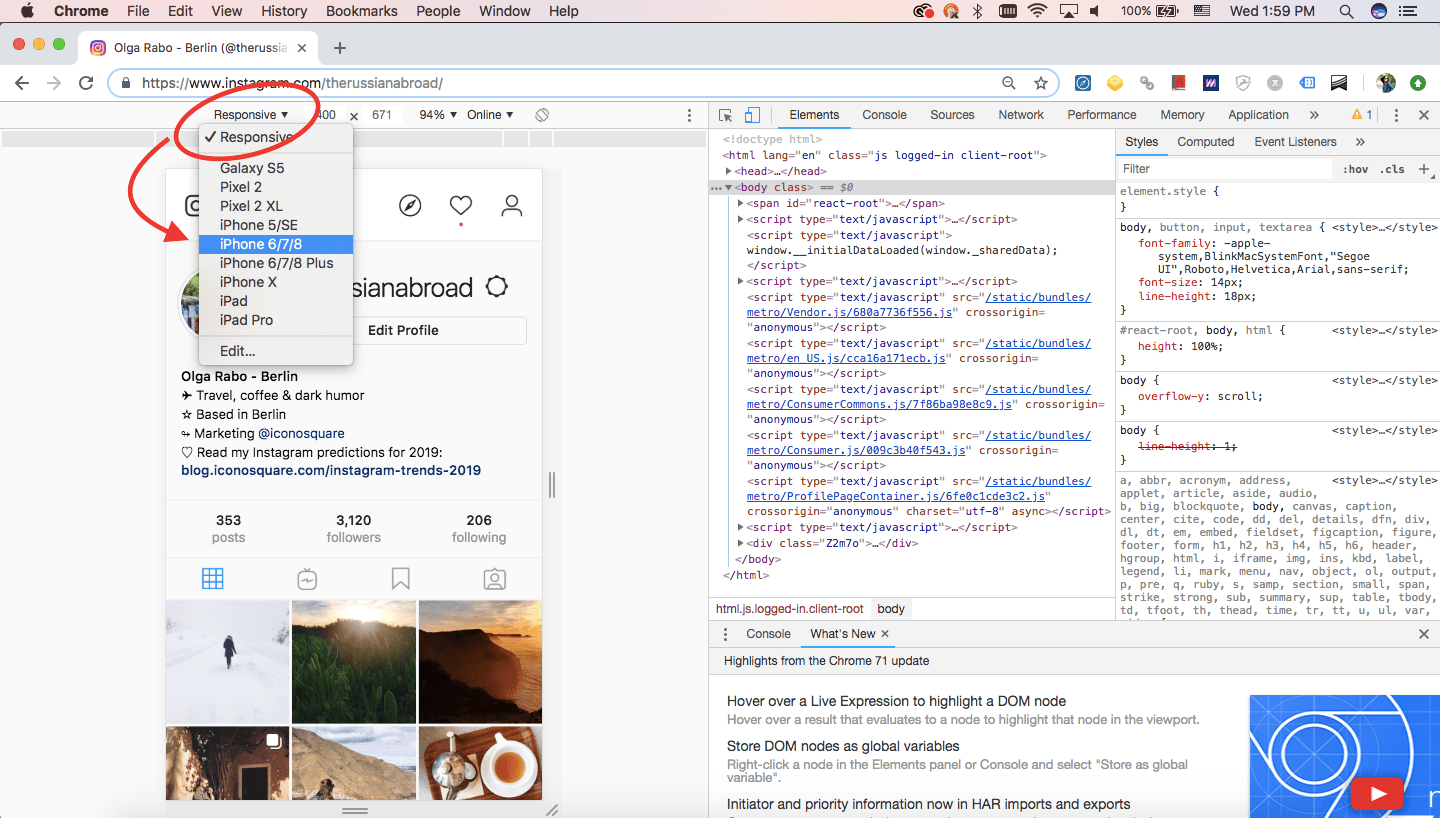
Instmsk makes posting photos quick and easy, and is one of the most popular Instagram tools. The program does not impose restrictions on the image format: settings for rectangular and square are available separately. A variety of filters, work with tags, support for multiple accounts. After editing, the quality is not lost. The post can be shared with friends in Odnoklassniki, Facebook, Vkontakte. The resource is flexible, does not freeze and saves traffic.
Uplet is another tool that solves the problem of how to post on Instagram through a computer. Available for Mac OS for a fee. The post is made in a few clicks: a photo is uploaded, a description, hashtags, etc. are filled in, everything is like in the regular version. It does not have wide settings for image editing.
The InstaPlus.me service has more advanced functionality:

Free use for the first 5 days.
The Windows 10 app allows users to capture broadcasts, send Direct messages, and download Stories.
It is not yet possible to add photos, but perhaps in the future this feature will be implemented due to numerous requests from users.
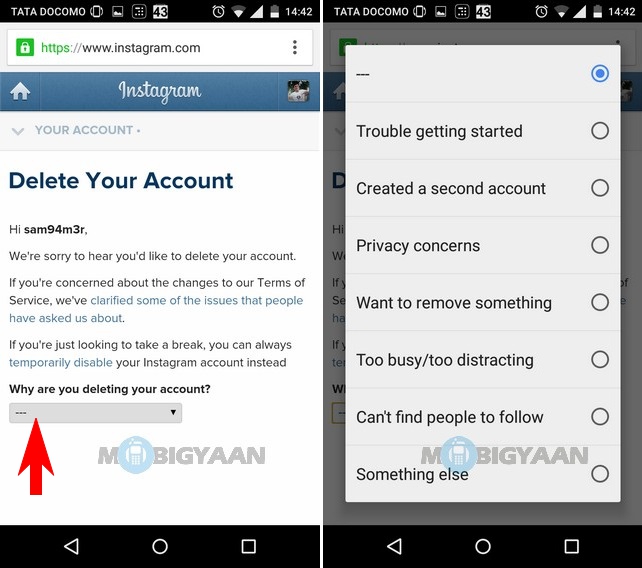
Another task that a user faces is how to edit a post on Instagram without a mobile application, from a computer. For example, a mistake has been made. Instaredactor will help with this task.
Basic functionality:

Deleting a post from a mobile application is easy, the social network has provided this opportunity. For some time, links to photos will be relevant, but after the services are updated, they will disappear and along with them all the information: likes, comments. But in the official version on the computer there is no delete function. But you can use the BlueStack emulator. Through it, you can fully use Instagram: publish, edit and delete posts.
Let's move on to tools that will help not only publish a post, but also schedule it for a specific time.

Of the main disadvantages - a paid subscription. And as mentioned at the beginning, Instagram may require you to confirm the password, up to the procedure for resetting it. All actions take time, you need to be prepared.
Now you can work on Instagram both from a mobile application and from a computer.
We looked at 9 ways to create and publish posts on Instagram from a computer, and this is not a complete list. Be careful when transferring data from your account to unfamiliar services: check the name of the site to avoid hacking. We wrote about how to protect yourself from phishing in the article "".
Continuation of the story from
Media news2
Stories
Stories
Veronica Elkina
Ex-Story Editor
Polina Todorova
The Instagram social network has always been primarily focused on a mobile application. Yes, you can view your feed from a PC or Mac, but your options there are limited. You can like photos, follow people, but you can't upload your own pictures and videos.
There are several ways to post photos to Instagram from your computer, from dedicated apps to plug-ins for Adobe Lightroom. But now it can be done much easier.
Polina Todorova
Instagram has added the ability to publish photos to the mobile version of the site (this version is seen by the user if he enters the social network through a browser, and not through the application itself). The new feature is just one part of the big changes coming to the mobile version of the site. All of them will be made to facilitate access to Instagram in countries with severe restrictions on Internet bandwidth.
Related content:
38 Instagram tricks not everyone knows about
Instagram stories: how to start thinking about content and make it work for you?
How to run a commercial Instagram: instructions with examples from an SMM specialist
To post photos to Instagram from a computer, you need to install a Chrome extension that will allow you to open the mobile version of the social network on a PC or Mac. Install the extension, select your device type (iOS or Android) from the menu, and go to Instagram.com. You will see a mobile version of the site with a button to upload photos.
This is what it will look like:
However, the functionality of the mobile version of the site is somewhat limited compared to the application. So far, videos cannot be uploaded through the site, and filters, photo editing mode, geolocation tracking do not work here, and it is impossible to publish a series of photos in one post.
But still this method works. If you suddenly need to urgently post a photo on Instagram from your computer, it will be easier to use this technique than to first transfer the picture to your phone and then publish it from it.
The extension modifies the user-agent string. This line is a kind of calling card used by browsers. It tells the site information about which device the browser is running on, and the browser, in turn, adapts to this device. The extension makes the site think that you have opened Instagram from a mobile device and not from a computer.
Source.
Related materials:
How to save photos from Instagram without taking a screenshot
How to get followers on Instagram
Instagram allows you to save live broadcasts to your phone memory
How to make money on star animals on Instagram
How to get a loyal audience on Instagram: success stories of three brands
Found a typo? Select the text and press Ctrl + Enter