Business Solutions
By Goal
Build Brand Awareness
Promote Your Local Business
Increase Online Sales
Promote Your App
Generate Leads
Monetize Your Content
Retarget Existing Customers
View All GoalsBy Business TypeSmall Business
Large Business
Agency
Media and Publisher
Creator
Developer
Startup
Business Partner
Technologies
Meta Technologies
Messenger
Audience Network
Oculus
Workplace
ToolsFree Tools
Stories
Shopping
Meta Business Suite
Ads
Video Ads
Ads Manager
Measurement
Facebook Wi-Fi
Inspiration
Insights and Inspiration
Meta Foresight
Creative Guidance
Business News
Case Studies
Video
Events and CollaborationEvents
Creative Hub
Education and Resources
Skills and Training
Online Learning Courses
Blueprint Certifications
Blueprint Programs
Webinars
Guides and ResourcesAds Guide
COVID-19 Resources
Safety and Integrity
Business Equality
Social Good
Find a Business Partner
Support
Business Solutions
By GoalBuild Brand AwarenessPromote Your Local BusinessIncrease Online SalesPromote Your AppGenerate LeadsMonetize Your ContentRetarget Existing CustomersView All GoalsBy Business TypeSmall BusinessLarge BusinessAgencyMedia and PublisherCreatorDeveloperStartupBusiness Partner
Technologies
Meta TechnologiesFacebookInstagramMessengerWhatsAppAudience NetworkOculusWorkplaceToolsFree ToolsStoriesShoppingMeta Business SuiteAdsVideo AdsAds ManagerMeasurementFacebook Wi-Fi
Inspiration
Insights and InspirationMeta ForesightCreative GuidanceBusiness NewsCase StudiesVideoEvents and CollaborationEventsCreative Hub
Education and Resources
Skills and TrainingOnline Learning CoursesBlueprint CertificationsBlueprint ProgramsWebinarsGuides and ResourcesAds GuideCOVID-19 ResourcesSafety and IntegrityBusiness EqualitySocial GoodFind a Business Partner
Search
Business SolutionsTechnologiesInspirationEducation and ResourcesSupport
February 15, 2019
Protecting people's information is the most important responsibility we have at Facebook. Our teams work around the clock to detect and prevent fraud, safeguard data and ensure our systems are secure. While we invest in finding, fixing and preventing security issues, there are things you can do to protect your account and your Page. We put together a list of security tips to help you recognize suspicious requests and activity, and keep your account and your Facebook Page safe. And since your business Page is connected to your personal Facebook account, it's important to keep both secure.
Pick a strong and unique password. Avoid including your name, phone number, email address or common words. Don't reuse your Facebook password on other services online, and never share your password with others.
To further secure your account, we recommend enabling two-factor authentication, both for yourself and as a requirement for other members of your business. Once you've set up this extra layer of protection, we'll ask you to enter a code or confirm your login attempt each time someone tries accessing your Facebook account from a computer or mobile device we don't recognize. We also encourage you to sign up to get alerts when someone attempts to log in from a device we don't recognize.
Visit the Help Center to learn more about how to set up and manage two-factor authentication and receive alerts about unrecognized logins.
Be sure to familiarize yourself with the different Page roles that exist and the permissions they have. We recommend regularly reviewing who has admin access to your Page in settings, and when you add your Page to a Business Manager, please take a moment to understand the permissions you allow. We also recommend having more than one admin for your Page, so that in case you ever lose access to your Page, someone you trust can help keep the Page up and running, and get you back in.
Scammers may create fake accounts in an attempt to friend and manipulate people. Accepting requests from scammers could lead to spam being posted on your timeline and shared with your friends. Scammers may also tag you in posts and send malicious messages to you and your contacts, so we encourage you to be careful to only accept friend requests from people you know and trust. Similarly, don't grant Business Manager permission to Pages you don't know. You can report suspicious Business Manager permission requests here.
Keep an eye out for links you don't recognize, especially if they're coming from people you don't know or trust. Be careful not to click on suspicious links, open suspicious files or install malicious apps or browser extensions—even if they appear to come from a friend or a company you know. This includes links on Facebook, in private messages and in emails. Keep in mind that Facebook will never ask you for your password in an email. You can always confirm whether an email claiming to be from Facebook is authentic by reviewing recent emails we've sent in the Security and Login Settings here.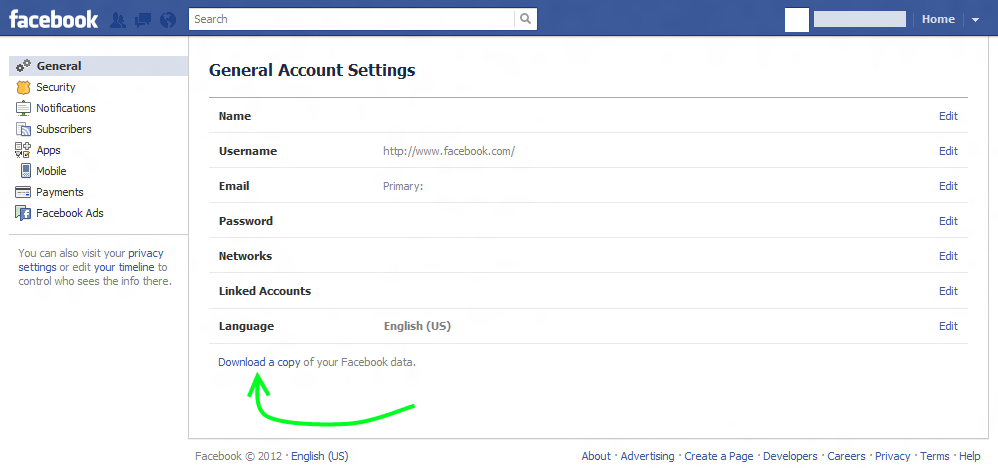 If you see a post or message that tries to trick you into sharing personal information, please report it.
To avoid infecting your device or computer network, learn the signs of malicious software and ways you can protect your devices from it. And remember to keep your devices, web browsers and applications up to date and remove any suspicious applications or browser add-ons.
To help you regain access to your account, and then your Page, in case you are ever locked out, you can enable your friends to be your trusted contacts. (Update on August 2, 2022 at 11:00AM PT: The trusted contacts feature is no longer available.) They'll be able to send you a recovery code with a URL to help you get back into your account.
Lastly, if you think your personal account has been compromised in any way, please visit facebook.com/hacked to get help, and visit our Help Center for help with your Page security. You can also explore Privacy Basics for more ways to increase your account security and to learn about the protections we have in place.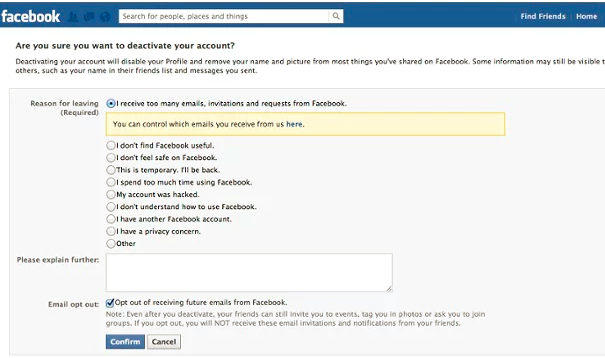
Sign up for our monthly newsletter for the latest updates, insights, marketing trends and articles from Facebook.
Sign up
Best Practices
Best Practices
Was this page helpful?
Meta Technologies
Messenger
Audience Network
Oculus
Workplace
Tools
Free Tools
Facebook Pages
Instagram Profiles
Stories
Shops
Meta Business Suite
Facebook Ads
Messenger Ads
Instagram Ads
Video Ads
Ads Manager
Goals
Set Up a Facebook Page
Getting Started with Messenger
Build Brand Awareness
Promote Your Local Business
Grow Online Sales
Promote Your App
Generate Leads
Measure and Optimize Ads
Retarget Existing Customers
View All Goals
Business Types
Small Business
Large Business
Agency
Media and Publisher
Creator
Developer
Startup
Business Partner
Industries
Automotive
B2B
Consumer Packaged Goods
Ecommerce
Education
Entertainment and Media
Financial Services
Gaming
Real Estate
Restaurants
Retail
Technology and Telecom
Travel
Inspiration
Meta Foresight
Creative Guidance
Business News
Case Studies
Video
Events
Creative Hub
Skills and Training
Online Learning
Certification Programs
Webinars
Guides and Resources
Ads Guide
COVID-19 Resources
Safety and Integrity
Business Equality
Find a Business Partner
Sitemap
Business Help Center
Create and Manage Accounts
Publish and Distribute Content
Advertise
Sell on Facebook and Instagram
Monetize Your Content or App
View All Articles
If you're looking to completely customize your Facebook privacy, you're expected to work your way through 40 entries, many of which list multistep instructions for changing a single setting.
Wouldn't you rather spend your time on Facebook sharing pictures of your fast-food lunch or watching videos of grumpy cats? If so, you can skip scrolling through screen after screen of shag-carpet text and instead zip through this six-step Facebook privacy refresher.
Step one: See your profile as others see it
Once you know how forthcoming your current Facebook setup is, you can decide what changes you need to make to your share settings. To view your account as others view it, sign into your account, choose the gear icon in the top-right corner, click Privacy Settings, and select Timeline and Tagging in the left pane.
Next, click View As to the right of "Review what other people see on your timeline" in the "Who can see things on my timeline?" section.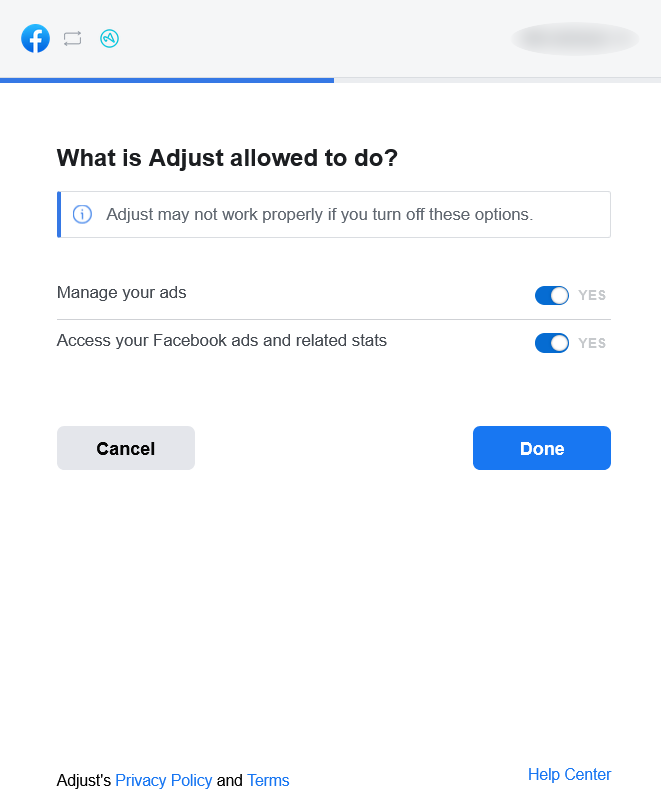 Click Okay to close the pop-up window, if necessary. Your timeline will then appear as the public sees it.
If you've limited access to your timeline to friends only, the public will see only your profile and cover photos, a link for contacting you (which you can limit to friends of friends), the people you're following, and the groups you belong to. To view your profile as a particular person sees it, click View as Specific Person at the top of the window and enter the person's name.
To change who can view your timeline, return to Facebook's Timeline and Tagging settings and click Edit to the right of "Who can see posts you've been tagged in on your timeline?" and "Who can see what others post on your timeline?" Make your selections for each setting on their drop-down menus and then click Close.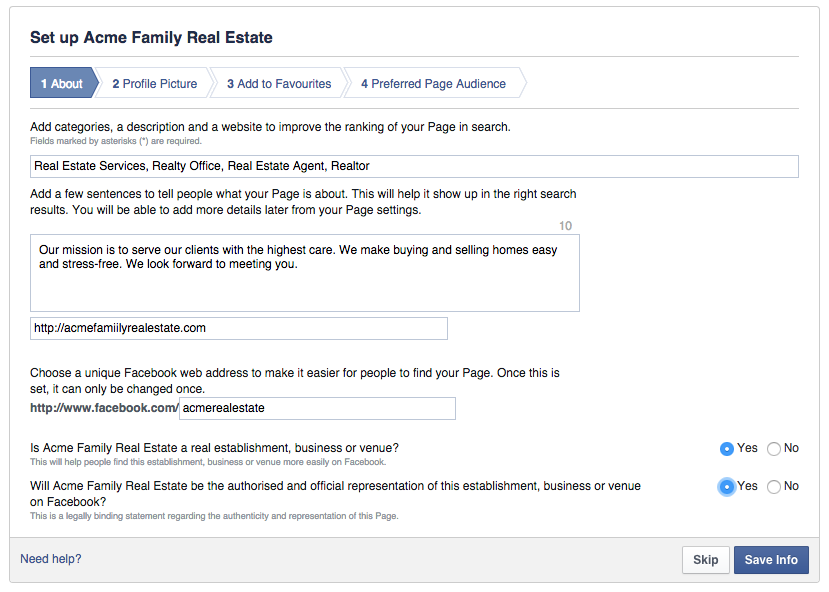
Step two: Make sure you're browsing securely
Last month Facebook made secure browsing the default for all users. To ensure you're using a secure connection whenever one is available, click Security in the left pane of Facebook's Account Settings and make sure Secure Browsing is enabled.
The security settings also let you enable log-in notifications and approvals, and view and edit your recognized devices and active sessions. To remove a device, click Edit to the right and then Remove next to the device's entry. Likewise, to end one or all active Facebook sessions, click Edit to the right of Active Sessions and choose End Activity or End All Activity, respectively.
End some or all active Facebook sessions by clicking Edit to the right of Active Sessions in the Security Settings and select either End Activity or End All Activity. Screenshot by Dennis O'Reilly/CNET
 Screenshot by Eric Franklin/CNET
Step three: Limit access to you and your Facebook stuff
To restrict access to your past and future Facebook posts, click Privacy in the left pane of the Account Settings. Then choose Limit Past Posts under "Who can see my posts?" and Edit to the right of "Who can see your future posts?" in the same section. A warning appears when you attempt to limit access to all your past posts at once rather than changing the setting post-by-post.
The options under "Who can contact me?" let you limit friend requests and filter the messages you receive. You can also restrict who can look you up by e-mail address and phone number, who can look up your timeline by name, and whether your timeline will link to search engines.
Step four: Tame your timeline and tags
You've already determined who can view your timeline (see step one), but you can also block friends from adding to your timeline and review photos someone attempts to tag you in via the Timeline and Tagging Settings. The only two options for "Who can post to my timeline?" under "Who can add things to my timeline?" are Friends and Only Me. To enable review of posts your tagged in before they appear on your timeline, click Edit to the right of the entry and select Enable in the drop-down menu.
Under "How can I manage tags people add and tagging suggestions?" you can enable the feature that allows you to review tags people add to your own posts before they appear, set who besides the normal audience sees the posts you're tagged in, and decide whether tag suggestions appear when photos that look like you are uploaded.
Step five: Don't let your apps run amok
Some Facebook apps grab all the permissions they can, including access to your information and the ability to post photos and status updates "on your behalf." For example, the IFTTT app lays claim to your complete profile and all your activities, as well as some of the profile and activities of your friends.
To review your Facebook app permissions, click Apps in the left pane of the Account Settings window, choose Edit to the right of the app's entry, and either change the app's visibility via the drop-down menu, or click "Remove app" at the bottom of the entry. You can also click "Report app" to let Facebook know the app is spam, inappropriate, or requesting too much information, or to contact the developer to report a bug or abusive content, or for another reason.
To prevent other Facebook users from volunteering your information to the Facebook apps they use, click Edit to the right of "Apps others use," uncheck the categories of information listed, and click Save Changes.
Step six: Opt out of Facebook ads
Facebook currently doesn't let third-party apps or ad networks use your image or name in ads, but that may change in the future. To opt out ahead of time, click Ads in the left pane of the Account Settings window and choose Edit in the Third Party Sites section.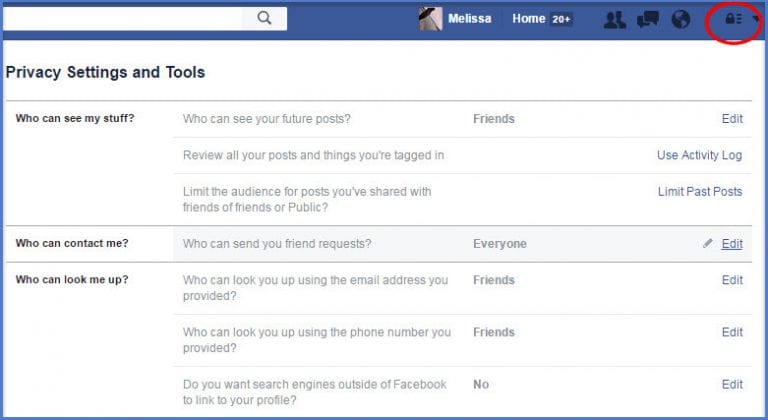 Select "No one" in the drop-down menu under "If we allow this in the future, show my information to" and then click Save Changes.
To exclude yourself from Facebook's social ads, click Edit in the Ads & Friends section, choose "No one" on the drop-down menu next to "Pair my social actions with ads for," and select Save Changes.
If you used Facebook you know for years that your account contains a veritable treasure trove of information that thieves would just love to exploit. It may go without saying, but keeping your Facebook account secure will go a long way in protecting you from having much of your private life exposed to questionable elements.
Luckily, Facebook has a lot of tools to protect your account. Here's what you should do.
Let's start with one of the most important: choosing a strong password . Your password is the first and often the best defense mechanism to protect against invaders, so be careful. Make sure it's long (12 to 14 characters or more), multi-character, and doesn't contain personal information as it can be easily changed. socially developed .
RELATED: Why you should use a password manager and where to start
But most importantly, do not use this password anywhere else on the Internet. You should use a different password for every account you have, and ideally they should all be random strings of characters. That's why the use password generator and manager like LastPass this is by far the best way to secure all your accounts.
Finally, beware of others trying to get your password through nefarious methods. Do not click on untrusted links, such as those sent by email that ask you to enter your password.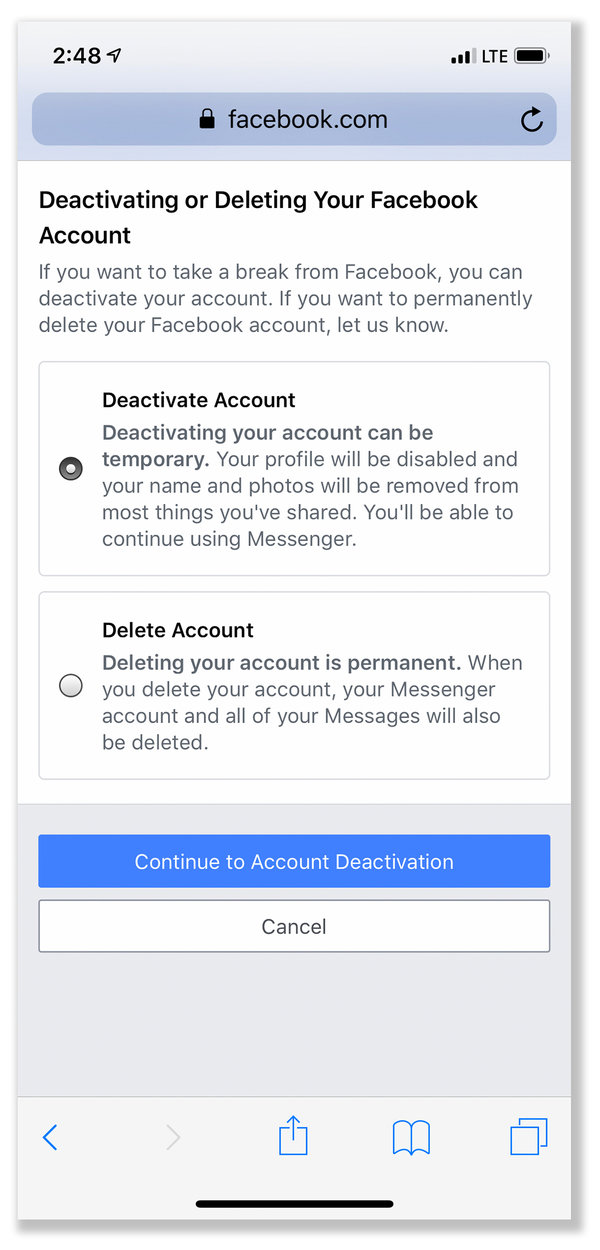
Got it all? Good. Let's change your password to something more secure. All the settings we will be talking about in this article can be accessed using a web browser by clicking on the little arrow in the top right corner and selecting "Settings" from the drop-down menu. Do it now.
On the mobile app, tap the "More" button in the bottom right corner, then scroll and tap "Settings." In the pop-up window that appears, select "Account Settings".
(In this article, we will use screenshots from the web browser. You will not find significant differences between it and the mobile app, although we will note them where possible.)
You can change your Facebook password in the "Password" section of your privacy settings. Use your password generator and password manager to save your password in a safe place and you're done.
Believe it or not, a strong password is not enough to really secure your account. It's just as important these days to enable a security feature known as two-factor authentication, which Facebook calls "Login Confirmation."
RELATED: What is two-factor authentication and why do I need it?
The principle is simple: you log in with what you know (your password) and something that you have - usually this is your phone. After entering your password, Facebook will send a code to your phone that you enter on the site to verify that you are who you say you are. That way, if someone knows your password, they still won't be able to log in without having your phone. You can receive this code as a text message or through an authentication app on your phone, such as Google Authenticator or Authy . You can learn more about two-factor authentication and why it's so important Here .
This feature - also called Login Confirmation on Facebook - can be enabled in Settings > Security > Login Confirmation. Check the "Require a login code to access my account from unknown browsers" box.
The next time you log in, you will be prompted for a verification code that needs to be sent to your phone.
After entering the code, you'll be asked if you want to keep this browser so that you don't have to enter a verification code the next time you sign in to Facebook using this browser.
This feature can be disabled at any time in the authorization settings. However, we recommend leaving them enabled and getting used to them. This is an important security feature of almost every service these days.
Note. If you're trying to sign in to another app with your Facebook account, but it doesn't support login verification codes, you can use the app's one-time password from the App Passwords option in Facebook's security settings.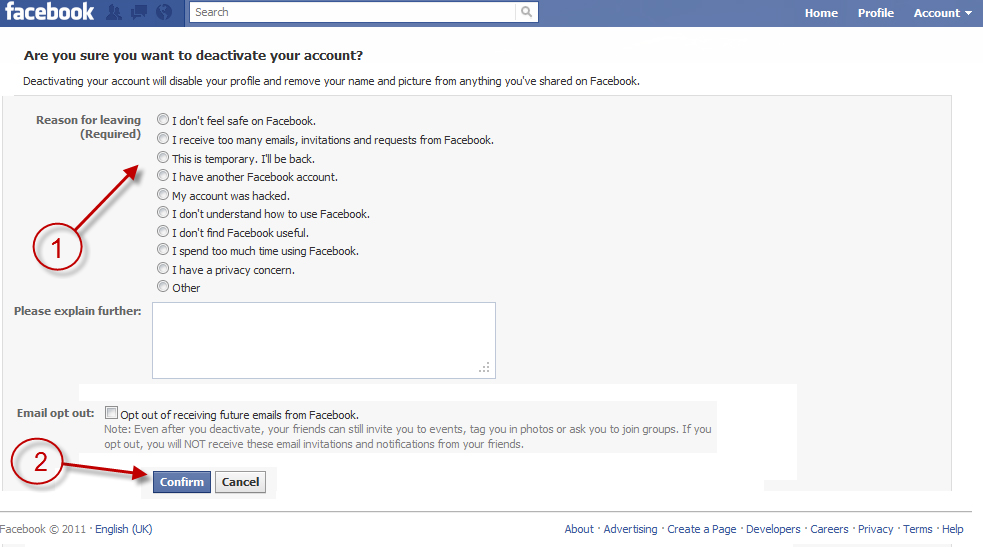
Strong passwords and login claims are the two best ways to truly secure your Facebook account, but there are other methods you can use to give yourself peace of mind. Login Alerts is one such tool. You'll find them under Settings > Security > Login Alerts.
You can choose to receive notification on Facebook, via email, or as a text message. The next time someone logs in from an unknown device or browser, you'll be notified.
It's also a good time to see which machines are logged into your Facebook account . If there are any entries you are unfamiliar with, you can log out remotely. (Most likely, you will only see your cars here, but you can never be too careful).
Go to Settings > Security > Where are you signed in and click End action for any unfamiliar devices or locations. If you don't want to go through and view all the sessions in the list, click "End all activities" to log out on all devices in the list.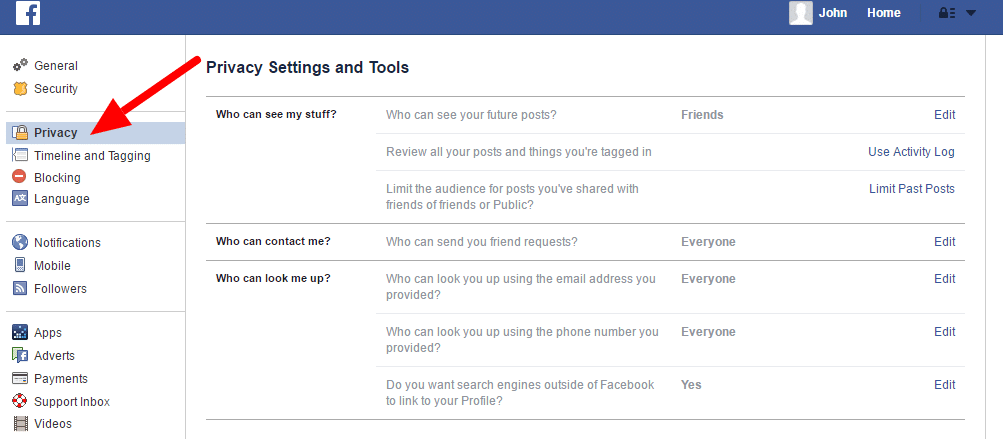
You don't need to save any changes in this step, once you've completed the action for the session, it will be done.
Note. If you log out of your session, you can still log in to this computer without entering the login verification code. You can revoke access for any sign-in confirmations - for example, if your laptop or phone is stolen - in the "Recognized Devices" section of your security settings. Simply remove any browser or device you previously approved, then click Save Changes. The next time this device tries to sign in, it will need the sign-in verification code again.
Other apps may also have access to your Facebook account. This is what allows you to use Facebook chat in the desktop chat app, or view Facebook messages in Flipboard. But these apps are like dust bunnies - they just seem to multiply in huge numbers over time.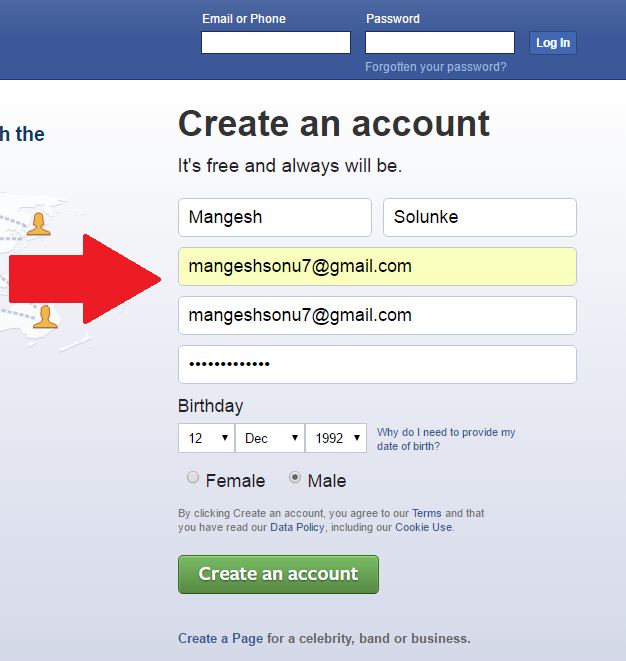 Go to Settings > Apps and delete anything that seems suspicious or that you no longer use.
To uninstall an app, just hover over it and click the "X" on the right side.
Alternatively, you can click the Edit button (next to the Delete button) to change the information you provide to the app.
At the bottom of the app settings screen, you can change the settings for a number of different items.
Here's what each of these options mean.
Apps, websites and plugins
Disabling this setting will completely disable Facebook integration with third-party apps, websites, and plugins. This means you won't be able to do things like sign in to your Facebook account from websites or apps, games, and other things.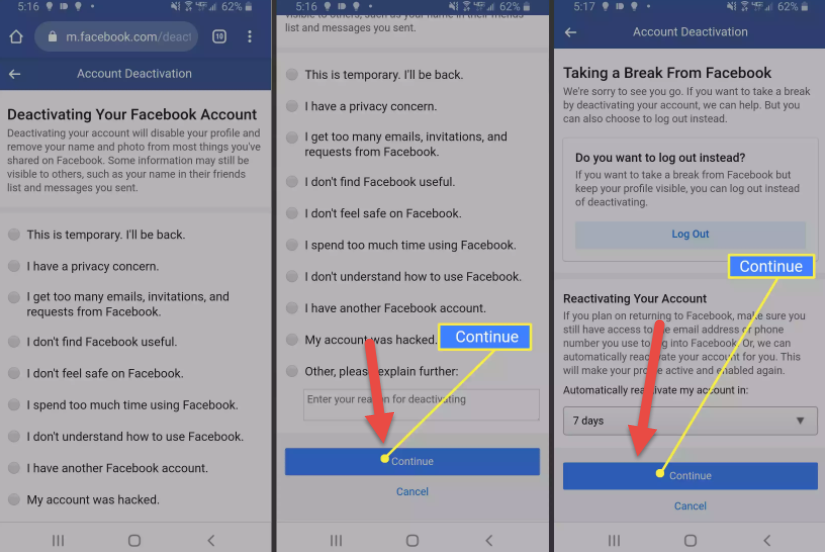
Click the Change button to learn more and disable this feature.
Game app notifications
Hate getting notifications from friends who play games and want you to play games too? Turn them off here.
Other applications
When you connect the app to your account, it can sometimes see information about your friends. Thus, when your friends use the apps, they can sometimes see information about you. Click "Edit" in this section to change what your friends' apps can see about you.
All of these categories appear to be subscription deals, so you can safely leave them unchecked, but it never hurts to know what's what.
Old versions of Facebook for mobile devices
This setting controls the privacy of everything you post using older, legacy versions of the Facebook mobile app. Basically, if you're not using a BlackBerry or any other device, you have nothing to worry about.
The settings we have highlighted are the most important settings that everyone should use. The rest of the security settings are up to you, but it's worth going through and checking which ones might be useful to you.
Hope you never lose access to your Facebook account. If you use a password manager (as we recommended above - you installed it, right? Do it now!), you will never forget your password. And even if you do, you can always reset your password... as long as you have access to your email account.
RELATED: How to Use Facebook Trusted Contacts to Access a Banned Account
If for some reason you lose access to all those things Facebook Trusted Contacts feature can help if you set it up beforehand. Trusted Contacts lets you choose from three to five friends you can call if you don't have access to your account. They will then give you the codes you need to return.
Just go to "Your Trusted Contacts" on the security settings page to set this up.
Be sure to let your trusted people know you're using them, and if anything ever goes wrong, they should make sure it's you who's calling before handing over your account keys.
Most users won't use this, but if you're interested in end-to-end encryption of Facebook notification emails, you can add your OpenPGP public key with this option.
This might be a bit advanced and you might not even get notification emails, but if you do and want to encrypt them then you can learn more about it .
Authorization with a profile image
This is a newer feature introduced by Facebook that allows you to simply click your profile picture instead of entering your password.
This way, anyone with access to your browser can click on your image and log into their account. This is probably a bad idea, so we don't recommend enabling it.
RELATED: How to set up a Facebook account to delete or keep your memory after you die
Have you ever wondered what happens to your Facebook when you die? That's what old contacts are for . You designate someone (such as a spouse or family member) as your former contact, and if you die, they can do things like pin messages to your timeline, reply to friend requests, and update your profile picture. They cannot post anything to your timeline or view your messages.
The legacy communication option is important because when you leave, hackers can potentially gain access to your account and you won't be around to prevent or respond to intrusions.
In addition, you may choose to delete your account upon your passing.
Disable account
This disable option is usually used to give you a break from Facebook, but is also useful if your account has been hacked. It's easy enough: just click Deactivate, enter your password, and read the instructions to enter it.
Finally, don't forget about basic, general security practices. If you're logging into your account from a public computer or someone else's device, make sure you always log out and, if you can, clear your history when you're done (or, better yet, use private mode ). Never leave yourself logged into your account, even if you're only gone for a few seconds. Make sure your computer and browser are always up to date, and have good protection against viruses and malware installed permanently.
Of course, it's all about keeping intruders out of your account.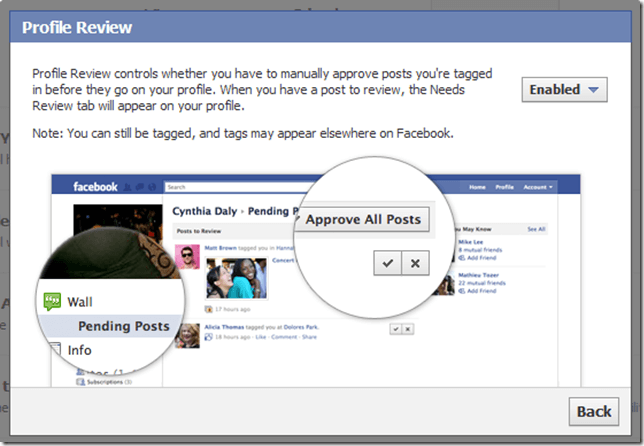 But if you're also concerned about your privacy on Facebook, that's a whole other topic. See what we've done in the past - you can hold back messages you're tagged in , block people from posting on your timeline , and even make all your old Facebook posts more private . Want to clean up some nasty stuff from your past on Facebook? Here is a little trick for that . Be sure to check out all the "Privacy" options in Facebook settings to see everything you can do.
So you have a Facebook account. You started it a few years ago, set it up to your liking, and since then you haven’t entered the “Settings” section. Or maybe you just recently registered on the social network and have not yet had time to figure out what's what. In any case, this post is for you.
The fact is that Facebook regularly updates its security and privacy settings (some will say even too often). Therefore, it makes sense to periodically check whether something new and useful has appeared there. In this post, we'll show you how to properly set your security settings and how to protect your Facebook account.
There are two ways to get to Settings. The fastest is to click on the globe icon in the upper right corner (with this button you usually view the latest alerts) and select "Settings" on the right. There is also a classic way: click on the arrow a little to the right and select "Settings" at the bottom of the drop-down list.
Next, go to the "Security" tab. Here you will see a list of settings that should protect your account. To read a detailed explanation of each setting, you will need to click on the "Edit" button.
Let's go over the settings that are available here - they really deserve it.
Login Alert - Facebook keeps a list of the computers, gadgets, and browsers you typically use when you log in. If the social network registers authorization from an unfamiliar device or browser, you will receive an email notification. So you can find out in time that someone else has logged into your account and change your password. Healthy.
Login confirmation , or two-factor authentication for Facebook. When you enter the social network, you receive an SMS message with a short code that you need to enter along with a password. We highly recommend turning it on!
Here you can also get a list of 10 “spare” one-time codes in case you have to log into Facebook in such circumstances when you cannot receive SMS. At first glance, this is a rather exotic situation. But imagine: your smartphone has been stolen, and you urgently need to change your Facebook password, and SMS messages are sent to the same smartphone… This is where these codes can come in handy.
Code generator - this feature allows you to use codes generated by the Facebook mobile application instead of SMS, or link a security check to another third-party application. After all, if you're already using a handy generator for another service (like Google Authenticator), why not link Facebook to it too?
Whether or not you use a code generator is up to you. But we recommend at least trying it.
App passwords - This feature is needed if you use your Facebook account to log into third-party applications, you have two-factor authentication enabled and all this together does not work or works poorly. In this case, you can get predefined codes for each of these applications. You can read more about this here.
Public key . Here you can publish your OpenPGP public key and it will be displayed in your account information. Why you need it: Using the OpenPGP public key, your friends can send you emails in encrypted form, so that even if this letter falls into the wrong hands, attackers will not be able to read it.
It works like this. You start two keys - public and secret . Public is used for encryption, everyone knows it. But for decryption you need a secret key, which only you have. This is called "asymmetric encryption": we encrypt with one key, we decrypt with another.
It doesn't work very well in practice, but it's the only way to truly protect your email communications. And even if someone hacks into your mail, he will not be able to read the letters - the secret key is never transmitted anywhere, so only you have it.
By the way, you can also check this box to have Facebook encrypt all messages it sends you via email with a PGP key.
Your trusted contacts are the friends who will verify your identity if you lose access to Facebook. You will need to ask them for a one-time password and enter it in order to recover your account. Here is a detailed explanation of how this happens.
Keep in mind that the safety of your account depends on a trusted contact. So you should choose only truly reliable people.
Trusted Devices is a list of trusted browsers and apps on various devices that you use to log in to Facebook all the time. As long as you connect to the social network from one of these devices, Facebook will not send you confirmation requests.
By the way, do not forget - just in case - periodically clean this list. And be sure to remove the device in case of loss, theft, and so on.
Where did you come from is a very handy feature that allows you to see which devices you are currently logged into Facebook on. Logged into a social network from a friend's computer and forgot to log out? Did you use a social network in a computer club? Do you see a suspicious session in the list of connections that has nothing to do with you? Close all these sessions and, if necessary, change the password.
Guardian . We leave behind a very different legacy, including digital. Guardians are users who can take care of your page after you die: pin a post to the top of your Timeline, respond to new friend requests, or update your profile picture. This person is not will be able to post for you. Read more here.
Deactivate account . If you want to take a break from Facebook, you can deactivate your account. Your entries will no longer be visible, but you can always return whenever you want - all you need to do is log in to Facebook.
You can actually delete your Facebook account, but you won't be prompted to do so in the settings. Here is a secret link to delete your account - no thanks.
Open the General tab. In addition to personal information, here you will find information about the last time you changed your password. We strongly advise you to do this from time to time - and, of course, do not forget that the password must be strong.
In addition, there is also a "Download a copy of your Facebook information" button. Often we post important files on social networks, such as photos and videos from a wedding or pictures of a newborn baby.