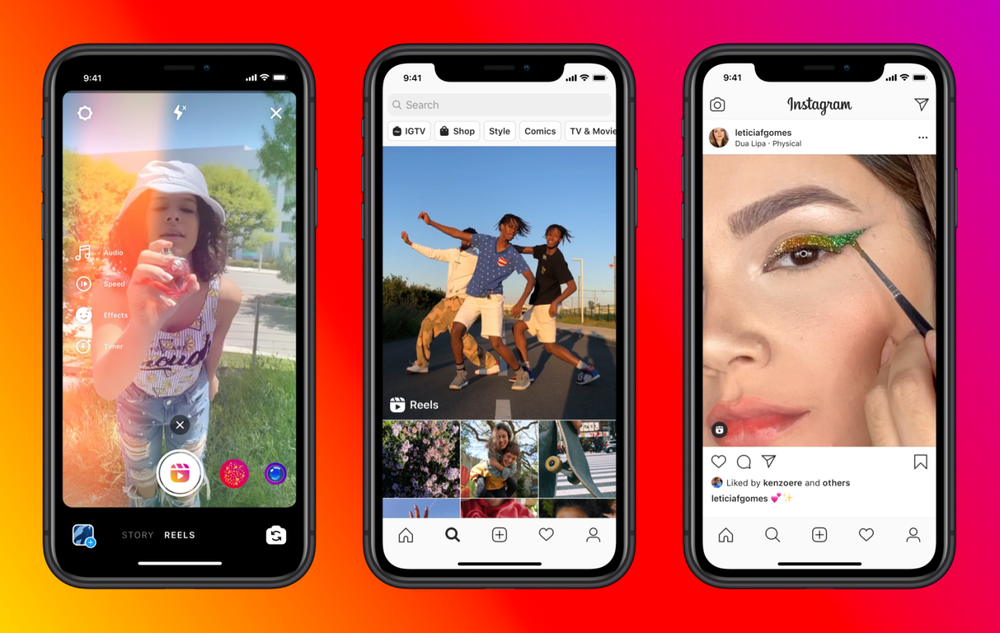
Everyone is talking about how the Instagram algorithm loves Reels, and that using the format can improve engagement and reach.
But getting started with such a creative medium can be intimidating. We’re here to help with an Instagram Reels tutorial that will help you master 11 essential editing tools and skills needed to create engaging content.
Keep reading to find out how to edit your videos for best results and kickstart your growth. Or, if you prefer, watch the video version right here:
1. Add music to Reels
2. Add text to the beat
3. Make multi-scene how-to Reels
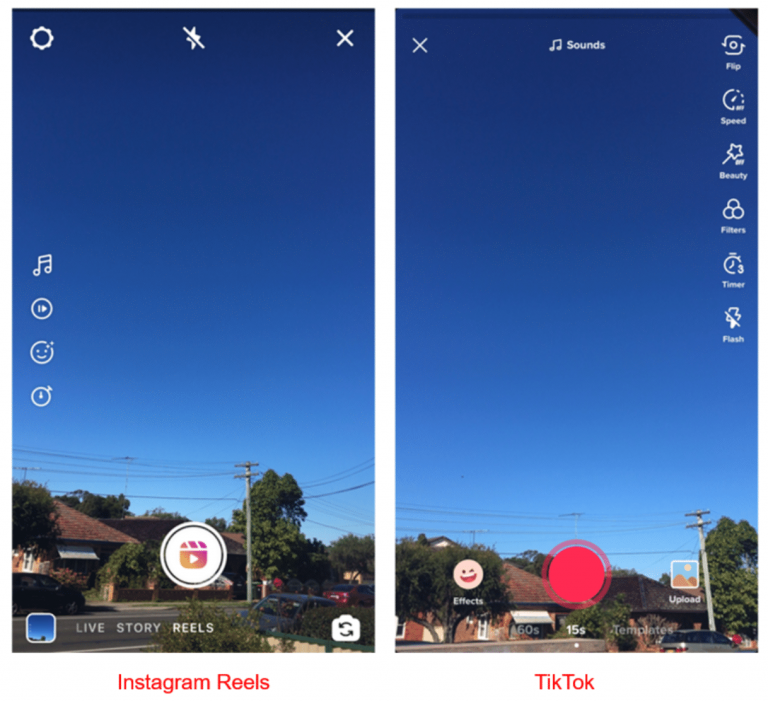
4. Record Reels hands-free
5. Find your favorite Reels filter
6. Use the Align tool
7. Make timelapse Reels
8. Add voiceover to Reels
9. Use the Remix feature
10. Use the green screen effect
11. Use Reels templates
Bonus: 14 Time-Saving Hacks for Instagram Power Users. Get the list of secret shortcuts Hootsuite’s own social media team uses to create thumb-stopping content.
1. Add music to ReelsWhen browsing the Reels tab on Instagram, you’ll notice that most videos have audio clips — most often songs or voiceover — playing over them. Adding music to Reels is one of the basic editing skills you should know if you want to create engaging content.
How to add music to Reels
 Add text to the beat
Adding captions to your video content serves multiple purposes:
One common move on Reels is to have text appear and disappear on the beat — follow the step-by-step instruction below to make it happen!
How to add captions to Reels
The beauty of Reels is that you can quickly stitch together clips to create a mini movie. You can use your Instagram camera to record fresh content or start with pre-recorded video clips.
Combining multiple clips will allow you to create engaging how-to videos and share some of your expertise with your Instagram audience.

No need to hold down the record button for the duration of your recording. The hands-free function allows for you to capture a moment from further than an arms-length away.
If you’ve got a fashion brand and want to show off your latest outfits in a full-body shot, or offer a mural-painting service and want to capture a moment of your production process, give hands-free recording a whirl!
Bonus: 14 Time-Saving Hacks for Instagram Power Users. Get the list of secret shortcuts Hootsuite’s own social media team uses to create thumb-stopping content.
Download now
How to record Reels hands-free
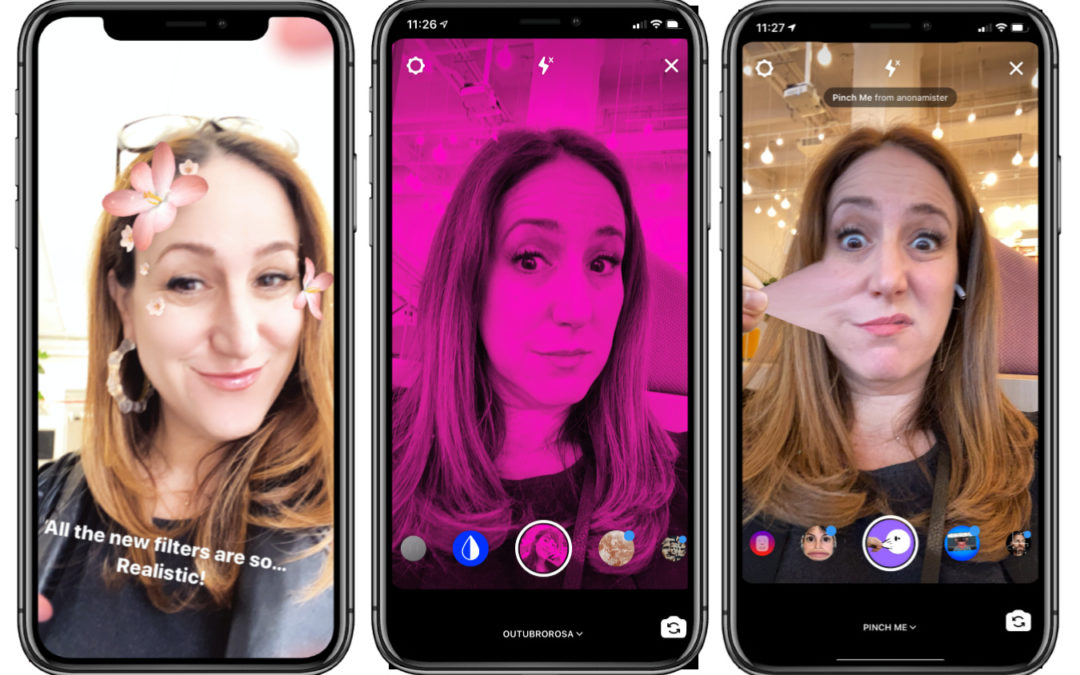
One of Instagram’s coolest features is its huge library of filters and AR effects. And with Reels, you’ve got access to them all.
When creating Reels, don’t be afraid to get a little silly and use effects that capture the spirit of your brand, whether that’s an over-the-top beauty filter or an avant-garde blur effect.
How to add filters to Reels See one you like? Tap Try It to test it out right away. Want to save it for future use? Tap the down arrow icon (save to camera) to add it to your filter rolodex.
The Align tool will allow you to add (or remove!) an object or person between scenes of your Real to create a fun appearing (or disappearing!) effect.
By starting a scene exactly where the previous scene ended, it’ll appear as if your outfit change (or begrudging boyfriend or statement hat) has magically popped into frame.
How to use the Align tool
Have something longer than 60 seconds to share? With timelapse recordings, you can squeeze more into your Reels.
Use timelapse videos to demonstrate a process, whether it’s pulling together an easy smoothie recipe or sharing your oh-so-Marie-Kondo folding technique.
The voiceover feature allows you to record voice overtop of a fully recorded video — a nice way to add an overarching narrative to a compilation of clips.
Maybe you’re explaining some more background info about a new makeup line you just launched, or sharing details about a sale overtop of cute shots of your boutique: if you’ve got something to say, this is your time to shine!
How to do the challenge Record your visual content using all your newly acquired filter, music, or speed-manipulation skills and tap the arrow icon to proceed to the editing screen.
Instagram recently added a Remix feature to Reels… so now’s your chance to record a video side-by-side with another Reel. Browse other Reels to find something that inspires you to comment, contribute or react, and start your beautiful duet.
How to Remix another creator’s Reel
The green screen effect in Reels is a game-changer. Get playful with the background of your choosing — video or photo! — to add a fun, faraway locale or a branded graphic behind you.
How to do the challenge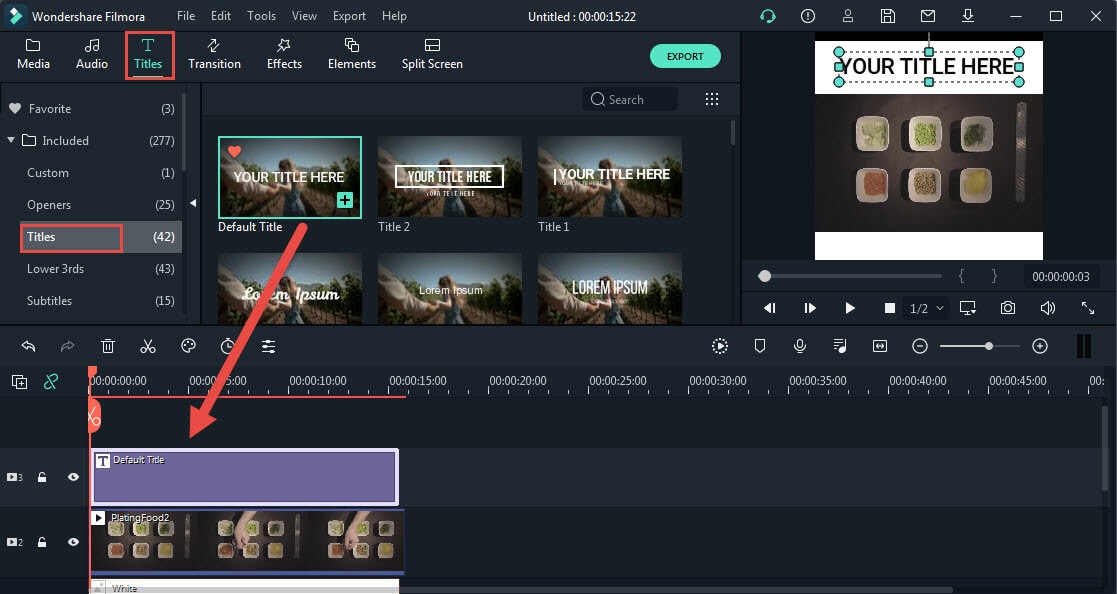
 Tap Share To when you’re ready to post.
Instagram Reels templates allow you to create a Reel using pre-set music and clip durations from existing Reels. You can use templates from any Reels that have music and at least three clips. Reels templates mean you can jump on trends faster than ever — no more wasting time editing clips or selecting music to match!
How to use Reels templates
Easily schedule and manage Reels alongside all your other content from Hootsuite’s super simple dashboard. Schedule Reels to go live while you’re OOO, post at the best possible time (even if you’re fast asleep), and monitor your reach, likes, shares, and more.
Get Started
Save time and stress less with easy Reels scheduling and performance monitoring from Hootsuite. Trust us, it’s reely easy.
Free 30-Day Trial
I am sure you know that you can make your photos and videos more artistic with a lot of Instagram editing magic. Instagram offers thousands of filters and effects to add the needed oomph to your photos, videos, stories, reels, and live videos.
Tons of apps offer you some beautiful filters and effects to use on your visuals, but Instagram ones still stand out. With Instagram, you can create a piece of art within a few seconds without dropping a sweat.
So, how can you add effect to your Instagram stories, reels, or live videos?
So, let’s dive in and learn how to add effects to your Instagram stories, reels, or live videos to make them look more dramatic and immersive.
Table of Contents
Instagram Effects are different from filters. You can only apply Instagram effects to your stories, reels, or live videos, unlike filters that you can apply to your posts.
When you use Instagram filters, you change the color or resolution of a picture, making, for instance, it a little brighter, warmer, vibrant, or colorful. The effects, however, can take your visuals to the next level.
Effects on Instagram can add dramatic elements to your stories, reels, and live videos. You can access them on your Instagram camera screen while creating a story, reel, or live video.
Effects can turn you into an anime doll. Similarly, if you want to see how you will look with lip fillers or botox, then Instagram has effects to show you.
Some effects add aesthetics to your videos, like snowflakes or raining glitters.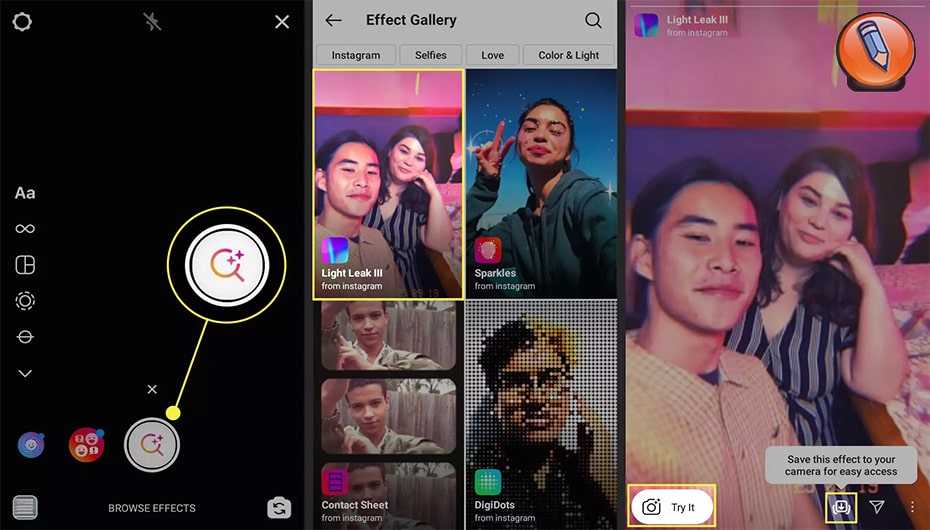
Some are just creative effects like rainbow makeup for your face.
Some story filters enable you to play games, like “Which Disney Princess Are You?” or Soulmate Radar which tells you, “Where is Your Soulmate?”
There are thousands of effects on Instagram. Most Instagram Creators have also created their own AR filters that you can use.
How To Add Effects on Instagram?To add effects to your story, live videos, or reel videos, you need to follow these steps:
You can also browse more effects by swiping the effects tray to the right end and selecting the “Browse effects” option. When you tap on it, it will show you effects for different categories.
To Sum UpWith Instagram Effects, you can jazz up your Instagram stories, reels, or live videos.
You can locate them when you launch the Instagram camera to record a story, reel, or live video.
A whole bunch of effects will pop up on your screen to choose from before recording the video. Select the one you like, and tap or hold the button to record your visuals using the selected effect.
FAQsYes, you can. Follow these steps:
1. Tap on the plus icon.
2. Hit any option (except Post).
3. Tap the album icon in the bottom left corner, and select the picture or video.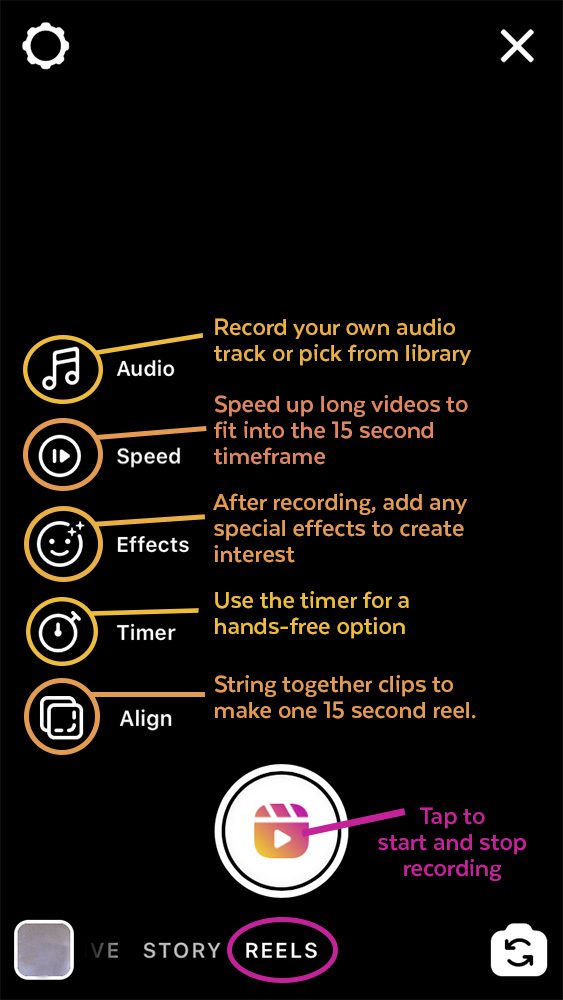
4. Click on the three stars icon on top to launch effects.
5. Swipe right to choose the effect.
6. Tap on “Done” and share or save it to your device.
If this happens to you, do any of these:
1. Try clearing the cache.
2. Update your Instagram app.
3. Grant location permission.
4. Uninstall and reinstall the app.
5. Select the effect or filter from someone’s else profile.
Within months of its launch, Instagram Reels has become one of the go-to spaces for thousands of content creators around the world. Given how Instagram's algorithms promote fresh new content to users who don't need to be followers. Reels has provided us with a fantastic opportunity to become a digital media influencer.
However, due to increasing competition, you should be careful about the quality of the short videos you post on Reels. Brand new edits and appropriate music are some of the elements that can help you here. Thankfully, Instagram has included several options for adding music and effects to Instagram Reels videos. So, you should make the most of these elements.
In this article, we have prepared a step-by-step and detailed guide to add music and effects to Instagram Reels. Regardless of your experience with Instagram Reels, you may find these tips helpful.
Making a video on Instagram Reels is like making almost everything else on a content sharing platform. To do this, you need,
These steps should take you to the camera interface you usually see on Instagram. However, you can also find a tag called Reels at the bottom.
Instagram gives you two ways to create a video in Instagram Reels.
If you want to select a video from the gallery, you can click the "Gallery" button on the bottom left of the screen. This will show all the videos you have taken with the system camera. You can also search for videos in other folders.
Now you can select a video, crop it to your size and click the "Add" button. Once you've done that, you should be back at the video editing interface in Reels again. Now this is where you add the music and effects that make or break your Insta Reels video.
Whether you want to record a video or take it with you, the steps below will help you add the necessary music/effects to Instagram Reels.
That's it. You have added music to your Instagram Reels video.
If you have used Instagram and Instagram Stories before, you know that the platform offers a rich collection of effects, filters and overlays. Adding one of these things to your small video on Instagram Reels doesn't take much effort. To do this:
Keep in mind that Instagram is always updating its collection of effects. Every day you can find new effects in the library. You can select the appropriate effect and press and hold the "Record" button to record video from the drums. After you finish recording, you should see an editing interface to trim or adjust the video content a little more.
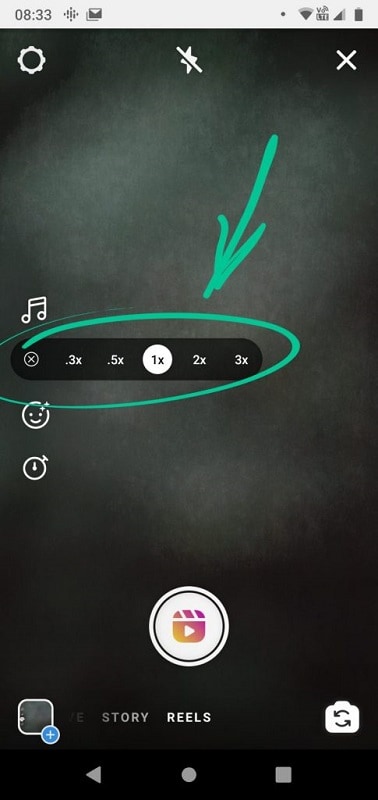
You can also control other aspects of your reel video, such as playback speed and timer, from the sidebar. You can use these features to change the tone of the video and make the recording process easier in general.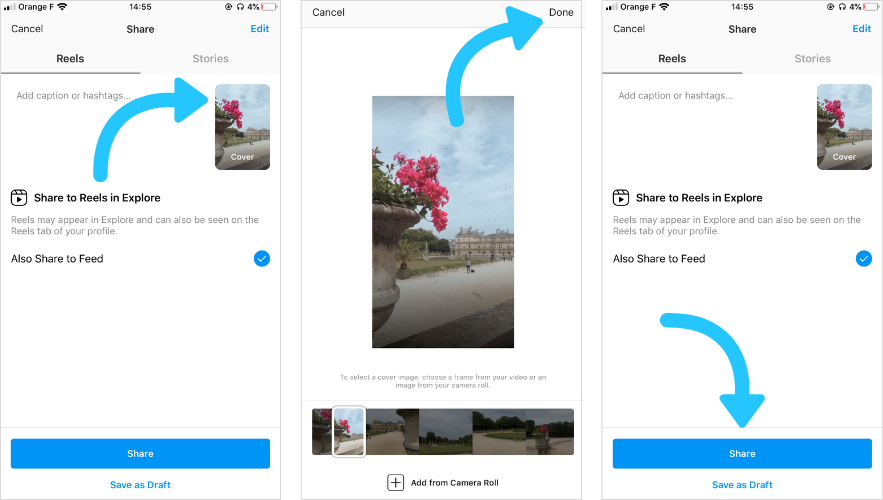 It is also possible to align the video to a part of the screen.
As we said, this is completely optional. If you want to make an informative video with good video effects, you can skip this section altogether.
This will take you to the last screen of the reels where you can write a title, choose a cover art and post videos to your followers or the public. Wasn't it easy?
We hope this guide will help you add the right music track and effect to your Instagram Reels video. As we said earlier, don't overdo this aspect. Instead, try selecting a track and a filter to enhance what you're doing on screen.
It works in countries where Instagram music is available. With the help of Reels create short creative videos. This is an analogue of TikTok, where it is also possible to add music from a large database, apply effects and mount everything right in the application.
Click on the Play button, which is located in the center of the bottom menu. You will see the Reels feed, which contains videos of other users.
When you post your first video, a separate tab will appear. As long as the blogger does not have Reels in their account, this tab will not exist either.
When TikTok gained popularity, everyone wrote about how easy it is to get followers on this platform. At the same time, Instagram complained that it was necessary to pay the site for displaying posts even among subscribers. Now Reels is the TikTok of the past couple of years. It's less likely to wake up popular the day after a viral video is posted, but right now it's a good channel to get free followers and account attention.
Here's what it says about Reels' display in the official Instagram summary:
Some more important facts:
 If you post a video to the feed, subscribers will see it.
 More details can be found in the SMM courses.
There are 4 ways to open the Reels editor:
Let's go from the profile page. To do this, click the "+" in the upper right corner and select "Video Reels". The video editor will open.
When creating Reels, you can choose between shooting a new video clip (Play icon in the center) or loading a pre-made file from the camera album (a square with a plus in the corner):
New video can be recorded in parts or all at once in one frame.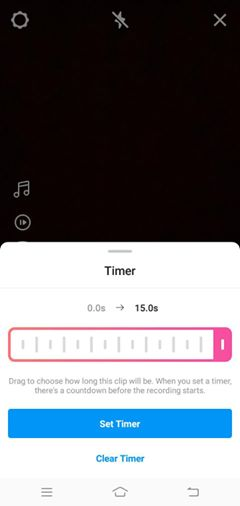 You can also mix recorded and downloaded clips. In total, the duration of all parts cannot exceed 60 seconds. If you upload a longer video, it will automatically be cut off.
There are eight basic functions on the main screen. Of these, 6 on the side menu:
And two on top:
First things first.
You can also use audio tracks from other users' Reels. Click on the line with music, and then "Use audio track."
Instead of music, you can also use your own sound recording.
 Instagram won't force you to shoot videos to the exact second - it's just a handy feature to help you figure out the length of the video.
 If you are shooting in selfie mode, the screen will increase the brightness to the maximum and illuminate the face.
 If you want to trim or delete any of the footage you've taken or added, click the back arrow to the right of the record button. Click on the passage you want to edit. When you have selected an excerpt, click on the scissors to cut it, or on the wastebasket to delete it.
Once you have selected or captured a video, you can add stickers, effects, text, and draw or overlay text tools, Instagram stickers are available.
 Handy if you're telling a story or reviewing a product. If you're shooting a video with voice-overs or dialogue, don't forget to add subtitles to your video. This is useful when your video is being watched without sound.
When adding text to a video, consider its position. When you share Reel on your Instagram feed, it crops it to a 4:5 aspect ratio. To avoid cutting off important text, place it close to the center of the screen.
When you're done, you can edit the title picture with a thumbnail or add cover art from your camera album.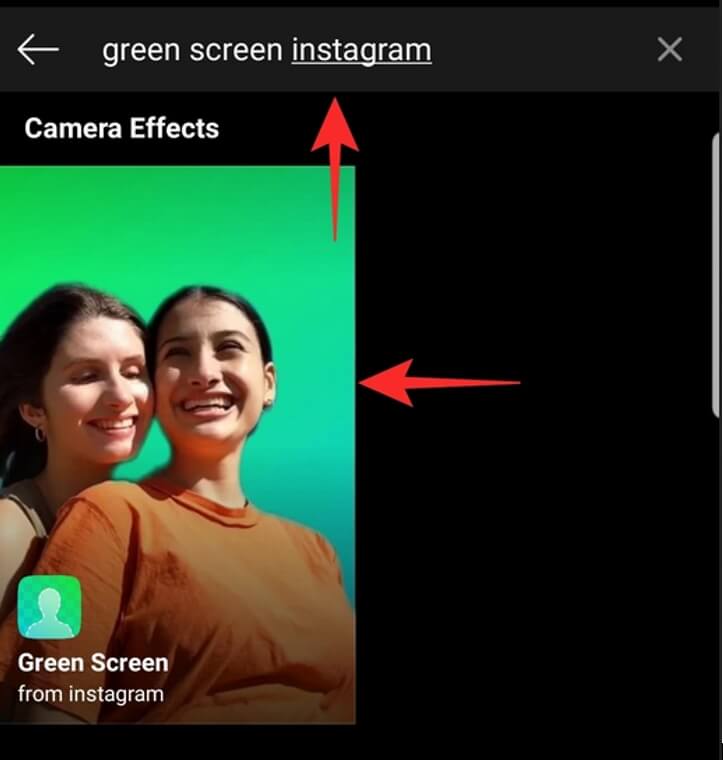 If you want to keep the Instagram aesthetic, upload a brand-appropriate picture from the camera album.
You can add or not add a video to the subscriber's feed at your discretion. If you remove the “Also share in the feed” option, Instagram will show the video to random users.
When posting in the feed, the post can be removed from the main page of the account, leaving it only in the Reels section. To do this, click on the three dots and select "Remove from Profile Grid".
Statistics are available both in the Insights tab and for individual Reels. To see the effectiveness of a particular Reels, open the video, click on the three dots and click on the “Statistics” item. Metrics are standard: coverage, views, comments, likes, saves, reposts.
Today, Reels is the best free way to build subscribers and increase sales. What to post in Reels for business and experts? Let's consider three successful categories:
Share educational content. Especially this type of Reels is suitable for experts. Video tutorials will help you establish yourself as an expert, and they will listen to you in your community. Share top five travel tips with your users, teach them how to take the perfect photo, write the perfect headline, or show them how to wear a skirt in five different ways. Choose a topic and discuss:
https://www.instagram.com/reel/CROeo3EKmdU/ - the link will open on a smartphone instagram.com/reel/CRUgsh5iPL5/ — the link will open on a smartphone
Describe a successful case:
View this post on Instagram
Post by Katerina, creator (@kornilovakat)
 Humor
Humor Suitable for everyone. You can come up with your own joke, or you can beat something from the trends.
For example, make a list of bad advice from an expert area:
https://www.instagram.com/reel/CRbhY1PKiJj/ - the link will open on a smartphone
Or playfully show how your product solves a problem :
View this post on Instagram
Post by Damir Khalilov (@damirkhalilov)
You can play a funny situation from experience with customers and partners:
View this post on Instagram
Publication from Galina Promotion Expert (@galya.
melnikova)
Recall something that was super popular in the past:
https://www.instagram.com/reel/CRbgGUfodwR/ - the link will open on a smartphone
Or use situational marketing:
View this post on Instagram
Publication from Travel | Flights (@aviasales)
This type of Reels is ideal for stores, both online and physical.
Show several product variants at once to trendy music with interesting transitions:
View this post on Instagram
Posted by 🥬 CHUKS 🥬 (@choux.ru)
Show how your product looks like in real life, as if a client shot for you:
https://www.