Video rendering is when the computer program processes the information provided from a coded data source and collaborates it to build and display an image. Or we can say that it is the process of converting the source material, in this case, a video, into the final form.
Today we will learn how to implement Sony Vegas best render settings. You will find several versions of Sony Vegas operational out there, but the render settings are almost the same for all, depending on the existing video codec. Video rendering is a hardware-intensive process. It puts to test even the best of processors and systems, hence, you must follow the right process for how to render Sony Vegas.
Part 1: Best Render Settings for Sony Vegas
Part 2: How to Render on Sony Vegas
Part 3: Best Way to Edit and Render Video-iMyFone Filme
Part 4: FAQs
Part 5: Final Words
Before moving to the best render settings for Sony Vegas, it's important to find out the difference between real-time and advanced rendering. The distinction between them is fairly simple.
Right now, you may be reading this article on a computer, which is rendering data in real time. In other words, whatever your computer is displaying on the screen is real-time rendering. The computer processors are computing and interpreting the coded data with a remarkable speed that you won't see any lag when it displays the images, content, etc.
In advanced Sony Vegas 11 best render settings or in any other version for that matter, the software will render a video in advance because real-time rendering is not possible. For instance, when you see an animated video by Pixar or Dreamworks, they are rendered in advance. This is because the video quality is too good to be rendered in real time. Hence, the editors render the video beforehand to ensure that it plays continuously.
For great results, you need to set Sony Vegas' best render settings before giving the command.
To create a high-quality and lag-free video, set the video render settings to HD 1080-60i (1920x1080, 29. 970 fps). This also means that the video will be produced in 1920x1080 resolution at 29.970 frames per second.
The frame rate must be set at 60 frames per second, which is not available on Sony Vegas under default options. The closest default option available is 59.940 fps, but you can set it to 60 fps manually.
In addition to these settings, choose the following;
Render Quality - Best
Motion Blur - Gaussian
The Deinterlace Method must be configured for Blend Fields.
For Resample Mode, set it to Disable Resample.
With these video settings set, you can expect a great video quality and outcome.
You can convert a video or a small length of a video into a GIF image with the Sony Vegas GIF render. The Sony Vegas best render settings for a GIF image are 240x80 with 256 colors set as the most suitable option for rendering.
Best Video Settings for Twitter >>
Add Text Over Video with Sony Vegas >>
How to Resize a Video in Sony Vegas >>
Earlier, the Sony Vegas had the Mainconcept encoder, which is still available in some of the Sony Vegas versions. But the new versions of the software come with the new Magix AVC/ACC video codec.
This codec has default templates for video render depending on the video resolution. You will find different Sony Vegas best render settings for 4K, 1080p, and 720p resolution.
The new Magix AVC/ACC video codec replaces the older version and it has been optimized to work with graphic engines including the Intel Quick Sync Video and other NVidia or AMD Radeon graphics architecture.
This means that now you can render videos on Sony Vegas by only using the Graphics card instead of the earlier CPU-only infrastructure. Here's the process for best render settings for Sony Vegas 11 and up versions.
Step 1:
Before rendering videos on Sony Vegas, you need to ensure that the software has your preferred graphic settings enabled. To do this, go to Options in the main menu and navigate to Preferences, then moving to Video.
Step 2:
Under "GPU Acceleration of video processes," select your system's graphic card.
Step 1:
For rendering the video with these settings, open the settings menu on Sony Vegas software and select the output folder destination. This is the folder where the final video will be saved.
Step 2:
On the left side, you'll find the Format section. Click on it, and from the drop-down menu, select MAGIX AVC/AAC MP4.
Step 3:
On the left side, you'll find video output templates with pre-set video rendering settings.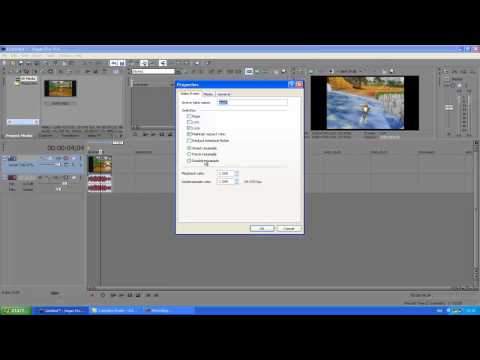 You can choose the preferable template. Rest assured that it can be customized according to specific requirements.
Step 1:
Click on the customize template while you are working on the video settings in the "Video" tab.
Step 2:
If required, start by renaming the template and click on the Save (Floppy Disk) icon next to the name bar.
Step 3:
Next, set the frame size and frame rate. For best render settings for Sony Vegas 17. From the options available under the drop-down menus of both the parameters, choose the highest value. For frame rates, you can also customize them to make the figure 60.000 fps.
Step 4:
Move to the "Project" tab and set the "Video rendering quality" to Best.
This completes the best render settings on Sony Vegas and all its versions.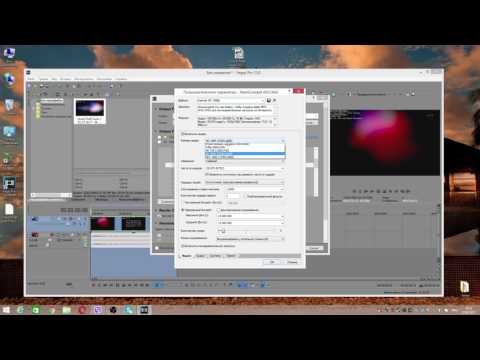 While there may be some differences in the interface of the Sony Vegas version you are employing, the settings and the parameters are the same.
So, make sure to understand this process and then navigate to the right options. While exporting the rendered videos to YouTube, you may see a dip in the quality. That is not an issue of the software, but YouTube minimizes the video size for storage and viewing purposes.
iMyFone Filme presents another easy and simple way to create a highly quality video without depending on the Sony Vegas best render settings. On iMyFone Filme, you need to gain access to the video play settings and adjust the video resolution plus frame rate to customize its rendering properties.
Step 1:
Import the video you want to render on Filme and check its video quality.
Step 2:
To change the output when you export the video, click on the Gear icon above the timeline, and the Play Settings window will open.
Step 3:
Here you can change the video aspect ratio, Resolution, and Frame Rate.
Step 4:
For the highest video quality, set the aspect ratio according to your requirements and change the Resolution to 1920x1080. Set the frame rate to 60 fps. Click on OK.
With iMyFone Filme, you can quickly change the video outcome by tweaking a few settings.
Besides letting you fine-tune the video quality, Filme also provides access to a ton of video editing features. While using Filme, you will find yourself surrounded by pro-quality editing tools that include cutting, trimming, adding graphics, voiceovers, etc.
Here's what you can do with Filme video editor;
From the Resources tab, you can add short videos depending on the occasion, like the one below, where we have added a short intro video.
You are free to add additional elements and transitions to the media content according to the requirements.
While these are the basic functions, some pro-level features of Filme include self voice recording, screen recorder, changing voice, changing the video quality via rendering (explained above).
All of these and many more features make Filme one of the best choices for creating bespoke videos from an easy and intuitive interface.
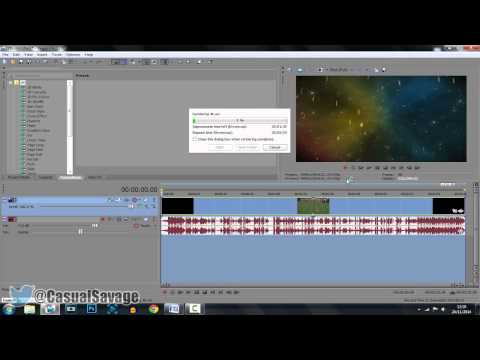
The ETA for rendering a video depends on the video length and quality. The longer length and higher quality will extend the rendering time and vice versa. Moreover, it can also depend on the encoder you are using. When it comes to Sony Vegas best render settings, the latest MAGIX AVC/AAC codec will take less time than its previous versions.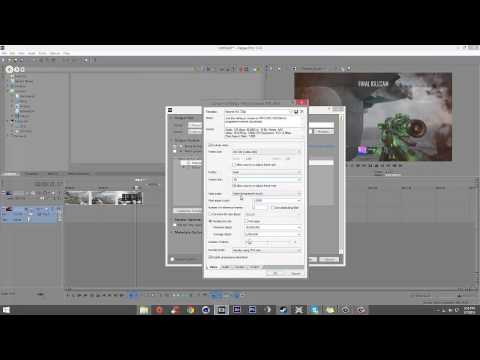
Yes, similar to changing the video settings before rendering, you can access the audio settings from the "Audio" tab next to the "Video" tab in the dialog box. With audio, you can change the format by choosing the template and also choose sample rates plus bit rate according to requirements.
The above guide explained the process for how to render on Sony Vegas, and the same process is applicable to all the versions of the software with some changes in the interface. The purpose of rendering a video is to ensure that it runs continuously when someone plays.
The Sony Vegas best render settings means setting the most effective video playback settings. Besides Sony Vegas, you can also use Filme to change the video playback settings, ensuring the same outcome with much less steps and work.
You will find the method to render a video with both the software. Make sure to understand the entire process before making a decision.
UPDATE: This article was originally published in July 2021 and Instagram has since updated their platform once again. IGTV is out, and Reels are now longer. The specs in this post have been updated to reflect the new best and max video settings.
Instagram allows for a variety of content types, but each post comes with its own caveats and restrictions. There are three main places you can publish video content on Instagram. The Instagram feed, reels, and stories. These videos can have an aspect ratio anywhere between 1.91:1 and 9:16
Let’s take a quick look at the different options and restrictions of each. Plus let’s learn about the two important things you must know — aspect ratios and time limits.
Now I should let you know that Instagram does allow for a variety of different aspect ratios when posting in the app, but when it comes to working with videos and running ad campaigns, there are four main aspect ratios that every agency and client will require.
The aspect ratio is more important than the frame size. With the proper settings, a 16:9 video that is 1152×648 can look even better than a 16:9 uncompressed 1920×1080 video. Instagram will compress on their end, so it’s best to make sure you compress and your files as much as you can and stick to the golden aspect ratios.
Instagram Video Aspect Ratios
Posts are the O.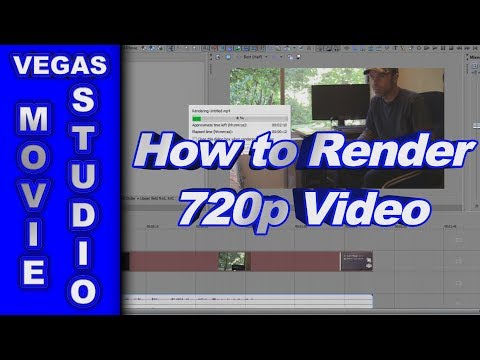 G. in the Instagram world, back in the days when it was a photo app. These posts can be photos or videos and will be displayed in the primary Instagram feed.
Back when Instagram was all squares with a 1:1 aspect ratio, you’d want to create content that was 640×640. Now in the world of 4K smartphones, your square canvas is better equipped to handle 1080×1080 pixels in the feed. (Keep in mind that Instagram will still compress your content.)
If you are posting a video to your feed, you’ll definitely want to use a traditional 16:9, 1:1, or 4:5 aspect ratio. You do not want to do a full vertical 9:16 video in the Instagram feed because the app will crop it to 4:5 to display. This is also true for Instagram Reels that you publish to the main feed.
What are the best video settings for Instagram feed video posts?
 6GB
6GBNote: Remember that all content will be cropped to 1:1 for display on the main account page, so no matter what you post, make sure your cover image looks good as a square.
If you are making video content, Instagram Reels are what you want to be making right now. These videos live in a separate feed of all vertical video content that takes many aspects from Tik Tok. The content is all 9:16 and unlike Tik Tok, Reels only allow videos up to 30 seconds long.
Reels can also be shared to the Instagram Feed but they will be cropped to a 4:5 aspect ratio.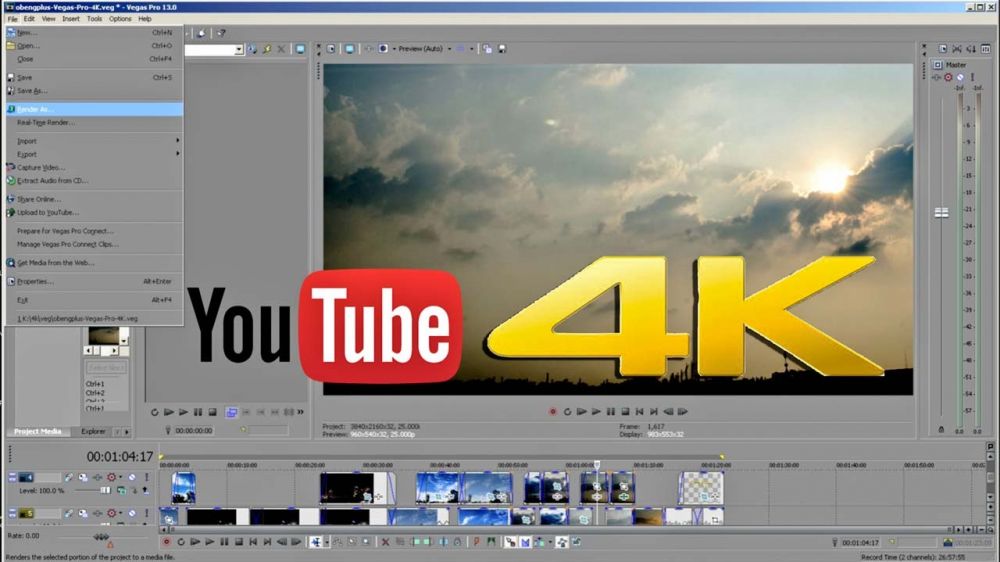 So make sure your text is in a safe margin or check to make sure people’s heads aren’t chopped off.
What are the best video settings for Instagram Reels?
Note: If you allow your Instagram Reel to also show up in the feed, your video will be cropped to 4:5 automatically. So if you have any text it may be cut out of frame, as well as the top of subjects heads. Not only that, your cover image will still be cropped to 1:1 for the profile page. It’s a headache to remember all of these steps.
To help you visualize where your Reels will get cropped, we have free templates you can use in Premiere Pro, Final Cut Pro, and Resolve to see where your video will be cropped in the main Instagram Feed.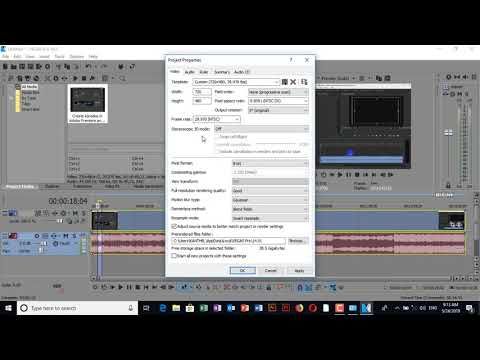 You can watch the tutorial and download the guides here.
Stories are a different kind of beast, especially for video. All stories are limited to 15-second intervals, but you can just post multiple 15-second videos in succession to make it longer. Just note that users can drop out or skip at any point very easily.
What are the best video settings for Instagram Stories?
I’m not gonna lie, I don’t really know why IGTV still exists.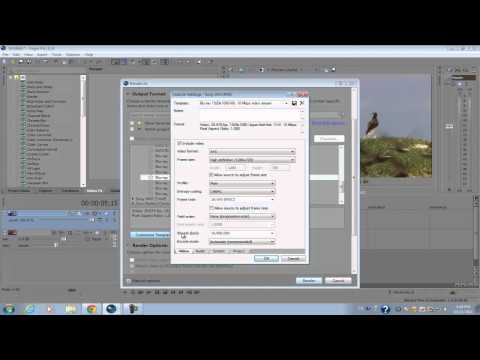 (UPDATE – IT DOESN’T EXIST ANYMORE!) It’s not very popular, nor was it truly adopted by users or advertisers. That said, it’s the least restrictive of all Instagram video content, and it is the only place you can really upload longform video content or go Live.
What were the best video settings for Instagram IGTV?
Are you cutting Instagram videos in an NLE like Premiere Pro, Final Cut, or DaVinci Resolve. You’ll want to make sure you have the proper sequence settings when editing, and the best compression settings when exporting your videos.
Here is a great tutorial from Matt Johnson using Premiere Pro, but the standards apply to all non-linear editors.
Need to resize your edits for Reels, stories, or posts? Here are some helpful tips and tricks you can use to make things easier and faster.
Instagram spoils video quality after uploading - how to avoid it?
Help1
Unfortunately, many people have a question about how to upload a video to Instagram in good quality, since the social network noticeably spoils the picture.
Only those who shoot video from their phone and immediately upload it to Insta do not have such problems. As a rule, such recordings are in normal, tolerable quality. nine0003
The reason why the video quality deteriorates is the automatic optimization.
But you can cheat by optimizing your video before uploading it yourself. To do this, set the following parameters:
The quality should improve after this. Otherwise, social network algorithms will degrade your video.
This advice worked in 2017 and works in 2018, so use it!
Help3
Total 2 answers.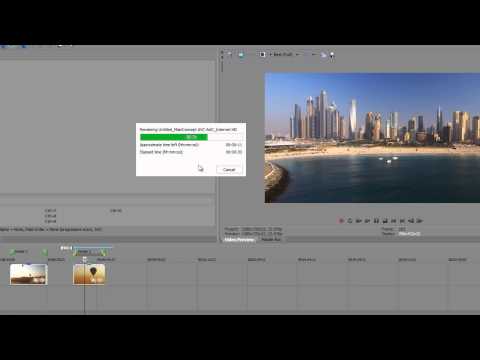
Drive needs to be formatted. Open "My Computer" and right-click on your flash drive. In the opened horse, select "Format". You need to select the NTFS file system. After formatting, the files should copy without problems.
expert142
THANK YOU SO MUCH!!! I already thought that I was completely so fucked up in the store n.2
There are 47 answers in total.
GIF is an animated image format. At the dawn of the development of computer technology, it was files in the GIF format that replaced the now familiar videos. Today, the GIF format is once again popular, and this happened due to the rapid development of social networks. For example, in Facebook , for example, you can not only publish or send a GIF file to your friend, but you can even select a suitable video sequence from an entire online library built into the social network interface. nine0003
In the case of Instagram , things are somewhat different. You, as the owner of the account, can post a photo or video on this social network. However, you can’t just publish a file in the GIF format - no, of course, you can select a GIF file in the gallery, but it will only get into your feed in Instagram as a static image. What to do? There is an exit! We offer you several scenarios that will allow you to solve this problem. Either way, you need to convert GIF - a file in a video format understood by a mobile device (formats MOV , MP4 ).
Scenario 1. When you know exactly which GIF you want.
If you have seen some cool video somewhere in the GIF format, and remember its content, then you can find it by keywords. Giphy is one of the most powerful libraries of GIF files on the Internet, you can find almost any memes and funny pictures here. The service allows you to automatically convert the 9 you need0067 GIF -file to video sequence MP4 .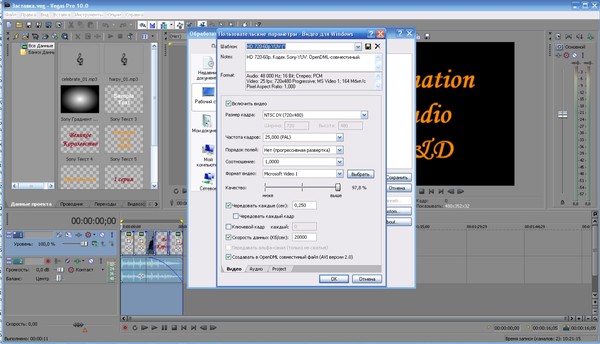 To do this:
Scenario 2. You have a GIF on your smartphone that is not on Giphy.com .
Let's say you own some GIF video that is physically on your mobile device and you would like to share it on Instagram . The easiest way is to install a special application that will convert. There are quite a lot of such applications in the app stores Apple AppStore and Google PlayMarket , and they all perform the same function - they transform the GIF file into the MP4 format.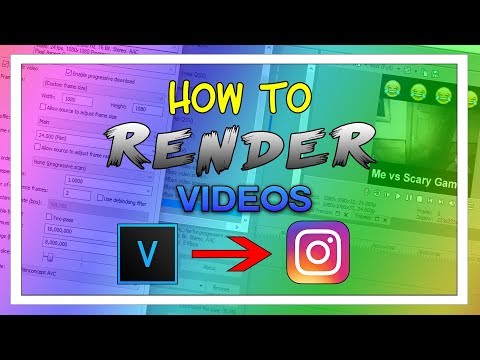 Depending on the complexity of the application, you may be offered some additional settings, such as speeding up or slowing down the video sequence, starting in forward or reverse sequence, the length of the video, and much more. For example, application 9 has pretty good functionality.0067 GIF Maker for Instagram (iOS). Using such applications is not difficult: you just need to download the GIF file from the image gallery, specify the transformation parameters and click the "Save and publish to Instagram " button.
Scenario 3. You want to make a short video and make it funny GIF .
For this purpose, completely different applications are needed, and strictly speaking, the resulting result will not be quite GIF file in the usual sense. For example, there is a proprietary application Boomerang (iOS, Android), which allows you to record funny videos: you only need to use it to shoot your video, and then, in just a couple of clicks, give it different properties: loop and play sequentially in one and the other side. The saved result can be published immediately to Instagram directly from this application.
Scenario 4. I want to make it cool!
For this purpose you will need a computer and a video editing program. For example, Adobe Premiere , Pinnacle Studio , Sony Vegas Pro or any other similar program. Load the source file into it, for example, the GIF file you have or the footage. Select the necessary parameters in the sequence settings on the timeline: 1:1 aspect ratio, the maximum possible resolution and the duration of the video sequence you need. I note that long videos in Instagram are unlikely to be watched to the end, and 10-15 seconds is enough for a funny video. Move the video sequence you need to the timeline, add suitable music to the audio track and export to a video file. I draw your attention to the fact that from such programs it is best to export to the most compatible video formats. So for smartphones Apple , you must use the MOV format, which will be possible to encode after installing additional video codecs included in the Apple QuickTime Pro set. This set of codecs is distributed on a paid basis. For smartphones based on Android , other formats are also suitable, for example, MP4 , provided that the video file is encoded with a standard codec like H.264 . The file obtained after export must be transferred to the image gallery, and from there uploaded to Instagram in your usual way.
I hope I answered your question. If you have additional questions - ask at TheQuestion !
Nikolai Levskiy22
Total 5 answers.
Sony Vegas does not consider vertical video as video material yet. nine0097 They promised to provide support after the appearance of vertical monitors and TVsFedostas1
Total 4 answers.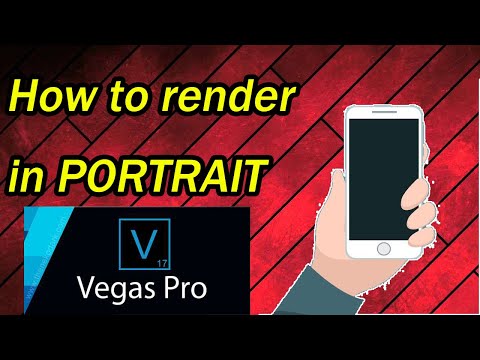
See where they are and nail them with your hands. Clean up the registry. And then reinstall the program, if you still need it.
Guest6
Only 1 answer.
You may also like
An article on how to save video without quality loss in Sony Vegas Pro video editor 13
Hello friends! In this article, I will show you the basics of working with Sony Vegas Pro 13. We will learn how to set up a project and save video without significant loss of quality. The settings that we will look at below are ideal for uploading videos to YouTube hosting and other video hosting sites.
So, first of all, let's cover the Sony Vegas Pro editor itself. nine0003
Next go to " File " - " Save as.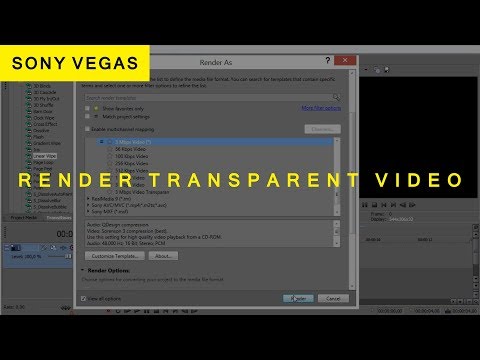 .. " and save our project.
It is best to save the project in a separate folder with videos and other materials, so as not to lose the path to these files in the future.
Now go back to " File " and left click on " Properties... " to set up our project.
In the window that appears, click LMB on the special icon " Coincident media settings for video ", which is located on the right side of this window and select a video for our project.
This way the video properties (width, height, frame rate, etc.) will be transferred to our project.
B In the same window, in the drop-down list called " Full Resolution Rendering ", select the option " Best ", in " Motion Blur Type " select " Gaussian ", in " Deinterlacing Method "select the item" Missing ". We look at the result in the screenshot:
Now that our project is configured, we import the video into the editor, for this, on the toolbar, click on the icon" Import multimedia .