“How can I SAFELY migrate to a new Facebook Pixel?”
I get this question quite often, so I decided to publish this small guide instead of e-mailing the answer every single time.
Migrating from an old to a new Facebook Pixel is not complicated if you have a good plan.
The biggest mistake you can do: replace the old pixel with the new one without any additional steps. This will break everything and ruin your Facebook ads just like that.
There are TWO things you need to keep in mind:
You need to TRAIN your new pixel for 180 days, re-create Custom Audiences and Custom Conversions, add it to your Product Catalogs, replicate Pixel Events, and use it for your ads at the right moment.
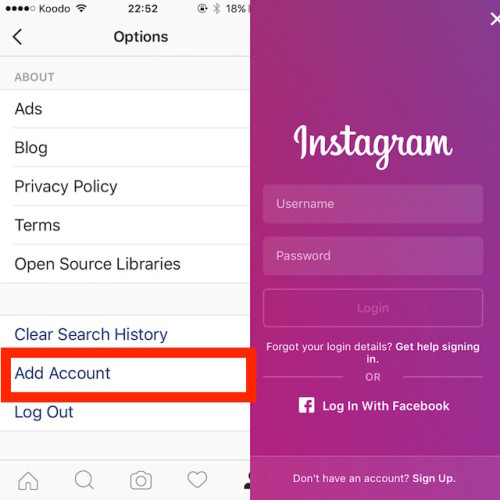
Create a NEW Facebook PixelInside your Facebook Business Manager, go to Events Manager and click on Add New Data Source. Follow the steps until your new pixel is created.
I am going to use PixelYourSite Pro for this task because it supports multiple pixels.
Copy your NEW pixel ID, open PixelYourSite Dashboard, click on the “Add Extra Facebook Pixel ID” button and paste the ID. Save the new settings.
Don’t delete the old pixel!
Train your NEW pixelThis is the key part o your migration plan, and it can take up to 180 days.
Custom AudiencesIf you’ve run Facebook Ads for a decent amount of time, chances are that you already have several Custom Audiences. You will need to replicate them using the new Facebook Pixel.
Tip: replicate only those audiences that you need.
Here’s a list of Custom Audiences that you might find useful:
Other audiences you should consider are direct traffic (GeneralEvent + the traffic source parameter), people that searched on your website (the Search event), embedded video views (the WatchVideo Event) and clicks on key links (the ClickEvent).
Lookalikes AudiencesReplicate your most useful Lookalikes Audiences.
What are Lookalikes? A Lookalike Audience is a way to reach new people who are likely to be interested in your business because they’re similar to your best existing customers.
If you run an e-commerce business, your most powerful Lookalikes will be based on the Purchase Event Custom Audiences 180 days (your clients).
If you don’t have enough purchases in your desired location, you can use AddToCart or even ViewContent Custom Audiences.![]()
If you use any Custom Conversion, replicate them for the new pixel.
Connect the new pixel to your Product CatalogsGo inside your Business Account, click on the top menu, and open Product Catalogs. Click on the catalog’s link and select “Events Data Sources” from the left-side menu.
Enable the new pixel and click Save.
This is a crucial step if you run or plan to run Dynamic Product Ads, so make sure you don’t skip it.
Replicate your Facebook Pixel EventsThe new pixel should send the same events and the same parameters as the old one.
If you use the PixelYourSite plugin you are all set, because it sends all the existing events to every installed pixel.
Update your Ads CampaignsYour existing campaigns are optimized and tracked by the old pixel and they target your old Custom Audiences or Lookalikes.
There are two things you will need to change:

For Catalog Sales campaigns that use “Retarget ads to people who interacted with your products on and off Facebook.” you must change the pixel AFTER the number of days your ads are configured to go back.
For all your other ads you can change the pixel right away.
How to change the pixel for existing adsOpen your Ads Manager and select all the campaigns you want to change. Click “Edit”, go on “Ads” and scroll down until you find the Tracking section. Select the NEW pixel and click Publish.
New ads trackingYour new ads can be tracked by the new pixel right away.
Your targeted audiencesYou can safely replace the old audiences AFTER the interval they are configured is consumed. So a Custom Audiences for the Purchase Event in the last 180 days can be replaced after 180 days.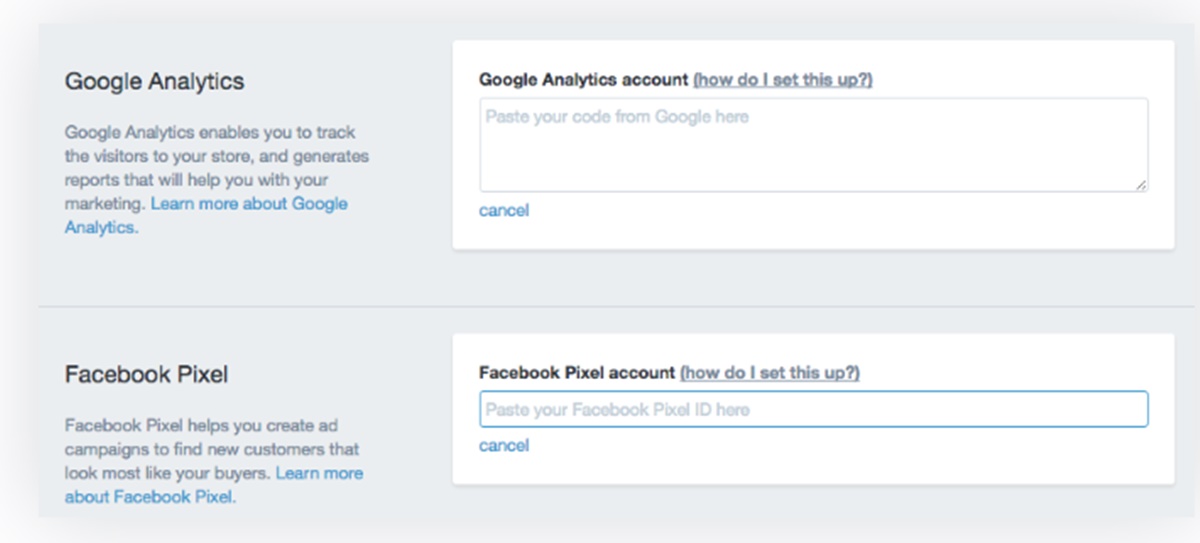
Shortcut: You can edit your ads and add the new Custom Audiences along with the old ones. The same trick can be applied to new ads.
Delete the old pixel after 180 daysIt is safe to delete the old pixel 180 days AFTER you installed the new one on your website. By then, the new pixel has all the possible data tracked.
TricksYou can RENAME your old and new pixels to make sure you remember what you need to do.
How to RENAME your pixelOpen your Business Manager top menu, click on Pixels and click on the pixel you want to rename.
The end result can be something like this:
ConclusionReplacing your Facebook Pixel is not complicated, but you’ll need a plan and some discipline:
Yes, you can replace your Facebook Pixel with a new one. Remeber it can take up to 180 days for the new pixel to work as expected.
No, your new Facebook will have NO data at all. That’s why you need to TRAIN YOUR NEW PIXEL.
Replicate your existing Custom Audiences and Lookalikes.
Replicate your Custom Conversions.
Replicate your current Pixel Events.
This proces can take up to 180 days.
One of the greatest benefits of social media advertising is the ability to test, track, refine and target your ads with laser precision.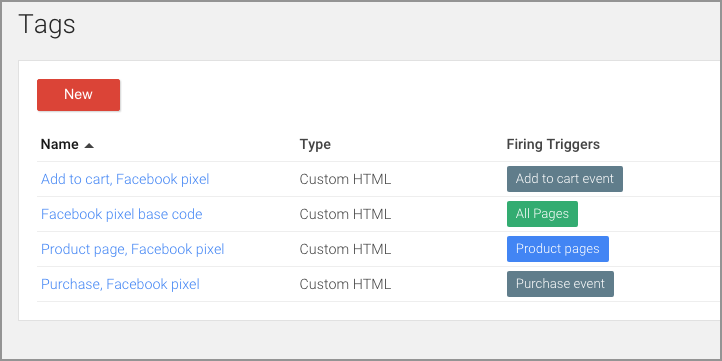 The Facebook pixel is a data-gathering tool that helps make the most of your ads across Facebook and Instagram.
As of February 2022, Facebook Pixel changed its name to Meta Pixel. You will see it referred to with both names throughout this article.
If you use Facebook or Instagram ads now, or plan to use them at any point in the future, the Facebook pixel (or Meta pixel) is a must-use tool. Read on to learn how it works.
What is the Facebook pixel (a.k.a. Meta pixel)?
How does the Facebook pixel work?
Facebook pixel setup
Why should you install the Facebook pixel?
Enhance Facebook pixel data with Conversions API
Bonus: Get the Facebook advertising cheat sheet for 2022. The free resource includes key audience insights, recommended ad types, and tips for success.
What is the Facebook pixel (a.k.a. Meta pixel)?The Facebook pixel is a piece of code that you place on your website.![]() It collects data that helps you track conversions from Facebook ads, optimize ads, build targeted audiences for future ads and remarket to people who have already taken some kind of action on your website.
It collects data that helps you track conversions from Facebook ads, optimize ads, build targeted audiences for future ads and remarket to people who have already taken some kind of action on your website.
The Facebook pixel works by placing and triggering cookies to track users as they interact with your business both on and off of Facebook and Instagram.
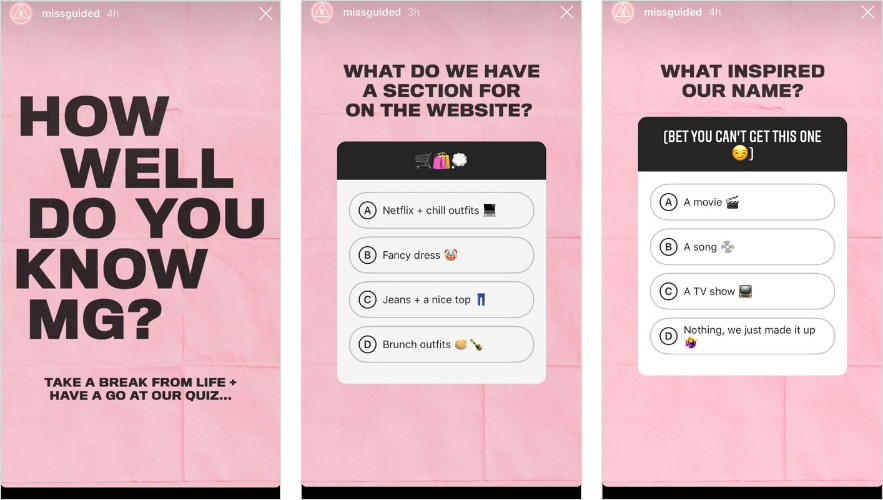
For example, I recently spotted a very cute bathmat in the Instagram Stories of interior design YouTuber Alexandra Gater. (At the time, I was thinking about my decorating my apartment, not the Facebook pixel, so I didn’t screencap – you’ll just have to trust me on this.)
I swiped up to check out the bathmat and even added it to my shopping cart. Then I got distracted by thinking about breakfast and put down my phone.
The next time I opened up Instagram, this ad popped up in Stories:
Source: Baba Souk on Instagram
And, sure enough, the next time I headed to Facebook on my laptop…
Source: Baba Souk on Facebook
This is called retargeting. It’s a handy way for marketers to remind shoppers to come back and buy all those items they leave in various shopping carts across the web.
Remarketing is not the only function of the Facebook pixel. It’s also important for tracking, analytics, and overall ad optimization.
The pixel tracks various actions people take on your website, like making a purchase or adding something to their shopping cart. Facebook calls these actions “events.”
Facebook pixel standard eventsThe 17 standard Facebook pixel events for which you can simply copy and paste Facebook event code are:

You can also add more details to standard events using extra bits of code called parameters. These allow you to customize the standard events based on factors like:
For example, you could use the Facebook tracking pixel to record views of a specific category on your website, instead of tracking all views. Perhaps you want to separate dog owners from cat owners based on which sections of your pet supply website they viewed.
The Facebook pixel and iOS 14.5Because of changes to third-party tracking in iOS 14.5, some Facebook pixel functionality will be disabled for updated Apple devices. Before you panic, consider that only 14.![]() 7% of mobile Facebook users access the social network using iOS devices.
7% of mobile Facebook users access the social network using iOS devices.
Still, changes to accommodate the iOS 14.5 requirements will impact all advertisers. One major change is that advertisers can only set up a maximum of eight standard events and custom conversions.
Advertisers will certainly have to change the way they think about the Facebook pixel as these changes take effect. We’ll address specific limitations and changes you need to know throughout this post.
Facebook pixel setupNow that you know what you can track, and why you would want to do so, it’s time to create your Facebook pixel and put it to work on your website.
Step 1: Create a Facebook pixel1. From your Facebook Events Manager, click Connect to Data Sources in the left-hand menu, then select Web. Click Get Started to continue.
Source: Facebook Events Manager
2.![]() Select Facebook Pixel, then click Connect.
Select Facebook Pixel, then click Connect.
Source: Facebook Events Manager
Name your pixel, enter your website URL, and click Continue.
Source: Facebook Events Manager
When choosing the pixel’s name, keep in mind that with Events Manager, you only get one pixel for each ad account. The name should represent your business, rather than a specific campaign.
If you want to use more than one pixel per ad account, you can do so using Facebook Business Manager.
Step 2: Add the Facebook pixel code to your websiteTo put the pixel to work gathering information on your website, you now need to install some Facebook pixel code on your web pages.
There are a few ways to do this depending on what website platform you use.
Source: Facebook Events Manager
 This will walk you through a series of steps to connect your Facebook pixel without any coding.
1. Click Install code manually.
2. Click the green Copy Code button.
Bonus: Get the Facebook advertising cheat sheet for 2022. The free resource includes key audience insights, recommended ad types, and tips for success.
Get the free cheat sheet now!
Source: Facebook Events Manager
3. Paste the pixel code into the header code of your website, just above the </head> tag. You need to paste it into every single page, or into your header template if you’re using one.![]() Click Continue.
Click Continue.
4. Choose whether to use automatic advanced matching. This option matches hashed customer data from your website to Facebook profiles. This lets you track conversions more accurately and create larger custom audiences. Then click Continue.
Source: Facebook Events Manager
Step 3: Set up Facebook pixel events1. Click the Open Event Setup Tool button.
Source: Facebook Events Manager
Choose your Facebook pixel ID, then click Settings and scroll down to Open Event Setup Tool.
Source: Facebook Events Manager
2. Enter your URL and click Open Website.
Source: Facebook Events Manager
3. Facebook will provide a list of suggested events. Click Review next to each event, then choose to Confirm or Dismiss. Click Finish Setup to continue.
If you’re interrupted in your pixel setup, you can always come back to this later by going to Events Manager.
Step 4: Confirm your pixel is working with the Facebook pixel helperBefore you start relying on the data from your Facebook pixel, you should confirm that it’s tracking properly.
1. Add the Facebook Pixel Helper extension to your Google Chrome browser. (It’s only available for Chrome, so if you use a different browser, you’ll need to install Chrome to use the Pixel Helper.)
Source: Chrome Web Store
2. Visit the page where you have installed the Facebook pixel. A popup will indicate how many pixels it finds on the page. The popup will also tell you if your pixel is working properly. If not, it will provide error information so you can make corrections.
Source: Facebook Pixel Helper
Step 5: Add a Facebook pixel notice to your websiteTo comply with Facebook’s terms (and, in some cases, the law), you need to make sure visitors to your website know you’re collecting their data.![]()
That means you need to provide clear notice that you’re using the Facebook pixel and that their information may be collected through cookies or other methods. You also need to let users know how they can opt out of having their data collected.
To get all the details, go to the Facebook Business Tools Terms and scroll down to point 3: Special Provisions Concerning the Use of Certain Business Tools. Or, check out Facebook’s Cookie Consent Resource.
Why should you install the Facebook pixel?Increase the ROI on your Facebook ad spendFacebook pixel data helps ensure your ads are seen by the people who are most likely to take your desired action. This allows you to improve your Facebook ad conversion rate and get better ROI.
Even if you’re not using Facebook or Instagram ads yet, you should install the Facebook pixel now. It will start collecting data right away so that you don’t have to start from scratch when you’re ready to create your first Facebook ad.
The Facebook pixel allows you to see how people interact with your website after viewing your Facebook ad.
You can even track customers across their devices. This is why I saw an ad for the bathmat on my laptop, even though I added to it the shopping cart on my phone.
This lets you see if people tend to see your ads on mobile but switch to a desktop before buying. Or, maybe it’s the other way around. This information can help you refine your ad strategy and calculate your return on investment.
This Facebook pixel function is impacted by the iOS 14.5 change, but Facebook will ensure advertisers still get some conversion tracking data through its Aggregated Event Measurement.
To ensure you continue to get the best conversion tracking data, you need to verify your website domain. You also need to stick to one domain for conversion tracking, since iOS 14.5 won’t allow tracking across multiple domains.
Use Facebook retargetingFacebook retargeting pixel data and dynamic ads allow you to show targeted ads to people who have already visited your site.![]() You can choose to get really granular here.
You can choose to get really granular here.
For example, you can show people an ad for the exact product that they abandoned in a shopping cart or added to a wishlist on your website – as happened with the bathmat I was ogling earlier.
Retargeting audiences will shrink as more people update to iOS 14.5. But they won’t disappear.
Create lookalike audiencesFacebook can use its targeting data to help you build a lookalike audience of people who have similar likes, interests, and demographics to people who are already interacting with your website. This can help expand your potential customer base.
iOS 14.5 will affect the input data for lookalike audiences, because the tracked audience the lookalike is based on will shrink. However, because iOS users are in the minority, the lookalike functions will still have plenty of information to work with. You won’t likely notice a major change to functionality here.
Optimize Facebook ads for valueAs Facebook collects data on who buys from your site and how much they spend, it can help optimize your ad audience based on value. That means it will automatically show your ads to the people who are most likely to make high-value purchases
To help counter the data-loss effects of iOS14.5 changes, Facebook introduced Conversions API. Rather than relying on cookies and web and mobile browsers for data, Conversions API collects information directly from your servers.
By combining Conversions API with the Facebook pixel, you’ll have access to more reliable data, even as the pixel loses information.
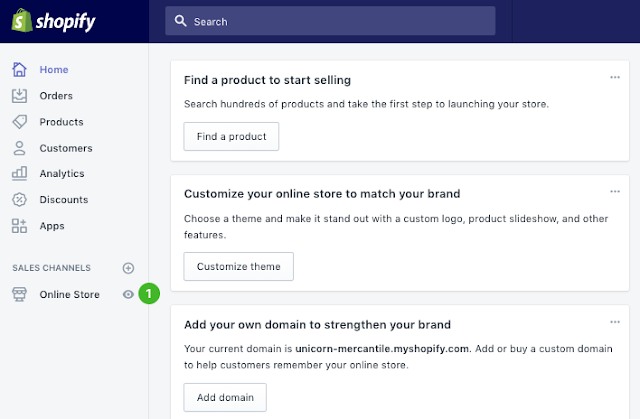
If you’re using one of Facebook’s integration partners, like Shopify or WooCommerce, you can turn Conversions API on without writing any code.
1. From Events Manager, click Data Sources in the left column, then click Settings in the top menu.
Source: Facebook Events Manager
2. Scroll down to the Conversions API section and click Choose a Partner.![]()
Choose your partner and follow the steps. Facebook also provides detailed instructions for setting up the Facebook pixel Shopify Conversions API integration.
If you don’t use one of Facebook’s integration partners, you’ll have to create some code, and you’ll likely need to work with a developer. Follow Facebook’s detailed steps for implementing Conversions API manually.
Conversions API can help fill in data your Facebook pixel is missing. For example, in late 2020, the bedding company Lull found their pixel was missing about 8% of purchase events.
Once they added Conversions API, they were able to track nearly 100% of purchase events. They also saw a 12.9% reduction in cost per action on a one-day click, one-day view attribution window.
Publish and analyze your Facebook, Instagram, and LinkedIn ads alongside your regular social media content with Hootsuite Social Advertising. Stop switching from platform to platform and get a complete view of what’s making you money.![]() Book a free demo today.
Book a free demo today.
Request a Demo
Easily plan, manage and analyze organic and paid campaigns from one place with Hootsuite Social Advertising. See it in action.
Free Demo
Tips
Don't distract the programmer :)
Follow us on Telegram
Understanding what is happening in the world of mailing lists and digital marketing. We publish announcements of articles, reviews, selections, expert opinions.
Watch channel
Become an email rocker 🤘
Take the free course and start your first mailing list
Read more
The Facebook* Pixel (Facebook* Pixel) is a piece of JavaScript code that collects information about website visitors and helps you customize Facebook* and Instagram* ads.![]()
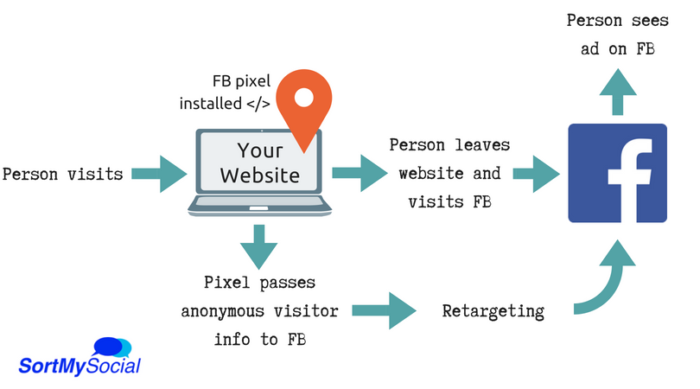
The Facebook pixel remembers everyone who visited the site and sends this information to the Facebook advertising account*. Thanks to this, we can find website visitors on Facebook* or Instagram* and set up ads for them.
How it works. A person visits the site, the Facebook* pixel remembers it and writes it to the audience. You set up an advertising campaign for this audience - the visitor sees your ad on Facebook* and Instagram*.
With the pixel you can:
I tell you how to add a pixel to the site without involving programmers.
Collect contacts from Facebook* with UniSender
Ready integration of Facebook* Lead Ads and mailing service. Gather a database, set up automation and get sales.
Try
1. Go to Ads Manager.
2. Click "Ads Manager" - "Pixels".
3. Select "Add new data source" - "Facebook Pixel*".
4. A pixel can be added through direct integration with Google Tag Manager, manually or by sending configuration information to a programmer.
We choose the second option to understand how the pixel works.
If Google Tag Manager is already installed on the site...
… You can set up automatic integration of the Facebook* pixel into the site. We press the first item and select among the Google Tag Manager partners (it should already be configured).
Next, just follow the simple instructions for setting up the integration.
5. In the next window, we see recommendations for installing the code on the site. From this page you need to copy the pixel code.
6. Go to Google Tag Manager.
Google Tag Manager (GTM) is a tool for working with various codes on the site. We install GTM, and add all other codes through its interface. When loading a page, Google Tag Manager loads all other scripts: Google Analytics, Yandex Metrica, Facebook* Pixel and others.
You can register in GTM on its official page. After registration, you need to install the GTM code in the site markup.![]() You can do it yourself (here is information to help) or contact a layout designer.
You can do it yourself (here is information to help) or contact a layout designer.
7. We installed GTM. Now you need to check its performance. The easiest way is to install the Google Chrome app - Tag Assistant.
Once installed, the application will appear in the browser window. Click on Tag Assistant, click "Enable" and refresh the page. We see which scripts are loaded.
8. We have verified that GTM is installed on the site. We return to his personal account and click "Tags" - "Create".
9. Enter the name of the tag (Facebook* Pixel) and click "Tag Configuration".
10. Select the tag type. GTM will offer many ready-made options, but we need "Custom HTML".
11. Paste our Facebook* Pixel code we got earlier.
12. In the advanced settings, select - "Once per page".
13. Select the standard trigger "All Pages" - "Page View". Now the Facebook* pixel will work on all pages of the site and transfer data to the Facebook* account.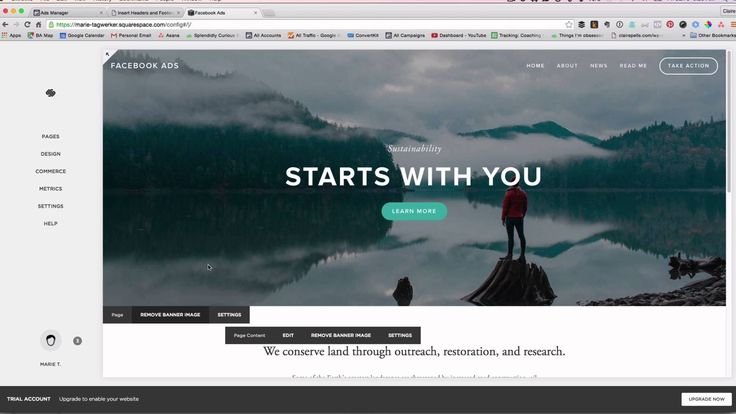
In the next article I will tell you how to create triggers for various events on the site.
14. Click "Save" and return to the workspace to check the work of our pixel. Click "Preview".
15. Go to your site, see a window with tags configuration.
16. In the "Summary" - "Tags Fired On This Page" window, we see our code - Facebook * Pixel (the name you entered earlier). Here you can see other scripts on the page.
17. If you see your code, go back to GTM and click the Submit button.
18. Enter the names for the story and click "Publish".
Congratulations! You have added a Facebook* pixel to your site.
In the next article, I'll show you how to set up conversions using the Facebook* pixel. We will solve problems like the following:
In the meantime, I have everything 🙂
Updated June 9, 2020
Other related materials
Share news and fresh articles, talk about new service
Once a week we send a selection of fresh articles and news from the blog. Trying joke, but it doesn't always work out
By leaving my email, I accept the Privacy PolicyOur lawyer will swear if you do not accept :(
In the free course "Rock-email" we will tell you in 15 letters how to set up email marketing in your company. At the end of each letter we give broken tattoos about email ⚡️
*Together with the course you will receive the Unisender
blog newsletter By leaving my email, I accept the Privacy PolicyOur lawyer will swear if you don't accept :(
The person went to the site, chose the product and even added it to the cart, but did not pay. Why did it happen? What needs to be fixed?
For a successful advertising campaign, a marketer does not have enough information about the pains and desires of the client. The advertiser needs information about user behavior on the site. With its help, he can target ads to those people who are more likely to make a purchase or leave a request.
And Facebook will help him solve these issues. * Pixel.
In this article, we will clearly show and tell you how to make the correct step-by-step setup of Facebook.* Pixel (Facebook.* Pixel).
What is Facebook.* Pixel and how it works
What is a Pixel for?
How to create and set up Facebook.* Pixel?
How to check if Facebook.* Pixel is working?
What are Facebook.* Pixel events and what are they?
BONUS: Apple's big 2021 update for Facebook.* Pixel with IOS
Facebook.* Pixel (Facebook.* Pixel) is a piece of JavaScript code that is used to track conversion, create a remarketing audience, and optimize advertising campaigns.
To get started, you need a Facebook code. * Pixel add to each page of the site. When a user visits these pages and performs certain actions on them, Pixel transmits this information to Facebook itself.* In this way, Facebook.* sees what actions the user has taken, which pages they have visited and which products they have added to the cart.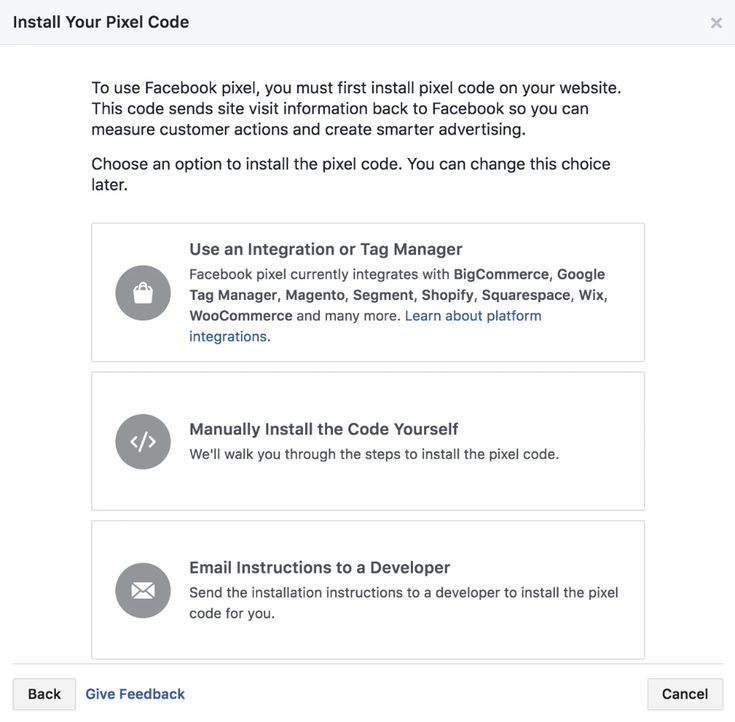
Algorithms Facebook. * allow you to select from millions of people within the social network exactly the audience that suits us as a potential buyer. Facebook.* takes into account thousands of parameters based on demographic, sociological, economic, political, psychographic characteristics. It also uses interest-based selection. This feature really makes life easier for the marketer in the process of working with ads.c
In the process of displaying ads, we can understand which ads perform poorly and which ones should be scaled up. After adding the Facebook.* pixel, you can easily track the statistics in the RK.
The user visited the site, added the product to the cart, but did not buy. No problem! The pixel will track the event of adding a product to the cart and, having collected such visitors, you can set up ads for them.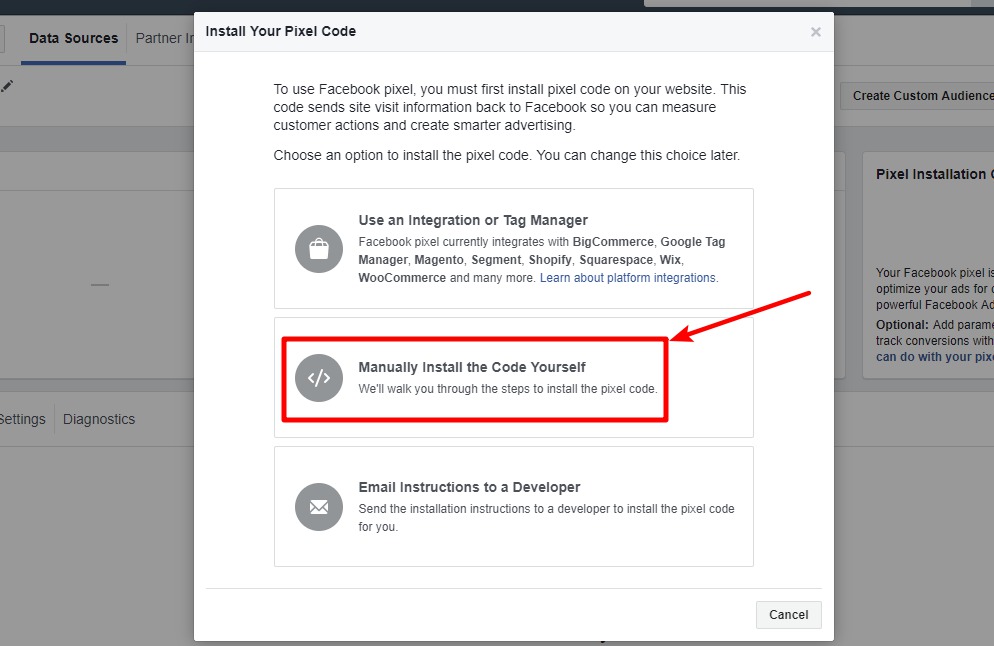 Perhaps people just didn’t have time to submit an application and Facebook.* will remind them of this using a retarget.
A conversion is an action that we expect from a user. This could be installing an app, buying a product, or watching a video. When a user has reached a certain goal on the site, an event is triggered and added to the Facebook.* Pixel list. In the future, for each audience, we will be able to launch an advertising campaign.
See also What is a good site conversion
The easiest way to check if the Pixel is working is to use Facebook.* Helper is a special browser extension. It shows the events that are triggered on the site, and the errors that occurred during the work.
This completes the basic installation and configuration of the Facebook.* pixel, and you can proceed to setting up events.
Events are actions that occur on a site when a user interacts with it. This can be adding a product to the cart, submitting an order, or viewing certain pages of the site.
Facebook.* defines 9standard events:
Events can be used to build audiences, record conversions, and optimize ads.
In January 2021, Apple announced the release of AppTrackingTransparency in iOS 14. According to this update, apps will need to notify the user and show them a tracking permission dialog box. This will directly affect the conversion tracking and event processing that Facebook.* Pixel logs.
Once the user accepts the agreement to update iOS to version 14.3, he will receive notifications of the following form:
Analysts say that around 50% of iOS users will choose to opt out of being tracked, and since around 70% of Facebook. * and Instagram* users are mobile devices, this update will have a significant impact on advertisers.
Of course, since personalized advertising will become more difficult to show and its effectiveness will decrease along with reach.
Facebook.* itself claims that this innovation by Apple will significantly harm small and medium-sized businesses, especially during a pandemic and related restrictive measures.![]() This means that in setting up personalized advertising, companies with a large advertising budget will have advantages over small businesses.
This means that in setting up personalized advertising, companies with a large advertising budget will have advantages over small businesses.
Facebook.* Pixel is an indispensable tool for every marketer and advertiser. With it, you can:
And in order to improve advertising performance, you need to set up events. Events are an important element when working with Facebook.* Pixel, which needs to be customized based on the goals and objectives of the business.
See also Proper setting up of an advertising campaign on Facebook *
Want to learn more useful guides and the latest news from the digital world? Subscribe to our blog and Telegram, we regularly publish new materials.