When it comes to sharing a moment on your Instagram Story, sometimes a single photo just won’t cut it. Suddenly you need to know how to add multiple photos to an Instagram Story.
And that’s where photo collages for Instagram Stories come in to save the day.
The 3 main ways to add multiple photos to an Instagram Story (a.k.a make a collage)
How to make a collage on an Instagram Story: easy way
How to make a collage on an Instagram Story: layering method
How to make a collage on an Instagram Story: most customizable way
How to post your collage on your Instagram Story
Bonus: Download a free checklist that reveals the exact steps a fitness influencer used to grow from 0 to 600,000+ followers on Instagram with no budget and no expensive gear.
Compiling multiple photos allows you to deliver maximum visual information in one powerful Instagram Story moment.
This is as true for fashion brands and it is for the owner/manager of a dog influencer who wants to share the best memories from Mr. Chonk’s bark mitzvah.
No matter what your business or industry, you should be using Instagram Story photo collages. There are actually three different ways to make it happen:
We’ll walk you through all three because we’re nice like that. (Maybe keep that in mind when you’re making the guest list for Mr. Chonk’s next major event?)
You can also watch our video on how to add multiple photos in one Instagram Story, right here:
How to make a collage on an Instagram Story: easy waySince you’re here looking for the answer to “how to make a collage on Instagram Stories,” we’re going to assume that you didn’t know Instagram offers an in-platform way to do just that.
But we don’t blame you for not noticing this feature: it’s weirdly hidden away.
Here’s how to find it and use it to share multiple pics in one sweet full-screen Story design.
1. Open the Instagram app and tap the + icon at the top of the screen. Select Story.
2. This will open your camera roll. But don’t be distracted by all your beautiful photos! We need to activate create mode first. Tap on the camera icon to do this.
3. On the left-hand side of the screen, you’ll see a list of icons. Tap the third from the top: a square with lines in it. This is the Layout icon.
4. Tapping the Layout icon will open up a quadrant of layout on your screen. From here, you can fill each segment either with a fresh photo or something from your camera roll.
Option 1: Take a photo! To capture a photo, just tap the photo-capture button: the white circle in the center of the btoom of the screen.
Once you take a photo, your pic will fill that top left corner shot. Continue shooting three more photos.
To delete something and take a new pic, tap the photo and then tap the delete icon.
Option 2: Select from your camera roll. Tap the square camera-roll-preview icon on the bottom left corner of your screen to access your camera roll.
Tap the photo you wish to be in the top left corner of the quadrant. Repeat until the screen has four photos.
To delete something and take a new pic, tap the photo and then tap the delete icon.
5. Happy with your collage? Hit the checkmark to confirm and move on to add stickers, text, or effects. Or, if you want to try a different layout, check out step 6.
6. To select a different layout, enter Layout mode and tap the rectangular grid icon directly below the Layout mode icon. This will open up a selection menu where you can choose an alternative style of grid. Tap your preferred style, and then fill each segment either with a photo capture or an image from your camera roll, as outlined above.
7. Tap the check mark to approve your design. Next, you can add stickers, text, or effects. Tap the arrow in the bottom right corner when you’re ready to publish.
8. Choose your preferred audience for your masterpiece and tap Share!
How to make a collage on an Instagram Story: layering methodFeeling restricted by Instagram’s layout grids? This alternative method gives you the opportunity to go rogue.
Images can be enlarged, shrunk, tilted, or placed in an overlapping formation. Time to freestyle!
1. Open the Instagram app and tap the + icon at the top of the screen. Select Story.
2. This will open your camera roll. But don’t be distracted by all your beautiful photos! We need to activate create mode first. Tap on the camera icon to do this.
3. Tap the sticker icon at the top of the screen (the square with the smiling face). Scroll through the stickers to find the Camera Roll sticker: it’ll be a circle previewing your latest photo, with a logo of a mountain and sun overlaid on top.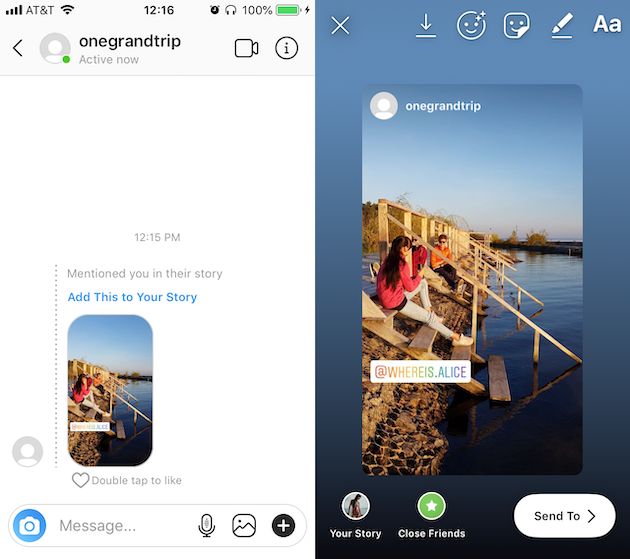 (We know that sounds confusing but we honestly don’t know how to describe this in a clearer way? Hopefully, this photo below will help clarify.)
4. Pick a photo and it will be added to your story. Drag it anywhere on the screen, or use your fingers to manipulate the size and tilt of the image. Then, tap the sticker icon again to add another photo.
Repeat until all your photos are on the screen. Move them around and tweak them as you’d like.
5. To change the background color, tap the colored circle at the top of the screen. (You’ll also find tools to add text or further stickers if you’d like!)
You can also change the shape of your images by tapping them — for instance, maybe circles tickle your fancy.
6. Ready to post? Tap the arrow icon to move on to your sharing settings. Select your audience and then tap Share.
How to make a collage on an Instagram Story: most customizable wayIf building your collage in the Instagram Story create mode isn’t getting you the results you want, there’s good news: dozens of apps exist out there to help you customize the multi-image graphic of your dreams.
1. Download the Instagram collage app of your choosing and design a graphic using your photos, cool templates, and other design details.(Alternatively: download one of our 72 free Instagram Story templates, open it in Photoshop and make it your own.)
For this example, we’ll use Unfold.
2. Export the image to your camera roll if you’re using an app. (Using the Photoshop method? Send the final file to your phone… make use to save it as a .jpg or .png!)
3. Create a new Instagram Story and select the collage image from your camera roll and post. See below for more explicit instructions if you need ‘em!
How to post your collage on your Instagram StoryOkay, you’ve got a collage saved to your phone that you’re ready to share with the world. All you’ve gotta do is post it to your Instagram Story like you would any other single photo.
Need a refresher? No sweat. Here’s how to use the Instagram Story create mode to post an image from your camera roll.
1. Open the Instagram app and tap the + icon at the top of the screen. Select Story. This will open your camera roll. Tap your collage to upload it.
2. Add any more text, stickers, or effects that you’d like. When you’re done, hit the arrow in the bottom right corner.
3. Choose where to share your Instagram story (to your public story, to your Close Friends List, or send it as a private message). Tap Share when you’re ready to publish.
Now that you’re an expert in creating beautiful collages for your Instagram Story, looks like you’ve got some time on your hands. Maybe a good opportunity to brush up on other hot tips for using your Instagram Stories for business?
Use Hootsuite to schedule Instagram posts and Stories at the best time, respond to comments, track competitors, and measure performance—all from the same dashboard you use to manage your other social networks. Start your free trial today!
Get Started
Grow on Instagram
Easily create, analyze, and schedule Instagram posts, Stories, and Reels with Hootsuite. Save time and get results.
Free 30-Day Trial
Instagram is one of the most popular social media platforms that allow users to share photos and videos with their friends and followers. To enhance user satisfaction, Instagram constantly adds new and cool features that make the app even more fun and interesting. In 2016, Instagram launched its own version of Stories, modeled from a similar element in Snapchat.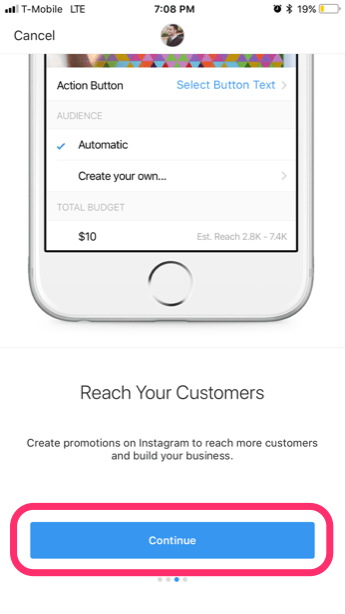
Instagram Stories allows you to share multiple photos and videos to document your day, whether you’re on an adventure or just chilling out. These stories can be viewed by your followers within 24 hours, after which, they are saved in your archive. The photos and videos in your Stories are uploaded separately from your Instagram posts.
Instagram Stories last for 24 hours (although you can Highlight them to keep them longer) and can be viewed by the world or just by your followers, depending on your privacy settings. For private accounts, only your followers can view your story; however, everyone can see your stories on public accounts.
Instagram Stories appear on your followers’ Instagram feed (at the top). Unlike standard Instagram Posts, users can add images and videos to their Stories.
Creating an Instagram Story is relatively simple. Here’s what you need to do:

Now, your Story will appear for all of your chosen friends to see it. But, what happens when you realize you forgot to add a few images? What if your Story is an actual story and you need to add more context throughout the day?
Fortunately, the next section explains how you can easily add to your existing Instagram Story.
Adding photos and videos to your Instagram story is easy. The steps are nearly identical to those creating a Story. But, there are a few things you should know to make sure the updated videos and images are added correctly.
To add content, follow these steps to add images to a Story you’ve already published:
You can add any filters or text before selecting the arrow icon to personalize your Story. After uploading your updates to your Story, users can tap your Story icon at the top of their feed and the Story will roll from the original images and videos to the newer ones.
You can repeat the same steps if you want to add more photos and videos to your Instagram Story.
Once you’ve uploaded your stories to Instagram, they will appear in these places:
Just in case you have added the wrong photo to your Instagram story, or you just changed your mind about it, you can always delete it from your Story. Here’s how:
Aside from simply adding more to your Story, Instagram limits your ability to make edits once you’ve sent it to all of your friends or posted it. If you want to make edits to filters or add the text you will run into some difficulty. Unfortunately, you’ll need to re-upload your Story.
But, if you want your story to live on forever, you can add it to your Highlights. A Highlight in Instagram will live on forever in your profile (or at least until you delete it).
Whether you’re an Instagram expert or a novice, we’ve heard your questions! Here are some more answers to the questions our readers have asked about Instagram!
Unfortunately, no. An Instagram post is different from an Instagram Story. The former is a permanent fixture on your Instagram account until you delete it, but it doesn’t have the same options as a Story for editing and updating. Once you publish a regular Instagram post, there aren’t a lot of options to edit or add content. You will have to delete the entire post and upload it all over again.
Yes, you can edit and add content to your Highlights. Highlights are a more permanent option to display your Story on your profile. If you’d like to add more content, you can visit your profile page and click on the highlight under the ‘Edit Profile’ button.
The Stories are usually short snips with a video or only one image. One option is to use your phone’s screen record feature to scroll through multiple images and upload the video. For this to look good, you may need to create an album on your phone just for those photos you want to upload to your story, but also be mindful of the video’s length. The other option is to set a photo as the background and use one of Snapchat’s stickers that allow you to upload more photos. When posting, take, or select your photo and swipe up from the bottom to access the stickers.
Instagram Stories are a neat feature of the app that makes it just that little bit more interesting. The time-limited nature of them is both a benefit and a bane of the system but forces you to be creative quickly. It also means you don’t have to scroll through weeks’ worth of other stories to get to the most recent.
Menu
Content
Methods for making a collage of multiple photos in the application for iPhones and for other phones differ. It’s easy to add several photos to stories on iPhone, you don’t need to download additional applications.
But in order to do the same steps on other phones, you will need to tinker, download a third-party application.
Step by step how to use this feature on your Android smartphone.
You can add several photos, reduce or enlarge them, write on them, use gifs, stickers, emoticons. When you have done all the necessary actions, share with your subscribers.
On different devices, the appearance and functionality of the keyboard may vary, but the essence remains the same, and if you search in the settings and widgets, you will find a “pin” to upload pictures.
Here are some ideas for adding variety to your Stories:
There are many ideas on how to use this feature on Instagram. As long as there is enough imagination and resourcefulness, the profile will be so unique.
What to do if you do not want to leave Instagram, and you are not going to download something additionally? For such cases, there is a function Instagram collage. Let's figure out how to put several photos in the story.
Keep in mind that the sizes are determined not by you, but by Instagram. It gives the same standard for everyone, except that there are several collage formats. Choose the one that suits you best.
And now you know how to insert several photos into one story.
Another way to attach multiple photos to Instagram Stories is to use the Stories editing app.
If the phone's memory permits, several applications can be downloaded. There are more editing options, application tools will make Instagram stories brighter and more creative.
So anyone who makes a minimal effort can make a story from several photos for Instagram. There are many applications in the Play Market that make stories more aesthetic, templates are selected according to the mood, seasons of the year, and even holidays.
From this article we conclude that there are many ways to make an Instagram account different from everyone else, they cannot be counted. Plus, they are easy to use.
If the tips from our article help to make your Instagram account more attractive to you and your readers, then we are not in vain. Experiment with content and have fun with it, and our blog with instructions will help you with this!
Share with friends:
Tweet
Share
Share
Send
Classify
Adblock
detector
Life is always in full swing on the Internet, and especially on Instagram*. And the busiest place on Instagram* is stories. This is a separate feed of photos and videos that disappear after 24 hours from the moment they are uploaded.
One of the most popular storytelling formats - it helps to establish an online presence without overloading the main feed. In Stories, you can upload tons of vacation shots, broadcast live from festivals, report or conduct surveys. If you haven’t done anything like this yet, but would like to, our beginner’s guide will come in handy.
You can access the story photo editor by swiping your Instagram feed* to the right. There are two ways to upload a photo:
- use photos from the phone's gallery - click on the thumbnail of the last photo taken by the phone, it is located in the lower left corner of the screen;
- take a picture directly in the application - for this, the developers have come up with several modes.
Regular photo . This mode is enabled first by default. One press takes a photo, a long press switches to a 15-second video mode. You can apply a filter on a photo with some romantic name like Tokyo or Rio De Janeiro - swipe right or left on the photo to apply effects
To send a photo to the feed, click the "Your Story" button at the bottom center of the frame. The "Save" button at the bottom left uploads the photo from Instagram* to your phone along with all the changes you made in the editor: pictures, text and stickers - this photo can, for example, be placed in the main Instagram feed*, from where nothing disappears, or send to friends. The "Recipients" button helps to organize the list of recipients of the frame, if you do not want to share it with everyone in a row - then the application will send the photo to Direct only to the selected ones.
Tooltip : Stories privacy can also be adjusted in the settings (cog icon in the upper left corner of the screen).
If you have selected a photo from the gallery and it was taken more than a day ago, you will see a sticker with the date in large print on it. To remove it, hold the date with your finger - a trash can will appear where you can drag this sticker.
Screen text . Sometimes there is too much text in the story for a short note on the photo - all the letters can be put on separate screens. In this case, there is a "Text" mode. You can change the background color (the colored ball to the left of the main button) and the font. The font settings are hidden behind a button at the top center. The background for the text can also be a photograph — to do this, click on the camera icon in the lower right. To make a colored background appear under the text, click on the icon with the letter "A" and stars in the upper left corner of the screen.
Hint : You can select this mode to tell what is going on in the photo or video you upload next.
Live . In this mode, the video will be immediately broadcast to the Stories feed. You can invite people to watch your live broadcast, but even after it ends, the video will be available for another 24 hours if you click the corresponding button after the broadcast ends.
Hint : This mode is great for shooting at public events, but mobile internet in such places tends to be poor. Provide yourself with a backup link, such as stable Wi-Fi from a friendly cafe next door.
Boomerang . Boomerang is a two-second looped video that captures a single movement. Swings, fountains, flowing hair, printing presses - they will all be happy to play in your creative boomerangs.
Superzoom . Allows you to shoot a three-second video with an increase in some part of the frame and accompanying music. There are several options for superzoom: drama, TV show, pendulum and disco beat. To select one of these options, you need to successively click on the icon with the treble clef.
Hint : to keep the music from disappearing from the video, you need to follow the sound speaker indicator in the upper left corner of the frame - there should not be a cross.
Backshot . You shoot the video as usual, and Instagram* shows it in reverse order.
Hint : It’s especially cool with those movements that in the usual version you won’t see in reverse - squeezing paste out of a tube, blowing soap bubbles or jumping into the water from a cliff.
Hands free . In this mode, pressing will start a 15-second recording, and you do not have to hold the record button with your finger. It will come in handy, for example, if you need to record your incendiary full-length dance on video.
Instagram Stories* opens up new possibilities for selfie lovers: you can apply virtual make-up, fan coloring or bunny ears to your photo or video. To turn on the front camera, click on the icon of two arrows in a circle, and then the adjacent button with a smiley. A set of masks will appear below - have fun! A single press will take a photo, and a long press of the button will record a video.
You can easily add a geotag, local temperature and time, a hashtag, your companion's Instagram* account to your photo. To access these buttons, tap the square smiley icon at the top of the screen.
You can also choose stickers or gifs there.
The Poll button lets you ask a two-choice question, while the moving emoji button invites your readers to rate it.
To add text to the photo, click the "A" icon at the top of the screen. In this editor, you can change the font and background under the text - the buttons are located at the top, and the color palette is at the bottom.
By the way, you can write something in another editor designed for drawing. It is activated by the pencil icon at the top of the screen.

/cdn.vox-cdn.com/uploads/chorus_asset/file/10932371/isnta_mute.jpg)