What are Instagram Reels?
How to make a Reel on Instagram in 5 steps
5 tips for making viral Reels as a business
Instagram Reels cheat sheet
By now, you already know that Instagram Reels are a gold mine for helping you grow your following. The short, entertaining videos have a special way of grabbing users’ attention, which can mean lots of engagement for your brand.
Since Reels debuted two years ago, they’ve become the platform’s fastest-growing feature. Creators like Justin Bieber, Lizzo, and Stanley Tucci helped transform the addictive feature from a TikTok wannabe to a full-blown competitor. And we’re not surprised.
But how do you use this tool to reach more people, get new followers, or spread the word about your products and services? In this guide, we’ll cover everything you need to know, from how to make a reel on Instagram to figuring out the best time to post it.
Bonus: Download the free 10-Day Reels Challenge, a daily workbook of creative prompts that will help you get started with Instagram Reels, track your growth, and see results across your entire Instagram profile.
Instagram Reels are full-screen vertical videos that can be up to 90 seconds long. They come with many unique editing tools and an extensive library of audio tracks (featuring everything from trending songs to snippets of other users’ viral content). On top of sounds, Reels can include multiple video clips, filters, captions, interactive backgrounds, stickers, and more.
Reels are different from Instagram Stories. Unlike Stories, they don’t disappear after 24 hours. Once you post a Reel, it’s available on Instagram until you delete it.
The best part? Reels are currently favored by the Instagram algorithm, which is more likely to recommend them to people who don’t follow you than feed posts. That’s huge for social marketers.
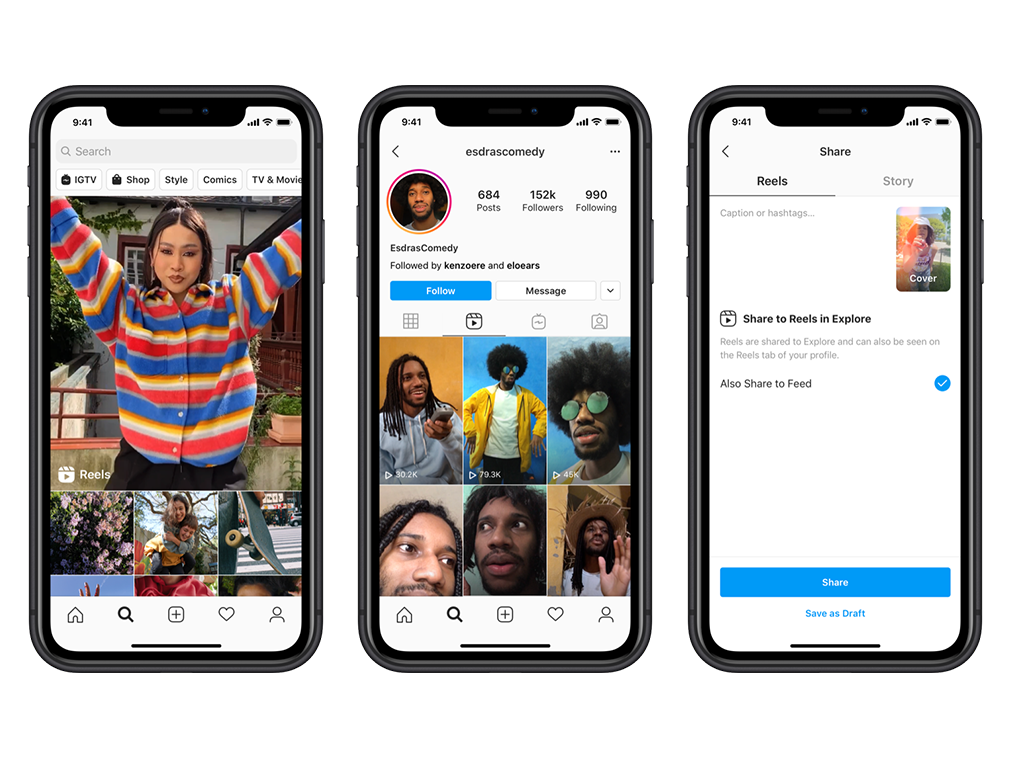
Users can also discover Reels in a dedicated section of the Instagram app. A scrollable feed full of trending Reels (a.k.a. Instagram’s version of the TikTok For You page) can be accessed through the Reels icon at the bottom of the Instagram app’s home page.
An individual user’s Reels can be viewed in a dedicated tab that can be accessed above the account’s Feed.
Reels are also heavily featured in the Explore tab. If you’d like to set your Reels up for success with this powerful discovery tool, check out our guide to getting your content on the Instagram Explore page.
If you’re familiar with Instagram and/or TikTok, you’ll find making Reels quite easy.
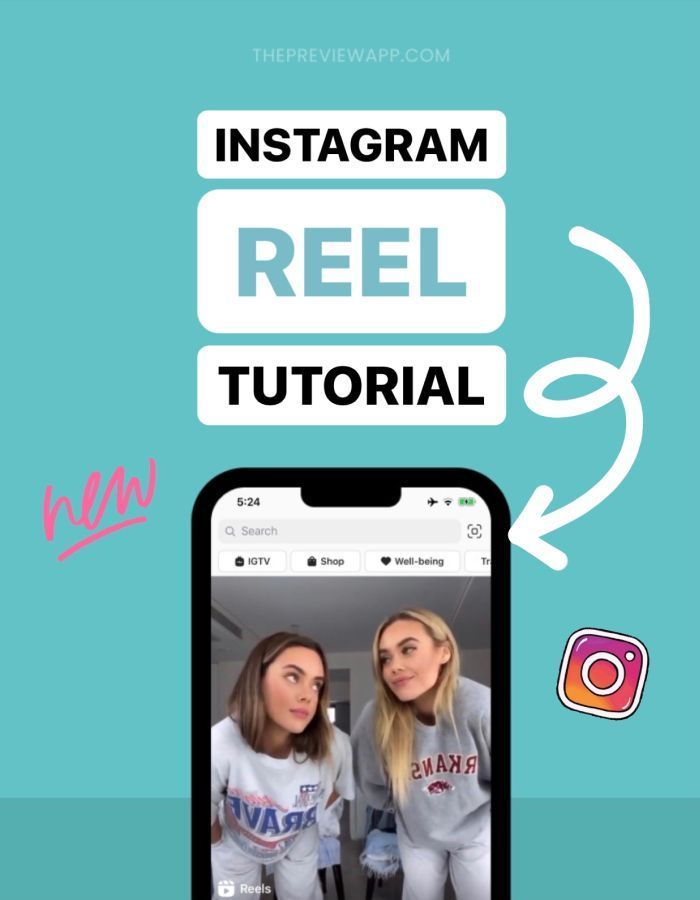
Are you a visual learner? Check out this video and learn how to make an Instagram Reel in under 7 minutes:
Otherwise, follow these simple step-by-step instructions.
To access Reels, simply open the Instagram app and head to your profile page. Click the plus sign button on the top right of the screen and select Reel.
You can also access the Reels editor by swiping left to the Instagram camera and selecting Reel from the bottom options.
Instagram Reels gives you two options to create a Reel:
Reels can be recorded in a series of clips (one at a time), or all at once.
If you set a timer early on, there’s a countdown before the hands-free recording starts.
During the recording, you can tap the record button to end a clip, and then tap it again to start a new clip.
Then, the Align button will appear, allowing you to line up objects from the previous clip before recording your next. This allows you to create seamless transitions for moments like changing outfits, adding new music, or adding new friends to your Reel.
If you want to watch, trim, or delete the previous clip you recorded, you can tap Edit Clips. Check out our Instagram Reels tutorial for more in-depth editing tips.
Once you’re done with recording, you can add stickers, drawings, and text to edit your Reel using the icons on the top of the editor.
The Reels editor features built-in creative tools so you can do all your editing from one interface.
Here’s what each feature does:
 You can even choose to add your favorite part only.
After you’ve aligned your clips, you can tap the music note icon to add trending sounds or music, or record a voiceover.
You can also tap the download icon to download Instagram Reels to your device to view or edit later.
Check out our Instagram Reels tutorial for more in-depth editing tips.
When you’re ready, tap Next in the bottom right corner of your screen. You will be able to:
Once you adjust your settings, tap the Share button at the bottom of the screen.
Congrats! You’ve posted your first Reel. Now, let’s move on to some tactics that will help you make this format work for your brand.
Optional: Schedule your Reel
You’ve got your Reel ready to go, but maybe 11:30 pm on a Tuesday isn’t the best time to get maximum exposure. You might want to consider scheduling your Reel to post at a more ideal time.
Until recently, this feature was only available via Meta’s Creator Studio, or with a third-party tool like, you guessed it, Hootsuite!
In-app Reel scheduling is coming to both business and creator accounts, with Meta confirming that they “are testing the ability to schedule content with a percentage of our global community.”
While only available to lucky Android users at the moment (check your App, you might have it already!) the scheduling feature is expected to be available to everyone very soon.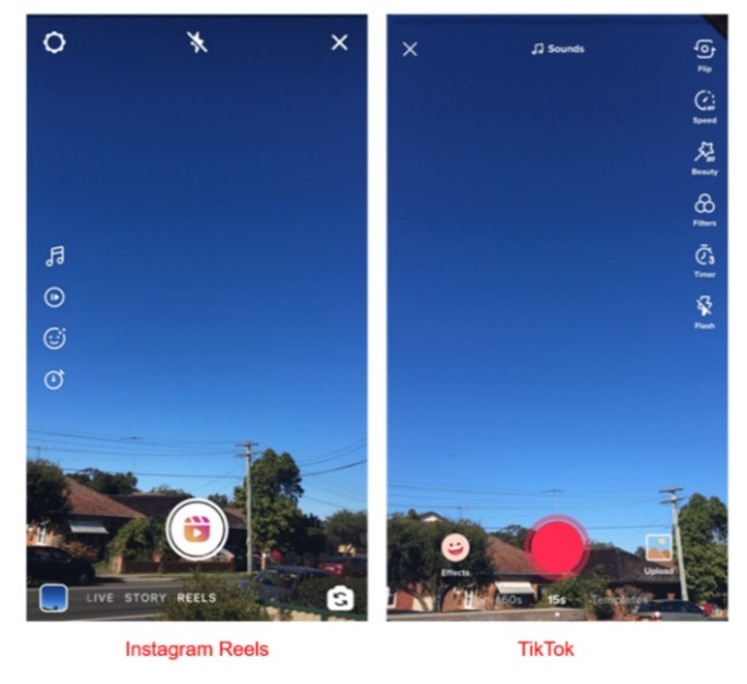
At this time, regular posts and Reels can be scheduled in-app, but not Stories and no scheduling feature is available for desktop users.
Instagram Reels can be a great way to get your business in front of the right audience. The feature can also help you grow your following and boost engagement rates. But this doesn’t happen automatically. You’ve got to know the hacks to go viral on Instagram Reels.
The magic of Reels is in Instagram’s not-so-secret sauce — the algorithm. This is the all-knowing matchmaker the platform uses to determine which Reels it shows to which users. Understanding the way the Reels algorithm works can help you get more views from the Explore page and the Reels tab.
Adding trending sounds, using the right hashtags, and making your Reels visually appealing are all great ways to tell the algorithm, “Hey! Pay attention to me!”
If you scroll through Instagram Reels or TikTok on the regular, you’ll notice that many creators use the same sounds on top of their videos. Thousands of people have used The Home Depot Beat and the typing sound audio. That’s not a coincidence.
Instagram Reels sounds are snippets of songs or audio clips from other creators’ videos. When they gain popularity, they can help you get more views if you add them to your Reels. This is because users often search by sounds and because, quite frankly, the aforementioned algorithm seems to like it.
The best way to find trending audio on Instagram is to use the platform and take note of which sounds you’re seeing pop up more than others.
When you scroll through Reels, make note of any sounds that have an arrow next to the name of the sound. The arrow indicates that they’re trending. It can be tough to find sounds after you’ve already excited a Reel, so make sure to save them and use them later.
One last tip! Be sure to choose songs wisely and use them sparingly. We all know what happens when trending sounds get overused. (Oh no, oh no, oh no no no no no).
As much as you might want to sell, the reality is that users don’t open up social media apps hoping to see ads. They turn to Instagram to explore ideas, connect with others, and get a quick burst of entertainment during breaks in their day. That’s why you need to make sure your Reels help them do just that.
Be sure to create content (yup, this includes Reels) that’s actually entertaining to your target audience. Whether that means leaning into a trending dance or creating quick how-to Reels, aim to delight, inform, and entertain users rather than sell to them.
See: Away’s comedic approach to travel content, Barkbox’s clever use of trending sounds, and Delta’s brilliant attempt to gamify Reels.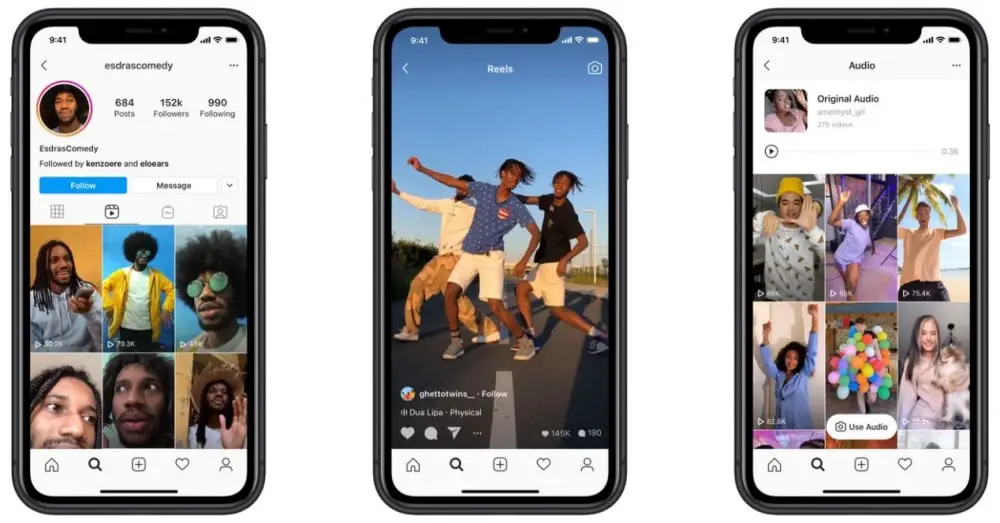
That doesn’t mean you shouldn’t turn your Reels into ads, though. Boost those high-performing—but non-salesly!—Reels to get even more visibility.
You can use the same strategies to be successful with Reels that you used to boost content on Instagram Stories or in the original Feed. Consistently posting is one of the best things you can do to help improve your performance across the platform, including in Reels.
Bonus: Download the free 10-Day Reels Challenge, a daily workbook of creative prompts that will help you get started with Instagram Reels, track your growth, and see results across your entire Instagram profile.
Get the creative prompts now!
That’s because it helps increase your odds of going viral. Plus, the algorithm is kind of like your biggest fan—it loves when you post new stuff! In general, the Instagram gods prioritize showing recent videos over stale ones, so keep things fresh.
Posting often also helps you aggregate a ton of helpful insights that will guide you when you’re trying to figure out what works and why. The more you post, the more you’ll learn about your target audience—what they like, when they scroll, and more.
Last year, Instagram added a new feature called Collabs. This option lets you share credit with another creator and allows them to share the Reel from their page as if it was their own.
The Collab feature is a game-changer if you work with influencers, brand partners, and others. It lets you extend your reach to their entire following, which can mean tons more likes, shares, reach, and overall engagement.
Here’s how to use Collabs:
Once the user accepts your collab invitation, the Reel will show up in the Reels tab in their account.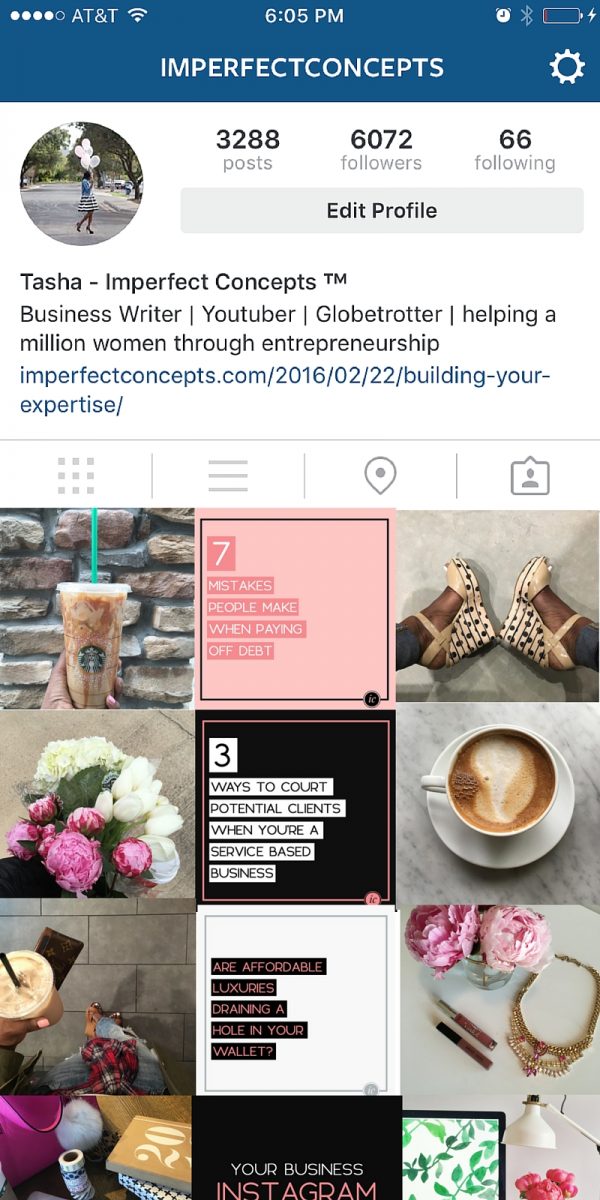
Need quick answers to all your burning Reels questions? Skim our cheat sheet (and bookmark it for later).
Scheduling social media posts is a must when you want to stay on your game without having to work overtime. Luckily, there’s an easy way to schedule Instagram Reels with Hootsuite.
Using Hootsuite, you can schedule your Reels to be auto-published at any time in the future.
To create and schedule a Reel using Hootsuite, follow these steps:
Start your free 30-day trial. You can cancel anytime.
And that’s it! Your Reel will show up in the Planner, alongside all of your other scheduled social media posts. From there, you can edit, delete or duplicate your Reel, or move it to drafts.
Start your free 30-day trial. You can cancel anytime.
Once your Reel is published, it will appear in both your feed and the Reels tab on your account.
Note: You can currently only create and schedule Reels on desktop (but you will be able to see your scheduled Reels in the Planner in the Hootsuite mobile app).
In-App SchedulingNote: At the time of writing this feature is in a limited testing phase but is expected to be released to all Instagram users soon.
Whether you’re a creator or a consumer, downloading Instagram Reels is a useful tool to have up your sleeve.
When creating, it helps you save drafts directly to your device or share them with others before they go live. You’ll also want to download Reels you’ve created if you plan to share them on another platform.
When scrolling, downloading allows you to save other creators’ videos permanently, even if the creator takes them down. It also allows you to access them when you’re offline.
There are several ways to download Instagram Reels.
If you own the Reel, you can download it using the Download option from the Reels editing page. Once it’s published, you can download it from the Reel itself. Click on the three dots in the bottom right corner of the Reel and select Save to Camera Roll.
If you want to download someone else’s Reel, you’ll have to record your screen or use a third-party app, such as InstDown or InSaver.
Learn more in our guide to downloading Instagram Reels.
Knowing what time to post on Instagram Reels is an easy way to target your users when they’re the most active. Catching them when they scroll means more engagement and further reach for your brand.
The thing is, everyone’s ideal post time is different. For Hootsuite, the best time to post on Instagram is between 9 a.m. and noon, Monday through Thursday. But your audience may skew later, earlier, or scroll more on the weekends.
Don’t worry. There’s a quick way to figure out when to post. In Hootsuite, you can see the best time to publish Instagram content from the Analytics feature. Click “Best Time to Publish” to see when your users are the most likely to engage with the post. The heat map is a handy way to visualize the best times.
Start your free 30-day trial. You can cancel anytime.
Another way to find the best time to post Reels is to check what worked best for you in the past. To review the performance, of your existing head to Analytics in the Hootsuite dashboard. There, you’ll find detailed stats, including:
Getting the sizing right is another great way to set your Reel up for success.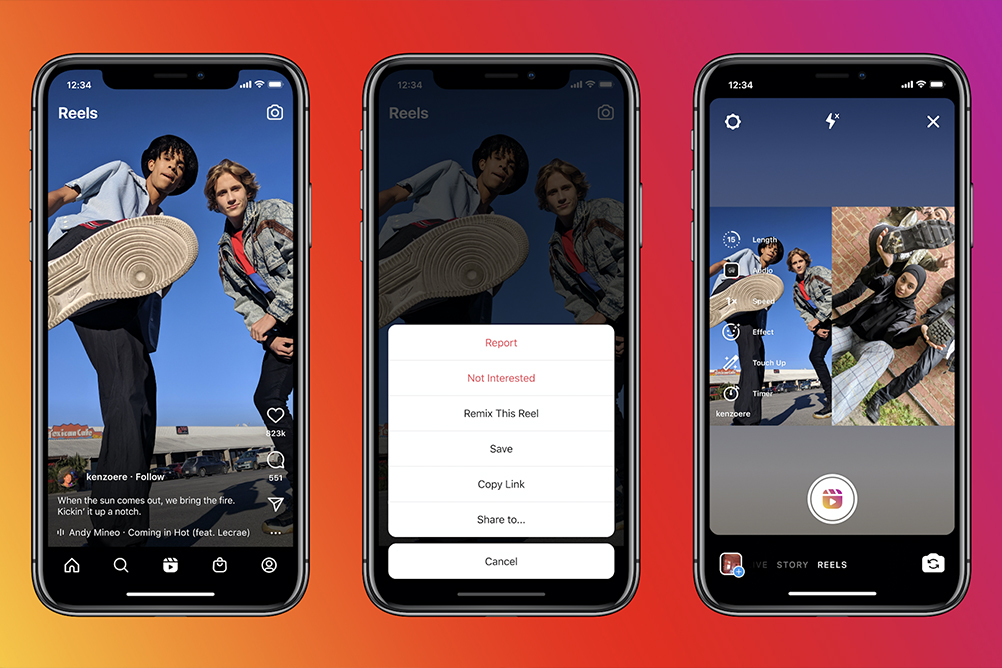
Using the wrong dimensions can make your post look—we won’t sugarcoat it—downright ugly. And that means an instant swipe-up from users. On top of that, the almighty algorithm doesn’t like it when your Reels look stretched or distorted. We don’t blame her.
So what’s the ideal Instagram Reel size? Make your Reel frames and cover 1080 pixels by 1920 pixels. If you choose to have your Reel show up on your regular Grid (probably a good idea, by the way), make sure your thumbnail fits the ideal size of 1080 pixels by 1080 pixels.
What about the Instagram Reels ratio? Users will have the best experience viewing Reels in full-screen mode, which features a ratio of 9:16. However, Instagram also shows Reels in the main feed, and crops them to a ratio of 4:5.
Just make sure to avoid putting any important information around the edges of the frame, because it could get cut off.
Read our full guide to Instagram Reels sizes.
Instagram Reels can be as long as 90 seconds.
When Instagram first debuted the Reels feature in 2019, users could only post Reels up to 15 seconds long. In 2022, users have a choice of four Instagram reel lengths up to 90 seconds each. That means you’ve got a full minute and a half to dazzle your audience.
But should you actually use all 90 seconds? Not always. It totally depends on the Reel itself. In general, aim for user-friendliness when you’re deciding how long to make an Instagram Reel.
Longer Instagram Reels come in handy for more time-consuming stories, how-to guides, tours, and more.
You certainly don’t want to draw things out, though. Remember that the point of Reels is to create small snippets of delightful content, so keep it short and sweet.
Bonus tip: Unless you’re looking for a quick way to enrage your audience, you should never post multi-part videos when you could do it in one. That’s what 90-second Reels are for!
One of the best things you can do as a savvy Reel creator is checking out what other people are doing on the platform. To get unique Instagram Reels ideas, you can search for content to help inspire you.
A quick way to search for Reels is to use the general search bar at the top of the app. Type in a search feature and explore content, users, and hashtags related to that term.
While Instagram’s standard search function is helpful, it doesn’t only show Reels. A good great way to search only Reels is to click on hashtags from other Reels. This will limit your results to Reels and filter out images.
For example, if you’re an avid consumer of puppy content, you can click on the #dogsofinstagram hashtag from a Reel’s caption to see more Reels of dogs being cute.
Easily schedule and manage Reels alongside all your other content from Hootsuite’s super simple dashboard. Schedule Reels to go live while you’re OOO, post at the best possible time (even if you’re fast asleep), and monitor your reach, likes, shares, and more.
Try it free
Save time and stress less with easy Reels scheduling and performance monitoring from Hootsuite. Trust us, it’s reely easy.
Free 30-Day Trial
Is Instagram Reels the new Tiktok? Well, it seems so! TikTok was being criticized for a long time for the kind of content people upload, for the breach of security, and for using people’s information. This resulted in the ban of TikTok in some major countries, including India and the US, and other countries are planning to do that too. Instagram couldn’t just let this opportunity go and launched its own short video feature, ‘Reels,’ inside the platform itself. Overnight, Instagram users went crazy and started uploading 15-second videos on their profiles.
So, in this article, we at RecurPost, a social media scheduler, will talk about exactly what the Instagram reels feature is and how it can be used to maximize your social media presence.
 TikTok
Instagram Reels is a brand new way to create fun and interactive short video content from Instagram Stories. Instagram has released this feature in more than 50 countries. The explore page icon is now replaced by the Reels section and users are able to discover all the content from that tab.
All Instagram users can record and edit 15 and 30 second video clips and share them on stories, feed, and the new reels tab on the profile. On your news feed, you will only see reels from people whom you follow. But in the discover section, you’ll be able to find popular reels from trending accounts on Instagram.
There are so many similarities that you’ll see between TikTok and Instagram reels. While the algorithm for reels has not been decided yet, it kind of feels similar to that of TikTok. You’ll be shown content based on people you already know, the kind of content that you like, and your location. Again, like TikTok, if you see an audio clip that you like, you can use that audio in your content. You can also select music from a huge library or use your own audio.
Apart from the music selection options, many editing tools are available to explore. There is a video countdown timer, the option to adjust your video’s speed, and a library of video effects to choose from.
To create reels, you can shoot the video on the spot from the Instagram camera or choose a video from your storage device. Once you set the clip and audio, you can use the text and drawing tools, or add stickers to your reels, just like Instagram stories.
How to make reels on Instagram? – Instagram reels tutorialHere’s a little step-by-step Instagram reels tutorial:
When you are using a pre-recorded video for reels, you need to take care of the size. The Instagram reel’s video size is 9:16. However, on the feed, they appear in a ratio of 4:5.
Reels can be shared with your followers as well as the entire Instagram community through the explore page. Your reels will be shown to specific people on the basis of whether you have a public or a private account. Additionally, you can post your reels using an Instagram post scheduler to save your time.
 You need to share the reels on your Instagram feed so that your followers can see them. Anyone will not be able to use the original audio from your reels and they will also not be able to share them with people who don’t follow you.
When your reel is ready, switch to the sharing screen where you can save your reel draft, change the cover picture, add the caption and hashtags, and tag your friends and followers. If you post the reels on your feed as well, it will appear on your main profile grid, even though you have the option to remove it.
It doesn’t matter whether you have a public or private account – you can share reels to your Instagram stories, close friends, or through direct messages. This will make it act like a regular story – it will not show up on your reels tab and will disappear after the duration of 24 hours. But do you know How To Add Multiple Photos To Instagram Story?
To find reels to watch on Instagram, there are basically four ways. Let’s have a look at them.
In 2016, when Instagram released the feature of Stories, it was mocked for being the clone of Snapchat. However, it was quickly adopted by Instagram users and surpassed Snapchat in the number of daily users. It has also become an effective feature for people to build their audience.
Keeping that thing in mind, it will be an ideal option for brands to grab the opportunity and start creating Instagram reels. As reels have a place on the Explore page, your brand will have a huge chance to get exposed to new followers. So let’s see how you can use Instagram reels to build your brand on this platform.
1. Curate content that resonates with your audienceInstagram Reels are developed to be quick and enjoyable and stuffed full of special effects. That makes it very easy to create engrossing and authentic content. This is a great chance for businesses to show their human side and build genuine relations with the audience. Create raw and engaging content that your audience will love and get a chance to be featured on the explore page.
2. Reuse your old TikTok videosIf you were already using TikTok for creating videos, consider posting them as reels on Instagram too.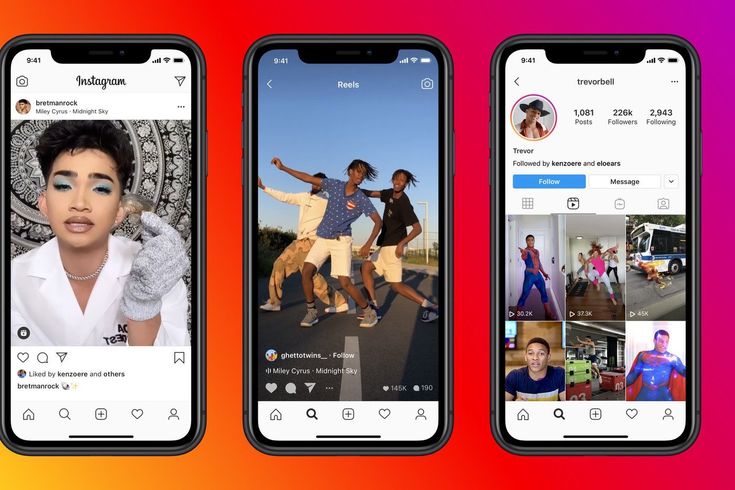 By doing that, you’ll be able to show the same content to people who don’t follow you on TikTok, thus reaching new audiences.
These are the top favorite kind of videos that people actually watch. Create and share something that can provide value to your audience. Best 3 skincare routines, How to bake a cake in 5 steps, or 3 things to consider while buying a laptop. There are so many ways to create content that will help your followers in learning something new.
4. Upload BTS videosBehind-the-scenes videos are something that people like to see too. They show the reality behind the picture-perfect feeds and lives portrayed on social media. People can connect with such videos instantly as they are personal. They’ll help in gaining trust and building personal relationships. You can share videos on selecting materials for your products, the day-to-day life at your workspace, the process of making products, and your brand’s unique story. Scheduling your BTS videos with tools that have a feature of social media bulk scheduling can help you upload your BTS videos whenever you want to upload by creating separate content libraries for each account.
As said earlier, Instagram reels are located on the Explore page, and even people who don’t follow you can see them. This is huge for brands trying to make their products reach new people. Make creative videos showcasing your products or services and add a caption and hashtags to increase your reach. For example, The automotive industry can use this well by showcasing its latest models and car rides. It is a good addition to an Automotive Marketing Strategy.
6. Make announcementsYou can successfully use Instagram reels to make announcements about your upcoming products or services, discounts, sales, upcoming events, etc. This way, more people will become a part of your customer group instead of just being followers.
Sharing the content generated by your users works magically in improving engagement on your profile. It builds trust and makes people believe in what you share. Ask your audience to participate in certain giveaways or competitions and use your brand-specific hashtags. Before sharing their content, make sure to ask for their permission as well.
Yes, absolutely! As you might know, after uploading a post on Instagram, you need to get engagement in the form of likes or comments in the initial hours of posting. If you don’t get that, the Instagram algorithm will stop showing your post to other people. Thus, while uploading a reel, you should toggle on the option of ‘Share to feed’.
This will make your reel appear in the feeds of your followers as well as the Reels explore section. It can gain you the required interaction and engagement after posting a reel. If you keep that option off, your followers will not be able to see your reel while scrolling their feeds. Your reel will only appear in the ‘Reels’ explore tab, where the certainty of getting likes is less.
If you are concerned about the aesthetics of your feed and want to maintain the overall look, share your reel on your feed while posting, and after 2-3 days, remove it! – It will still be there on your profile’s Reels section. It’s that simple.
Instagram Reels Vs. TikTokGiven the massive success of TikTok, it can be said that Instagram also took the advantage of short video content to grow its popularity even more. Even though your Instagram audience might be different from your TikTok fan following, the basic editing tools and features of Instagram reels are similar to TikTok.
Both Reels and TikTok let you start and stop recording videos at your own pace. However, the biggest difference is that you can upload 60 seconds of footage in a TikTok video as compared to only 15 or 30 seconds on Instagram reels.
There are slight and subtle differences in branding. They make Instagram look like a grown-up and more polished version of TikTok. Videos on Instagram reels feel more curated as compared to the raw videos on TikTok. Even while the format of both platforms is the same, the kind of content seen on both of them is entirely different.
Many TikTok influencers have started creating content on reels and building an audience on Instagram too. 44% said they would repurpose their TikTok content by uploading them on reels. However, most of them said they’ll be focusing on both platforms and not just one of them.
Instagram Reels vs. Stories This increases the visibility of your reels and they can also appear in some of the hashtags feeds.
When you are using Instagram for growing your own brand, it is essential to have engagement on your content. And Instagram reels will provide you with the engagement that you need. Because of reels, the visibility of your posts will increase. It provides Instagram users more ways to engage with your content and lets you reuse video resources.
A major advantage of reels is that it grabs the attention of more people than just your followers or audience. Your Reel goes under your Reels tab, shows up in your main profile grid, in Feeds, and under the Explore button. Thus, it gives you an opportunity to attract a new audience.
With the right hashtags, music, and effects, your reel can also appear on top pages in your niche. And as videos are the people’s favorite kind of content to see from brands on social media, reels have a huge potential of winning fans. Also, it is easy to repurpose long videos or user-generated content and convert them into short engaging videos.
The only drawback is that when you post them on stories, they don’t appear in the reels tab and disappear after a period of 24 hours. There are no other disadvantages of using Instagram reels for building a brand. And if you are already using IGTV or stories to upload videos, then getting started with reels will be a no-sweat thing.
The exact algorithm behind Instagram latest update reels is still a mystery, but there are a few things we know for sure. Instagram is increasingly encouraging the use of reels and has kept it in the center of the platform now.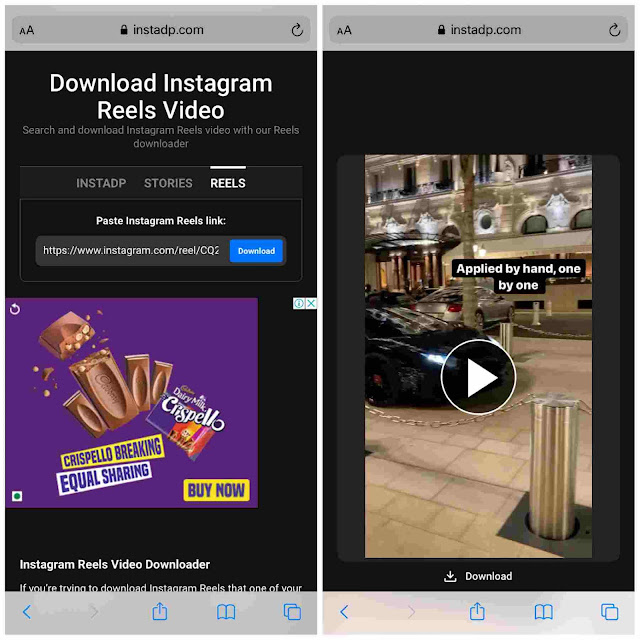 Even in the explore tab, there is a large space occupied by reels. Thus, by making reels that the algorithm likes, you can surely expand your reach and followers quickly.
According to Instagram itself, it’ll display a Reel based on how likely a user is to:
This means that a user is more likely to see your reel if it aligns with their past activity, is popular, or when they have an engaging relationship with you. Also, your reels will not be recommended if they have a watermark, are of low resolution, or focus on political issues.
Here are some tips to make reels that the algorithm likes:
By following these tips, you’ll stand a better chance of hacking the Instagram algorithm and reaching new audiences. To get an additional boost, it is recommended to share reels to your feed along with the main reels tab. Also, include relevant hashtags and a caption to engage users.
To find your reel drafts on Instagram, follow the below steps:
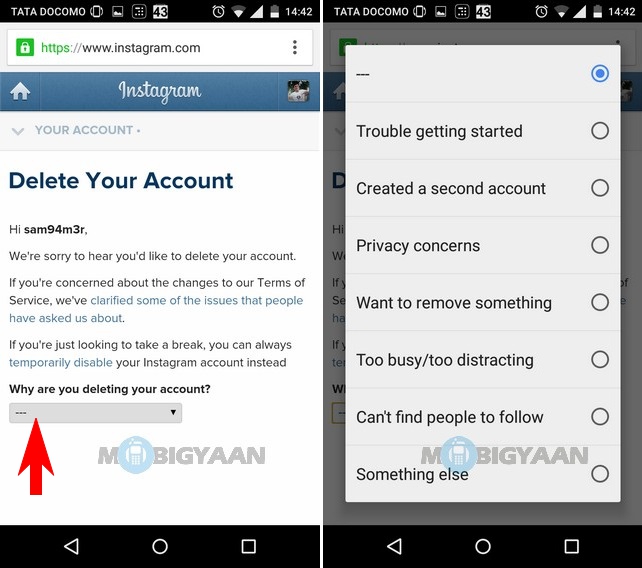
When you go to Instagram’s site from your desktop, all you can see is the login screen. Thus, it doesn’t matter whether you are using Chrome on a desktop or smartphone’s browser, you can’t use Instagram like actual users without logging in. However, there is one way around it.
You can view any Instagram profile and check out the reels as long as you know the exact username and that account is public. Type the Instagram website URL in your browser followed by the account’s username, like www.instagram.com/[username]. Alternatively, you can search that account’s name directly in your browser, for example, ‘Beyonce Instagram account’.
This way, you’ll be able to see the profile details and a minimized feed of the particular account. You’ll not be able to perform any other actions like liking or commenting on posts, following the account, or viewing stories and highlights. And if you attempt to do any of the actions, a prompt will appear asking you to log in to your account.
Apart from creating appealing content, you also need to take care of posting it at the right time. It is crucial that your content gets uploaded when most of your audience is online and actively scrolling through their feeds.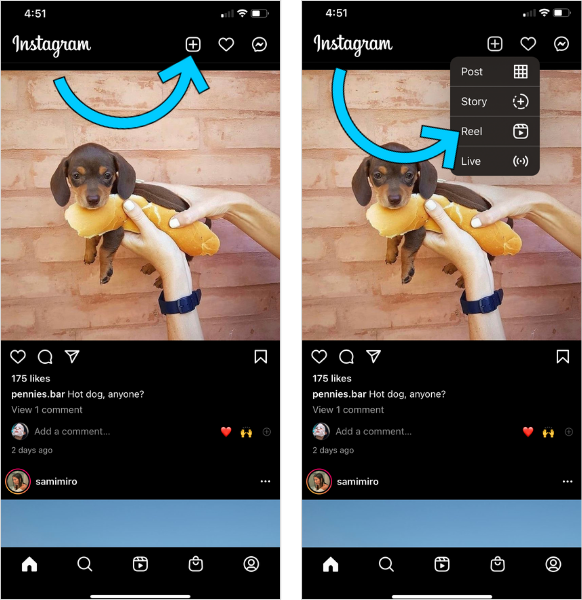 If you don’t know about the best and worst time to post on Instagram, don’t worry! We have a complete guide ready for you. Click here to read it and find your best and worst times.
Also, you can manage your Instagram accounts and other social platforms using RecurPost. It is a social media management tool offering an Instagram scheduler. It’s also one of the best free hootsuite alternatives and also one of the most trusted tailwind alternatives; you can schedule and publish posts from a single dashboard, engage the audience, and measure performance. Try out its 14-day free trial today!
P.S. do you know how to change background color on instagram story to get more views n engagement?
1. How to download Instagram reels?
To download Instagram reels, follow the below steps:
– Download ‘Video downloader for Instagram’ (for Android users) or ‘InSaver for Instagram’ (for iOS users).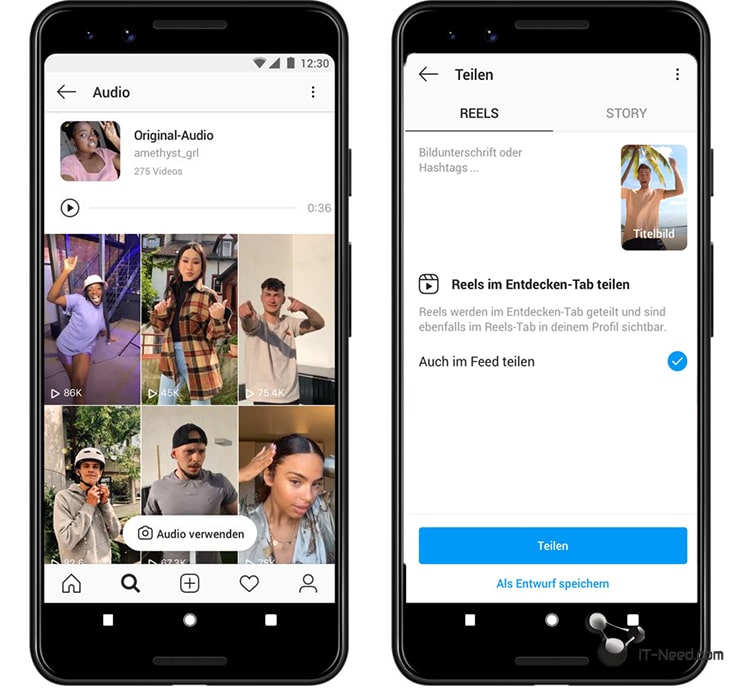
– Install the app, open it and set it up.
– Go back to Instagram and select the Reels video that you’d like to download and open it.
– Click on the three dots icon and tap on ‘Copy link’.
– Now open the recently downloaded app and the link that you copied will automatically be pasted.
– Android users can now find the reel downloaded in their gallery. For iOS users, after pasting the link in the app, Tap Watch It! > Options > Share > Save Video to save the short video to the Photos app.
2. How long are Instagram reels?
When reels were launched, users could create up to 15 seconds long videos. Then just a month later, it doubled the timing and allowed users to create 30 second long videos. And on July 27, 2021, Instagram announced that people could now create 60 second long reels! Thus, you can choose between creating 3 seconds – 60 seconds of videos.
3. How to show reels on feed after posting?
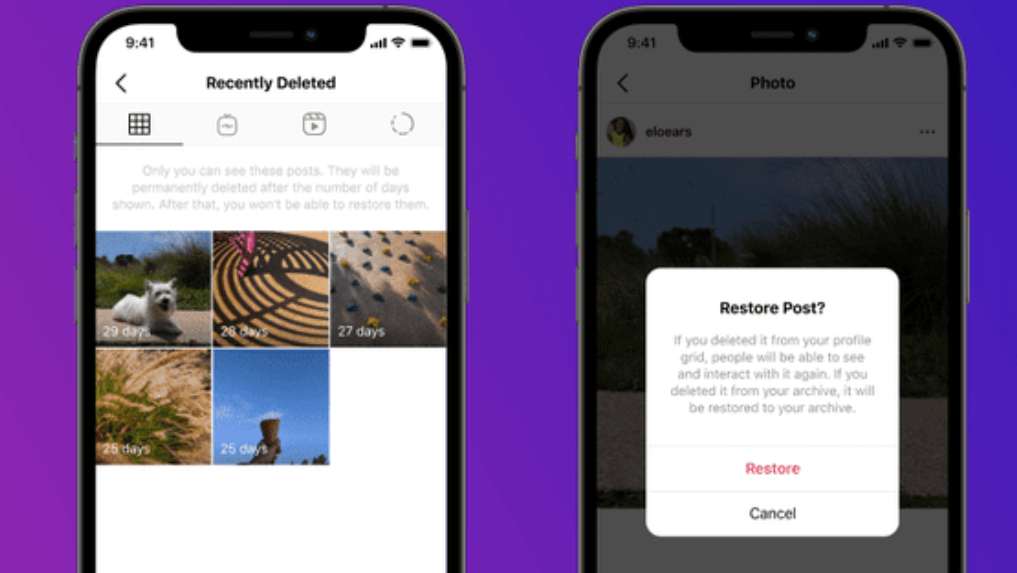
Once you have posted your reel without selecting the option to post to feed or removed a reel video from your profile grid accidentally, there is no option to add back the reel video to your profile grid./cdn.vox-cdn.com/uploads/chorus_asset/file/22714641/reshare.jpg) The only way to add that reel video on your Instagram profile grid is to delete and repost it again.
The only way to add that reel video on your Instagram profile grid is to delete and repost it again.
4. Do reels show up on your feed?
Yes, you can choose whether you want to show your reels on your main feed or not. Once your reel is ready to upload, you will be asked to write a caption for the video. Right below that, there will be a button named ‘Also share to feed’. Make sure that you toggle it on to share the video on your feed.
5. How to share reels on Instagram feed?
To share a reel on your Instagram feed, follow the below steps:
– Go to the Instagram Reels camera and load the video from your gallery.
– In the editor screen, you can add text, stickers, or apply a filter to the video.
– Click on ‘Next’ and you’ll see the options to add caption, tag people, and more.
– There will be a button saying ‘Also share to feed.’
– Toggle it on and share the video.
– The reels will not be shared to your feed when that option is turned off.
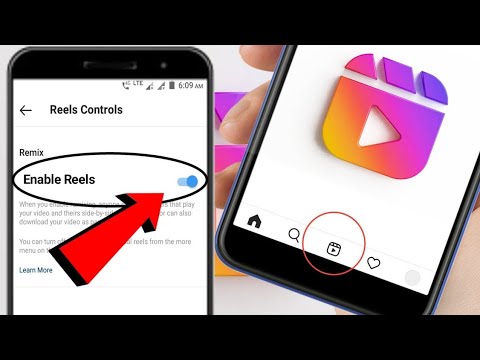
6. Why can’t I see reels on Instagram?
If you can’t see reels on Instagram, there is a possibility that you might be using an outdated version of the app. Go to the play store or app store and download the latest version of the app. If it is still not available, you can join the Beta program. This option will be available in the play store or app store, right below the install button. Another tip is to go to the ‘help’ section in the settings of the Instagram app and report a problem.
7. How do I put text on a reel on Instagram?
To add text on reels, follow the below steps:
– Create the video that you want to upload on Instagram reels.
– Go to your profile, select Reels, and upload the video.
– Select the music by searching for the audio you want by typing the song name or the artist who created it.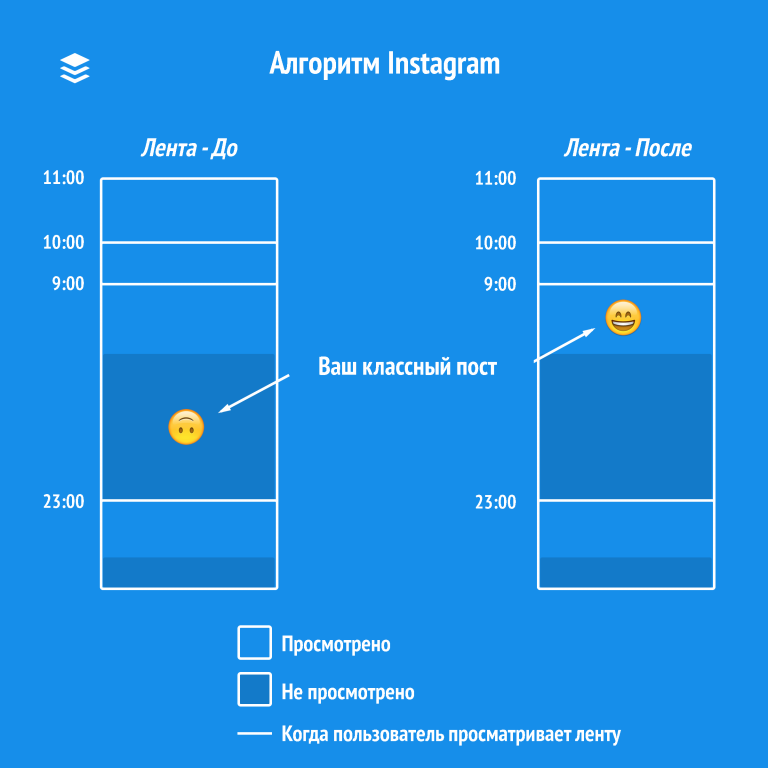
– Click on ‘Preview’ and you’ll see the screen where you can add text, stickers, or GIFs.
– Click on ‘Aa’ and simply type out the text. You can also adjust the timing of the text from this screen itself.
– Crosscheck to make sure the text transitions perfectly.
– You’re all set to upload the video!
8. How do I make text disappear in reels on Instagram?
You can make text disappear in reels on Instagram by setting a duration. Here are the steps to do so:
– Open the Instagram app and add your video to reels.
– Add your choice of music and Click on the ‘Preview’ button to go to the screen where you can add text and other interactive items like GIFs and stickers.
– Tap on the ‘Aa’ icon at the top and add text to your Reel.
– If you add multiple texts, each text appears as a separate block at the bottom of the video.
– Tap on the text block that you want to edit and a white box will appear around your video preview.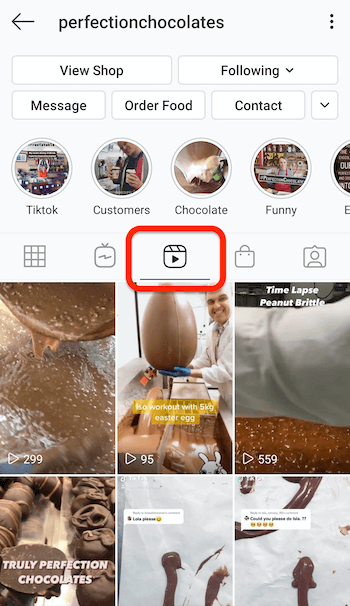
– Drag the white line from either end to adjust the start and end time.
– You can then publish your reel.
9. How to share reels on Instagram story?
To share reels on your story, follow the below steps:
– Open the Instagram app and go to the reel that you want to share.
– At the bottom of the reels, select the share icon that looks like a paper plane.
– In the pop-up menu, select ‘Add reel to your story.’
– The reel will appear in your story and then you’ll be able to customize it as you like.
– Write text, add sticks or GIFs, or apply a filter.
– Once you’re done, share it to your story.
Amaiya Rathi
Amaiya Rathi is a content writer at RecurPost. She helps RecurPost communicate with their readers in their own language. Whether it is the web copy, social media posts or blogs, Amaiya has worked on all aspects of copywriting.
Tags:best time to post on instagraminstagram marketing strategiesVideo Marketing Tips
Video is not a photo, it is more difficult to work with it. In the early days of Instagram*, many third-party services provided the ability to upload videos to the social network. 2020 "cleaned up" the ranks of volunteers.
Let's look at how to add videos to Instagram* from a computer, and for beginners, we will repeat the process of uploading videos in the application from a phone.
The easiest way to upload videos to an Instagram page* is to upload directly through the app on your smartphone. nine0003
You can add a video to Instagram Feed* in the following way:
Enter the app and click the create post icon You can add a finished video from your phone's Gallery or take a video directly from the app. Time limit 60 seconds. Then you will be prompted to apply a filter or select a coverIf your video from the Gallery is longer than a minute, then before posting you will be offered two options:
If you select shorten to a minute, you can do it right in the application.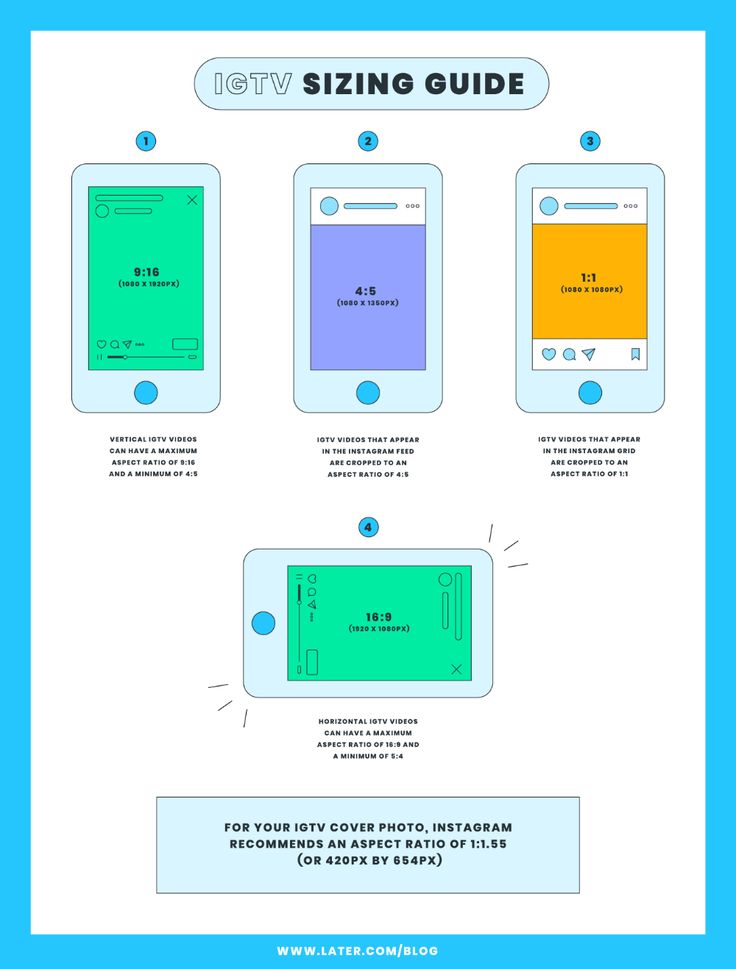 The video will be published in the feed. But if the original video you want to share is longer than 20 minutes, the program will warn you that the video file is too long.
What to do? Trim it with third-party programs.
For example, using VideoShowIf you choose the second option - put the video on IGTV, then you will be given a time limit of 15 minutes. There will be only a short announcement about it in the Feed. And if you don't want to, then you won't. nine0003
For more information on other video specifications, see The Truth About Instagram Videos*.
Uploading videos in Stories is done by clicking on your main profile picture.
You can click both on the Feed view page and in the Profile Video length is limited to 15 seconds, but if necessary, one long video can be split into several short ones before uploading. Here you can also shoot immediately or add from the Gallery. There are many different filters, effects and more available. nine0003
Read more about this in the article How to Use Instagram Stories*.
Posting a video on Instagram* is more difficult here. Simply by opening your page in the browser, you cannot post new content to the Feed and Stories. The exception is IGTV. Otherwise, in 2021, there are only three ways to upload a video to Instagram * from a computer.
The easiest way to solve the problem is with the help of SMMplanner. You can add photos and videos to your Feed, Stories, and IGTV. Yes, the service is paid, but for minimal money you will get the highest pleasure from the process of downloading videos. Suitable for those who post content on Instagram* on a regular basis. nine0003
Read more about working with the service in the article “How to upload a video to Instagram* from a computer”.
 To link an Instagram* account, click on its icon and follow the instructions
 To use it, after logging into the service, link your Instagram* and Facebook* accounts to each other, and you must also have a business account or an Author account on Instagram*.
Switching to the Author's account is not difficult. nine0003 Go to Instagram settings* on your smartphone, select "Account" and then "Switch to professional account". Choose the post category that best suits your content. Select "Author".
You can then upload the video to your Stream. But you can’t make a carousel or add a video to Stories through the service. Alas.
Another way to publish from a computer is to use an Android application emulator. By installing it on your computer, you will work with applications on the monitor, as if you were sitting on your phone. nine0003
Consider BlueStacks.
After installing the application, log in to your Google Play account In the search, enter the word "Instagram*" and install the application You can enter Instagram* by clicking on the Notifications icon.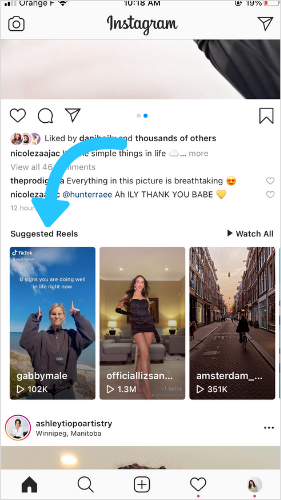 .. ... it in the section My games
 To upload videos to Instagram*, you first need to add these videos to the emulator library.
Log in to Media Manager, yellow icon in My Games Click "Import from Windows" and select the videos you want You will see them in the imported files here Now go to the Instagram* emulator and upload the videos in the same way as you would on your phone: plus sign at the bottom in the center of the screen , and the Gallery will already have the necessary videosNow the moment about the performance of your computer. If you have 4 GB. RAM and less, then each process in the emulator will take you 5 minutes or more; In other words, everything will slow down. nine0003
By opening your page through any computer browser, you can only post videos to the IGTV section.
Go to the IGTV section in your profile and click "Download" When working through a browser, you can download a video longer than on a smartphone, namely up to 1 hour.
If you want to track statistics on Instagram**, we recommend DataFan. You only need to connect your account once and select the type of report - the service will collect the data into a visual dashboard, and they will be updated automatically. nine0003
If you are an ordinary user of a social network and publish video from your computer once or twice a year, then transfer it to your phone's memory and publish it in the usual way. Or use an emulator.
If you regularly post videos to Instagram* that are stored and processed on your computer, delayed posting services and the official Facebook service* will help you. But be aware of the limitations: the service on Facebook* is fairly recent, and Stories, carousel, and some other things are not available there. nine0003
If you shoot Instagram videos with a digital camera instead of a smartphone, you will most likely need to edit them on your computer before posting. And if you need to save the same file in several formats - for example, for the feed and for stories - cropping can take a lot of time.
To make it easier, we've prepared detailed instructions on what Instagram video sizes are considered optimal, how different aspect ratios look in the feed, and how to quickly save an Instagram video in the correct size and format. nine0003
We use VSDC as the editing program. It is a free video editor for Windows that is suitable for both simple operations such as trimming and adding audio, as well as for more complex tasks such as creating a picture-in-picture effect, color correction, and working with sound.
Looking for a convenient and free video editor for PC?
Download VSDC
VSDC has special video export profiles for Instagram and other social networks in the required size. This means that you can automatically apply the optimal settings for each social platform, and adjust them if necessary. nine0003
We will show how this works in detail below. But first, let's talk about the optimal video size for Instagram.
The answer to this question depends on what type of post you are planning. Currently you can post on Instagram:
The general requirements for any video on Instagram are as follows: MP4 format, H.264 codec, 30 frames per second - maximum frequency, resolution - 1080 pixels wide. Lower quality videos - 600 pixels wide - are allowed, however, you should understand that on a visual platform like Instagram, you should always strive for maximum image quality. nine0003
Let's move on to the aspect ratio of the video for Instagram. Here you have several options.
If your video for is a normal post in feed, you can choose any aspect ratio between 1.91:1 (horizontal video) and 4:5 (portrait/vertical mode). Naturally, if your goal is to draw attention to the publication as much as possible, we advise you to choose the second option, because it takes up much more space on the smartphone screen. The recommended settings for vertical video on Instagram are 1080 x 1350 and 864 x 1080 pixels. However, if you shot the original video in a non-portrait mode, it will be difficult to apply the optimal aspect ratio. In such cases, it is worth using square videos with a standard 1:1 ratio. The optimal resolution here would be 1080 x 1080 pixels. nine0003
The best video resolution for Instagram Stories is 1080 x 1920 pixels. And, of course, for maximum organicity, shoot video initially in portrait mode.
Finally, if you're editing a video for IGTV , you can save both a 9:16 vertical video and a 16:9 horizontal video. It is worth remembering that when an IGTV video is viewed in the feed, it is loaded in portrait mode, so it is again recommended to shoot vertically for optimal results. nine0003
After you have finished editing, you can save the video in the desired format and size as follows:
To change any of the video parameters - width, height or frame rate - use the "Change profile" option, this button is located below the preview window. If you need to create and save your own video export profile, see this guide. nine0003
If your video is longer than allowed, you can quickly split it into parts and post sequentially to the carousel or stories. The easiest way to do this is with cropping markers:
Saving videos in the optimal size for Instagram is not difficult if you use a program with preset export options.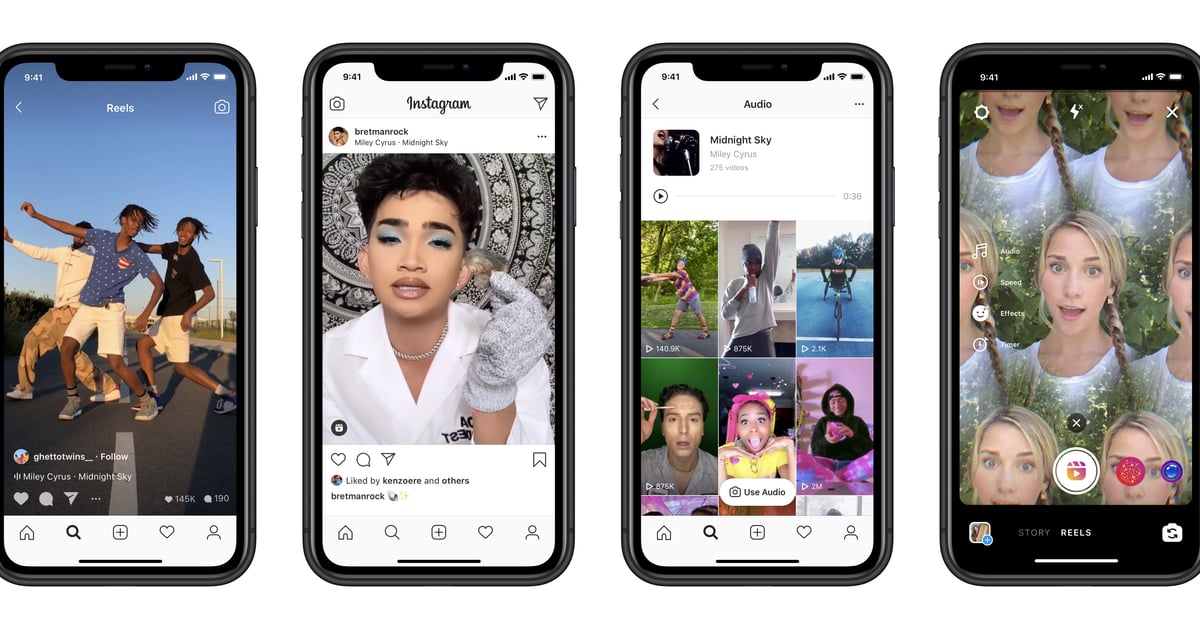 Maintaining maximum quality, however, can be more difficult. We recommend that you try the following tips: