3 min
On Instagram, it’s impossible to post an album — multiple photos or videos in one post that you swipe through — with multiple different aspect ratios. In this article, I'll show you how to do it for free and online.
When posting an album, Instagram requires that the images have the same aspect ratio. In this post, I’ll describe how you can post multiple photos or videos with different sizes by first resizing them to square.
On Instagram, it’s impossible to post an album — multiple photos or videos in one post that you swipe through — with multiple different aspect ratios. For example, if you want to post a landscape image and a portrait image at the same time, you need to crop one or the other (or you could crop both to square). Instagram requires that your photos have the same aspect ratio.
When posting multiple photos or videos, all are cropped to squareTo post multiple different photos or videos with different sizes on Instagram, you need to use a tool to resize them first. To avoid cropping out content, add a white background to make each photo or video in to a square. Then, you can post the album without cropping out or changing the size of your image.
Here’s a step-by-step tutorial:
Open the Kapwing Studio and start with a square 1:1 canvas (or 4:5 or 5:4, which are both accepted by Instagram).
One at a time, upload the photos or videos you want to post. Kapwing is free to use and online, so you don’t need to download an app. It supports images, GIFs and videos.
If needed, tap the photo or video and resize the canvas to the right aspect ratio. On mobile, use the "Edit Background" button to find the Resize Canvas button.
1:1 for an Instagram Post appears under the "Size" dropdown (Kapwing also supports 9:16 sizing for Stories and other formats). Turn off "Canvas Blur" and select white for your background color.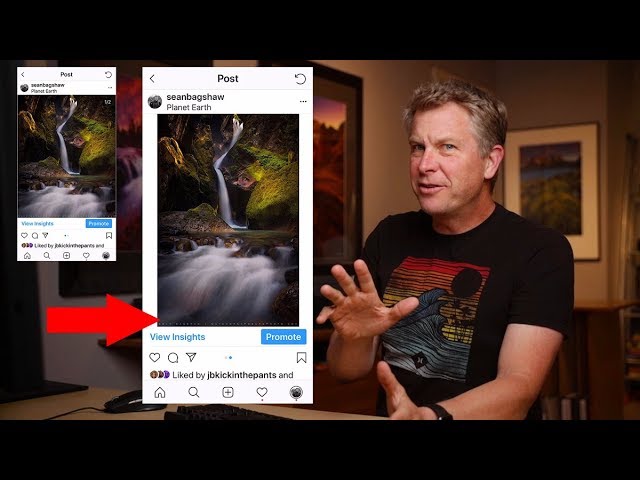 You can use Kapwing’s zoom and positioning tools to zoom in, crop, or add a border. Double tap to crop the image or video, and use the Play button to watch a preview of what your post will look like. Click Export once the preview matches what you want your post to look like.
After resizing your posts, you can download them and share them on Instagram as an album. Since each photo/video now has a 1:1 aspect ratio, you can publish them without cropping.
On an iPhone, use the "Downloads" gallery to find the file you just made and save it to your camera roll.
If you're not signed into a Kapwing account, sign in or sign up using your Google or Facebook account. Once you're signed in, each of your exports will be saved in your workspace so that you can download them later.
Repeat these steps for each of the photos and videos that you want to share in your Instagram carousel. After you've downloaded each of the square posts, open the Instagram app and upload them as an album.
For more ideas, tutorials, and features, check back in at the Kapwing Resources page or our YouTube channel! And remember to tag us @KapwingApp whenever you share your content on social media– we love to see what our creators are passionate about!
Related Articles:
• How to Caption Videos Using Instagram Threads
• How to Download Anyone's Instagram Stories
• How to Make Social Justice Slideshows for Instagram
• How to Download Instagram Reels
Instagram is a great app for sharing the daily highlights of your life and experiences – and the platform being highly-visual makes that even more appealing. Everybody wants their photos to look good on Instagram and once you finally have that perfect photo it can be annoying to see it get cropped by Instagram.
Instagram uses different image aspect ratios, specifically 4:5 for portraits, 1:1 for squares, and 1.91:1 for landscape pictures. If your image does not align with image guidelines for Instagram your image would get cropped to fit.
However, there are multiple ways you can add your pictures on Instagram without them getting cropped which involve resizing, adding borders, and using third-party apps to make your image fit within Instagram’s given frame. Read on to find out how to fit your images for a cleaner and more consistent look.
When Instagram first started out it only had the option to upload square images with a ratio of 1:1 however an update back in 2015 changed this as Instagram started to allow uploading portraits and landscape images as well.
It’s very easy to resize your images using Instagram’s crop feature. When adding a new post you will see a light grey icon with a white frame inside on the bottom left of your post screen. Click on it and it will automatically resize your images to fit the frame. You can also pinch your fingers together to shrink your image so it fits in the post.
The main downside to this method is that it is limited and might not fully cover the excess or might awkwardly resize them. You want your images to look good, natural, and neat but the zoom feature can only do so much.
If this method does not work on your image then a much better way to resize your images is to do it manually using a photo editing tool or third-party apps.
The best way to make your images fit on Instagram without cropping them is to manually resize them. Resizing your pictures this way would allow you to have full control over the image.
It’s important to know that when you do resize your image you will have some empty space around your image. The thing cool thing is that if you are manually resizing your images you can have a custom background for your images.
A great tool you can use is BunnyPic – a free online photoshop editor. You don’t have to sign up, install it or be worried to have a watermark on your images. It is totally free to use and beginner-friendly.
To resize your images using BunnyPic follow the below steps:
You can see how the image now fits perfectly inside the frame compared to the cropped image from before without losing any of its original value.
The above method should work for all your photos but if you want to keep the whole process on your phone without having to switch around your photos from your computer you can try third-party apps.
There are numerous third-party apps on Google Play Store and Apple App Store that you can download which would automatically resize your photos to fit into your canvas.
The best free apps to make pictures fit on Instagram without cropping are No Crop & Square, Whitagram, and PicsArt.
No Crop & Square for Instagram is an app that gives you different options to edit your photos for Instagram. It has a number of resizing options such as rotation, shrink, and enlarge. You can also add text and stickers to your images; making it a great app to meet all your needs.
No Crop & Square is only available on Android and can be downloaded for free from the Google Play Store here.
Whitagram is an IOS app that allows you to add white borders and resize your images for Instagram. It is quite similar to the above app and will get the job done to make your images look cleaner without going through a complicated editing process.
Download Whitagram from the Apple Store here.
PicsArt is a popular editing app that is available for both IOS and Android and has a better and unique way of resizing your photos for Instagram. It has a blur effect which can be added to the image borders which is far more attractive than the white or black borders from the previous apps.
To edit your Instagram pictures without cropping using PicsArt follow the below steps:
The effect works best for landscape photos. This is the kind of result you would get.
Download PicsArt on the Play Store or App Store.
Instagram is a great app for sharing your pictures online but it can be annoying when Instagram crops your image to make it fit in the post. This cropping is poorly done, making it look awkward and not as you intended.
To make your images fit better on Instagram you can use their crop feature, our BunnyPic editor, or third-party apps on your phone to resize your images and make them fit the way you want them to.
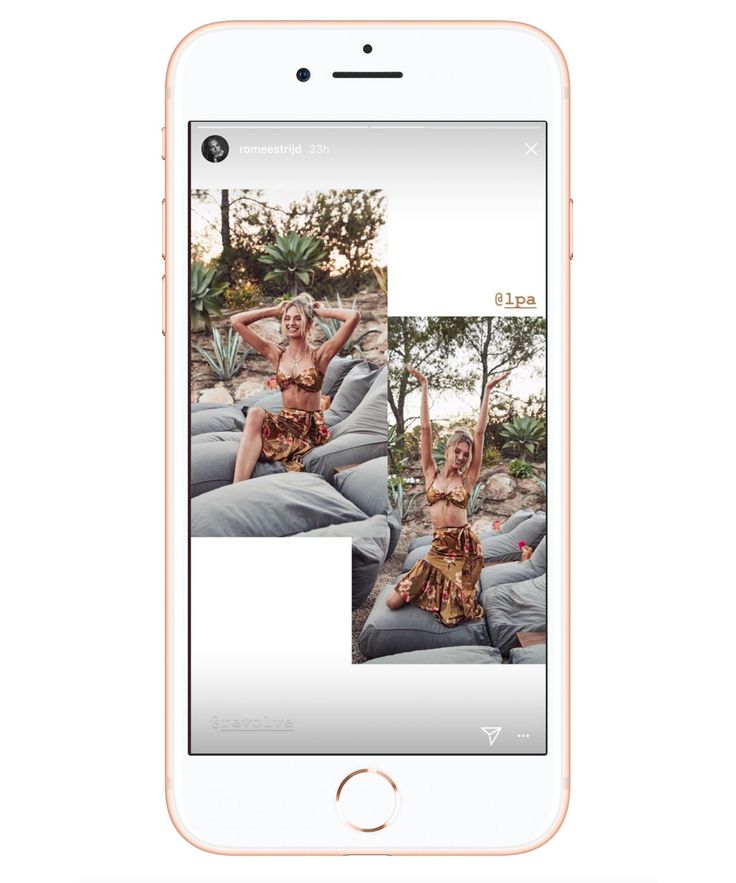
Recently, Instagram announced support for both landscape and portrait formats, but only when you post multiple images and videos in one post. It soon became allowed for individual downloads as well. While welcomed, this move is still limiting as I can't post vertical photos to Instagram unless they have a specific aspect ratio.
I've put together a few methods for adjusting your photos to the correct aspect ratio. These are multi-platform applications and tools that will allow you to upload Instagram vertical images in a few clicks. Let's start.
Read: Make a photo square without cropping - online tool
Windows programs, mobile applications, games - EVERYTHING is FREE, in our closed telegram channel - Subscribe :)
There are two options for cropping images for Instagram:
While Instagram isn't perfect, there are ways to fix this problem. Some tools and applications allow you to post vertical photos with a few clicks. Let's see how.
A strange and curious name, but a very popular app for those who want to upload vertical images to Instagram without cropping them. No Crop and Square won't let you post vertical photos like the one you see below.
The process is quite simple. You open the app and select the image you want to share on Instagram. There are a number of filters and effects to choose from. You can apply whatever you like. There are also emoji, stickers, emoji, and 3D emoji if that's what you're looking for.
You can create a collage in no time. Just add all the images you want to add with the collage tile button. The ability to add text with different fonts, patterns, resize and rotate images makes No Crop and Square a complete Instagram app.
The app is free to use, but with ads that can be removed with a $0.99 upgrade. In my experience, the ads were unobtrusive, with the exception of full-screen pop-ups.
Download No Crop and Square (Freemium)
Whitegram does for iOS devices what No Crop does for Android. It allows you to post full size images and photos to Instagram without having to crop or resize them. Simply select the image you want to upload in vertical mode and the app will automatically crop it to perfection against a white background.
You see the beauty of this. By adding a white background, it misleads Instagram into thinking the image is square. There are other apps in the App Store that will give you the results you want.
Tip: Always choose the highest resolution when working with a vertical image.
Download Whiteagram (Free)
Here is the easiest trick from the book. Instagram has a hidden option that will let you upload vertical images if you know how to crop images to the right size. You can do this on any platform because it is an online tool. Pixlr is a free and powerful image editor.
You start by selecting an image and cropping it to a 4:5 aspect ratio. Pretty easy, right? Now, in order to upload an image to Instagram using your PC's browser, you will have to fake it. Follow this guide. It will tell you how to make Instagram think that you are posting from your mobile phone, when in fact you are using your computer.
This is what your screen should like when you faked your browser. You should see the familiar "+" icon at the bottom to add a new image.
Read: 8 (+1 new) ways to post to Instagram from your computer
When you click the plus icon and add an image, you should see an expand button that looks like an arrow from either end.
Clicking this button will place your image in its original portrait mode with a 4:5 aspect ratio. You will also notice that there are no borders on a white or black background. No more square images that can be annoying as hell when they're crisp, portrait should be the obvious choice.
Note that the developer mode trick mentioned in the tutorial above will also work on Mac OS using the Safari browser. In fact, it works in all browsers on all platforms.
Visit Pixlr (Free)
 Entry Staircase
 I can't stress enough how annoying Instagram rules are. I agree that this gives a uniform look to the whole platform, but the tools that do this are not in the application. Instapadder is a web service that completely solves this problem. You can use it on your computer and Android devices to quickly adjust images to match Instagram without cropping content. iOS users cannot get a piece of this particular cake due to their own rules, but they can try the iOS specific method above.
To add padding around images, simply go to the website in your web browser, click the download button and select all files. It uploads images to a server and converts the images to an Instagram compatible format. The best part about this method is that you can upload and process images right away.
It accepts most image formats and outputs converted images fairly quickly. The only limitation I found with this service is the lack of a preview option before uploading augmented images, so you can't choose which images to upload. Otherwise, Instapadder is pretty good.
Visit Entrance Staircase
Polarr Photo Editor is available from the MacOS App Store and can be used as an integration with the iPhoto editor or as a standalone editing tool.
Once you have downloaded the Polarr Photo Editor (link below), just open it and import the photo you want to edit for Instagram.
Once you enter the editor application, click the settings tab on the right side of the screen. Scroll down and click "Border" '. Now select the aspect ratio and border color from the available custom menu. When you click on the Save button, the changes to the photo will be saved and the iPhoto library will be updated immediately. If you're using an iPhone, it's probably also in your iPhone Photo Library.
Download Polarr Photo Editor (Free, $24 per year)
If you're using a Windows tablet with touchscreen support, Instagram has announced an app just for you. The app is available on the Windows Store, but what about other users? This is where Gramblr comes into play.
Gramblr didn't support vertical images before, but I think they made some changes to their API since the current version supports it. Here is a screenshot.
As you can see, Gramblr does its job. The application is free and works on all Windows computers, including 32-bit versions. You will need to create a free account, but there is no need to verify your email address. Just select, crop, add filters, add a caption and post it to your Instagram.
Download Grambler (Free)
Instagram was originally designed to be used on mobile devices such as Android and iOS. But that doesn't mean you can't use it on your PC or Macbook. Whether you need an online tool or offline software, we take care of your Instagram needs.
Also read: How to turn off the last activity feature on Instagram
Programs for Windows, mobile applications, games - EVERYTHING is FREE, in our closed telegram channel - Subscribe :)
 The social network diligently crops the edges of the picture, other people's and not only arms and legs, heads and parts of the landscape. Previously, it was necessary to avoid difficult situations with the help of separate software, but now several local solutions have appeared that allow you to publish entries with almost no additional processing in graphic editors.
There are many reasons why Instagram crops a photo. Saving space on servers, the desire to fully adapt content to vertical screens of mobile technology (the key goal is to put users on an equal footing when scrolling pages is the same on the iPhone, and on Samsung, Xiaomi or Huawei), maintaining proportions for non-standard shots with a strange ratio sides.
Together, these factors make us look for ways to get around the restrictions so that Instagram does not cut off the excess.
You can add a full photo in the following ways:
It has long been possible to take a picture and immediately upload it to Instagram without a white background, previously used to get into standard proportions. An automatically arranged transparent margin will now appear around the edges. It is better to immediately follow the proportions of 16 d9and choose a resolution of 1067x600 pixels.
A full-length photo on Instagram is now added without much experimentation. Finally, a separate button appeared in the interface that allows you to stretch out a vertical shot and add everything in full size, but with frames on the sides.
You can experimentally upload a rectangular photo to Instagram, elongated horizontally and designed as a panorama, using separate software. SwieablePanorama and InSwipe help you cut the image into pieces and load the pieces into a grid of 3 or 6 frames that are easy to scroll from left to right. The combination looks unusual and even advantageous against the background of the usual publications in the news feed.
Fitting the original image to the proportions of a social network is a task, although annoying, not at all difficult - it is easy to find a bunch of software on the network that simplifies the task at times:
even the graphic editors pre-installed in Windows or MacOS operating systems will help to achieve a full display of the image on the pages of the social network (Microsoft's Paint allows you to resize in pixels or percentages). If Photoshop or Lightroom was at hand, then there will be no problems either.
It is important to remember only about proportions - 16 to 9, and about a resolution of no more than 1067x600 pixels for posts that fall into the feed, and up to 1920x1080 for Stories.
An alternative to Paint, Photoshop and Lightroom is a tried and true tool that has been on the web for a long time - Canva. To upload a photo so that Instagram does not cut anything superfluous (and at the same time change some details, such as captions, filters, or even frames), Canva helps with the help of special templates pre-selected for different social networks.
In the reality of Instagram, there are special sets for publications, Stories, covers for the eternal "Stories", avatars and even grids.
As soon as you enter a suitable option in the search, the system will immediately select the missing details and help you move on to experiments, and also tell you what things you should not forget about, and what else is easy to impress the public with.
Special recommendations help you get inspired in minutes.
A whole collection of graphic editors - NoCrop, Square, Whitagram - can automatically adjust the proportions to the size of the Instagram news feed. The listed assistants adapt the content to both classic publications and Stories, and at the same time they will help with a superficial change in individual details. They will add text and effects, non-standard geometric shapes and visual elements that can emphasize the theme of the picture.
Posting a photo on the Instagram social network without cropping details around the edges will help both special software and manual adjustment of the resolution of photos or images downloaded from the network.