Plan, schedule, and analyze your posts to Facebook Pages and Groups with Buffer's Facebook scheduling and analytics tools.
In this post, we’ll share with you everything you need to know about Facebook Ads to get your ad campaigns up and running, as well as all we’ve learned from our own experiences.
Paid advertising on social media is an immediate way to impact the reach of your content. With 2.91 billion active users, Facebook is the most popular social media platform for running ads.
But it’s becoming more likely that if you want to get your posts seen on Facebook, you’ll have to pay for reach through advertising. So, when it comes to social media strategy, understanding how to use Facebook Ads is a must.
💡
Schedule your Facebook posts and save time with Buffer
Plan, schedule, and analyze your posts to Facebook Pages and Groups with Buffer's Facebook scheduling and analytics tools.
Facebook has a lot of data on its users and allows marketers to use it when targeting their audiences.
When creating a Facebook Ad, you can specify demographics like gender, location, and age. Where Facebook really differentiates itself from other platforms with ads, though, is through lifestyle-based targeting options, like:
Once you’ve mastered Facebook Ads Manager, setting up ads is easy, and results happen quickly.
A 2020 survey of US retailers showed that 41% see the greatest return on advertising spend (ROAS) from Facebook Ads. That’s huge compared to the average conversion rate across all industries of just 9.21%.
Because Meta owns both Facebook and Instagram, their platforms are easily integrated. This means that ads can be run simultaneously on both platforms, giving you access to even more social users. The reach potential of advertising on Facebook and Instagram is unmatched.
While Meta got rid of its full Facebook Analytics platform in 2021, it still has great resources for understanding ad performance, including metrics for reach, engagement, conversions, and more. This data is updated in real-time so you can adjust your campaigns based on performance.
Another major benefit of Facebook’s current analytics is the ability to add the Facebook pixel to your website. Most content management platforms allow you to easily add this piece of code to your website and track the effectiveness of your Facebook Ads. You can keep an eye on user behavior and create specific target audiences for future Facebook advertising campaigns.
Before you jump in, it’s important to think about why you’re advertising and what you’re aiming to achieve. By determining your personal measurement of success ahead of going live with ads, you’ll be able to decide which ad objective is best for your needs.
For example, if you’re looking to increase downloads of your mobile app through Facebook Ads, your success metric could be 100 downloads in the first month. If you want to generate more leads, success could be measured by a larger email list. The point is, you should think about your reason for advertising before you create a campaign.
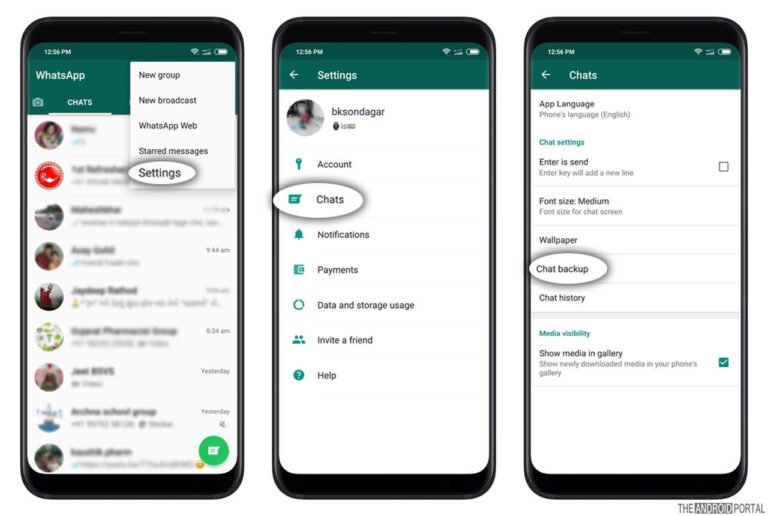
When you sign up for Facebook, you’re given a personal ad account ID by default. You can see this ID by going to Ads Manager and looking in the upper left-hand corner.
In order to use Facebook Ads Manager, you need a verified payment method and:
If you do not have a Page for your business, you can follow Facebook’s steps to set one up. Any Page you create will be automatically given an ad account.
If there is a Page you wish to advertise for that was created by someone else, you need to ask the Page admin to assign you an admin, editor, or advertiser role on the Page.
If you already have an existing ad account for your Page but would like to create a new one, you’ll need to have a Business Manager account. Once you sign up for Business Manager, you can create a new ad account.
All of Facebook’s ad campaigns run through the Facebook Ads Manager tool. These steps are for using it on a desktop or laptop computer.
The easiest way to find Facebook Ads Manager is to click and bookmark this direct link. You will be brought directly into the Facebook Ads Manager for your personal ad account. If you manage more than one ad account, use the account drop-down menu to pick the right account.
Toggle between accounts on FB Ads ManagerTo navigate to Ads Manager right from your business page, head to the left sidebar and click on the “Ad Center” drop-down arrow of any Facebook page, then choose “All Ads” from the drop-down. At the bottom of that page, there is an option to click “Ads Manager.”
You will be brought to your Facebook Ad Accounts page, where there will be a quick overview of your ad account(s). If you have access to more than one ad account, select the account where you wish to run ads.
If you’d rather use a mobile device, there is a Facebook Ads Manager app available for Apple and Android.
You can also use Meta Ads Manager on your phoneTo get started with your first ad, click the green ‘Create Ad’ button.
Create your first ad by clicking the green buttonFacebook will take you to a page where you will be prompted to choose a campaign objective.
Choose your campaign objectiveYou have many different ways of approaching an ad campaign based on what you wish to achieve. These ways fall within three categories of benefits:
This category consists of objectives that generate interest in your product or service. You can choose to:
Top tip: For small budgets, you’re likely to get the most bang for your buck with the awareness ad types. Moz found that $1 per day can grow your audience by 4,000 people. While this didn’t quite match our experience, it’s well worth trying.
You might want to choose this category if you want people to start thinking about your business or looking for more information about it. Actions in this category include:
The objectives in this category are designed to get people to purchase or use your product or service. You may opt to:
Once you’ve selected your marketing objective, you’ll be asked to name your campaign. Make sure to make your campaign name something recognizable to everyone working on the ads.
Pick a name for your ad campaignNow it’s time to choose how much you’d like to spend on your ad. When you set a budget, it’s important to remember that this figure represents the maximum amount of money you want to spend. You can set your budget per day or as a total amount for the campaign.

Because it determines who Facebook will show your ad to, a strategically defined audience is crucial for the success of your Facebook Ads campaigns.
As mentioned earlier, the audience for your ad can be customized based on all the following demographics:
In addition, with the Connections setting, you can choose advanced targeting, which lets you include or exclude people who are connected to certain pages, apps, or events. You can also further customize your targeting using custom audiences for retargeting people who have already interacted with your business.
For example, let’s choose an audience for a Buffer ad. Facebook recommends narrowing your reach in a targeted way in order to maximize the impact of your ad.
We are going quite narrow for this example, choosing the following audience demographics:
This gave us an estimated reach of up to 3,200 people out of 14 million. The 3,200 people are how many we could expect to be online any given day and potentially see our ad.
Customize your target audienceAd placement defines where your ad appears for your target audience. Based on your objective, you may choose to show your ad on Facebook, Instagram, Messenger, or the Audience Network.
Select how you'd like your ad to be displayedImage Source
Facebook recommends using automatic placements for the objective you chose, which enables Facebook to optimize placements for you in order to get the best possible results at the lowest overall average cost.
However, if you want to select your own placements, Facebook has several options:
For more, check out Facebook’s guide to ad placement.
This is where Facebook Ads gets really fun! Now it’s time to create your Facebook ad. You can use an existing post or start from scratch.
For certain types of ads, such as boosted posts, you can create your ad using a post that’s already on your Facebook Page.
To do this, select the ‘Use Existing Post’ option. From here, you can choose your page from your linked accounts and pick the post you want to use as your ad.
Create your Facebook ad using a preexisting postIf you’d like to create your ad from a blank canvas, the first task is to select a format. You’ve probably seen many of the Facebook Ads formats on your personal feed, but your choices will vary based on the objective you set for your ad during Step 3.
There are a variety of ways to display your Facebook AdFacebook has eight ad formats, and it will recommend one or more to you based on your campaign objective. We have also included Facebook’s technical guidelines for certain formats.
 These simple ads use a single image and can be used in different ad types and placements.
Facebook’s specs for photo ads
Facebook’s specs for video ads
Facebook’s specs for carousel ads
Facebook’s specs for collection ads
 Creatively, there is a lot of freedom with these ads.
Once the format is selected, you need to add visuals and copy. If your ad is going to be a success, you want your image and copy to be enticing enough to make people stop scrolling and click.
Upload your images for your Facebook AdTo submit your ad, click the ‘Publish’ button at the bottom right-hand corner of the page.
Once your ad is submitted, Facebook will hold your post so they can review it to make sure it fits their specs and doesn’t violate their community guidelines. Expect for it to be reviewed within 24 hours. You’ll receive a confirmation email from Facebook once the ad is live.
While the specifics are more complicated, the simple answer is that you will never pay more than you want to spend.
To give a little context into what’s achievable with Facebook Ads, we ran an experiment to see what a budget of $5 per day would get us. We tried three different types of Facebook Ads, each designed with a different objective in mind.
Here are our results:
When we view this in terms of how much $5 per day will buy you, these are the numbers:
It might be useful to see how our experience compares to Facebook Ads benchmarks overall. WordStream analyzed the Facebook Ads performance of its 256 US-based clients and came up with many helpful performance benchmarks, such as the following.
These can be helpful stats to consider when running your Facebook AdsSince we find ourselves in the technology space at Buffer, we can compare it to the industry benchmarks in this chart.
Average click-through rate: 1.04%
Ours: 0.95%
Average cost per click: $1.27
Ours: $4.01
Like all the experiments we run and share here, your mileage may vary. And we’d love to hear your experience and results. If you’re curious and want to dive further into the cost of Facebook Ads, we recently published a complete guide to the cost of Facebook Ads.
Now that you’ve nailed the basics of how to create a Facebook ad, you can start experimenting to see what works best for your audience.
For each of the steps above, it’s helpful to pause and think back to your goals. Make sure everything you are defining and creating is in line with your own measure of success. Not sure what your audience wants to see? No problem. Facebook has plenty of tools for A/B split testing, so you can compare ads side by side to find out what works. Get creative and make sure to monitor the performance of your ads so you can change things when necessary.
And check out Buffer’s top Facebook advertising tips to help you get started.
Brought to you by
Get started for free now
Learn More
About
Image
Video
Carousel
Collection
ImageVideoCarouselCollection
Help people discover your brand across Facebook products. Design your ad using various formats, placements and objectives to meet your marketing goals.
The Facebook Ads Guide provides design specifications and technical requirements across each format and placement. You'll find information on dimensions, file sizes, character limits and more.
Create an ad
Drive people to destination websites or apps through high-quality and engaging visuals. Use your own images or create an ad with stock photos to tell your story.
Get image ad specifications
Learn more about image ads
Show off product features and draw people in with sound and motion. Upload a video you created or create one in Ads Manager using our video creation tools.
Get video ad specifications
Learn more about video ads
Display up to ten images or videos within a single ad, each with its own link. Use carousel ads to show different images of the same product, or create one long photo that people can swipe.
Get carousel ad specifications
Learn more about carousel ads
Encourage shopping by displaying items from your product catalogue – customised for each individual. Use our dynamic options to showcase your products in various ways.
Get collection ad specifications
Learn more about collection ads
Was this page helpful?
Meta technologies
Messenger
Audience Network
Oculus
Workplace
Tools
Free tools
Facebook Pages
Instagram profiles
Stories
Shops
Meta Business Suite
Facebook ads
Messenger ads
Instagram ads
Video ads
Ads Manager
Goals
Set up a Facebook Page
Build brand awareness
Promote your local business
Grow online sales
Promote your app
Generate leads
Measure and optimise ads
Retarget existing customers
View all goals
Business types
Small business
Large businesses
Agency
Media and publisher
Creator
Developer
Start-up
Business partner
Industries
Automotive
B2B
Consumer packaged goods
E-commerce
Education
Entertainment and media
Financial services
Gaming
Property
Restaurants
Retail
Technology and telecom
Travel
Inspiration
Meta Foresight
Campaign guidance
Business news
Case studies
Video
Events
Creative Hub
Skills and training
Online learning
Certification programmes
Webinars
Guides and resources
Ads guide
COVID-19 resources
Safety and integrity
Business equity
Find a business partner
Site map
Business Help Centre
Create and manage accounts
Publish and distribute content
Advertise
Sell on Facebook and Instagram
Monetise your content or app
View all articles
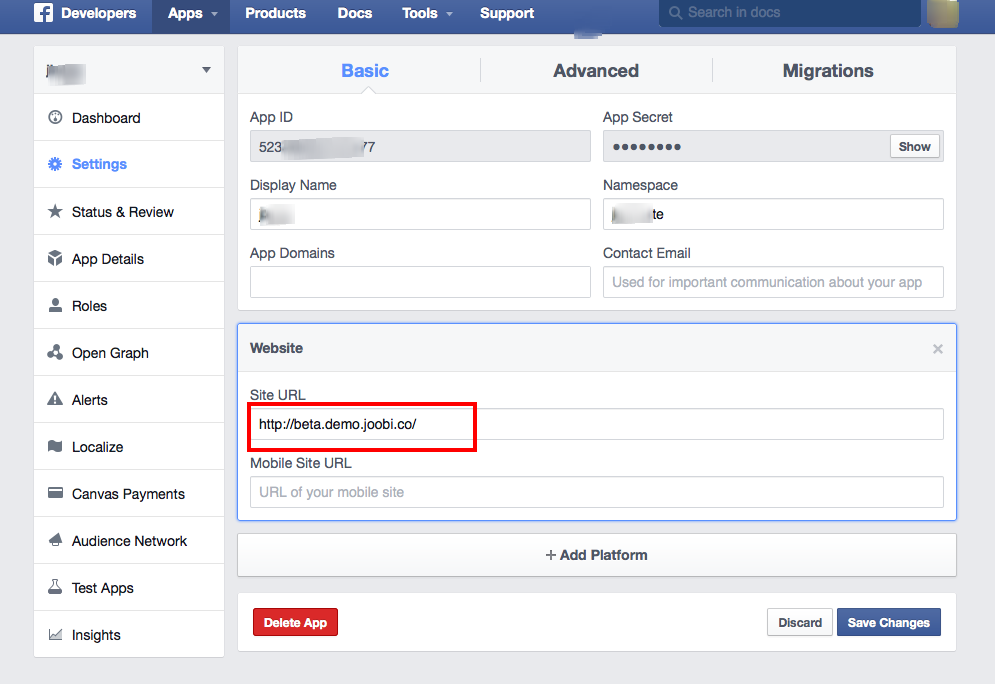
Step 3. Specify business information
After clicking “Get Started” , a context menu will appear where you will need to specify the name of the business page and the field of activity, for example, retail, auto sales, online store, real estate, law, web design, restaurant or other. Just enter the keywords that characterize your business in the "Category" field, and the system will display the available options.
Next, fields for entering the address and phone number will appear. The address entered in this step will be displayed on the business page profile as a map with a marker in the center. If you do not want this, then the address can be hidden from page visitors by checking the box next to "Don't show my address ...". At the same time, the system will save it and will use it to determine the time zone and the target region for displaying ads. Specify the address with the phone and press "Continue".
Step 4. Upload the logo (avatar)
In a new window, the system will prompt you to download the logo (avatar) for the business page profile from your hard drive. This should be a square image with some kind of picture or photo in the center that users will see as a circle, not a square. Optimizing an image on Facebook will not work, it must be done in advance using Canva, Crello or other similar services.
Step 5. Loading the cover of page
After the avatar, you also need to upload a cover image (displayed at the top right in the business page profile). This should be a photo, picture, map or video that will be displayed on the screens of computers and laptops with dimensions of 820×312 pixels, smartphones - 640×360 pixels.
After uploading the cover, the business page will open, where you will see that the cover space is empty. To fix this, click "Add a Cover" and then "Choose From Photos" or whatever.![]()
In the new window, double-click the right button to select the desired image.
Step 6. Set up Ads account
Your business page has been created and you now have a Facebook Ads account. Next, you need to make sure that the settings are correct and link the payment instrument to it. To do this, go to Ads Manager by clicking "Create" and then "Ad".
In a new tab, click on the "Ads Manager" icon at the top left of the screen and then "Settings".
In the window that opens, there will be data on your advertising account, including its ID, which can later be used to launch advertising campaigns, link new users to it, and more.
Check that all information about your ad account is correct. If necessary, change the time zone and currency. But note that any change will automatically create a new ad account (with new ID). The old one will also be visible to you, but it will be suspended, as well as all advertising campaigns launched from it.
If you plan to work in a team, you can add a new member by clicking on the "Add People" icon. In the box, you need to specify the Facebook user ID and indicate its role: administrator, advertiser, or analyst.
Administrators will have access to almost everything :
Advertisers will only have access to two features:
The analyst will have access to only one function :
To link a payment method to an advertising account, go to section "Payment Settings" and click on the "Add Payment Method" icon.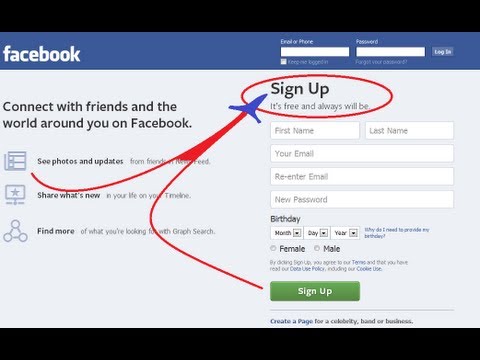
In the window that opens, select your preferred payment method and enter payment details. It is important that you have at least a few dollars in your bank card or digital account.
You now have a Facebook ad account ready to use to promote your business on the world's largest social network. If you plan to use multiple ad accounts or need to create an account for a client, read the next section.
Now we will tell you how to create a new advertising account using Business Manager (BM) - a tool for managing all business processes on this platform, including the promotion of other campaigns (users).
Step 1. Create an account in BM
If you already have a Facebook Business Manager account, open it and proceed to the second step. If there is no account in Business Manager, you need to create one. To do this, click on the "CREATE ACCOUNT" icon in the upper right corner of the screen and follow the instructions.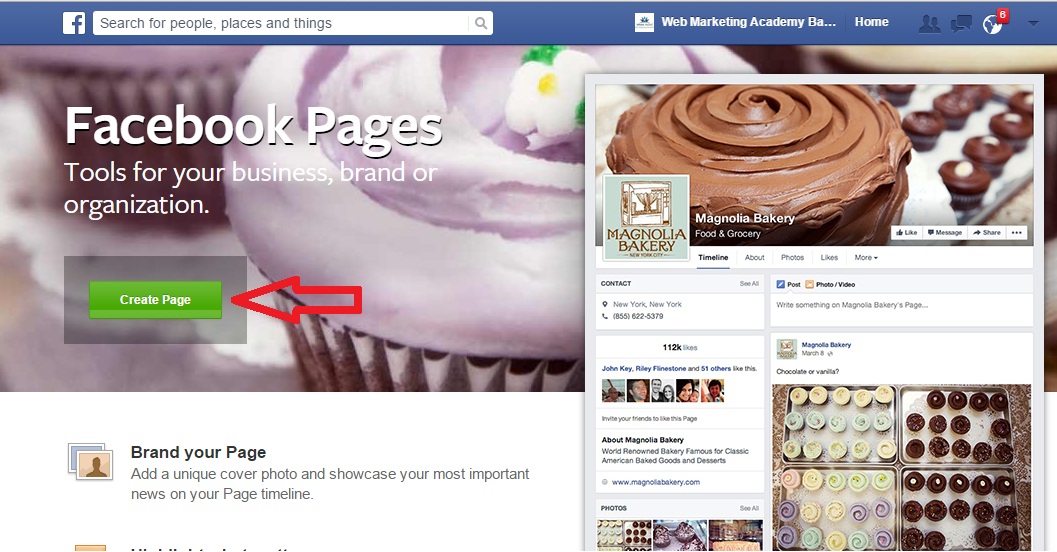
In a new window you will be asked to name your account in Facebook Business Manager, to enter your first and last name, as well as your business email address.
Next, you need to enter your business data: location, phone number and website. All fields are required, except for the second address.
Step 2. Create a new ad account
Once you open Facebook Business Manager, you must click on the "Business Setting" icon at the top right of the screen.
Next, go to the "Ad Accounts" section and click "+ Add". A context menu will open where you need to select "Create a New Ad Account".
Enter a name for your new ad account and specify your time zone and currency. Please note that the currency must match the currency of the payment method you choose later to activate your ad account. Whereas the choice of time zone will affect when the system will show your ad to users.
Next, you'll be asked if you're creating an ad account for your business or someone else's. Choose the option you want and click "Create".
Step 3: Add yourself as an Administrator
Next, you need to specify who will have access to the created account and in what role. Usually, administrator rights are left to themselves, and the rest are assigned the rights of a manager or analyst. If you are a marketing agency and create an account for a client, then you need to agree on access rights in advance.
After entering these details, a Facebook ad account will be created and you will see the following notification.
To quickly go to the next step, click on "Payment Methods" in the text of the message.
Step 4. Add a payment method to activate your account
In the "Payments" section, click on the "+Add" icon.
A window will open where you need to select a payment method and enter payment details.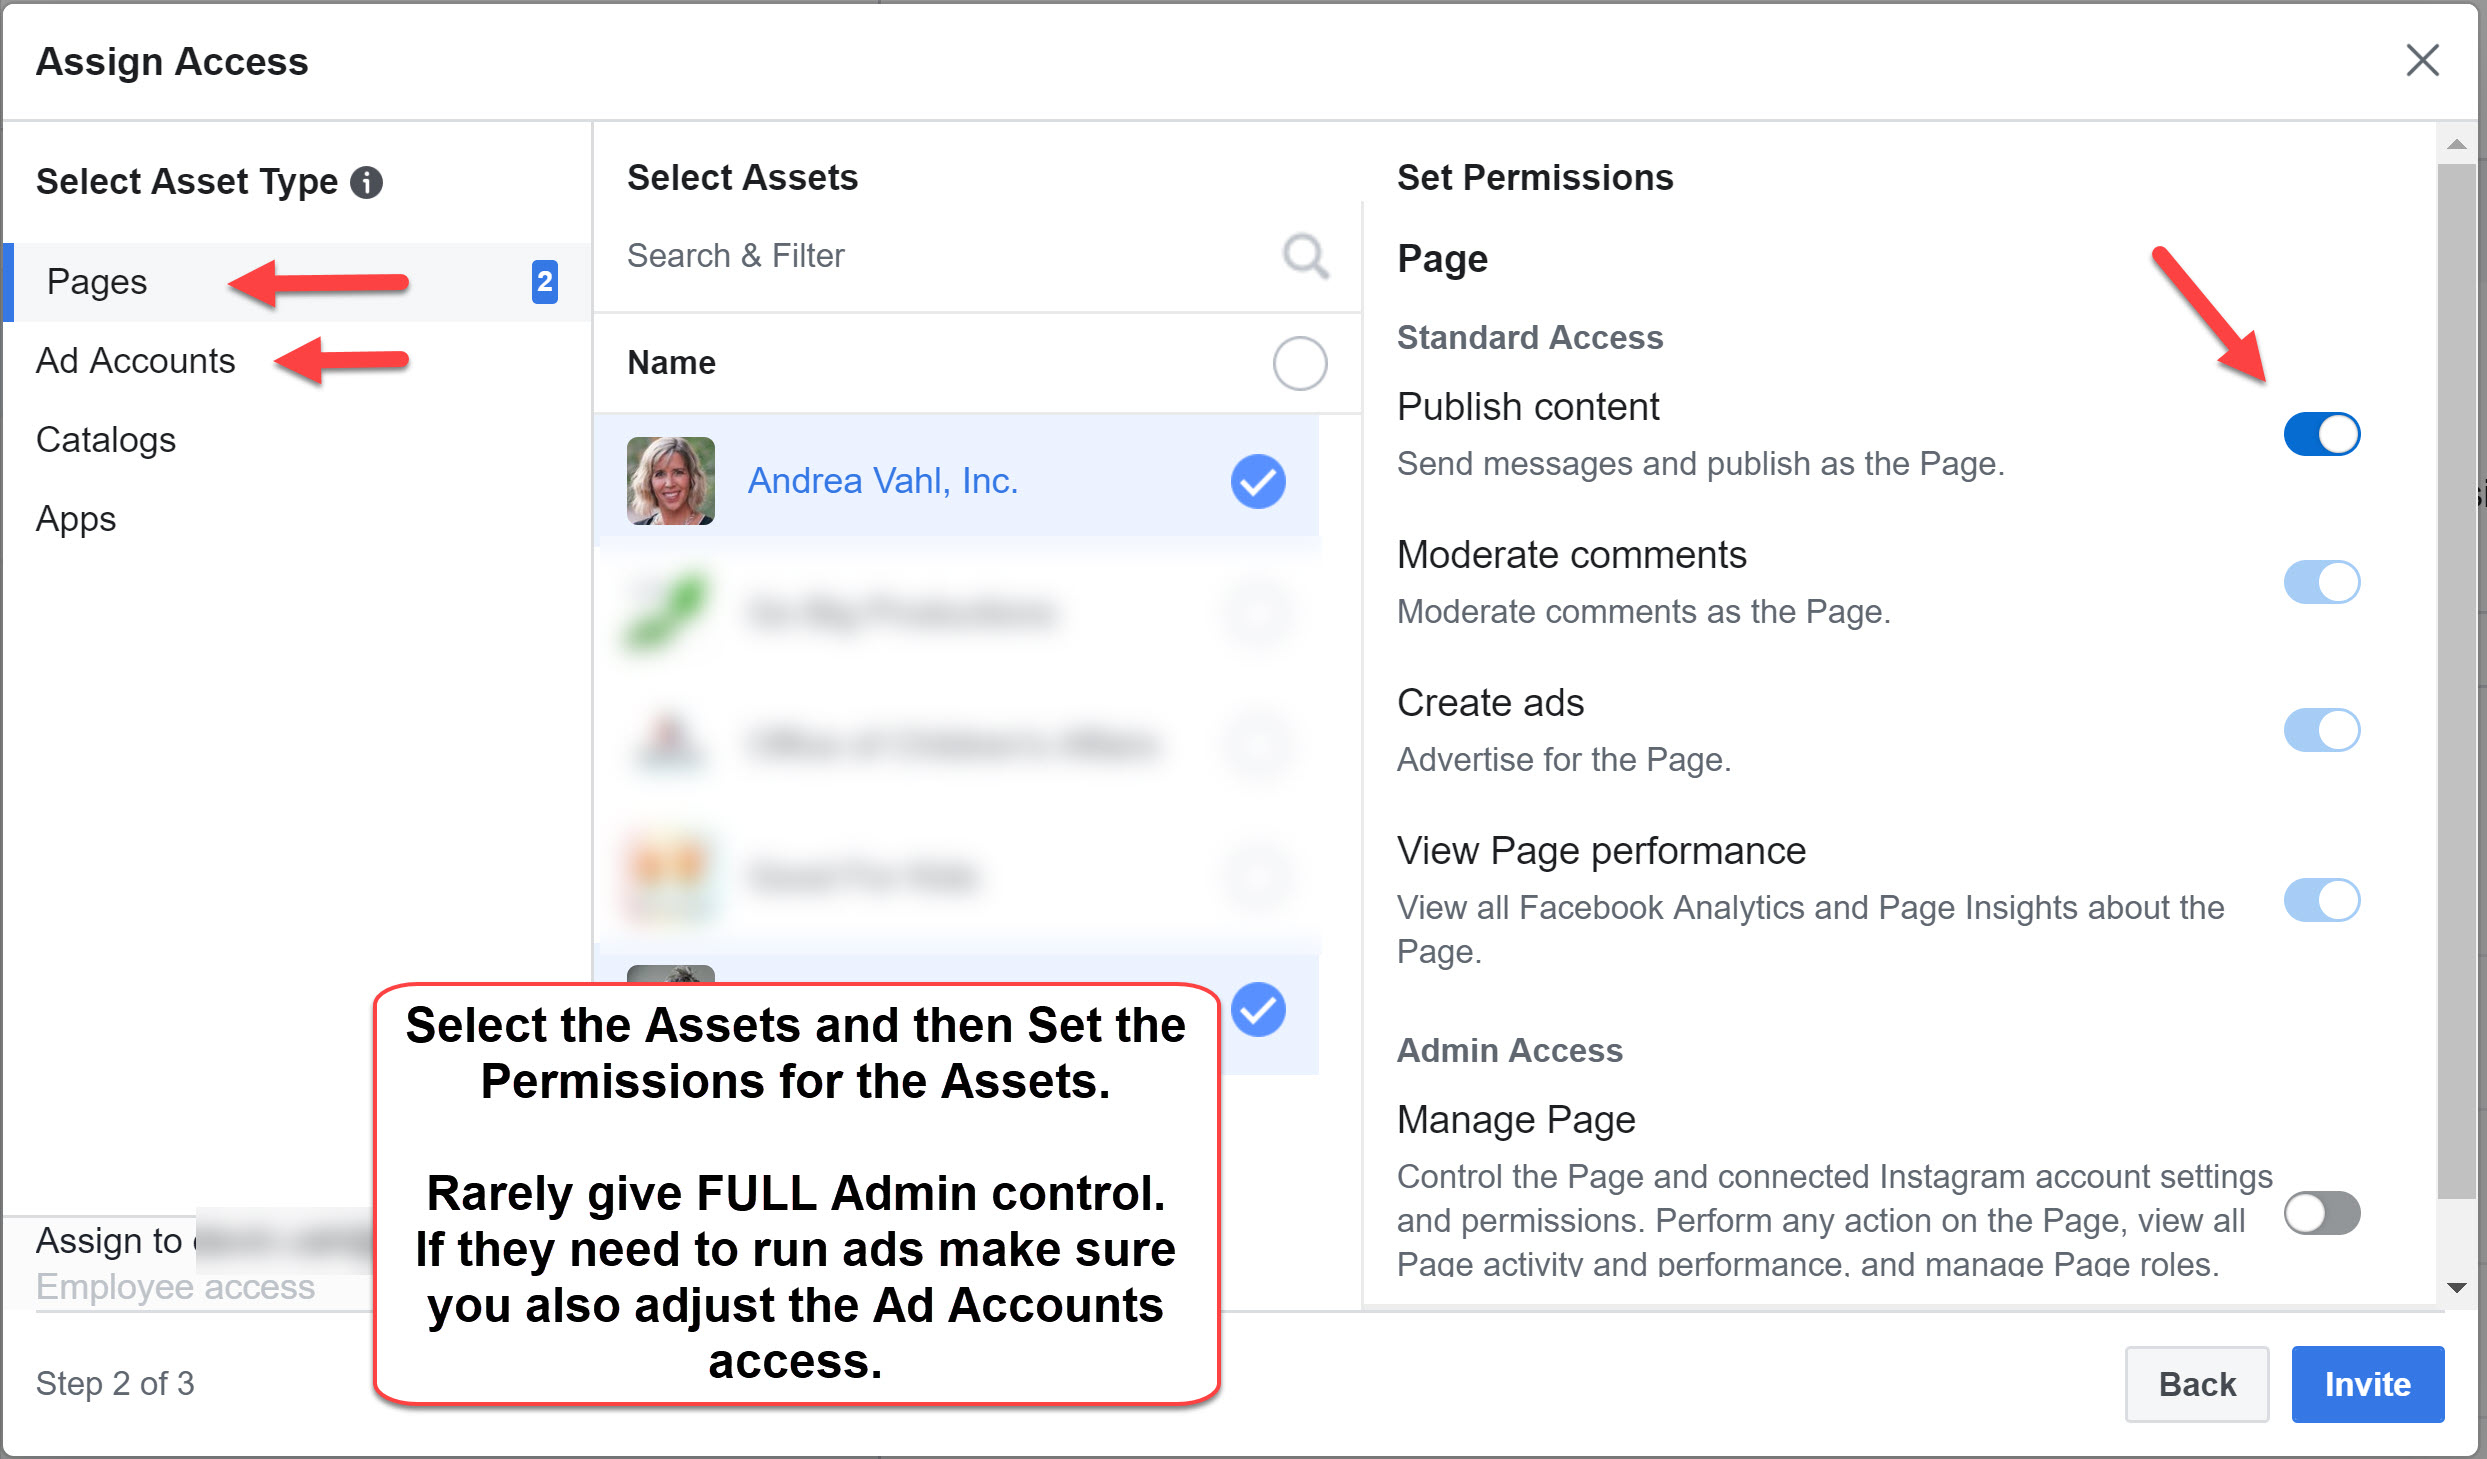 This is an important point that affects what type of account will be created: with manual or automatic payment, that is, prepaid or postpaid. This will be discussed in more detail in the next section.
Please note that the advertising account will be activated only after the successful connection of the payment instrument, which you should be notified about. Sometimes at this stage the system freezes for a long time. In this case, simply reload the web page, return to the "Ad Accounts" tab, and if everything is fine, you will see the activated account.
When you attach the payment tool to your ad account or create your first ad on Facebook, you also decide how the payment will be made:
Automatic postpaid . You link a bank card or a PayPal fiat money account to your Ads account and run ads without any advance payment. As soon as your debt exceeds a certain threshold (billing threshold), the system will write off the debt from your account on a bank card or PayPal. If the debt for displaying ads does not exceed such a threshold, then the money is debited on a certain date of each month. The threshold for spending funds and the number for debiting them can be set in the settings.
Consider examples:
Manual payments (prepayment) . First, you make a deposit to your Facebook ad account and only then launch the campaign. Ad impressions will go on as long as there is money in your account. You won't have a billing threshold, but you will be able to set a threshold for ad spend per day.
Consider an example:
How to choose a payment method . If you are interested in manual payment, then you can see which instruments with this payment mechanism are available in your country by following this link. Select the country and see the table.
All other available payment instruments will use automatic postpay. You can see their entire list at this link.
173
9. 99 USD
The macro FB Add Friends is added as a friend to users whose list is created in advance and is located in a separate text file fb_base_add_friends.txt
Firefox Macros. Version at the time of creation: If you do not know what iMacros is, read iMacros FAQ .
How to install the iMacros plugin.
 Installing the script
 How to find the iMacros folder on your computer, see FAQ-iMacros
Examples of all files can be found in the archive when buying the script.