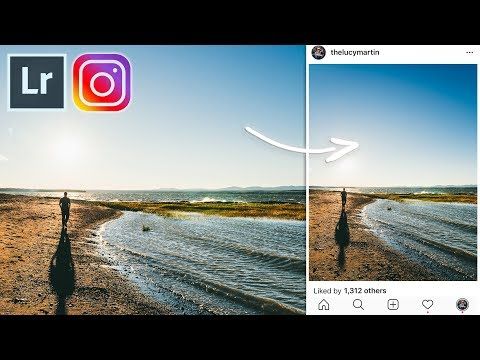
If you’re a heavy social media user, this guide to the best Lightroom export settings for Instagram will be helpful to you.
With over one billion people using Instagram every month and over 95 million photos uploaded every day, you definitely need your images to stand out!
You may have found that images uploaded to Instagram can look fuzzy, or lower quality to how they originally looked. This is because of the Instagram image compression algorithm, which can degrade quality in favour of a smaller image size.
Fortunately, if you’re an Adobe Lightroom user, it’s simple to ensure your Instagram images look as good as they possibly can.
So, let’s dive right into the exact Lightroom export settings to use.
Don't Have Lightroom?
Download Adobe Lightroom
Download the latest version of Adobe Lightroom to follow along with this simple tutorial.
Start a free 7-day trial today
LEARN MORE
Table of Contents
These are the Best Export Settings for Instagram in Lightroom:
If you stick to the above export settings, your images should look their best each and every time you upload to Instagram.
To save you some time, I’ve put together these Instagram Lightroom export settings as an Export Preset which you can download for free right here.
Here’s a quick definition of what each of the main export settings means:
 It has to do with the relationship between the shortest and longest side (aka, the aspect ratios).
 This is useful because it will lose some of this when it’s uploaded.
Now let’s have a closer look at each of these Lightroom Export Settings in detail to see how they help to make your images look their best.
1. Image CropCredit: Kristopher Roller
While Instagram became famous for its square images (1:1 ratio), things have changed quite a bit. By now it has become more flexible.
You’ll find that Instagram supports portrait, landscape, and square formats. The width of your photo needs to be between 320 and 1080 pixels.
The official Instagram guidelines also state: “If the aspect ratio of your photo isn’t supported, it will be cropped to fit a supported ratio.”
At this point, the results are not in your hands, and that’s not a position that you want to be in. So, one of the settings that you need to consider for uploading to Instagram is cropping and sizing your image yourself.
Instagram supports most popular image aspect ratios, it’s generally best to crop your images to 4:5, since portrait orientation images take up the most real estate in the Instagram feed.
To do this in Lightroom, you need to go to the Develop module. On the top of the panels, you’ll find the adjustment tools.
The first one from the left is a square icon – click on that. You’ll see a square and a grid appear on top of your image. That’s the Crop and Straighten tool.
In the panel, you’ll see its settings. The first one is the Aspect, referring to the aspect ratio. By default, it will be set as Original and it will have a padlock on in.
Click on the arrows next to the word Original to open the drop-down menu. From there you can choose which one to use.
Normally you’ll find aspect ratios expressed with a colon separating both numbers, for example, 4:5. Here you’ll see the multiplication symbol (e.g, 4 x 5). It’s the same thing, so don’t let it confuse you.
If you can’t see the aspect ratio that you’re looking for, click on Enter Custom and type the one that you prefer. You can either type the aspect ratio or the number of pixels. The recommended aspect ratios for Instagram are:
You’ll see a frame that will show you a preview of the crop. By default, it considers the center of the image to make the measurement. If you’re not satisfied with it, you can drag the image to recompose according to the crop. Then click Done.
What are the Dimensions for Instagram?
| Type | Aspect Ratio | Size |
| Square Photo | 1:1 | 1080 x 1080px |
| Landscape Photo | 1.91:1 | 1080 x 608px |
| Portrait Photo | 4:5 | 1080 x 1350px |
| Instagram Stories | 9:16 | 1080 x 1920px |
| IGTV Cover Photo | 1:1.55 | 420 x 654px |
| Instagram Square Video | 1:1 | 1080 x 1080px |
| Instagram Landscape Video | 1. 91:1 91:1 | 1080 x 608px |
| Instagram Portrait Video | 4:5 | 1080 x 1350px |
You can also check out the other popular social media sizes here.
2. File FormatFile format is another of the export settings for Instagram you need to consider.
While you should be taking and editing your photos in RAW format, you should never share a RAW file (not least because of the huge file size). That’s a general rule that you should follow regardless of the platform.
So, once you’re done with your post-production process, export your file as either JPEG or PNG.
Since Instagram doesn’t preserve transparencies, I would recommend using JPEG. However, this is a personal preference and your image won’t lose any quality if you use PNG.
The format of your images can be modified in the File Settings in the export window.
3. Color SpaceDifferent devices work with different color spaces. You’ve probably heard about the two most common: RGB and CMYK.
The RGB (red, green, blue) color space works with additive color theory and it’s mostly used for screens. CMYK (cyan, magenta, yellow, and black) uses a subtractive color theory and is used for printers.
While these are just the basics, there are many more color spaces. I’m not going to dive deep into that, but I will tell you that choosing the right color space for Instagram can make the colors more accurate and vibrant.
By default, Lightroom Classic uses the Adobe RGB color space to display previews, export to PDF, upload, and other actions. But in the Develop module, images display by default in a color space called ProPhotoRGB.
When you’re exporting to share images on Instagram you should change the Color Space to sRGB. You can do this in the File Settings section of the Export window.
4. QualityWhen you change the file format in Lightroom, different choices will become available to you – much like what happens in Photoshop.
If you’re exporting your image as a TIFF file, you’ll be able to control compression. If you choose JPEG, which is the best one for Instagram, you can choose the quality.
Keep in mind that the more quality you want, the bigger the file size will be. Since Instagram will run your images through the algorithm anyway, this shouldn’t be a problem.
Some people argue that exporting at 100% is better because a higher quality image will suffer less damage after the compression algorithm.
Others say it’s 76% because this is the sweet spot of the algorithm. You can try it both ways and see which one works better for you.
In any case, I don’t recommend lowering the quality below 76%.
5. Image SizeThe fact that you changed the image aspect ratio to, let’s say, 1080 x 1080 doesn’t mean that your image will now be exported to the size 1080 x 1080.
What it means is that it will maintain the relationship between the width and height regardless of the size. For example 5000 x 5000.
That’s why you should also adjust the image size to optimize your images for Instagram. To do this in Lightroom, go to the Library Module.
From there, click on the Export button you’ll find in the left panels. This will open a dialog box where you input the export settings.
Under the Image Sizing section, enable the Resize to Fit option. Here you need to type again the size you typed in the Aspect field. In my example: 1080 x 1080.
Remember that if you intend to post multiple photos on Instagram in one post, you’ll need to maintain the same sizes throughout the carousel for the best appearance.
6. Image ResolutionIn the same dialog box where you’re resizing your image, you also need to input the resolution.
If you’re asking yourself: what resolution should I export from Lightroom from Instagram?
For digital devices, the standard is 72 ppi (pixels per inch) because anything higher than that won’t be noticeable and would just make your file size larger – see what does PPI mean?
7. Sharpen
Even though your images look great on your computer screen, they often end up looking dull once you upload them to Instagram. That’s why it’s important to add some extra sharpening when Instagram is the final destination of your image.
This will not only ensure that the image looks like you intended it, but also that it will appear as its highest image quality.
When we see an image where the elements and the edges aren’t well defined, we immediately associate it with bad quality.
You can adjust the sharpness of your photo in Lightroom in the Develop Module. Then expand the Detail panel.
The first slider that you can adjust is the Amount. This, as the name says, refers to how much sharpening is being applied to the image.
The next slider is called Radius. Since the sharpening tool works by increasing the contrast on the edges, this defines how many pixels around the edge it should affect. So, a small value gives you a thin edge, while a higher value results in a thicker edge.
Then there’s Detail. This controls how much sharpening is applied to different details. If you drag it to zero, only the bigger edges will be considered; all the way to 100 considers even the smallest details. Be careful because higher values can create noise.
The Masking slider limits the effect to wider or smaller areas. With the slider set to zero, the sharpening applies to the entire image. If you drag it to the right it will apply to fewer areas, until it considers only the strong edges.
If you hold the Alt key while dragging the slider, the image will show black and white and you’ll have a better understanding of how it’s working.
Making your Instagram feed load quickly isn’t easy to do when 50 billion images have been uploaded to the platform, and almost 1,000 more are added every second.
So, Instagram has developed proprietary algorithms that make sure things run smoothly. This means that your images are going to be crunched down to reduce their size.
As such, it’s better if you optimize your settings for Instagram when you export from Lightroom – that way you can match the app’s capacity and speed to keep the best quality even after going through the algorithm. The end result? You have more control over the outcome.
To sum up the best Lightroom export settings for Instagram, you need to start in the Develop Module.
First, adjust the aspect ratio to 4:5 for portrait photos, and 1.91:1 for landscape images. Of course, it’s still possible to stick to the classic square image format of 1:1.
Then increase the sharpening. Make sure that it looks a little bit exaggerated because then it will look just right once it’s uploaded to Instagram.
After that, you’re ready to export your photo. In the settings window, look for the Image Sizing section. Here, adjust the size to fit the aspect ratio and make sure the width is no longer than 1080. Then set the resolution to 72 ppi (pixels per inch).
In the File Settings section, set the file format to . jpeg. That enables the image quality slider, which you can crank up to 100. Finally, set the color space to sRGB.
I hope this guide made it easier for you to adjust and export your images using the best settings to improve the image quality on your Instagram feed.
If you have any questions about export settings for Instagram, or suggestions for editing Instagram images in Lightroom, please share them in the comments section below.
I love to post my images on Instagram, but I hate it when the picture comes out fuzzy or washed out. It’s important to know the correct settings when exporting your photo from Lightroom (or any other photo management/editing tool) so that it’s displayed the way you want on Instagram. So what are the best export settings for Instagram?
Instagram’s current guidelines for image sizes and aspect ratios are a little hard to track down because the page is no longer in the Help Center’s menu. But just in case you want to see the official info, here’s a direct link.
When Instagram initially launched a decade ago, it only supported a square crop (1:1) image. In the intervening years, it has added support for both landscape (1.91:1) and portrait crops (4:5).
Instagram’s display area for images is 1080 pixels tall, so when you upload an image the application will scale it to match that height.
Doing a little math shows that the native Instagram image sizes for posts are:
The first step in exporting an image for Instagram is to crop your images into one of the sizes shown above. To crop the image, you will have to use the cropping tool in your photo editor and create the proper aspect.
Even though you can crop your image when posting on Instagram, I always suggest changing the image in your photo editor. Your editor gives you more control over how the image will be cropped. You can zoom in on the image to see the exact placement of the crop and do some “border patrol” to ensure there are no oddly “cut off” people or elements.
So use the editor’s crop tool and set the aspect ratio to one of the following based on how you want your image to be displayed :
Tip – In Lightroom, when you set an aspect ratio, the crop will be in the wide mode. By pressing the X key, the crop will rotate 90 degrees to be in the tall mode.
Once the image is properly cropped, you can then export the image using the pixel with and height settings as shown here:
Most people export to JPG format. Although other formats are supported, JPG is the most widely used for posting to Instagram.
Other settings that are important to set up correctly are the color space, jpg compression, and sharpening.
The colors in your digital image are controlled by a standard called the “color space.” There are several common color space standards, but Instagram, like most web-based applications, uses the sRGB colorspace.
If you export with one of the other color space settings (ProPhoto, Adobe, etc.), then the colors displayed in the image will be off in weird ways. So make sure to set the color space to sRGB.
Another important setting is the JPG compression or quality amount. The best image format for posting images on Instagram is JPG. While other image formats such as PNG, BMP, non-animated GIFs, most photographers tend to work with JPGs.
One of the features of the JPG image type is being able to set the compression level. JPG compression is called lossy compression meaning that the more compressed the image is, the smaller the file is and the lower the visual quality. There is always a temptation to crank the quality up to 100%, but there’s no win going above about 75%. The human eye really can’t see the difference and basically turning compression off creates a huge image file.
The downside to that is if your image size is too large, Instagram will compress it for you anyway using whatever compression setting they want. So, set the image quality/compression to about 75%, so you create a reasonably sized file.
The last setting to look at export sharpening. Most image editors have a setting to add some additional sharpening when exporting the photo. Sharpening for the screen is done so that when images are displayed online, at reduced sizes or resolution will still have some pop to them.
I haven’t run too many tests to see how sharpening affects an Instagram photo. My suggestion would be to use the Sharpen for Screen (or Sharpen for Web) setting.
But, there’s always a but, when you upload an image to Instagram, there still seems to be some image modification or compression going on.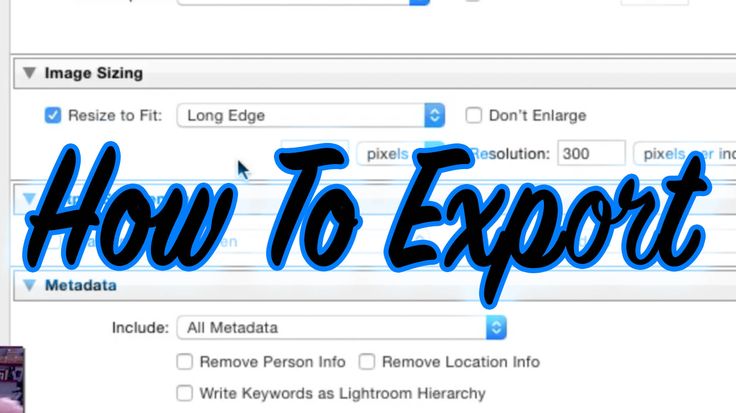 So even paying close attention and uploading with the proper crop settings and pixel sizes, Instagram will still mess with your image quality.
So how do you get around that?
I’ve seen it suggested that you can get around Instagram’s bad habits by doubling the pixel sizes on your images. By doubling the image’s pixel density, when Instagram’s image sizing algorithm kicks in and shrinks your images, it actually results in a sharper image.
To use a double-sized image for Instagram the image sizes for posts are:
I tried this doubling technique as an experiment with the following image of a green heron. I thought that this photo would be a great choice because I could look at the quality in the fine detail of the feathers.
So I made five posts to Instagram and looked for the differences –
 9:1, resized to 1080 × 566 (native size) #1080×566
Using my fingers to expand the images on my phone, I was able to see more detail in the double-sized images. So I think there is some truth to this technique, and I’ll be using these values to export my photos for Instagram
An important final note – If your image does not have enough resolution (pixels) to reach the required size (2160px), use the standard sizes. Your images will look like crap if Lightroom enlarges it and then Instagram squishes it back down.
This quick tip has covered my suggestions for the best export settings for Instagram. While most of my examples are oriented towards exporting from Adobe Lightroom, you should easily be able to adapt these techniques to Photoshop, On-1, Luminar, or any other modern photography management system.
I hope these methods work for you, and I look forward to seeing your awesome posts on Instagram soon. If you have any questions or suggestions, please post a comment below!
For more quick tips and photography guides, check out my Guides Page
These articles will tell you about ways to improve your landscape photos or wildlife lenses.
I posted test images on Instagram. To see them navigate to my feed, https://www.instagram.com/gregc_test/ and search for the tag –
#instagramimagesize
What is the optimum size for a Square Instagram Post?
The standard image pixel size for the Square (1:1) crop on Instagram is 1080 x 1080 pixels.
You may be able to enhance the image by using double the pixel density at 2160 x 2160 px –
What is the optimum size for a Portrait Instagram Post?
The standard image pixel size for the Portrait (4:5) crop on Instagram is 1080 x 1350 pixels.
You may be able to enhance the image by using double the pixel density at 2160 x 2700 px –
What is the optimum size for a Landscape Instagram Post?
The standard image pixel size for the Landscape (1.91:1) crop on Instagram is 1080 x 566 pixels.
You may be able to enhance the image by using double the pixel density at 2160 × 1132 px –
Mango Street over on YouTube has a quick tutorial on exporting to Instagram from Lightroom. They don’t cover the double image size, but their vid is excellent at quickly covering the basics.
RBC Trends explain how to download all important information from Dropbox, Apple Notes and Facebook services in the face of their possible blocking
In recent days, Roskomnadzor has partially restricted access to Facebook, and Twitter was experiencing crashes. Other services where Russians store valuable information were also under threat. RBC Trends tells you how to save your data when blocking popular applications. nine0003
WhatsApp chats can be configured to be copied daily and automatically saved to your smartphone. If the user decides to uninstall WhatsApp, they will need to manually back up their chats. To do this, open WhatsApp, click "More Options", select "Settings" → "Chats" → "Backup Chats" → "Backup". nine0003
The export function can be used for both individual and group chats. To do this, open the chat, click "More options" → "More" → "Export chat".
Find the option "Export chat" in the drop-down menu in the upper right corner of the chat
In this case, the user must choose whether he will export media files. After that, he will receive an email with an attachment in the form of a document in TXT format containing the history of correspondence.
To receive a copy of all materials, you must send a download request in JSON format. To do this, you will need to enter your Instagram account password. The user must go to their profile, click on the icon in the upper right corner, select "Your activities", click "Download information". Then you will need to enter the email address to which Instagram will send the download link and click "Request File".
Instagram asks for an email to send the archive
When saving data, the user can choose what content he wants to download, as well as set the date range for downloading. nine0003
To download all data from Facebook, you need:
 The download request will then be set to "Pending" status and will appear under "Available Copies of Your Download Information Tool"
 .
Facebook allows you to select the format, quality and time range for saved files, as well as their categories
It may take up to several days for Facebook to prepare the archive. Then the user will receive a notification from the social network.
To download a copy of the requested data, you need:
User can choose HTML or JSON file format to download files.
The latter is more convenient for transferring data to another service. nine0003
To submit a request to upload an archive of tweets, the user needs to click the "More" icon in the navigation bar to go to the account settings. Then you need to select the item "Your account" in the menu, click "Upload an archive of your data", enter the password in the section "Upload an archive of your data" and click "Confirm".
The user will then receive a code to the account's stored phone number or email address. After confirming your identity, you need to click the "Request data" button. Twitter will send an email or push notification when the download is complete if the app is installed on the smartphone. After that, in the settings in the "Download data" section, you can click the "Download data" button. The archive is uploaded in ZIP, HTML, JSON formats. It may take several days to prepare. nine0003
Upload Your Data Archive button in the Twitter account dashboard demographic information, advertisement information, and so on.
You can transfer files and folders from your Dropbox account to your computer. To do this, you need to sign in to your account on dropbox.com, hover over the file or folder you want to download, then click "..." (ellipsis) and select "Download". nine0003
Download a folder with photos from Dropbox
This way you can download folders up to 20 GB in size, the number of files in which does not exceed 10,000. All folders are downloaded as ZIP archive files.
Dropbox Paper docs must be converted to one of the following formats to download to PC: DOCX, MD, or PDF. To do this, click "..." (ellipsis) in the document, select "Export", select the file format to download and click "Download".
The DOCX format will only be compatible with Microsoft Word, not Google Docs or OpenOffice. nine0003
Most users sync their notes with iCloud accounts. To upload notes from iCloud on Mac, you need to:
Windows users must first install the iCloud app on their computer and then sync their notes with Outlook. In the iCloud app, you need to:
Selecting notes to download in Backup Explorer (Photo: macroplant.com)
All iCloud notes will be available in the selected folder on the computer.
The export function can be found in the Board menu → More → Print and Export. The information is downloaded in JSON format. It is currently not possible to import the archive back to re-create a Trello board. nine0003
Export board from Trello
Trello Premium allows you to export all boards in your workspace in CSV and JSON formats. Also the user can include all their attachments as a ZIP file in their own format.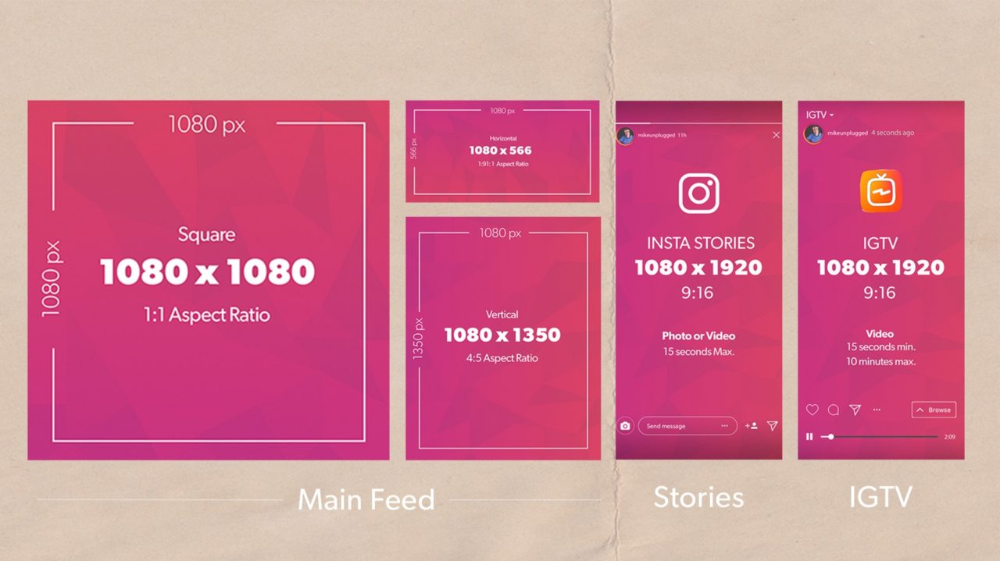 To do this, go to the Premium Workspace page and select the Export tab.
To create an archive, you need to go to "Settings and members" at the top of the left sidebar, select "Settings" in the sidebar of this window, scroll down and click "Export all workspace contents" (Export all workspace ). The user will then receive an email from Notion with a link to download the files. The link will expire after 7 days. nine0003
Export workspace from Notion
For Enterprise members, this option can be disabled at the administrator's discretion to keep documents available for internal use only. Enterprise plan users can export their workspace as PDF files.
You can upload individual images, HTML, Markdown, PDF and CSV tables on the service. To do this, click in the upper right menu "...", then - Export, and select the desired format. nine0003
Photos
• 3 min read
You've probably had times when you've edited your photos with passion in Photoshop or Lightroom, and Instagram turned your gorgeous photos into a grainy, discolored, faded mess. And here is the question: why Instagram ruins the quality of and makes photos edited in Photoshop/Lightroom dull (and almost black and white)?
Instagram has become the leading photo-sharing platform on the planet. Naturally, the huge user base has attracted professional photographers who post their professional shots, polished in Lightroom or Photoshop, via iPhone. Which, of course, is a distortion of the original intent of the application. nine0003
Instagram was meant to be a mobile photo-sharing platform, so it makes sense that it distorts photos taken with SLR cameras. It's beneficial for them to reduce the file size on their servers in order to store more photos for less money, and so they wrote an image reduction algorithm that prioritizes a smaller file size over preserving the user's original image quality.
Obviously, the purpose of the algorithm is to keep the quality as low as possible for the photo size. Therefore, following some rules for exporting photos to Lightroom / Photoshop, reducing visual information and file size, you can achieve a result in which Instagram won't distort the colors of your photo.
Although the reduction algorithm used by Instagram is their own development, the photographers managed to find the ideal export settings in Lightroom and Photoshop for Instagram.
And from theory, that's all you need to know.
On Retina devices, Instagram handles images in two different ways:
nine0008Some claim that Instagram actually renders portrait images on Retina screens at 1350px, but there are also conflicting reports.
Uploading a portrait photo larger than 1200px runs the risk of to be affected by algorithm - therefore, the vertical length of a portrait image must not exceed 1200px.
Similarly, if your photo is a landscape photo, the horizontal length must not exceed 1080 pixels .
In Lightroom, it's worth checking the " Don't Enlarge " checkbox when exporting. If your image is smaller than 1200/1080 pixels on its longest side, this will prevent any scaling issues that could reduce quality. nine0003
So forget those white frames. Instagram now has 4 possible aspect ratios :
"Universal" aspect ratio can be used in both portrait and landscape orientations.
Most of these aspect ratios are built into Lightroom's cropping feature, but specifically the 1.91:1 ratio, which is the Facebook recommended image preview size in Facebook Ads, needs to be set manually.
To do this, simply click on the drop-down list of the control element "Crop Overlay" in Lightroom, select option "Enter Custom" and enter 1.91 and 1.
You may not be familiar with color spaces, but setting them up correctly can create a noticeable effect towards a perfect, undistorted Instagram upload. With their correct settings, you can get rid of coloring in green , or by dimming the photo with the Instagram algorithm. nine0003
A color space is the range of colors that can be represented in an image. The theory is much deeper, actually. You might have thought these things were only important for printing, but rendering images properly on the web also requires a basic understanding of color space. Without diving too deep, here's what you really need to know .
When you export an image to Lightroom or Photoshop, several different color spaces are available. However, browsers and image-sharing apps like Instagram usually display 9 images0177 in the default sRGB color space . This means that if you export an image as AdobeRGB or ProPhotoRGB, the photo's color settings will be shifted, resulting in a tinted and distorted photo.
The slight color difference you may see on laptop and phone screens is due to color calibration rather than export color space - and it's not something you can really fix. But here's what you can control: when publishing to the web - desktop or mobile - make sure your image is exported0177 with sRGB color space.
We have already added an article on how to convert a color profile to sRGB in Photoshop.
Now, put it all together...
