It’s essential to create shoppable Instagram posts cause it is not only one of the social selling trends but also the best way to drive sales and traffic effectively for your Shopify businesses in 2021.
To fully leverage shoppable posts to get more sales on Instagram, businesses of all sizes and shapes should understand it clearly first. Afterward, we will guide you through all the simple steps to create and make an Instagram post shoppable. Let’s start with the definition first.
Table of Contents
What is a shoppable Instagram post?‘Create Shoppable Instagram posts’ is a term referring to the action of tagging products to unpaid Instagram posts. The ultimate goal of product tagging is to lead users from Instagram to the brand’s websites where the tagged products can be purchased.
Add product tags to create shoppable Instagram posts
Business owners and creators can tag products to not only images but also videos, carousels, IGTV, Reel, Guide, and even Livestream. The maximum number of products that can be tagged to an image or video is 5. Also, you can add no more than 20 products to a multi-image post.
With product tags, Instagram users only need a tap to check out product details and make a purchase. You know what? Users can even do payments right on the platform with Instagram checkout.
Obviously, shoppable Instagram posts are changing the e-commerce game on Instagram. However, if you still doubt the efficiency of the shoppable posts, let us blow your mind with several reasons.
Why should you create shoppable Instagram posts?First of all, shoppable Insta-posts offer your prospective customers a direct path to your brands and help you boost sales. Also, it makes the customer journeys seamless from seeing a product to make a purchase. These two factors will simplify the way customers shop as well as provide business owners with more slots to display and promote their products on social. Eventually, it drives up your sales.
Secondly, Instagram has proven itself to be a huge potential market for e-commerce with over 1.16 billion monthly active users. By showing your products on Instagram, you are approaching more prospective customers than ever before.
Thirdly, no other better way to test your products on the real market than to create shoppable Instagram posts. By connecting with your customers on Instagram posts, you will be able to identify which products your target audiences will like and be willing to buy.
Last but not least, shoppable Instagram posts eliminate the shopping barriers in comparison with other e-commerce platforms. Nowadays, customers are savvy in social media ads and marketing, so it is very hard to convince them to buy directly on e-commerce platforms as before. However, if you approach them in an indirect way through Instagram posts, they tend to let the guard down and check out your products through Insta-posts.
Are these reasons strong enough to convince you to create shoppable Instagram posts? If the answer is yes, then we’re not gonna waste your time. Let’s craft your post that sells on Instagram now.
Before you start to tag products to make your Instagram posts shoppable, you must set up Instagram Shopping first. To do so, your business must meet certain requirements:
All done!? Let’s get to the first step to create shoppable Instagram posts.
Step 1: Convert to the Instagram business accountFirst thing first, you have to switch your personal account to a business account. Do as instructed below:
On Mobile: Go to your Instagram profile > Click on the 3 lines in the top right > Go to setting > Account > Switch to Professional Account > Business > Done
On desktop: Go to your Instagram profile > Settings > Switch to profession account > Choose Business > Select your business category > Add business contact info or skip it > Done
Go to your Instagram account settings
Firstly, go to your Instagram account settings.
Switch your personal account to a business account
Then proceed to Switch to Professional Account.
Choose Business
You are given 2 options to turn your Instagram account into an account for Creator or Business.
Pick the category for your business
There are multiple categories to choose from. You should pick the most relevant category for your business.
Add your business contact information
Once you own a business account, you can add in relevant business information including business address, phone number, business email, etc. Then, you can also link your business account to your website.
Now, your Instagram business account is ready
NOTE: If you already have an Instagram business account, you can skip this step and proceed to step 2.
Step 2: Connect to your Facebook pageIn this step, we are going to link your Instagram business account to your Facebook page. You can connect your Instagram business account to your Facebook page in two different ways:
Log in to Facebook > Select Pages > Choose Settings (From your Facebook page) > Scroll down and select Instagram > Click on Connect Account > Input your Instagram username and password > Done
Connect your Instagram business account to your Facebook page
From InstagramGo to your Instagram business profile > Select Edit Profile > Select Page > Pick the Facebook page you want to connect > Done.
NOTE: You only need a Facebook page to connect to your Instagram business account, not Facebook Page Shop.
Now, your Facebook page and Instagram business account are connected.
Step 3: Upload product catalogs to FacebookSince your Instagram business account already connected to your Facebook page in the previous step, all you need to do now is to upload products to your Facebook page’s catalogs, then the products will be updated on your Instagram account automatically.
To ease the process of creating Facebook catalogs and uploading products manually, we recommend you to use Socialshop.
With Socialshop, you can sync all your products from your Shopify/WooCommerce/BigCommerce to Facebook catalogs automatically in a click.
Socialshop – Sync products from Shopify/WooCommerce/BigCommerce to Facebook automatically easier than ever
Once you’ve done it, all your products will be available on your Facebook page shop as well as on Instagram (As we linked Facebook page with Instagram business account). Let’s proceed to step 4.
Step 4: Submit your account for reviewNext, you need to submit your Instagram business account for review. Follow the instructions below:
Go to your Instagram business page > Settings > Business > Shopping > Done
Now, you have to wait for a few days until your Instagram business account is approved for the shopping feature. However, the account review process sometimes takes you longer.
In some cases, you are asked to prove your ownership of your website domain before submission, follow the instructions here to complete domain verification. Then, you can submit your account for review.
Step 5: Activate the Shopping featureOnce your account is approved for Instagram Shopping, you can enable the Shopping feature.
Go to your Instagram business page > Settings > Business > Shopping > Select Product Catalog you want to link to your account > Done
After your Instagram business account is approved, you can activate the Shopping feature
NOTE: If you are unable to access Shopping, perhaps your account is still being reviewed or has not been approved for Instagram Shopping.
Step 6: Create shoppable Instagram postsFinally, you are fully enabled to use product tags to highlight your products in Instagram posts.
It’s time to tag products to your Instagram posts
You can create a post as usual and add product tags to your video or images. As mentioned above, you can add a maximum of 5 products to an image or video, and up to 20 tags for the carousel.
To tag products to your Instagram post, follow these steps:
Add photos/video > Add note > Click on Tag Products > Tap on the photos/video > Search products > Select products > Click on Done > Share.
Once you finished, your posts are shoppable now. Instagram users can check out all the products you tagged on your posts easily in a click.
Final thoughtsIn brief, it is essential for you to leverage Instagram posts to promote your products and drive more sales. To create shoppable Instagram posts, you should follow our 6 steps:
Let’s create your shoppable Instagram posts and rock your sales today!
Here is your guide on how to start reaching customers with your shop
Download the Guide
Products
Ad SolutionsVideo SolutionsInstagram ShoppingBranded ContentFeedStoriesReelsInstagram Direct Here is your guide to how to create effective Reels ads.
Download the Guide
For Creators
Inspiration
Latest News & TipsHouse of Instagram EventsCase StudiesHere’s your guide to help get the most out of creators for your business.
Download the Guide
Instagram Help CenterFacebook Ads GuideFree Online CoursesNearly half of people say they use Instagram to shop, weekly.1
Instagram Shopping is a set of features that allow people to easily shop your brand’s photos and videos all across Instagram.
Open your shop by completing the set-up process below in Commerce Manager.
You can choose to onboard onto Instagram Shopping by setting up your shop in Commerce Manager or a supported platform. Or, you can get started directly within the Instagram app.
You can choose to onboard onto Instagram Shopping by setting up your shop in Commerce Manager or a supported platform. Or, you can get started directly within the Instagram app.

GET STARTED IN COMMERCE MANAGER
@instagramforbusiness
Do you want to make a post with photos on Instagram, but you have never done it before? Our small but useful guide on this topic may be useful to you.
Posting a new post on Instagram* takes a little time and is not difficult. How to add a post to Instagram* from your phone: first you need to go to your profile through the official application, then follow the steps. nine0003

 If you don't like the result, you can undo the changes, in which case the picture will return to the way it was before editing. You can change all photos in the same way, each in its own way, only part of the frames from the post or not change any photo.
 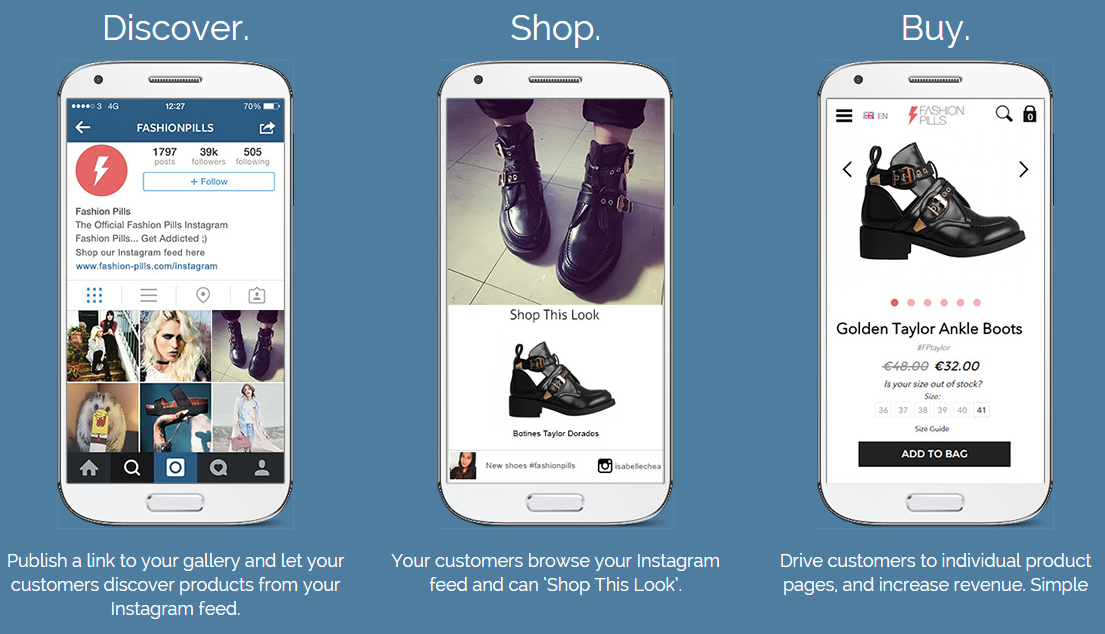 nine0010
 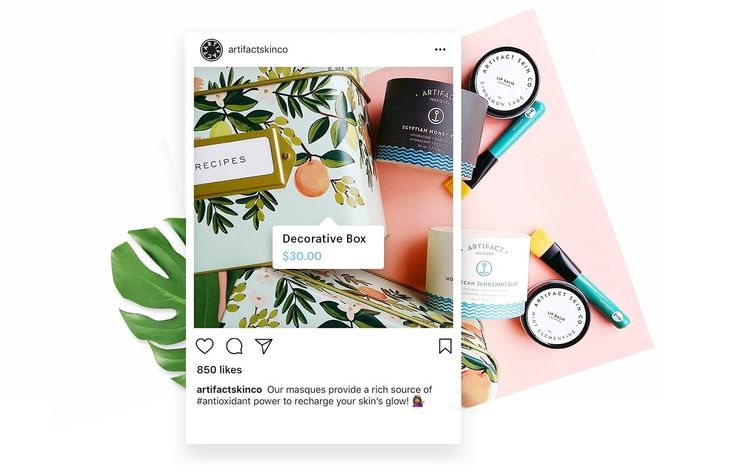 We talked about this in the article "Large texts on Instagram *: why are they needed and how to design." nine0010
 We looked at how to post on Instagram* from Android. If you have iOS, the intuitive process will be the same, just some functions will be called differently.
There is another way to post from your phone. This is very convenient, for example, when you scroll through your gallery and find a photo that you urgently need to share with other users.
Step by step how to add a post to Instagram* from your phone through the gallery:
 We are looking for those photos or videos that we want to publish for our subscribers. At the bottom of the screen in the center there is a "Share" button. On Android, it often looks like an unfinished triangle with circles at the ends.
 You can also crop unwanted parts of the frame to make it more accentuated in the right place in the photo. Or do nothing, don't edit, just click on the blue arrow to go to the next block. nine0003 You can use any suitable hashtags and geotags of your choice
Our blog has a lot of articles about the benefits of hashtags and how to use them correctly in publications. For example:
And if you just need to quickly find hashtags for publication, you can use our bot "Gennady". You give him a photo or a word for which you need to pick up hashtags, and he gives you a whole cloud of hashtags that can be attached to a post. But we digress. While we were thinking about hashtags, our post has already been published.
Let's say you tried both options, but the photo still doesn't want to be added. What to do in this case? Determine the cause and try to fix it:
 For the correct operation of the entire device, it is important to update the OS regularly.
 We have figured out how to post to Instagram* from your phone using the Instagram* app or photo gallery. We talked about how to change settings, edit images and their number, add geotags and tag people. We studied why the photo might not be added to the post, and what to do in each of the cases. You can find more information about Instagram*, posts and promotion in our blog.
Elena
Sergeeva Targeted advertising specialistAccording to Facebook Ads, 70% of users learn about new products from Instagram. To help sellers promote them, Instagram created the Instagram Shopping tool, which became available in Russia in March 2021. We will tell you why to connect this tool and how to set it up.
Instagram Shopping, or Shopping, is a tool that lets you tag products in your posts and Stories. Instagram takes information about products from the catalog that the seller uploads. nine0003
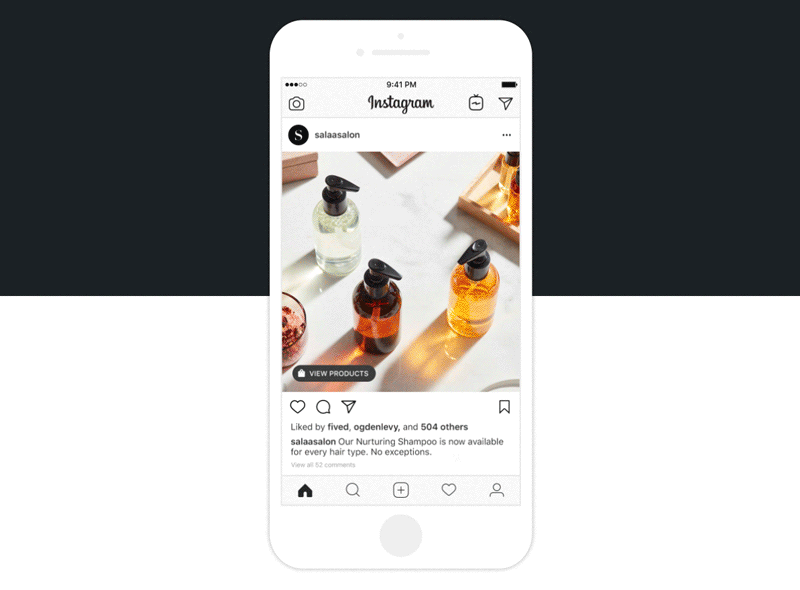
The profile with the option enabled looks like this:
There is a bag icon on the photo, which means that if you open a post, goods will be marked in it.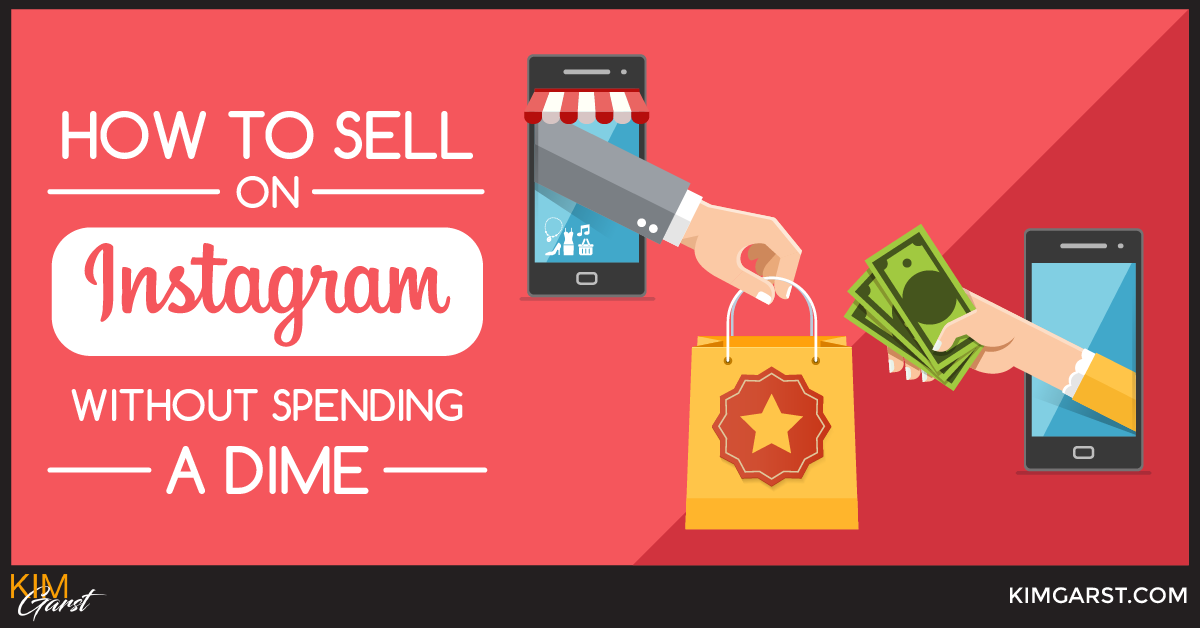 Source: COS
 Several items can be noted in the photo. When clicking on shopping tags, users will see the price and description of the product, and will also be able to follow the link and place an order on the site.
In addition to prices and the products themselves, the user also sees additional information about them: in the description, you can specify the composition of the fabric, size, available colors, etc. The user can also view the item from different angles in the gallery or learn about other products of the online store All this without leaving Instagram. nine0003
To get to the catalog with goods, you need to click on the "View store" button. Inside the store, products can be grouped into thematic collections, such as new arrivals or gifts.
US residents can pay for items within the app using Facebook Pay. In other countries, including Russia, this option is not yet available: users follow the link on the product to an external site and pay for the order there.
 For example, Facebook prohibits the sale of replica brands and any infringing products rights, and in order for the system algorithms to work correctly, the advertiser must agree to the transfer of data from his site. Violation of the trading agreement can result in account suspension. nine0010
 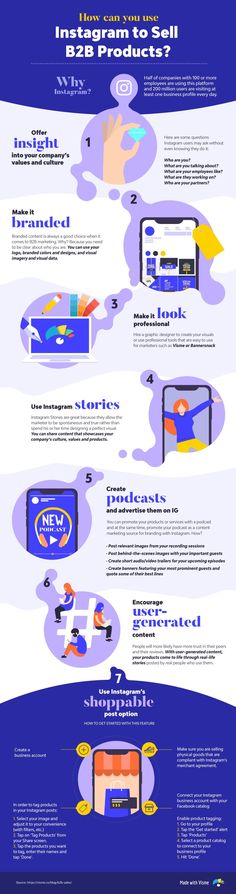 The new catalog is created in Facebook's Commerce Manager, a section within the social network where you can manage your inventory and sales. If you already have a catalog, you can add it using one of the partner platforms: OpenCart, WooCommerce, Shopify, etc. We will talk about this when we go through the setup.
 Sign in to Commerce Manager, also found in your ad account.
The system prompts you to create a shop or catalog. The store is a single storefront for Instagram and Facebook, which is available to companies with physical goods. To promote products on Instagram, click Add Catalog. Choose the type of catalog depending on the subject of your business, e-commerce is suitable for online stores. nine0003
The next step is to configure the parameters and method for loading products. From the drop-down list, select the advertising account to which the catalog will be linked.
You can create a catalog yourself - by uploading a spreadsheet or by connecting a pixel - or through integration with one of the partner platforms. In the second case, the goods will be loaded from an existing online store.
Click the "Create" button - the catalog is ready.
Important : the catalog must contain exact prices and information about the availability of each item. In addition, the rules for returning goods must also be indicated - on the store's website or in the Instagram account. nine0003
To proceed with product creation, select the desired catalog in Commerce Manager and then click Add Products.
Add products using one of the following methods:
If you choose to download manually, a form will open. In it you need to add the name of the product, its description, images, link to the site and price. The system will tell you which data is not required.
After completing the form and uploading, the products will appear in your catalog. nine0003
Inside the catalog, products can be grouped into collections: for example, by subject, season, upcoming holidays, etc.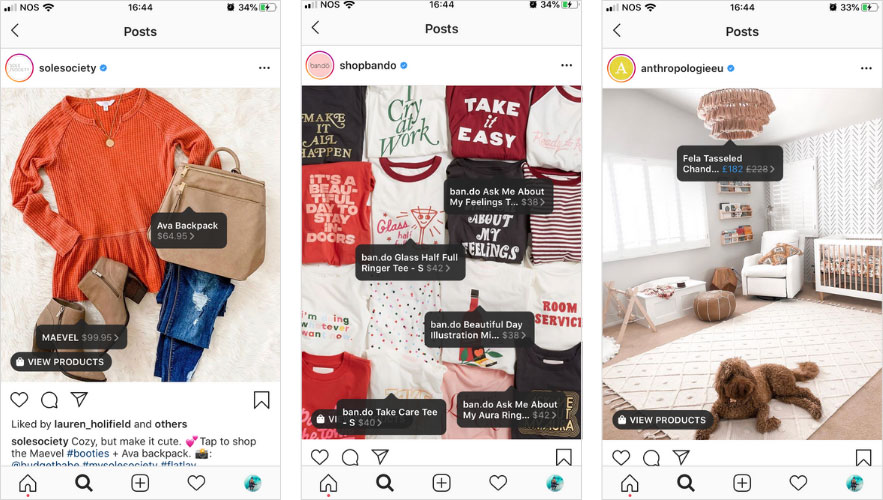 Collections help sellers to get to the user's interests more accurately, and users to quickly select goods.
You can create not only the standard collections, but also those that will attract more attention, such as "Top 10 coats" or "Gifts for best friends".
You can combine products into groups manually or using filters, for example, if there are a lot of products. nine0003
At the final stage, specify the name of the collection and click the "Create" button.
After creating a product catalog, you need to send an account for verification. The verification may take several days.
To add a catalog to Instagram, go to the "Settings" section in the application and select the "Company" tab.
Then click "Set up Instagram Shopping" and follow the prompts.
If the catalog passes the check, a "Purchases" section will appear in your Instagram account. Once your account is approved, turn on Instagram Shopping.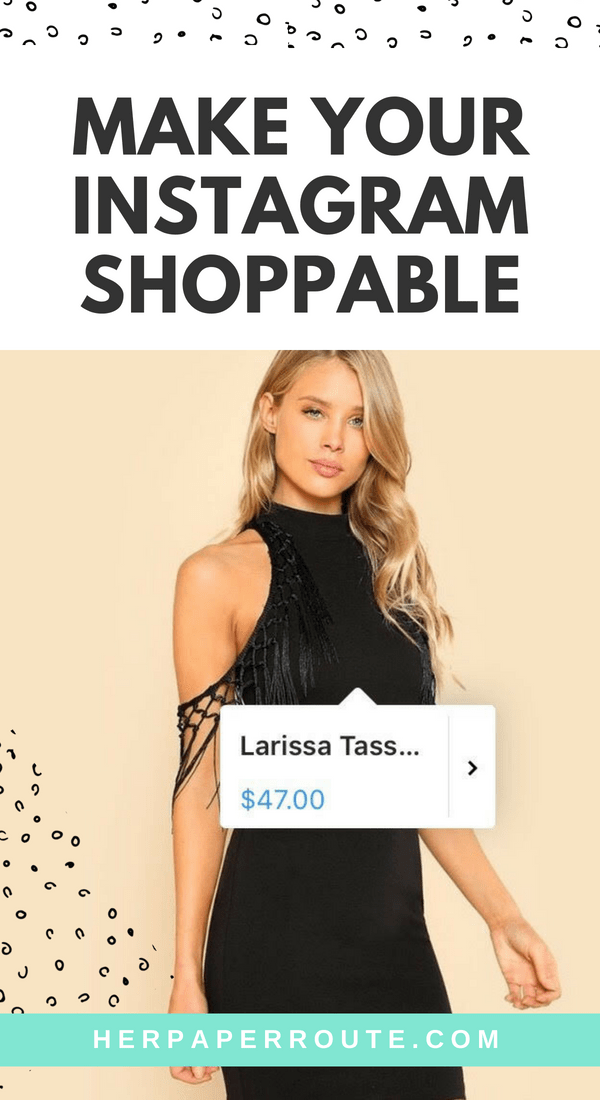 To do this, in the "Purchases" section, select the product catalog that you want to connect, and click "Finish". nine0003
To tag an item in a post, start posting as usual - add a photo and post text, and then follow these steps:
You can also mark the product in Stories. To do this:
Up to 5 products can be tagged in one photo, up to 20 in total in the gallery. In Stories, a sticker is added to only one product, but you can change its color and text.
Instagram Shopping will increase sales and user engagement in your account.