 But those tools also help you explore all the different options before picking the right font for your brand, giving you the freedom to choose insta fonts you’d like.
 Have you noticed how more and more Instagram accounts use different fonts on their bio and posts? Are you wondering how they do it, and how you could change fonts on Instagram too?
In this article, we’ll show you how fonts work on Instagram and what options you have if you want to change them on your Instagram bio, posts, or profile.
But let’s get something out of the way first.
Why Should You Change Font on Instagram?Well, there are three reasons:
#1. To Stand OutInstagram is one of the most creative social media platforms. Many designers, creators, artists use it to showcase their work. Similarly, many brands are also competing for attention by highlighting their creativity.
And that means that the level of competition in terms of creativity is incredibly high.
Using custom fonts is one way to make your Instagram presence different from the others and stand out.
#2.Instagram is all about experimenting with your content, isn’t it?
The social media platform offers so many ways to do that, after all.
Changing text fonts is another way by which you can showcase your creativity.
#3. To Bank on the Latest TrendsAnother incredible thing about Instagram is the speed at which new trends emerge on the platform. And, let’s face it, they will affect what you do on the platform as well.
Just imagine sticking to a trend for way too long. Eventually, your followers will see your profile as outdated and falling behind the pack.
Using custom fonts on Instagram is currently trending among influencers and brands. This means that it is time to give it a try.
With that off the way, let’s cover how you can change fonts on Instagram.
How to Change Fonts on InstagramThe process is quite simple. To change fonts, you need to use an Instagram Font Generator.
Font generators, as the name might suggest, aim to simplify the process of changing fonts. But those tools also help you explore all the different options before picking the right font for your brand, giving you the freedom to choose insta fonts you’d like.
There are four main Instagram font generators that you could use:
IGFonts.io – This is a very simple tool that helps you pick the best font for you. All you have to do is type the text and explore all the available fonts.
The tool’s interface includes only a text field where you can type your Instagram content to style. Once you’ve done that, the tool will generate fonts to output your copy, allowing you to choose the one you like.
FontGet – Instagram Font Generator – Here is another simple option to try based on a text box and a list of all the available fonts that you can use.
However, FontGet also expands your options with emojis, cool symbols, and text faces.
MetaTags Font Generator – If you want to preview how your new font shows up on your bio, then this tool is for you.![]()
You can use it to preview your profile with different fonts and see how they’d work to represent your brand.
Fonts.Social – This is a fun tool to try out new fonts while exploring their emoji recommendations that go along with your text.
How to Change Font on Your Instagram BioLet’s look at the step-by-step process on how to add custom fonts to your bio.
First of all, you need to use one of the Instagram font generators we’ve mentioned above.
Let’s say you decide to use the MetaTags Font Generator. Here’s the exact process to use it to change fonts on your bio:
TIP: Keep in mind the limit of 150 characters, so make sure you provide all the necessary details for your brand in this section.
Here’s how the process will look like when changing fonts on an Instagram post.
Once again, you need to start with an Instagram font generator. We’re picking IGFonts.io this time.
So, here’s what you need to do:
Custom fonts can also help you decorate your Instagram Stories.
Changing fonts on your Instagram Stories can help you build your brand through everyday content. Even if you simply stay consistent with a couple of fonts that reflect your brand, it’s still a creative tactic to play around based on the different themes you are focusing on.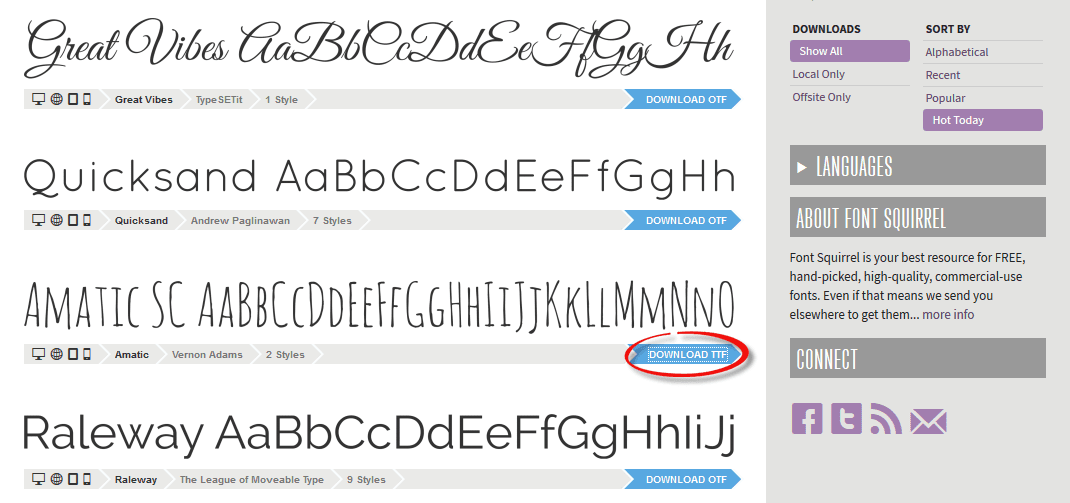
There are two different ways to use different fonts on your Instagram Stories:
Let’s look at the second option.
Changing Instagram fonts is relatively easy, isn’t’ it? Unfortunately, making sure that custom fonts work for your brand and elevate your image is entirely different.
That’s why there are some things I recommend you keep in mind when changing fonts.
#1. Don’t Change All Your Instagram FontsFirst of all, you don’t necessarily need to change all your Instagram fonts. Just because it’s fun and it can help you stand out, it doesn’t mean that you need to use them on all your posts.
In fact, it’s better to use the new fonts strategically so that they help you stand out.
There’s no need to go through the process of using an Instagram Font Generator for every single feed post. It will soon look repetitive to your followers.
It can also look like you’re overusing an Instagram trend. You don’t want your followers to think that you’re trying too hard, do you?
#2. Retain Brand ConsistencyAll your creative output on Instagram should align with your branding. Changing your Instagram font can be fun, but you still need to be consistent with your brand.
Make sure you stick to the fonts that reflect your brand instead of using a different one on every single post.
Pick one or two fonts that match your brand’s content and start using them more often.
#3. Consider AccessibilityCustom fonts are all based on Unicode characters. This means that they should show up on all browsers and devices using a universal code.
However, it’s not always the case. Sometimes not all characters show up, which makes your custom font illegible.
Be careful with the fonts you’re using, and make sure you test them as much as possible on different devices.
TakeawayChanging Instagram fonts can help you make anything you post on the social network to stand out and showcase your creativity. It is also incredibly easy to do so. All you need is an Instagram font generator, and you can start boosting the creativity of your profile bio, posts, and Stories.
Good luck!
You may be wondering how to change the font in your Instagram bio if you've seen examples of profiles with non-standard fonts on the platform. If you use a different font on Instagram, it can grab attention and make your profile and copy stand out, and it's actually very easy to do. You don't even need to download any special app.
To change the font in your Instagram bio, or indeed in the captions on your Instagram posts, all you need to do is copy the text into one of the many Instagram font generator tools, choose the font you like and paste it in. It's as easy as that, but we'll illustrate the process below.
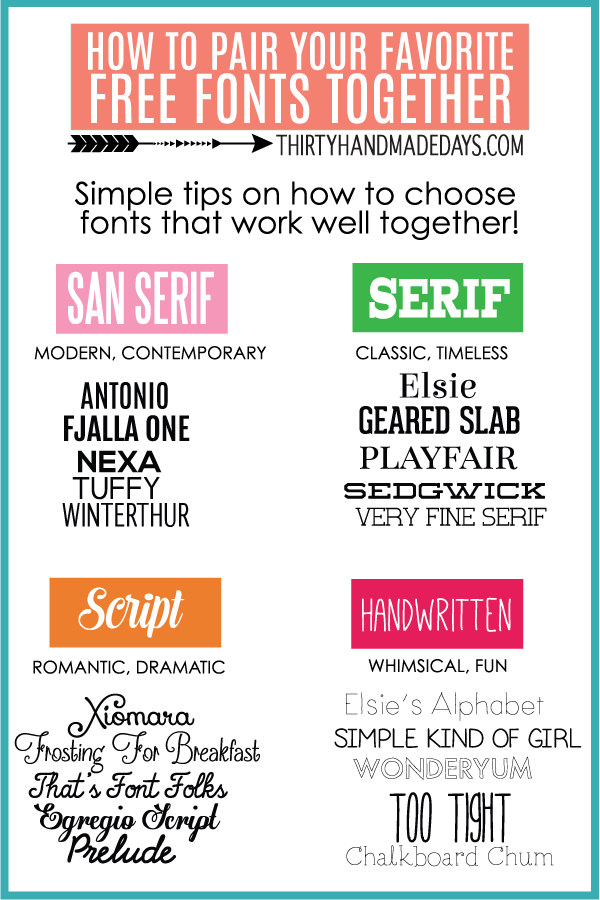
Instagram remains one of the most popular social media platforms for artists and designers due to its focus on imagery. To make your profile stand out in a crowded marketplace – which you might particularly want to do if you're getting to grips with how to sell on Instagram, an unusual font can help. Just remember that you don't want it to look childish, amateur or cheesy, so do take some time to choose which Instagram font to use. See some more pointers at the bottom of this guide.
Need some inspiration? Check out our list of free fonts to help you decide on the type of font you might like.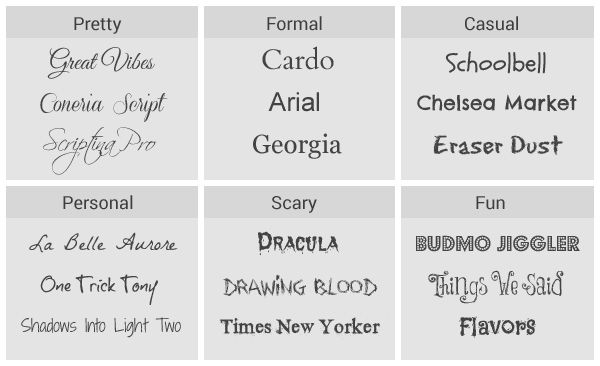 The odd emoji is also good for breaking things up and adding a bit of personality and colour, but don't go overboard or your bio may become off-putting or hard to read.
With that in mind, read on to find out how to change the font in your Instagram bio. For more Instagram tips, see our guides to how to turn on Instagram's Dark Mode and how to download Instagram photos. And don't forget to follow Creative Bloq on Instagram !
(Image: © Fancy Fonts)
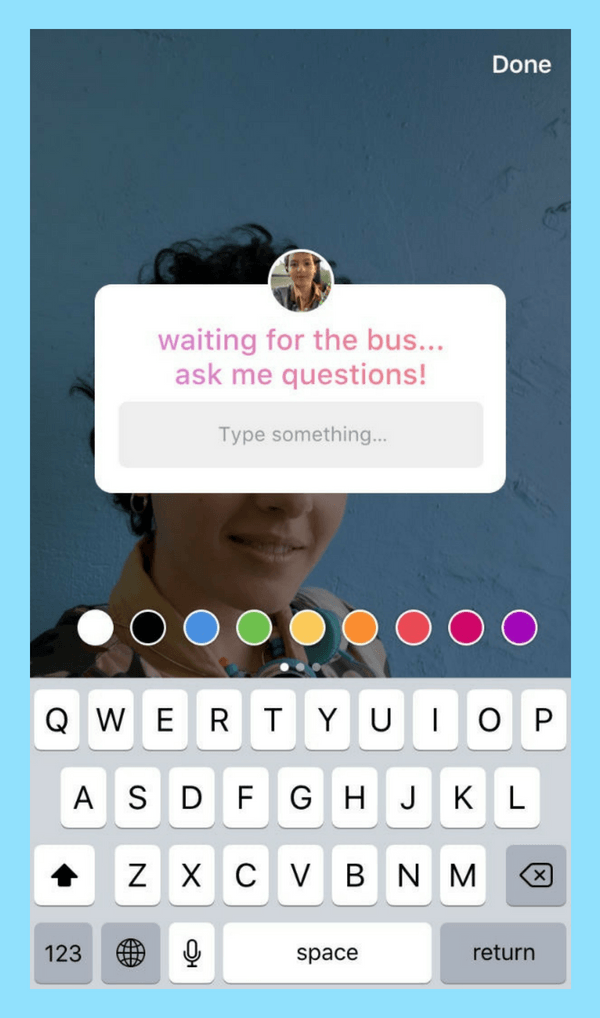
First up, you'll need to open up an online Instagram font generator tool. There are many available on the web, including Insta Fonts , Fancy Fonts and Cool Symbol , but one of our favourites is Meta Tags Font Generator , because it makes it super easy to preview how your font will look live on your Instagram profile.
Type or paste in the text that you want to change into the box that reads 'Edit text'. Below, you'll see a list of fonts that can be used in Instagram, together with previews of how your text would look in each of them. If you're on a desktop computer or tablet, you'll also see a mockup of how your text will look in an Instagram profile on the right.
Some of these fonts are pretty simple; some use emoji and symbols, which may either look creatively inspiring or completely daft; and some will be almost impossible to read. Once you've found the font that works for you, use the 'Copy' button to copy the text.
(Image: © Gavin Strange on Instagram)
Now open Instagram, click on your profile picture, and click the Edit Profile button. In the form that appears, paste in your text into the appropriate box. Click Submit and you are done.
If you don't like the look of the font you've chosen, you can easily go back to step one and choose another. If you're using an iPhone or iPad and prefer a wider selection of fonts, check out the Fonts – for Instagram app for OS. Note that the same technique should also work to change the font in Instagram captions. Just right click and paste the text into the caption field when you're making an Instagram post.
A crucial thing to remember is that changing the font in your Insta bio involves the use of unicode characters, which are often not accessible for people who use screen readers. This means you definitely don't want to put your whole bio, or entire captions, in a different font. Most people only change the font for their name, or a small part of the description.
Remember, too, that updating the text itself can have as much impact as changing the font, if not more. The ideal Instagram bio is generally short and sweet: a few snappy words rather than long sentences. Don't forget to include any relevant links to other accounts you manage. To discover other ways to tweak your account and get more from Instagram, see our top Instagram tips.
Read more:
Thank you for reading 5 articles this month* Join now for unlimited access
Enjoy your first month for just £1 / $1 / €1
Already have an account ? Sign in here
*Read 5 free articles per month without a subscription
Join now for unlimited access
Try first month for just £1 / $1 / €1
Already have an account ? Sign in here
Sign up below to get the latest from Creative Bloq, plus exclusive special offers, direct to your inbox!
Contact me with news and offers from other Future brandsReceive email from us on behalf of our trusted partners or sponsorsRosie Hilder is Creative Bloq's Deputy Editor. After beginning her career in journalism in Argentina – where her blogging prowess led her to become Deputy Editor of Time Out Buenos Aires – she moved back to the UK and joined Future Plc in 2016. Since then, she's worked as Operations Editor on art and design magazines, including Computer Arts, 3D World and Paint & Draw, and got the 'Apple bug' when working on US title, Mac|Life. In 2018, she left the world of print behind and moved to Creative Bloq, where she helps take care of the daily management of the site, including growing the site's reach through trying to please the Google Gods, getting involved in events, such as judging the Brand Impact Awards, and helping make sure its content serves its readers as best it can. Her interests lie in branding and illustration, tech and sexism, and plenty more in-between.
Do you want to add some custom Instagram fonts? If so, look no further.
In this article, we'll show you how to use custom fonts in Instagram Stories, Posts, and your Bio to make your content stand out.
How to use different fonts on Instagram
Instagram developers have recently tried to spice things up by increasing the number of fonts available for your Instagram stories from one to nine. While this came as a relief to users who originally only used the Sans Serif font, most people find that their options are still limited. The situation is even worse because Instagram does not have built-in fonts for your captions, comments, or bio.
Fortunately, third-party developers have made the most of this opportunity and created dozens of fonts. At this point, it's nearly impossible to exhaust the font options available online. All you have to do is find a suitable third party text generator site where you can create your texts and then copy and paste them on Instagram.
Font generators are one of the fastest ways to add fun fonts to your Instagram content. In short, here's what you need to do:
The following text generators are the most popular and they are all free as well.
 You can even use different fonts for each field.
 Your Instagram bio is limited to 150 characters, which means you need to be creative but not wordy. Adding a stylish custom font is one way to achieve this. Here's how to do it:

When it comes to Instagram Stories, you have 9 different built-in fonts to choose from. Here's how to use them:
That's it! Before clicking the publish button, you can change the size of the text or change its position on the screen as you wish.
Alternatively, you can choose the pre-made Instagram Stories template app. These apps contain pre-made text that you can edit to fit your story. A good example would be Storyluxe.

If you have an iPhone, you can use different fonts on Instagram in two ways:
Just like on iOS devices, custom fonts work well on Android devices. All you have to do is find a reliable font source. You can use websites with text generators or install font apps that are free to download from the Google Store.
The Instagram app itself does not offer bold letters. However, most third-party text generators and font apps have a "Bold Letters" option. Lingo Jam is especially popular with Instagram users who like bold, italic or cursive.
When using a third party text generator, copying and pasting fonts on Instagram is very easy.
Programs for Windows, mobile applications, games - EVERYTHING is FREE, in our closed telegram channel - Subscribe :)
The following fonts are very popular:
• Novecento
• Montserrat
• Helvetica
• Playfair 9 display0003
• PT Sans
For a long time there have been five separate fonts:
• Classic
• Modern
• Neon
• Typewriter
• Strong
• Four more variants have recently been added:
similar to the original Sansif Comic Sans.
• Italic serif
• Capital letters font.
• Serif font without italics.
Using different fonts is a sure way to stay unique on Instagram. This not only makes your content stand out, but also makes it clear that you're on top of the latest tech trends. What's your favorite font for Instagram stories?
Feel free to chat with us in the comments section below.
Programs for Windows, mobile applications, games - EVERYTHING is FREE, in our closed telegram channel - Subscribe :)
You have probably noticed more than once Instagram profiles that are designed quite unusually. Most often, a beautiful font in the profile header of the account owner attracts attention. Not everyone knows that it is not so difficult to make yourself an unusual font in the header of your account. In this short review, we will tell you how to change a classic font to an unusual one.
In order to change your biography (profile header), you will need third-party applications. To begin with, we will tell you how and where this tab with information about you is located.
You cannot change the background and font size in the profile header. But you can use various emoticons, thanks to which you can also make your profile more unique and bright.
Pay attention to the beautiful font of the name Vanessa.
Now we will tell you which applications will help you change the font. For smartphones on Android, the app Font for Instagram is suitable: https://play.google.com/store/apps/details?id=com.coolfonts.instagramfont.
For IOS, look for app Fonts : https://apps.apple.com/us/app/fonts-for-instagram/id903648056.
They work according to the same type. You open the tab with fonts, select the one you need, type your text. Then paste the formatted text into the desired boxes in your social network.
Applications work only with Latin letters , and this should be taken into account. Choose only well-readable fonts for your profile header, and do not overdo it with emoticons. Since the abundance of bright spots can scare off subscribers. Try to make a hat in the same style.
If you use the desktop version of Instagram, then there is also a special application for you with which you can change the font in the header.