Learning how to schedule Instagram posts in advance is the easiest way to save time on the platform so that you can focus on what matters.
The more complex your Instagram marketing efforts are, the more helpful a scheduling tool becomes. This is true whether you own a small business or manage a global team. Consistent, high-quality content is easier to plan, craft and share when you automate some of the grunt work.
In this article, we’ll go through how to schedule posts on Instagram, including the best Instagram scheduling tools for Business, Creator and personal accounts.
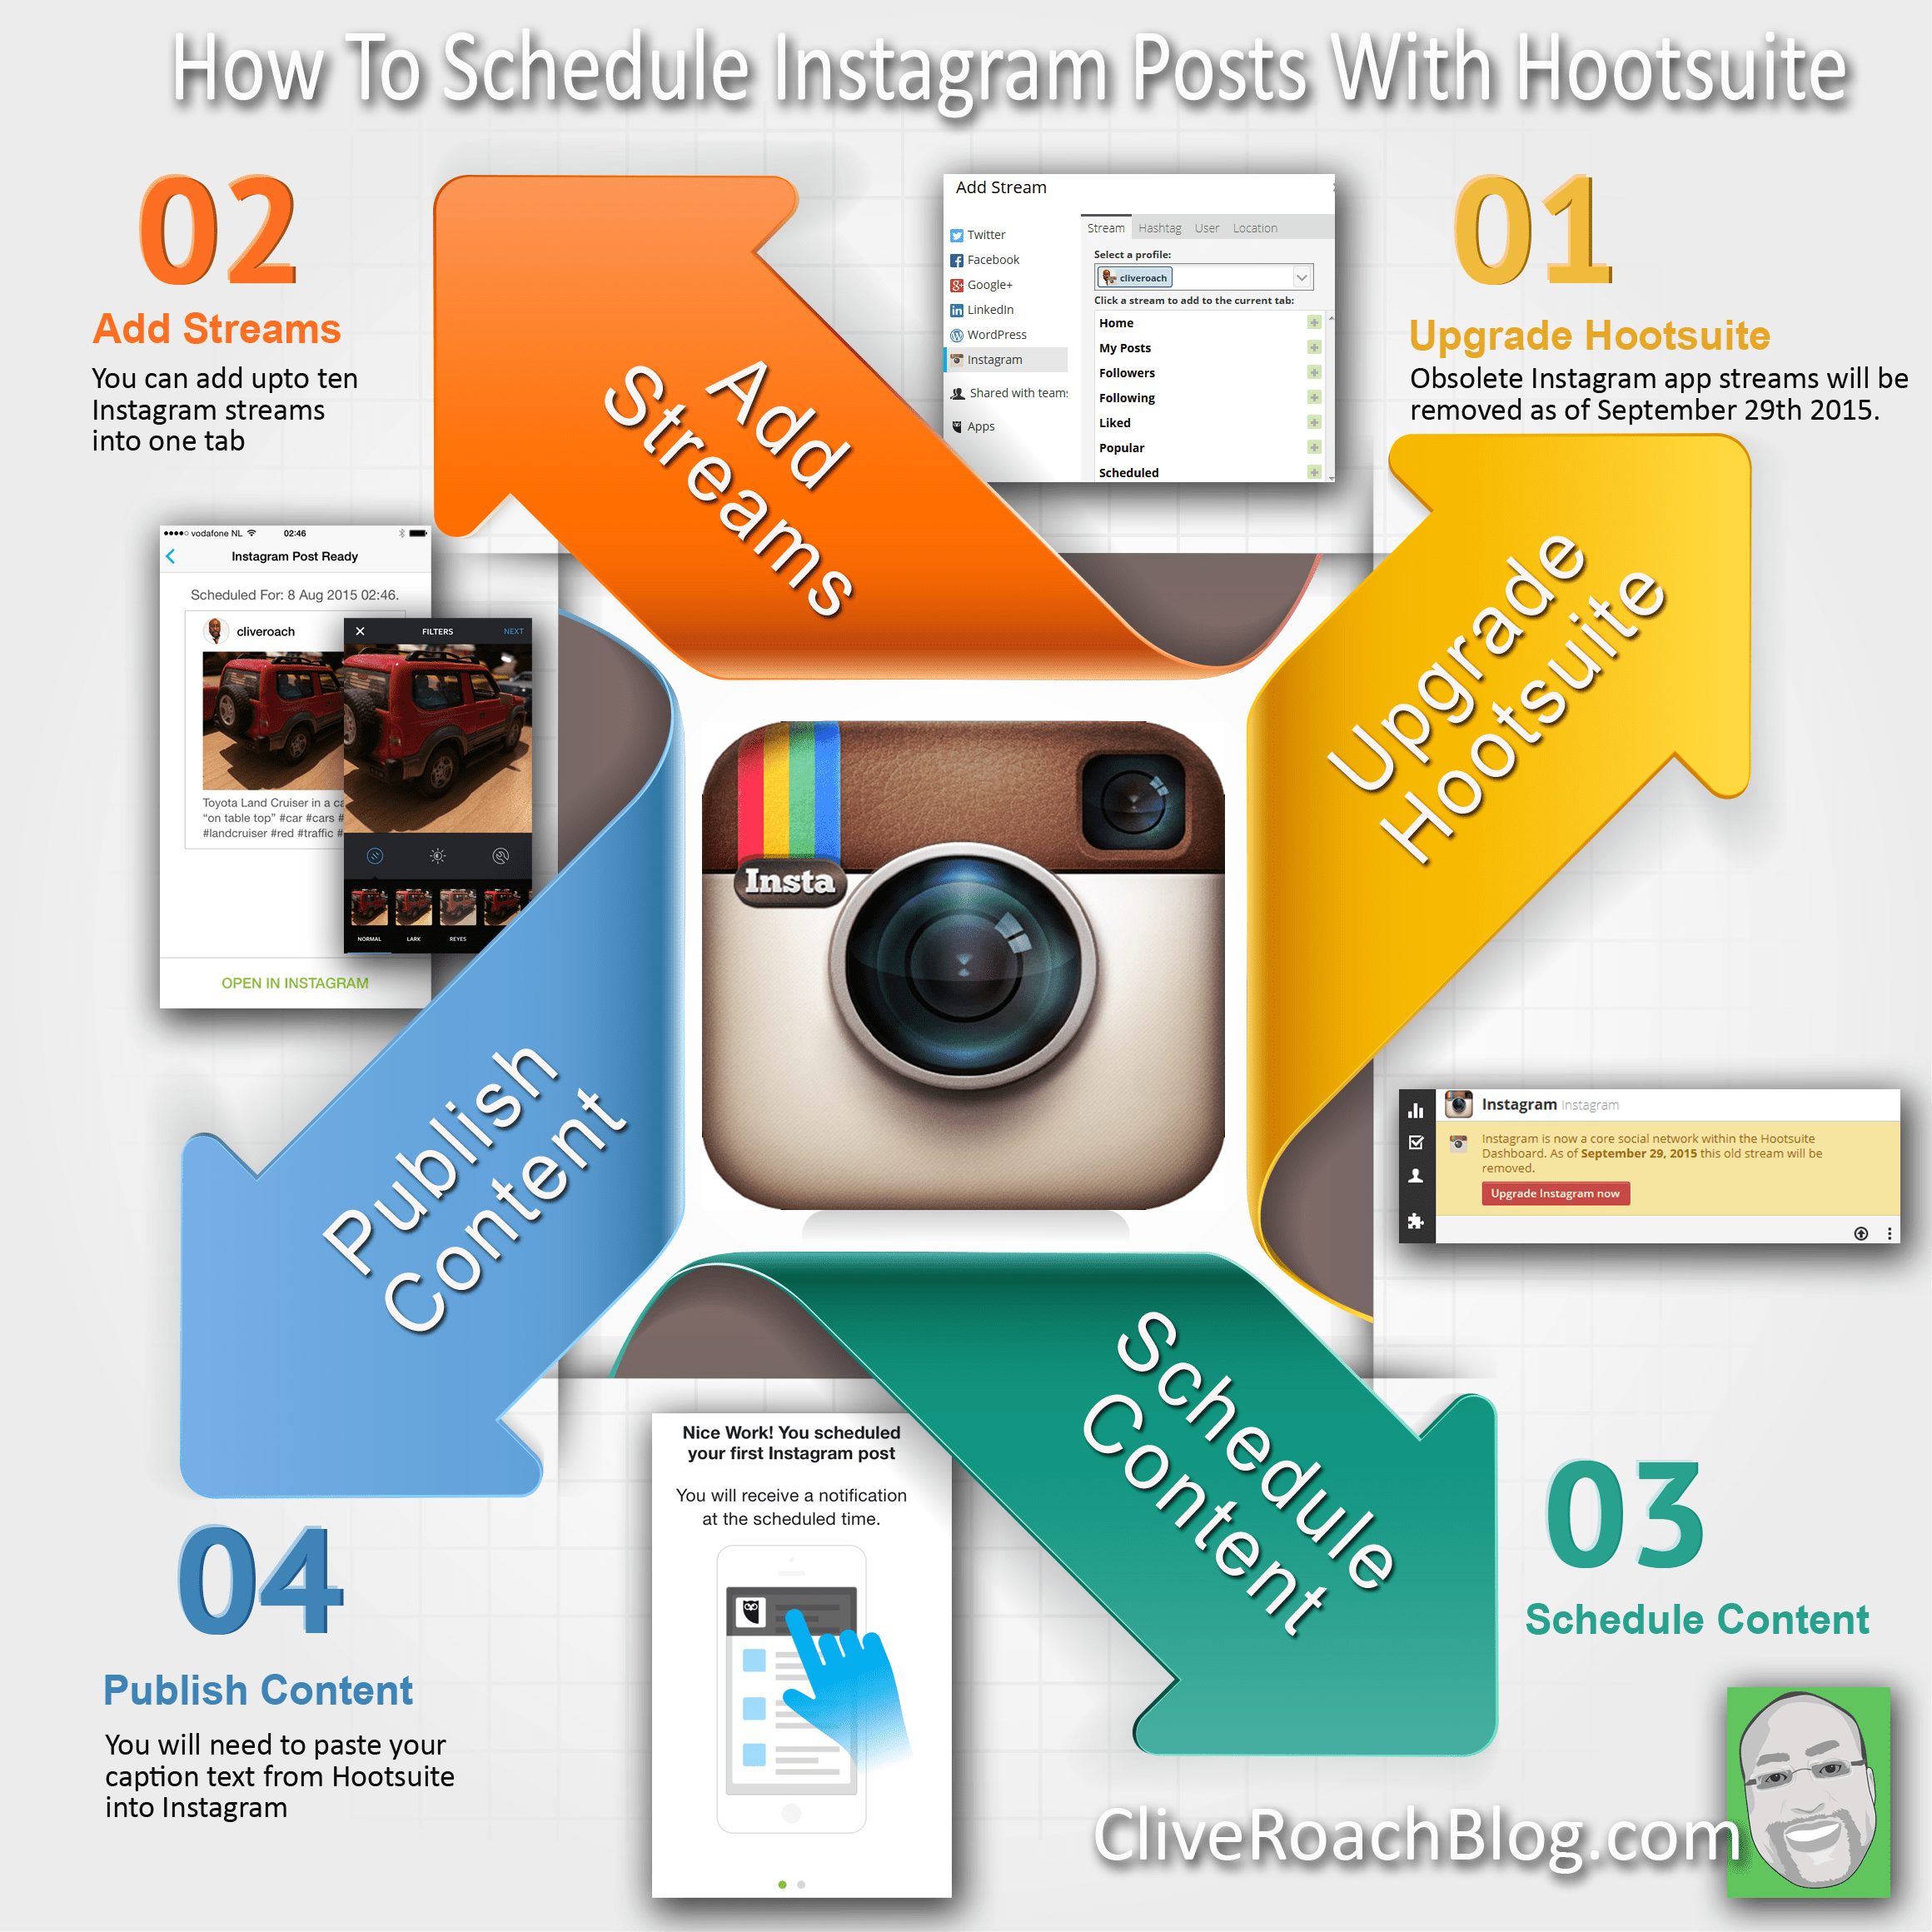
1. Add your Instagram Business account to your social media management platform
2. Compose your Instagram post
3. Find the best time to post
4. Schedule your post
Bonus: Download our free, customizable social media calendar template to easily plan and schedule all your content in advance.
Can you schedule posts on Instagram Business? You sure can!
Visual learners: Watch this video for demos of how to schedule Instagram posts and Stories with Creator Studio and Hootsuite. Everyone else: keep reading.
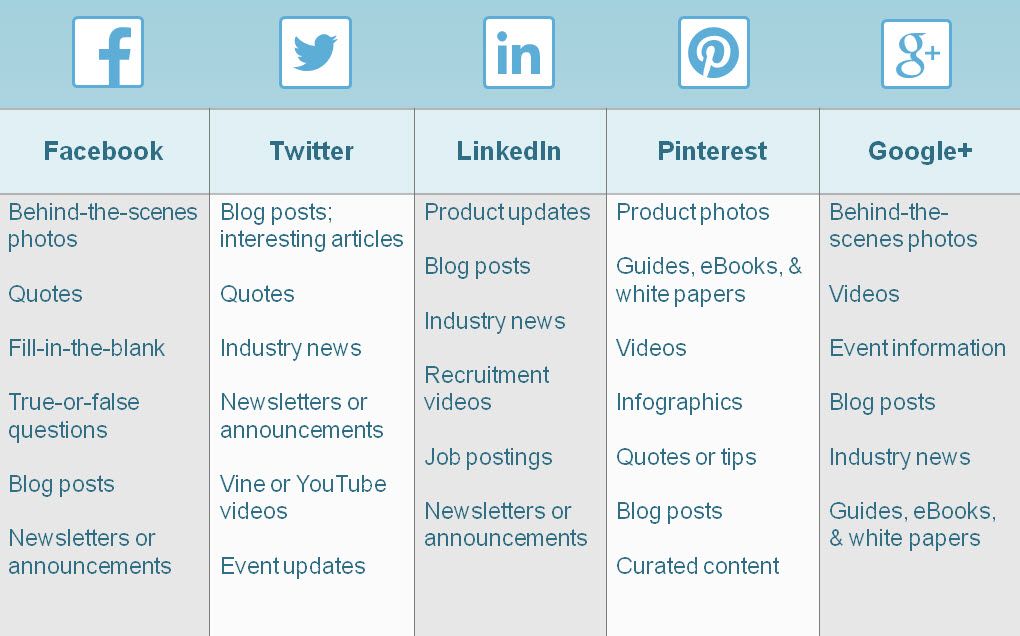
Brands with business profiles can use third-party apps like Hootsuite to schedule posts across multiple social media platforms, including Instagram, Facebook, TikTok, Twitter, LinkedIn, YouTube and Pinterest.
You can schedule feed posts, Stories, carousel posts, and Instagram ads with Hootsuite.
Before you start, make sure to switch to an Instagram Business or Creator account — it’s free, and it only takes a minute. If you’d rather stick to a personal account, we have a section for you coming up.
If you’re using Hootsuite, it’s easy to link your Instagram account. From the Hootsuite dashboard:
For more details on this process, check out our very thorough help article.
In your Hootsuite dashboard, click the Create icon, then select Post.
In the Post To field, choose your preferred Instagram account from the list.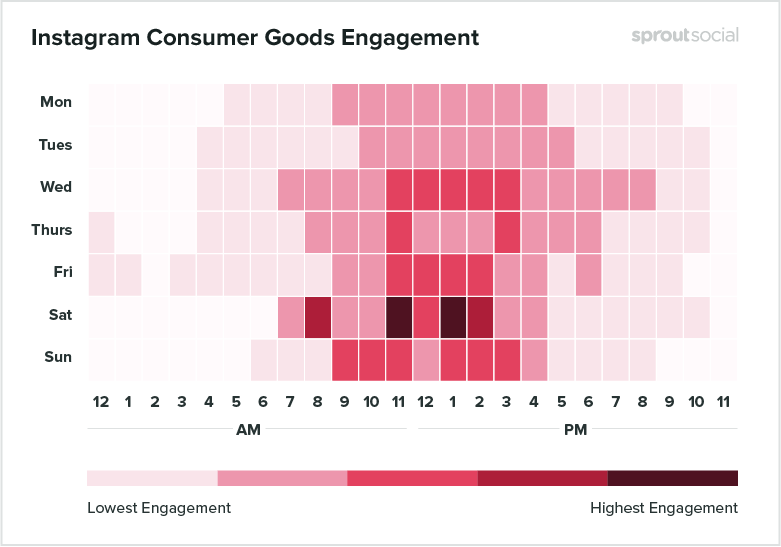
Now go ahead and upload your visuals (or select them from your content library). You’ll also want to write an engagement-driving caption, add your hashtags, tag relevant accounts, and add your location.
Your draft will show up as a preview on the right.
Start your free 30-day trial
If you haven’t already prepared your image for Instagram, it’s easy. Click Edit Image to crop your visual to the required aspect ratios (that is: 1.91:1 or 4:5), filter it, and otherwise perfect it.
Bonus: Download our free, customizable social media calendar template to easily plan and schedule all your content in advance.
Get the template now!
You can also edit your image using Canva’s editor inside the Hootsuite dashboard. No more switching tabs, digging through your “Downloads” folder, and reuploading files — you can seamlessly create beautiful visuals from start to finish without leaving Hootsuite Composer.
To use Canva in Hootsuite:
Start your free 30-day trial
Posting at the right time can help you reach your audience when they’re online. Plus, early engagement tells the Instagram algorithm that people like your content (a.k.a. gives it a nudge to surface it in more users’ feeds).
Hootsuite’s Best Time to Publish feature shows you your best time to post on Instagram based on your posts from the past 30 days. It groups posts by weekday and hour to identify when your posts had the highest impact, based on average impressions or engagement rate.
To find your best times to post, save your post draft and follow the instructions below:
You will see a heatmap highlighting your best times to post (based on your account’s historical performance). You can switch between two tabs: “Build awareness” and “Boost engagement” to find the time that will work best for your specific goals.
Start your free 30-day trial
All right, now comes the easy part. Click Schedule for Later in the bottom right, and select the date and time you’d like your post to go live.
If you skipped the step above and didn’t go to analytics to look up your best times to publish, you will see a couple of recommended posting times once you select a date. You can pick one or manually set a time.
That’s it! You can review your scheduled posts in the Hootsuite Planner, and edit them there before they go live, as well.
Start your free 30-day trial
Finally, let’s take a look at how to schedule an IG post for those of us using personal profiles.
If your Instagram profile is neither a creator nor a business account, don’t worry. You can still schedule your posts; there are just some extra steps involved. In short: Hootsuite sends you a mobile push notification at the scheduled time, which reminds you to log in and tap publish.
For self-evident reasons, we’ll pretend that your preferred management platform is Hootsuite. From the Hootsuite dashboard:
You’re also going to want to set up the ability to use mobile push notifications. Follow these steps on your phone:
 Compose your post
You know the drill: write a good caption, use the right hashtags, tag relevant accounts, and add your location.
If you want to level up your posts, check out our list of Instagram marketing tips. Or else read up on the latest Instagram trends in 2023.
The key difference between business and personal accounts? Posts scheduled for a personal account don’t publish automatically. Instead, you’ll get a mobile notification.
You’ll still want to check your Instagram analytics and make sure you select the best time to post.
Go ahead and pick your time and date, then click Schedule.
When the time comes, you’ll receive a push notification on your phone to remind you to post to Instagram. Note that this is essentially the same process for scheduling your Instagram Stories (no matter what kind of account you have).
The process for posting looks something like this. The Hootsuite app will take care of most of the work, but you need to open Instagram, paste your caption in, select your photo, et cetera. Not tough brain work, but give yourself five minutes to triple-check that everything’s right.
And voila! You’ve done it!
Can you plan your Instagram feed on Facebook? You sure can — if you have a Business or Creator profile on Instagram. Facebook’s native Creator Studio allows you to craft and schedule Instagram posts from your computer.
Note that while Creator Studio is a handy Facebook scheduler for Instagram, it’s currently not possible to post or schedule an Instagram Story from Creator Studio. To do that, you’ll want to check out our post on how to schedule Instagram Stories.
In general, Creator Studio is a good tool if you only want to schedule Instagram and Facebook posts (and don’t mind not being able to schedule Stories). But most social media pros can save a lot of time and energy using a social media management tool and handling all social channels from a single dashboard.
A tool like Hootsuite will help you schedule content to Instagram and Facebook pages, as well as TikTok, Twitter, LinkedIn, YouTube and Pinterest, all in one place. Here is how Creator Studio compares to Hootsuite:
To schedule Instagram posts from your computer using Creator Studio, follow these steps:
That’s it! Now you can lean back and check your DMs.
If you’d like to streamline your process even further, you can also consider cross-posting.
Cross-posting is the process of sharing similar content across multiple social media channels. It’s a handy choice for businesses with smaller budgets and less time to personalize content.
You can use cross-posting (via Hootsuite or Facebook Creator Studio) to set Facebook to post to Instagram. It’s not always the best choice for truly engaging content, though.
We’ve got more details in our in-depth guide to cross-posting. If you’re serious about scaling your Instagram marketing efforts, you’ve got better options.
If you’re ready to take the plunge and get real efficient with your posting habits, these tips will help keep you ahead of the game.
In general, posting when your followers are online is key. That’s because the Instagram algorithm prioritizes recency. This means that, generally, a newer post will show up higher on your followers’ newsfeed than an older one.
That’s one reason why simple cross-posting may not work. Your audience on Facebook may be active from 6-10PM on weeknights, but browsing Instagram from 1-4PM.
The right Instagram analytics tool will tell you when your audience is most likely to be online and/or engage with your post.
For the Hootsuite social media team, that time is 8AM-12PM PST, or 4-5PM PST on weekdays. For you, it might be different.
Luckily, Hootsuite’s Best Time to Publish feature can show you your best time to post on Instagram based on your posts from the past 30 days. It groups posts by weekday and hour to identify when your posts had the highest impact, based on average impressions or engagement rate. Then it suggests the best times for you to post moving forward.
It will also suggest time slots that you haven’t used in the last 30 days so that you can shake up your posting habits and test new tactics.
If we learned anything in 2020, it’s that the world is changing faster and faster. That’s why automating Instagram posts is a little more nuanced than “set it and forget it. ”
”
When it comes to Instagram scheduling, going much farther than a week in advance can start to increase the risk of something going sideways. You don’t want to cause a social media crisis for your brand by posting something insensitive. If something unexpected happens, you may need to pause your posting calendar entirely. You might even need to use your social channels to communicate through a crisis.
Our advice: keep your finger on the pulse, and stay nimble.
#1 Social Media Tool
Create. Schedule. Publish. Engage. Measure. Win.
Start free 30-day trial
If you do schedule your posts far in advance, it’s not the end of the world. Sometimes you need a full two weeks of vacation!
Just make sure you’re using an Instagram scheduler that allows you to press pause on all upcoming content if a crisis or emergency suddenly occurs.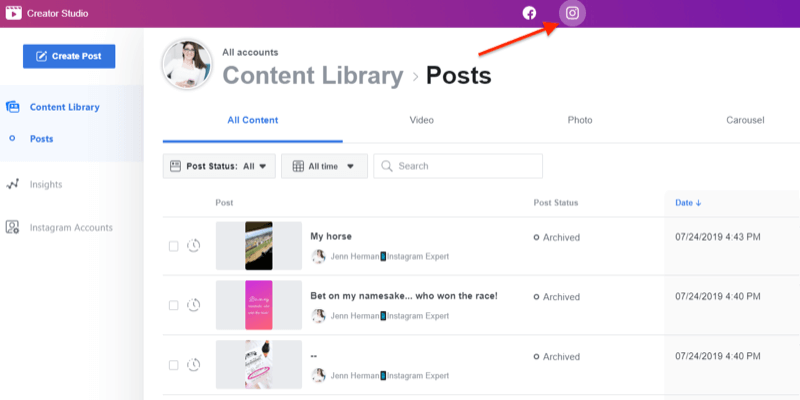
With Hootsuite, pausing your scheduled social media content is as simple as clicking the pause symbol on your organization’s profile and then entering a reason for the suspension. (This is actually one of our favorite Hootsuite hacks.)
Source: Hootsuite
Yes, the miracle of Instagram scheduling means you can now increase your quantity of posts without sacrificing quality. But should you?
The short answer is “maybe.” The long answer is “maybe, if you can maintain consistent quality at that pace over the long term.”
Consistency matters more than frequency when it comes to engagement. Remember that the algorithm prioritizes good relationships: if your followers are engaging with your Instagram content, the algorithm will show more of it to them.
No matter how busy you are, make sure you take a fresh look at that copy before it goes live.
And for big teams with a lot of moving parts, an internal multi-stage approval system is ideal for preventing a gaffe.
But though words are important to any social media post, visuals are key on Instagram. Get yourself an Instagram scheduler that allows you to edit your photos in the same dashboard you publish from. It’ll save you much more time and ensure that your images are fully optimized before posting.
Shout out to Hootsuite’s image editor, which can crop your image to the correct size for any social network. It also has an extensive filter library (useful for those of us who would rather leave photo editing up to the professionals). Watch the video below for a preview of the tool.
Now that you know how to schedule posts on IG, you’ve got time to take a look at the big picture.
Are you creating content that works for your audience? What’s earning likes? What’s falling flat? Choose your preferred Instagram analytics tool and start exploring.
Use Hootsuite to schedule Instagram posts at the best time, respond to comments, track competitors, and measure performance—all from the same dashboard you use to manage your other social networks. Start your free trial today.
Get Started
Grow on Instagram
Easily create, analyze, and schedule Instagram posts, Stories, and Reels with Hootsuite. Save time and get results.
Free 30-Day Trial
Posting Instagram content when your audience is most active on the app increases chances of engagement, brand awareness, referral traffic, and conversions. However, it's not always efficient to hover over your phone or laptop to post on Instagram at the perfect moment — so you'll need a way to schedule Instagram posts ahead of time.
This is where Instagram scheduling software comes into play.
Can you schedule Instagram posts?
Why You Should Schedule Your Instagram Posts
Instagram Scheduling Best Practices
Best Way to Schedule Instagram Posts
Tools for Scheduling Instagram Posts
HubSpot Social Media Management Software
Later
Tailwind
Buffer
Sked Social
Sprout Social
Loomly
How to Schedule Instagram Posts
Schedule Your Instagram Posts
Yes! If you're a content creator or business owner with access to Meta's Creator Studio, you can connect your Instagram account to Creator Studio to schedule posts.
If you don't have Creator Studio, Instagram's API lets users of marketing tools like HubSpot schedule Instagram posts in advance.
It's also worth mentioning that Instagram is testing a new in-app tool to schedule posts and Reels. In October 2022, a Meta spokesperson said, "We are testing the ability to schedule content with a percentage of our global community. "
"
That same month, Twitter user @WFBrother posted a screenshot showing how the tool works.
Now you can schedule posts on the Instagram app! ✨
You can schedule posts and reels by going to Advanced settings when creating new content. #Instagram @MattNavarra pic.twitter.com/yJykq108wK
— ㆅ (@WFBrother) October 18, 2022
However, the tool is still in the testing stage, so you'll need to rely on either Meta's Creator Studio or third-party social media scheduling software to schedule your content.
There are many reasons you should get in the habit of scheduling your Instagram posts. One reason is that it saves valuable time and gives you the opportunity to plan and execute a comprehensive marketing strategy. Think about it — instead of scrambling to post content at the perfect time, you're able to schedule a string of compelling posts that include stories, Reels, carousels, polls, and more in advance.
You'll also have more time to interact with followers and reply to comments, which can build lasting relationships with customers and generate leads.
Here are some best practices to keep in mind when scheduling posts to Instagram.
Track how your posts perform at different times, and use that information to optimize your posting schedule. To get you started, here are some great posting times, according to Search Engine Journal:
 m.
m.If you're scheduling content ahead of time, there's no need to rush writing your caption. Take the time to figure out the right hashtag to use, the right accounts to tag (if any), and a compelling call to action.
The time you save by scheduling posts can be used to connect with your audience, Block off time to reply to comments, and host polls. If your audience tags you in a story, post that story to your account.
The simplest way to schedule Instagram posts will be via Meta's Creator Studio if you have access to it. To schedule posts via Creator Studio, do the following:
If you don't have Creator Studio, you can use plenty of excellent, user-friendly scheduling software. Here are some of your best options.
With HubSpot's Social Media tool, which is part of HubSpot Marketing Hub, you can schedule and publish social posts to Instagram, Facebook, Twitter, and LinkedIn. From within HubSpot, you can edit your post, schedule it, and add @mentions to tag other accounts and users.
Upload the image you want to share on Instagram to HubSpot, then drag and drop it into the post you're scheduling. You can preview the final post before it goes live to see what your visitors will see.
After you choose the date and time, your Instagram post will be shared and previewed. Tag it with a relevant HubSpot campaign, so all your social posts associated with a marketing campaign you're already running are organized.
Once you schedule your post, you can select "Schedule another" to plan another social post. There's an option to auto-copy and paste content from the post you just scheduled so you can plan similar posts for different dates, times, and platforms.
Lastly, if you're using HubSpot's social tool to schedule and publish across other platforms, target specific audience groups (for instance, you can target specific countries or languages on Facebook).
Get HubSpot's Social Media Management Software to help you focus more on connecting with your customers and target audience by using time-saving publishing and scheduling tools that prioritize social interactions.
Later is a social media post scheduler dedicated to Instagram. The platform includes a full social content calendar, drag-and-drop post planning, and the ability to publish automatically to your Instagram Business profile. In addition, the service's Linkin.bio feature allows you to link individual posts to specific product pages.
Tailwind is a social media scheduler and innovative assistant platform specifically for Instagram and Pinterest. Using smart features like bulk image uploading and the built-in Hashtag Finder, the tool allows small businesses to personalize their Instagram posts and get them scheduled quickly.
The tool also allows you to visually plan and preview your Instagram post schedule and grid via a single dashboard your audience will see before posting.
Buffer allows you to schedule social media posts across six social networks: Facebook, Instagram, Twitter, LinkedIn, Pinterest, and Google+. Buffer for Instagram makes it easy to manage and schedule your posts via a single dashboard.
There's an option to include hashtags in your Instagram post in the Comments section versus in the caption (to keep the post and caption as simple as possible). Using Buffer's social media analytics feature, you can also analyze your Instagram posts to determine what worked among your target audience.
In addition to a mobile app for iOS and Android, Buffer also offers an extension for your internet browser.
Sked Social offers an Instagram scheduling and auto-posting tool for Instagram posts and stories.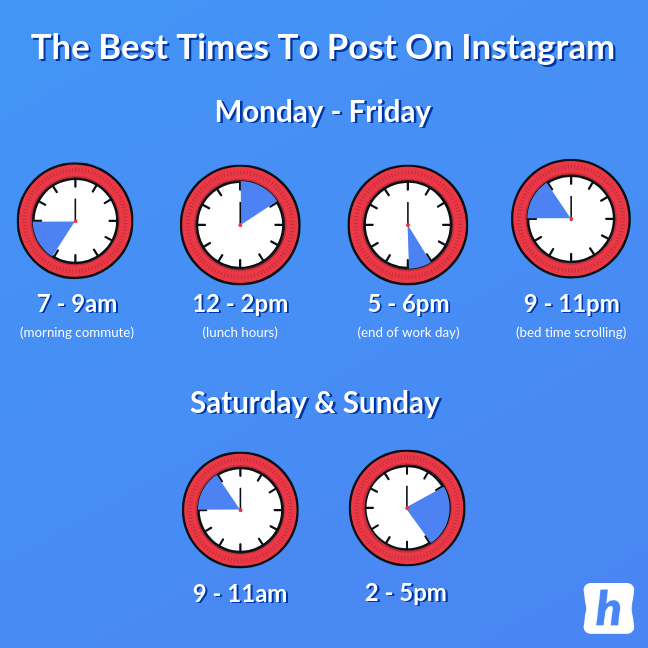 Using the tool, you can plan to post your stories automatically, whether photo or video, so you never have to intervene or receive reminders to click "Post" again.
You can also schedule your Instagram posts via iOS or Android to upload content directly from your mobile device's camera roll.
Sprout Social is a social media management platform that's clear with six major social networks, including Instagram. It has a social media content calendar allowing you to schedule your social posts and measure engagements once live.
Easily upload the image you want to post on Instagram, add the caption and other Instagram post details (e.g., location), and then schedule it to go out at the date and time of your choosing.
The tool's social listening abilities also help you identify unique trends across your Instagram content and then apply these trends to the rest of your Instagram marketing strategy.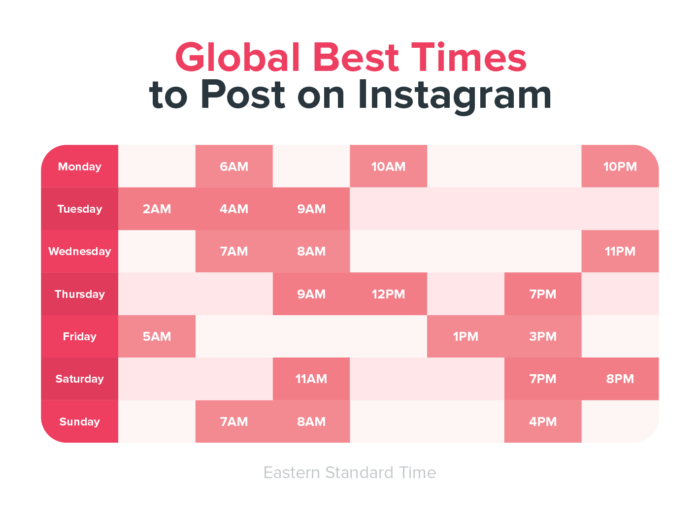
Loomly is a brand success platform with content management and social media publishing and scheduling features. Schedule your social media posts in advance — there are automated scheduling and publishing options for various social platforms incl,uding Instagram, Facebook, Twitter, LinkedIn, and Google. Loomly also offers automated Instagram Ad (and Facebook Ad) publishing.
With the platform, you easily manage your organic and paid social media content — you can also get notifications (via email, Slack, and more) whenever one of your team members works on a piece of social content to make for easy team-wide collaboration. The tool provides social media post recommendations based on trends, events, holidays, and social platform best practices.
Next, let's dive into how to schedule Instagram posts for an Instagram Business page — for the sake of this post, we'll use HubSpot as our scheduling and publishing tool.
Instagram and Facebook might be separate accounts to you personally, but businesses that want to automate their Instagram posting schedule will need to tether both accounts together. So, you'll need the username and password of your business's Facebook account to do this — in other words, head over to the Instagram Business landing page to set up your account if you don't already have one.
If you have a personal Instagram account, you probably know you can manage more than one profile from the app — and the other profile is your business account (keep in mind you'll need an Instagram Business account to schedule Instagram posts in HubSpot).
To switch to your Instagram Business page from your page, navigate to your profile on your mobile device and tap the three dots in the upper-right corner of your screen. Then, in the next screen, select "Switch to Business Profile," as shown below:
Under "Settings," select "Linked Accounts." Here's where you can choose Facebook and link your two accounts together. You might be asked to "Log in With Facebook," at which point you'll enter your business account's username and password. Otherwise, select "Continue as [yourself]."
Now that your Instagram profile is anchored to Facebook, you can integrate it with your post scheduler. As mentioned, we will use HubSpot's Social tool for our purposes.
Open HubSpot, select "Settings" > "Marketing" > "Social" > "Connect Account" > "Facebook and Instagram."
Click the first option, "Facebook & Instagram," and follow the prompts to complete this step (which are listed here in greater detail).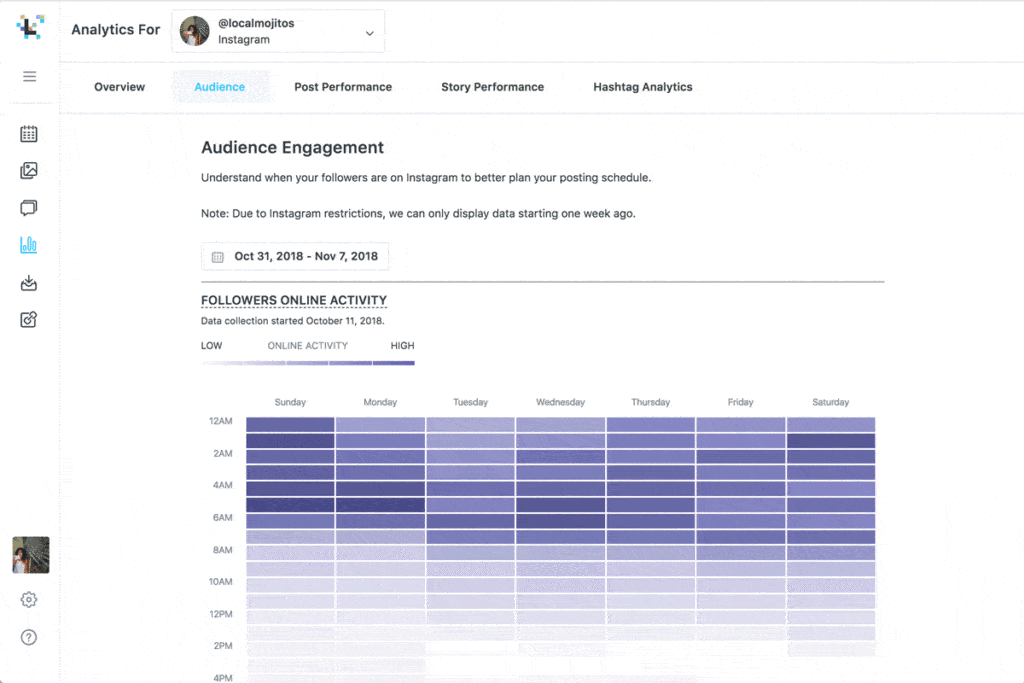
Once your Instagram account is integrated into HubSpot, you'll see an option to "Create social post" in your HubSpot dashboard. Click it, and you'll see icons for which social network you want to start with. Select the Instagram icon to compose your first post for your Instagram account.
Customize your Instagram post and upload an image using the landscape icons on the bottom-lefthand corner of the white text field that appears. Then, caption your image with the text, hashtags, and user mentions you'd like to post your photo with, as they should appear on Instagram.
Above the photo you're posting, you'll see a field where you can add the date and time the date and time that your post will be scheduled to go live. Use this field to automatically set the date and time you want your post to go live on your Instagram profile.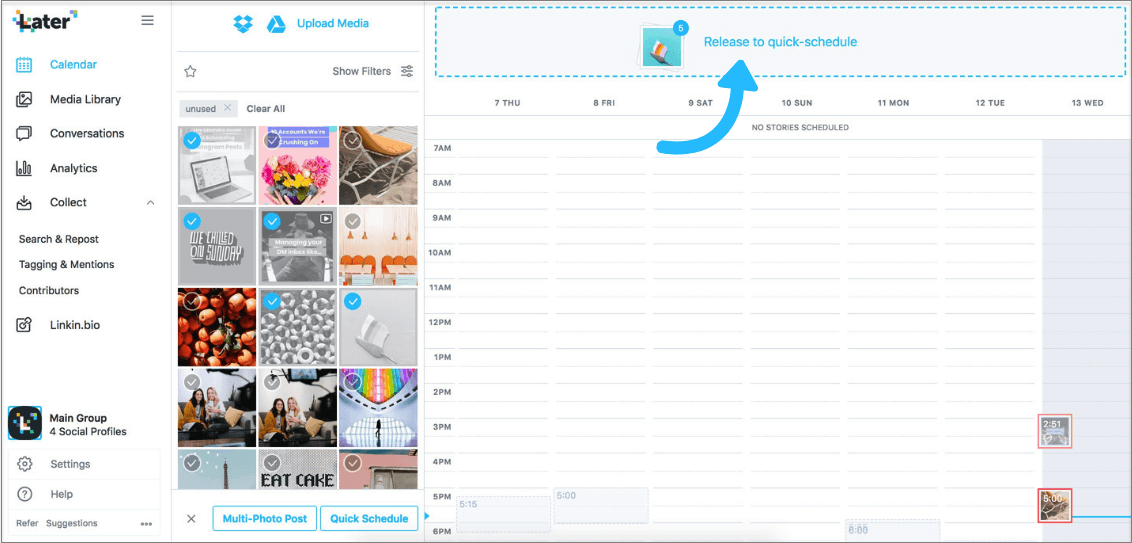
Any grammatical errors? Are all your intended hashtags included? Is the image successfully uploaded? Check to make sure, and you'll be ready to schedule.
Got any more Instagram posts planned? Draft them now and schedule all of them simultaneously — with HubSpot, you can schedule your social posts in bulk.
Once every post you want to schedule has been loaded into HubSpot, you can hit the "Schedule" button on the page.
Start scheduling your Instagram posts to make your workflow more efficient and to ensure the content you need to get in front of your audience does so in a timely fashion.
Editor's note: This post was originally published in August 2018 and has been updated for comprehensiveness.
Topics: Content Planning Instagram Marketing
If you “post” something on Instagram very often, or develop your brand (or both), you will definitely need such a useful feature as automatic posting on a schedule.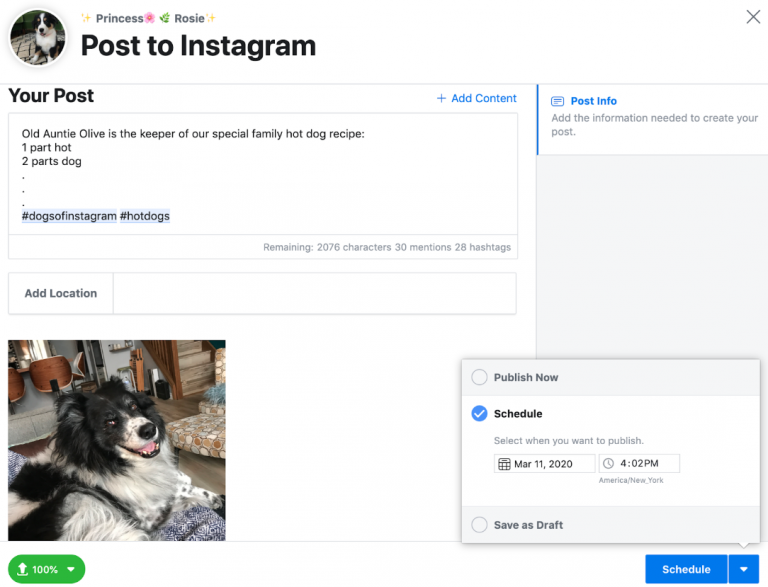
| Apple in Telegram and YouTube. Subscribe! |
BY THEME: Invisibility in Instagram stories, or how to anonymously view other people's Instagram stories. nine0010
Another thing is that this is not so easy to do - the developers of Insta did not provide an intuitive interface for this. Nevertheless, it is still possible to automate your publications, and right now we will do this.
To begin with, let's deal with
Yes, yes, the difficulties begin here. The fact is that not all users of the social network have this function. The creators of Insta gave this right only to users with a business profile. But don't worry - that doesn't mean you have to have a "real" business. nine0003
Well, if you are a professional Instagram user and want to get more conversions from there, you definitely need to switch from a regular account to a Business Profile. Why? You will immediately have access to more detailed statistics about the visitors to your account - and will be able to draw conclusions about when it is best to publish the next post (so that it gets the maximum number of views). Plus, you'll find out exactly where your most devoted fans are. Finally, a business profile will give you the option to add a call-to-action button to your account description. nine0003
Switching to a business profile is very easy. The only thing is that you will need a Facebook page (if you don't already have one). Fortunately, active - i.e. one where something is constantly happening - it should not be. Just create it and link it to your Instagram account. Ready! You are now a user with a Business Profile.
BY TOPIC: How to properly unfollow a person on Instagram so that he does not find out (so as not to offend).
To do this, you will need to use a third-party service - there are no such options in the standard Instagram interface.
One such service is Buffer. You can set up scheduled photo publishing both from the mobile app and from the web interface.
Once you've linked your Instagram account to Buffer, you'll be able to add a photo, text description, geotags, mention friends with tags, and, of course, set the date and time you want to post. nine0003
BY TOPIC: How to put music on Instagram Stories on iPhone - 2 ways.
If you have already automated the publication of posts on Facebook or Twitter, check if there is integration with Instagram.
If you haven't decided on a service yet, you can again recommend Buffer. It pleases with its capabilities, and the free tariff is quite suitable for most users. The Buffer app for iOS and Android, as well as the web version, is easy to use, the interface is simple and clearly smart. By the way, Buffer is also suitable for reposting your favorite photos from other Instagram profiles.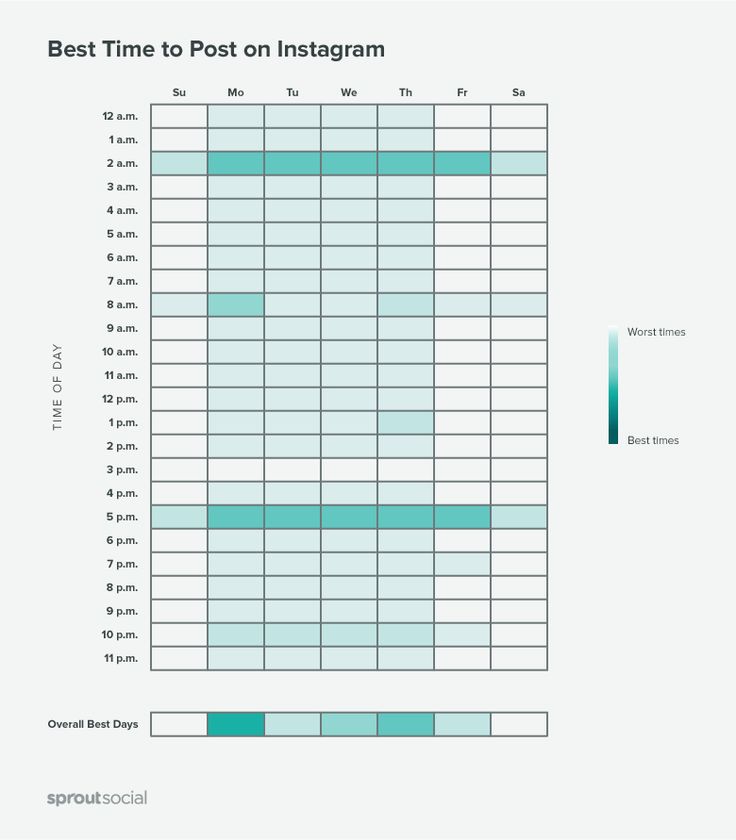 nine0003
The free plan allows you to add up to three accounts in social networks to the system and publish up to 10 posts on a schedule at any convenient time during the day.
If for some reason you didn't like Buffer, there are a couple more options - Later (30 free posts per month or 100 posts per month for $9) or Hootsuite (also 30 free posts per month).
RELATED: Kirakira+, or how to add a sparkle effect to an Instagram video.
As you can see, Buffer is the most interesting free Instagram auto-post offer. Now is the time to figure out how to use it.
1. Open the Instagram app on your mobile device, go to your profile and tap on the hamburger menu button (three horizontal lines). Next go to Settings .
2. Click on Account .
3. Select option Convert to company account and press Continue .
4. On the next page, you will be prompted to connect to your Facebook page. If you already have it, select it from the list, if not, create a new one.
5. Enter the required information, select the appropriate category and click Next , then check your contact information.
Done - now your Instagram account has been converted from personal to company account. nine0003
You can now open the Buffer application (or the web version of the service on your computer) and begin the process of connecting Buffer to your updated Instagram account. To do this:
1. Log in to your Instagram account and allow Buffer to access it.
2. The service will ask you to log in using the data from Facebook. Do this and the process of connecting your account to Buffer will be completed.
BY TOPIC: Google photoscan for iPhone, or how to post old paper photos on Instagram without glare. nine0010
1. Open the Buffer application.
2. Press the large plus button at the bottom of the screen. Write a description and then upload a photo or video. You can also add a geotag if you wish.
3. Click the Share label and select the Schedule Post option to specify the exact date and time of publication. When everything is ready, click on the Schedule button. Done - Buffer will now automatically post your task to Instagram at the right time. nine0003
Buffer features allow you to gradually publish throughout the day and the whole "series" of several posts. To do this, go to the settings (Settings) and click on the inscription Posting Schedule. Next, you can select several time slots for your publications at once.
Please rate the article
Average rating / 5. Number of ratings:
No ratings yet. Rate first.
The social network itself still does not have special mechanics. But there are at least three suitable solutions. Detailed instructions on them were compiled for Pressfeed by the author of the blog SMMplanner Alexey Edakin. nine0003
The Instagram application and the website do not have a built-in function for delayed publications, as is done in VKontakte or Odnoklassniki. But on the other hand, Facebook, which owns Instagram, offers two tools at once - Creator Studio and Business Suite, where this function is available.
Creator Studio is the official Facebook posting tool. It is simple: you need to go to your Instagram account, click on the "Publish" button, set the release date. Everything, the post will go to the "future"! nine0003
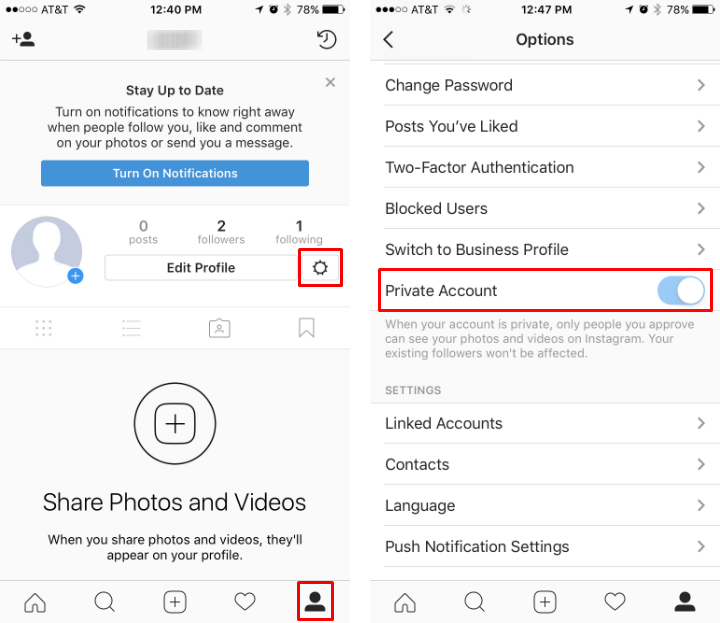
Changing the type of account on InstagramYour Instagram account must be switched to a business profile for scheduled posting.
To do this, go to Settings → Account → Change account type.
Link the page to Facebook immediately: Edit profile → Page → Create or connect a page.
Associating an account with FacebookNow let's start delayed posting.
Step 1. Go to the Facebook Creator Studio home page. Select the tab to enter Instagram. You will need to enter your username and password on a new page. nine0003 We go through Instagram
If you have linked pages on Facebook and Instagram, then go through Facebook - this way you can send posts to both social networks.
Step 2 . Click "Create Post" and select "Instagram Feed".
You can also make a delayed video in IGTV Step 3. Create a post. Add a photo or upload several at once to make a carousel. There is no built-in editor, but you can mark an account and crop images to 1:1, 1.9 formats1:1 and 4:5.
The maximum amount of text is 2200 characters. You can make 30 mentions and post 30 hashtags. All indents and paragraphs will be preserved - you do not need to use services to create invisible spaces.
In advanced settings, you can disable comments for a post and write alternative text for uploaded images.
Post advanced settingsStep 4. Making a delayed post. Click on the arrow next to the "Publish" button and select "Scheduled Post". We set the time and day. nine0003
A delayed post cannot be released immediately to the feed - the minimum time is +10 minutes from the current one. Planning for later dates is unlimited - you can set any day and time.
We plan to release a post on InstagramAs a result, the delayed post will appear in the profile exactly at the specified time, with all the tags and a breakdown by paragraphs in the text.
A delayed post is no different from a posted one from the application You can view all posts in the "Content Library" section - the first in the list will be scheduled publications. In the same section, you can see the number of likes and comments for each post that appeared on your account. nine0003 Where to see the release date of the post
Creator Studio has a publication calendar - this is a visual content plan. A scheduled post can be edited or its deadline can be shifted - this helps to flexibly change the order of posts.
Publication calendarIn the "Statistics" section, you can see the audience and study the dynamics of likes, coverage. The data is available for a week and a month and is no different from the statistics from the application.
How to view Instagram statistics on a computerCreator Studio has apps for iPhone and Android, but delayed posting is only available for Facebook. If you want to make scheduled posts on Instagram from your phone, you will need to install Business Suite.
Business Suite is a marketing platform for managing advertising and commercial accounts on Facebook and Instagram.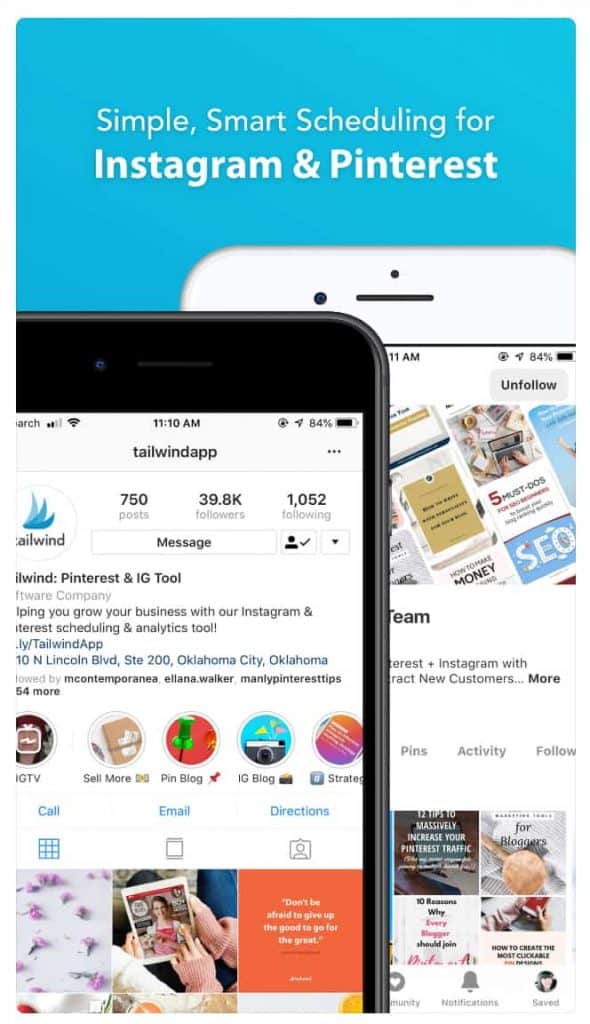 The service has an online version and applications on the phone. The functionality is wider than that of Creator Studio, so you can also do delayed posting on Instagram. nine0003
You need to transfer your Instagram account to a business profile and link it to Facebook - the Business Suite can only be accessed through this social network. See instructions above.
After that, install Business Suite on the phone.
Step 1. Download Business Suite to your Android phone or iPhone.
Download Business Suite to phoneStep 2. Login to Facebook by email and password. Click the "Publish" button in the center. We switch in the post editor to the Instagram profile. nine0003 If you do not switch, the post will be sent to both social networks at once
Step 3. Create a post. We write the text, add an image, mark people and put a geotag. We click "Next".
Writing a post. The restrictions are the same - 2,200 characters maximum Step 4. Set the exit time. Click "Publication scheduling options" → "Schedule for the future". Specify the date and time. Click "Schedule" and go back. Click "Publish".
The post went on hold. You can find it in the "Publications" → "Scheduled" section. You can edit the post, change the posting time, or delete it.
How to delete a scheduled post for InstagramBusiness Suite, like Creator Studio, has access to profile statistics and a number of advanced features: you can reply to direct messages and run targeted ads. The only downside is that you can’t schedule stories in both services. But there is a solution.
To do this, we will use one of the delayed auto-posting services with the ability to edit stories - SMMplanner.
Step 1. Go to the SMMplanner website. We enter the account, create a new one or do it through any social network.
Step 2. Enter the menu. Go to the menu tab and select "Accounts".
To enter the menu, click in the upper left corner - the list will openStep 3. Connect your Instagram account. Select "Advanced API SMMplanner". Enter login and password. nine0003
What does this mean: posting via the Instagram API will not allow you to create delayed stories - its functionality is the same as Creator Studio.
ConnectingStep 4. Planning stories. We return to the "Posts" section and click "Schedule a story."
Planning a StoryStep 5. Creating a Story. First, select an account, then make a background - you can upload a photo or video. All stickers from the application are available, but if you need text, you will first have to add it to the image. You can use the Canva or Crello editors that are built right into SMMplanner. nine0003 Editing and setting the timer
Step 6.