Making sure your images and videos are the right size and don’t get chopped in awkward places is a key part of preparing your Instagram Story for publication. This tutorial is going to walk you through cropping images and videos for Instagram Stories.
Instagram Stories have a very defined size that fits your phone screen dimensions. It is 1080px by 1920px, or aspect ratio of 9:16. This fits the portrait orientation of most phone screens and will allow the image or video to be seen in full from within the app.
If your image or video is too large, the app will crop it automatically. Sometimes this might work for you but most often it won’t. That’s why it’s useful to crop it yourself so you can control where and how it is arranged to fit that very specific size. You can resize images and video within a specific app or Instagram itself has a cropping tool that does a decent job of things.
You’ve just snapped the perfect picture for your Instagram, but there’s one problem-you can’t do it the way you want to. This can be really frustrating because you cannot get the composition you want. With TinyWow, this is no longer a problem! Cropping is now made easy with our simple drag-and-drop interface. Our simple tutorial will walk you through the process step-by-step, so you’ll be able to crop like a pro in no time.
You can crop your images within the app itself but I think Photoshop or Paint.net make better work of images, especially if you have more than one.
In Photoshop:
Getting the image right will take some adjusting but it should fit somehow. You can try without using Shift if you like but you need to try to maintain image proportions as much as possible to keep perspective.
In Paint.net:
Like Photoshop, adjustments may take a little while but are much more accurate than using the Instagram app.
If you want to use the Instagram app, you can.
Cropping videos uses a similar process but you can do it online. Unless you have video editing software already, the easiest way to crop video to the correct dimensions is to use Kapwing. It’s a web app where you upload your video and have the app resize it for you.
The process works well enough. I uploaded a 15 second video and the site took less than a minute to process and resize it. The resolution remained unchanged and the app mainly just added white bars each side of the video so it fit the required dimensions.
You can use an app if you prefer though. iPhone users should try Cropic – Crop Photo & Video, while Android users should try Story Maker. Both can resize your videos to fit Instagram Story requirements. Both are free and ad supported.
You can also just rotate a video if you shoot in 16:9 already. I use VLC for that purpose.
This will rotate your video from landscape to portrait which will fit the 9:16 format demanded by Instagram Stories.
With emojis, face filters, a 24-hour time limit, and the infinite possibilities of sequential storytelling, Instagram’s Stories feature offers a unique opportunity for users and brands to just have fun. But don’t let the casual nature of the feature fool you—when it comes to Instagram for business, Stories can turn browsers into customers with a swipe.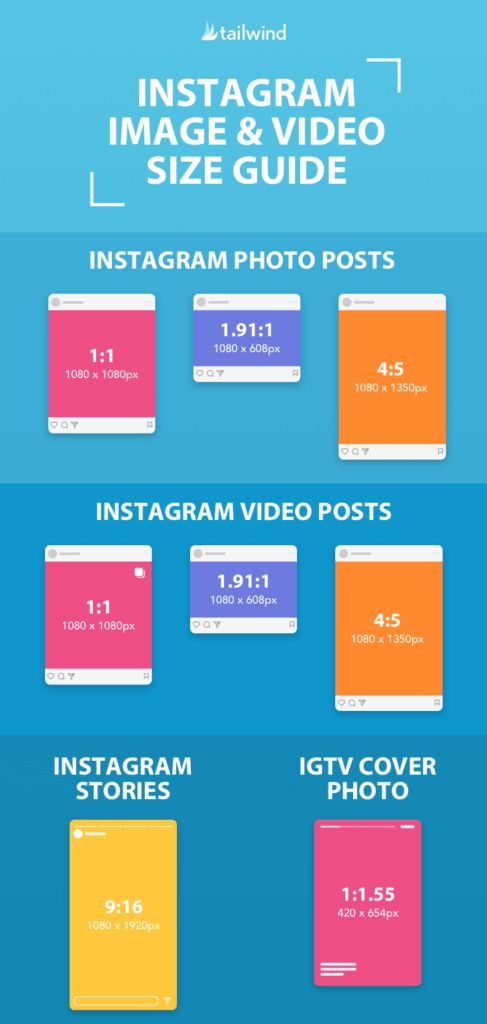 These days creators are pulling out all the stops to generate new and exciting content for Stories. If you’re wondering how to take your Instagram Stories to the next level, look no further than high-quality photography.
If you’ve ever tried to upload images taken outside of the Instagram app, however, you’ve likely gotten some odd cropping results that aren’t as #instacool as planned. Luckily, this frustration is easily quelled with Photoshop. In a few simple steps, you can crop any image for Stories. In this tutorial, we’ll learn how to create a sequence of Instagram Stories posts using these images of fresh herbs and crispy croutons.
Access the best video tips, design hacks, and deals straight to your inbox.
1. Set Up Your DocumentStart by creating a new document in Photoshop. Under Preset Details, change the width to 1080 pixels, and the height to 1920 pixels. Next to the resolution settings, check the Artboards box (Creative Cloud only).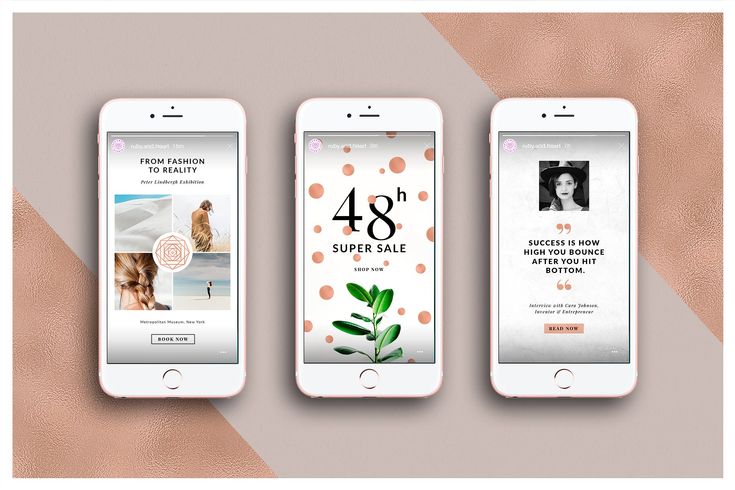
At this point you may want to save these settings as a preset for next time. Just click the save icon for easy future access.
2. Crop and ResizeNext, drag and drop your downloaded image onto the Artboard to insert it in the document, and use the corners to resize. Hold Shift while you drag to lock the image proportion. Hold Option at the same time to keep the image centered as you resize. Press Return to place the file. You can always click and drag to tweak the framing. If you need to resize again, just select your image and press Command + T (Control + T for Windows users) to pull up the Transform Tool again.
You may want to create a series of images to tell a story in your Story. With Photoshop we can use Artboards to seamlessly create multiple posts in one document. Right-click on your Move Tool to switch to the Artboard Tool. (Tip: the keyboard shortcut “v” activates the Artboard Tool or the Move Tool, depending on which is selected.) Next, select your existing Artboard by clicking it in the Layers panel. You will see a plus sign appear next to the Artboard. Click it to create a blank Artboard, or Option + Click it to duplicate the existing Artboard.
You may choose to add text or decoration right in Photoshop. It can be helpful to view the posts together before brining them into Instagram. You can also do a combination of both, like adding the text in Photoshop and then adding stickers and emojis in Instagram.
4. ExportWhen you’re ready to export, select all of your Artboards in the Layers Panel and right-click them to choose Export As. Again if you used multiple Artboards, select them all here. Choose JPEG as the format and lower the quality to around 80% to create a smaller file size that still looks great on Instagram. Upon exporting, you may opt to save the images directly to a cloud service like Dropbox or Google Drive for easy access from your phone.
And there you have it! Stock photography can open up a whole new world of possibilities with Instagram Stories for business as well as personal use—all you need is some beautiful photos (we’ve got you!) and Adobe Photoshop.
Caryn Tayeh is a freelance writer whose specialties include tutorials, content marketing, and video production. When she’s not writing, she can be found reading books by women she admires, researching social media trends, and tweeting about #TheBachelor.
Contents:
Instagram is much more focused on visual content than in other social networks. Therefore, the first thing that catches our eye is a photo or video. However, at the same time, Instagram is one of the first services focused primarily on mobile devices. And this imposes restrictions on the appearance of publications - gadgets usually have a smaller screen than computers and laptops, images need to be adapted to this. Therefore, each user has to adapt to the framework in which the service places us. Let's talk about how to crop a photo like on Instagram and what formats you can use there.
For many, it is obvious that when uploading a photo to Insta, the quality may drop or part of the image may disappear. Why is photography doing this? Of course, this is not a selfish desire to spoil people's lives.
In fact, now the issue of cropping images is not so acute. If earlier only a square format was available to us, now we can use both horizontal and vertical ones. But the size of the photo and its quality as a whole is still limited. Although there are cameras that can shoot in 4K or even 2K, due to the fact that Insta's main mode of existence is an application, there are problems using photos of this quality.
 5G, of course, is also starting to be introduced. It is quite possible that in the future this will contribute to the fact that social networks will allow you to upload large pictures in full, but until that moment you still have to go and go.
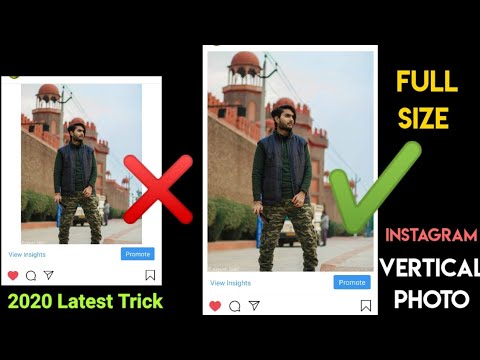
 So, although Insta has stopped cropping your photos, it makes no sense to upload high-quality files - in any case, they will be cropped to at least 1080x1350 if we are talking about posts, and up to 1080x1920 if we are talking about stories .
If I were writing this article a year ago, I would say that in order to add full-length images, you need to use applications. Now the question is “How not to crop a photo on Instagram?” does not require any "crutches" to solve. Therefore, with your permission, I will allow myself not to make a selection of tools that are not needed now, and move on to the instructions for Instagram itself so that you do not have to cut or trick the photo grid in some other way. To do this, we will need to take a picture of what we need in advance.
It's even easier with stories - with two fingers you can zoom in or out on a photo, tilt it as you like. So, the question “Instagram crops the photo, what should I do?” no longer makes sense.
What if you like the look of photos just after Instagram cropped them? You can use any graphics editor on your computer or phone. Even the built-in capabilities of the mobile operating system will be enough to cope with the task. That is what we will consider. How to crop a photo like on Instagram without downloading anything? The example will be for Android on Xiaomi, but on other devices the sequence of actions will be about the same. But iPhone owners will have to install additional software.
Instagram was created for mobile devices. This imposes some restrictions on users. In particular, they concern the maximum resolution of uploaded images. Previously, restrictions were also imposed on the orientation of the photos - the service automatically cut off the extra parts, fitting the posts to fit the square. Now there are no such frameworks, you can choose a “full-length” publication in the service itself and not know any problems.
#1. Can I crop a photo after posting?
Once you have created a post, the selected photo cannot be replaced or edited.
#2. How to upload an image to Instagram through a computer without cropping?
Usually people use extensions or source code to post online via PC. Both involve the use of a mobile browser version, which does not even allow you to choose which part of the picture will be visible. To have full control from a stationary device, there is only one way out - to use an emulator.
#3. Is there a way to upload a picture without losing quality?
No services or applications will allow you to bypass social network restrictions. Something more than 1080 by 1920, you will not be able to post.
If you want to ask a question or express an opinion - write in the comments. And also watch a helpful video on the topic.
[Total: 0 Average: 0/5]
Like the content? Share with your friends!
Home » Photo » Crop
Views 18.4k. Posted by Updated by
Good afternoon, friends! Perhaps most of you use Instagram to communicate. The main idea of the creators of the application was connected with the ability to provide users with a tool for instant sharing of photos and videos, printing them in an elegant, unique way. The problem, however, is that not always readers, subscribers can see the pictures the way you prepared and posted them. The face, legs, and other parts of the body are often cut off. To avoid such a situation, it is important to learn how to choose the right image size.
Content
Instagram users often face the fact that the photos they post in stories or posts are cropped on subscribers' devices.
This happens for the following reasons:
 Devices simply will not be able to accommodate the entire picture;
 Previously, the application correctly displayed only square photos, but recently it has become possible to insert portraits, landscapes.
The only way to reduce the size of photos without cropping on PC is to change the height, width or scale.
Can be done with most imaging applications:
You can also correct the height and width in smartphone applications. Photo&picture resizer is installed on android. On iPhone - instasize. The last application was created specifically for editing pictures and uploading them to Instagram.
The photo reduction option is also available in some online editors, such as optimizilla. You can download a series of 20 images at a time and then compress them without losing quality.
When resizing and scaling images, be careful not to flatten or stretch them disproportionately.
Without any additional manipulations related to cropping, you can upload images to Instagram using smartphone applications.
You can do this, except for instasize: