Home » Misc » How to create profile type facebook page
How to create profile type facebook page
How to convert your Facebook profile into a Page
by Rachel Clemens
Social Media
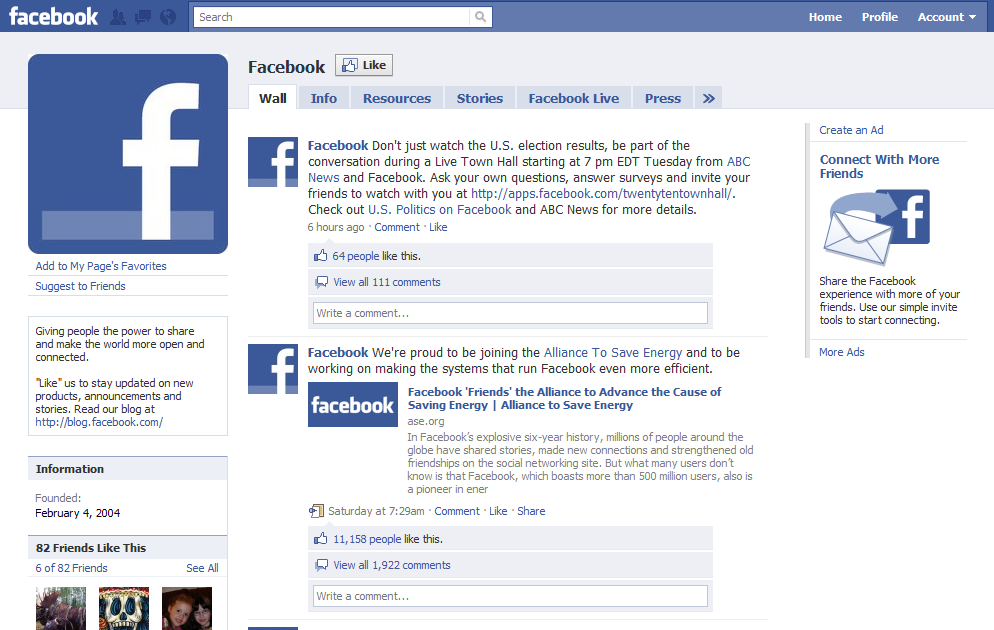
At this point in the digital age, we all know how to make a Facebook profile (heck, you’ve probably been on Facebook for so long, you don’t even remember making your profile anymore). However, many of us are less familiar with the process of creating Facebook Pages, or have never been faced with the need to make one. If you’re a nonprofit with some awesome social impact goals, then you probably do have the need for a Facebook Page. If you already have a profile with followers or information that’s tied to your organization, then luckily you don’t have to start from scratch. Check out our step-by-step guide below on how to convert a Facebook profile into a Page.
Why would I need to convert a Facebook profile into a Page?
Well, first of all, it’s breaking the Facebook terms of service to use a profile to represent anything other than yourself (i.e., your nonprofit). If you use a personal profile to represent a business and don’t convert it into a Facebook Page instead, you could permanently lose access to your account. There are also a ton of perks to creating a Facebook Page for your organization: If you convert your Facebook profile into a Page, you’ll have access to Facebook Insights (yay for useful data!), have the chance to share admin access with your colleagues, and be able to create Facebook ads. Even if you’re comfortable with the layout of your profile, a Facebook Page is definitely the better tool for your organization.
How to convert a profile into a Page
Convinced? Good! Take the following steps to convert your Facebook profile into a Page (note that you must be logged in to your Facebook account):
Go to Create a Facebook Page Base on Your Profile
Click “Get Started”
Follow the on-screen instructions — you will choose the correct categories for your Page, and decide which of your friends, photos, and videos you want to retain
Review your choices
Look at the “Publish Page when done” setting — turn this setting “off” if you do not want your Page to publish automatically once converted
Check your privacy settings
Enjoy your new Facebook Page!
You will have both a Facebook profile and a Facebook Page after conversion. Based on your selections, your new Page will have the ability to retain:
Your profile picture, cover photo, and name from your profile
Your friends (as Page likes and Page followers), selected at your discretion
Your photos and videos (profile views and other metrics do NOT transfer)
Your verified status
Converting your Facebook profile into a Page is something that you shouldn’t sweat. Once you’ve followed these easy conversion instructions, you’ll be on your way to a better social media strategy and more connections with your customers and supporters.
Online Course
Social Media for Social Impact
Become your own social media marketing expert!
Take the Course
After upgrading your Profile to a page
The full power of targeting your actual audience with ads is now possible with Facebook ads. We recommend using a Business.facebook.com account connected to your profile to do this!
Once you have your Facebook page, consider how you can use AI content writing tools to help make posts for your organization.
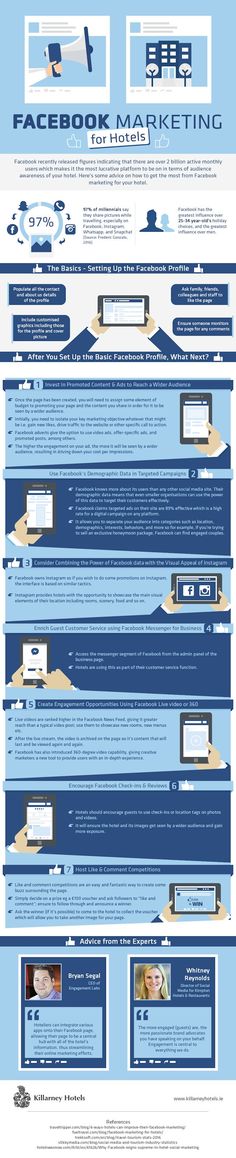
Want to take your nonprofit’s Facebook presence to the next level? Discover how to win at Facebook advertising, learn the do’s and don’ts of Facebook fundraising, and check out our other resources on managing social media. Don’t forget to share your own Facebook tips and tricks with us @WholeWhale!
How to Convert Your Profile into Fan Page? Step-By-Step Tutorial..
Although Facebook is already over ten years old (it appeared in 2004), many people are not clear about the difference between a Facebook Profile and a Facebook Page. That’s what we’ll talk about here! Today we will show you how you can turn your Profile into Fan Page and why it is convenient to do so.
This article is especially aimed at those people who use their personal profile to promote their business. Here you will know the advantages that a Facebook Page can bring to your company or venture, and the reasons why you should turn your profile into Fan Page. Let’s start!
What is the difference between a Facebook Profile and a Facebook Fan Page?
First of all, it is important to explain the difference between a Profile and a Fan Page. While the first one is for personal use (that is to say non-commercial) and is designed to connect with friends and family, the second is designed to promote companies and commercially proposed on Facebook.
In fact, the Facebook Pages are integrated with a complete advertising platform that provides refined segmentation, promotion and statistics tools related to the target or target audience of advertisers using this medium to promote their companies.
The Facebook advertising service fits in everypocket and is extremely effectivefor both large companies and small retailers. This is thanks to the effective mechanical segmentation, which allows displaying ads to your target audience with virtually no margin of error.
Now let’s look at the differences between Pages or Fan Pages and Facebook Profiles with more specificity:
Facebook profile
A Facebook profile is a personal account created to be used by a real person (that is to say, with your real name).
With a Facebook profile you can:
Connect with people by adding them as friends or by following them (the maximum limit is 5 thousand contacts).
Share States, photos, videos, links and other content with your friends and followers.
Post photos and comments on your friends’ accounts, or send private messages through Facebook Messenger.
I like Groups and Facebook Pages.
Create your own Groups and Facebook Pages.
Connect with applications to improve the look and performance of your Fan Page.
Facebook pages
A Facebook Page is similar to a Profile but unlike this, it can represent anything (not just people). Indeed, there are Pages or Fan Pages for everything from celebrities to festivals, local businesses, politicians, movies or books. Postcron also has one!
So, if your goal is to generate a relevant presence for your business on Facebook, the best option without doubt is to create a Fan Page.
With a Facebook Page, you can:
Make people connect with your business by giving Like a Fan Page.
Share publications for your followers to see.
Respond to messages that people send to your Page.
Launch ad campaigns.
Comment the posts of your own Page and other places on Facebook.
To do any kind of thing on Facebook, like creating a Fan Page, you need a Profile. Besides it is convenient that you use your real name, since Facebook sanctions the users that lie with their personal data. You can take a look at this article to know what other actions you should avoid not to be blocked on Facebook.
A Facebook page for your business allows you to:
Provide information about your products and/or services
Share content (photos, videos, etc.) that contribute some added value to your community of followers and that therefore gives them a reason to follow you on Facebook.
Set your hours of attention and the location of your business.
Provide customer service, responding to queries sent to you by private message.
Tell the community what you offer, through a brief description on your Fan Page.
Add links to your website to promote it and increase visitor numbers.
In conclusion, if you are looking for a way to promote your business and connect with your audience, the way to do it on Facebook is through a Fan Page.
What you need to know about turning your Facebook profile into a Fan Page
In case you have been promoting your brand or business from a personal profile, it is time to stop! Create a Fan Page from your profile to prevent blocking Facebook and access the many facilities that the social network provides to businesses and shops.
Doing so is really simple, as we’ll see in the step-by-step tutorial below. But first it is important that you take into account the following points:
At the end of the conversion process, you will have your personal profile on one side, and a Fan Page on the other.
Your profile will serve to manage your Page, since the Fan Page will have been created through your personal account.
Once you activate the conversion process, you will only have 14 days to pass the information from your personal profile to your Facebook Page.
The conversion cannot be undone.
Your profile picture will be transferred to your Fan Page.
How to convert your Profile to Fan Page? Step-by-step tutorial
Now that you know why having a Fan Page for your business is the most convenient, we will show you how to generate a Facebook Page from your profile, step by step. You will see that it is very simple! Here we go:
Step #1
Enter your Facebook profile, since you must be “logged in” to perform this process.
Step 2
After entering Facebook, click on this link: facebook.com/pages/create/migrate/ to start the process of creating a Fan Page for your business from your Profile.
Step 3
Press the “Start” button and after a few moments you will see a message saying: “Congratulations, you already have your new Facebook Page”.
That is all! Simple, right? Now we’ll give you some tips to get the most out of your new Fan Page.
5 Tips to Manage Your Facebook Page Successfully
1- Add information to your new page
You can add relevant information such as the name of your business, your address, your website, hours of operation, and a map with your location, a description of your proposal and all kinds of information that is useful to the public.
2- Get fans for your Fan Page
First of all, we advise you to select all your friends from your profile, or the majority, to follow you on your new Facebook Page. Complementarily, you can write an email introducing your new Fan Page and send it to all your contacts, to tell them your proposal and invite them to follow you.
3- Put some photos of your profile to your Facebook Page
The idea is to add some content so that users who visit your Fan Page can know more about your business, products, staff, etc. If you are uploading photos from your computer, we recommend you take a look at the sizes recommended by Facebook to make your images look attractive.
4- Create a content strategy
To capture new followers and keep the ones you already have, you need to provide quality content. And for that nothing is better than creating your own social media strategy. For this we advise you to analyze the profile of your audience, to raise the communication objectives of your business and generate content to achieve them and at the same time to bring added value to your audience.
5- Publishes with constancy to generate engagement
After creating and optimizing your Fan Page, it is important to maintain a systematic pace of your publications, so that there is always fresh and interesting content available to your visitors. That’s why the best practice is to schedule your publications in advance, so that they are automatically shared with no margin of error on the days and times you set.
To conclude this article, we can say that turning your profile into Fan Page is the way you should follow to promote your business on Facebook and reach your audience. Follow the steps proposed here and then tell us!
To learn more about managing your Facebook Page, we recommend reading the following articles from our blog:
6 Facebook post Ideas to position your Business and sell more
3 Ways to take advantage of your Facebook cover
How to create a Facebook Party in Three Steps (Without Dying in the process!)
How to advertise on Facebook videos? 9 useful tips to publish advertising videos that convert
Facebook live videos: how to make live videos step by step along with 7 tips so they’ll be a hit in your social media strategy
That’s all for today! What did you think of this blog post? What is your experience promoting your business on Facebook? Tell us your opinion! And please do not forget to share this article with all your contacts that could interest you. See you soon! ?
Comments
Tags: customer loyalty on Social Networks, digital marketing, Facebook, fanpage, Marketing on Social Networks, Social Media Marketing, social networks
How to create a business page on Facebook
A business page represents your company on Facebook. On it, potential customers can communicate with the brand, find contacts, view a list of services or reviews of other users. And most importantly, it is an opportunity for advertisers to launch campaigns on Instagram and Facebook. We share step-by-step instructions on how to create a page for business on Facebook.
Creating a company page
A business page requires a personal Facebook account. If you are already registered, log in to your profile and click the plus in the upper right corner, and then select the "Page" tab. nine0003
In the window that appears, fill in the information about the company: name, category and description. In the preview on the right, you can see what your page will look like.
What can not be used in the title of the page:
Words that may offend or violate someone's rights.
Any Facebook word forms.
Capital letters, if they are not used according to the rules of the language. To write eLama in the title of our page, we had to contact representatives of the social network. You can write the whole word in capital letters, but only if it is an abbreviation. nine0014
Symbols and punctuation marks, if they are also used inappropriately.
Common words that may confuse the user. For example, the page of the Lipetsk beauty salon "Buttercup" cannot be called a salon / hairdresser in Lipetsk.
Add a brief description of the company. It will be displayed in search results, so it is important to indicate how the company will be useful to customers. The more fields you fill out, the more information users will receive. This will increase their loyalty to your product. nine0003
Save the page, it can now be found in the "Pages" tab in the right menu of your personal profile.
Set up a business page
What should be on the page:
Images: cover and profile photo.
Username - this will be displayed in the URL of your page.
Call to action button. For example, if you have an online store, you can add a "Buy" button and link to a product catalog.
nine0013 Company information: address, map, phone, opening hours, etc.
Let's take a closer look.
Add a profile photo and a cover photo
Cover pages tend to get more hits and likes.
If you skipped this step when creating the page, you can add a cover image in edit mode. Click on the "Change" button and select one of the options. If there is a logo or text on the cover, then it is better to upload the file in PNG format so that the quality does not deteriorate (photo upload rules). nine0003
Your profile photo will appear in your posts and comments. To download it, click on the camera icon and select "Edit profile photo".
Enter @username
@username is the URL of your page. If you have a brand, then just enter its name in Latin. If your page title contains key characteristics, then you do not need to write them. The shorter the better. The username is written in Latin and may contain numbers. Maximum 50 characters. nine0003
If the name is free, a green checkmark will appear.
Add a button
Add a button to encourage users to take a targeted action. It can be changed later.
Select the desired target action:
In the next step, specify a link to the site or form that users will go to when they click the button.
Specify the contacts by which you can be contacted
To do this, select "Edit" in the left menu of the page management. In this tab, you can also change the description and categories, add a work schedule. nine0003
And then what?
We have analyzed the basic settings of the business page. They are enough to launch the first campaigns.
Now you have to:
Create a business manager to manage multiple pages.
Set up an advertising account.
Distribute access to the advertising account to employees and partners.
Install the Facebook pixel to track user behavior and measure the effectiveness of ads. nine0014
Link an Instagram business account to increase your reach and get more features.
Read the Facebook Ads Policy to easily pass moderation.
And finally launch the first campaign.
How to create a business page on Facebook in 2022: step-by-step instructions
A business page on Facebook is a page of a company (similar to a business account), a brand, and any other organization. Potential customers can find your contacts, a list of services, see reviews from other users, and contact you on this page. For you, a business page is an opportunity to run ads on Facebook and Instagram, communicate with customers, as well as another way to promote. nine0003
In this article, you will learn how to create a Facebook business page, set it up properly, and use it to attract customers.
Advertising: 2VtzqwCpaPT
Read also : 10 best targeting courses
How to make a business page on Facebook: step by step instructions
Let's not languish for a long time and get straight to the point. We will show the process of creating a business account from a computer, if you are making a page from a phone, then the procedure is exactly the same. nine0003
Step 1: Create a business page.
In order to create a business page, you need a personal account. If you are already registered, go to Facebook, click the big plus sign on the top panel and select "Page".
Step 2: Name, category and description.
The page creation window opens. In the left part, you need to enter the name of the business page on Facebook, select a category and add a description. On the right - a preview will be available and all the changes that you make will be displayed. nine0003
Here are a few suggestions:
Name - put your company or brand name so customers can easily find you;
Category - Specify the category your business belongs to. You can select no more than 3 categories;
Description - here you briefly and concisely describe ( no more than 255 characters with spaces ) what your company does. Contacts in this section do not need to be specified, there will be a separate field for them.
nine0027
Finally, click "Create Page" at the bottom. After that, a notification will appear that the page has been created and you can continue to edit it here, or by clicking "Save", go directly to the page. So let's do it, and proceed to the configuration.
Setting up and designing a business page
Step 3: Page cover.
Before you put the cover, make it according to our instructions: "How to make a beautiful cover for Facebook. " After, in the place where the cover will be, click "Edit", select "Upload photo" and upload the picture from your PC. nine0003
If you want to be creative, but nothing works, you can peep ideas from competitors or take ready-made templates from services like Canva. Alternatively, you can set a video as the cover.
Step 4: Profile photo.
A profile photo accompanies all your comments and posts. Here, a personal photo or company logo would be ideal. To set a profile photo, click on the camera icon, then "Edit profile photo" and upload a picture from your computer. nine0003
After uploading, you can change the scale and position of the picture.
Please note that your profile photo must be at least 180 pixels wide and high. In order for the page avatar with your logo or text to be shown in higher quality, use a PNG image.
Step 5: Unique username.
Set a unique username - this is the part in the URL of the page that is displayed in the address bar of the browser, after facebook. com/. Click "Create @username".
A window opens where you need to enter a unique nickname for the page. No more than 50 characters without spaces, only letters of the Latin alphabet and numbers can be used. If the name is free, a green checkmark will appear next to it.
Step 6: Action button.
Here, in the header of the page, we immediately set up a button that will be visible to all guests of the page. Click "+ Add button". nine0003
In the window that opens, select the appropriate option. You can put a subscribe button, send a message to WhatsApp, go to the site and others. The button can be changed at any time.
Step 7: Contact information.
In the menu on the left, click "Edit", on the right, a field for entering information opens. Here, first we indicate the phone number (you can specify the number to receive messages in WhatsApp), email address and website.
We go down below and enter the address.
Specify the hours of operation. Below there are additional options that allow you to specify the operating mode on holidays.
You can also specify other data: products, price range and pages in other social networks.
This completes the basic page setup. This page can be linked to an Instagram account, it contains contact details and an action button is configured. Next, we move on to advanced settings that will allow you to use your Facebook business page even more efficiently. nine0003
Interesting: How to set up Facebook ads
How to use a business page for promotion
Template and tabs website. In particular, choose a page design template and include the necessary sections. Open the settings and find "Templates and tabs". Here you can choose the appropriate design template.
For example, if you use the cafe page template, the Offers and Jobs tabs will appear, and the action button will change to Directions.
Tip : Experiment with patterns by changing them. So you will choose the most suitable one. Then you can manually customize the template by turning off unnecessary tabs or swapping them.
Set up a welcome message
If you enable this option, every time someone visits your business page, a welcome message will automatically be sent to them. This will increase the conversion of the page and allow you to quickly build communication with a potential client. nine0003
We go to the page settings, open the "Messaging" section, find and activate the "Show greeting" item. Then click "Edit" to set your message.
Enter the text of the welcome message. The character limit is 160 with spaces. You can use emoticons and username. At the end, click "Save". Please note that the message will go to Messenger.
How to link a business account to Instagram
In the Instagram section, you can link a business page to your Instagram account. This will allow you to publish content immediately on Facebook and Instagram, reply to messages on any social network, and respond faster to new comments. To communicate, click "Connect account", then you will need to log in through Instagram to confirm adding an account.
After linking the business page with Instagram, you will also have access to Creator Studio ( free auto-posting and statistics service ) and in the Rights Manager ( copyright protection ). Also, if you plan on having both Instagram and Facebook presence, we recommend that you manage your Pages in Business Suite.
WhatsApp Link
In the WhatsApp section, you can link a business page to a messenger and you can be contacted on WhatsApp directly from an ad or from your Facebook Page. This is handy if you're used to replying to people on WhatsApp.
To get in touch, select a country code and enter a phone number. You will receive a verification code to verify that the number belongs to you. nine0003
We also recommend that you set up a WhatsApp business account to access more features.
Invite your friends to like it
In general, Facebook promises to remove the Like button from business pages, but even when it is removed, everyone who likes your page will remain subscribed to it. Therefore, we do not ignore the opportunity to attract the first audience. On the business page itself, scroll down a little and find a column where you can invite friends. Click "View All Friends". nine0003
In the window that opens, select all friends or those who will definitely be interested. Also, in the lower left corner there is an option that allows you to send invitations to private messages ( no more than 50 pieces at a time ). Once selected, click "Send Invitations".
There is a "More" button, you can also invite friends through it.
Follow the statistics
To keep track of how effectively the page is developing, there is a "Statistics" section. You can access it through the settings. nine0003
Statistics provides an overview of all indicators in general, as well as detailed statistics for each metric separately ( left menu ). Here you can also download all the data, the "Export data" button in the upper right corner.
Access control
At some point, you may need to transfer control of a business page or add other team members to collaborate. For example, a sms manager who will be responsible for posting or a targetologist who will run ads. nine0003
To add new users who will be able to manage the page, go to the "Roles on the Page" section in the settings. In the "Assign a new role on the Page" field, write the username ( he must have a personal page in FB ) and select the role. Thus, you can assign an advertiser, editor, moderator, analyst, or a new page administrator.
How to delete a business page
If your organization has ceased operations or you no longer see the point in a business page, you can always delete it.
 Based on your selections, your new Page will have the ability to retain:
 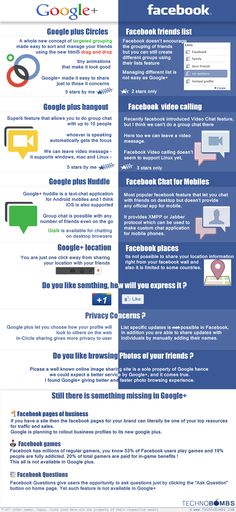 We recommend using a Business.facebook.com account connected to your profile to do this!
 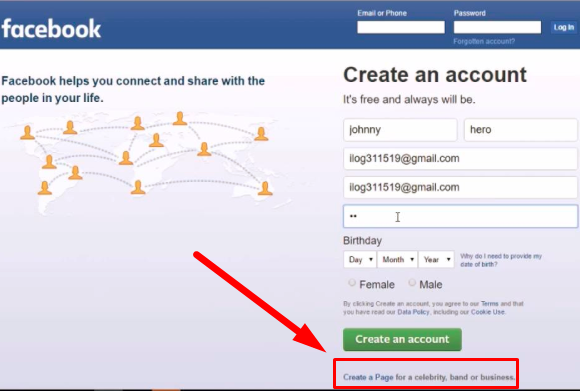 Here you will know the advantages that a Facebook Page can bring to your company or venture, and the reasons why you should turn your profile into Fan Page. Let’s start!
 Indeed, there are Pages or Fan Pages for everything from celebrities to festivals, local businesses, politicians, movies or books. Postcron also has one!
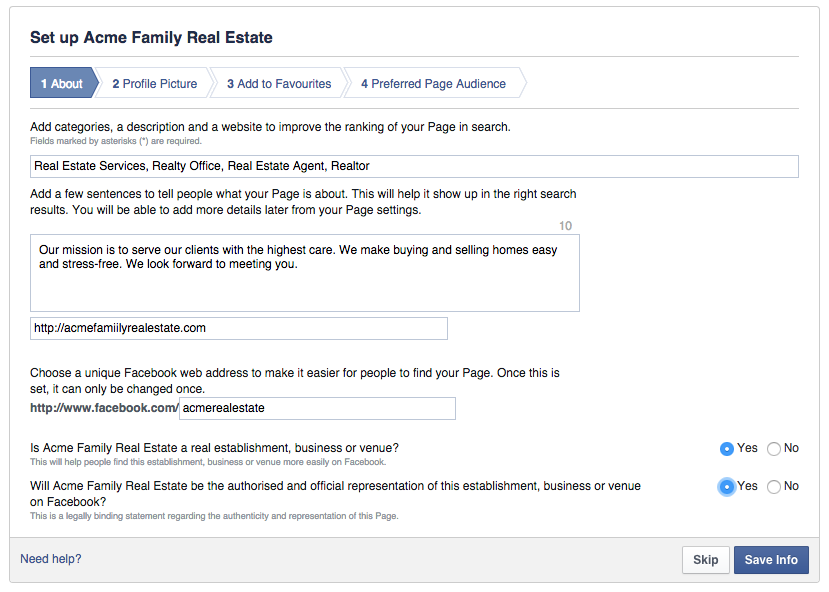


 Complementarily, you can write an email introducing your new Fan Page and send it to all your contacts, to tell them your proposal and invite them to follow you.
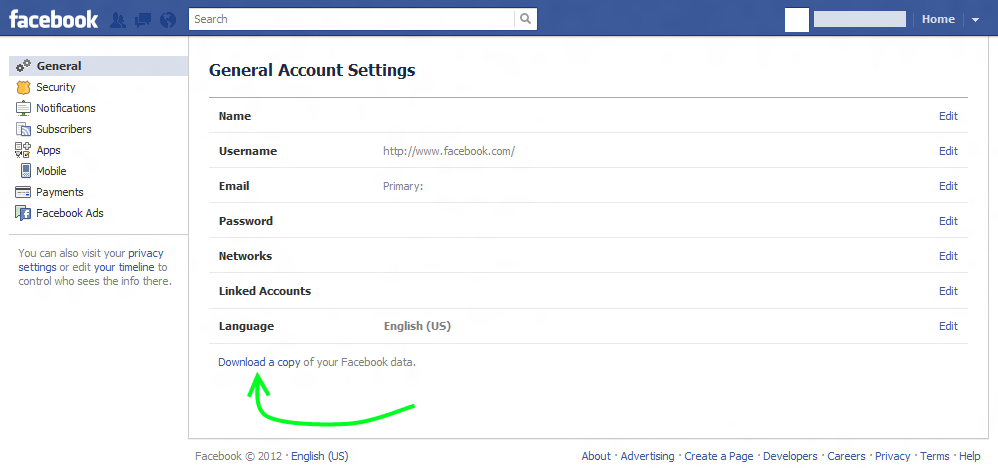 That’s why the best practice is to schedule your publications in advance, so that they are automatically shared with no margin of error on the days and times you set.
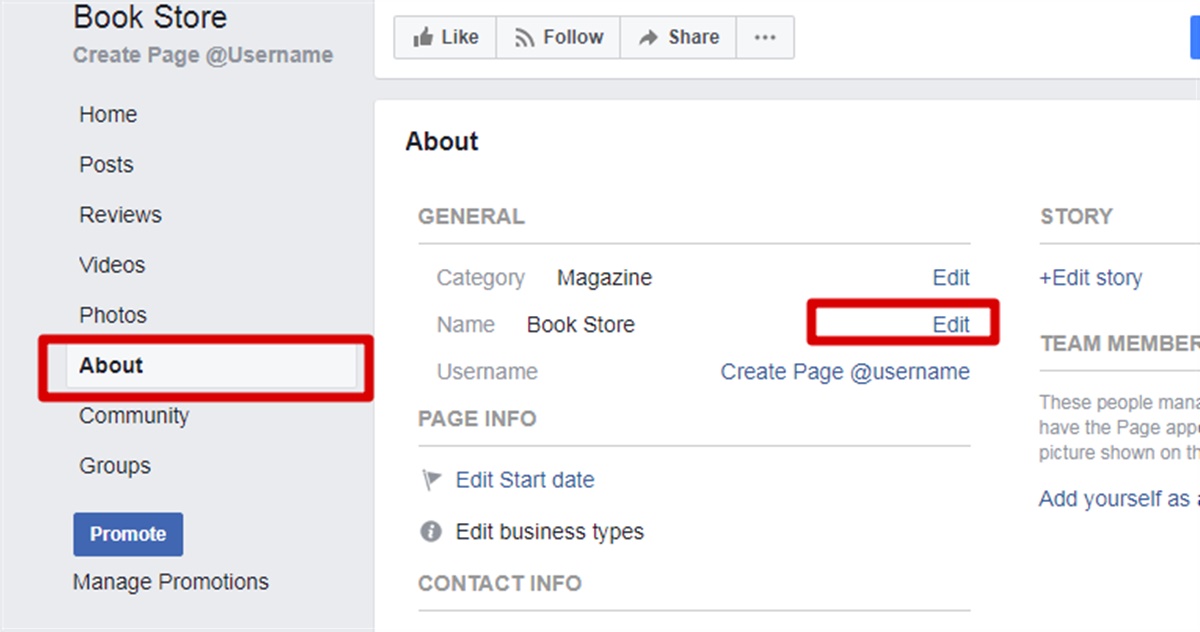 See you soon! ?
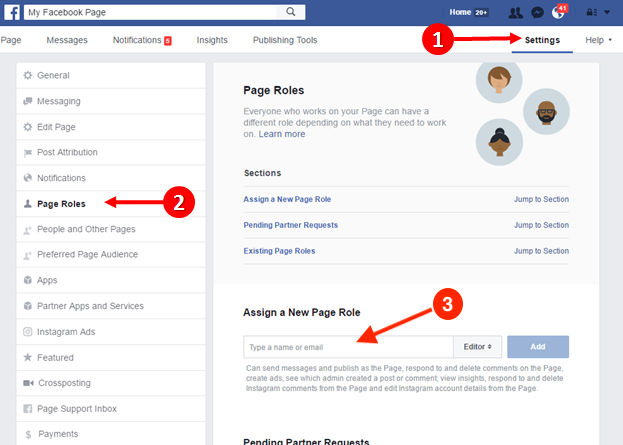
 nine0003
  To download it, click on the camera icon and select "Edit profile photo".
 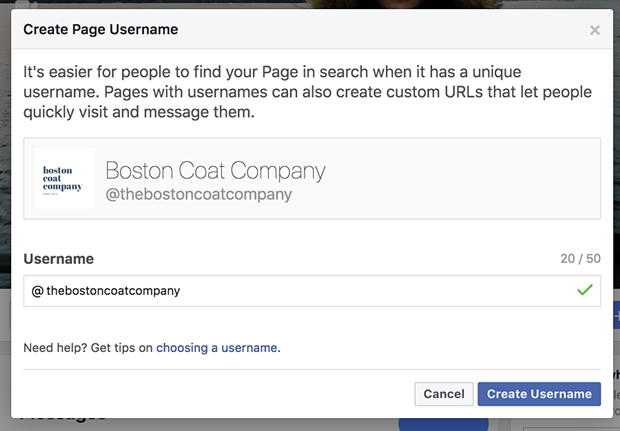 They are enough to launch the first campaigns.
  nine0003
  On the right - a preview will be available and all the changes that you make will be displayed. nine0003
 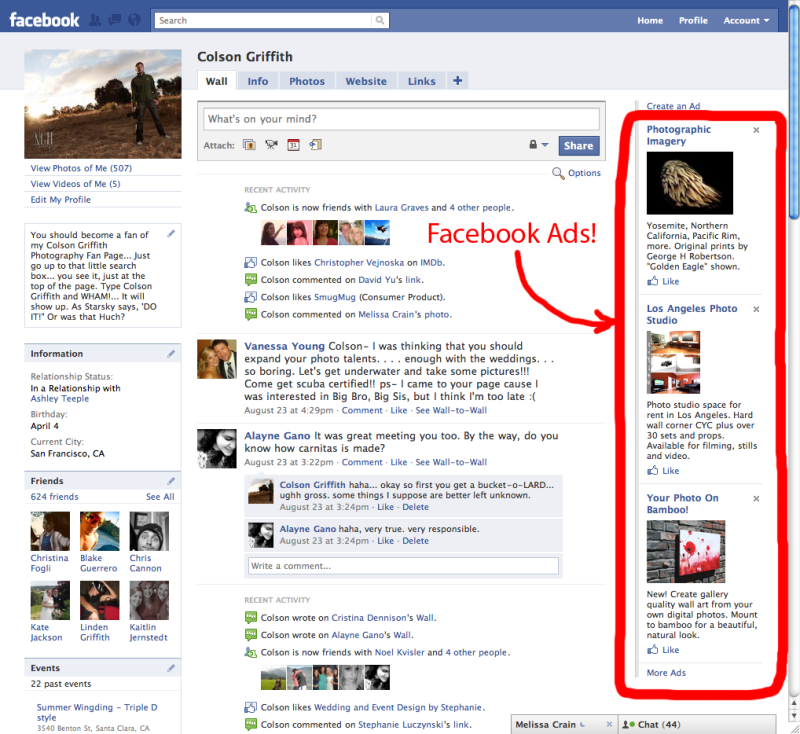 " After, in the place where the cover will be, click "Edit", select "Upload photo" and upload the picture from your PC. nine0003
  com/. Click "Create @username".
 This will allow you to publish content immediately on Facebook and Instagram, reply to messages on any social network, and respond faster to new comments. To communicate, click "Connect account", then you will need to log in through Instagram to confirm adding an account.
 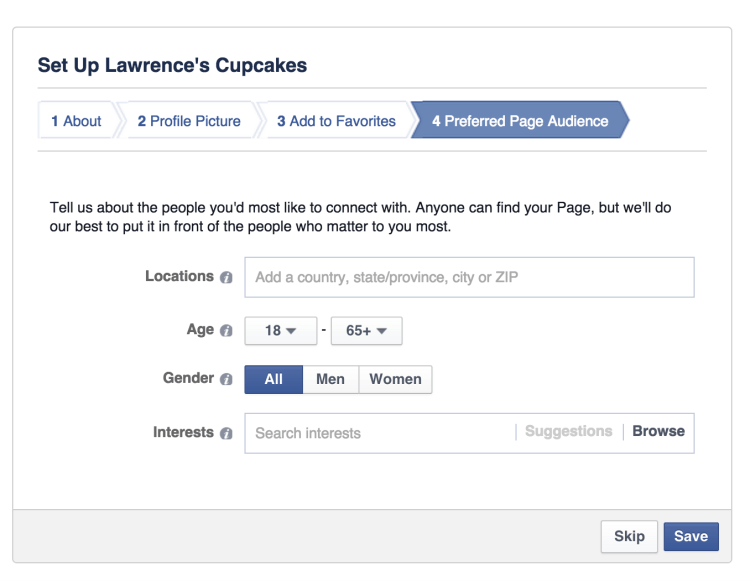 nine0003
 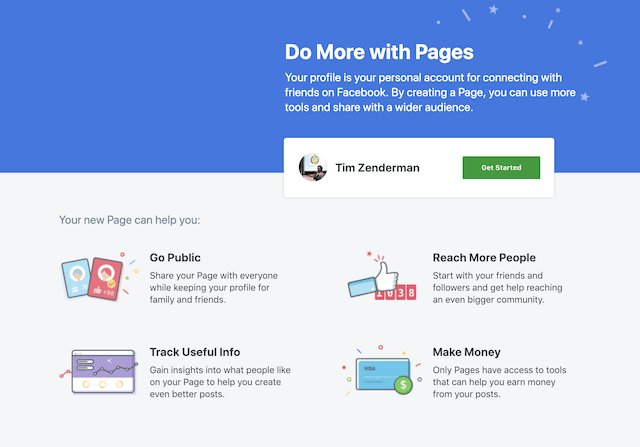 You can access it through the settings. nine0003