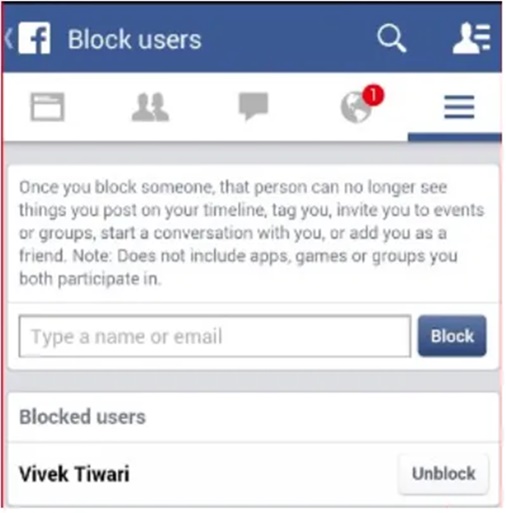
Building bots for Workplace in groups and chat
Bots in Groups | |
Bots in Chat |
With custom integrations for Workplace, it's now possible to build powerful bots that can interact with people in groups and chat.
You can build a bot that automatically posts content into groups, responds to questions with extra information or takes action when mentioned in comments on a post. You can also build bots that can converse with people in Work Chat, providing information in real time, or handling requests with structured conversation elements like quick replies and persistent menus.
To build a bot for your community, you'll need a System Administrator admin role.
If you are not an admin of your Workplace community, you will need to work with an admin in order to build a bot.
On Workplace, similar to the Messenger platform, bots are represented as pages. A page is automatically created when you create a custom integration app. People in your Workplace community can discover and interact with your bot through this page
Bot pages are company-public, so any member of a Workplace community can see, tag, and message the bot. However, depending on the permission level you choose when creating your bot, it may not be able to see and interact with all of the content on Workplace.
For example, if your bot has the Read group content permission, it will be able to see content in groups. And if your bot doesn't have the Post to groups permission, it won't be able to reply to content in any group.
Additionally, people will only be able to find and message your bot in Work Chat if it has Message any member permission.
In groups, bots can do many of the things that people can do. This means you can build bots that post new content, comment on content with new information and like posts to indicate acknowledgement or approval.
Bots can also @mention people to get their attention, and be @mentioned to kick off a specific workflow or ask a question.
Lastly, bots can subscribe to group and @mention webhooks which provide the ability to monitor content and interact with users in flexible ways.
While in groups, bots are able to consume and share information across a group of people asynchronously, bots in chat are best for direct real-time interaction with a single person or defined group of people.
For instance, a chat bot can be used to send important reminders or notifications to someone based on an upcoming event like an interview or a meeting. Work chat bots can also be used to engage with a user in a conversation and take follow up action based on feedback received.
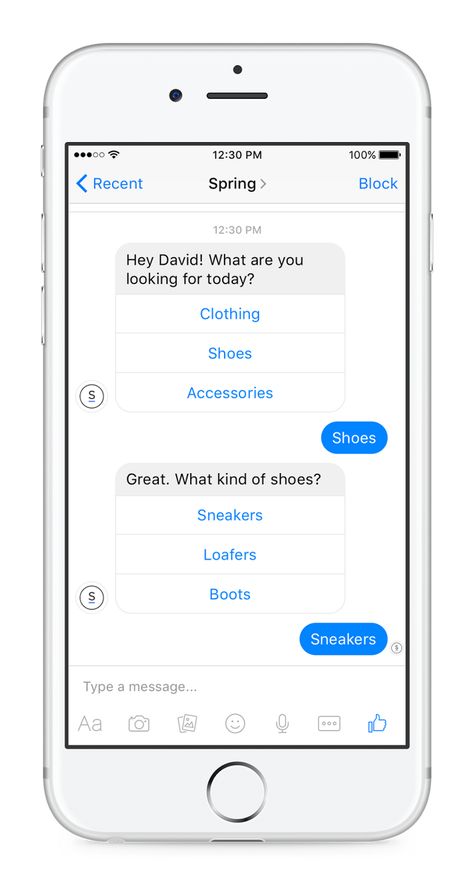
This interaction model is based on the same concepts used by the Messenger Platform. As a result, work chat bots can use features like persistent menus, quick replies, and templates to enrich the user experience.
A bot can only reply to a Chat thread in which Bot is a member(1-1 chat or Groups chats). Additionally the Bot must have Message Any Member permission.
When a bot has the Message Any Member permission, it will be allowed to send a direct message any person on Workplace via their email address or their Workplace ID via the Messenger Send API.
A bot in a new message typeahead
The Message Any Member permission also allows your bot to show up in typeaheads in Workplace chat surfaces.
A bot in a new message typeahead
By subscribing for Page Message webhooks, your bot will also get notified when a user messages your bot, and you can build a conversation flow by combining sending and receiving.
A bot-to-user conversation
Bots can also create, manage and be added to multi-person group chat threads.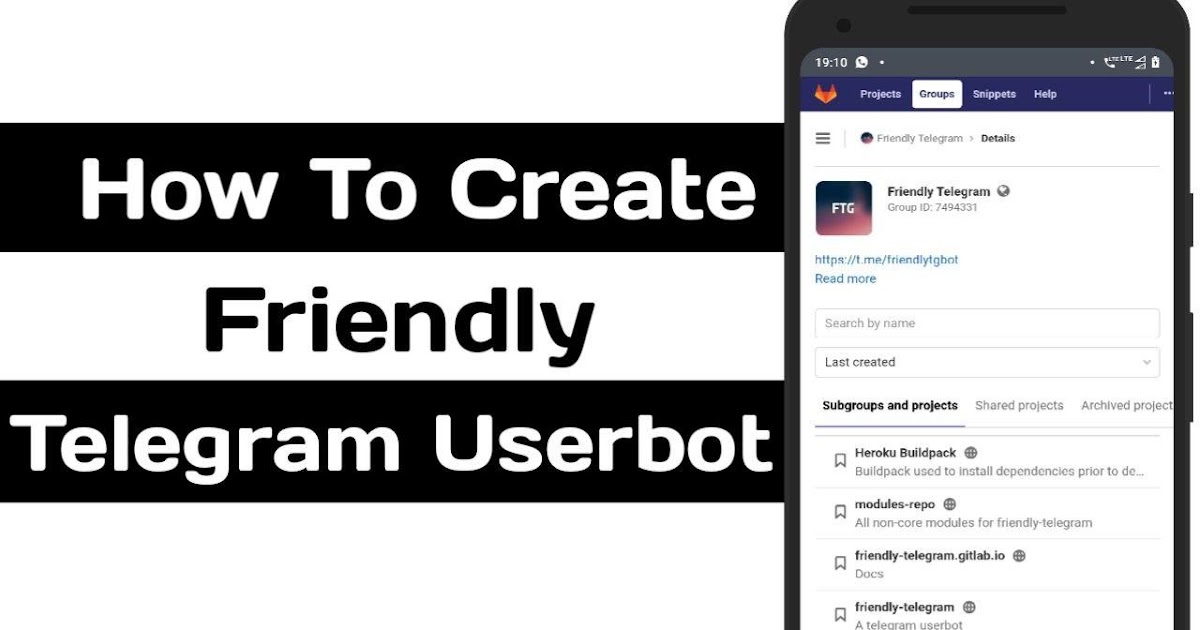 Bots can create new group threads by specifying a list of recipients, and can rename threads to create chat discussions on specific topics with specific people.
A named thread with specific people, created by a bot.
To enable a bot to create group chats with Workplace users, open the Permissions panel of the Edit Custom Integration dialog, and check the box labelled Allow this integration to work in group chats.
Enabling a custom integration bot for group chat support.
By enabling group chat support, your bot will show up in the Add people typeaheads in an existing group chat thread. It will then receive webhooks for each message sent by people in that thread, and can reply to that thread using its thread ID.
Adding a bot to a group chat, then @-mentioning the bot
To create a new thread with specific recipients, make a POST request to the /me/messages endpoint specifying an array of recipient IDs and an initial message payload as follows:
POST /me/messages { "recipient": { "ids": [<user_ids>] }, "message": <message_payload> }You'll get back a response payload that includes a thread ID, which you can use for follow-up messages.
If you use the same endpoint with the same list of recipients again, a new thread will be created. To send follow-up messages to an already-created thread, make a POST request to the /me/messages endpoint using the thread_id in the recipient payload, as follows:
POST /me/messages { "recipient": { "thread_key": <thread_id> }, "message": <message_payload> }To rename a thread created by your bot, make a POST request to the /{thread}/threadname edge, as follows:
POST /t_<thread_id>/threadname { "name": "new name" }Note the need to prefix the thread_id with "t_" in the edge path.
You can also get the list of participants of a thread by issuing GET requests on the /{thread}/?fields=participants edge, as follows:
GET /t_<thread_id>/?fields=participants
You can also add and remove participants from threads by issuing POST or DELETE requests on the /{thread}/participants edge, as follows:
POST t_<thread_id>/participants { "to": [<user_ids>] } DELETE t_<thread_id>/participants { "to": [<user_ids>] }Workplace has a number of bot platform partners who have built support for bots on Workplace. You can see a list of them here. You can use one of these platforms to build a powerful bot without writing a single line of code.
When deciding whether to build group or chat interactions for your bot, it's worth considering where your bot will be most useful.
A single app can handle both channels. There may be times when, for example, your helpdesk bot takes messages in work chat, and other times when it needs to post in groups and pick up the replies.
Once your app is subscribed for webhooks, your bot will get notified when it's mentioned in a group post or comment. It's important for your bot to respond to mentions in a timely fashion. If your bot has to process a request before replying, it's useful to like the comment, to indicate to the person that the bot knows it was mentioned.
Then if you're providing information after being mentioned in a comment, add a threaded reply to keep the rest of the group conversation flowing.
If your bot needs to provide info to the original poster, add a comment on the post itself, so they get notified too.
Bot interactions in Work Chat support similar functionality to the Messenger platform. This includes quick-reply buttons and templates that help you implement decision trees in bot conversations.
This makes it much simpler to build useful workflows and reduces the amount of typing people need to do, without the need for sophisticated natural language processing, which makes internationalisation much much simpler if you're building bots for a global workforce.
You’ve set up a visually stunning cover photo for your Facebook business page, chalked a marketing plan, and are almost done setting up your shop on the social network too.
But when it comes to a Facebook chatbot for Messenger, you find yourself scratching your head.
Should I give it a shot? Is it even worth it? Will it bring in business or is it just another shiny object I’m chasing in a desperate attempt to increase my Facebook followers?
In this post, you’ll get the answer to just that.
We’ll kick things off by discussing what a Facebook chatbot is and how it facilitates Facebook Messenger marketing. Next, we’ll look at what benefits you can drive home for your business using chatbots. Finally, you’ll learn how you can use a Facebook chatbot builder to create a bot for your business page.
Let’s get started.
Post Contents
Start selling online now with Shopify
Start your free trial
A chatbot is an artificial intelligence program that can chat with your customers on your behalf with pre-programmed responses to frequently asked questions.
The conversation could be as basic as directing them to your product page. Or it could be as smart as helping them find the right product or change their reservation like Marriot’s Facebook chatbot does.
Source
Think of a Messenger bot as your Facebook assistant that converses with your audience.
From a customer’s perspective, a Facebook Messenger chatbot is a lifesaver. It answers their questions instantly — saving them from having to Google your site, head to the FAQ section, look for the question they have, and finally, get an answer.
In addition to that, a Messenger bot saves you time. It answers queries quickly — queries that you’d be in charge of responding to if bots didn’t exist. It can also walk your customers through your product collection, or supply them with your phone number or address.
But these are just statements with a bunch of examples added to the mix, aren’t they? No worries, here’s solid proof:
 This number must have grown by now since the statistic is sourced from a 2017 survey.
Plus, chatbots are not going out of business anytime soon. Just look at how their usage has branched out to different areas:
Makes a compelling case, doesn’t it?
So how can you use a Facebook chatbot for your business?
There are tons of ways you can use a Messenger bot to win at Facebook marketing. For example, you can engage your audience with interactive content, drive traffic to your latest blog post, share shipping details and more. Here’s a look at some of its biggest benefits.
Chances are that a potential lead liked your Facebook page because they enjoyed a picture you shared. It’s also possible that they heard about your business elsewhere and decided to follow your page.
But in the whirlpool of pages they see on their newsfeed, it’s likely they’ll forget about your business in only a few days.
So should you let bygones be bygones? Absolutely not. A Facebook chatbot can ensure that potential leads stay aware of your brand by engaging with them through live chat.
With a Messenger chatbot, you can:
According to The Social Habit, 42 percent of customers expect you to get back to their queries on social media within 60 minutes. Any delay here will leave you at risk of offending your customer.
Not to mention, if you take too long to respond, your customer could start looking for alternatives. Ouch.
Chatbots can prevent this from happening by instantly responding to your customer. Make sure to program your Messenger bot to connect your prospect to your customer service team if it’s unable to answer a question, like Sephora does here:
By 2021, customer experience is anticipated to rank higher than product and price as a brand differentiator. Research also shows that customers are willing to pay more for good experiences.
By getting back to your audience with instant replies to their queries, you’re already improving customer service as well as experience. But that’s just the tip of the Facebook Messenger bot’s potential.
Take ModiFace as an example here.
The brand pairs its Messenger bot with simulation tech, which lets users try on different lipsticks before making a purchase.
While it’s certainly true that not all business types can replicate such a chatbot messenger, it gives a good idea of how beneficial a Facebook chatbot can be for your business.
You can also enhance your prospect’s experience by sharing valuable resources that they may find helpful.
Your Messenger bot can help you direct them to your latest blog post. Or you can schedule the Facebook bot to share how-to guides or videos with your audience depending on their previous purchase history.
Alternatively, you can share interactive content such as quizzes with your prospects to keep them engaged, like Sephora does.
Source
A Facebook Messenger bot can work wonders in increasing your conversions too. How? By nurturing a relationship with your audience.
Victoria Beckham, for instance, keeps the conversation going by sharing product updates with her fans.
Such updates are a great way to keep business on top of your prospect’s mind.
Pro tip: Be sure to space out your Messenger bot messages. Sending too many of them at once could result in negative consequences (such as your lead getting annoyed).
Lastly, you can also use a Facebook chatbot to offer a seamless purchase, like Pizza Hut does via Messenger.
Since the average smartphone user has around 80 apps installed on their device, Pizza Hut took a unique approach to get the attention of potential customers.
Instead of creating an order delivery app, it lets customers place an order in a few clicks through its Facebook Messenger bot.
The chatbot also collects transaction data to make placing future orders easier than the first time.
Put simply, the bot is able to show order history as well as suggest new promotions and items based on the customer’s preference.
Now that you’re familiar with how Facebook chatbots work, let’s walk you through making your first Messenger bot with the help of Chatfuel.
Chatfuel is an easy-to-use chatbot builder that powers 46 percent of Facebook chatbots.
With Chatfuel, you can create a Messenger bot without any coding or having to hit your head against the wall. You can try a host of other chatbot builders as well.
For this piece though, we’re going to stick with Chatfuel and show you how to use it to build an intelligent Facebook chatbot.
Here are the steps:
You can use Chatfuel for free as long as you have less than 500,000 monthly active users. However, once you cross this mark, you’ll need to switch to the premium version.
Setting it up is hassle-free. All you need to do is log in via Facebook.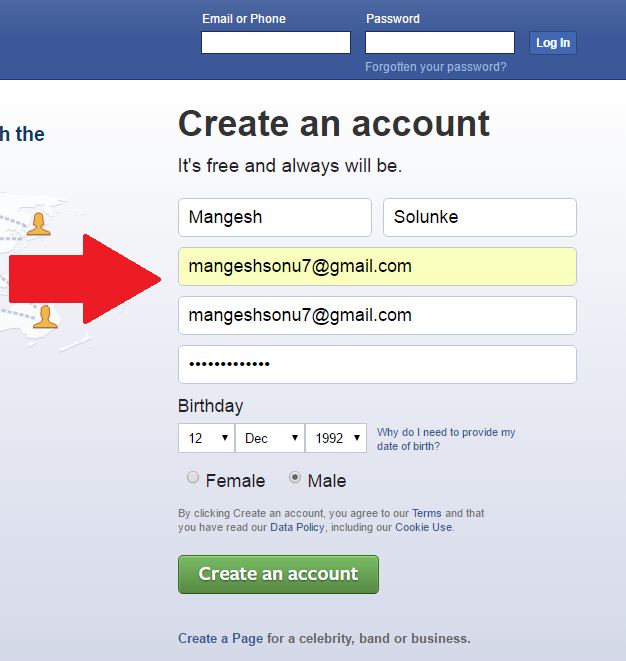 No need to spend minutes working out a new passcode for a new account ID. Just enter your Facebook username and password.
Chatfuel would now request to access your Facebook name and profile picture. Click Continue as [your name] to grant access, and then select the Business page that you want to set a Facebook chatbot on.
If you don’t have a Facebook Business page, you’ll have to set it up before making a Facebook chatbot for your service or product.
Here’s your guide to setting up a Facebook business page in just 19 steps.
Next, Chatfuel will seek permissions for what it’s allowed to do.
You’ll need to grant access to each of the four options for optimal performance. Once you’ve done that, click Done to finish the process.
It’s best you go through the short tutorial that pops up at this point. It’s a quick guide to creating a Facebook bot via Chatfuel.
The welcome message is the one that shows up when a potential customer interacts with your bot for the first time.
You can use it to give an introduction about your bot. Tell people that there’s a friendly robot (feel free to give it a name) that’s going to try its best to resolve their queries.
Also, work on personalizing the default message, which is presented to the customer when the chatbot is unable to answer their questions.
You could say something along the lines of, “I’m not sure I understand what you’re asking.” Then provide links to the FAQ and other helpful pages on your site.
Your conversation navigation is the way your Facebook chatbot will be interacting with your audience.
A good idea is to program your Messenger bot to answer frequently asked questions that customers typically have.
To this point, start adding blocks with the Add Blocks option in your Chatfuel dashboard:
In each of these blocks, type in the answers that your Facebook auto reply bot will give your customers.
Let’s say you run a bookstore. In this case, two frequently asked questions could be:
You can provide answers to these questions by creating blocks that:
When giving a title to these blocks, add a URL to your website where possible so that the Facebook bot can take visitors to the relevant page.
For instance, you can add a link to your website’s library page when adding a “Browse library collection” option:
You also have the option to choose how long your bot will show that it’s typing when interacting with your audience. Choose from a scale of 0.1 to 20 seconds.
Once your blocks are ready, add them under your welcome message by going back to the Welcome Message tab in your dashboard.
Use the Add Button option to add the button’s name. In this case, we’ll use “Browse library” and “Location”.
Next, select the block you’ve created to go under the button.
In this way, you’ve created a button with a block to provide an answer to a frequently asked question.
At this stage, click Set up AI on the left side of the dashboard.
Now fill in two main details; firstly, the phrases your bot needs to look out for under the If Your User Says Something Similar To section, and secondly, the content that pops up in response.
Put simply, this content is the answer that your Facebook business chatbot will give when similar words are used. This goes in the right side box titled, Bot Replies With.
You can either pick a Block you’ve created in the steps above or you can enter fresh content for the bot to reply your user.
And that’s all.
You’re now only one step away from launching your Facebook bot.
Test your Facebook chatbot via the Test Your Bot button on the bottom right of your page.
Click on Promote page on the left-hand side of the navigation menu to get the URL on the page.
This is the URL to your chatbot. Put it on your Facebook page, website, or online ads. You can also spread the word about your bot as part of your Facebook marketing plan.
Running your business via Facebook can be challenging, but it doesn’t have to be. A Facebook chatbot can help streamline your communications, enhance your productivity, improve customer service, and boost your sales among other things. With just 300,000 chatbots in existence, now is a great time to enhance your customer experience with a friendly, intelligent Messenger bot.
Are you using a Facebook chatbot for your business? Let us know by dropping a comment below.
Start selling online now with Shopify
Start your free trial
Create and set up a chatbot with SendPulse in just a few clicks
No programming experience
In your SendPulse account, select the "Messengers" section and log in
with your Facebook account.
The chatbot is connecting to a Facebook page that you manage as an administrator.
Gather a database of contacts for mass mailing of a chatbot and private messages.
Analyze what your audience is interested in. See the number of sent and read messages, as well as clicks on links. Learn more
Subscription Widgets
Widget allows the user to subscribe to the chatbot mailing list on your site without going to Facebook. You can choose the type of widget form and add a description of the bot in the title. nine0006
Create widget
Send a mass mailing of different types, even from several messages. Add a button with a link or enter a phone number that can be called with one click.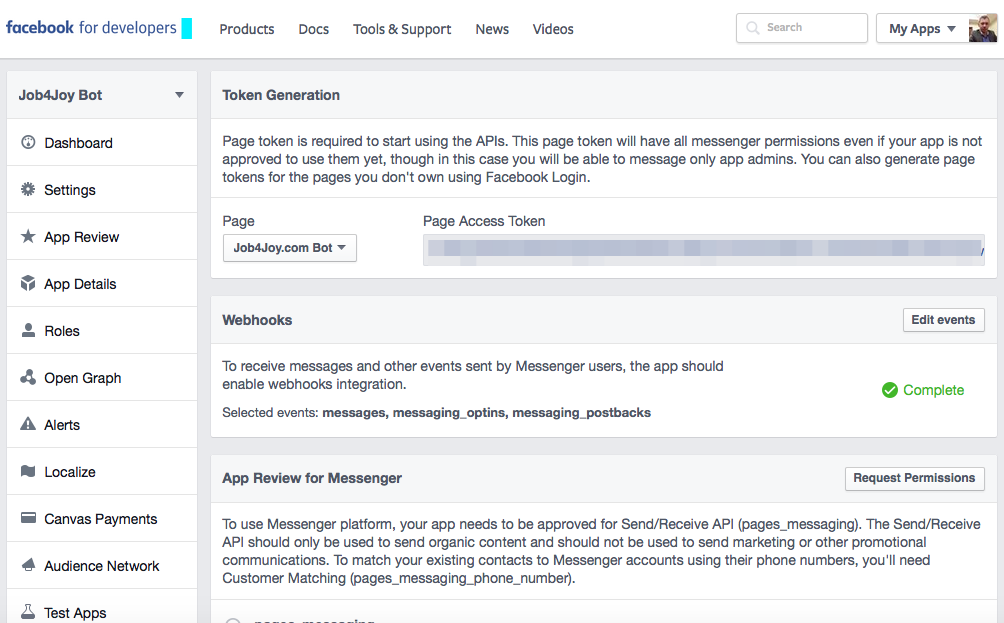
Diversify text mailings with visual content. You can add an image, a product card or a file to the message. nine0006
Using the application, you can quickly respond to messages from Instagram, WhatsApp, Telegram and Facebook, work with subscriber data and analyze statistics.
A well-designed Facebook bot takes care of your business 24/7. It can offload sales and customer support departments. In addition, you can use the Facebook bot to advertise and send marketing emails directly to your private messages. You can even set up autoposting to fully automate your interactions with customers on Facebook Messenger. nine0006
It helps you support your customers at every stage of their life cycle. Without knowing a single line of code, you can set up a Facebook bot that will move users through the sales funnel, answer FAQs, register participants for webinars, collect resumes - the possibilities are endless. Here's how to create a Facebook bot if you want to understand how it works. nine0006
On the basic plan, you can create up to 3 bots for free and send up to 10,000 messages to an unlimited number of users. The choice of a paid plan will depend on the number of your subscribers. Check out the prices and functionality of our Facebook bot at the link.
SendPulse provides a free subscription widget for Facebook Messenger that can be easily connected to your website. This is a great way to build a subscriber base. Read the instructions for adding a subscription widget to your site.
Continue reading →
Try free Facebook Messenger bot
Connect bot
 ru
ru Column of the director of digital marketing "Atlas"
Viktor Babichev, Digital Marketing Director of the biomedical holding Atlas and mentor of the Growth Hacks section, wrote a column for vc.ru about the algorithm for creating a bot for the Facebook messenger.
Digital Marketing Director of Atlas Medical Center Victor Babichev
In order to create a bot for the Facebook messenger, you need to have minimal programming knowledge and skills. In fact, everything goes to the fact that bots will be created in a couple of clicks, but this is still far away. Already projects begin to appear that greatly simplify the development of bots, but most often they solve far from all tasks. Therefore, let's look into the issue and write our own simple bot for the Facebook messenger. nine0006
You need to start with the environment. Necessary:
First, we need to decide what we want to write. Our task is to create a simple Facebook bot that will automatically respond to user messages. The goal is to figure out how everything works.
We need a community for testing. So far, the structure is such that the Facebook bot is a separate page. That is, if you want to add a bot to an already existing community, then you need to handle the situation where the user wants to write to the administrator, and not communicate with the bot. Example: CNN edition page. nine0006
We create new application, where we indicate that this is App for Pages:
We go to the Messenger tab, select the desired community, log in and write down the received token. We still need it.
Now you need to configure WebHooks - this is the address of the site to which the user's responses will be sent in real time. The application must process requests and return the result. The site must be accessible via HTTPS, and the verification token must match the settings in the application. nine0006
We will create such a site and go through the verification procedure. This will require a bit of programming.
For convenience, we have chosen the Node.js platform, as the examples in the Facebook Messenger Platform are located there.
Follow the sequence of steps:

To verify the address in WebHooks, you need to publish the site on a public hosting. The easiest way is offered by Heroku.
Set up WebHooks in the application: add /webhook to the generated site address. In the Verify Token, we insert the phrase that we came up with a little earlier and wrote it into the code: nine0006
If everything worked out, it will look like this:
For everything to work, you need to create a subscription from the community - then all new messages from the user will be immediately processed.