Facebook lead ads can accomplish a variety of marketing objectives, but they’re best at helping with one of marketing’s golden rules: Know thy audience.
Many marketers think they know their audience, but often confuse customer data with customer analytics. In a mostly online ecosystem, it’s easy to forget that sometimes the best way to learn about customers is to just ask questions. That’s exactly what Facebook lead ads (sometimes called Facebook lead forms) do.
If your objectives include market research, customer feedback, or even increasing conversions, Facebook lead ads may be the right solution. This guide will answer all of your questions about the ad format, including how to create a campaign and how to optimize for success.
Bonus: Download a free guide that teaches you how to turn Facebook traffic into sales in four simple steps using Hootsuite.
Facebook lead ads are essentially promoted forms. These forms allow marketers to capture details from customers while offering opportunities to connect, such as newsletter subscriptions, demo requests, or contest registration.
When someone clicks on a lead ad, they presented with a form that’s pre-populated with information from their Facebook profile. The rest can be completed in a few easy taps.
A major attribute about lead ads is that they are optimized for mobile. That’s key for Facebook’s 88 percent share of mobile users–especially since it typically takes 40 percent longer to complete forms on desktop.
Another advantage Facebook lead generation ads offer is that generated leads can be synced directly with your company’s customer-relationship management system or downloaded as a .CSV file. This allows marketers to follow-up more efficiently, which is vital for closing the deal.
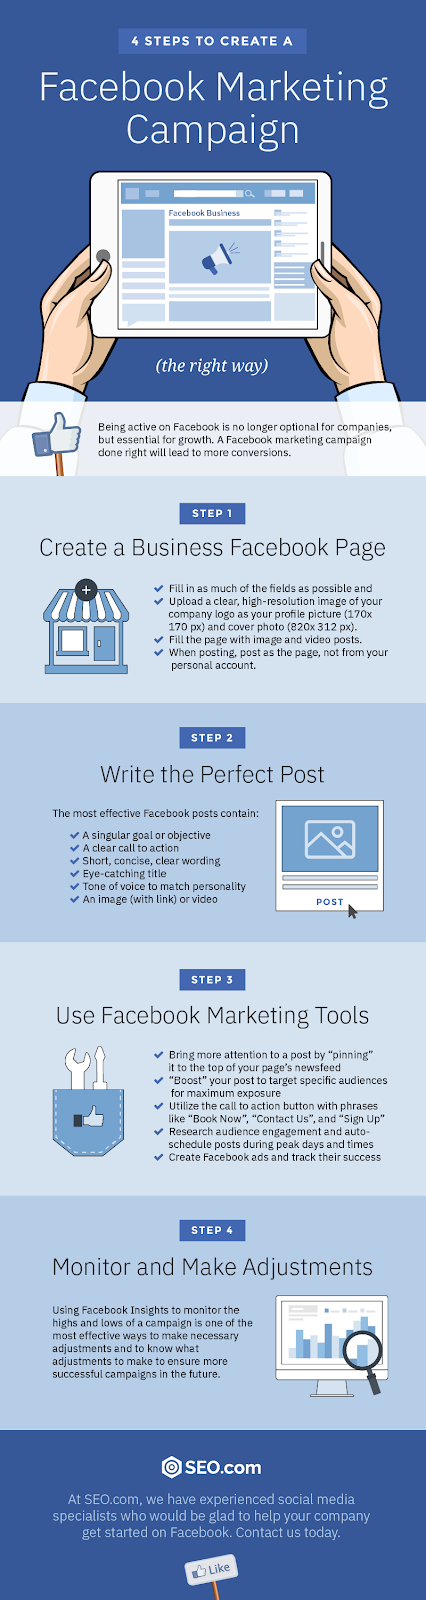
Here’s how to set up Facebook lead generation ads, step by step.
1.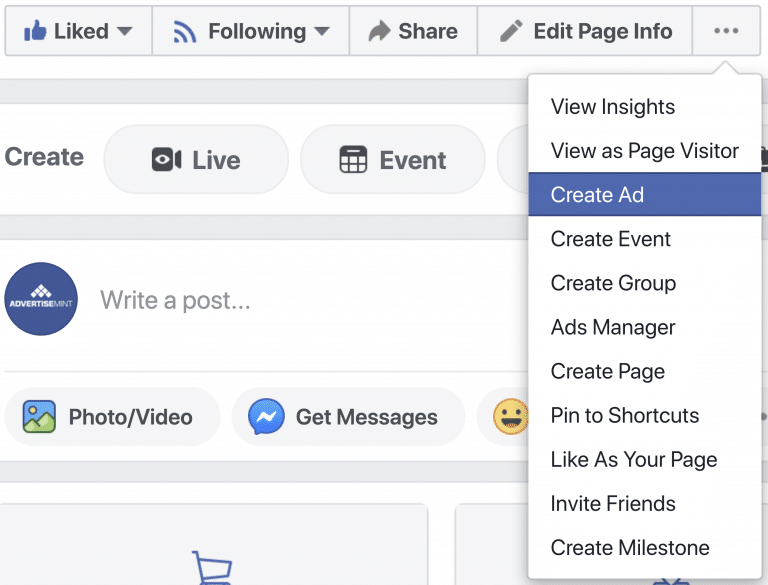 Go to Ads Manager.
2. In Ads Manager click Create in the top left corner.
3. Choose Lead generation as your objective and name your campaign.
4. Choose the Page you plan to use for the lead ad. Click View Terms and then agree to the Facebook Lead Ads terms and conditions after you’ve read them.
5. Choose your target audience, placements, budget, and schedule. Note: Lead ads cannot be targeted to people under the age of 18.
6. Select your lead ad formats. You can select carousel, single image, video, or slideshow.
7. Add your headline, body copy, and a call to action. A window on the right offers a preview of your ad as your create it.
8. Scroll down and click Contact Form. Here you can add a form title, add an intro, questions, your company’s privacy policy, and a thank you screen.

9. Click Settings under the name of your form and check that you would like to collect organic leads. This advanced step is optional, but recommended. You can also change the language of your form here.
10. Click Finish in the top-right corner. Review your ad from Ads Manager and when you’re ready to publish, click Confirm.
Once you’ve created an ad, you can access leads through, customer system integration, implementation of the Facebook Marketing API, or by manual download.
Facebook also allows advertisers to collect leads using Facebook Instant Experience forms.
People are more willing to share their personal information with you if you offer something in return. Whether it’s a promo code or a free download, a good incentive shows customers you value their information.
Popular incentive examples include:
Share your value proposition upfront so that people understand what they are signing up for. While optional, Facebook recommends you include this information in your promotional copy and in the introduction at the beginning of your form. Also, add branding throughout the experience so there isn’t any ambiguity as to who people are sharing their info with.
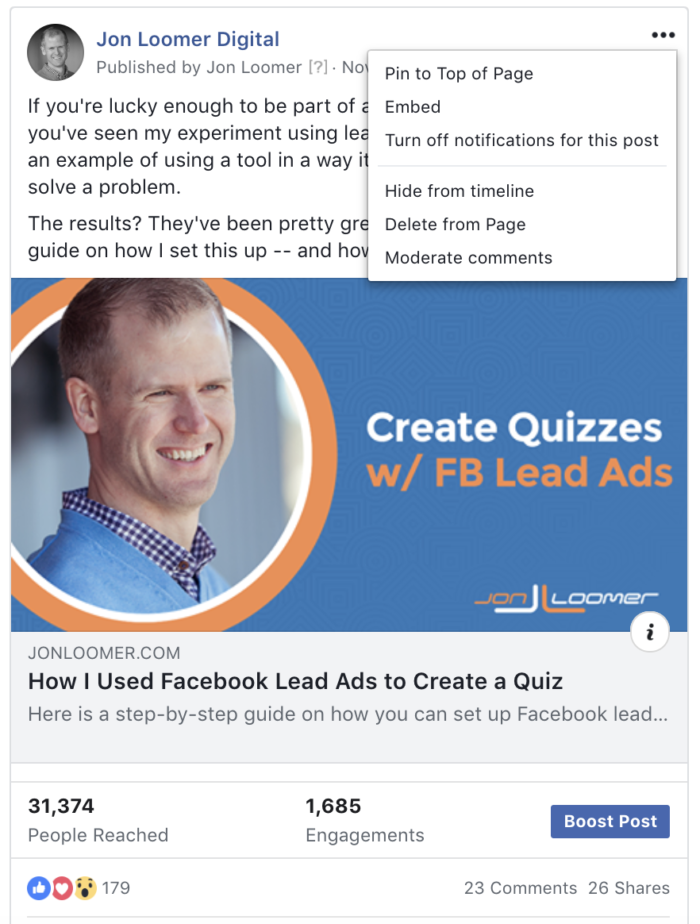
It’s also important to choose imagery that supports your messaging. For instance, point-of-sales systems provider Revel Systems tested different creative for its lead ad campaign, and found images with the product as a focal point were much more effective.
Just like any other Facebook ad, lead ads best served when the medium fits the message. For instance, if you want to showcase multiple products or features, perhaps a carousel format is the best choice. Short video, on the other hand, is a good format for storytelling and increasing brand awareness.
Don’t assume that because you’re offering an incentive creative doesn’t matter. Include high quality images and videos, sharp copy, and a CTA button for best results. You can find lead ad design specs here.
It’s simple: The easier your form is to fill out, the higher your completion rate will be. According to Facebook, with each question you add, the chance of someone abandoning the form increases.
Only ask for the most relevant information. If your form includes multiple-choice questions, limit the number of choices between three and four.
If Facebook’s provided questions don’t meet your needs you can create custom questions for your form. Choose between short answer, multiple choice and conditional questions, which change based on how a previous question was answered.
Your form can also include Store Locator and Appointment Scheduling fields which let people search for a nearby location or schedule visits.
Need help brainstorming questions? Facebook’s rubric of business goals and examples is a good place to start.
Your target audience should align with your lead ad’s objectives. There are three primary audience types you can choose from:
 This audience segment is ideal if your aim is to schedule appointments, demos, or simply encourage customers to visit.
A swift follow-up can significantly improve the chances of a conversion. And the quicker you do it the better. A landmark study published in Harvard Business Review found that businesses that make contact with customers within an hour are seven times more likely to secure qualified leads.
Keep in mind that messaging apps are now consumers’ preferred way to connect with brands. Two-thirds of customers rank messaging ahead of phone, live chat, and face-to-face communications. Maybe it’s time for your business to hop onto Facebook Messenger. And of course, if you want to know your customer’s preferred time and means of communication, don’t forget to ask.
The best lead ads are often the result of A/B testing and fine-tuning. Consider running two lead ads with different imagery or copy. Or try running lead ads with different form lengths to measure completion rates.
Here are some Facebook lead ad examples to inspire your next campaign.
The LA Auto Show ran multiple Facebook ad campaigns to promote its marquee event, but lead ads were critical for revving up interests. To find auto enthusiasts and increase ticket sales, LA Auto Show created a lead ad campaign targeted to a lookalike audience similar to those who had already purchased tickets online.
The lead ads offered a ticket discount incentive for those who submitted the form. And critically, LA Auto Show representatives followed up to complete the sales, contributing to a 37 percent increase in online ticket sales compared with the previous year.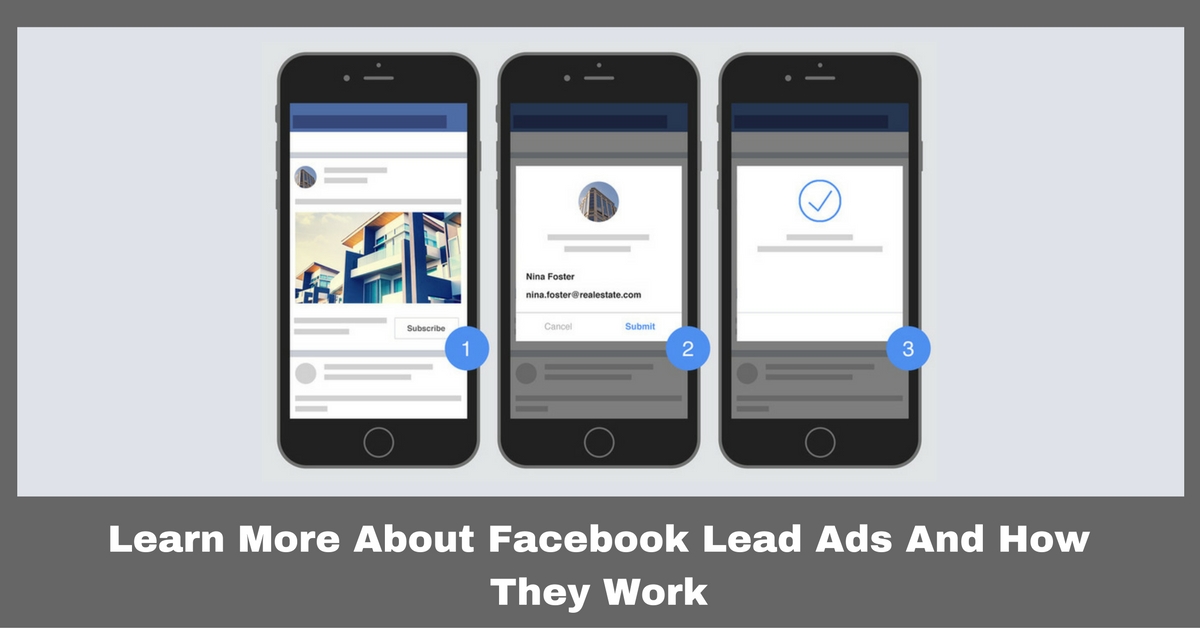
To assess market interest in affordable disposable contact lenses, Hubble Contacts leveraged lead ads to create a simple sign up form. All the company asked for was for people to submit their pre-populated email address if they were interested in learning more.
Bonus: Download a free guide that teaches you how to turn Facebook traffic into sales in four simple steps using Hootsuite.
Get the free guide right now!
While the company hadn’t launched yet, these insights played a critical role in raising funding. “The data from this campaign was key to raising a USD 3.7 million seed bridge before launch, which gave us the capital to lean heavily into marketing from day one,” said Co-CEO Jesse Horowitz.
When Hubble launched was able to use its email list to create ads optimized for conversions.
With the goal of generating more customer leads for its point-of-sales system, Revel Systems tested lead ads against link ads that directed people to a campaign landing page.
Early results showed that the in-app lead ad format led to 619 times the amount of leads and a 74 percent lower cost per lead. The company also tested different images, finding that images that focused on the product performed better.
To improve its response time to new customer queries, personal insurance company Generali Thailand ran a lead ad campaign that integrated leads with its CRM management system.
The pre-populated forms and automated collection of customer information helped take the burden off of sales team agents, helping them identify and respond to new queries faster. By acting on Facebook leads within 24 hours, Generali Thailand saw a 2.5x increase in sales conversions.
The UL Skin Sciences brand Myra is a big brad in the Philippines and was able to grow its national customer base through offering samples offline. To grow its business online and reduce costs, Myra turned to Facebook lead ads.
Using lookalike and custom audiences, the beauty brand targeted an existing customer base and a new qualified customer segment. The campaign was able to secure 110,000 sign-ups at a 71 percent lower cost per sign-up rate.
Champions League soccer team Real Madrid has a loyal fan base on Facebook, and an even stronger one offline. To bridge the gap and grow its base in countries with low engagement, the club launched a series of lead ads.
Optimization played a big role in the three-month campaign through a series of A/B tests that compared audiences, creative, and formats. At the end of the allotted period, the club generated a whopping 2.4 million leads, and was able to achieve a 70 percent decrease in cost per lead.
Manage your Facebook presence alongside your other social media channels using Hootsuite. From a single dashboard, you can schedule posts, share video, engage your audience, and measure the impact of your efforts. Try it free today.
Get Started
If you haven’t created a Facebook Lead ad before, it may feel a little daunting. In this tutorial, I’ll walking you through how to create and run your first Facebook lead ad campaign.
I’m going to assume you already have a Facebook Business Page and Ad Account setup for your business, and we’re going to be using the Facebook Ads Quick Creation tool instead of the Guided Creation tool.
If you’re not already familiar with the Facebook Lead Ads as a format, find our more here.
From Facebook Ads Manager, click on the Create button.
Name your campaign and select Lead Generation from the Campaign Objective dropdown.
Set your budget. I recommend starting with a minimum of $5 – $10 per day, but if you can afford more, then by all means, increase the budget. The more budget, the faster you’ll see results.
Name your ad set. The Ad Set is where you will choose the audience you want to target, so you may want use a name that reflects this.
Make sure your Business Page is selected, in this example, I’m using my LeadSync.me business page.
Add an Ad Name.I tend to use a simple naming convention here, such as “Ad 01”. Click Save to Draft.
Now that your draft has been created, click on your Ad Set name.
Scrolling down the Ad Set settings window, ignoring Dynamic Creative and Catalog for now (if you have these settings).
In Budget & Schedule, set an end date if you wish to run this campaign for a set period of time.
Start building your target audience by selecting a geographic region. This could be a whole country, such as the “United States”, or it could be a more targeted local location. In this example I’m targeting “People living in this location” and San Francisco, California, with a 25 mile radius selected.
Narrow your target audience by age, gender. Primary language is optional.
Now for the fun part! You can define your target audience based on Demographics, Interests and Behaviours. There are 100’s of options in the Detailed Targeting section, so I suggest you take a look around at the options to try to find your ideal target audience. This targeting map will show you all most of the options available.
As a first timer, I recommend leaving these default settings. Due to their format, Lead Ads are restricted to where they will display.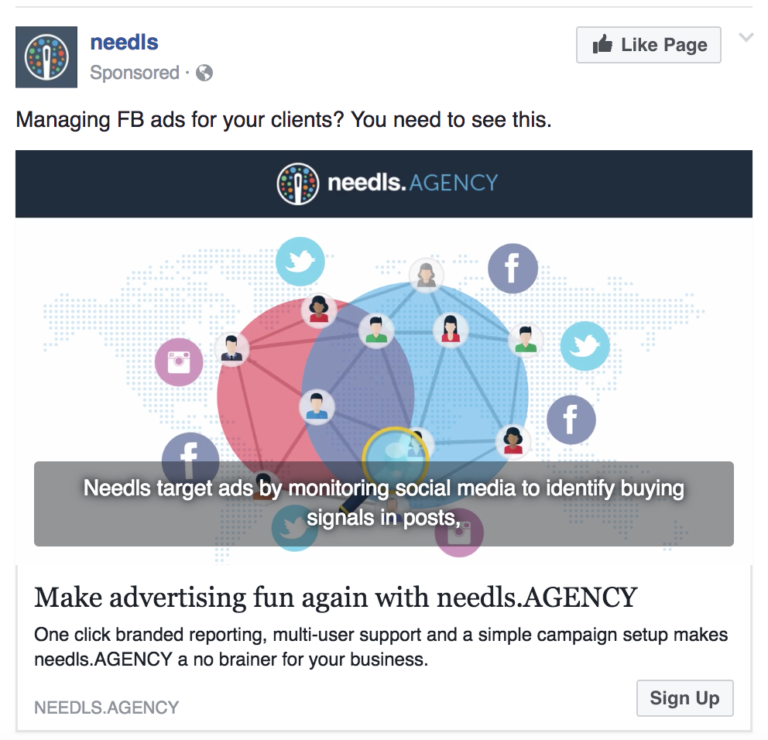
By default, our Optimization & Delivery setting are set to optimize for Leads and we’ll be charged by Impressions (when our ad is shown).
If you need some inspiration for ad copy and images, check out our post on How to Spy on Your Competitors’ Facebook Ads.
Click on the Ad Name to start creating your Ad. Make sure the correct Facebook Page is selected. If you have an Instagram account connected to your Business Manager account, you will be able to select it here. Otherwise, your Lead Ads will show up on Instagram as a sponsored ad on behalf of your Page, which is fine when you’re getting started.
Ad Setup: Here’s where you’ll need to have either a static image or a short video (under 15 seconds). Using a square or 1:1 ratio image or video will save you creating multiple formats for placements in Facebook & Instagram.
If you have a little bit of creative flare, then I recommend Canva for creating static Facebook ads for yourself. You can start with one of their square Instagram templates.
If you’d prefer a graphic design professional’s help, then I highly recommend 99designs.
Upload your image: Assuming you’ve created an image, click on the Add Image button then the Upload button. Find the image on your computer and upload it. Click Continue once it’s uploaded.
There have been volumes written on ad copy, so I won’t go too much into what makes good Facebook Lead ad copy.
Fill in your Primary Text, Headline and choose your Call to Action.
Use an appropriate call to action. As you can see in the image above, there are a number of options to choose from. In this Lead Ad example, I’m going to ask people for their Name and Email address before sending them to this very blog post. Yep, it can be as simple as that.
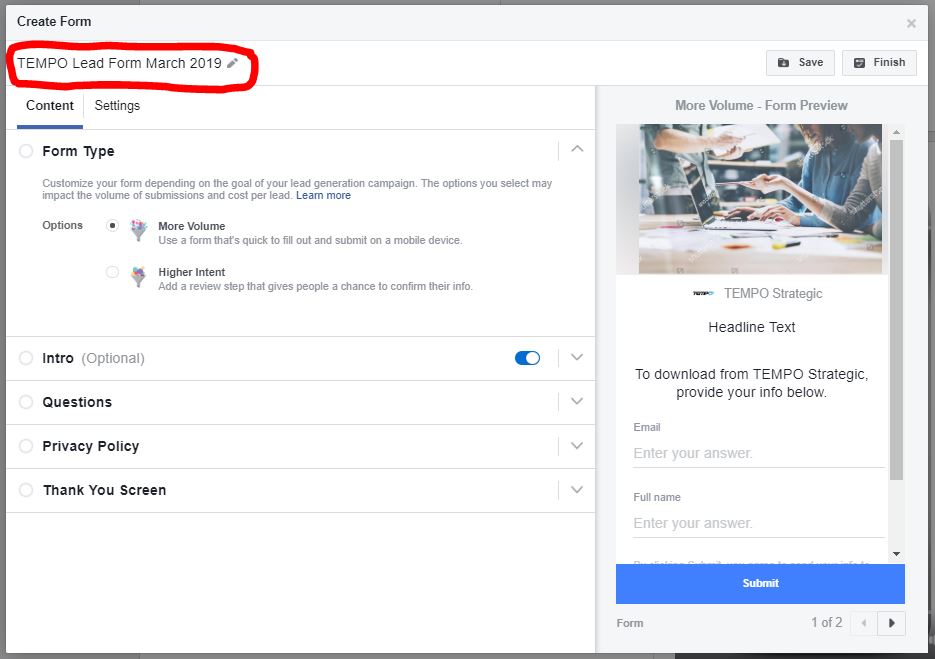
Time to create you lead form. This is the form people will see when they click on your ad. To get started, click the Create Lead Form button in the Instant Form section and name your form. This will make it easier to find later when you start creating multiple campaigns and forms.
Leave the More Volume default form type selected.
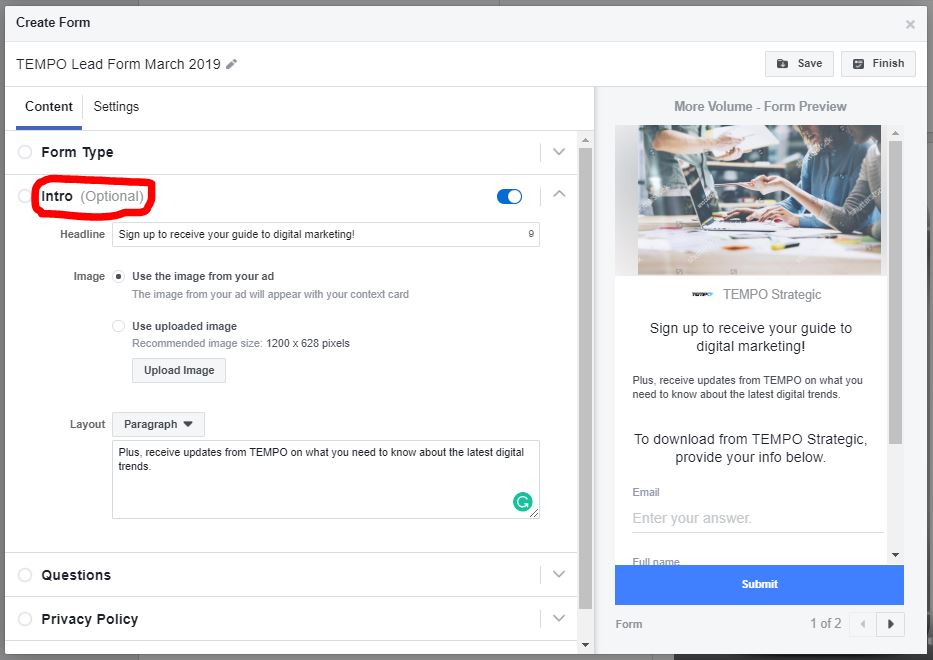
Fill in the Intro: Add a Headline and an introductory paragraph to reiterate what people should expect after they submit the form. By default, your form will use the image from your ad as the header image, but you can customise this image.
Add a headline that will appear above the form fields.
Customise your form questions: By default, your form will ask for the person’s full name and email address but there are a heap more questions you can ask to better qualify your leads as you can see in the image above.
Here’s a list of all the pre-filled fields you can use in your lead form.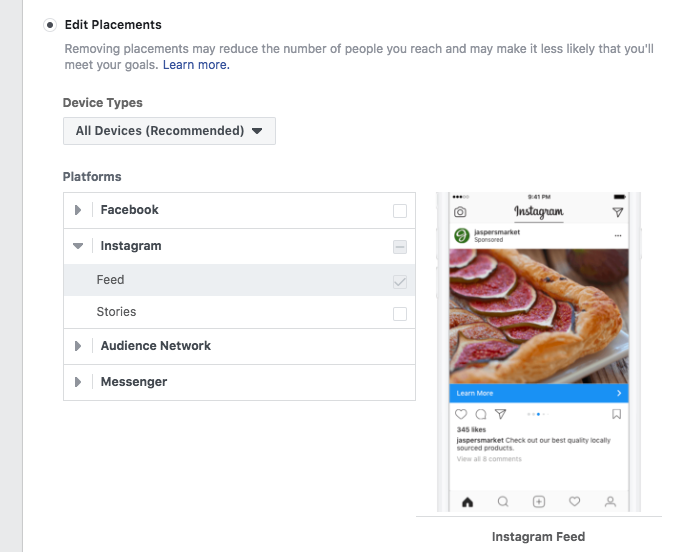
In the above example, I’ve asked for the person’s first name, email address and a response to a simple Yes/No question.
Link to your Privacy Policy: hopefully you have a privacy policy on your website. Add a link to it here. If you don’t have one and you’re running a WordPress website, there’s a good Privacy Policy generator here.
Customize your Thank You screen: this is what people will see after they’ve submitted their details. This could be as simple as “Thanks for sending us your details, we’ll be in touch shortly”, or as in this example, I’m asking people to click on the link to view the content.
Click the Finish Button to finish editing your form.
If you want more qualified leads and less volume, then check out how to use the Higher Intent Lead form option.
Click the Publish button at the bottom right of the screen to publish your Lead Ads campaign. 💥
💥
There are two ways to access your leads:
Make sure you regularly check on the performance of your campaign by viewing your Facebook ads manager reports. You want to keep an eye on your Cost Per Result which is your cost per lead generated.
Congratulations! You’ve launched your first Facebook Lead Ad campaign. 🥳
Access your leads faster with LeadSync.
Start your 14 day free trial today!
Need more help? Check out my free step by step Facebook lead ads video course on YouTube.
One of the ways to increase the number of sales is lead forms or Lead Ads. To get the most out of this tool, you must not only set up the form correctly, but also have time to connect the manager with a potential client as soon as he left a request. We'll show you how.
Reading time 11 minutes
You can go directly to the section of interest:
The user sees the lead form as a post in their feed. It looks like this:
In order for the form to break through the “banner blindness” and the user catches their eye on the ad, it must:
The lead form also needs a button that prompts the user to take the advertiser's desired action. For example: "Subscribe", "Register", "Get an offer", "Apply".
After the person presses the button, he proceeds to fill out the form. At the same time, the data that he indicated about himself on the social network, for example, e-mail, phone number, name, are filled in automatically. But, if necessary, they can be adjusted.

Advertisers appreciate many of the advantages of lead forms.
Advertisers also like the fact that the submitted lead form clearly shows the user's interest in the product or service. That is, it is a “warm” lead, which is much easier to work with.
This format also has disadvantages.

Learn more
To create a lead form, you need to log in to Facebook and go to the account of the page on behalf of which you plan to collect contacts, and then follow these steps.
After the lead form has been created and launched, data about it can be found in the Form Library.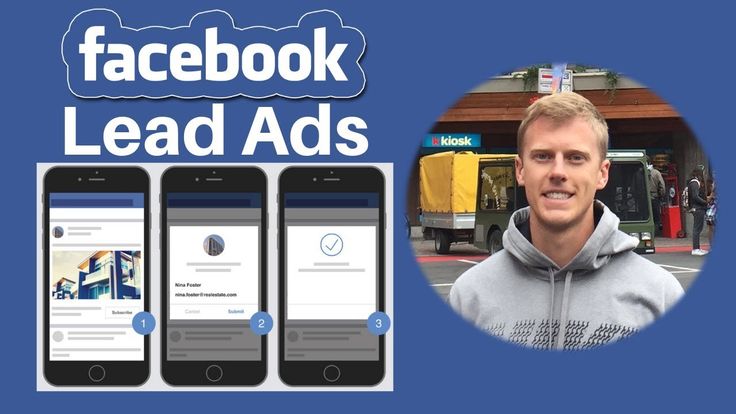 Lead information is stored here. It can be downloaded in CSV or XLS format. The sequence of actions is this.
To make your lead form work better, you can use these tips.

Even the best lead form will be useless if the user is not contacted quickly. This happens if managers did not track down a new application in time or they have a lot of incoming calls.
It turns out that the moment of the highest interest of the potential client is missed. And while a person is waiting for a call, he can easily browse the sites of competitors, and as a result, buy from them. Especially if the competitor's managers turn out to be more efficient and call the user faster.
Avoid this nasty scenario with just two tools:
To better understand how to work with spreadsheets, read the article " Basic tips for working with Google Spreadsheets ". It has tips to help you master basic formulas, create useful uploads, and work with data easily.
After creating the lead form, you need to set up automatic transfer of user data to Google Sheets. And then embed a special script into the document. After that, events develop like this.
Learn more
Step-by-step instructions on how to set up such a link can be found in the article “How to set up automatic callback for forms on any sites and social networks”. And this table looks like this:
Ringostat clients enhance the benefits of lead forms and increase their conversion due to such factors.
 If the manager correctly describes the benefits of your product or service and overcomes the objections of the client, then the transaction is likely to take place during the conversation.

Elena
Sergeeva, Targeted advertising specialistThe Facebook Ads lead generation form helps to collect contacts of potential customers — purchase requests, registrations for events, subscriptions to email newsletters, and so on. Lead form (Lead Ads) is an advertisement in the Facebook and Instagram feed, which contains fields to fill out. Creating a form won't take long. To verify this, see the instructions below.
Advantages of the lead generation form:

You can do it in Ads Manager or on a business page. Let's take a look at both methods.
From the Business Page menu, select Publishing Tools.
In the column on the left, find the "Lead Ad Forms" block and select "Form Library".
Facebook will redirect you to a special Instant Forms section in Facebook Business Suite. It allows you to manage Facebook and Instagram lead forms in one place: download leads, follow notifications, and create posts regardless of your account.
Click the Create Form button.
In the window that opens, select New Form.
Name the lead form. Only you can see the name, but it is important that it is simple and clear. This will help in the future to navigate within the advertising campaign.
Define the shape type:
 Allows you to quickly fill out a form from mobile devices. In this case, the system can substitute part of the data automatically from the user's account.
 The summary section is optional, but will help the user learn more about your company or project. Indicate the essence of the promotional offer in the title.
In the description, select whether the form is displayed as a list or as a paragraph. This is a required field in which you need to enter a description of your product, service or offer. Try to make it clear from the description what exactly you want from users.
In the "Questions" section, you determine what data you will collect.
Custom Questions helps you get valuable information about potential customers for your business.
Then create fields with the type of data you need - name, email, or phone, for example. Do not overdo it with the number of fields and remember that each additional field reduces the conversion.
The next section is "Privacy". It cannot be missed. You collect users' personal data during an advertising campaign with a lead form, so without a link to the privacy policy, it will not work.
At the final stage, add a title, description, calls to action, and a button to increase user engagement. Do not treat this step formally - well-thought-out phrases will help a potential client remember your ad better.
Now the content for the lead form is ready, you can go to the settings. Specify the desired language and allow or block the repost of your lead form.
The "Field Names" and "Tracking Options" sections are optional - these settings are relevant if you are working with the Facebook API.
If you have completed all the required sections, complete the lead form setup.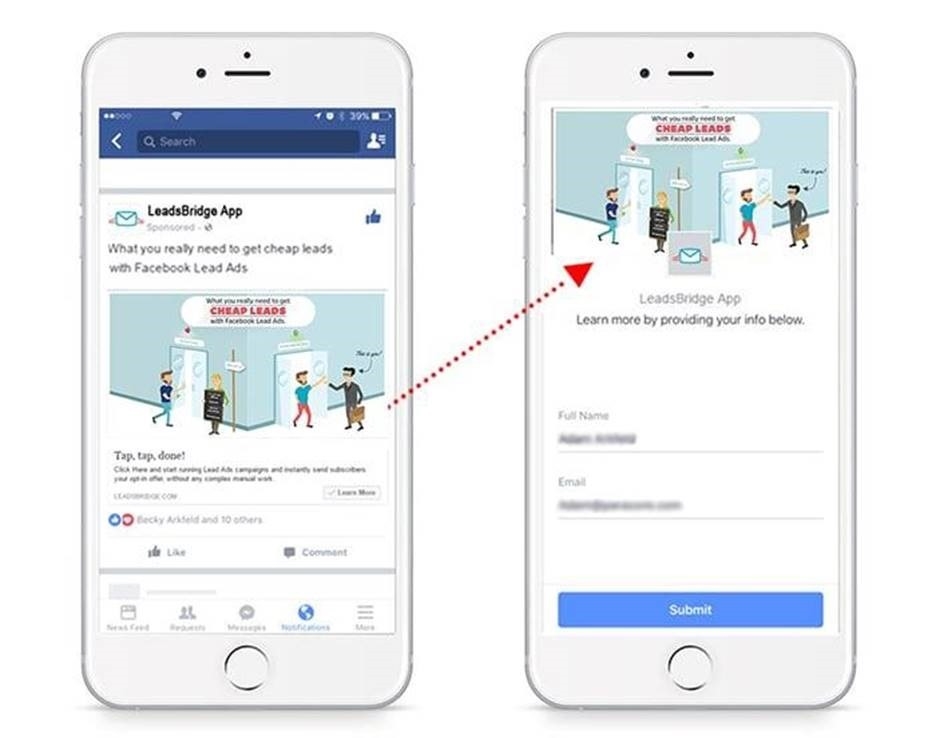 The finished version of the form at all 4 stages of interaction with the user can be seen in the preview to the right of the settings block. Make sure the lead generation form looks the way you want it to and click the "Publish" button.
If you plan to edit the lead form, select Save Draft. Once published, no changes can be made.
This is what Facebook lead ads might look like:
Go to Facebook Ads Manager.
At the campaign level, use the green Create button to select the Lead Generation objective, name the campaign, and click Continue.
The following steps are similar to setting up any Facebook Ads campaign. For more information, see our step-by-step instructions for running ads for Facebook and Instagram.
At the step of creating an ad, the "Instant Form" section will appear with the "Create Form" button.
Then you will be taken to the lead form settings similar to those specified in the first method - through the Facebook business page.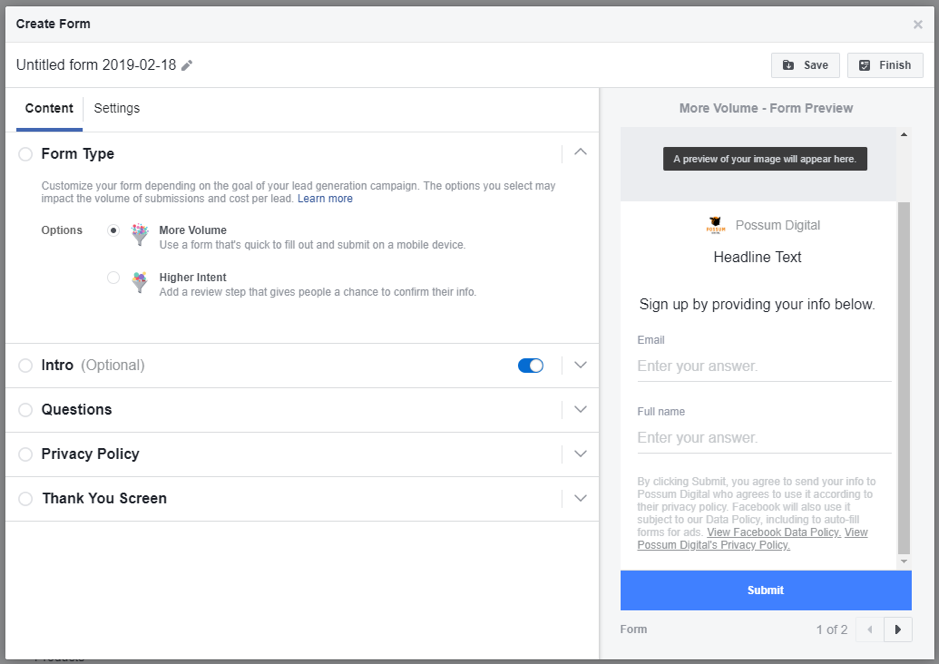
To store and process leads, they can be integrated into your CRM system.
Lead data can also be exported in CSV or XLS format from Ads Manager or a Facebook business page. Please note that lead data is stored on Facebook for 90 days, after which it cannot be downloaded.
1. In the menu of business page , go to "Publishing Tools" - "Form Library", and then select the lead form whose data you want to download, and click the "Download" button.
You can upload new leads received since the last download, or specify a range of dates. A screen will appear with the name of the form and the number of leads, after which you need to select the format - CSV or XLS.
2. In Ads Manager , go to the "Ads" tab, select the desired ad. Then, in the "Results" column, click "Facebook Leads" and select from the options: "Use Lead Center" (suitable if you do not use CRM), "Download New Leads", "Download by Date Range".