What is a Facebook Business Page?
How to create a Facebook Business Page in 7 steps
How to add an admin to a Facebook page
How to delete a Facebook Page
How to easily manage Facebook Pages
Facebook Business Page FAQs
With all the focus on new social networks like TikTok lately, the buzz around the first social platform to become popular with businesses, Facebook, has gone down. But with 2.91 billion monthly users — 79% of whom are active daily — you still need to be there.
Don’t worry: It’s easy and free to create a Facebook Business Page. Besides audience growth, your Facebook Page connects you to many opportunities, including linking an Instagram Shop and of course, running Facebook ads.
Keep reading to learn how to set up a Facebook Business Page the right way. Or, if you’re a visual learner, start with this video that explains the process in 10 minutes:
Bonus: Download a free guide that teaches you how to turn Facebook traffic into sales in four simple steps using Hootsuite.
A Facebook Business Page is a public profile on Facebook intended for businesses, organizations, and public figures to promote themselves.
Customers can follow (or “Like”) Facebook Business Pages to see posts, photos, and videos from — and connect with — their favorite brands, companies, and creators.
You need a Facebook Business Page to run Facebook ads, open a Facebook Shop, and use other Facebook Commerce and promotional tools.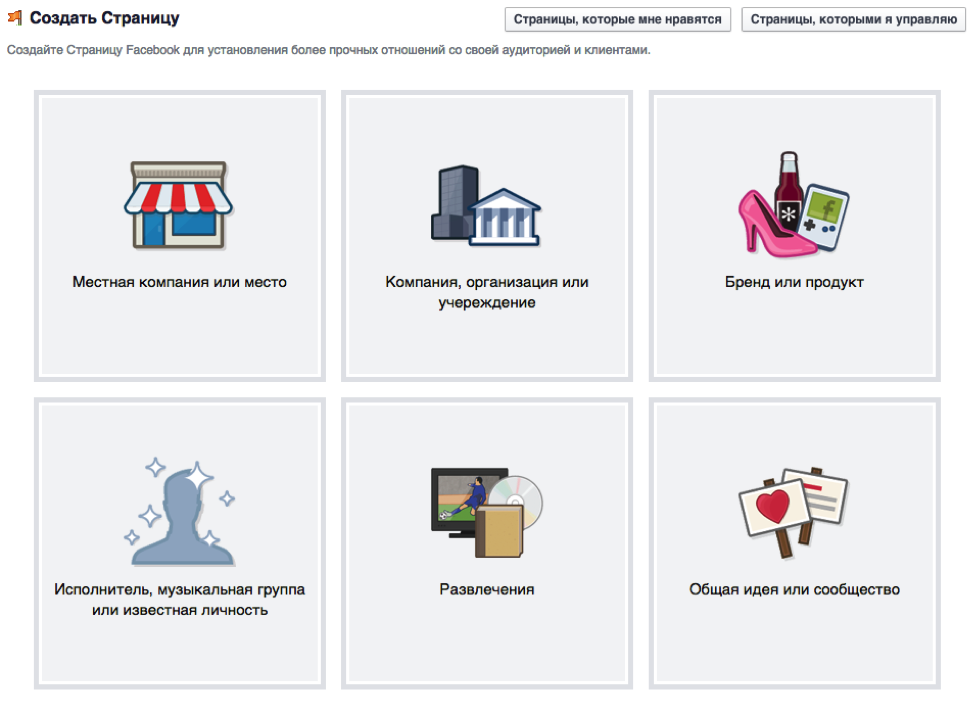
Facebook Business Pages aren’t the same as Facebook profiles or users. They’re assets managed by a personal account, known as the Page administrator. A Page can have more than one administrator; more on this later.
You can either use your personal Facebook account or create a new one with your work email address if you want to fully separate your personal and work lives. (Do you remember last year’s holiday party? If not, definitely separate your accounts.)
Log in to Facebook with your account, then create a Facebook Page. You can also click on the menu icon on the left, then click Page under the Create section.
Source: Facebook
Fill in your business information. You can add more business details later later, but you only need 3 things to create a Facebook Business Page:
 In most cases, your business name by itself is enough. If there is another popular Facebook Business Page or company with the same name as you, you may want to add a descriptor so people can find you easier, like “Michelle’s Restaurant” instead of just “Michelle’s.”
Then, tap Create Page.
Congrats, you made a Facebook Page! Now comes the fun stuff.
Follow the prompts to enter more details, like your business hours, website, phone number, and all that good stuff.
All these fields are optional, so if you don’t want to advertise your phone number or address, leave those blank.
Besides adding style to your Facebook Page, your profile and cover photos should feature recognizable branding so your customers know they’re in the right place.
Your profile pic should include your logo. Get creative: Add a background color to help it stand out.
Your cover photo can be something general about your business, or change it up to match current promotions or events.
Source: Facebook
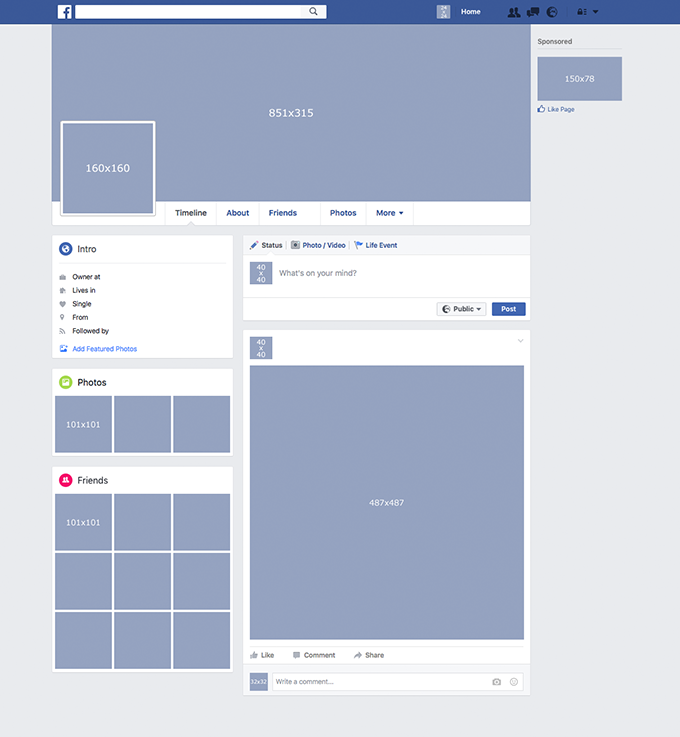
Social media image sizes occasionally change, but here’s what you need for 2023:
Grab our free Facebook Page cover photo templates to spiff up your new Page.
The action button at the top of your Page serves as your main call to action. You can link to your website, a special landing page or offer, or connect to business-specific services, such as online ordering for restaurants, and more.
For example, ours is “Sign Up,” which takes you to our Plans page.
Source: Facebook
Tap on Add Action Button.
Then choose what you want to promote: Link to a website or app, get people to contact you, or connect a specific action, like buying tickets or booking an appointment.
You could stop here and start posting content on your new Page, but for best results, take the time to do the following:
 And, if any customers are unhappy, ensure you’re reaching out to make it right. Turn reviews on under Settings -> Privacy -> Page and tagging.
Source: Facebook
 It’s a good mini-introduction to your Page and business.
Source: Facebook
Looking for more optimization tips? Try these lesser-known Facebook Page hacks.
People won’t start discovering your Facebook Page, or have a reason to follow it, until you post some great content.
Stuck for ideas? Here are 20+ social media post ideas and how to develop a content creation process.
Log in to Facebook, then switch to using Facebook as your Page. Click on your profile photo at the top right, then tap the circle icon to switch to the last Page you used, or See all profiles if you manage more than one Page.
From your Facebook Page, click on Professional dashboard in the left menu.
There are 5 types of access you can give:
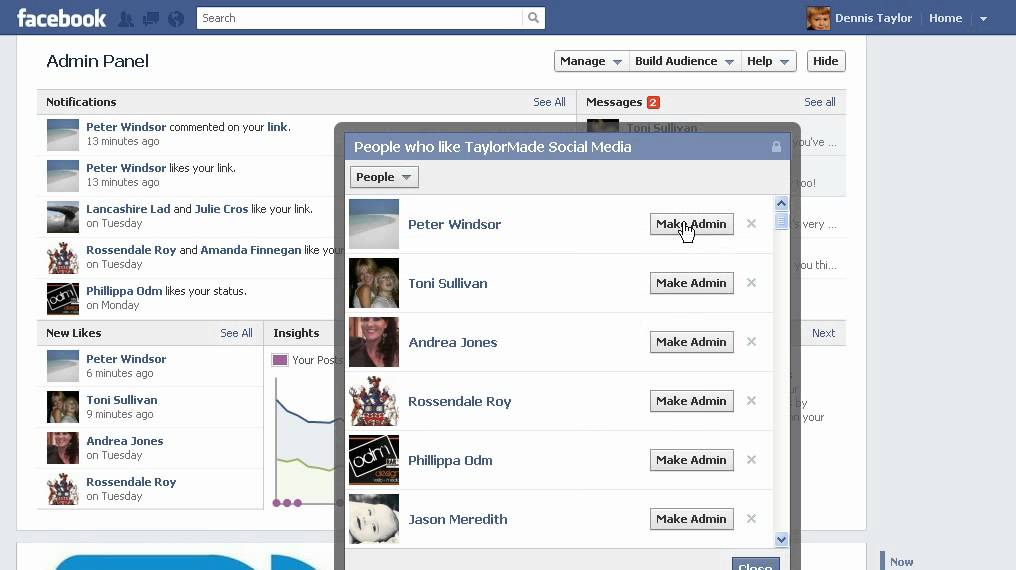
From your Page’s Professional dashboard, click Add New next to whichever kind of Page access you want to give. For example, to add a staff member to post content for you, you’d choose either the People option (for full access), or Task (for specific access).
You can search for them by name or enter an email address to invite them. Inviting by email is safer, so you don’t accidentally click the wrong “Mary Smith” Facebook profile and suddenly have your 70 year old aunt managing your Page.
They’ll be able to access your Page after clicking the email confirmation link.
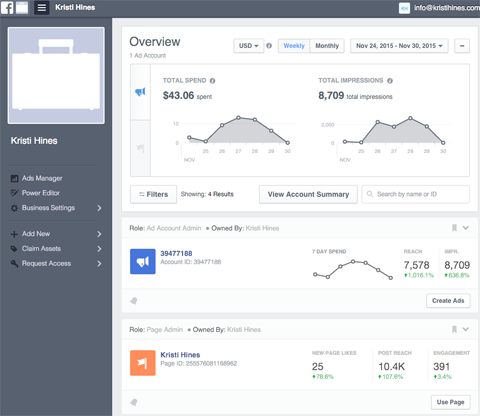
This adds a person to your entire Meta Business Suite account, not only your Facebook Page. This is helpful to give your staff access to all your Meta assets, including Facebook and Instagram profiles, analytics, ads account, and more.
Log in to Meta Business Suite and go to Settings, then click Add People.
You have to invite business partners by email address. Then, choose which roles you want this person to have.
On the next screen, choose what this person has access to. If you want them to only have access to your Facebook Page, check that.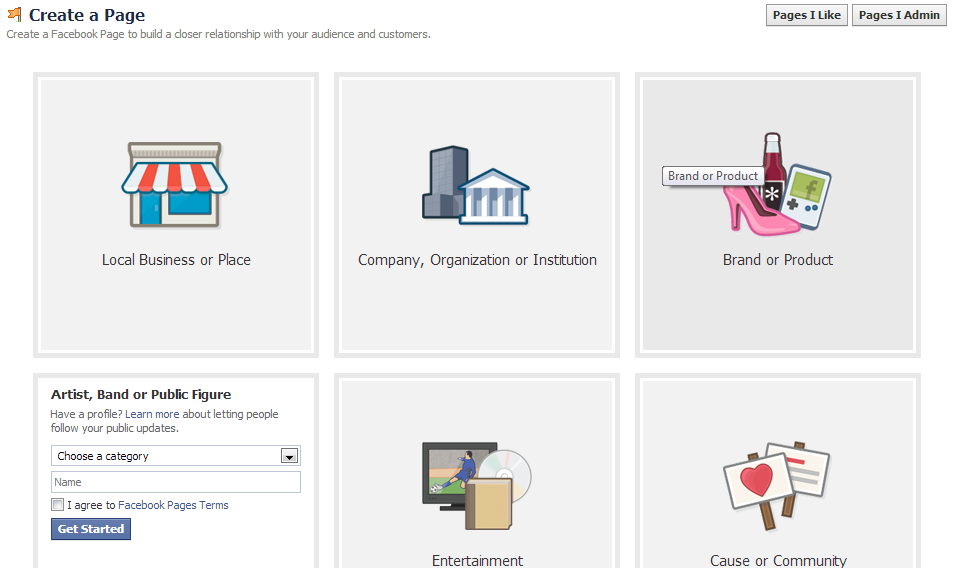
You’ll see a summary of who you’re assigning to what, and what they’ll be able to do. Click Send Request. After accepting the email invitation, they’ll be in your Meta Business Suite account.
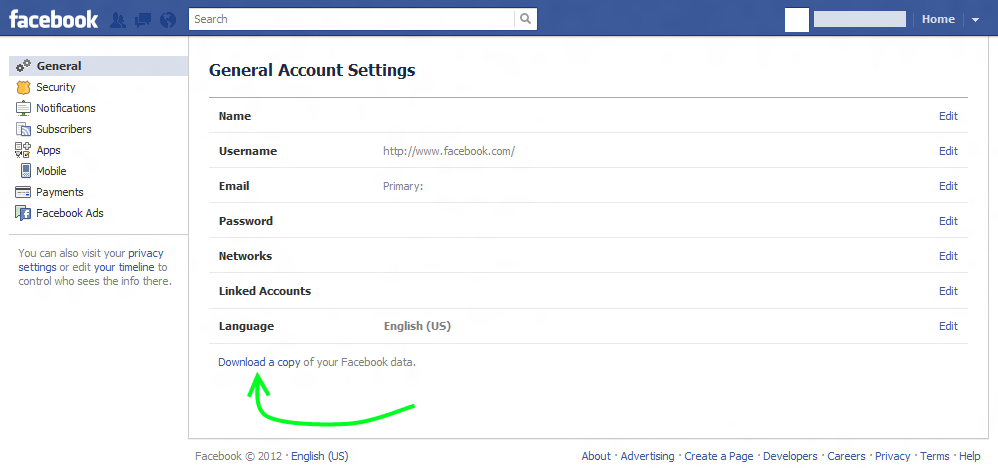
You can either temporarily deactivate your Page, or delete it, by clicking your profile photo in the top right corner, then going to Settings & privacy -> Settings -> Privacy -> Facebook Page information -> Deactivation and deletion.
I recommend this for most users. Whether you’re taking an extended break, or just want to hide from search results, temporary deactivation accomplishes the same goal — no one can find your Page — but it’s still reversible.
You’ll have to enter your Facebook password to proceed.
You also have to choose a reason for deactivating. The first option — “This is temporary. ” — comes with the ability to automatically reactivate your Page after a set time. This is helpful to really unwind during a vacation, for example. (Although a better practice would be to leave your Page up and simply delete Facebook from your phone for a week instead.)
Choose a reason and click Deactivate to finish. To reactivate it, follow the same steps as above to go to your Settings & privacy area and you’ll see an option to reactivate there.
I must stress: Don’t! Unless you’re going out of business, there aren’t many good reasons for permanently deleting your Facebook Page.
Alas, if your mind is set, choose Delete Page from Settings & privacy -> Settings -> Privacy -> Facebook Page information -> Deactivation and deletion.
Before deletion, download or transfer your data. There’s no way to get it back if you change your mind later (which is why you should deactivate instead of delete, friend).
Clicking Continue prompts you to enter your password then shows you this warning message. This is it! Clicking Continue here will delete your Page. (!!!)
Although unlike everyone who got a tramp stamp tattoo in 1999, Facebook gives you 30 days to change your mind and reactivate your Page.
Meta, owner of Facebook and Instagram, has two native solutions to manage one or multiple Facebook Pages: Meta Business Suite and Creator Studio.
You need Meta Business Suite to run ads, use Facebook Commerce, and connect your Facebook and Instagram business accounts.
Creator Studio allows Page managers to create and schedule content and view analytics, either on the web or via mobile app. It includes the ability to go Live on your Page or post across multiple Facebook Pages simultaneously.
There’s still a wayyy better way: Hootsuite.
Don’t leave your exposure up to chance. Schedule your Facebook Page posts — and all your other social media content — with Hootsuite. Save time by batch producing your content and stick to a consistent posting schedule.
Okay, but when should you post? The best time to post on Facebook is 8 a.m. to noon on Tuesdays and Thursdays.
Done, right? Nope.
Besides convenience, scheduling your posts with Hootsuite grows your audience faster thanks to the Best Time to Publish feature. It analyzes the last 30 days of engagement for each platform to automatically schedule content for your personal best time to post. It’s like having a super smart algorithm-busting robot in your back pocket.
Try for free
With Hootsuite, you can easily handle Facebook, Instagram, TikTok, Twitter, LinkedIn, YouTube, and Pinterest from one dashboard — and view all of your published and planned content in one clean content calendar.
Efficiently handle direct messages from all platforms in Hootsuite Inbox, including tools to eliminate double work, save time with reply templates, and ensure customer messages aren’t missed.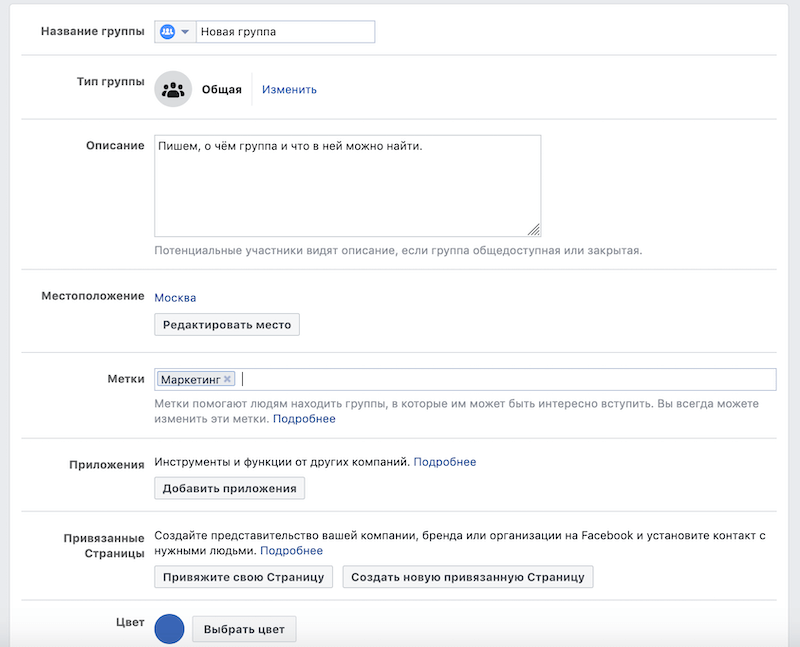
Your staff can reply to messages and comments everywhere from inside their Hootsuite dashboard.
Forget spreadsheets and a bunch of numbers without context. Hootsuite Analytics gives your team the information they need to determine if a campaign is working while it’s still happening — and if it’s not, enough notice to salvage the damage.
See all the basics like reach, impressions, and followers along with advanced analytics like when your audience is online, individual post performance vs. your average performance, and more.
View stats for all your social profiles together so you can see if everything’s growing at the same pace, or if you need a strategic pivot.
Start free 30-day trial
Updated daily, your Social Score is a personalized comparison of your performance — including follower growth, engagement, clicks, activity, and more — across all your social media to other businesses, so you always know how your marketing stacks up.
Engagement low? Start planning content that gets your audience talking. Plus, receive personalized tips to improve your social presence even more.
Streams are customizable data feeds to show you what matters most all on one page. For example, you can see recently published posts from each platform so you can quickly jump in and reply to comments to drive engagement.
Or, set up Streams to monitor specific keywords or competitors, and run advanced searches such as filtering by location. Streams can boost your engagement as well as tell you what people are saying about your company online, in real time.
Facebook Page and Facebook Business Page are two names for the same thing: a Facebook profile for your business.
Yes, creating a Facebook Business Page is completely free. Paid services, such as Facebook advertising and boosting posts, are optional.
Yes. Your personal Facebook account and Facebook Business Page aren’t connected on Facebook, and won’t be publicly listed on each other. You need a personal account to create and manage a Facebook Business Page, but you could always create a separate personal profile with your work email address if desired.
The best Facebook Page cover photo size is 851px x 315px in 2023. Platforms change often, so check our social media image size guide for up-to-date information.
Manage and grow your Facebook Page alongside all your social media profiles with Hootsuite. Plan and schedule content, engage your audience, measure and improve performance, boost posts, and more — all from one dashboard. Try it free today.
Get Started
Grow your Facebook presence faster with Hootsuite. Schedule all your social posts and track their performance in one dashboard.
Free 30-Day Trial
With all the options at your fingertips, setting up a Facebook business page can feel like prepping a rocket ship headed to outer space.
But if you want to do business online, having a presence on Facebook is a good idea.
With 2.94 billion monthly users and 1.96 billion people logging on daily, Facebook is by far the most popular social network.
Don’t waste another day poking around Facebook, trying to figure it all out. This article will walk you through everything you need to know to get your Facebook business page up and running like a social media marketing pro.
But before we dive in, let’s go through some of the commonly asked questions about Facebook business pages.
Start selling online now with Shopify
Start your free trial
What is a Facebook business page?A Facebook business page is where you manage your brand’s presence on the largest social network in the world. Your page allows you to connect with your customers and nurture prospects by:
The image below shows Shopify’s Facebook business page:
The page also serves as your Facebook business address. It’s what you share with prospective clients to help them see what products or services you offer.
Can I use a personal Facebook account for my business?There are many well-intentioned entrepreneurs out there using personal Facebook profiles for their brands, instead of an actual Facebook business page.
This is a bad idea.
If you create a personal profile, you’ll miss out on a whole suite of content creation tools, analytics, and paid promotional opportunities that come with a Facebook business page. What’s more, users would need to send you a friend request to engage with your brand.
And you don’t want to make it more difficult for your customers to engage with you on social media.
So harness the power of Facebook business pages.
How much does a Facebook business page cost?Just like Facebook profiles and groups, you can set up and use a Facebook business page for free—regardless of how many followers or likes you have.
Even if you spend money on Facebook Ads, there’s still no charge for the organic aspects of your Facebook business page.
What’s more, Facebook doesn’t even charge a fee to add a storefront to your page!
So why does a Facebook business page cost nothing? Well, it doesn’t.
In exchange for using the platform and engaging with your potential customers, you help Facebook acquire even more attention from your audience.
Facebook then sells this attention to advertisers in the form of Facebook Ads.
How to create a Facebook business page in 5 stepsYou can set up your Facebook business page by taking the following steps:
1. Create your page
To get started, click this link.
Facebook will ask you to enter basic business details:
Do your best to pick the most appropriate category for your business. But don’t worry if you change your mind, as you can always switch categories in the future.
Next up, you need to provide the following information:
After you’ve filled out the details, click on Next to get to the next step of your page setup. Optionally, you can skip this step for now and add those details later.
2. Add a profile photoNext, Facebook will prompt you to upload a profile picture.
Most businesses use their logo as a profile picture, as Shopify does on its Facebook page:
If you don’t have a great logo design for your business, check out Shopify’s free tool, Hatchful. It’ll help you create a professional-looking logo in minutes.
What’s more, Hatchful will create an entire brand package from your logo design. This includes images perfectly formatted for all of the most popular social media platforms.
Bear in mind that your profile picture is often shown as a circle throughout the platform.
So make sure there are no vital elements on the fringes of your image and that it looks great when displayed as a circle or a square.
Finally, the ideal size of Facebook profile photos is 180 x 180 pixels.
3. Add a cover photoNow it’s time to add your cover photo.
Your Facebook cover photo is often the first thing visitors notice. So it’s best to choose an image or video that immediately conveys your unique value proposition and brand personality.
Here’s Oberlo’s Facebook cover image:
The image delivers a unique value proposition, and the design conveys its brand’s personality.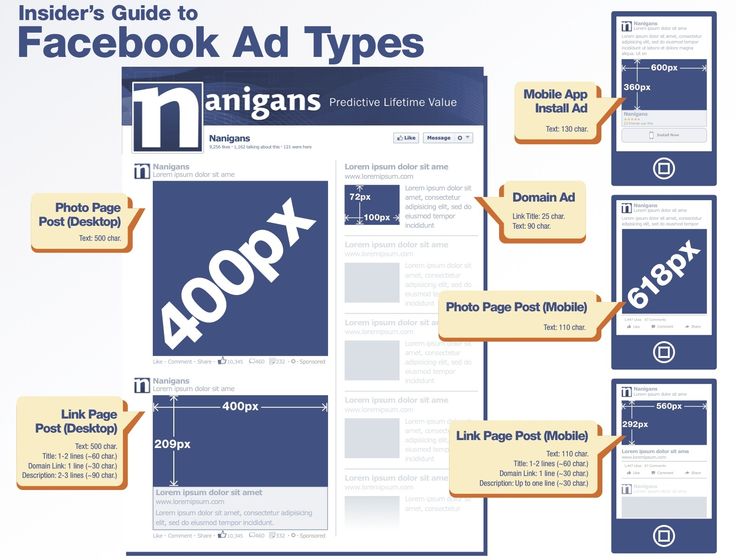
Notably, cover art displays at 820 x 312 pixels on computers, and 640 x 360 pixels on mobile devices.
Videos must be between 20 and 90 seconds long and have a maximum 1080 pixel resolution. You can upload them in .mov or mp4 format.
Below are some Facebook Business page tips to keep in mind when uploading either:
Keep it fun but on brand. It’s fine to have fun with your Facebook cover image or video, but don’t get too unprofessional as it may distract users from the unique value proposition of your company.
Center the text. Since you’ll be cropping and dragging your Facebook cover to the correct size, try to place text or objects in the center, so they are visible.
Make videos pleasant for the auto loop. Remember that Facebook cover videos play on a loop. Once they end, they automatically play over if the viewer is still browsing your Facebook page. Make sure whatever content you upload is pleasing to see when played over and over.![]()
Facebook also lets you include an action button at the top of your page. You can use it to direct visitors toward the action you want them to take, such as calling your business, viewing your store, or even sending a message.
Select the most relevant option and click Next > Save.
5. Connect WhatsApp (optional)You also get options to connect WhatsApp and invite friends to like your new Facebook business page.
You can complete these steps now or later. Click Done to proceed.
Facebook will now give you suggestions on how you can improve your page health. Complete the recommended actions to improve the foundation of your Facebook business page.
Learn the key aspects of your Facebook business pageCongratulations, you’re now the proud owner of a Facebook business page!
At the left of your page, you’ll see links to the different page management sections:
Have a quick look to familiarize yourself with each of them, and then come back to your page.
And at the top-right of the page, you’ll see links to Facebook’s Help section and your page settings.
View your Facebook business page settingsNow that you’re familiar with your new page, let’s take a look at the settings.
Facebook gives you a lot of options:
But thankfully, these settings are all fairly straightforward, and you can leave most of them as they are.
For now, have a read through the settings and change anything that seems particularly relevant to your business.
For example, if you sell children’s toys, you may want to turn on the profanity filter. Or, if you have an international target audience, be sure to enable the ability to write posts in multiple languages.
Next, input your business information in the About section.
Make sure to include your mission statement as well as links to your website and other social media profiles in this section.
Add your story
This is showcased prominently on your Facebook page in the right-hand sidebar.
To edit your story from the About tab, just click “Tell people about your business.”
Facebook allows you to include three elements:
Most brands will simply copy and paste their website’s About Us page to this section. To learn more about creating a killer About Us page, watch the video below:
Once you’ve finished creating your Story hit Save, and don’t forget to publish it when you’re ready. It’s easy to make edits in the future.
Create your first post and pin it to your pageFacebook allows you to pin one post to the top of your page so that whenever users view your page, it’s always the first post they see.
Facebook provides plenty of pinned post options.
Use this opportunity to promote your current offer or a key value proposition.
Once you’ve created your post, click the three dots indicating the drop-down menu, and click “Pin to top of page.”
You can check that it’s worked by looking for the blue pin icon.
Add photos/videos and reelsBefore you begin promoting your business page, it’s best to upload some content for new viewers to check out.
To add photos or videos, simply click the Photos/Videos tab, and then click Post.
And to add a reel, just click the Videos or Reels tab and then click Add Video.
Review your business page as a visitorYou’re nearly finished setting up your Facebook business page! But before sharing your page, it’s a good idea to see how it appears to visitors.
Thankfully, Facebook lets you view your page as a visitor without having to log out.
To do this, click the three dots indicating the drop-down menu, and then click View As.
Be sure to do this from time to time to check that you’re happy with how your page appears.
Once your friends have helped you get your page off to a good start, you can link to your Facebook business page from your website and other profiles and begin promoting it!
Bonus: Familiarize yourself with Facebook page insightsFinally, Facebook tracks your page interactions to provide you with a suite of useful analytics.
You can find this data by clicking Insights at the top of your Facebook business page.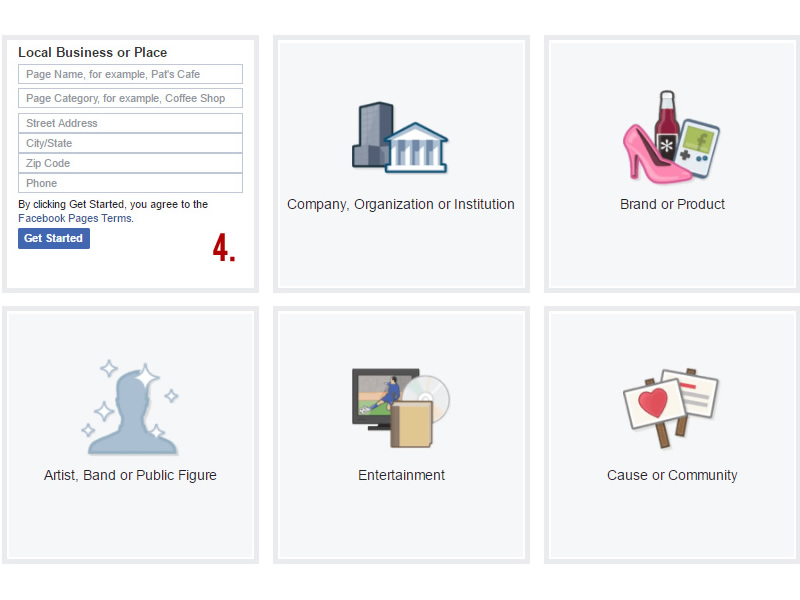
It’ll be blank until your page accumulates interactions, but after a while, it will be full of useful information!
While having all this data at your fingertips is nice, it’s only beneficial if you understand which Facebook insights matter the most to your business. Below are three key metrics you should track and improve upon.
 A low number indicates the need for new posts that entice audiences to follow your brand on social media channels.
Start selling online now with Shopify
Start your free trial
ConclusionFacebook is the largest social network in the world—by far. So if you want to expand your business online, it’s well worth taking the time to set up a Facebook business page.
This marketing tool has a lot of moving parts, but for best results, be sure to configure your page correctly.
And remember, before you start promoting your Facebook business page to customers and prospects, it’s imperative to have plenty of content ready and waiting for them to enjoy.
Do you have any questions about Facebook business pages? Let us know in the comments below!
Step 1. You need to go to the main page by clicking the Facebook logo. Please note that Facebook has groups and pages. Groups are more suitable for thematic communities, where the content is created by the users themselves. If you want users to create content themselves in the same community, choose a group. If you want to create content yourself, you will have a page for your company or your personal page to advertise you or your company, then you need a page.
Step 2. Open this section, here we have options - you can see the pages that you manage, and you can also create a new page. Go to the page section, there is an item "create a new page".
Step 3. Click "Create a new Page". You need to come up with a name. It should be short, concise, preferably optimized for search, contain key queries. If you have a regional community, you may also use the name of the city.
Step 4. Next, Facebook prompts you to select a category. There is a drop-down list if you click on the categories. Then you write a short description in two or three sentences, what kind of company you have, what kind of page.
Step 5. Click "Create Page".
Step 6. After Facebook says that the page has been created, you can either just save it or continue with the design. You can add a profile photo.
Cover and avatar parameters are easy to find on the Internet, the size of the top header changes, so just make a widescreen image in HD quality, at least 1900 pixels.
Step 7. So, the page is created. Then you can: add a button, a link to the site, if it exists, or a link to messages so that a person can write to you.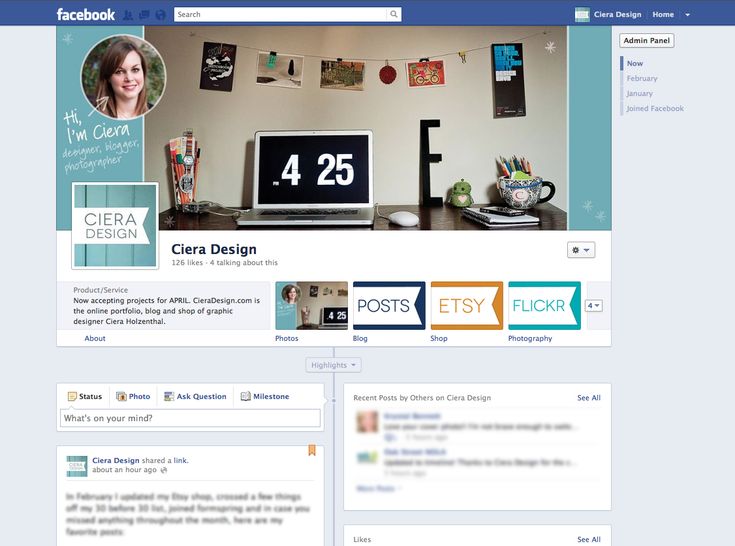
The default settings are pretty good. But there are some points to which you need to pay attention.
An important setting is the prohibition of user publications. You don't want someone to write something on your wall. Therefore, prohibit other users from writing on your page. This doesn't mean they won't be able to comment, but they won't be able to add a post to your feed. We also recommend that you turn on the obscene language filter.
If you will be writing posts in different languages, there is a special feature that you can enable, it is disabled by default.
You can enable a greeting and write a welcome text that will automatically be sent when the user wants to write a message.
You need to enter a username - this is the URL of your page. It is important that you have one nickname on all social networks and sites so that people can easily and quickly remember your corporate hashtag and your nickname.
Next, you need to provide contact information. If necessary, indicate the phone number, e-mail, website. If you have a regional business, be sure to include the address. Write down the geolocation, check that Facebook correctly shows and reads the desired house. You can set the opening hours.
The next step is to set up sections - active and inactive. There are a lot of them, customize the ones you need and leave what you don't need.
 But most of the time people don't see it and don't come here. They use the main tape.
 An important point: these sections can be dragged and moved. If you want the block with the latest videos to be at the very top, you can move it to the very top. Or vice versa: if you will not have videos, or they will be very rare, you can move this section to the very bottom.
You can set various notifications to be sent to you by SMS, email, messages, for example, when someone likes, subscribes or writes a comment.
Social or political advertising related to targeting. This feature is for political ads and things related to politics - in terms of ad safety. If you don't, ignore this section.
If you have several administrators or will have an editor - all this can be configured in the access section. Here you write the username or email address to which the Facebook account is registered, you can assign its role:
Access to analytics and advertising account: in this section you can see the current administrators, if necessary, you can add or remove someone.
In this section you can connect your Instagram account. Instagram has regular user accounts and business accounts that have the ability to create ads, have analytics and statistics. You can switch to a business account from Facebook. If you haven't done so yet, you have a regular Instagram account, here you can link it. You will be able to create ads, set up targeting, view statistics.
Notifications will also be shown here if you write to Facebook technical support.
Then you can add different photo albums - from events, thematic, group. Create a new album, come up with a title, description and upload photos. This is convenient when you need to show a lot of different media content. The same with video.
You can also create playlists. Let's say you have themed videos with different headings - organize them using playlists.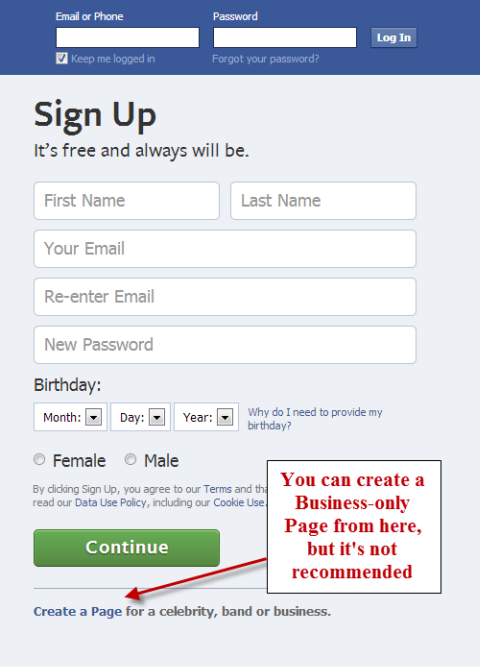
When publishing, you can upload photos and videos, add geolocation, YouTube videos. When you paste a link from YouTube, Facebook automatically converts it into a video format that can be played and watched directly from Facebook.
A business page represents your company on Facebook. On it, potential customers can communicate with the brand, find contacts, view a list of services or reviews of other users. And most importantly, it is an opportunity for advertisers to launch campaigns on Instagram and Facebook. We share step-by-step instructions on how to create a page for business on Facebook.
For a business page, you need a personal Facebook account. If you are already registered, log in to your profile and click the plus in the upper right corner, and then select the "Page" tab.
In the window that appears, fill in the information about the company: name, category and description.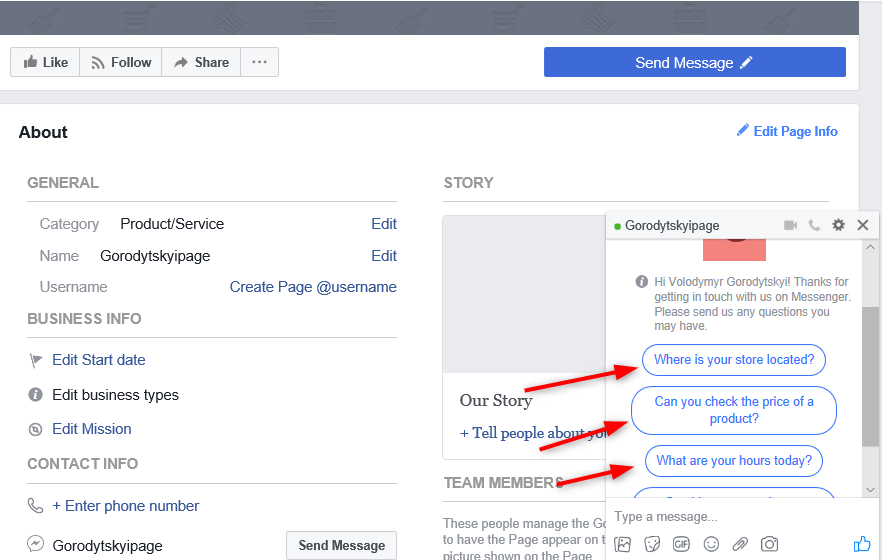 In the preview on the right, you can see what your page will look like.
What can not be used in the title of the page:
Add a short company description. It will be displayed in search results, so it is important to indicate how the company will be useful to customers. The more fields you fill out, the more information users will receive. This will increase their loyalty to your product.
Save the page, it can now be found in the "Pages" tab in the right menu of your personal profile.
What should be on the page:
Let's take a closer look.
Cover pages tend to get more hits and likes.
If you skipped this step when creating the page, you can add a cover in edit mode. Click on the "Change" button and select one of the options. If there is a logo or text on the cover, then it is better to upload the file in PNG format so that the quality does not deteriorate (photo upload rules).
Your profile photo will appear in your posts and comments. To download it, click on the camera icon and select "Edit profile photo".
@username is the URL of your page. If you have a brand, then just enter its name in Latin. If your page title contains key characteristics, then you do not need to write them. The shorter the better. The username is written in Latin and may contain numbers. Maximum 50 characters.
If the name is free, a green checkmark will appear.
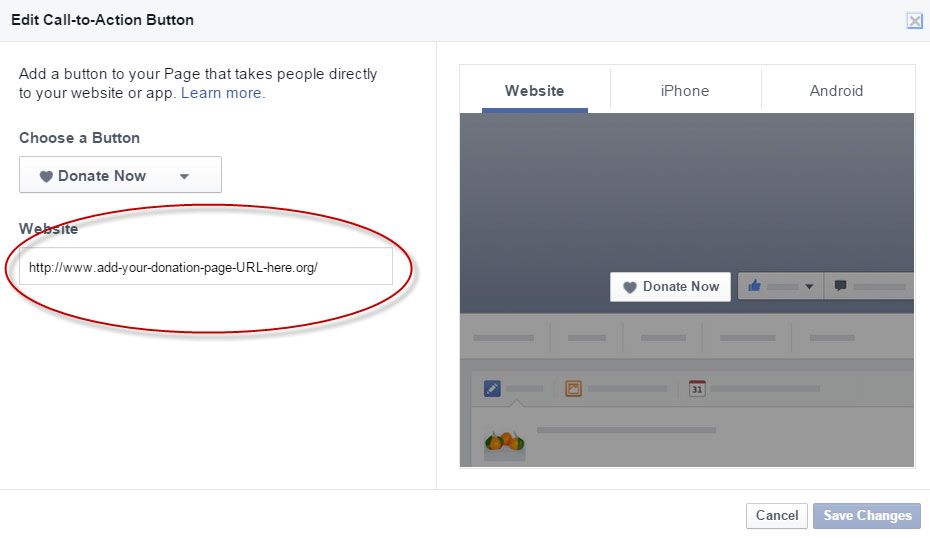
Add a button to encourage users to take a targeted action. It can be changed later.
Select the desired target action:
In the next step, specify a link to the site or form that users will go to when they click the button.
To do this, select "Edit" in the left menu of the page management. In this tab, you can also change the description and categories, add a work schedule.