Home » Misc » How to connect my personal and business facebook pages
How to connect my personal and business facebook pages
How to View and Link Your Personal and Business Facebook Profiles
By: Amy Porterfield and Phyllis Khare and Andrea Vahl and
Updated: 02-03-2022
From The Book: Facebook Marketing For Dummies
Facebook Marketing For Dummies
Explore Book Buy On Amazon
When you have a Facebook business page, you have two separate profiles with Facebook: your personal profile and your business page profile. Each profile allows you to view Facebook, post status updates, and comment on other posts. But depending on which profile you’re using, you show up as either your personal profile (you) or your business page profile.
In addition, each profile has its own news feed:
Switch your profile view
Start by changing your profile view from personal profile to page profile. To do that, follow these steps:
Log in to Facebook as you normally do.
Click the Account drop-down arrow in the top-right corner of the page.
From the drop-down menu, choose the business page link that you want to use.
This menu is where you toggle among your personal and page profiles. If you’re an Admin of several pages, you need to select the correct page.
After you click the preferred page link, you’re taken directly to that page. Now you’re viewing your business page “as” your page, not as your personal account with admin privileges for the page. This point is an important one to understand, and you may need to switch between your personal profile and your page profile to see the differences.
When you change over to working as your page, you should see your page’s Admin panel expanded to include these sections: Notifications, Messages, New Likes, Insights, and Page Tips.
Your business page news feed
We’re sure that you’re used to seeing your personal account news feed. Well, a business page can have a news feed, too! Your page profile news feed is based solely on the pages you’ve liked as your page. To see that news feed, click the link in the top-right of the page called Home.
This feed functions just the same as your personal profile news feed, except that it’s filled with posts from other Facebook pages that you have liked. If you haven’t liked any pages yet as your page, you won’t have anything in this news feed. You can’t like a personal account as a page, so this feed shows only page updates.
To switch back to your personal profile, follow these steps:
Click the Account link in the top-right corner of the page.
From the drop-down menu, choose Use Facebook as your personal account name.
This menu is where you toggle your personal and page profiles.
There’s one more little view that you need to understand. When you’re on Facebook as yourself, and you go to your page, you see a notification bar at the top of the page. Notice the word Voice and the link to change to yourself.
But wait! You might say, “But I am myself!” This Voice notification and link replace what was previously called Posting Preference and was part of the editing dashboard. Facebook pulled it out to make it very obvious “who” you are while you’re on your page: your personal account or your page.
Tips for switching between personal and business pages
Now that you’ve had a chance to see your profile options and are comfortable switching between them, here are a few tips:
If you’re viewing Facebook with your page profile, and you go to another business page for which you’re an Admin, you won’t be able to do any Admin stuff (editing, posting as that page, and so on) until you switch back to your personal profile.
You can’t post as your page on anyone’s personal Facebook profile, but you can post as your page on another page.
Try not to be too spammy by posting as your page all the time. Yes, this option is a great way to promote your page, but remember that Facebook is a social network, not a place to go dropping your business name everywhere!
How to link to your profiles
If your Facebook business page is a service that you offer, go back to your personal Facebook profile, and add a little bit to your About tab about your new page’s location. If your business is something that you want to keep completely separate from your personal profile on Facebook, skip these steps.
To link to your business page from your personal profile, follow these steps:
Click your name in the top right corner of any page on Facebook.
This step takes you to your personal timeline.
Find the About link below your picture, and click it.
This brings you to an interface in which you can edit all the bits and pieces of your personal account.
Click the Work and Education Edit button.
You can use the Work and Education section to add your new page address.
Type the name of your new business page.
When you see the page come up in the suggestions, click it to add it to your Work section.
Fill in your position and any other important information (address and so on).
Click the Add Job button.
Click the Done Editing button.
Make sure that the viewing option is set to Public so that people will be able to see your page linked and be able to click through to it. You can change the icon by clicking the drop-down arrow while you’re in Editing view and selecting the world icon (public).
Another creative idea is to put your business page URL on your personal profile’s cover photo. You have to do a little photo editing, but the result will help move people over to your page. Or you can put your website address on the image.
About This Article
This article is from the book:
Facebook Marketing For Dummies ,
About the book authors:
Stephanie Diamond is a marketing thought leader with 20+ years of experience building profits for both small business and multibillion dollar corporations. She is the founder of Digital Media Works, Inc. John Haydon owns Inbound Zombie, a consultancy that provides nonprofits with strategic training about Facebook.
This article can be found in the category:
Marketing ,
How to Create a Facebook Business Page (and Grow It) in 2023
What is a Facebook Business Page?
How to create a Facebook Business Page in 7 steps
How to add an admin to a Facebook page
How to delete a Facebook Page
How to easily manage Facebook Pages
Facebook Business Page FAQs
With all the focus on new social networks like TikTok lately, the buzz around the first social platform to become popular with businesses, Facebook, has gone down. But with 2.91 billion monthly users — 79% of whom are active daily — you still need to be there.
Don’t worry: It’s easy and free to create a Facebook Business Page. Besides audience growth, your Facebook Page connects you to many opportunities, including linking an Instagram Shop and of course, running Facebook ads.
Keep reading to learn how to set up a Facebook Business Page the right way. Or, if you’re a visual learner, start with this video that explains the process in 10 minutes:
Bonus: Download a free guide that teaches you how to turn Facebook traffic into sales in four simple steps using Hootsuite.
What is a Facebook Business Page?
A Facebook Business Page is a public profile on Facebook intended for businesses, organizations, and public figures to promote themselves.
Customers can follow (or “Like”) Facebook Business Pages to see posts, photos, and videos from — and connect with — their favorite brands, companies, and creators.
You need a Facebook Business Page to run Facebook ads, open a Facebook Shop, and use other Facebook Commerce and promotional tools.
How to create a Facebook Business Page in 7 steps
Step 1: Choose or create a personal Facebook account
Facebook Business Pages aren’t the same as Facebook profiles or users. They’re assets managed by a personal account, known as the Page administrator. A Page can have more than one administrator; more on this later.
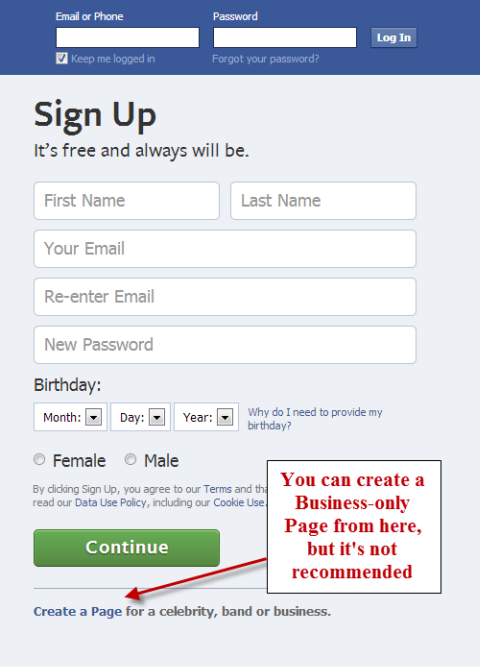
You can either use your personal Facebook account or create a new one with your work email address if you want to fully separate your personal and work lives. (Do you remember last year’s holiday party? If not, definitely separate your accounts.)
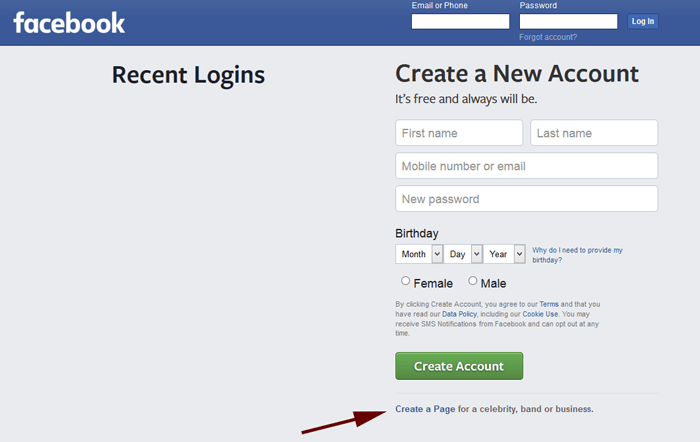
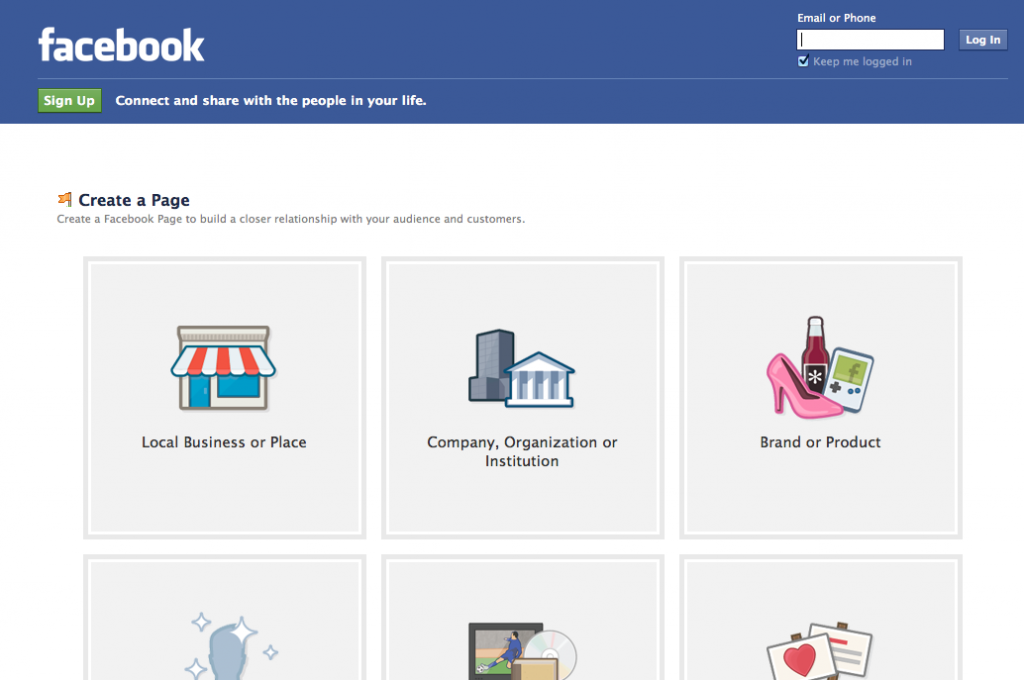
Log in to Facebook with your account, then create a Facebook Page. You can also click on the menu icon on the left, then click Page under the Create section.
Source: Facebook
Step 2: Enter your basic information
Fill in your business information. You can add more business details later later, but you only need 3 things to create a Facebook Business Page:
Name: This is the public name and title of your Page. In most cases, your business name by itself is enough. If there is another popular Facebook Business Page or company with the same name as you, you may want to add a descriptor so people can find you easier, like “Michelle’s Restaurant” instead of just “Michelle’s.”
Category: Start typing a word to describe your business and Facebook will suggest options. Choose what fits the best.
Description/Bio: Your elevator pitch. Write a one or two sentence summary of your business.
Then, tap Create Page.
Congrats, you made a Facebook Page! Now comes the fun stuff.
Step 3: Complete your Facebook Business Page info
Follow the prompts to enter more details, like your business hours, website, phone number, and all that good stuff.
All these fields are optional, so if you don’t want to advertise your phone number or address, leave those blank.
Step 4: Add profile and cover photos
Besides adding style to your Facebook Page, your profile and cover photos should feature recognizable branding so your customers know they’re in the right place.
Your profile pic should include your logo. Get creative: Add a background color to help it stand out.
Your cover photo can be something general about your business, or change it up to match current promotions or events.
Source: Facebook
Social media image sizes occasionally change, but here’s what you need for 2023:
Profile picture: Square format, at least 170px x 170px
Cover photo: 851px x 315px
Grab our free Facebook Page cover photo templates to spiff up your new Page.
Step 5: Add an action button
The action button at the top of your Page serves as your main call to action. You can link to your website, a special landing page or offer, or connect to business-specific services, such as online ordering for restaurants, and more.
For example, ours is “Sign Up,” which takes you to our Plans page.
Source: Facebook
Tap on Add Action Button.
Then choose what you want to promote: Link to a website or app, get people to contact you, or connect a specific action, like buying tickets or booking an appointment.
Step 6: Optimize your Facebook Page
You could stop here and start posting content on your new Page, but for best results, take the time to do the following:
Add your website: Ensure your website URL is there, and fill in a brief About description.
Connect WhatsApp: Have customers reach out directly to WhatsApp instead of Facebook Messenger by connecting your Page to WhatsApp Business.
Add your location and hours: If you have a physical business location, add your address and opening hours in the About section.
Turn on reviews. Build trust with new visitors by featuring ratings and reviews on your Facebook Page. When using this feature, ensure you’re keeping an eye on reviews to ensure they’re from real customers and not spammers trying to ruin your reputation. And, if any customers are unhappy, ensure you’re reaching out to make it right. Turn reviews on under Settings -> Privacy -> Page and tagging.
Source: Facebook
Edit your Page tabs: Choose to hide your Likes or Reviews, plus irrelevant sections like Music, Sports, Books, and more. From your Page management dashboard, tap More, then Manage sections.
Create a custom URL: Besides being easier to link to, a custom Facebook Page URL or username makes your Page seem more legitimate to customers. Set yours under Settings -> General Page Settings then tap Edit next to the Username field.
Create a pinned post (optional): Add a new post to offer something exclusively for your Facebook Page fans, such as a coupon. Or, use it to link out to your other offers, profiles, and more. It’s a good mini-introduction to your Page and business.
Source: Facebook
Looking for more optimization tips? Try these lesser-known Facebook Page hacks.
Step 7: Create a post
People won’t start discovering your Facebook Page, or have a reason to follow it, until you post some great content.
Stuck for ideas? Here are 20+ social media post ideas and how to develop a content creation process.
How to add an admin to a Facebook page
Step 1: Log in as your Page
Log in to Facebook, then switch to using Facebook as your Page. Click on your profile photo at the top right, then tap the circle icon to switch to the last Page you used, or See all profiles if you manage more than one Page.
Step 2: Go to your Access settings
From your Facebook Page, click on Professional dashboard in the left menu.
Step 3: Go to Page access
There are 5 types of access you can give:
People access: Personal Facebook profiles who can log in as your Page with full access to manage it.
Task access: Personal Facebook profiles who can’t log in as your Page, but have access to a specific task or set of tasks to do for your Page.
Community managers: Personal Facebook profiles who can moderate comments and live chat discussions and suspend or remove Page fans. They cannot change your Facebook Page settings or post content.
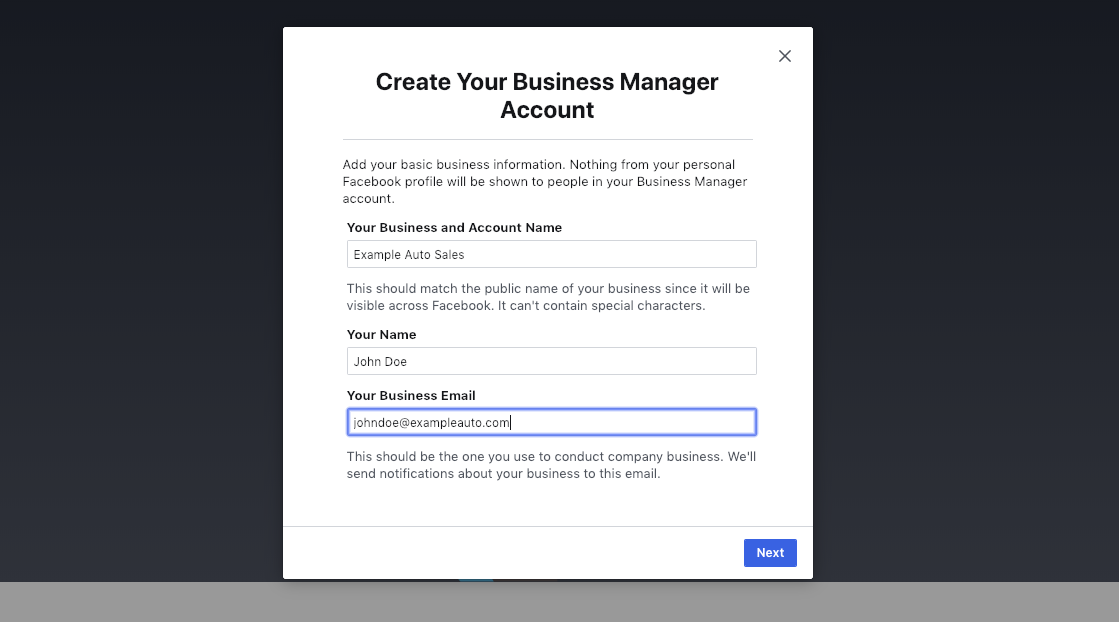
Business account access: Grant access to a Meta Business Suite account to fully manage your Page, add or remove administrators, and even delete your Page. Learn more about when you should use Meta Business Suite.
Partner access: Business Manager accounts with access to specific assets or tasks, such as helping run Page ads or analytics.
Step 4: Add a Facebook administrator
From your Page’s Professional dashboard, click Add New next to whichever kind of Page access you want to give. For example, to add a staff member to post content for you, you’d choose either the People option (for full access), or Task (for specific access).
You can search for them by name or enter an email address to invite them. Inviting by email is safer, so you don’t accidentally click the wrong “Mary Smith” Facebook profile and suddenly have your 70 year old aunt managing your Page.
They’ll be able to access your Page after clicking the email confirmation link.
Step 5: Add a partner to your Meta Business Suite
This adds a person to your entire Meta Business Suite account, not only your Facebook Page. This is helpful to give your staff access to all your Meta assets, including Facebook and Instagram profiles, analytics, ads account, and more.
Log in to Meta Business Suite and go to Settings, then click Add People.
You have to invite business partners by email address. Then, choose which roles you want this person to have.
On the next screen, choose what this person has access to. If you want them to only have access to your Facebook Page, check that.
You’ll see a summary of who you’re assigning to what, and what they’ll be able to do. Click Send Request. After accepting the email invitation, they’ll be in your Meta Business Suite account.
How to delete a Facebook Page
You can either temporarily deactivate your Page, or delete it, by clicking your profile photo in the top right corner, then going to Settings & privacy -> Settings -> Privacy -> Facebook Page information -> Deactivation and deletion.
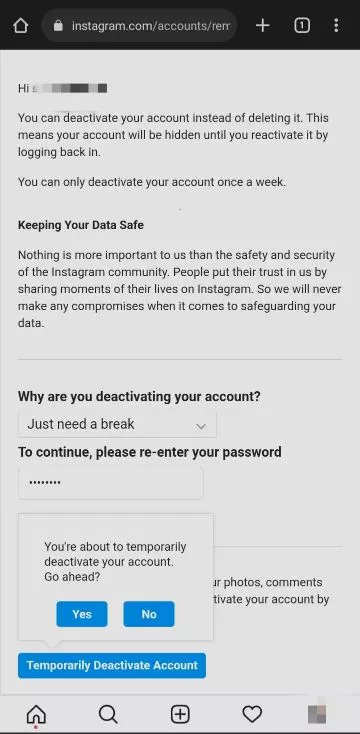
Option 1: Temporarily deactivate your Facebook Page
I recommend this for most users. Whether you’re taking an extended break, or just want to hide from search results, temporary deactivation accomplishes the same goal — no one can find your Page — but it’s still reversible.
You’ll have to enter your Facebook password to proceed.
You also have to choose a reason for deactivating. The first option — “This is temporary.” — comes with the ability to automatically reactivate your Page after a set time. This is helpful to really unwind during a vacation, for example. (Although a better practice would be to leave your Page up and simply delete Facebook from your phone for a week instead.)
Choose a reason and click Deactivate to finish. To reactivate it, follow the same steps as above to go to your Settings & privacy area and you’ll see an option to reactivate there.
Option 2: Permanently delete your Facebook Page
I must stress: Don’t! Unless you’re going out of business, there aren’t many good reasons for permanently deleting your Facebook Page.
Alas, if your mind is set, choose Delete Page from Settings & privacy -> Settings -> Privacy -> Facebook Page information -> Deactivation and deletion.
Before deletion, download or transfer your data. There’s no way to get it back if you change your mind later (which is why you should deactivate instead of delete, friend).
Clicking Continue prompts you to enter your password then shows you this warning message. This is it! Clicking Continue here will delete your Page. (!!!)
Although unlike everyone who got a tramp stamp tattoo in 1999, Facebook gives you 30 days to change your mind and reactivate your Page.
How to easily manage Facebook Pages
Meta, owner of Facebook and Instagram, has two native solutions to manage one or multiple Facebook Pages: Meta Business Suite and Creator Studio.
You need Meta Business Suite to run ads, use Facebook Commerce, and connect your Facebook and Instagram business accounts.
Creator Studio allows Page managers to create and schedule content and view analytics, either on the web or via mobile app. It includes the ability to go Live on your Page or post across multiple Facebook Pages simultaneously.
There’s still a wayyy better way: Hootsuite.
Optimized scheduling with Best Time to Publish
Don’t leave your exposure up to chance. Schedule your Facebook Page posts — and all your other social media content — with Hootsuite. Save time by batch producing your content and stick to a consistent posting schedule.
Okay, but when should you post? The best time to post on Facebook is 8 a.m. to noon on Tuesdays and Thursdays.
Done, right? Nope.
Besides convenience, scheduling your posts with Hootsuite grows your audience faster thanks to the Best Time to Publish feature. It analyzes the last 30 days of engagement for each platform to automatically schedule content for your personal best time to post. It’s like having a super smart algorithm-busting robot in your back pocket.
Try for free
All your social accounts in one place
With Hootsuite, you can easily handle Facebook, Instagram, TikTok, Twitter, LinkedIn, YouTube, and Pinterest from one dashboard — and view all of your published and planned content in one clean content calendar.
One inbox for comments and messages (from all networks)
Efficiently handle direct messages from all platforms in Hootsuite Inbox, including tools to eliminate double work, save time with reply templates, and ensure customer messages aren’t missed.
Your staff can reply to messages and comments everywhere from inside their Hootsuite dashboard.
Easy, actionable analytics
Forget spreadsheets and a bunch of numbers without context. Hootsuite Analytics gives your team the information they need to determine if a campaign is working while it’s still happening — and if it’s not, enough notice to salvage the damage.
See all the basics like reach, impressions, and followers along with advanced analytics like when your audience is online, individual post performance vs. your average performance, and more.
View stats for all your social profiles together so you can see if everything’s growing at the same pace, or if you need a strategic pivot.
Start free 30-day trial
Updated daily, your Social Score is a personalized comparison of your performance — including follower growth, engagement, clicks, activity, and more — across all your social media to other businesses, so you always know how your marketing stacks up.
Engagement low? Start planning content that gets your audience talking. Plus, receive personalized tips to improve your social presence even more.
Social listening with Streams
Streams are customizable data feeds to show you what matters most all on one page. For example, you can see recently published posts from each platform so you can quickly jump in and reply to comments to drive engagement.
Or, set up Streams to monitor specific keywords or competitors, and run advanced searches such as filtering by location. Streams can boost your engagement as well as tell you what people are saying about your company online, in real time.
Facebook Business Page FAQs
Is there a difference between a Facebook Page and a Business Page?
Facebook Page and Facebook Business Page are two names for the same thing: a Facebook profile for your business.
Is a Facebook Business Page free?
Yes, creating a Facebook Business Page is completely free. Paid services, such as Facebook advertising and boosting posts, are optional.
Can I separate my Business Page from my personal account on Facebook?
Yes. Your personal Facebook account and Facebook Business Page aren’t connected on Facebook, and won’t be publicly listed on each other. You need a personal account to create and manage a Facebook Business Page, but you could always create a separate personal profile with your work email address if desired.
What’s the recommended Facebook Page cover photo size?
The best Facebook Page cover photo size is 851px x 315px in 2023. Platforms change often, so check our social media image size guide for up-to-date information.
Manage and grow your Facebook Page alongside all your social media profiles with Hootsuite. Plan and schedule content, engage your audience, measure and improve performance, boost posts, and more — all from one dashboard. Try it free today.
Get Started
Grow your Facebook presence faster with Hootsuite. Schedule all your social posts and track their performance in one dashboard.
Free 30-Day Trial
Merging two Facebook Pages | Facebook Help Center
Pages you manage may use the new version. More.
The administrator of two Facebook Pages can merge them if:
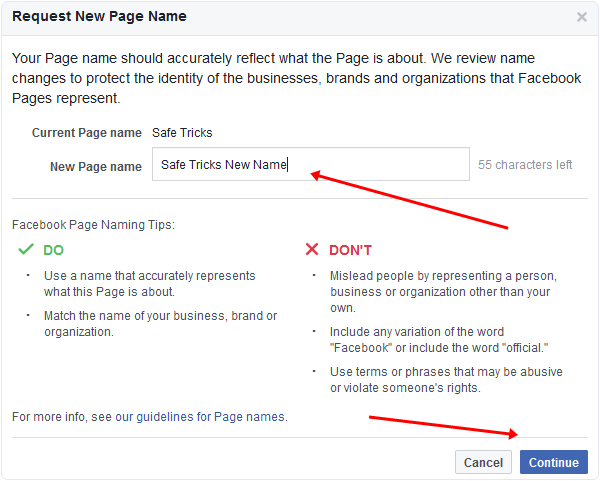
The Pages have the same title and theme. In order for Pages to have the same title, you can request a title change for one of them. Once the change is approved, your Pages will have the same title and you can request to merge them.
Pages have the same address (if they have a physical location).
They belong to the same Business Manager account.
Both Pages are used in either the classic or new version.
The Page that you want to merge with another page that is not the main Page of your Business Manager account.
Pages cannot be merged if:
Both Pages are global.
One of the Pages is not validated.
One Page is used in the classic version and the other is used in the new one.
Classic Pages
If Pages can be merged, their followers, likes, and visits will be aggregated together as a result. Groups associated with the merged Page will be transferred to the saved Page. Only the likes, followers, and visits of the linked Page will be added to the Page you save. The rest of the Page content will remain unchanged.
All posts, photos, reviews and ratings, as well as the username, will be removed from the merged Page. The page you choose not to keep will be removed from Facebook. It is not possible to undo the merger.
Before requesting a Page merge, make sure your active campaigns do not link to the Page that will be removed.
Merge Pages
To merge Pages:
Classic Mobile
Click the icon in the upper right corner of the Facebook window.
Click Pages.
Go to your Page and click More.
Select Edit settings.
Click General and then Merge Pages.
Enter your Facebook account password and click Continue.
Click Select Page and select the two Pages to merge. Then click Continue.
Click Request Merge.
New version for mobile browser
Click the icon in the upper right corner of the Facebook window.
Click Pages.
Go to your Page and click More.
Open the settings in the Page Management section.
Select Delete.
Click General Settings and then Merge Pages.
Click Select Page or Profile and select the two Pages you want to merge. Then click Continue.
Click Request Merge.
If you cannot merge Pages, this feature is not available for them. If you have the option to request a Page merge, we will review your request.
Note. If your Pages are in Business Manager, you can merge them at business.facebook.com/pages/merge.
New Version of Pages
If you have access to a Page at the Facebook level, you can go to it and request that two Pages be merged. If you only have task-level access, you can't merge Facebook Pages.
If Pages can be combined, their followers and visits on different profiles will be brought together as a result. Groups associated with the merged Page will be transferred to the saved Page. Only the followers of the connected Page will be added to the Page you save. The rest of the Page content will remain unchanged.
The username, posts, photos, reviews and ratings of the merged Page will be removed. The page you choose not to keep will be removed from Facebook. It is not possible to undo the merger.
Before requesting a Page merge, make sure your active campaigns are not linking to the Page that will be removed.
Merging Pages
Before you begin, switch to your Page.
To request a Page merge, sign in to Facebook on a computer.
To merge Pages:
Open your Feed and click on your profile picture in the upper right corner of the screen.
Click Settings & Privacy and select Settings.
Click New Version Pages in the menu on the left side of the screen and select Merge Pages.
Click Create Query next to Merge Multiple Pages.
Follow the on-screen instructions to submit your request.
Enter your Facebook password to submit your request.
If you cannot merge Pages, this feature is not available for them. If you have the option to request a Page merge, we will review your request.
Note. If your Pages are in Business Manager, you can merge them at business.facebook.com/pages/merge.
How do I add or change the Facebook Page associated with my Instagram business account?
Help Center
We are updating the mobile version of Facebook.com. 9 more0003
When switching from a personal Instagram account to a business account, you'll see an offer to link it to a Facebook Page. We recommend that you link your Facebook Business Page to your Instagram account. This is not required, but doing so will help you get the most out of Instagram's business tools.
Learn more about the features that will become available after linking Instagram and Facebook.
You can also link another Facebook Page to your Instagram business account at any time. Follow the instructions below to add or edit the Facebook Page associated with your Instagram Business account.
Before you begin
You may need to switch to a professional Instagram account to link it to a Facebook Page owned by your Business Manager account.
Your personal Facebook account must administer the Page you want to link to your Instagram account. If you don't see your Page in the drop-down menu on your Instagram profile, check your Page settings on Facebook and make sure you're assigned the admin role.
How do I link a Facebook Page to a business account?
To add or edit the Facebook Page associated with an Instagram business account:
Go to your Instagram profile.
Select Edit Profile.
Under Public Company Information, select Page.
Click Create a Facebook Page or Link an Existing Page.
Select one of your Pages or click Create a Facebook Page.
When finished, click Done.
Your business account is now linked to a Facebook Page. If you don't see the Page you want in the drop-down menu on your profile, you may not be administering it. Check your Page settings to make sure you have permission to add it to your Instagram business profile.
Was the article helpful?
What happens after linking a Facebook Page to an Instagram account?
 Well, a business page can have a news feed, too! Your page profile news feed is based solely on the pages you’ve liked as your page. To see that news feed, click the link in the top-right of the page called Home.
 Notice the word Voice and the link to change to yourself.
 Yes, this option is a great way to promote your page, but remember that Facebook is a social network, not a place to go dropping your business name everywhere!
 She is the founder of Digital Media Works, Inc. John Haydon owns Inbound Zombie, a consultancy that provides nonprofits with strategic training about Facebook.

 You can link to your website, a special landing page or offer, or connect to business-specific services, such as online ordering for restaurants, and more.
 Set yours under Settings -> General Page Settings then tap Edit next to the Username field.
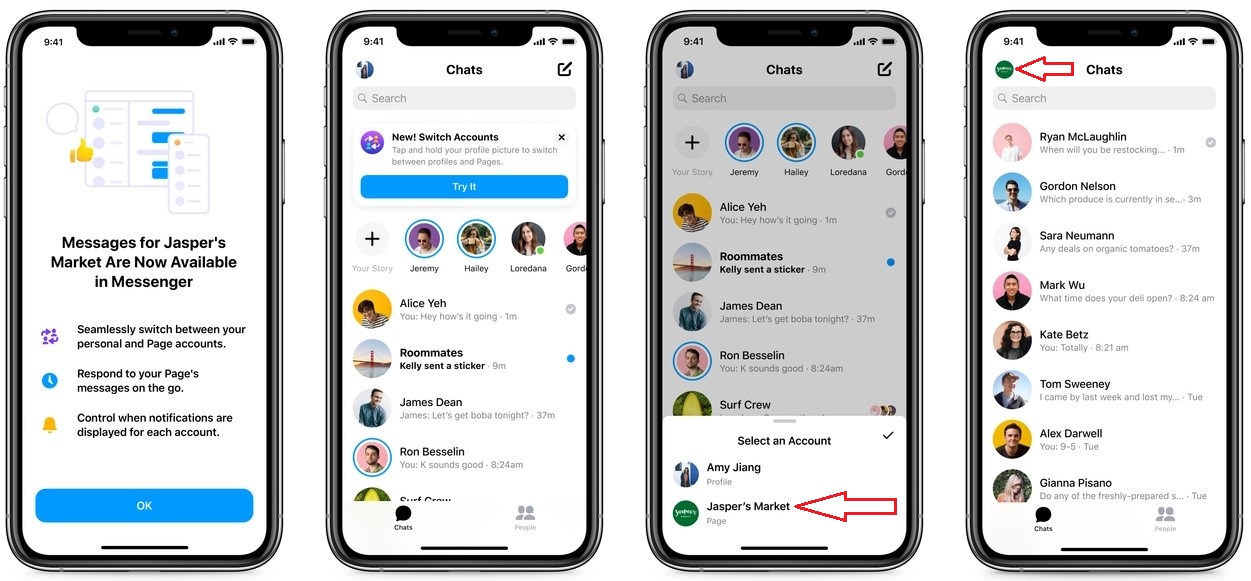


 Try it free today.
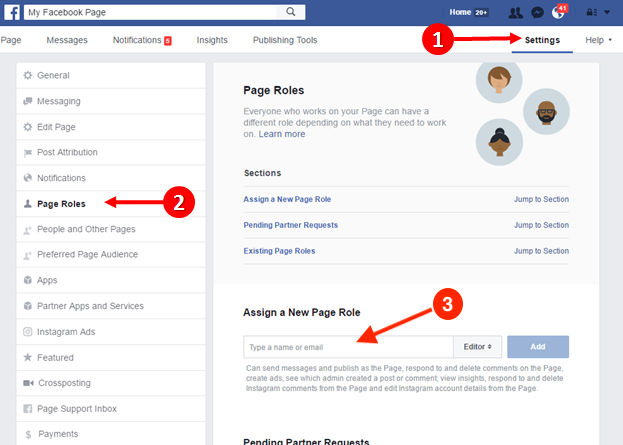

 We recommend that you link your Facebook Business Page to your Instagram account. This is not required, but doing so will help you get the most out of Instagram's business tools.