Social media companies regard privacy as an annoyance rather than a human right. Users have to take matters into their own hands if they are to retain some degree of privacy. Even with the inclusion of the European Union (EU) General Data Protection Regulation (GDPR), UK GDPR, UK Data Protection Act 2018 (DPA ACT), California Consumer Privacy Act (CCPA), and many others, the user still has to approve, correct, or opt out in writing or online. The options vary based on location, and the US currently has no laws that compare to the GDPR or UK’s DPA ACT.
For residents in the United States, internet privacy control requires more effort than it does for people in EU, including the UK. Regardless, many companies offer privacy control in the US just as they do in the EU, making it easier to manage your privacy information. Deleting/clearing Instagram search history is just one of many steps you have to do yourself.
Instagram search history is a collection of all the searches you perform, whether you search for real names, profile names, topics, or specific subjects, such as Star Wars, Nascar, etc. Instagram search history is not available to view by other users, but the company harvests the information to suggest new people/profiles you can follow. The data may also get used for other purposes (unspecified), but you can control what Instagram stores by deleting your search history manually from an android, iOS, or PC browser.
Like many social networks, the more you use Instagram, the more complete their dossier on you becomes, and it’s legal. Perhaps it’s time to take some of that back, which is also legal in the US and EU regions.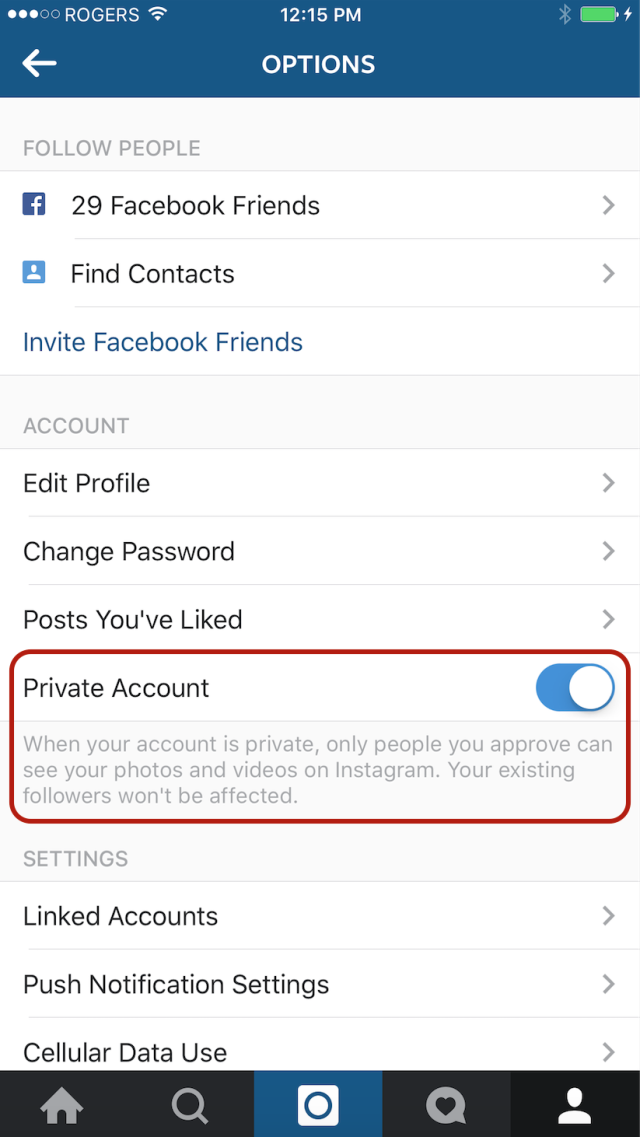 You can start by deleting your search history, then move on to other Instagram privacy options. Here’s how to do it.
Clearing your Instagram search history is essential if you don’t want the company to use the information to fine-tune your follow suggestions. This is especially needed when you performed numerous searches over time with many entries that create misguided suggestions or lists you have no interest in. Cluttered data can mislead IT bots or technology, which then delivers mistargeted suggestions. Use the steps below to maintain some privacy by removing your search history.
Both Android and iOS have the same process, locations, and appearance for each step, except that some icons are line art on iOS, and Android has a few more options in the menus. However, the extra menu items are not relevant to this procedure. Here’s how to clear Instagram search history on Android and iOS.![]()
Your search history is now cleared and nothing appears when you open the search bar unless you only deleted specific searches. Your suggested people is also reset.
Deleting Instagram searches using a browser is similar to the processes used for Android/iPhone, but navigation is a little different. Given the slight change to using Instagram on a computer back around April 2022, here is how you can currently clear all Instagram search history using your browser of choice.
As mentioned, the more you use a social network, the more complete a profile they build on you. If you want to know exactly what Instagram knows about you, you can find out. You can request a data dump from Instagram that will be delivered within 48 hours via a .zip file within an email.

Once the email arrive, it will contain a ZIP archive file. You will need to decompress this somewhere on your computer to be able to read it. You can then open it with a text editor to see just how much data the network has compiled about you.
If you want some time to browse without being disturbed or want to keep your Instagram activity under the radar, you can hide your online status.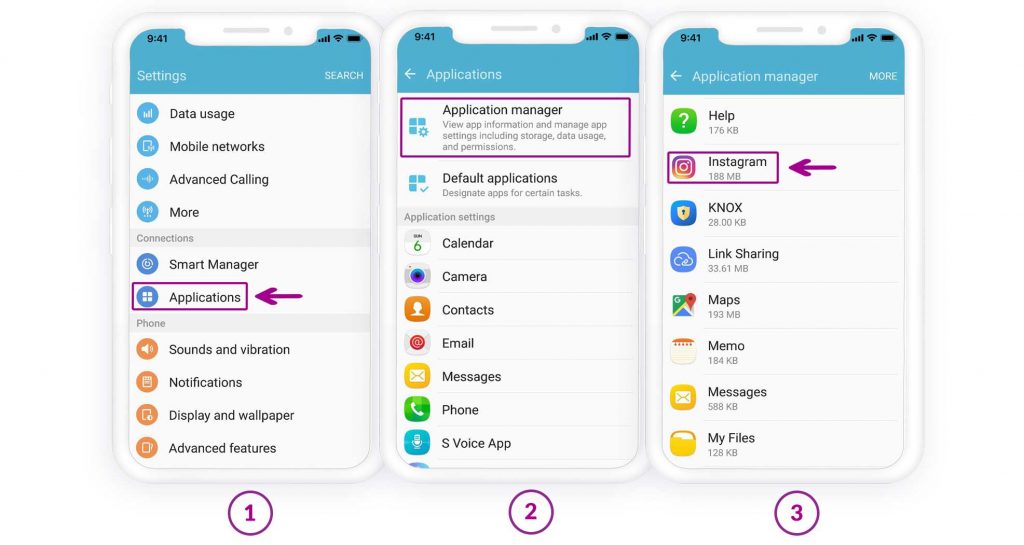 This is essentially an incognito mode for the social network that keeps your presence hidden while you do what you need to do.
Now you should not show up as online when you’re using the app. You can turn it back on again when you’re ready by repeating the above and toggling Activity Status back to on again.
There is a clue in the name social network. They are designed to be social and encourage sharing and interaction. If you want to keep yourself to yourself or want to stop people following you, you can make your Instagram account private. This keeps your posts private and forces users to request to follow you.
If you’re having issues with people viewing Stories that you don’t want them seeing, you can filter them out. You don’t have to stop following them or stop them following you, there is a setting within Stories that allows you to filter out certain users. Here’s how to do it.
From that moment on, the users you add into that final section will not be able to see your Stories.
You can exercise an element of control over comments too. If you’re suffering from a troll infestation or an individual who says dumb things, you can stop them commenting.
If all else fails and you’re still having issues with individuals on Instagram, you can block them. This is a measure of last resort as it can lead to awkward social interactions with them if you see them in the real world but sometimes there is no other choice.
Once blocked, you may have to manually remove any comments they made on your posts but they will no longer be able to comment on future posts.
The vast majority of Instagram users are fine, but every village has its idiot and most of them use Instagram. At least now you know how to handle them!
Clearing your Instagram search history is an easy process, but keeping your personal data away from unwanted eyes isn’t. Using social media can be a fun way to meet and interact with new and interesting people, but it’s nice to know how to block and limit your online presence to some.
Instagram co-founder and CEO, Kevin Systrom.
Vivien Killilea
Facebook's Instagram keeps a copy of everything you've ever shared. It's easy to download an archive of that information, so I'm going to show you how.
There are two primary reasons you might want to do this: first, it's worth seeing what sort of private information is stored on Instagram's severs. Second, it's convenient if you want to take all of your data and move to another service.
I downloaded my archive and discovered that Instagram has access to all my contacts phone contacts -- including their names, email addresses and full names -- even if they don't use Instagram. It also has a copy of:
The Instagram archive doesn't include any data about ads you've viewed or interacted with, or what sorts of ad topics it think you might be interested in. Facebook must have this data somewhere, but it isn't included in the file you download.
You can download your own archive and discover what Instagram still knows about you. Here's how:
While Instagram says it can take up to 48 hours, I received my download link in under thirty minutes.
The data comes through as a zip file with folders for photos, stories, and videos. Anything that isn't a photo or video -- messages, profile, searches, and settings -- are saved in text format that you can open with notepad on a computer.
If you don't want Instagram to have this data, you can delete it all. (Instagram confirms in its FAQ that it's actually deleted.) Doing so requires you to delete your entire account permanently, however. If you don't want to do that, you can temporarily disable your account, too.
Here's how:
That's it. Now you've learned how to download a copy of all of your Instagram data and, if you want, how to delete it.
WATCH LIVEWATCH IN THE APP
WATCH LIVEWATCH IN THE APP
Social networks actively collect information about their users and are not at all eager to part with it - even if the account owner makes such a request. We figure out how to delete your data from Facebook, Twitter, VKontakte and Instagram.
Most social networks base their business on displaying advertisements. For their targeting (personalization of the display), a lot of data from the user profile is used, as well as information about actions in the social network, and sometimes beyond it. By creating a profile on Facebook, VKontakte or Twitter, the user accepts the confidentiality agreement, often without even reading it, and also leaves the privacy settings set by default. This leads to the fact that social services accumulate a huge array of data related to a particular person for years.
Of course, Russian legislation establishes certain rules for the processing of personal data of citizens and limits the possibility of their use, however, not all information about your actions in social networks is subject to Law No. 152-FZ and other regulations. In addition, by registering an account, we usually give the service consent to the processing of our data. However, the operator is under no obligation to provide us with tools for self-management of information about itself.
Interestingly, foreign Internet sites are often more client-oriented in terms of personal data management. This is partly due to more stringent legislation (primarily European and American), partly due to more developed traditions regarding the secrecy of correspondence and personal life, a higher culture of handling such information. Nevertheless, for both Russian and foreign social services, the rule is true: it is much easier for them to become a user and a donor of information than to delete this information later.
In order to minimize the amount of data collected about you by the social network, we recommend that you pay attention to your profile privacy settings as soon as possible (ideally, immediately after registration). If you did not immediately limit the "appetites" of the site, try deleting some of the accumulated information. We have prepared short instructions on how to do this on Facebook, Instagram, VKontakte and Twitter.
Facebook collects a lot of data about the activities of its users. Information that allows you to more accurately target (and therefore sell more expensively) ad impressions is the basis of a social network business. Therefore, she knows and remembers a lot about you: what and when you published, whose post was “liked” and what information they were looking for. Moreover, sometimes Facebook shares some of this data with other online resources - as part of partnership agreements and with your consent (remember the boxes that you checked when logging into a third-party service using your account). There is also a reverse scheme - online stores, banks, taxi services and other companies transmit data about your actions to Facebook in order to “catch up” with you with their advertising on the social network.
Nearly two-thirds of Americans don't trust Facebook to store their personal data, according to a study by NBC News and The Wall Street Journal. If you are also uncomfortable with being tracked by a social network, we recommend limiting its activity in relation to your personal data, as well as deleting information that you do not want to share. This is not to say that this is a very simple and convenient process, but there is an opportunity to clean up your personal data box.
First of all, we recommend downloading the archive of information collected by Facebook about you - in order to understand the scale of the problem and just in case. Here's how to do it:
By default, all types of data that Facebook collects about you are selected; if necessary, you can disable the download of individual sections. Select the file format - HTML or JSON - as well as the date range and quality level of downloaded photos and videos (the size of the archive depends on this), then click the "Create file" button. In an hour or two, a link to download the archive will be sent to the email associated with the account.
Let's start deleting information. Unfortunately, Facebook does not allow you to “wholesale” destroy all personal information or individual groups of data, but it is possible to get to each individual record. Open the same "Your information on Facebook" section (see above) and select "View my information".
Figure 1. User information collected by Facebook
This is a comprehensive library of Facebook data related to you: information about all posts, photos, search history and interactions with other users. We recommend that you carefully study each section and delete redundant data about yourself. Here is a list of 5 sections that you should take a closer look at:
Finally, we recommend that you visit the Off-Facebook Activity page, which is also located under Your Facebook Information. Here you will find data about third-party sites and services that transmit information about you to Facebook, you can see what specific information they share (section "Manage information about actions outside of Facebook"), and delete it (section "Clear history").
Instagram is part of the Facebook media empire, so the conditions for storing, using and administering user data are largely similar. You can view, download and - in some cases - clear information about your activities within the service. Most of the features for managing your information on Instagram are located in the "Security" section of the "Settings" menu.
In the Data Access section, you can see what information the social network has collected about you. Not all data can be deleted, but the information from the "Account Activity" section can and should be cleared.
Figure 2. User data collected by Instagram
The Apps & Sites menu item contains information about Instagram-related third-party services. If you used your account details to log in to another site, then its owners may have access to some information from your profile. We recommend that you audit the connected services and remove those that you no longer use.
Instagram stores and uses your search history for personalization purposes. This information is involved in the formation of a "smart feed" and the display of targeted advertising. You can view the relevant data and clear it in the "Search History" section.
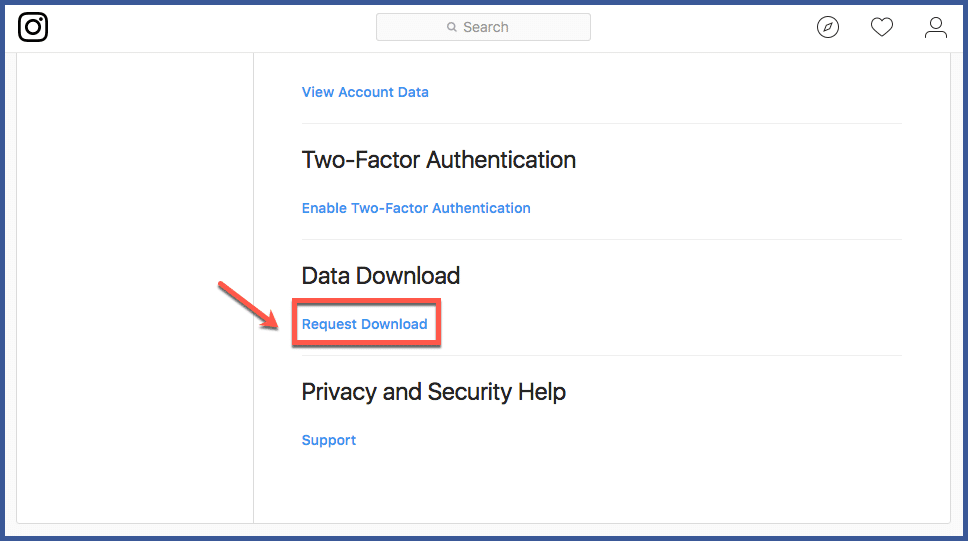
To download an archive of all the data collected about you by Instagram, you need to go to the "Download data" section, enter the email address where the link will be sent, and click the "Request file" button. Interestingly, you can specify any mailbox as a recipient, not just the one associated with your profile. To verify the request, Instagram will prompt you to enter a valid password for your account.
Just like Facebook, Twitter collects a lot of information about you to manage smart feed (show posts based on your preferences) and target ads. Removing or preventing the storage of some of such information may affect the operation of these services; This is something to keep in mind when changing your privacy settings on Twitter.
You can download data about you accumulated by the social network; this will allow you to understand what personal information Twitter holds, as well as to have an archive of published posts and photos. To request a download of information, follow these steps:
After the social network creates an archive with information about you, a link to download it will be sent to the e-mail specified in your account.
Unfortunately, you can remove all information about yourself from Twitter only by deleting your profile, and even then in this matter you will have to rely on the honesty of the service. However, you can adjust the privacy of your account to reduce the amount of information about your activity saved by the social network. To do this, in the "Settings and Privacy" section of the main menu, select the "Privacy and Security" item.
Figure 3. Off-Twitter Data Management Menu
In the “Sharing and Actions Off-Twitter” section, there are four important privacy sections:
To complete the process of removing redundant data about yourself on Twitter, take a look at the "Security and account access" section, which is also located in the "Settings and privacy" menu. Here you can edit the list of applications that are associated with your account - for example, used its data for authorization.
Unfortunately, the leading Russian social network does not provide the user with advanced tools for managing personal data. Even the basic function of downloading an archive of personal information appeared in it only a couple of years ago. To ensure the necessary level of confidentiality of information, the creators of VKontakte offer to set the visibility of information about you for other people and services (this can be done in the "Privacy" section), but they do not allow you to regulate their storage and further use.
You can delete all information about yourself from VKontakte only when deleting your account. However, even in this case, your data will be stored on the servers of the social network for some more time, during which you will be given the opportunity to restore your profile.
Figure 4. Information about data management in VKontakte
select the "Data Management Order" section. From it you can find out what information the social network collects about you and how it uses it. The button for requesting the accumulated data archive is located at the bottom of the page. The download link will be sent to the email address associated with your account. The term for completing the application is from three hours to several days, depending on the composition of the requested information.
The most effective way to delete data from social networks is to completely delete your account. Theoretically, one month after you have deactivated your profile, all data associated with it should be deleted from the servers of the company that owns the service. In practice, this does not always happen. If, 30 days after deleting your account, you find that your information is still being used by a social network, you need to contact its technical support with a letter withdrawing consent to the processing of personal information, and if this does not help, write a complaint to Rospotrebnadzor.
However, deleting an account is a drastic measure. In the vast majority of cases, information about the user's actions in the social network is used to make his work with the service more convenient. Simple rules of information hygiene will help you find a balance between a comfortable level of privacy and using the opportunities of the site for communication and entertainment:
Sometimes it's good to take a break from social media, but self-discipline only allows a few. Then deleting the profile comes to the rescue. We explain how to delete from Instagram permanently or temporarily, saving data
Since March 21, 2022, the social networks Facebook and Instagram have been banned in Russia by a court decision, and the Meta Platforms holding company that owns them has been recognized as an extremist organization and is also banned.
Some users notice that they devote too much time to managing their Instagram account to the detriment of work and personal affairs. Even the owner of Instagram, Meta, admitted in internal documents that its social networks have a negative impact on sleep, work, parenting, work productivity and personal life of approximately 12.5% of users. And scientists from the University of British Columbia found that users' own lives begin to seem insufficiently bright and interesting compared to what they see on Instagram.
Meanwhile, until the spring of 2022, the social network was consistently in the top 10 in terms of downloads in Russia and in the world. The international agency We Are Social estimated that in 2021 Instagram ranked fourth in our country in terms of the number of users (61.2% of Russian Internet users go there), and in total 67.8% of the Russian population (99 million people) use social networks. The average Russian spends 3 hours a day outside of work at the monitor or with a smartphone.
In November 2021, Instagram began testing the Take a Break feature. It will allow users to escape from the continuous viewing of the feed. In the settings, it will be possible to set reminders for breaks, for example, 10, 20 or 30 minutes. After that, the application will issue a warning about the need to rest. However, this feature has been opened to a limited number of users so far.
For now, everyone has the only alternative - to give up Instagram for a while or for good.
This option should be chosen when the profile is definitely no longer useful: for example, if we are talking about the account of a company that has closed.
Before deleting a profile, Instagram will offer to save data from it. To do this, you need to send a download request. After that, an email will be sent to your email within 48 hours with a link where you can download photos and videos. You can also request a copy of your data through the Instagram app for Android and iPhone. To do this, open the menu in the profile, go to the "Settings" - "Security" section and select the "Download data" item. Next, you will need to enter your email address and account password.
Download request from Instagram
Even after deleting the profile, it will be visible on the social network for another 30 days. During this time, the user can change his mind and restore the account. If within a month the owner of the profile has never logged into the system, then the account is permanently deleted.
To delete a profile using a computer, you need to perform several steps:
To delete an Instagram profile using your phone, you need to take more steps:
The user can also stop using Instagram for any period and then restore the page. However, you can do this no more than once a week. A temporarily deleted profile is not visible to other users of the social network. To restore it, you just need to log into the application.
To temporarily deactivate your profile using a computer, you must perform the following steps:
As in the case of the "permanent" deletion, temporary blocking of Instagram will require more steps:
To delete your account, you need to know your username and password. A forgotten password can be reset using an email address, phone number, or Facebook account. If the user does not have access to the email address specified during registration, and his Instagram and Facebook accounts are not linked, then the support service will not be able to provide access to the account.
In the event that an Instagram account has been blocked by the social network itself, its owner will see a corresponding message when logging in. He can appeal this decision. To do this, you need to open the app, enter your username and password, and then follow the instructions on the screen.