Learning how to claim a Facebook business Page is crucial for any brand. The page is an opportunity for consumers to learn more about products or services and read Facebook reviews, which helps encompass a comprehensive shopping experience. When done correctly, claiming and optimizing your Facebook page can be an integral part of your customer acquisition strategy, local listing management plans, and efforts to improve your ability to monitor social reviews.
Specifically, there are two avenues when claiming your Facebook business Page.
Take the guesswork out of your strategy. Instantly generate your brand's online Reputation Scorecard, complete with review highlights, ratings, keyword trends and more.
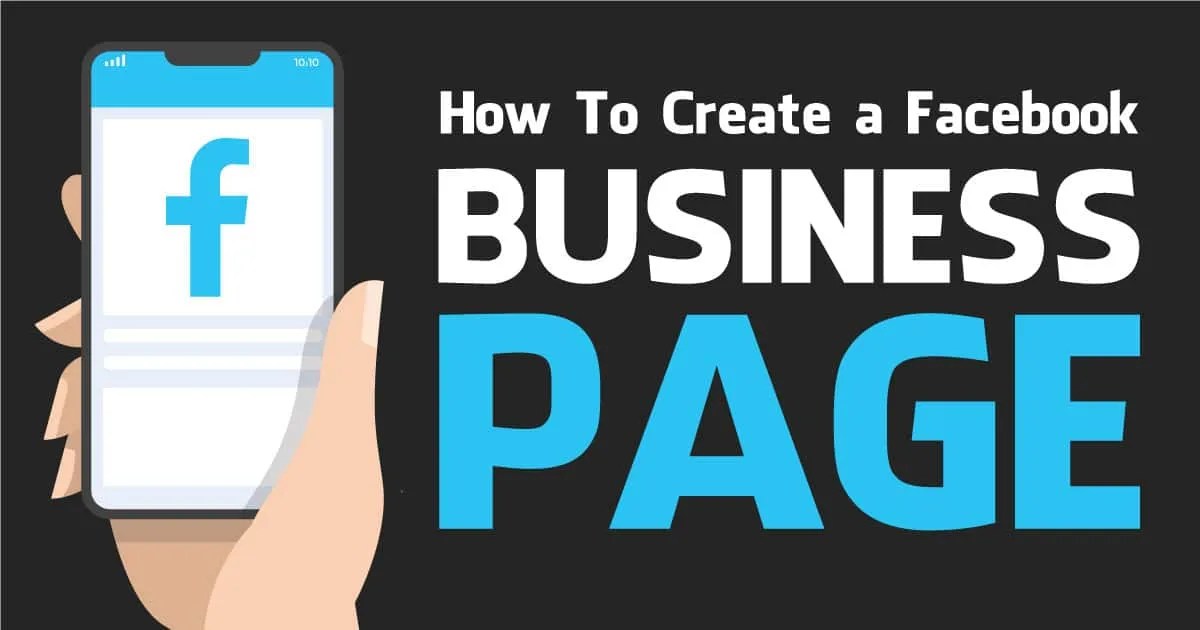
How to Claim a Facebook Business Page with a Personal Facebook Account
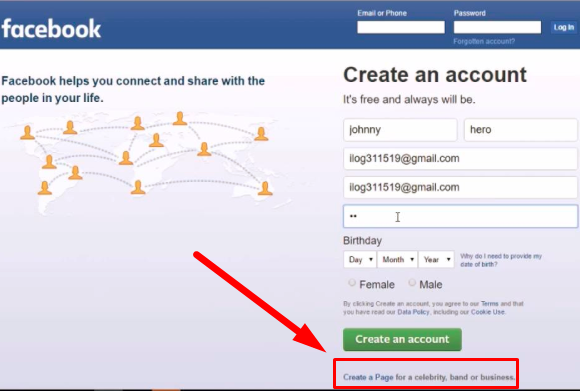
The steps to creating your own Facebook Page via a personal Facebook account is easy. With just a few clicks you can create the basic foundation for your brand’s presence on the social media site.
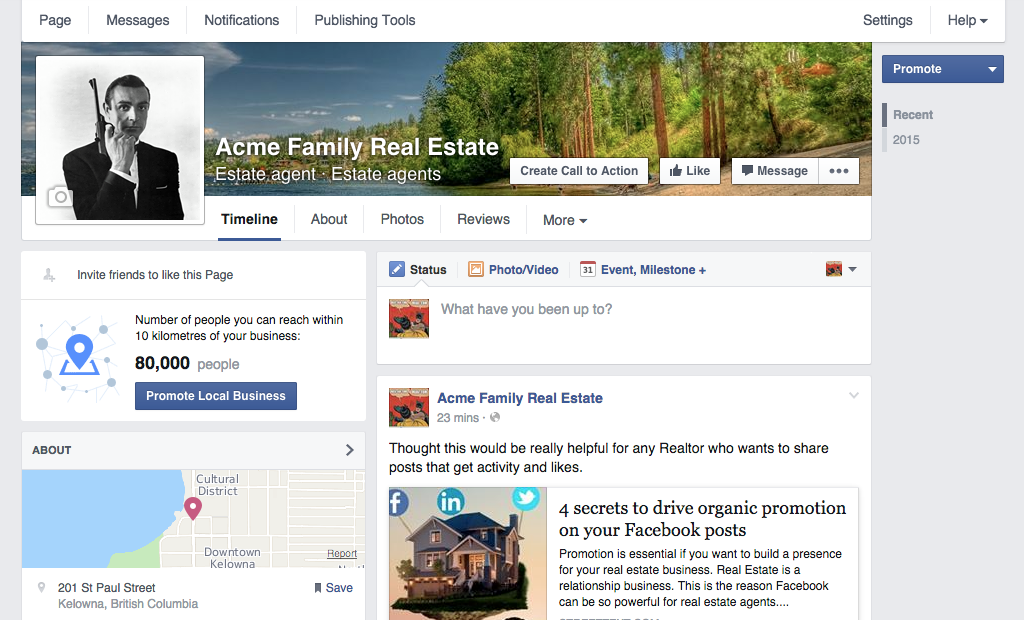
Your brand new Page is now visible, but it’s barren at the moment. However, there are plenty of opportunities to spruce it up. The first thing we recommend you do is to go to the “Page Settings” on the left side of the screen. From there, click on the “Page Info” button on the menu to add crucial information that makes it easier for customers to find your business. This includes:
You can add all this information at a later date, of course, but it should be one of the most important steps when creating a new Page. Having correct and updated information helps establish trust with your customers and is the first step to legitimizing your brand’s presence online. You can also add photos to your page after it’s created, and you can learn more about the process by reading up on how to upload photos to your Facebook business page.
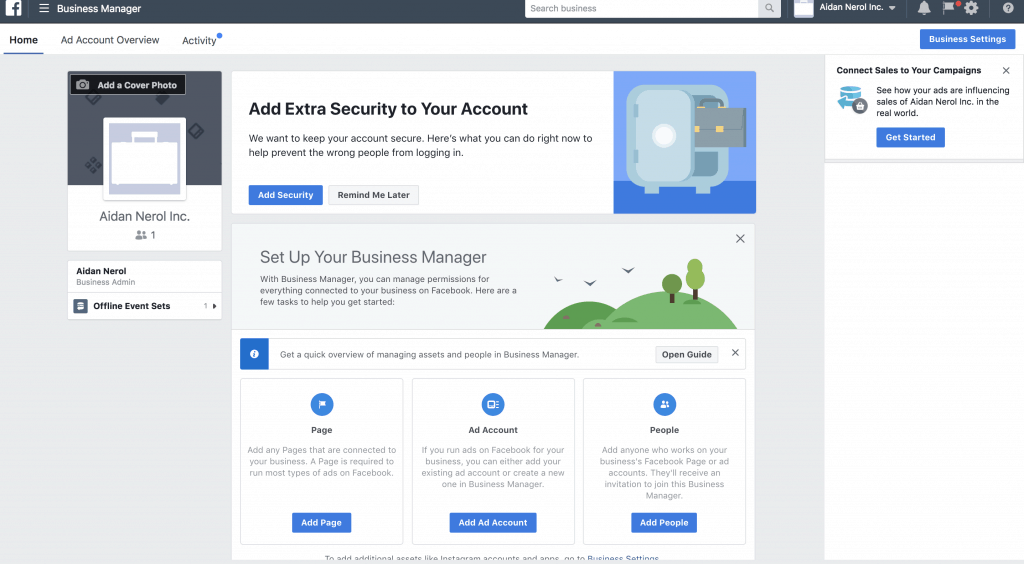
Create or Claim a Page with Facebook Business ManagerIf you use Facebook Business Manager (FBM), you can easily oversee the multiple Pages under your control by clicking on the gear icon on the top-right corner of the FBM home page, which takes you to your settings. From there, click on the “Accounts” tab and the “Pages” section nested within it to see your Pages.
Through FBM, you can either claim an existing Page or create a new one from scratch.
How to Claim a Facebook Business Page on Facebook Business ManagerThe simple process for claiming a Page through FBM first involves a choice: do you want to add an existing page to your FBM account or request access to a Page owned by someone else? The former choice is the more obvious pick for most brands while the latter option is better suited for those in an agency position managing Pages for different clients. The steps for claiming a Page in either scenario is the same.
Once you claim the appropriate Pages, you can manage them yourself or delegate others to do it within FBM. If need be, you can also use FBM for other actions such as learning how to delete a Facebook business Page, but be warned that a Page won’t be removed from FBM if it’s connected to other assets that exist within FBM.
The First StepLearning how to claim a Facebook business Page is an important first step for a business’s digital footprint on Facebook. By taking advantage of all of the features that a Page has to offer, a business can widen its exposure and attract customers with special deals, video content, or even Facebook reviews. Request a demo today to learn how our team can help with your business’s Facebook page.
Nowadays companies can display their shops on Facebook thanks to Facebook Local Pages. Those Local Pages can be managed from the corporate Facebook Page. However, sometimes you’ll notice that your location is already published on Facebook Local Pages. Therefore Facebook created a claim system in order to gain ownership of your Local Page back.
You don’t have any Facebook Local Page yet? Take a look at Facebook’s Support Guide to learn how to add your Facebook Local Pages from your corporate Facebook Page.
The publication of Facebook Local Pages occurs when users inform Facebook about a specific point of sale that isn’t registered in Facebook yet. You can recognize such a page thanks to the “Unofficial Page” mentioned below the cover picture. Their is also a notification statin that “This unofficial Page was created because people on Facebook have shown interest in this place or business.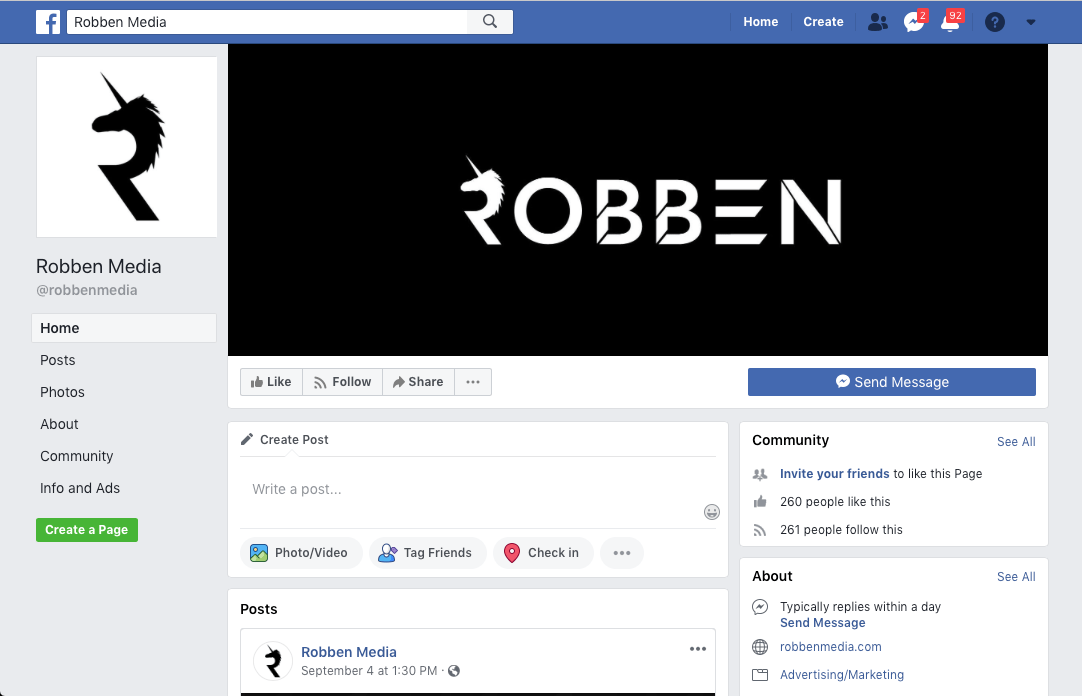 It’s not affiliated with or endorsed by anyone associated with [company name].”
To become the owner of a Local Page, you have to claim your Local Page or merge the Local Page with antoher Local Page that you already manage. To claim your non official Local Page you must:
 The second option is to follow the steps to claim the page by phone or by sending document. Here we will discuss the second option:
From a technical point of view, claiming your Local Facebook Page isn’t that complex. Nevertheless, when you have more than one location to manage, it can become a time consuming task.
There are different tools available to manage this workload. For example, the Platform My.Mobilosoft allows you to easily manage your location’s data on Google and Facebook Local Pages. Our platform also centralises your activity and you will benefit from our professional support. Furthermore you’ll gain a competitive advantage as Mobilosoft rapidly adapts to the latest developments within the digital local marketing landscape. We directly integrate those novelties in our platform to provide you with the best and most up-to-date tool possible.
For more info, contact us!
Consult other articles on the subject…
A business page on Facebook is a page of a company (similar to a business account), a brand, and any other organization. Potential customers can find your contacts, a list of services, see reviews from other users, and contact you on this page. For you, a business page is an opportunity to run ads on Facebook and Instagram, communicate with customers, as well as another way to promote.
In this article, you will learn how to create a Facebook business page, set it up properly, and use it to attract customers.
Reduce the budget of targeted and contextual advertising with click. ru
ru
Click.ru will return up to 15% of advertising costs.
Cut the budget >> Advertising
Read also : 10 best targeting courses
Let's not languish for a long time and get straight to the point. We will show the process of creating a business account from a computer, if you are making a page from a phone, then the procedure is exactly the same.
Step 1: Create a business page.
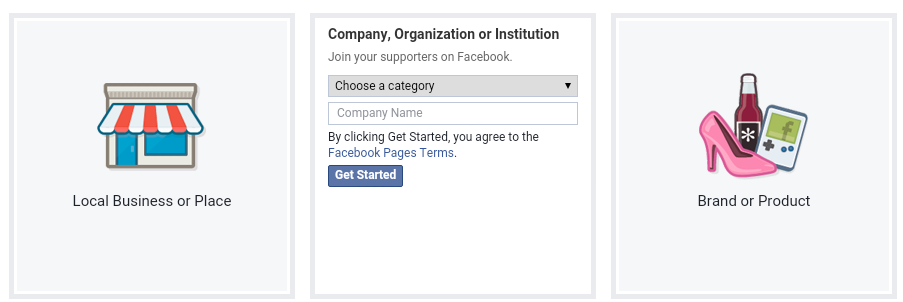
In order to create a business page, you need a personal account. If you are already registered, go to Facebook, press the big plus sign on the top panel and select "Page".
Step 2: Name, category and description.
The page creation window opens. In the left part, you need to enter the name of the business page on Facebook, select a category and add a description. On the right - a preview will be available and all the changes that you make will be displayed.
Here are a few suggestions:
Finally, click "Create Page" at the bottom. After that, a notification will appear that the page has been created and you can continue to edit it here, or by clicking "Save", go directly to the page. So let's do it, and proceed to the configuration.
Step 3: Cover page.
Before you put the cover, make it according to our instructions: "How to make a beautiful cover for Facebook." After, in the place where the cover will be, click "Edit", select "Upload photo" and upload the picture from your PC.
If you want to be creative, but nothing works out, you can peep ideas from competitors or take ready-made templates from services like Canva. Alternatively, you can set a video as the cover.
Step 4: Profile photo.
A profile photo accompanies all your comments and posts. Here, a personal photo or company logo would be ideal. To set a profile photo, click on the camera icon, then "Edit profile photo" and upload a picture from your computer.
After uploading, you can change the scale and position of the picture.
Please note that your profile photo must be at least 180 pixels wide and high.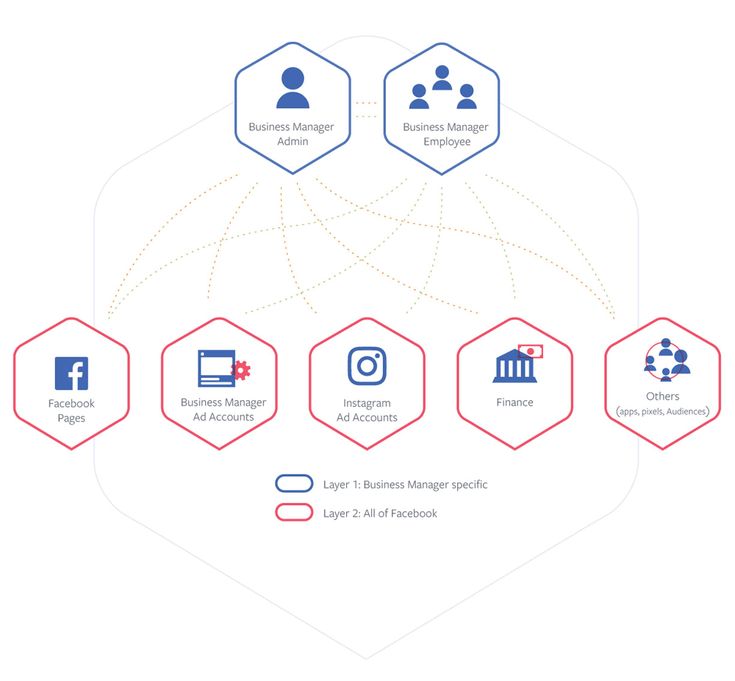 In order for the page avatar with your logo or text to be shown in higher quality, use a PNG image.
Step 5: Unique username.
Set a unique username - this is the part in the URL of the page that is displayed in the address bar of the browser, after facebook.com/. Click "Create @username".
A window opens where you need to enter a unique nickname for the page. No more than 50 characters without spaces, only letters of the Latin alphabet and numbers can be used. If the name is free, a green checkmark will appear next to it.
Step 6: Action button.
Here, in the header of the page, we immediately set up a button that will be visible to all guests of the page. Click "+ Add button".
In the window that opens, select the appropriate option. You can put a subscribe button, send a message to WhatsApp, go to the site and others. The button can be changed at any time.
Step 7: Contact information.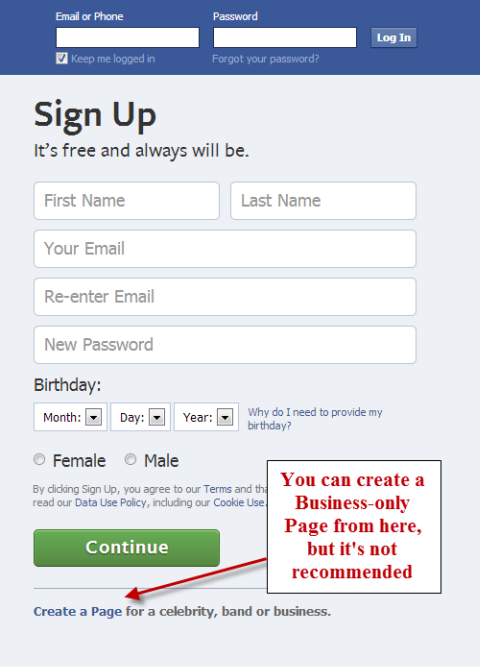
In the menu on the left, click "Edit", on the right, a field for entering information opens. Here, first we indicate the phone number (you can specify the number to receive messages in WhatsApp), email address and website.
Go down below and enter the address.
Specify the hours of operation. Below there are additional options that allow you to specify the operating mode on holidays.
You can also specify other data: products, price range and pages in other social networks.
This completes the basic page setup. This page can be linked to an Instagram account, it contains contact details and an action button is configured. Next, we move on to advanced settings that will allow you to use your Facebook business page even more efficiently.
Interesting: How to set up Facebook ads
 Open the settings and find "Templates and tabs". Here you can choose the appropriate design template.
For example, if you use the cafe page template, the Offers and Jobs tabs will appear, and the action button will change to Directions.
Tip : Experiment with patterns by changing them. So you will choose the most suitable one. Then you can manually customize the template by turning off unnecessary tabs or swapping them.
If you enable this option, every time someone visits your business page, a welcome message will automatically be sent to them. This will increase the conversion of the page and allow you to quickly build communication with a potential client.
We go to the page settings, open the "Messaging" section, find and activate the "Show greeting" item. Then click "Edit" to set your message.
Enter the text of the welcome message. The character limit is 160 with spaces.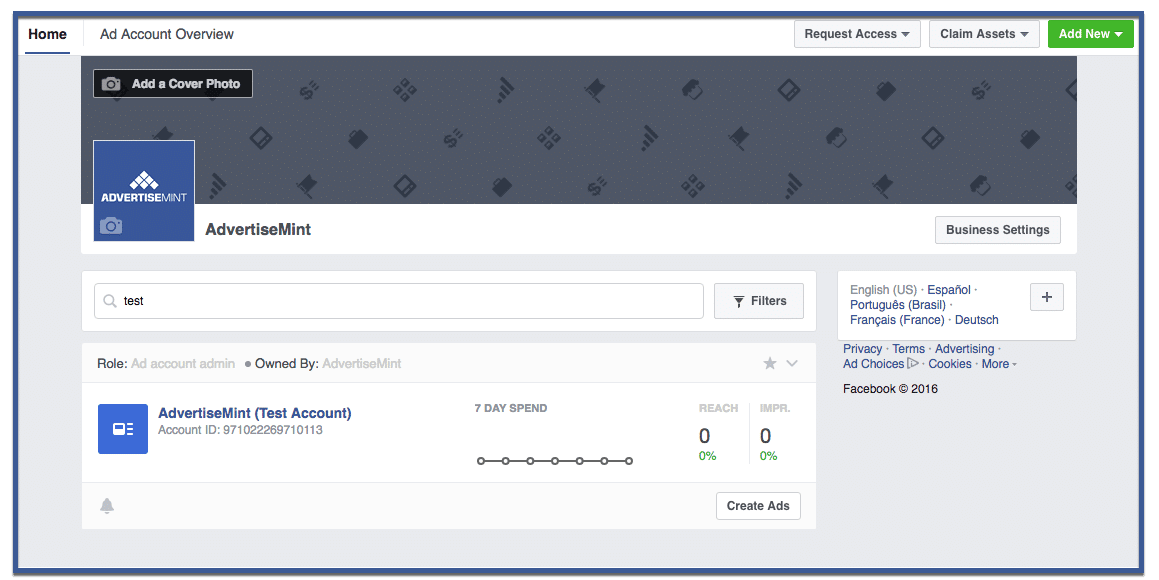 You can use emoticons and username. At the end, click "Save". Please note that the message will go to Messenger.
In the "Instagram" section, you can link a business page to your Instagram account. This will allow you to publish content immediately on Facebook and Instagram, reply to messages on any social network, and respond faster to new comments. To communicate, click "Connect account", then you will need to log in through Instagram to confirm adding an account.
After linking the business page with Instagram, you will also have access to Creator Studio ( free auto-posting and statistics service ) and in the Rights Manager ( copyright protection ). Also, if you plan on having both Instagram and Facebook presence, we recommend that you manage your Pages in Business Suite.
In the WhatsApp section, you can link your business page to a messenger and you can be contacted on WhatsApp directly from an ad or from your Facebook Page. This is handy if you're used to replying to people on WhatsApp.
To get in touch, select a country code and enter a phone number. You will receive a verification code to verify that the number belongs to you.
We also recommend that you set up a WhatsApp business account to access more features.
In general, Facebook promises to remove the Like button from business pages, but even when it is removed, everyone who likes your page will remain subscribed to it. Therefore, we do not ignore the opportunity to attract the first audience. On the business page itself, scroll down a little and find a column where you can invite friends. Click "View All Friends".
In the window that opens, select all friends or those who will definitely be interested. Also, in the lower left corner there is an option that allows you to send invitations to private messages ( no more than 50 pieces at a time ). Once selected, click "Send Invitations".
There is a "More" button, you can also invite friends through it.
To keep track of how effectively the page is developing, there is a "Statistics" section. You can access it through the settings.
Statistics provides an overview of all indicators in general, as well as detailed statistics for each metric separately ( left menu ). Here you can also download all the data, the "Export data" button in the upper right corner.
At some point, you may need to transfer control of a business page or add other team members to collaborate. For example, a sms manager who will be responsible for posting or a targetologist who will run ads.
To add new users who will be able to manage the page, go to the "Roles on the Page" section in the settings. In the "Assign a new role on the Page" field, write the username ( he must have a personal page in FB ) and select the role. Thus, you can assign an advertiser, editor, moderator, analyst, or a new page administrator.
If your organization has ceased operations or you no longer see the point in a business page, you can always delete it. To do this, open the "General" item in the settings and at the very bottom we find the option to delete the page. We click on it, then click "Permanently delete the page" and confirm the deletion.
A Facebook business page is a must for marketing, whether you plan to promote on Facebook itself or not. It will make your company visible to more potential customers, as well as enhance your Instagram experience.
Useful links :
Natalia Shpitula
Updated by
Loading. ..
..
To make platform users aware of your products, create a business page - a company account where you can post news, answer questions from subscribers, and attract new customers. Why can't the same be done with a personal profile? A business account has additional tools available to help you manage promotion more efficiently:

Creating a business profile will not take much time if you prepare all the elements in advance: come up with a name, description and process images.
Follow this link and sign in to your personal account, which will be used to manage your business account. On the left you will see three fields to fill in:
After filling in the data, click "Create" and proceed to filling in and settings.
A profile photo (avatar) will help you remember and recognize the company: this image will appear in search results, next to your posts, comments and private messages. An effective avatar reflects a brand’s personality—a logo does the job best.
The minimum image size is 180×180 pixels. You can create a logo adapted for social networks in a few seconds using the Logaster online generator.
Need a logo for your Facebook business account?
Create it for free in a couple of clicks! At any time you can go back and edit the image
The cover completes the impression of the brand. It can display:
The cover can be changed depending on the season, product line updates or special offers. The dimensions of this photo for computers are 820x312 pixels, for mobile devices - 640x360. Also on the cover you can place a video lasting from 20 to 90 seconds with a maximum resolution of 1080 pixels.
In Settings, you can:
 It should be unique and ideally match the name of the business. If such a name is already taken, complete it with a number or a word that specifies your activity.
 This is one of the main elements in any advertisement, from billboards to social media posts.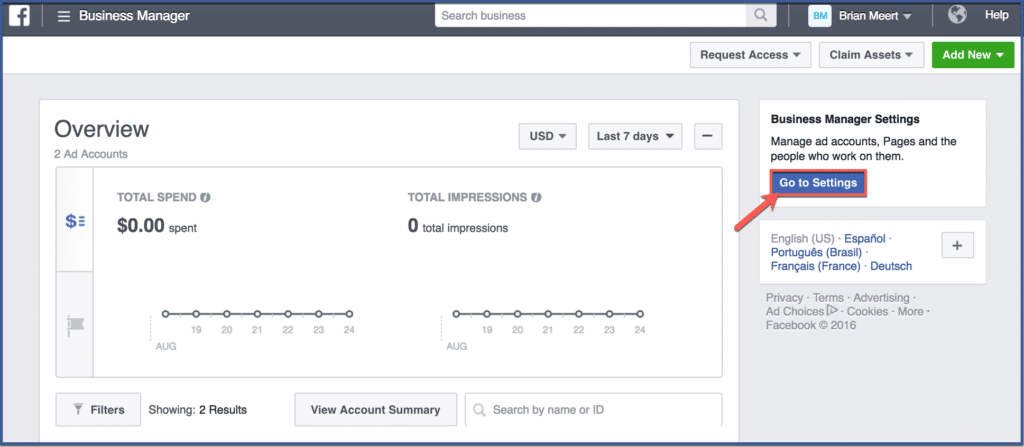 Facebook allows you to place it on the blue button at the top of the page.
Click on the "Edit button" block on the right under the cover, and select from the options: "Place an order with us", "Contact us", "Learn more", "Make a purchase or donation", "Download the application". You can also specify a link to which the call button will lead, for example, a website, landing page or YouTube video.
In Settings, go to Templates & Tabs to access the visual organization of your content.
The social network offers to choose a template for an account depending on the type of activity: a store, a charitable organization, etc.
Tabs help subscribers quickly find the sections they need: photos, videos, reviews, information about the company. You can manage tabs: remove irrelevant ones and reorder, putting the most important ones first.
After filling in and setting up the account, see how it will be seen by the audience of the social network. To do this, select the "View as user" option. Make sure your profile and cover images match, your tabs are in the right order, and your call to action grabs attention.
The nuances of a social media marketing strategy are constantly changing depending on the trends and policies of Facebook. We will give basic recommendations, and we advise you to follow the changes in the market.
The more people who find out about your profile and subscribe to it, the more potential customers you get. To do this:
The target audience (CA) of a brand is the group (or several groups) of people for whom you create products. To successfully sell, you must understand what excites these people, how they communicate, where they live, what they do, how old they are. To make a portrait of the target audience:
Your task is not just to advertise the brand, but to create a loyal community around it. Choosing the right content will help you gain people's trust.

Facebook posts with images are 2.3 times more engaging than plain text. Use photo and video content to engage potential customers.

Track your results using the statistics section of your account settings to progress effectively. There you will see activity data for a certain period: reach, likes, traffic sources, etc. If these indicators fall, change the strategy and test different tools.
Facebook helps entrepreneurs reach potential customers from all over the world, reduce the distance between brands and consumers, and better understand their problems and needs. To make your promotion effective, start with analysis, create and fill out an account, test different tools, think carefully about content, and track analytics.