Whether you've recently changed your last name or want to add a fun nickname, changing your name on your Facebook profile is a fairly straightforward process.
Note: You can only change your Facebook name once every 60 days, though, so if you're going for something humorous, make sure you can live with it for at least two months.
Here's what you need to know about Facebook's name change policy and how to change your name on a desktop browser or the Facebook mobile app.
What is Facebook's name change policy?While you don't have to use your full legal name on Facebook, there are rules as to what types of names you can and cannot use.
Facebook prefers its users to use the name they go by in everyday life. Facebook names cannot include the following:
As far as nicknames go, Facebook allows them for first or middle names as long as they are a variation of your actual name (like Abby instead of Abigail). Impersonating other users is not allowed on Facebook and violates their Community Standards.
Note: Choosing a name that matches an ID or document on Facebook's approved ID list can help you regain access to your Facebook account
How to change name on FacebookYou can change your name on Facebook via a desktop browser or the Facebook mobile app once every 60 days. Here's how it's done.
1. Log in to Facebook. Click the down arrow at the top-right of the screen.
2. Click Settings & Privacy, then Settings.
Navigate to "Settings" to change your Facebook name. Abigail Abesamis Demarest3. Click Name.
The option to change your Facebook name is under "General Account Settings." Abigail Abesamis Demarest4. Enter your new name, then click Review Change.
5. Enter your Facebook password, then click Save Changes.
Quick tip: If you're unable to change your name using the steps outlined above, fill out this form.
On mobile app:1. Open the Facebook app for iPhone or Android.
2. Tap the Menu icon at the bottom-right of the screen for iPhone, top-right of the screen for Android.
The menu icon will appear at the bottom-right on iPhone.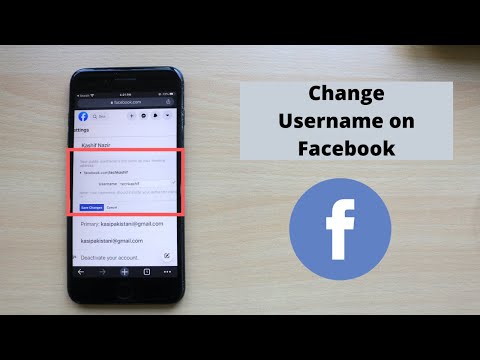 Abigail Abesamis Demarest
 3. Scroll down the list. Tap Settings & Privacy, then Settings.
"Settings & Privacy" is at the bottom of this page. Abigail Abesamis Demarest4. Tap Personal and Account Information.
5. Tap Name.
6. Enter your new name, then click Review Change.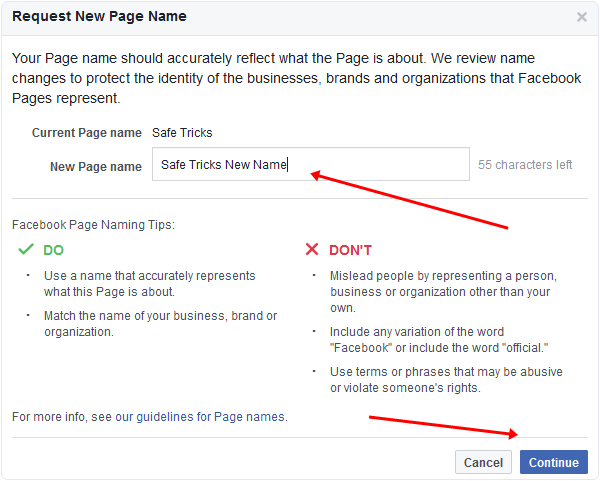
7. Enter your Facebook password, then click Save Changes.
How to use a nickname on Facebook1. Open the Facebook app for iPhone or Android.
2. Tap the Menu icon at the bottom-right of the screen for iPhone, top-right of the screen for Android.
3. Scroll down the list. Tap Settings & Privacy, then Settings.
4. Tap Personal and Account Information.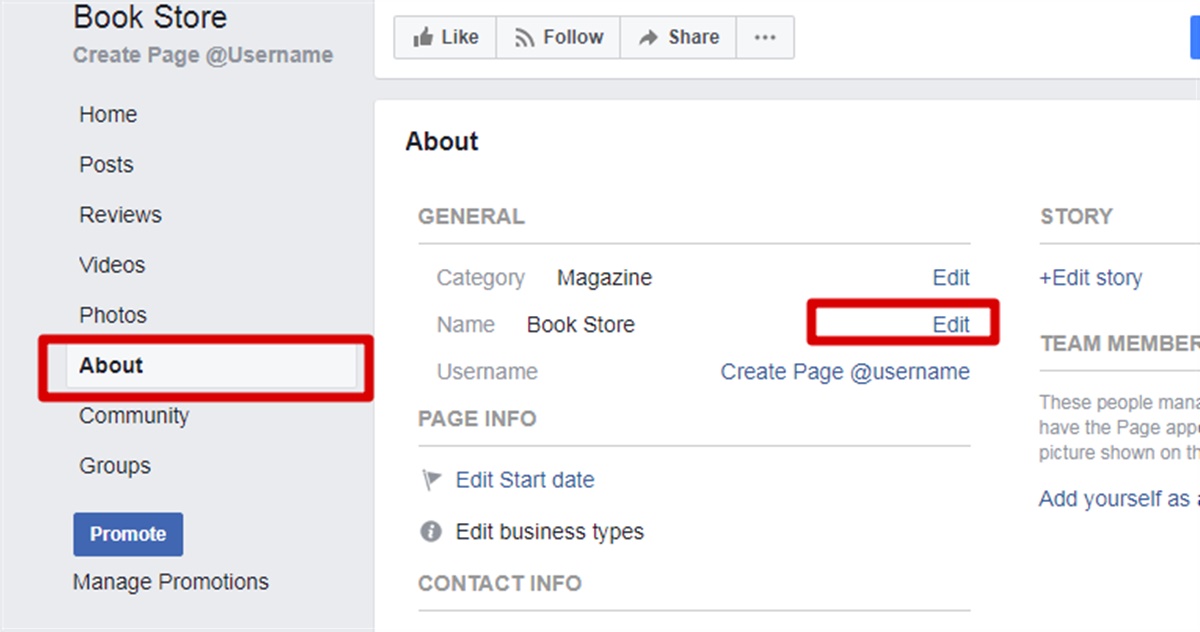
5. Tap Name.
6. Tap Add a nickname, a birth name.
Instead of changing your Facebook name, you can enter a nickname that appears on your profile page. Abigail Abesamis Demarest7. Choose a Name Type (nickname, maiden name, alternate spelling, etc.), enter your name, then tap Save.
Set a name type and a secondary name for your Facebook profile. Abigail Abesamis DemarestAbigail Abesamis Demarest
Abigail Abesamis Demarest is a contributing writer for Insider based in New York. She loves a good glazed donut and nerdy deep dives into the science of food and how it's made.
Read moreRead less
So, you’re having an identity crisis and want to learn how to change your name on Facebook?
Maybe only the second part of that is true, but either way, you’ve come to the right place.
Back in 2009 when everybody was creating their profiles on the still up-and-coming social media site, you’d see your Friends using all sorts of variations of their names. Last name first, replacing their last name with their last initial, and more.
Perhaps you too were using your middle name (to avoid your parents finding you, of course) and now you’re finally ready to become official Facebook friends with mom and dad. On the other hand, maybe you’ve been using your real name and want to change it up before you dive into your job search.
No matter your reason, you need to learn how to change your name on Facebook. We’ve got you covered.
Whether you’ve taken on the last name of your spouse or are simply trying to revamp your personal brand, you need to change your name on Facebook. Luckily, the process is simple. Follow along and I’ll walk you through the steps.
First things first – head on over to Facebook and log into your account using your email address and password. And speaking of, if you’re changing your name on Facebook for privacy purposes, you may want to consider learning how to change your Facebook password, too.
Once you’re logged in to your account, navigate to your account settings. You can do this by clicking the blue arrow in the top right corner and selecting the “Settings” tab. This will open up your General Account Settings, which is where you’ll find the option to change your name.
At this point, you’ll also have the option to edit your username. If you’re interested in that, consider learning how to change your Facebook username as well.
Your name will be the first thing listed under your General Account Settings. Click the “Edit” button on the right of the screen and you’ll see the options to change your name.
At this point, you can change your first name, your last name, or a middle name, as well as add other names. Make whatever changes you would like, and click “Review Change."
From here, you can preview your name and choose how it will appear on your profile – basically, you’ll choose the order in which your first and last name will appear. If you’re happy with your Facebook name, then you can enter your password (for security purposes) and click “Save Changes.”
When it comes to changing your Facebook name, be sure to review Facebook’s name standards beforehand. You can’t change your name within the next 60 days, so you’ll want to be sure before you make the switch!
Facebook has a full list of guidelines, but to summarize, your name can’t include any symbols, numbers, repeating characters, punctuation, or unusual capitalization. Additionally, you’ll need to stick to characters from one language.
You also can’t include a title of any kind – only names. This means no professional titles, religious titles, etc. On a similar note, you can’t use any words or phrases in place of a name, and any offensive or suggestive words are a no-no.
As a general rule, the name on your Facebook profile should be the name that your friends refer to you as in real life. If the name on your birth certificate is William, but you’ve gone by Billy your entire life, then you can be Billy on your Facebook profile. The point here is that the names don’t have to match exactly, but the display name does have to be a variation of the actual name that Facebook has on file for you.
Last but not least, keep in mind that profiles can only be for an individual – not a company. If you’re looking to use Facebook for business, you’ll need to create a separate Facebook business page.
You’ve officially updated your Facebook name and can be found (or not found) by whomever you’d like.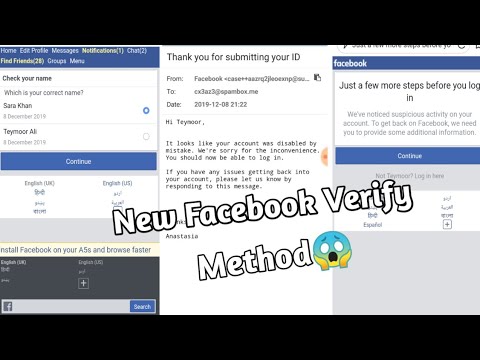
Interested in optimizing your Facebook profile even further? Be sure to check out our additional resources.
Claire Brenner
Claire is a former growth marketing team manager at G2. Born and raised in the Chicago area, her brief stint in Ohio (University of Dayton) gave her a new appreciation for deep-dish pizza, but left her well-versed in Cincinnati-style chili and "cities" with a population fewer than 400,000. While not writing, Claire can be found practicing calligraphy, seeking out the best dive bars in Chicago, and planning her next trip. (she/her/hers)
Help Center
Using Facebook
Groups
Managing People and Content
We're updating the mobile version of Facebook.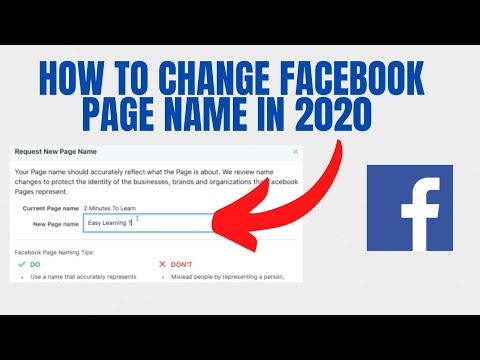 com. More
Manage people
How do I manage membership in a Facebook group that I administer?
How do I use the Admin Help tool in a Facebook group?
How do I filter requests to join a Facebook group that I administer?
How do I manage questions for group candidates and questions for members of the Facebook group I administer?
How do I turn on the member pre-approval feature in a Facebook group I administer?
How do I automatically approve group members on Facebook?
How do I pre-approve a member of a Facebook group so they can post to it without admin approval?
How do I assign an expert role to a member of a Facebook group that I administer?
How do I turn icons on or off for a Facebook group I administer?
How can I see group members on Facebook?
What's the difference between a member, visitor, and active member in public groups? nine0003
Who are unavailable members in a Facebook group?
Why is the total number of Facebook group members shown different from the actual number?
Content management
How do I choose what types of posts are available in my Facebook group?
How do I manage posts in a Facebook group that I administer?
How do I use the Admin Help tool in a Facebook group? nine0003
How do I sort posts in a Facebook group I admin?
How do I manage spam in a Facebook group that I administer?
How do I manage anonymous posts in a Facebook group that I administer?
How do I manage topics in a Facebook group that I administer?
Why are some posts empty in the Facebook group I administer?
Content policy enforcement and moderation
How do I delete or block someone in a Facebook group?
How do I temporarily mute a member of a Facebook group I manage?
How can a Facebook group administrator temporarily limit how often members post or comment?
How do I delete posts from a Facebook group that I administer? nine0003
How do I turn off comments on a post or replies to a comment in a Facebook group?
How do I set up alerts for moderation in a Facebook group?
How can Facebook group administrators limit the frequency of comments on posts?
How do I flag a rule in a Facebook group that I administer?
Group Quality
What is Group Quality and how does this tool work? nine0003
How can a Facebook group admin manage reported content?
How do I check the content in the "Tagged Facebook" section of a group I administer?
How can I automatically manage posts with false information in a Facebook group?
Admin/Moderator Team
What's the difference between a Facebook group admin and moderator?
How do I make someone an admin or moderator of my Facebook group?
How do I remove the administrator or moderator of a Facebook group?
How do I chat with other Facebook group admins and moderators?
How do I see the actions taken by other admins in our Facebook group?
How do I get the admin or moderator badge on Facebook?
Information
Confidentiality
Conditions and rules
Advertising preferences
vacancies
COOKIE
Create a page
Create page
90,000 use with certain colleagues and the necessary resources to collaborate on the creation of documents, presentations and spreadsheets.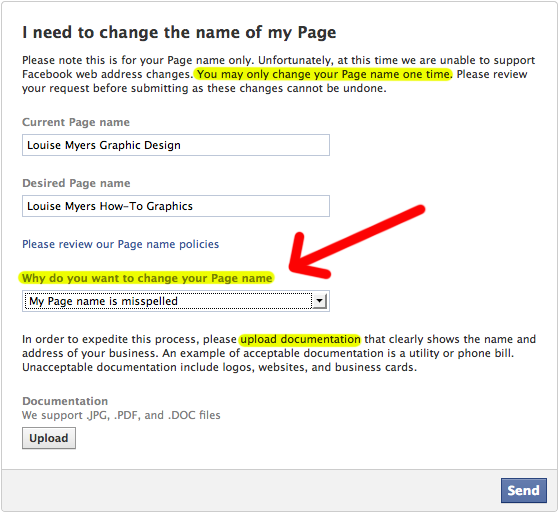 The use of @-sign can open up immediate access to context-relevant media, even in anticipation of potential resource requirements. nine0003
 Notes:
Find, select, and tag people by name, nickname, or email ID
Fast and almost instantaneous results of offers
Photographs shown on tiles for easy identification
nine0228Elements suggested before entry (null prompt)
Sign in to Microsoft 365 with your work or school account and navigate to a document that's saved to a SharePoint library or OneDrive for work or school.
Note: You must be signed in to Outlook on your computer for this feature to work. nine0003
Add a comment from the context menu or tab Review > Create Comment .
Enter @ and the first few letters of the user's first or last name, and then select the desired name (if the user does not yet have permission to open the document, you will be prompted to provide one).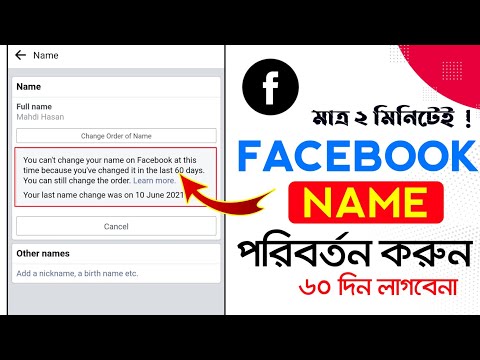 nine0003
Tip: You can easily remove everything except the name in an @mention for more informal communication. To add more people, type @ again and mention another person.
Sign in to Microsoft 365 with your work or school account and navigate to a document that's saved to a SharePoint library or OneDrive for work or school.
nine0002 Note: You must be signed in to Outlook for Mac to use this feature.Add a comment from the context menu or tab Review > Create Comment .
Enter @ and the first few letters of the user's first or last name, and then select the desired name (if the user does not yet have permission to open the document, you will be prompted to provide one). nine0003
Tip: You can easily remove everything except the name in an @mention for more informal communication. To add more people, type @ again and mention another person.
Sign in to Office.com with your Microsoft 365 work or school account and navigate to a document that's saved to a SharePoint library or OneDrive for work or school.
nine0228 Add a comment from the context menu or tab Review > Create Comment .
Enter @ and the first few letters of the user's first or last name, and then select the desired name (if the user does not yet have permission to open the document, you will be prompted to provide one).
nine0228Tip: You can easily remove everything except the name in an @mention for more informal communication. To add more people, type @ again and mention another person.
In Word or Excel for the web, you can use @mentions to assign a task to someone else when you post a comment or reply. When a task is created, it is tracked across all interactions and reassignments so that you can view its history. However, because tasks are currently only available to corporate users in Word and Excel for the web, you can't reassign tasks in other applications. However, you can still reply to comments, resolve issues by resolving comments, and reopen issues by reopening comment threads. You can also view the comment log in these apps, but you won't see the task log. For example, if you assign a task in Word for the web and then open the document in Word for desktop, you'll see the comment, but not the task. If you reopen the document in Word for the web, the task is visible again and you can interact with it. nine0003
To create a task:
Add a new comment or reply to an existing comment.
Use @mention in a comment. You will be able to assign the comment as a task to the mentioned persons.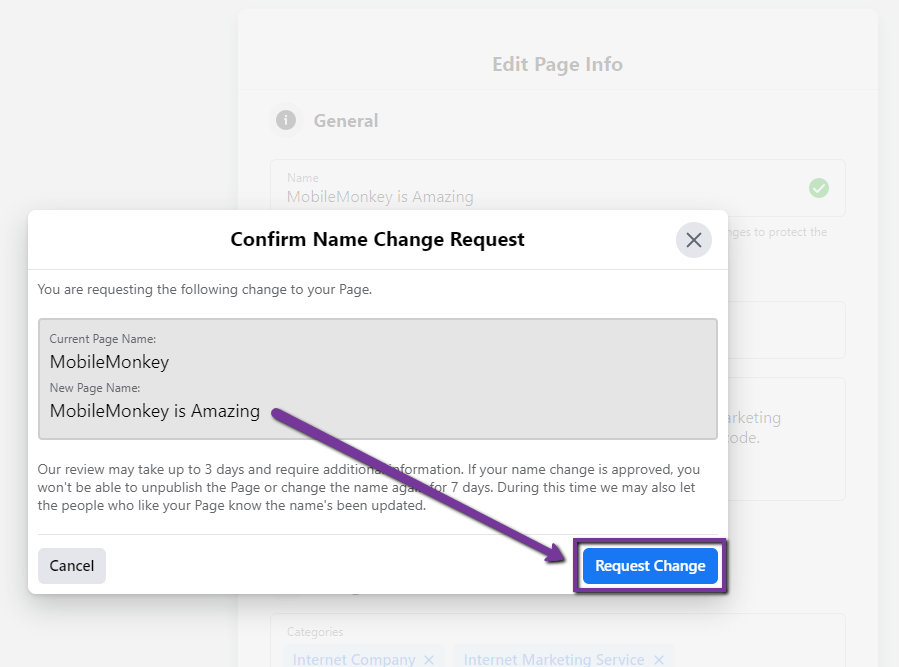
Post a comment or reply. The person who is assigned the task will receive an email notifying them that the task has been assigned. The assigned task will be displayed in the comment.
For task reassignment:
nine0242Leave an @mention in the reply field.
Check the box Reassign .
Post a response. The person who is reassigned the task will receive an email notification that the task has been assigned. nine0003
To resolve a task assigned to you:
At the top of the comment, hover over the circle next to Assigned to you . A checkmark will appear in the circle.
To resolve the task, click the flag circle.
nine0228To reopen a resolved task:
Open the "Notes" area.
At the top of the allowed comment, click the green flag circle.
Note: Conditional Access customers will not be able to send @mentions. For more information, contact your organization's IT administrator. nine0003
On your device, navigate to a document saved to a SharePoint or OneDrive for work or school library.
Select the words in the document and tap Create Comment .
Enter @ and the first few letters of the user's first or last name, and then select the desired name (if the user does not yet have permission to open the document, you will be prompted to provide one). nine0003
Tip: You can easily remove everything except the name in an @mention for more informal communication. To add more people, type @ again and mention another person.
Note: Conditional Access customers will not be able to send @mentions. For more information, contact your organization's IT administrator.
Select the words in the document and tap Create Comment .
Enter @ and the first few letters of the user's first or last name, and then select the desired name (if the user does not yet have permission to open the document, you will be prompted to provide one). nine0003
Tip: You can easily remove everything except the name in an @mention for more informal communication. To add more people, type @ again and mention another person.
When someone mentions you in a note in Word, Excel, and PowerPoint, you receive an email notification containing a link to the note in the file.
If you've been mentioned multiple times, you'll get the links in one post.
nine0002 Note: This feature is not available to users of the Microsoft 365 service operated by 21Vianet.E-mail notifications will include a context preview and inline replies if a comment is added by a user using the following versions of Word, Excel, and PowerPoint:
| nine0478 | Windows | Mac | Internet | Mobile devices (Android/iOS) | nine0495
|---|---|---|---|---|
| Word | Not yet | Not yet | Yes nine0502 | Yes |
| excel | Yes (version 1911 or later) | nine0002 Yes (version 16. 31 or later) 31 or later) | Yes | Yes |
| PowerPoint* | nine0002 Not yet | Not yet | Yes | Not yet |
*PowerPoint does not yet support inline responses
nine0002 To reply to a comment from an email notification, you must be using Outlook for Windows, Outlook on the web, or Outlook mobile. Support for Outlook for Mac and dark mode in Outlook on the web is coming soon.
 Administrators can use the SharePoint PowerShell cmdlet to disable context preview:
Install the latest SharePoint Online Services Module for Windows PowerShell.
Connect to a client using the Connect-SPOService cmdlet.
Run the following cmdlet: Set-SPOTenant -AllowCommentsTextOnEmailEnabled:$false
nine0002 Note: Email notifications for comments left on rights-protected files or marked as confidential using DLP rules will not include context preview or inline replies, regardless of whether the feature is enabled.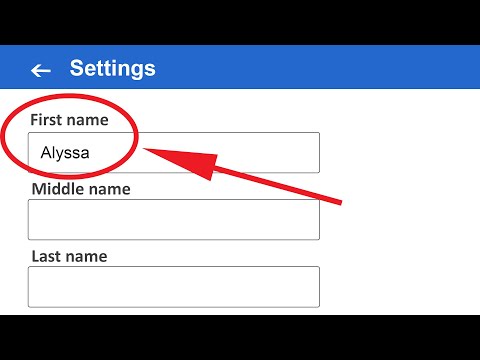
By default, the creator of the original document and all members of the comment thread are notified every time someone creates or updates a comment thread. If the thread is long and has multiple users, you can pause notifications and keep your inbox clean. nine0003
There is no global setting to disable comment notifications. Contributors in the thread must do it themselves in OneDrive. To turn off comment notifications, do the following:
In a new Microsoft Edge browser tab, click App drawer , then select OneDrive .