Article Last Updated: 05 Aug 2021
In latest Viber version (released around mid 2021) developers finally added an option to also include Photos and Videos along the chat messages in automatic cloud backup! This is a really cool feature that was missing for ages in Viber (read updated methods below). Please be aware of the storage quota and other limitations of free Google accounts!
Viber is a very popular app these days, now even more than ever, because of a global pandemic with Corona virus (COVID-19) going on. In any case, there are few ways to make a simple backup of your chats before you permanently delete them.
Viber App Logo
Now, why would you want to delete them in the first place? Well, I for one, like to keep things clean on my screen, and occasionally remove staled and old chats. That makes my Viber app and phone overall performance much more stable and faster.
On another hand, I have friends and relatives which NEVER, like NEVER, delete anything from their chats, even when they move on to their new phones and do upgrades. Can you imagine how much stuff you can find in there? Practically, entire person’s history :)
Anyway, enough of the chitchat and let’s get onto work!
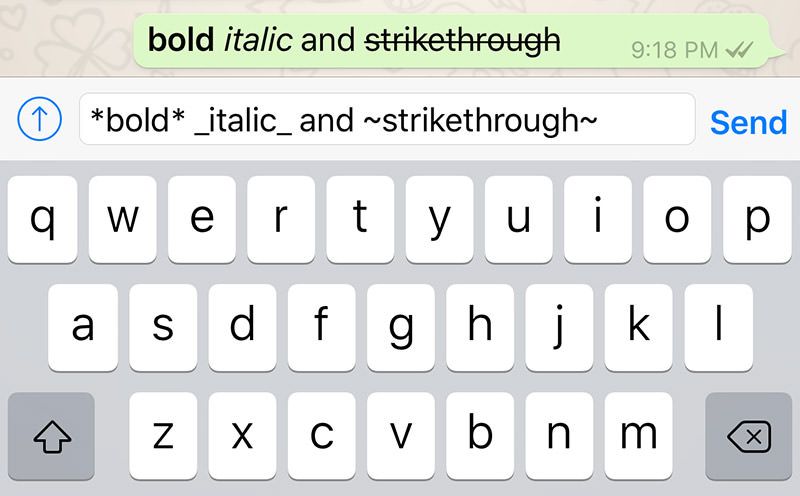
HOW TO MAKE VIBER APP MESSAGES & CHATS BACKUPSNote: Only textual messages can be exported this way – images and videos cannot! You have to manually backup Viber media files using separate procedure (e.g. copy/paste Viber images and videos files and folders to SD card or external USB flash memory stick).
This method is excellent for manual individual chat backups (e.g. chats with specific person or group).
This method – watch video tutorial here – is a variation of the screenshot method, but instead on your phone, you can install Viber for Desktop on your PC and once you connect it with your phone’s Viber account (just follow instructions on PC, it is very easy to do it), all your chats will be there as long as you have it on your phone. You can then use screen capture or screen recorder app on your computer to make “analog” backup just as described in Method #2 above. But, that’s not the main trick this time.
However, on computers we can export specific chat messages into text document of choice (e. g. TextEdit, Notepad, WordPad, Word etc.) as explained in the video.
Still, nice thing is that messages will have date/time timestamps and participant’s names in chronological order, along with the textual content next to every line.
This method is kind of analog and slow, and it comes in two different flavors (so to speak) but you can take screenshots of your phone’s screen of your particular chat simply by scrolling one step at a time and taking screenshots or screen capture.
Yeah, I know. It can be a tedious or impossible job if the chat is endlessly long. But, still, this is great to take at least partial backups of important conversations and – on a plus side – you will, at least, have an exact chronological order of messages with image thumbnails and video clip previews.
To make a screenshot on most modern phones just click Power/Screen Lock button shortly at the same time with Volume Down button.
Samsung Android Phone – How To Take A Screenshot
On other phones like Sony Xperia you have to long-press Power/Screen Lock button and simply select Take Screenshot from the menu. Your screenshots are stored on your phone’s internal memory under Pictures > Screenshots folder or similar (use Gallery app > open a screenshot > then hit info/properties to find exact path). You can then use other ways to backup them to your computer, cloud storage etc.
To make a screen capture / video recording, you either have to download a dedicated app, or use a built-in one if it comes with such feature. For example, most Sony phones have an excellent built-in screen recorder feature, Samsung phones require special app to be downloaded and enabled from app store, and for other phones just google the best solution.
Note (2020):
Only textual messages can be backed up and restored this way – images and videos cannot! You have to manually backup and/or restore Viber media files and folders (e.g. using copy/paste to/from SD card or external USB flash memory stick).
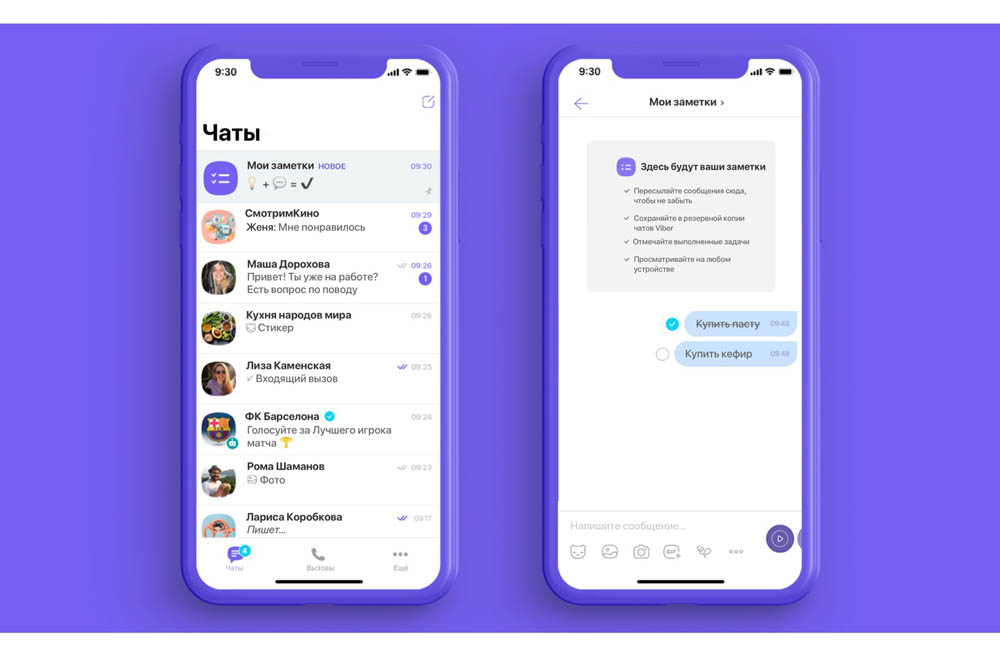
Update (2021): Viber developers finally added a long requested option to include photos and videos in automatic backups!
Viber App Google Drive Cloud Backup Feature 2021 Update – Includes Photos and Videos
Once a Viber cloud backup is created, you’ll be able to find it on Google drive tied with your selected Google account (Gmail address and password), but the files themselves may be encrypted (test it first before you permanently delete your original chats!).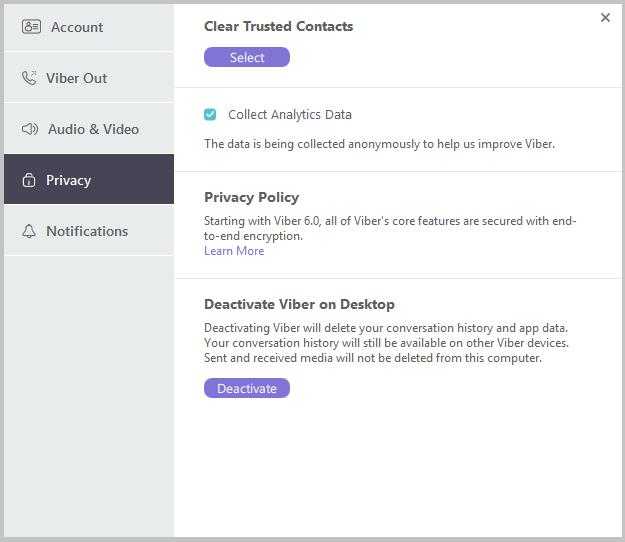
Backup is hidden / not visible in your G drive like other files, it is stored under HIDDEN APPS menu. You can access backup like this: open G Drive Settings (top left gear circle/wheel icon) > Settings > click on Manage Apps on the left pane of the new popup window, there should be Viber App listed
Google Drive – Where Are Viber Backups Located
CONCLUSIONHopefully, these ideas above will help you choose the best backup strategy.
“Hi! I have accidentally deleted some important chats on my Viber and now I want to get them back. Can someone tell me how to restore deleted Viber messages?”
If a similar query about deleted Viber chats has brought you here, then you are about to get it resolved right away. You might already know that Viber is a freely available cross-platform application that is used to chat with our contacts and do voice/video calls as well. Although the app is pretty popular and secure, users often complain about getting their messages deleted. Thankfully, we can use Viber’s native and third-party solutions to easily restore our chats. In this guide, I will tell you how to retrieve deleted Viber messages in 2 different ways.
Try it FreeTry it Free
safe & secure
If you have already taken a backup of your Viber chats on your Android or iPhone, then you won’t face any trouble restoring it. By default, Viber lets us link our Google Drive or iCloud account to our Android/iOS device to save our chats. In case of an unwanted loss of your chats, you can simply restore this previously taken backup to your Android/iOS device.
Android device users can simply connect the Viber app to their Google account. This will let them back up their chats to Google Drive, which they can later restore. It will include their Viber messages, group chats, attachments, and other app data.
Step 1: Back up your Viber chats
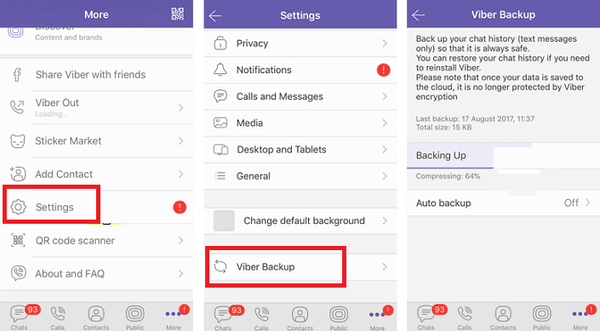
Firstly, make sure that you have already taken a backup of your Viber chats on Google Drive. To do this, launch Viber and go to its Settings from its menu. Now, browse to Settings > Viber Backup and tap on the “Backup” option. You can also connect your Viber account to your Google Drive from here.
Step 2: Restore Viber chats
If you have got your Viber messages deleted, then reinstall the application and connect your phone to the same Google account. While setting up your Viber account, you will get an option to restore an existing backup. If not, then you can go to its Settings > Viber Backup and tap on the “Restore” option.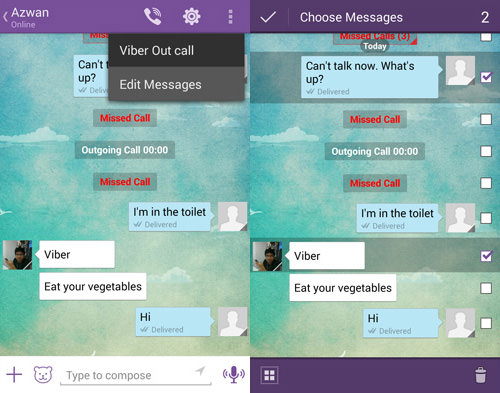 View the details of the previous backup file and tap on the “Restore” button again to get back your Viber messages.
Just like Android devices, we can also backup and recover Viber chat history on iPhones as well. To do this, you need to turn on the iCloud option on your iPhone and link Viber to your iCloud account. Here’s how to retrieve deleted messages on Viber.
Step 1: Back up Viber messages
To save your Viber messages, go to Viber’s Settings > Viber Backup and just tap on the “Backup” button. Make sure that you have enough free space on your iCloud to accommodate the Viber backup beforehand. Furthermore, there is also an Auto Backup feature here to automatically backup your Viber messages.
Step 2: Restore Viber backup
To restore the existing backup from iCloud to Viber, make sure that your device is connected to the same iCloud account where the backup is stored.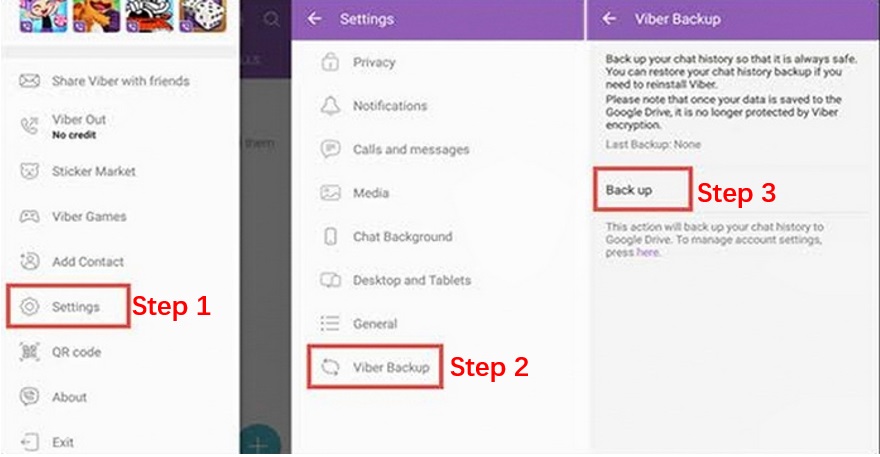 Go to its iCloud settings and turn on the iCloud Drive option as well as the Viber app sync feature from here.
Afterward, reinstall Viber on your device and link it to the same phone number. The application will automatically detect the presence of an existing backup and will inform you about it. Just tap on the “Restore” button now and maintain a stable internet connection to restore your Viber chats.
With the above-mentioned solution, you can learn how to restore deleted Viber messages from a previous iCloud/Google Drive backup. Though, a lot of users don’t like to backup their Viber data on the cloud due to low space, security concerns, or any other reason. If you wish to backup your Viber chats on your computer, then you can simply try MobileTrans - WhatsApp Transfer. It is a complete Viber data management application that can let you backup and restore your Viber chats to/from your computer.![]()
Free DownloadFree Download
safe & secure
With just a single click, you can save your chats, group info, contacts, attachments, and every other Viber data. Once you have taken a backup of Viber chats from your iPhone to PC, you can later restore it to the same or another iOS device. Apart from that, it can also backup/restore your phone and other social app data like WhatsApp, LINE, WeChat, and Kik. To learn how to restore deleted Viber messages with MobileTrans, follow these steps:
Step 1: Launch the Viber Backup Tool
To start things off, just install and launch the MobileTrans application on your computer and connect your iOS device to it. Select the “WhatsApp Transfer” feature from its home and select "Other Apps Transfer" option, then tap "Viber Transfer". Now, click on the “Backup” button to save your data.
Step 2: Backup Viber Chats
The application will automatically detect your iPhone and would display its snapshot. Just click on the “Backup” button and wait for a while as your Viber data would be saved on the computer.
Step 3: Restore Viber Backup
To learn how to restore deleted Viber messages, connect your phone to MobileTrans and browse to WhatsApp Transfer > Other Apps Transfer > Viber Transfer option. This time, click on the “Restore” option and view the existing Viber chat backups. Select the backup file of your choice from here that you wish to restore.
Click on the “Start” button and just wait for a while as the application would restore your Viber chats to the connected device.
I’m sure that after reading this guide, you would be able to backup and restore your Viber chats via iCloud, Google Drive, or your computer. As you can see, MobileTrans provides a quick one-click solution to backup and restore our Viber chats to/from a computer. It can also directly transfer data from one phone to another and backup/restore social apps data, such asWhatsApp backup&restore, LINE backup&restore, WeChat backup&restore, and Kik backup&restore. Feel free to give it a try and share this post with others to teach them how to restore deleted Viber messages as well.
Free DownloadFree Download
safe & secure
New Trendings
By Juli To Read 6 min Views 10.3k. Posted by
How can I save the history of correspondence in Viber? What are the ways for owners of iPhone, Android phones? Is it possible to save history from the Viber version for a computer? Find answers to these questions in our article.
Viber is needed not only for personal correspondence, but also for business. Therefore, some account holders greatly value the information received and remaining in the application. The developers of Viber honestly state that they do not store chat conversations on their servers, but at the same time they provide users with special options for copying messages. Including transferring the viber to another phone while saving the correspondence.
This article will discuss how you can save information and refer to the right letters at any time.
Contents
The Viber messenger has a built-in autosave conversation function. However, when you reinstall the application on your smartphone, all data is lost.
To avoid such losses, Viber provides the ability to create a backup copy, as well as share the history of correspondence as a separate file by mail or in another application.
You can enable the backup option as follows:
Help. The backup is uploaded to the cloud storage. Google Drive for Android, iCloud for iPhones.
This option allows you to copy the chat in Viber into a separate document, but without the ability to return the messages back to the program (restore as if backed up). If the essence of the transmitted information is important to you and it is not important that it is in Viber, this option for saving correspondence is for you.
Detailed instructions can be seen on the video:
Help. An archived .zip file should come to the mail.
For the IOS system, Viber developers did not come up with any discrepancies in sending the history of correspondence to the mail. Therefore, feel free to look into the instructions for Android.
As we wrote earlier, in Viber you can start the backup process, which in the future will allow you to restore the messenger system from scratch.
Attention! Media files, unsent and hidden messages are not saved. Likes are also non-recoverable.
Backup.In addition to setting up automatic copying, which we have already described, you can copy the data manually. On iPhones and Androids, the process is slightly different.
The copy will be saved in the Google Drive cloud.
The procedure for creating a backup copy on the iPhone is similar to the process on Android:

The only difference is that the IOS smartphone saves data in iCloud.
Unfortunately, the messenger on the computer does not provide the ability to save messages in Viber through backup.
Another interesting option for perpetuating correspondence in Viber is a special utility called Backup Text for Viber.
It allows you to export messages from Viber to an HTML, CSV or Excel document and send it to yourself by e-mail. This program is available on both mobile and desktop.
Attention! The utility interacts with Viber versions higher than 3.0.
How to make a backup figured out. Now let's look at the process of restoring message history in Viber.

Important! You must have a Google account set up to run the process.
For Apple products, there are two options for restoring backup data.
1 method is similar to the procedure on androids (see instructions in the previous section of the article).
Restoring a backup.Method 2:
If you need to witness only a couple of messages, or you don't want to bother, understand the algorithms and need to quickly capture the correspondence, you can do this using the screenshot function.
Available on both mobile and PC. To take a screenshot on Android devices, hold down the unlock and volume down keys at the same time. The second option is the "Home" key (the central large button on the main screen) + volume down.
Taking a screenshot on the iPhone is done by simultaneously pressing any of the volume keys and the on/off button of the smartphone.
On a computer, a screenshot is taken by simultaneously pressing CTRL and Print Screen (on some laptops, also FN). The snapshot is saved to the clipboard and will need to be pasted into a document or into Paint.
Keeping messages is sometimes very useful, because they can be excellent evidence in the judicial authorities.
They can be used to confirm threats, insults, agreements and other facts.
True, just taking a screenshot and coming to court with a printout will not work.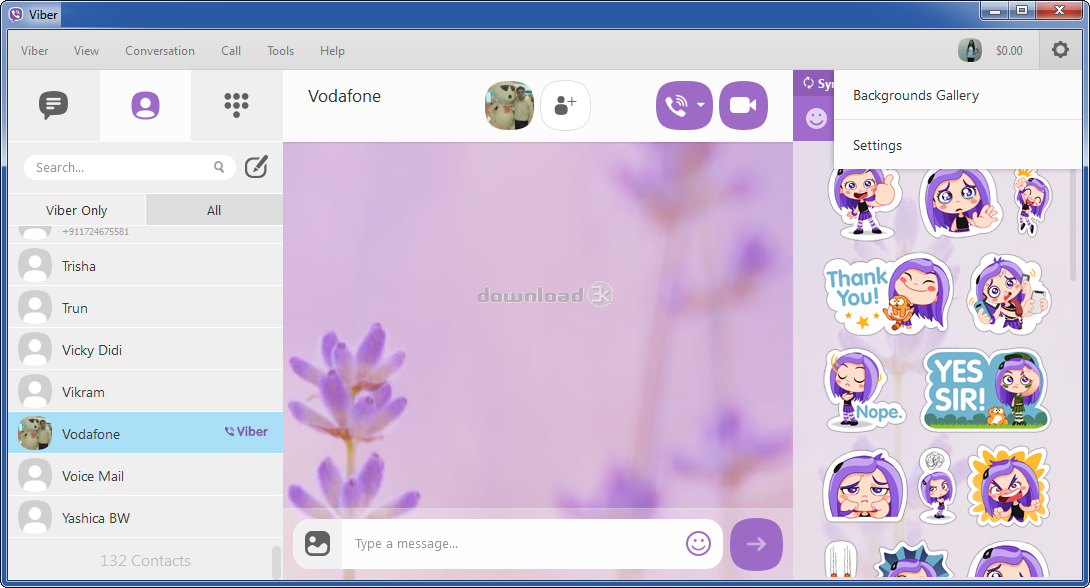 In order for the correspondence to acquire the status of reliable evidence, it will need to be notarized.
There are also cases when a person provides a copy of the conversation and a carrier (smartphone) with it. The judge in this case appoints an examination to certify the authenticity of the message history.
Help. Voice mail can also be used as evidence in court. To do this, it is decrypted.
Now you know how to protect yourself from data loss in the popular messenger. You do not have to worry about the disappearance of valuable information, as well as potential evidence for the court. Choose what suits you: a screen, a backup copy, a special program or an email history.
See video for detailed instructions:
Content
 Creating a backup copy
 Many Viber users periodically need to save the history of messages sent and received during their stay in the service. Let's consider what methods messenger developers suggest using to create a copy of the correspondence for Viber participants using devices running Android, iOS and Windows.
Since the information transmitted and received via Viber is stored exclusively in the memory of users' devices by default, the need to backup it is quite justified, because the device can be lost, fail, or be replaced after some time another. The creators of Viber have provided in the client applications for Android and iOS functions that ensure the extraction, as well as relatively reliable storage of information from the messenger, and you should contact them to create a copy of the correspondence history.
Saving conversations in Viber for Android can be done in one of two extremely simple ways. They differ not only in the algorithm of their implementation, but also in the final result, and therefore, depending on the final requirements, you can use them individually or, conversely, in a complex way.
By following the instructions below, you will be able to permanently back up information from the messenger and restore it virtually instantly in the Viber application at any time. All that is required to create a backup, except for the Android client, is a Google account to access the Good Corporation cloud storage, since Google Drive will be used to store a copy of the messages that we will create.
Read also:
Creating a Google account on a smartphone with Android
How to log into a Google account on Android
 Open item "Settings" .
 But much more often, the ability to create a backup copy of the correspondence and save it in the "cloud" is available immediately when you visit the messenger settings section of the same name.
Therefore, just click "Create a copy" and wait until it is prepared and uploaded to the cloud storage.
In addition to the above method of saving the contents of dialogs, designed to a greater extent to ensure long-term storage and restoration of information in critical situations, Viber for Android has a function that provides its users with the ability to create and receive archive with all messages sent and received through the messenger. In the future, such a file can be easily transferred to any other device using third-party applications.
With the release of version 10.6 of the Viber application for Android, the ability to access the function discussed below from the messenger menu has been removed! Since then, to implement the procedure described below, each time you need to activate the option in the client settings, resorting to a certain "trick" (the first paragraph of the next instruction)!
More details about working with files of this type are described in the last part of the article devoted to solving our today's problem in the Windows OS environment.
Users of Viber for iPhone, as well as service members who prefer the above-described Android, can choose one of two ways to copy the correspondence carried out through the messenger.
The developers of the iOS version of Viber, in tandem with Apple, have created a simple and effective system for backing up data from the messenger to the "cloud", available for use by any owner of the iPhone.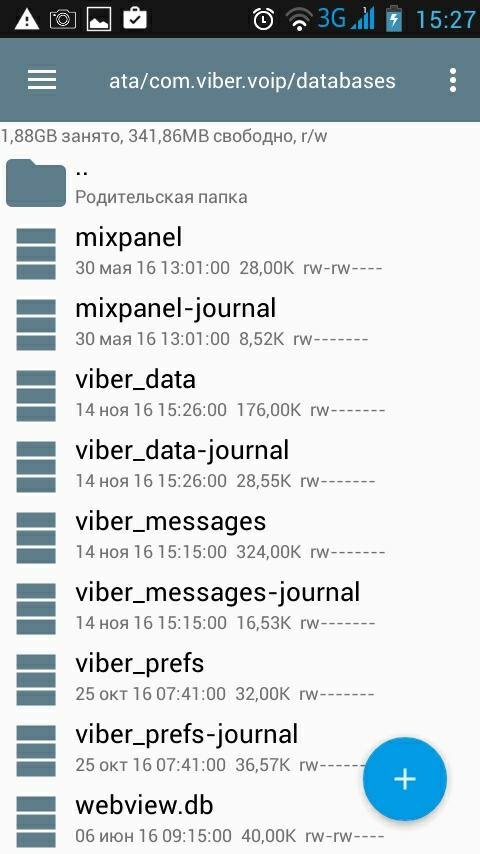 To successfully complete the operation according to the instructions below, an AppleID must be entered into the mobile device, since the generated backup copies of information are stored in iCloud.
Read also: How to create an Apple ID
 We touch on item "Create automatically" and select the time period when copying will be carried out. Now you can not worry about the safety of the information received or transmitted through Viber for iPhone.
 In versions of Viber for iOS released before April 2019, access to a function was opened that allows you to extract information from the messenger in order to save it on any device that is not even involved in the process of using the service or to transfer data to another user. In new builds of the client application, this option was “hidden” from users, but it is still possible to use it.
tinyurl.com/yyfnlrfj by entering it manually. Confirm request "Open this page in Viber" by tapping "Open" .  Tap on the function name.
 The Viber client for Windows, designed to access the service from a computer, does not contain all the functions provided in the mobile versions of the application. Access to options that allow you to save correspondence in the desktop version of the messenger is not provided, but it is possible, and most often most convenient, to manipulate the message archive and its contents on a PC.
If you need to save the message history as a file (s) on the PC disk, as well as view the information extracted from the messenger, you need to do this: