Likes/dislikes and reactions in Telegram are a powerful tool for promoting the channel.
Example of what likes/dislikes look like:
Example of text responses:
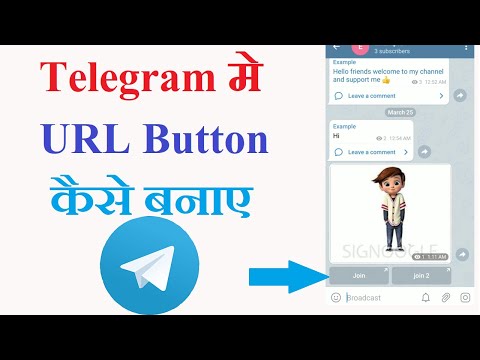
Adding buttons is easy-just one-two-three. This is done using free Telegram tools — one creates a bot, the other manages it.
We find @BotFather in the search — we need it with a blue checkmark, this is the official telegram bot.
Click “Run” or START.
Then we write the /newbot command to create the bot. Send messages.
We call the bot. You can use Latin or Russian letters.
We come up with a username — it should end in bot. We capitalize it in Latin letters. You can use the channel name if it is not occupied. You don’t need to use the word “bot” or “bot” in the title, but you do need to use it in the username.
Then @BotFather issues a link to the newly created bot and its token (a long string of numbers and letters) — we save them, they will still be useful to us.
You need to add the bot to the channel administrators. To do this, open your channel, click on 3 points — channel Management.
Find the Administrators tab and click on it. Click “Add Administrator”. By default, only the channel Creator is shown at first. Insert the link to your bot that @BotFather provided us with.
Click on the bot and confirm adding it to the Admin panel. Leaving the default options, click “Save”.
Now we need to configure the created bot via @ControllerBot — it is a bot that controls other bots. It must be linked to our bot administrator.
We find @ControllerBot in the search. Please note that there are many analogs in the search (just like @BotFather). We need a bot with a white mouthpiece on a blue icon, the username is @ControllerBot (not Bote, not Bota, but Bot).
Launch the bot — click “Run” or START. It offers you to choose a language that is convenient for you. We chose Russian.
The bot offers several commands to choose from. We need to add our own channel to it. to do this, click on the command /addchannel .
@ControllerBot suggests that we create a bot via @BotFather and copy the token to the chat.
Since we have already created the bot in advance, just copy and paste the token into the dialog box and press Enter.
After adding the token, @ControllerBot suggests adding the bot to the channel Administrators. We’ve already done this too, so skip step 2 and go to step # 2 — Send me any message from your channel (you can also send @username or Group ID.
The easiest way is to forward the message, which we will do. This can be any record from the group. Click the right mouse button — “forward the message”.
In the recipients, select @ControllerBot. The bot asks you to enter the name of the city to determine the time zone. This is necessary for sending deferred posts (likes/dislikes are not the only function of @ControllerBot).
The channel was added successfully, as @ControllerBot informs us. Now you can create posts and manage them.
Posts can be created from your own bot or just click on the “Create a new post” button, and we are automatically transferred to the bot — admin of the group.
Launch your bot as standard via the “Launch” button. The bot offers to customize the formatting, audible notification of the group and the link preview (on/off). You can leave notifications enabled by default — this means that each new subscriber will receive audio notifications about fresh posts on the channel, but they will have to manually disable them. You can immediately disable notifications — it makes sense if you post a lot of posts a day and don’t want to annoy your followers. After all the settings, click “Continue”.
Now you can create a publication. We write the desired text in the dialog box or insert the prepared text in advance. You can see what the published post will look like-the “Preview”button. When everything is ready, press Enter.
Here you can finally create reactions — add likes/dislikes and other emoticons. From the drop-down list, select the “Add reactions”button. In addition to reactions, you can add files, buttons, and comments.
In the dialog box, you need to send text with a slash / or emoticons without a space. For example: a class or fiscal unit. For likes/dislikes, choose 2 smiles — a finger up/a finger down. The bot has a hint on how to send proper emoticons.
It turns out like this. If we want to change the reactions, then click on the “Delete reactions” button and send new ones. But this must be done before the post is published to the group.
To send a post to a group, click the “Next” button. You can place the post immediately or make a delayed publication. Once again, we confirm the selected action.
We posted a post in the group. The number of certain reactions is very easy to follow — the number is displayed next to the Emoji.
You can add up to 6 different emojis to the reaction.
If you use the same reactions, you don’t have to re — enter them every time-the bot remembers the last combinations.
Check out below video for more details:
Talking with friends, sitting at a table in a cafe, we can almost always understand their reaction to the phrases we said. In the virtual world, things are different: determining whether we are interested in our interlocutors is not easy. For feedback, invented amusing mechanisms that evaluate the quality of content. Their name is familiar to everyone – likes.
We are used to putting hearts under photographs, evaluating “thumbs up” statements on forums .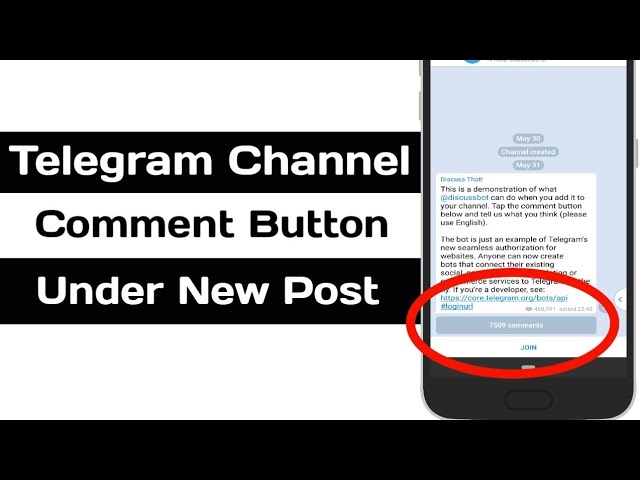 . But what if the reaction is needed in the messenger? After all, the developers did not provide such a function. And for these applications there are solutions.
We declare with all responsibility: you can put a Like in the Telegram messenger under the post. To do this, you need to know a couple of combinations. In the article we will tell which ones.
Contents
Likes on Telegram.
Likes in Telegram, as well as on any other platforms for communication, allow you to express your reaction to a text or multimedia message of the interlocutor.
For example, they sent you a picture with rough content. To express your dissatisfaction, it is not necessary to write a long message. It is enough to send dislike – thumbs down. The interlocutor will immediately understand that such content is not to your liking.
If you are the owner of the channel, then using reactions to publications you can promote your brainchild and win subscribers. In addition, likes will help to understand: is it interesting to the audience what you are sharing? If there are more dislikes, it’s time to configure the channel and change its contents.
To put a Like on Telegram, you will have to use the help of a bot – a special electronic assistant. This will be relevant for any version of the program and for all platforms. Let’s look at the algorithm of actions in more detail.
In order to start putting likes and dislikes in Telegram, you will need to remember a simple text formula. It must be inserted into messages.
On an Android phone
 For example: “@Like Today we’re going to sit in a cafe after work”, we send to chat.
On iphone
Actions will be similar:
Likes in polls.
As you may have guessed, the algorithm for creating likes on the desktop version will be the same. We, similarly to users of iPhones and Androids, put @Like in the text box.
By the way, the function works not only in private conversations. You can provide a message with buttons on channels and in groups. In these cases, you will find out a few opinions. You can include similar texts on other people’s channels.
There is another way to look at the reaction of subscribers to your channel in Telegram: make your own assistant – a bot.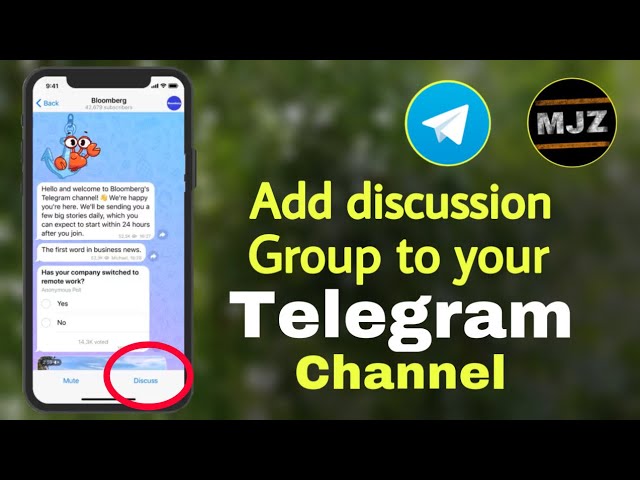 With the help of the robot, you can also track the statistics of channel visits that affect the cost.
Done! Now the audience will see your message, and clickable emoticons will be displayed below it. Everyone can like your posts.
The previous algorithm for a beginner will seem too tricky. If the first time you didn’t succeed in creating your own bot, don’t be upset! The messenger has built-in helpers endowed with the same “powers”. You can create nothing and use them.
There are two of them – Votebot and Likebot. The first is responsible for creating polls.
The questionnaire can be organized as follows:
Done! A questionnaire appeared in a friend or group.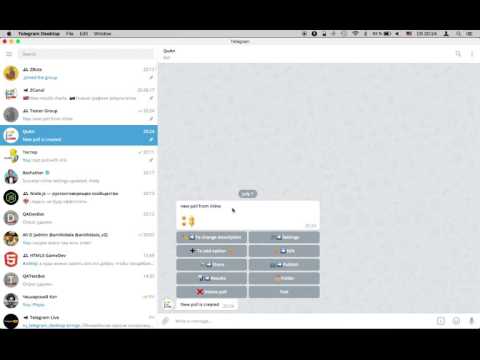 In the second case, everyone can answer it. In the first – you and a friend.
The situation with the like bot is about the same, only instead of “Yes / No” you can set emoticons for the reaction. After you select them, click on “Publish” and select a chat or your channel.
With the help of likes it is easy to find out the reaction of friends and subscribers to your posts. Adding bots is a simple task, start with those that are already built into the application. Thanks to the response of the audience, you can pump the channel, increase its cost and become more interesting for subscribers.
This website uses cookies to improve your experience. We'll assume you're ok with this, but you can opt-out if you wish. Cookie settingsACCEPT
Ivan Ivanichev
March 29, 2022
The easiest way is through the settings A more complicated way is through the bot
Reactions are a cool communication tool. They allow subscribers to express their emotions, and the owners of channels and groups to evaluate the involvement of the audience. We figure out how to enable likes and other emoticons under posts.
Previously, reactions in Telegram had to be connected through a third-party bot. Since the beginning of 2022, there is a built-in functionality - the update was released right before the New Year.
Reactions are enabled automatically in private chats, but they must be specifically enabled in groups and channels. How to do it in Telegram Desktop:

Done — now users can rate any channel or chat post in a couple of clicks.
You can also use the mobile app to make reactions available. In Telegram Android: open a channel or chat → tap on the name or avatar, and then on the pencil icon → enable reactions in the corresponding section. The iOS app isn't much different, just instead of an icon, there's a button with the text "Change".
You can also add reactions if you post to Telegram through a special bot. The process takes longer, but there are also advantages: you can use more emoji and add text.
If the bot is not yet connected to a channel or chat, you must first:
Next, you need to forward any post from the channel or group to @ControllerBot - and you're done.
To make a publication, you need to open a dialog with the created administrator bot:
In the article "How to create a poll in Telegram" we talked about other bots that allow you to put likes, dislikes and other emoticons under posts.
We share news and fresh articles, talk about new service
Once a week we send a selection of fresh articles and news from the blog.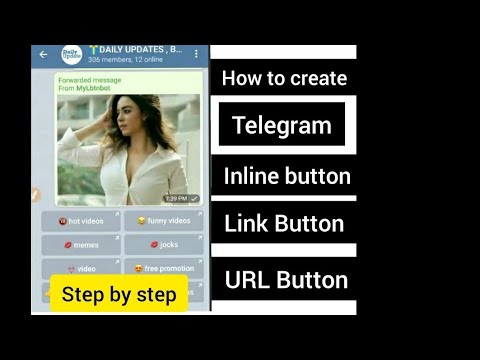 Trying joke, but it doesn't always work out
Our lawyer will swear if you do not accept :(
✓
Thank you, please wait for the letter.
Check your mail - the letter will arrive within 5 minutes (usually instantly).
In the free course "Rock-email" we will tell you in 15 letters how to set up email marketing in your company. At the end of each letter we give broken tattoos about email ⚡️
*Together with the course you will receive the Unisender
blog newsletter By leaving my email, I accept the Privacy PolicyOur lawyer will swear if you don't accept :(
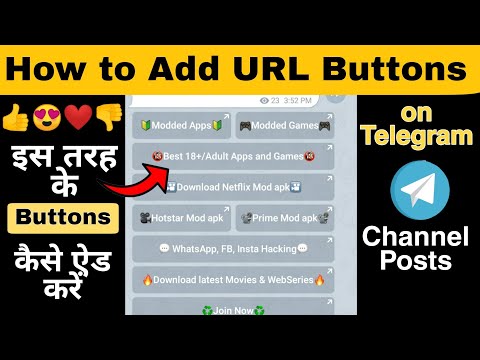
If you have your own channel in Telegram, then you should not be limited to standard features for maintaining it - texts and a link, you can add like / dislike buttons and reactions to publications.
In the article we will tell you how to make posts with reactions on your Telegram channel using two simple bots.
Reduce the budget of targeted and contextual advertising with click.ru
Click.ru will return up to 15% of advertising costs.
Cut the budget >> Advertising
Read also : How to make link buttons in a Telegram channel
Likes/dislikes and reactions in Telegram is a powerful channel promotion tool.
 They see how subscribers rate the content, and how active they are in the group, and decide whether they should subscribe to you or not.
 An example of what likes/dislikes look like:
An example of text reactions:
Adding buttons is as simple as one, two, three. This is done using free Telegram tools - one creates a bot, the other manages it.
We find @BotFather in the search - we need it with a blue checkmark, this is the official Telegram bot.
Press "Run" or START.
And then we write the /newbot command to create a bot. We send a message.
Name the bot. It can be in Latin, it can be in Russian letters.
We come up with a username - it must end with bot.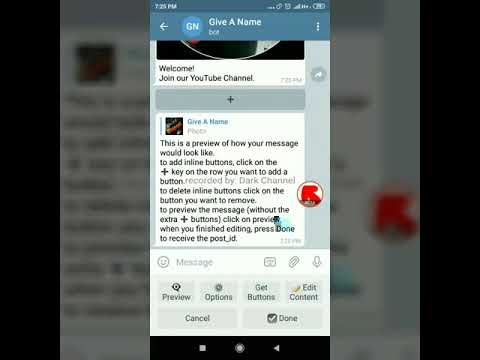 We write it in Latin letters. You can use the channel name if it is not taken. It is not necessary to use the word "bot" or "bot" in the name, but it is necessary in the username.
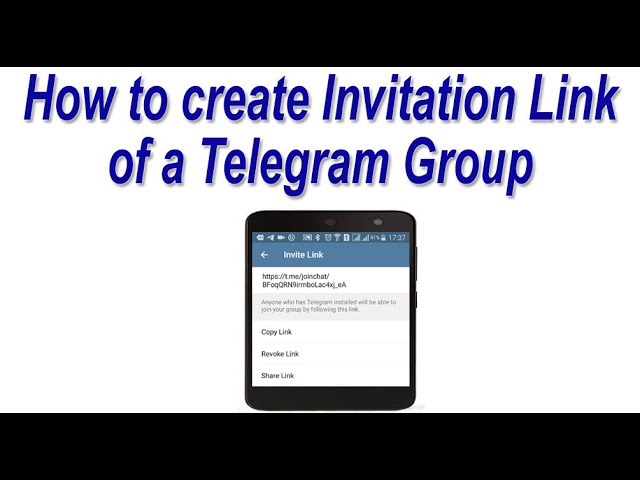
Next, @BotFather gives a link to the newly created bot and its token (a long line of numbers and letters) - save them, they will be useful to us.
You need to add the bot to the channel administrators. To do this, open your channel, click on 3 dots - Channel Management.
Find the Administrators tab, click on it. Click "Add Administrator". By default, only the creator of the channel is highlighted first. Paste the link to your bot provided by @BotFather.
Click on the bot, confirm adding to Administrators. We leave the default options, click "Save".
Now we need to set up the created bot via @ControllerBot - this is a bot that controls other bots. It needs to be linked to our admin bot.
Search for @ControllerBot. Please note that there are many analogues in the search (as well as @BotFather). We need a bot with a white mouthpiece on a blue icon, the username is @ControllerBot (not Bote, not Bota, but Bot).
Launch the bot - click "Run" or START. It offers to choose a language - choose the one that is convenient for you. We chose Russian.
The bot offers several commands to choose from. We need to add our channel to it, for this we click on the /addchannel command.
@ControllerBot invites us to create a bot via @BotFather and copy the token into the chat.
Since we have already created the bot, just copy and paste the token into the dialog box and press Enter.
After adding the token, @ControllerBot offers to add the bot to the Channel Administrators. We already did that too, so skip step and go to step #2 - Forward me any message from your channel (you can also send @username or Group ID.
The simplest is to forward the message, which we will do. This can be any entry from the group.Right click - "Forward message".
In the recipients, select @ControllerBot. The bot asks for the name of the city to determine the time zone. This is necessary to send delayed posts (likes / dislikes - not the only @ControllerBot function).0004
The channel was added successfully, as reported by @ControllerBot. Now you can create posts and manage them.
Posts can be created from your bot or just click on the "Create a new post" button, and we are automatically transferred to the bot - the group admin.
We start our bot as standard through the "Run" button. The bot offers to set up formatting, group sound notifications, and link previews (on/off). Notifications can be left enabled by default - this means that each new subscriber will receive sound notifications about fresh posts on the channel, he will have to turn them off manually. You can immediately turn off notifications - it makes sense if you post a lot of posts a day and do not want to annoy subscribers.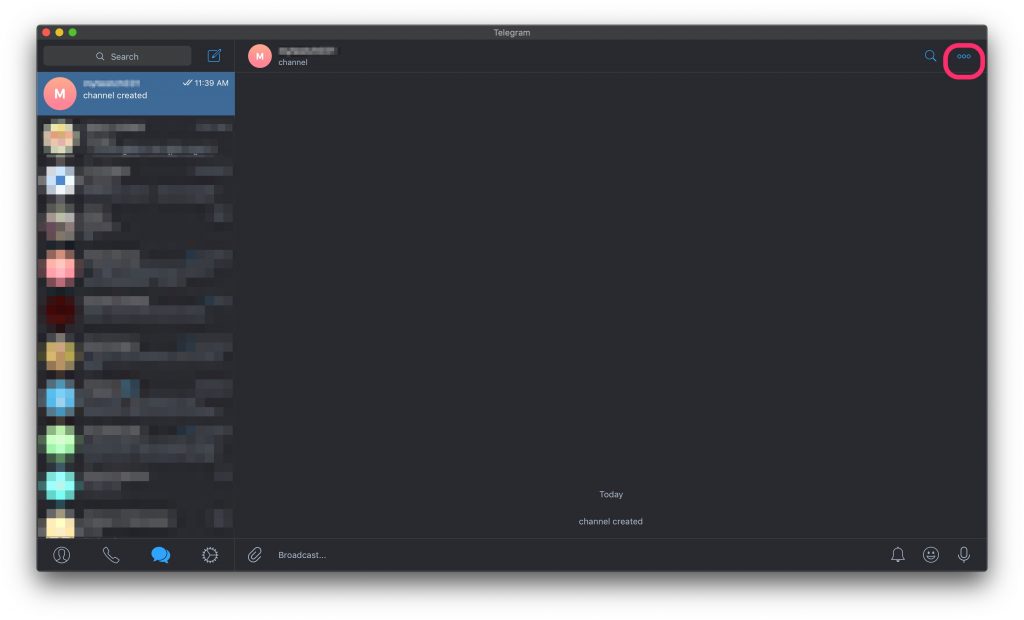 After all the settings, click "Continue".
You can now create a publication. We write the desired text in the dialog box or paste it prepared in advance. You can see how the published post will look - the "Preview" button. When everything is ready, press Enter.
Here you can finally create reactions - add likes / dislikes and other emoticons. From the drop-down list, select the "Add reactions" button. In addition to reactions, you can add files, buttons, and comments.
In the dialog box, you need to send text with a separator (slash) / or emoticons without a space. For example: class / fu. For likes / dislikes, choose 2 emoticons - thumbs up / thumbs down. The bot has a hint on how to send emoticons correctly.
It turns out like this. If we want to change the reactions, then click on the "Delete reactions" button and send new ones. But this must be done before the post is published to the group.
To send a post to the group, click the "Next" button.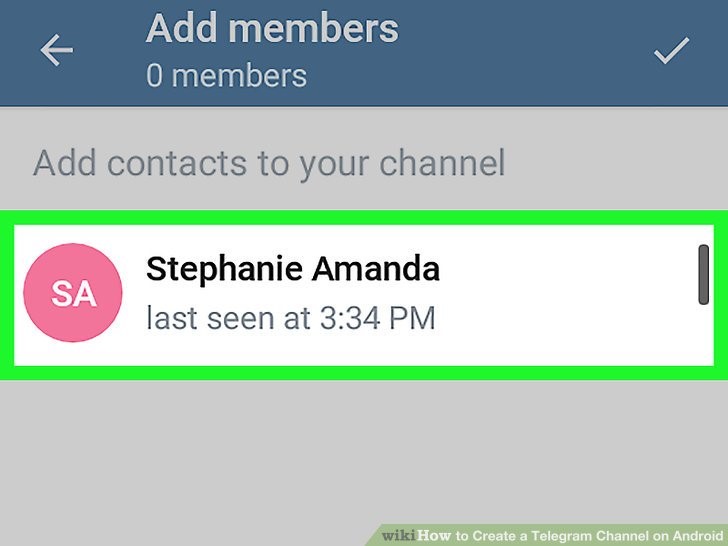 The post can be posted immediately or delayed publication. Once again confirm the selected action.
We posted a post to the group. It is very easy to keep track of the number of certain reactions - the number is displayed next to the emoji.
Up to 6 emoji can be added to a reaction.
If you use the same reactions, then it is not necessary to enter them again each time - the bot remembers the last combinations.
Buttons with emoticons are needed to increase engagement and find out the reaction of subscribers to the content - to the proposed idea, the content of the post, the material by the link, a specific person. You can also do surveys this way. Use not only like / dislike, but also any other emoji, as well as text reactions.
Useful links :
Comparison of Online Courses
Before you buy any course, compare conditions from different schools - tuition fees, discounts, duration, whether there is an employment program.