You can add your location to your Instagram bio on your business page and ensure potential customers on app know where you're located if they're interested in visiting later.
To add a business location to your account, first navigate to your profile page on the Instagram app.
This story is part of Business Insider's Guide to Instagram.
If you run a business account on Instagram, it may be essential to include a location in your bio so potential customers can easily determine where the business is located if they are interested in later visiting it.
By including your business location, you make it easier for users to navigate there using third-party apps like Google Maps and Apple Maps.
Adding a location to your Instagram profile bio is easy and can be done in just a few steps — and it takes less than two minutes.
Here's how to do it.
Check out the products mentioned in this article:
iPhone 11 (From $699.
99 at Apple)
Samsung Galaxy S10 (From $859.99 at Walmart)
How to add a location to your Instagram bio on a business account
1. Launch the Instagram app on your Android or iPhone.
2. Using the menu on the bottom of the screen, tap the profile icon, which resembles a person.
3. Under your account's bio information, select "Edit Profile."
Navigate to your Instagram profile page and then select "Edit Profile." Meira Gebel/Business Insider
4. Under "Public Business Information," select "Contact Options."
Select "Contact Options" from the menu's list. Meira Gebel/Business Insider
5. Next, select the "Business Address" text box to add a location.
Tap "Business Address" to add a location. Meira Gebel/Business Insider
6. Fill in the text boxes for street address, city/town, and zip code.
Fill in all the required fields. Meira Gebel/Business Insider
7. Once you've entered all of your location information, make sure it is accurate and then select "Done" from the top-right corner of the screen.
Tap "Done" at the top when finished. Meira Gebel/Business Insider
8. To finish, select "Save" at the top-right.
To finish, select "Save. " Meira Gebel/Business Insider
9. After you've exited from the Edit Profile menu, your business profile will now reflect the location you've entered. This location will be visible to anyone who views your profile, whether they follow you or not.
How to unmute posts on Instagram using the mobile app
How to post videos on Instagram in 3 different ways
How to clear suggested searches on Instagram on your Android device
How to edit your Instagram bio on desktop or mobile
How to get Instagram on your iPad by downloading the iPhone app version
Meira Gebel
Meira Gebel is a freelance reporter based in Portland, Oregon. She writes about business, culture, and technology for Insider. Her work has been featured in Digital Trends, Willamette Week, USA Today, and more. She is a graduate of Columbia Journalism School and San Francisco State University. Feel free to reach out to her on Twitter, where she can be found most of the time, @MeiraGebel.
Read moreRead less
Insider Inc. receives a commission when you buy through our links.
How to add locations to your Instagram bio in 2022?
You may have noticed that brands often add locations to their Instagram bios. You can add them too! Then, your followers will definitely find you offline. We will tell you how to get a clickable address displayed on your profile page. We will also share a way to put several addresses with clickable links to maps at the same time.
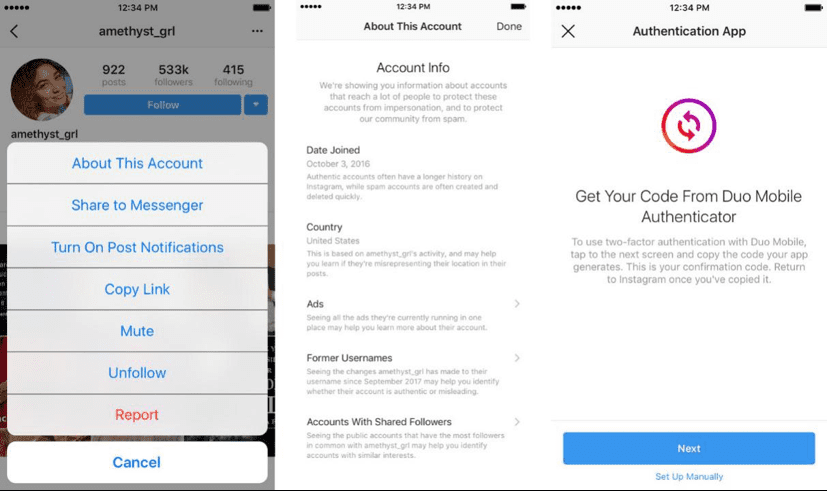
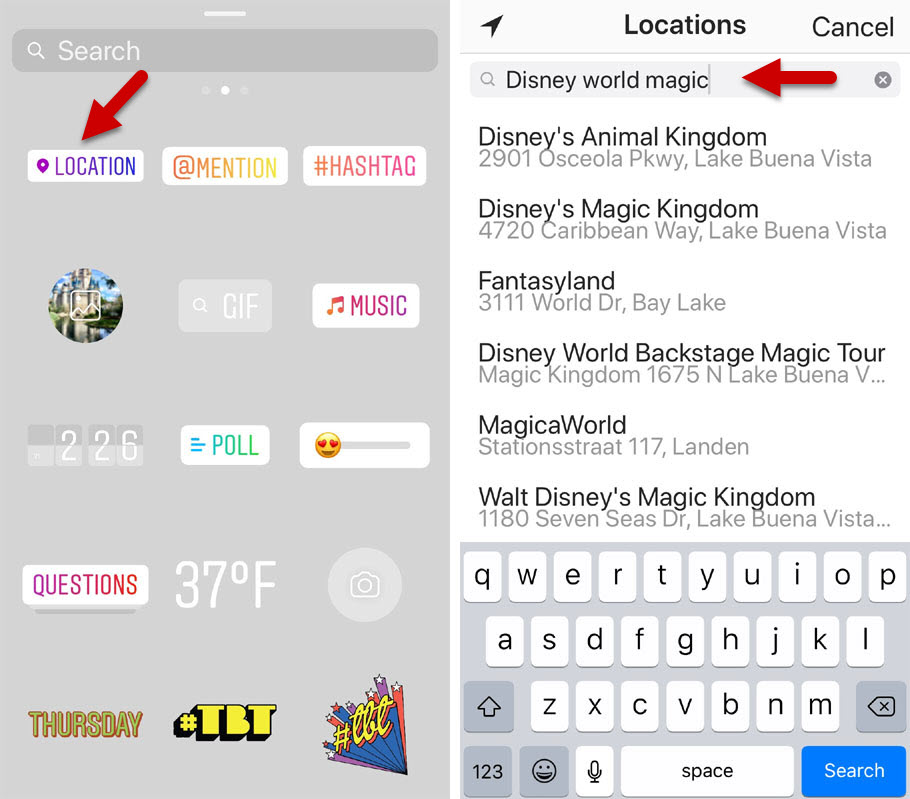
First, let's see how a location in an Instagram bio works. You add one, and when a user taps it, they are offered to open one of the map applications installed on their phone. The application that opens shows the address to the user.
When can a link to an exact address on a map be useful in your brand’s Instagram bio? Add a location when you want to tell customers:
how to get to your offline shops or offices if you have them. Give buyers a link to an accurate point on the map, and they will know exactly where and how to go there.
what regions you work with. You should add a location to your Instagram bio even if you do not have offline stores, it will help if your business is focused on an audience from a certain city.
For example, you sell on Instagram, but the delivery area is limited. You need to put the location in your bio because it will help users understand whether you will deliver the goods to them if they place an order. This saves characters in your bio text for other important things.
Note that you can add only one clickable address to your Instagram bio. If you work in several cities, put them using the second method that we describe in this article. So you can list all the places and avoid losing customers.
Put in your Instagram bio only the locations where you work with clients. The address of your head office is no use for clients if they can’t place or pick up an order there. It can only confuse them.
Now we will explain in detail how to add a location to your Instagram bio for those who recognize themselves in this part. We will also tell you what to do if you need to put several addresses at once.
You can add a location to your Instagram bio that will be a link. This can only be done in a Business account. If you want to tag a clickable address in a Personal or Creator account, use the second method that we describe in this article.
Since you can add a location to your bio only in a Business account on Instagram, let's first see how to switch to it. If you have already switched, go to the next step.
Switch to a Business account:
Tap your profile photo.
Tap the hamburger menu.
Select Settings.
Go to Account.
Tap Switch to professional account.
Tap Continue.
Choose a category.
Tap Done.
Select Business.
Tap Next.
Tap the cross to skip the settings for now. You can always adjust them later.
Now you have a Business account on Instagram, so, you can get to the next step and add a location to your bio.
Now you have a Business account. It means you can put a location on your Instagram bio. Add it in the profile settings.
Here is how to set a location in your Instagram bio:
Tap Edit profile.
Select Contact options.
Select Business address.
Put your city or town name, you can also specify your ZIP code and street address in the fields.
Tap save.
Tap save again.
Choose save one more time.
It’s your call how accurate the address in your Instagram bio will be. You can specify only the city, or add the street name and house number as well. You can also put your organization name, then, a map application will also show the floor and office number to a user.
If you ever want to change the location tag in your Instagram bio, follow the same steps we described in the instruction on how to add it.
There is another way to share locations with users in your Instagram bio. It doesn’t force you to switch to a Business account, and it allows you to add as many clickable addresses as you like.
What you need is to create a micro landing page with locations and add its link to your Instagram bio. In the bio text, let users know that the addresses can be found on this page. Here is what it looks like:
Below we give you step-by-step instructions on how to create a landing page for your Instagram bio like in the screenshot, and how to add locations on it. We use a link in bio tool for this.
We chose Taplink as the tool to create a page with location links for your Instagram bio too. It allows adding interactive maps directly to the page, and also clickable addresses with links to Google maps.
In addition to the locations, you can add other elements to your page for the Instagram bio, such as text, pictures, and links to instant messengers. They will help you to tell Instagram users more about each address — working hours, the issues it deals with, and how to contact the employees.
These are more examples of pages with maps and clickable addresses created on Taplink. You can follow the links to view the full pages.
Power fitness.
Pegasus.
Car rental.
After the registration, you will be directed to the page with templates. There are also options with added maps and location links. You can choose the one you like or choose a blank template to create a page from scratch for your Instagram bio, then you have to add everything manually.
We chose Empty template as an example.
Now you have a page for your Instagram bio, let's add locations and maps to it so that users can easily find you. On Taplink, the Maps block is provided for this.
Add a location to the page:
Tap Add block.
Select Map.
Write an address or copy it from maps and paste it to the address field.
Tap Add marker.
Optionally, specify working hours, the floor, office number, employees’ names and their contacts, and other details in the information field.
Repeat steps 3–5 to put another address. We added two more addresses as an example.
06. Tap Save changes.
This is how a map and clickable addresses on the page look in edit mode.
You can add as many maps and tag locations on your page as you want.
Let users, who come to the page from your Instagram bio, know what these locations are. Add some explanation, you have 17 different blocks for this. For example, you can write working hours using a block of text, or put a photo of beautiful interiors in each of your chain restaurants.
All blocks are added in the same way, just like the maps and location links. Select one and fill in the fields.
We added different blocks to our page for Instagram bio too. Now, there are not only locations but also:
Text with information about the vet clinic.
Banner with a picture of a cute dog, which is relevant to the topic.
Link on a page looks like a button. We added one for making calls.
Media and text block on the page tells potential customers about the principles that the vet clinic keeps. There is one more Media and text block with the clinic's contacts at the bottom of the page.
FAQ is usually used for answering questions. But we added it to place a list of services.
Form and payment allowed us to put an opt-in form for collecting users' contact details on the page.
Image carousel on this page shows customers' reviews.
Social networks allowed to add buttons that will lead users to the clinic's social accounts.
This is how some of them look on the page in edit mode:
Blocks added to the page that you create for the Instagram bio can be edited, moved, and deleted. Map blocks with locations too.
Here is how you can edit a block:
Tap a block.
Change settings and information in the fields. We changed the text that will be displayed in the buttons and the order of the links to give you an example.
Tap Save changes.
Remove a block you don’t need:
Tap a block.
Open the Action menu.
Select Delete.
Select Delete again.
We illustrated the steps, but decided to save the map with location links on the page :)
Now you've got all the blocks you wanted on the page. You may want the page to look different. If you do, change the design. There are more than 300 options on Taplink. You will definitely find some designs you like. Read about it here.
We applied a design, edited and deleted some blocks. You can see the result in the screenshot below. Follow the link to see the full page with locations that we are going to add in the Instagram bio: veterinary clinic.
When all the locations and maps are added, it’s time to publish the page. You will get a link that you should add to your Instagram bio.
Get the link to your page with locations:
Tap Publish.
Complete the web address of your page. It can be any word, we recommend writing your brand name.
Tap Connect.
Tap Copy link to get the page’s web address.
The final step is adding the copied link to your Instagram bio. We have described the instructions here.
Tip: direct users to the page in your bio from posts and link to it in your Instagram Stories. Thus, people will visit it more often.
If you have faced a problem adding a location to your Instagram bio, you can find the solution below.
You can add a location to your Instagram bio without switching the account type. The address can be mentioned in the text of your bio, but there is a better option. Use a micro landing page made on Taplink. This is possible in both Personal and Creator accounts.
There is a special setting that enables and disables the display of your business contact details on the Instagram profile page. If the location you have added is not displayed, check if the display is enabled. You can find the settings on the same page where you add the address.
The location appears in your Instagram bio if the Display contact info button is active. The active button is blue. If it's gray, you need to tap it to make it blue.
Note, when you enable contact details on the page, then your business phone and email also become available to Instagram users.
If you want to hide your business contact details and the location from Instagram users, disable their display in your bio. You need to tap the button to make it inactive. The button is gray when it is inactive.
You can remove the location from your Instagram bio at any time. Go to the contact options settings and tap the remove button.
Taplink is both for those who are holding a phone for the third time in their lives and for those who use it regularly all day long. Everyone can create a page with locations and add its link to their Instagram bio. This is because the service provides:
intuitive user-friendly interface.
more than 300 page templates that were created by marketers and designers specifically for increasing your sales.
a great support team that is quick to answer your questions.
Instagram allows you to add a single location link in your bio. You need to switch to a Business account to be able to do this. You put the clickable address in your profile settings.
A location added to your Instagram bio is a great way to develop your business. Read more ways to grow on social media to reach new people and increase sales.
You can add several clickable addresses using a micro landing page in your Instagram bio. This method is available to everyone, you don’t have to change the type of the account. You can even add an interactive map to the page as well as location links to specific addresses on Google maps. You can create your own landing page on Taplink.
Is one location in your Instagram bio enough for you, or do you need a micro landing with multiple clickable addresses? Write in the comments!
How to add a photo to Instagram from your phone
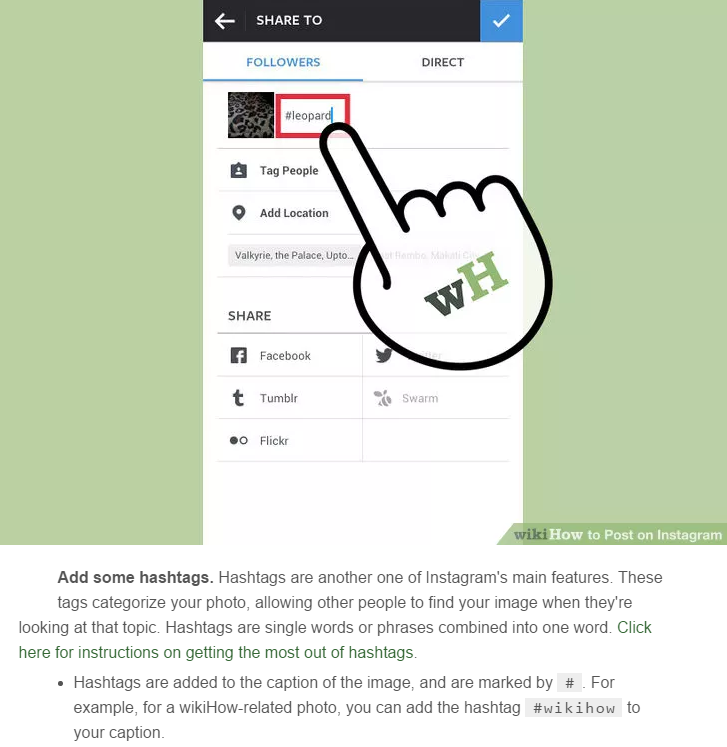
There are 3 main ways to add a photo to Instagram* from your phone: upload via the Instagram* mobile app, from your phone gallery, or via third-party apps. We will analyze separately how to publish a photo in a post and a story.
How to publish a post in the feed
Method 1: through the Instagram app*
Download the Instagram app* from the AppStore or Google Play. After registering or logging into your account, you will see the [+] icon in the upper right corner, click on it, and then in the menu that appears, click on the "Publish" button.
Interface for adding a new post to the feed
Next, you will open the interface for adding a post, you need to go through several steps:
select media files;
file editing: filters, light and color correction;
adding text, geotagging, etc.;
publication.
Let's take a closer look at how to post photos on Instagram* from your phone.
Select media files. After pressing the "Publish" button, you will be taken to the gallery on your phone. Select the photos or videos you want to post. At this stage, you can also change the resolution or select multiple files for one post.
Basic buttons for setting up a future publication
Editing files. After selecting all the settings, click the "Next" button in the upper right corner and go to the editing interface - here you can apply filters, adjust contrast, add sharpness, level the horizon, and so on.
Photo and video editing tools
Add text and labels. Once you've finished editing your media, click the Next button again and the last settings will open: select other social networks for publication, add text, geotag, user tags. Read more in our article “Instagram tags*: how and why to use”.
Final settings for posting to the feed
Big text cannot be posted on Instagram*, the limit is 2200 characters. But if you really need it, we have an article with recommendations for the design of such publications.
Publication . When you're done with the settings, click "Share" in the upper right corner and the post will appear in your account feed and in the news feed of your followers. Hooray!
The process of loading a post and its display in the news feed
Method 2: through the phone gallery
This is a quick way when you just need to post one file with a caption, because this way you can not customize the display format, add multiple files to one post, edit media files, add geotags and tag other users.
How to post photos on Instagram* from your phone using the gallery:
open the gallery on your phone;
click on the desired photo;
select "Share" from the menu;
click on the Instagram icon*;
click on the "Publish" button;
write the text for the post and click "OK" in the upper right corner;
then click "Share" in the same place.
That's it - the publication has been uploaded to your profile!
Step-by-step process of publishing a photo in the feed through the phone gallery
If you do not know what, why, why to publish and how to design, I recommend our free course "7 Steps of Content Marketing". In the course, we tell you what content marketing is, how to create, design and promote content on the Internet. All this will help you understand how content works, why publish posts and how to make them beautiful and interesting.
Method 3: Through other apps
You can upload photos to Instagram* from photo and video editing apps, feed maker, and so on. Almost all of these applications have the ability to automatically add media files to Instagram*.
For example, the Canva photo and video editor app has a Share button in the top right corner. In the additional menu, the Instagram icon appears *, when clicked, it transfers to the social network application with the option to select a placement: Stories or feed. After clicking on the "Feed" button, the standard Instagram interface * opens to add a post to the feed.
Algorithm for publishing a post in the feed from the Canva application
How to post a Story
You can upload a photo to Instagram stories* from your phone both directly from the Instagram application* and through third-party applications.
There are 3 ways to post a Story via the Instagram app*:
click on the blue [+] icon on your avatar in your feed or profile;
click on the [+] button in the upper right corner and select the "History" item;
in the news feed, swipe from left to right across the screen.
Ways to add a new Story: icon next to the avatar and icon on the right
After clicking, the interface for creating Stories will open. By default, the camera opens, and you can immediately take a picture or video for stories. If you want to add files from your phone's gallery, tap the button in the bottom left corner of the screen or swipe up from the bottom of the screen.
Stories interface when first opened with camera enabled
The story editing interface also has many useful features:
Text. Different fonts, colors, ways of writing, animation. To add, click once on the screen or on the “Aa” icon at the top right of the screen, the interface for adding text will appear with additional settings at the top of the screen.
Drawing. Brushes for painting on photo or video. Click on the ellipsis in the upper right corner and on the "Draw" button. The color and brush settings will also appear at the top of the screen.
Interactive Instagram stickers*. Questions, tests, polls, mentions, geolocation, music, hashtags and so on. To select stickers, click on the sticker icon in the upper right corner or swipe up from the bottom of the screen. Read more about them in our article with an overview of new stickers.
Masks. Filters and AR masks to decorate stories. There are masks both from Instagram* itself and from users. To get as many creative masks as possible, subscribe to major bloggers who create such masks. For example, bloggers ya.molli or georska.
Stories editing interface
Once you're done with your stories, select the publish option at the bottom of the screen:
Your Story. Stories are immediately published on your profile, and all users can see it.
Close friends. Stories will only be seen by users that you have added to your Close Friends list.
Right arrow. An additional menu will open, which has the function of sending stories in a private message.
Selecting a publishing location Stories
Stories, like posts, can be posted from other applications, only when choosing a placement, you need to click "Stories".
Check out the Instagram Stories* section of our blog for inspiration on how to use Stories on both your personal blog and brand account.
If you feel uncomfortable publishing posts and stories from your phone, use services for publishing from your computer, such as SMMplanner. With it, you can design and post posts and stories from your computer and specify the time at which they will be automatically published.
Scheduling a new post on Instagram* from a computer via SMMplanner
What is the convenience of delayed posting and how to post on Instagram* from SMMplanner, read in our article "Delayed posting services on Instagram*: why they are needed and how they work".
Briefly about the main
Universal algorithm of actions for posting photos on Instagram* from the phone:
download the Instagram application*, register or enter your profile;
click on [+] in the upper right corner and select "Publication" or "History";
edit media file, add interactive elements or labels;
click the "Publish" button.
Done! Your first story or post is already in the feed.
how to add highlights to instagram without adding to story?
By Milena Anderson Reading 5 min. Views 7 Posted by
Short answer
Click the plus button in the upper left corner of the screen to create a new selection.
Name your selection and click Create.
Click the Add button in the upper right corner of the screen.
Select videos or photos. you want to add to your highlight, and click Finish.
How to add highlights to Instagram without adding to your story | Manual
How to Add Instagram Highlights without Adding to Story (2022 Hack)
How to Add Instagram Highlights without Posting?
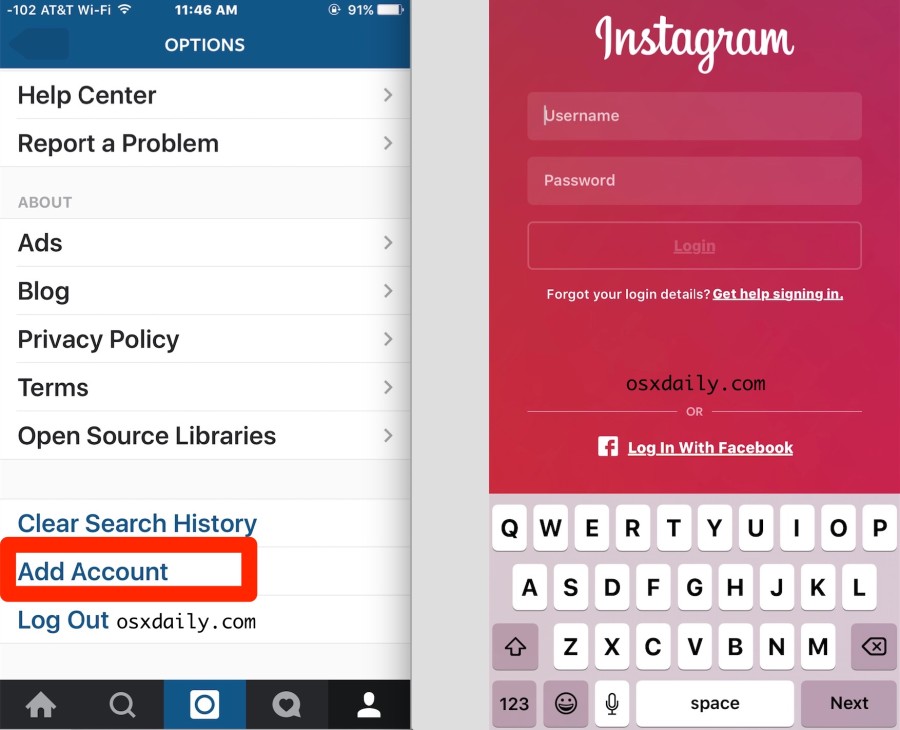
You can add highlights to Instagram without posting using the app's saved posts feature. To do this, open the app and tap the profile icon in the bottom right corner. Then click on the three lines in the top left corner and select Saved Messages. From here, you can add highlights by clicking on the plus icon in the top right corner.
Can I add directly to Instagram highlights?
Yes, you can add directly to Instagram Highlights. To do this, open the story you want to add to favorites and click the "Highlight" button at the bottom of the screen. Then select the highlight where you want to add the story.
Is it possible to post a highlight without adding it to the story?
Yes, you can post highlights without adding them to the story.
Can highlights be added without a story?
Yes, you can add highlights without a story. Highlighting is a great way to highlight the most important points in your book without having to read the entire book. They may also be useful for reviewing the book later.
How to change your highlight on Instagram without posting 2021?
You can't change your Instagram highlight without posting 2021. If you want to change your highlight, you'll need to delete the old one and create a new one.
Can you post the best moments from close friends?
Yes, you can post highlights from close friends. You can also post highlights from people who are not your friends. However, if you're posting highlights from people who aren't your friends, you need to make sure you have their permission to do so.
Can I add highlights to Instagram from my camera roll?
Yes, you can add highlights to Instagram from your camera roll. Just follow these simple steps: Open Instagram and go to the “Your Story” section. Click the “+” icon at the bottom of the screen. Select the photos and videos you want to add to your story. Click Next. Add a caption and click Share.
How to change highlight cover?
To change the skin of the selection, first open the "Basic" tab in the menu. Then click on the skin of the selection you want to change. A menu will appear from which you can select a new cover.
How do I update the Highlights cover?
To update the highlight cover, first open the Settings menu. Then select "Bookmarks" and "Highlight". In the Cover section, select the image you want to use as the highlight cover. If you don't have an image you want to use, or if you want to create a new one, select "Create New Cover".
How do I add a highlight cover?
To add a highlight cover, open the document you want to highlight and select the text you want to highlight. Then click the "Select" button on the toolbar. The selection toolbar will appear. To add a cover to highlight, click the Add cover button. The Add Cover dialog box will appear. Select the cover you want to use and click OK.
How do you put together highlights on Instagram?
To combine the best moments on Instagram, open the app and tap the profile icon in the bottom left corner. Click the Edit Profile button, then scroll down and click Highlights. Click the "+" button to add a new selection, then give it a name and choose a cover. Click the "Add Photos" button to add photos to the selection, then click "Done". Repeat this process for each selection you wish to create.
Can you see who is viewing your Instagram highlights?
Yes, you can see who is viewing your highlights on Instagram. To view this information, open your profile and click "Statistics" located in the upper right corner of the screen. From here, select “Highlights” from the menu on the left side of the screen. Under “Who Viewed Your Highlights?” you can see a list of people who have viewed your highlights.
 Meira Gebel/Business Insider
  Meira Gebel/Business Insider
  " Meira Gebel/Business Insider
  She writes about business, culture, and technology for Insider. Her work has been featured in Digital Trends, Willamette Week, USA Today, and more. She is a graduate of Columbia Journalism School and San Francisco State University. Feel free to reach out to her on Twitter, where she can be found most of the time, @MeiraGebel.
 The application that opens shows the address to the user.
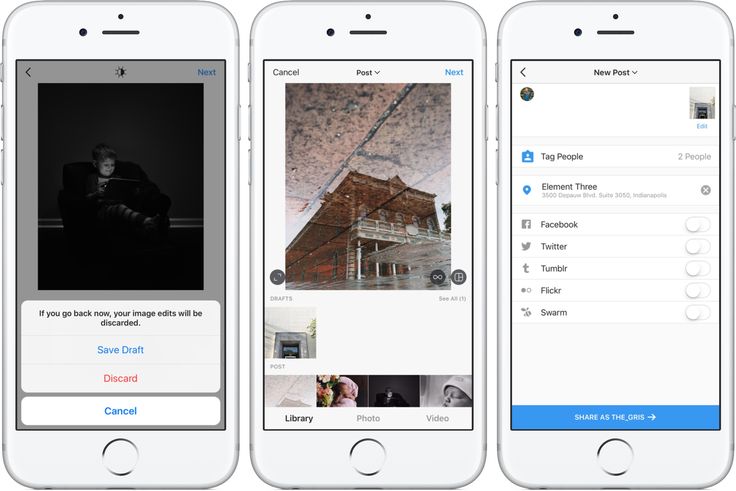 So you can list all the places and avoid losing customers.
 We use a link in bio tool for this.
 For example, you can write working hours using a block of text, or put a photo of beautiful interiors in each of your chain restaurants.
 You may want the page to look different. If you do, change the design. There are more than 300 options on Taplink. You will definitely find some designs you like. Read about it here.
 Thus, people will visit it more often.
 You put the clickable address in your profile settings.

 Hooray!
  In the course, we tell you what content marketing is, how to create, design and promote content on the Internet. All this will help you understand how content works, why publish posts and how to make them beautiful and interesting.
 Stories are immediately published on your profile, and all users can see it.
 To do this, open the app and tap the profile icon in the bottom right corner. Then click on the three lines in the top left corner and select Saved Messages. From here, you can add highlights by clicking on the plus icon in the top right corner.
  They may also be useful for reviewing the book later.
 The Add Cover dialog box will appear. Select the cover you want to use and click OK.