Summary
Wondering how to upload multiple photos to one story and share it on Facebook? Keep reading, and you will find out how to create a Facebook Story with multiple pictures.
A Facebook Story is a great way to share things and express feelings. While sometimes, just one photo or video clip isn’t express everything. Adding more than one photo to one story helps, and you can even try to add music to one Facebook Story with multiple photos. Also, adding multiple photos to a single story is a great way to share a longer story or event on Facebook.
How To Add Multiple Photos to One Facebook Story - 2 Ways
How to Add Multiple Photos to One Facebook Story as a Photo Collage How to Post Multiple Photos to One Facebook Story as a Photo Album
How to Add Multiple Pictures to Facebook Story with Music
Preview
Photo Blog
Use This Template
Preview
Summer Fashion Instagram Reels
Use This Template
Preview
Daily Life
Use This Template
Also Read: How to Post Long Video on Facebook Story >
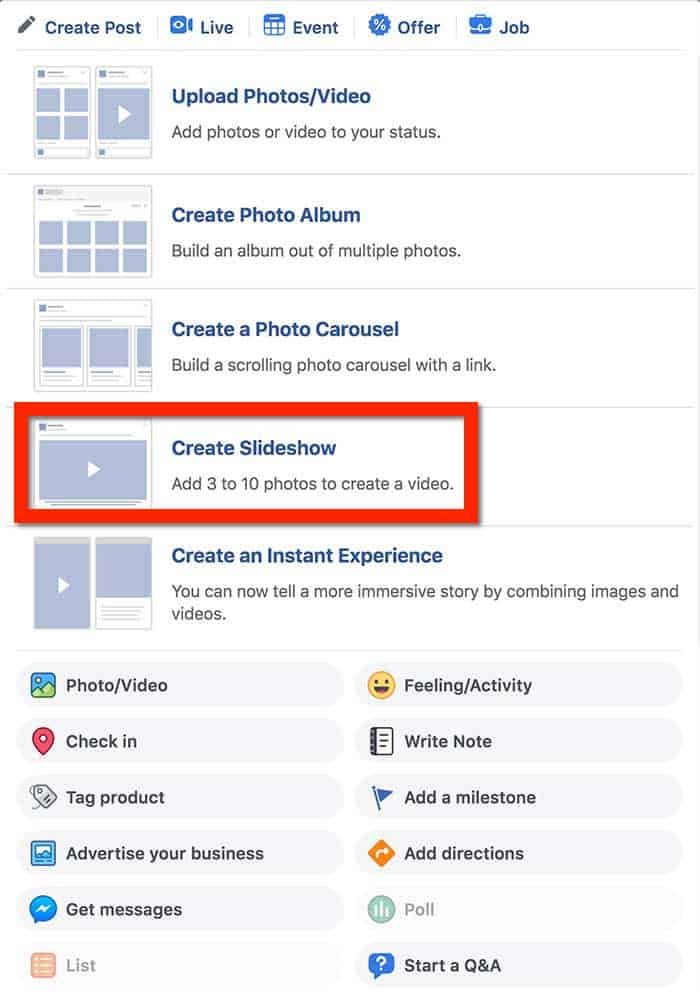
There are two ways to add more than one photo in one Facebook story - add several photos to one frame on one Facebook story as a photo collage, and post multiple photos to one story as a photo album.
To add more than one photo on one frame in your story, you just need to make use of the sticker feature of Facebook to add several pictures one by one.
Just follow these steps below to add several photos to your Facebook story as a photo collage:
Step 1
Launch the Facebook app and click on the "Create a story" option.
Step 2
Here, you can upload a background photo from your phone, take a picture, or choose a background color.
Step 3
After that, you can add multiple pictures for the story. Click on the sticker option on the top right side of the screen and select your gallery(a little square with a mountain-like landscape).
Add Multiple Photos to Facebook Story as Collage
Step 4
Then, you should access your gallery or camera roll. Here you can pick the picture you want to add to your story, and then you can move and resize it on the background if you want.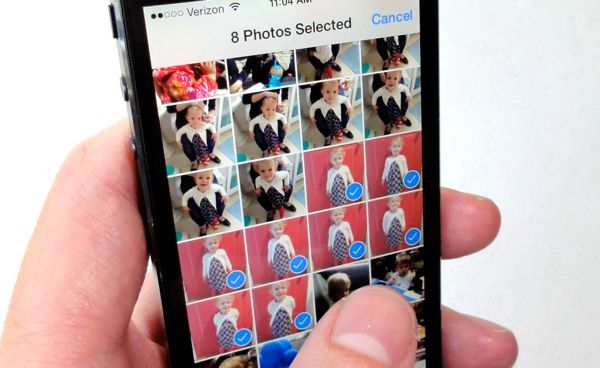 (Repeat the process to add as many pictures as you want.)
Step 5
Once done, click on the "Share to Story" button at the bottom, and you will be able to share your Facebook story with more than one photo in one frame.
Another way to add multiple photos to a single Facebook story is by posting your photos as a photo album. You can add multiple pictures at once from the Gallery directly.
Step 1
Open Facebook and click the "+" to create a new story.
Step 2
Then, you should see the photo gallery, click on the Select Multiple button.
Add Multiple Photos to Facebook Story as Album
Step 3
Choose the photos you want to post one by one and click "Next".
Add Multiple Photos to Facebook Story
Step 4
Then, you can preview your photos and edit each photo freely.
Step 5
After that, you can click Done and publish your Facebook Story with multiple photos by clicking on the Share to Story button.
You may also want to create a Facebook story with multiple photos and music. Although adding multiple photos in a single Facebook story is super easy, there is no way to add music to multiple pictures and videos to Facebook Story.
So, if you want to create a Facebook story with multiple pictures and music or try to add music to multiple pictures on Facebook story, you'll need a workaround - using a Facebook Story video editor, like FlexClip, to create a Facebook story with multiple photos and music.
Get Started Now View Templates
Step 1
First, choose the proper ratio of 9:16 for your Facebook Story, then upload your multiple photos or video clips to FlexClip.
Add Multiple Photos to Facebook Story with Music with FlexClip - Step 1
Step 2
Add your photos and clips to the Timeline. Here you can also use the Picture in Picture feature to make a photo collage for your Facebook Story, then edit the pictures with FlexClip’s powerful features.
Add Multiple Photos to Facebook Story with Music with FlexClip - Step 2
Step 3
Add music to your Facebook Story. You can upload your own one or use FlexClip's royalty-free music.Here, you can trim it and adjust the position where the music starts and ends, apply the fade in/out effect to make the music match your photos.
Add Multiple Photos to Facebook Story with Music with FlexClip - Step 3
Step 4
(Optional) Add animated text, and funny elements to add style and vibe to your Facebook Story.
Once you're satisfied with your video, you can save it to your computer in 480p, 720p, 1080p HD and then post it to Facebook
Final Words
That’s all for how to add multiple photos to one Facebook Story. We hope this guide was helpful, and you were able to add several photos on Facebook Story and also to add music to Facebook with multiple photos using FlexClip.
Sandy /
Has 4-year of professional photographing experience. Very much into recording every detail of life. She is passionate about all things related to video production, and loves to exploring tips and tricks about it.
The default Android app of Facebook is great but it has some limitations, as far bulk photo and video uploads are concerned.
You can’t upload multiple photos to your Facebook account from Android in one shot. You have to tap the camera icon, select the photo which is to be uploaded, upload the photo to one of your existing photo albums and then repeat the same procedure for other photos that are in the upload queue. There is no way you can upload a batch of photos and pictures to your Facebook account by using the default Android app.
This can be a bit irritating, when you are in a state of hurry and want to quickly upload the snaps you have just taken. Another disadvantage of Facebook’s Android app is that there is no way you can upload photos to your custom Facebook pages, directly from the Android device.
In this tutorial, we will learn how you can bulk upload photos and videos to your Facebook account from any Android phone or tablet device.
1. First you will need the Speedy uploader application for Android (lite). Install it here.
2. Once the app is installed, add your Facebook account and grant all the necessary permissions. You can use multiple Facebook accounts with the app, so this is again another neat feature the default Android app of Facebook is lacking. Uploading the same photos to multiple Facebook accounts from your Android becomes a requirement, if you travel a lot and dont have access to internet from a desktop computer.
3. Once, all the permissions are granted, you will have six different options – quick upload, batch upload, upload videos, manage existing photo albums, manage pages and manage videos. Additionally, you can also post a status update on your Facebook account by using the post button at the top.
4. Tap the “Upload Photos” button and the app will automatically scan your Android’s internal SD card for photos, screenshots and other images. Select the ones you want to upload by tapping on the thumbnail
5. By default, the app will upload photos to your Facebook wall but you can also choose a specific photo album where the photos need to be uploaded. This is just awesome, because you need not upload everything to your wall and let anyone see the photos you have just uploaded. If you have correctly chosen privacy settings for your photo albums, there is no need to worry who can see your Facebook photos and who can’t.
6. After the photos have been uploaded, you can tag your friends or add picture captions. I personally hate mass photo tagging but those who love it, will thank the person who developed this application.
Sharing is made easy, thanks to the “Share” button which lets you share the photo on your wall or with specific friends of your choice
The app can also upload multiple videos to your Facebook profile or to one of your pages where you are the administrator. There is only one downside, there is no way to get notifications whenever someone posts a comment on your photo or video. But that should not be a problem with most Facebook users, who already use the official Facebook app for Android.
So when you are back from a holiday and have dozens of photos and videos waiting to be uploaded to your Facebook account, there is no need to hunt for cables, connect your phone to a computer and manually upload them on your Facebook profile. In fact, you can upload them right away the moment they are taken.
Related: Share Facebook photos with people not on Facebook
Useful apps » Facebook
Updated: 05/28/2020, author - Ilya
Ilya is the editor-in-chief of the site softdroid.net. He is the author of several hundred guides and articles on Android setup. For about 15 years he has been repairing equipment and solving technical problems for iOS and Android. I dealt with almost all more or less popular brands of mobile smartphones and tablets Samsung, HTC, Xiaomi, etc. I use iPhone 12 and Samsung Galaxy S21 with the latest firmware version for testing.
Information about the author
It seems like a simple task to upload a few photos to Facebook. But if this needs to be done for a single status update, things get more complicated. This can be done, and in two ways - through the creation of a photo album or without it. We will look at how to do this through a browser on a PC or through the Facebook mobile application.
Any modern browser installed on your system will work, be it Chrome, Opera or Firefox (if Facebook opens correctly, then this browser can be used for posting).
Note . Only 5 images will be displayed in your friends' newsfeed. Users will see a number with a plus sign indicating that there are additional photos to view.
There is another way to publish a series of images in the Facebook feed - through the creation of albums. In short, you create an empty album, add photos to it, then a link to the album appears on your public timeline. Through it, your subscribers will be able to access the content of the album - all published photos.
So, in order to create an album in Facrbook and publish a link to it:
If you use mobile applications to browse social networks, you can share a series of photos with your friends via Facebook. This method is no less convenient than those described above. And for iOS and Android, the method is no different.
To post some photos to Facebook:
Please rate the article:
Ilya is the editor-in-chief of the site softdroid.net. He is the author of several hundred guides and articles on Android setup. For about 15 years he has been repairing equipment and solving technical problems for iOS and Android. I dealt with almost all more or less popular brands of mobile smartphones and tablets Samsung, HTC, Xiaomi, etc. I use iPhone 12 and Samsung Galaxy S21 with the latest firmware version for testing.
Didn't find the answer to your question? Perhaps you will find a solution to the problem on our Youtube channel! Here we have collected small but effective instructions. Watch and subscribe to our youtube channel!
Watch on Youtube
↑ Back to top ↑
Our life is full of stories, and we publish some of them on the Internet. But sometimes not everything is expressed by just one photo or video. Adding more than one story helps.
While Facebook and Messenger Stories offer different features, publishing one automatically publishes them to the other. This saves us from having to host it again on a different platform. But what if you want to add a second photo or video to your story? How to do it?
Well, you are in the right place. Here we will guide you on how to add a second photo or video to your Facebook and Messenger story.
Let's get started.
There are three ways to do this.
When you add the first image or video to your story, return to the Facebook app home screen. You'll notice that the old Add to Story button is still there. Click on it to add a second photo and post it just like you did the first one. Repeat the process in the same way if you want to add more.
When viewing a published story, if you decide to add more photos, Facebook also provides this option.
To do this, open a published story by clicking "Your Story" on the Facebook home screen. Then click the Add button at the bottom of the published story.
Hint: Notice the highlight icon in the screenshot above? Just like on Instagram, you can also create highlights on Facebook.
Take a new photo or upload an old one by clicking on the gallery / camera roll icon next to the camera shutter button and share it.
Another way to add more stories is to use the Facebook Camera. To do this, tap the camera icon in the top left corner of the Facebook app. Here, capture a new photo or select one from the gallery and enhance it. Then either tap on the Your Story option to directly share it with your story, or tap on Share followed by Your Story (on the next screen).
There are two ways for desktops and laptops.
Open the Facebook website and click the "Your Story" button. This will open the story you recently posted. On the published material, you will see the "Add to your material" button. Press here.
Facebook will take you to the Create Post popup. Now add a photo and hit the share button. Make sure your News Feed is selected instead of News Feed.
You can add multiple stories without opening an existing published story. To do this, click on the status box or the area that says "Write something here." A pop-up window will appear. Now add a photo and select the "Your Story" option. Then click the "Share" button. If you select Newsfeed, Facebook will post it on your wall. So be careful.
Using this method, you can add multiple photos to your story at the same time. To do this, select multiple photos instead of just one, or simply click the plus sign (+) next to the selected image.
If you use Messenger to add stories to Facebook and Messenger, here are two ways to post multiple stories from the Messenger app.
Note . The desktop version of Messenger does not support stories.
Whether you posted your first story on Facebook or Messenger, when you launch Facebook Messenger, you'll see a "Your Story" option with a plus sign. Click on it. Then use the camera button to take a new photo or select an existing one. Finally post it.
To do this, launch the Messenger app on your phone and tap the camera icon at the top. Upload your story and publish as usual.
When you add more than one story on Facebook or Messenger, they all play as a slideshow in the order they were added. Currently, you can't reorder them after they've been published. To fast forward a story, tap the right edge of the screen to move to the next story. Touching the left edge will take you to the previous story.
Click here to see our articles page with instructions/guides
If you like the effects and filters offered by the Facebook Camera, you can add its shortcut to your phone's home screen for quick access.
To do this, follow these steps:
Step 1: Launch the Facebook application on your phone.
Step 2: Click on the camera icon in the top left corner. Then click the settings icon at the top.
Step 3: Click on Add Camera Shortcut. A pop-up window will appear. Click on Ok to confirm.
Now go to your phone's home screen. There you will find the Camera app. Click to launch. You can use it to post photos to your feed and story, or save them to your phone.