Looking to save Instagram photos and add user-generated content (UGC) into your Instagram strategy?
Start by saving photos on Instagram and sharing them on your feed and stories. While UGC is a great way to grow and engage your community — it comes with its own set of rules.
In this blog post, we’re outlining how to save Instagram photos, credit the original creator, and best practices on how to reshare (legally) on both your feed and Stories.
With Instagram testing removing likes in certain countries, there’s been a lot of talk about Instagram Saves and what it means for the Instagram algorithm.
What we do know is: the more saves a post gets, the higher the quality content is, the more likely it’ll show up in people’s feed.
For tips on how to get more Instagram Saves on your Instagram posts, read our blog post where we go deep into Instagram Saves.
So, how can you use Instagram Saves to elevate your content strategy? One way to do this is by searching for branded content (or on-brand content) on Instagram and saving it to a Collection for future use.
Collections are an awesome way to keep your saved content organized — think of it as a Pinterest board, just on Instagram.
Step #1: Select the post you want to save.
Step #2: Tap the bookmark icon on the bottom right corner.
Step #3: To see your Saved posts, go to your profile and press the 3 lines in the top right corner.
Step #4: Press “Saved”
Step #5: To create a collection, tap the ‘+’ button in the corner, and name your collection. Press “Next” to save.
Step #6: Now, select the photos you want to add to the collection.
Step #7: Press “Done”.
While the feature is there to keep your favorite posts together in one place, there is currently no way to save pictures directly to your camera roll from Instagram.
If you want to save images to your camera roll for future use, it’s best practice is to reach out to the original creator for permission. This is a crucial step — It’s very important to correctly credit the original creator.
Another way to do this is by using Later’s UGC Tool. With the UGC tool, you can search branded hashtags, posts you’re mentioned in and/or tagged in.
Ready to start using UGC in your Instagram marketing strategy? Later makes it easy for you to find, plan, and schedule your user-generated content.
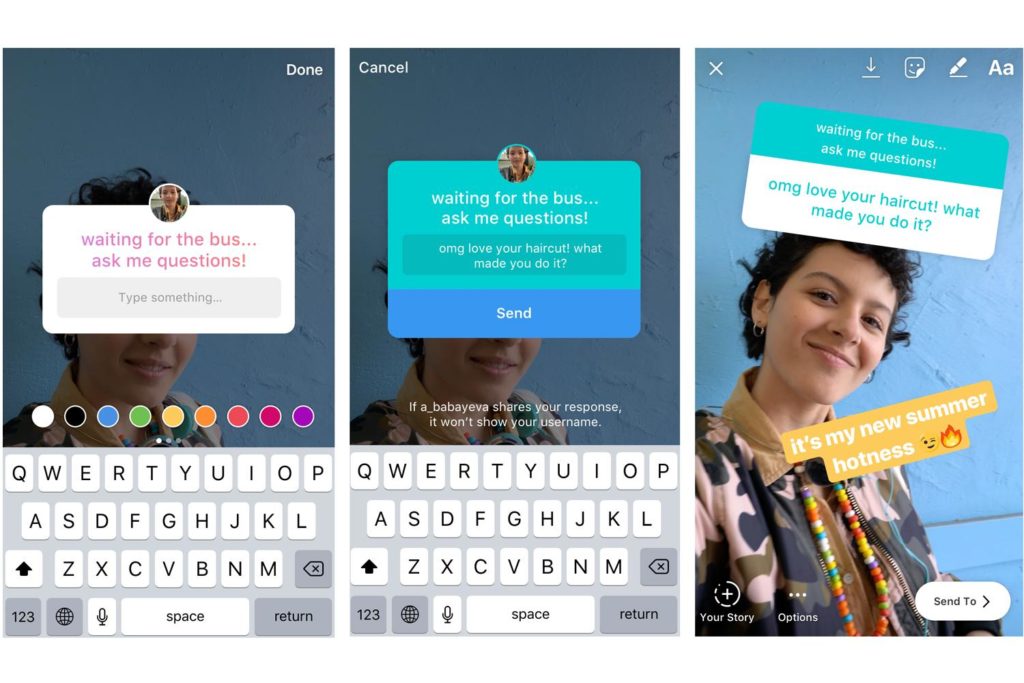
When you see a post on the News Feed from another profile that you’d like to share, or are tagged in a post, Instagram makes it easy to share it on your Instagram Stories.
When you find the post you want to share, tap the paper airplane below the post.
You’ll notice the “Add post to your Story” option — tap to see the feed post as a sticker on your Instagram Stories.
Here is where you can creatively edit your Stories.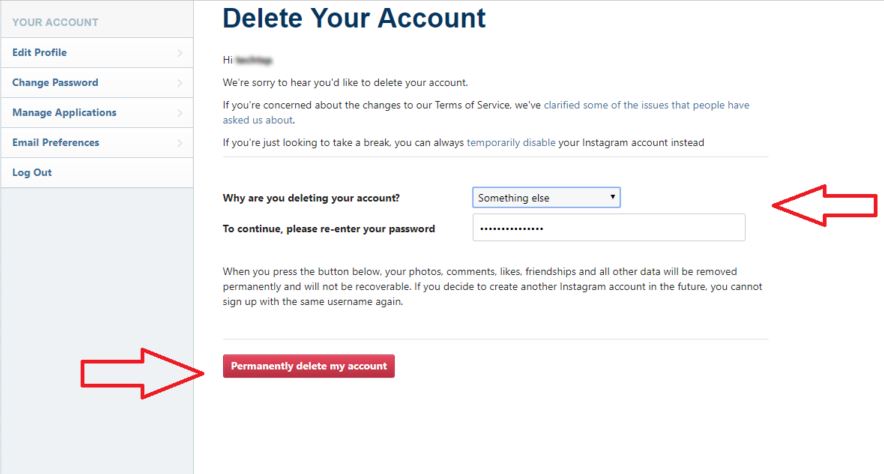 Tap to drag it to a new position, add in GIFs or text, and pinch the screen to change the size. The creative options don’t stop there — check out some of our design hacks.
Seeing as 55% of consumers trust UGC over other forms of marketing, now is a great time to consider UGC in your marketing strategy.
Cosmetics company, Lush Cosmetics, makes UGC a huge part of their marketing strategy.
One benefit of sharing users’ Instagram posts to your stories is that it’s quick and easy. Plus, it gives credit and links to the original post — avoiding any confusion on who the original creator is.
A downside of reposting other users’ posts is that the design options can be quite limited. Since you’re resharing in the app, it’s not possible to take the image itself and design it in an external app, like Storyluxe.
Start scheduling Instagram Stories with Later, available on all paid plans.
Now that you know how to repost to your Instagram Stories, let’s get into one of the most popular forms of UGC — sharing others’ Instagram photos on your Feed.
Why go this route?
To begin, UGC is a super effective form of marketing — 85% of consumers actually find UGC more influential than brand photos or videos.
Why? Because it’s coming from a trusted source — an authentic customer voice and not from the brand.
Curating your feed with user-generated content means you can spend less time creating the perfect post and share something that’s already out there. Plus, it’ll help you engage with your current followers and attract new ones.
@airbnb
Reposting UGC to your feed has a few more steps than sharing to your Stories does. But, no need to worry because if you follow the steps below, you’ll be ready to start sharing right away.
When choosing to repost UGC on your feed, there are two ways to go about it.
Posting UGC is all about asking for permission and giving credit where credit is due. It’s not enough to simply screenshot a photo off Instagram and share it on your feed with the original creator tagged in the photo.
Send the creator a DM.
Whether you’re sharing something a customer posted about your company or content created by someone in your community — you always have to ask for permission.
You can search for posts by checking your tags and mentions, searching relevant hashtags or by scrolling through your News Feed. Once you find the image you want to share, you should send the creator a DM asking for permission.
TIP: When asking for permission, ask the creator to email you the original file. If you take a screenshot, you risk the image being blurry or poor quality.
Alternatively, you can ask permission by leaving a comment on the post, like FabFitFun did below.
It’s always good to go the extra mile and shoot over a quick DM. Plus, 65% of people will grant permission to use their photos within 24 hours — so the chances are you won’t even lose any time by sliding into their DMs.
View this post on Instagram
A post shared by Later: Visual Social Marketing (@latermedia)
One way to start (and keep up with) using UGC in your marketing strategy is by using our UGC features. Later’s UGC Tool helps you collect, organize, and of course, repost content on Instagram.
When you open Later on a desktop, press “Collect Media” on the sidebar. Here is where you will find all the tools you can incorporate in your social plan.
Here are four ways you can find and share UGC with Later.
When you’re tagged or mentioned in an Instagram post, it’ll show up here. Select the posts you want to re-share and add them to your media library.
This is an easy hack to keep track of what your followers are saying about you while also giving them a cheeky shoutout!
Search by mentions and tags requires an Instagram business profile and is available on all paid Later business plans.
If you have a branded hashtag, like Mejuri’s #TheFineCrew, this feature is a way to keep track of everyone using your hashtag.
You can save branded hashtag searches on Later — it’ll display the last 7 days of posts using that hashtag across Instagram.
When you find posts you like, you can add them to your media library.
If you don’t use a branded hashtag, no need to worry. You can still find trending content within your community. Keeping with Mejuri as an example, you can search #FineJewelry or something similar to see what kind of content people are sharing.
Search by hashtag is available for free to all Later users with an Instagram business profile.
Lastly, if you work with partners — like influencers, brand ambassadors, photographers, or agencies — you can add them as contributors to make sure their content is sent straight to your Later account.
From here, you can approve or deny the content — your approved content is added to your media library.
Collaborate with Contributors is available on all Later Business Plans.
There you have it! Now you have all the tools you need to start finding, saving, and *legally* sharing UGC on your News Feed and Stories.
Ever since Instagram opened the floodgates to media beyond still images, the platform has become a prime location for watching videos. From insightful tutorials to funny moments captured on camera, there’s a plethora of content for you to discover. But what if you love a video so much that you want to save it and rewatch it? Luckily, there are a variety of ways on how to download Instagram videos, both within the app and on your iPhone.
In this guide, we’ll go over everything you need to know on how to download video from Instagram.
Now, before you get too excited and have a free-for-all downloading videos from Instagram, you should really make sure you have enough free space. Videos are typically big files. So, the more you want to download, the more space you’ll need on your iPhone.
The good news is, most of the storage on your iPhone is taken up by the photos and videos you already have. And thankfully, there’s an app that can help you clean up the photos and videos you don’t really need: Gemini Photos.
Once you download Gemini Photos from the App Store, it will scan your phone for duplicate, similar-looking, and even blurry pictures. Then, it will help you quickly get rid of them. Here’s how to use the app:
Now, you can tap Similar > Your Library at the top to go through the other categories and keep decluttering your phone.
You should remember that Gemini Photos only moves your pictures to the Recently Deleted album in the Photos app. Which means they’re still taking up space on your phone for the next 30 days. So, if you want to remove them immediately, just open the Photos app and tap Albums > Recently Deleted > Select > Delete All.
Maybe you love a video so much you want to show it to a friend — or maybe you just don’t have time to sit through the whole thing right now. You’ll be pleased to learn that saving an Instagram video for later is easy thanks to the app’s Collections feature.
Instagram Collections is an in-app feature that allows users to bookmark content like posts and IGTV videos from other users to view later. You can even organize your saves into Collections folders to make them easier to find.
While it is possible to save your own posts in Collections, this feature is primarily meant for saving content from other accounts. You can only save content from public accounts or private accounts that have accepted your follow request.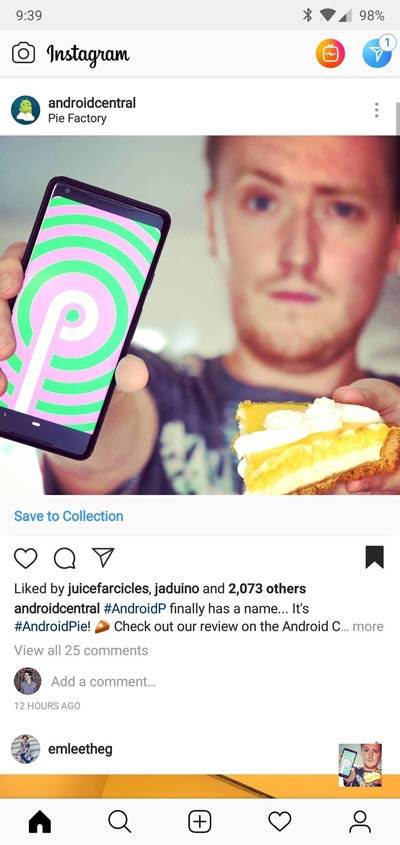
Here’s how to save an Instagram video post into your Collection:
Following those steps will save content to your Collections. Here’s how to find it once you’re ready to view it again:
From there, you’ll see all the content you’ve saved. If you wish to create a new folder within your Collection, simply press the + icon at the top-right of the screen.
While you can save your videos to Collections, you can also save them via your Archive.
The Archive is an in-app feature that allows users to remove posts from their profile and save them to a private folder that only they can see. It’s also a place to store Stories after they’ve exceeded the 24-hour lifespan on your profile and Stories feed.
Luckily, you don’t have to save these manually; you just have to make sure the Save Story to Archive feature is turned on. Here’s how to do that:
From there, your videos, photos, and posts will all be automatically saved to your Archive.
If you don’t want to store your favorite content in the app, you can use one of the following methods to download Instagram videos directly to your device instead.
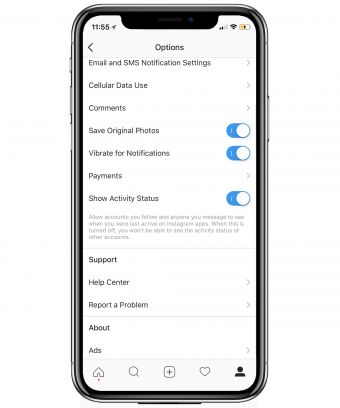
While many users shoot their content with their device’s default camera app, others use Instagram’s in-app camera, especially when creating Stories. If you want to make sure those videos are saved to your iPhone, follow the instructions below:
After you turn this feature on, all videos and photos you take with the Instagram feed camera will automatically be saved to your iPhone’s camera roll.
The feature mentioned above will only save content from Instagram’s feed camera. To save videos taken with the Stories camera, you have to turn on a separate setting.
Here’s how to do that:
Following those instructions will download all your Story videos automatically. But if you only want to download one current Story, here’s how:
Doing this will add the video to your Camera Roll.
At the time of this writing, there is no way to download someone else’s Instagram video to your iPhone within the Instagram app. However, there’s an easy way to work around that issue: iPhone screen recording.
Before we dive into how to record a video posted on another account, it’s important to note that saving and reposting someone else’s content without their consent is a violation of copyright law. If you want to make sure you’re protected, get the original user’s written permission first.
Now that we’ve covered the legality around this option, here’s how to record (and save) someone else’s Instagram video:
Now, you might want to trim the beginning and the end of your recording or crop out the top and bottom where the Story controls were.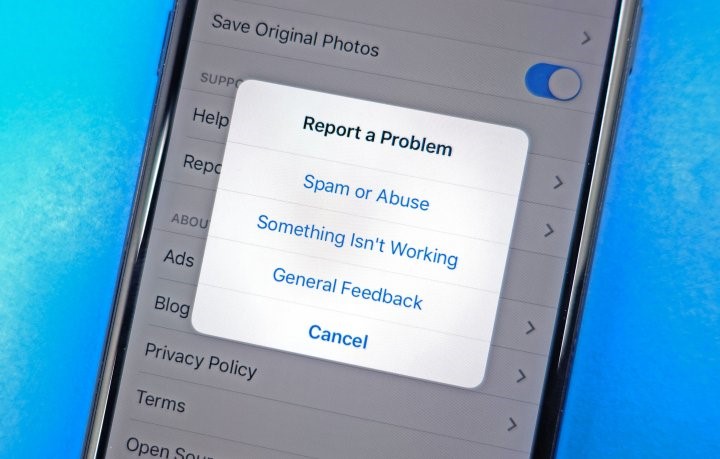 Here’s how to do that:
From there, your newly saved video will be stored in your Camera Roll.
Unfortunately, this feature is only available for those with iOS 11 or later, or an iPadOS. However, there are third-party apps that can help you download an Instagram video if your iPhone doesn’t support screen recording.
There are multiple third-party apps and tools you can use to copy and download Instagram videos. But for the purpose of this guide, we’ll show you how to save a video using the free app Instake.
Here’s how to use it:

After you follow these steps, the video will be saved in your Camera Roll.
With videos becoming more and more prominent on Instagram, the ability to save content is a useful feature to keep in your back pocket. Luckily, Instagram and other third-party tools make this easier than ever.
Writer and editor, driven by curiosity and black coffee.
Menu
Content
Often you see something interesting in the Instagram feed, and then you can't remember where it was? Or would you like to watch impressive videos and photos several times, but you have to do too much to find them?
The app has already come up with a clever solution to this problem! The Instagram Saved section is a feature that allows you to remember and not lose posts created by other users in your personal folders for later use.
Each saved photo or video is added to the collection inside the application, not in the memory of your smartphone or tablet. You can then view or delete all posts at any time by opening the bookmarks section in the Instagram app.
These instructions apply to the official Instagram apps for iOS and Android devices.
Adding other Instagrammers' posts to your Saved Folders is a convenient and easy way to keep up with gift ideas, cool ad layouts, exciting travel destinations and workout tips.
Instagram Collections can also be a great way to organize folders of photos or videos posted by close friends and family members.
No one can see your saved Instagram posts and these collections are only available to you.
Any desired photo or video content can be added to the Instagram collection if you view it from your account.
When viewing a post you don't want to lose, tap the bookmark icon below the photo or video. The post will be immediately added to your Instagram collection.
The bookmark icon adds the selected publication to the Saved section.
By default, all posts are bookmarked without any other action.
If you want to add an Instagram post to a custom bookmark folder, press and hold the bookmark icon on the right under the photo. A special window "Save to ..." will appear at the bottom of the screen.
A new menu will appear with all your current selections in Saved. Click on the desired folder to distribute it there.
You can select a folder when saving a post.
Even if you bookmark a video or photo in a user's Instagram collection, it will still be viewable in the All Posts category.
To save an entry in a new collection, click the plus icon, enter a name for the new folder, and click Done. This will create a new folder and automatically display the selected desired entry in it.
In addition to this function, you can save photos from Instagram to your phone or computer through our service.
If you're hooked on something on Instagram while browsing your feed, but you're not ready to buy it yet, use the save feature. Just like under publications, there is a bookmark icon under the product.
Click on it and the application will prompt you to add the product to the Saved section. All products are added to a separate Wish List folder. There you can view, purchase or remove this product from the collections.
A selection of saved items on Instagram.
In the Instagram app, you can view all posts in your Saved Items at any time if you have an internet connection.

You should now see all the post collections you created when you saved posts in the past. All bookmarked photos and videos can be found in the All Posts folder, but they can also be viewed in separate collections if you created them.
By default, all saved Instagram posts will appear in the "all posts" collection, but you can also create custom collections to sort your bookmarked posts by theme or mood.
For example, divide publications by interests - one collection for hobbies, one for fashion looks, and one for posing ideas. This makes it much easier to quickly find the material you need.
After creating a folder, you can edit it at any time, change the name and cover.
To create a new collection in Saved:

If one of the collections is no longer needed, you can delete it completely and immediately. To do this, open the desired folder, click on the three dots in the upper right corner and select "Edit Collection".
There, the item "Delete collection" will be highlighted in red. At the same time, if you delete a folder, all photos and videos added to it will remain in the general collection.
It should be remembered that bookmarking posts by other users directly affects the attitude of the Instagram algorithm to your account. You can see the number of times your content has been saved in the Statistics section. So you can understand what is most interesting for the target audience.
But the function does not allow you to see who exactly added this or that information from your profile. We advise you to use various calls to save the post and write useful content that will encourage you to do this without further ado.
Share with friends:
Twit
Share
share
Send
Grade
ADBLOCK
DETECTOR
Roskomnadzor announced that on Monday, March 14, the procedure for blocking Instagram in Russia will be completed. These 48 hours were specifically given to users so that they could decide what to do with everything accumulated on Instagram. We tell you how you can save your data and where you can transfer it.
The Russians were given two days to "save" their contacts and photos from the American social network. Not everyone has the ability and desire to use a VPN
It has long been possible to save everything that you have accumulated in it over the years in a social network. You can use it both from the application and from the browser. Below is a clear video instruction when using a smartphone from ordinary bloggers from the “where to poke” series:
In short: go to your profile, click on the menu button in the upper right corner, select “Your actions”, and then “Download information” .
Here's the same step by step, if you're more comfortable with pictures:
Step 1: Switch to your profile and press the menu button (three bars)
Step 2: In the pop-up menu, request "Your Activities"
Step 3: Then request all the information related to you from Instagram
After that, you will be asked to confirm the email to which you need to send everything, and again enter the password from your account.
Step 4: wait for the letter
After a while, a link to download the zip archive will be sent to the specified e-mail. It can be very large, so check the free space on your phone in advance or download via your desktop computer.
Upload your Instagram via browser
In desktop version of (open Instagram in a browser from a desktop computer or laptop), the upload is located in "Settings", in the "Privacy and Security" section (here is a direct download link).
Here you can select the format of the downloaded data.
The technical JSON format is difficult for human perception and viewing, but is much better suited for subsequent uploading of data to other Internet services.
So far, there are no good Russian services that can fully download all your data saved from Instagram. But we think it won't be long.
However, for commercial accounts, it is already possible to automatically transfer some of the information to the Yandex.