If you're the type of person who often makes long, informative posts on Facebook, you've probably gotten the request, "Can you make this shareable?," a few times before.
Facebook's sharing feature is a great way to allow folks to spread posts, in their entirety, from the original source, instead of just reposting.
People share posts for all kinds of reasons: Maybe it contains an encouraging message, or gives information about a serious issue that many people are unaware of. Maybe it talks about an event that's going on, or asks people for help with a GoFundMe for a good cause. No matter what the reason or what the post, allowing people to share them always works the same way.
Here's how to allow people to share your post on Facebook.
1. Find the post you want to make shareable and click the three dots in the upper right corner.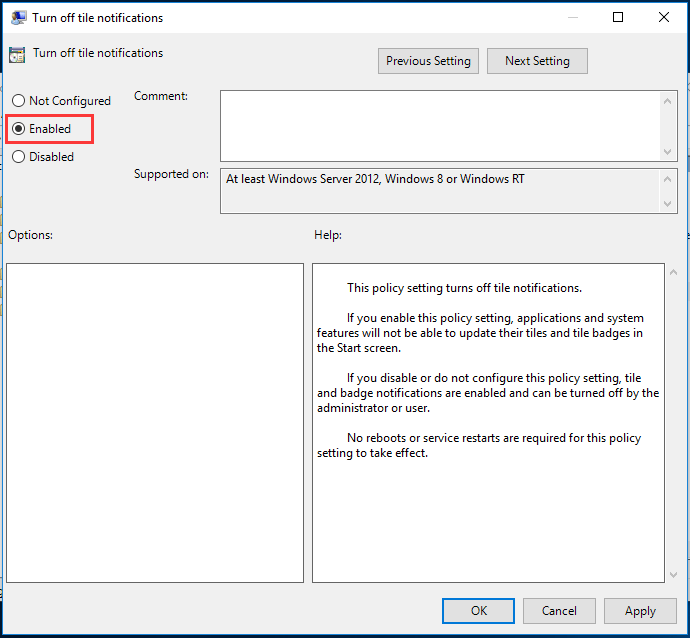
2. In the little pop up menu, click "Edit Post."
Click the three dots and then "Edit Post." Melanie Weir/Business Insider3. At the bottom of the post pop-up, next to the "Save" button, click the drop-down menu to bring up the post's privacy settings.
4. From the menu, select "Public," then click Save.
Click "Public." Melanie Weir/Business Insider1. Find the post you want to make shareable and tap the three dots in the upper right corner.
2. In the pop-up menu, tap "Edit Privacy."
Tap "Edit Privacy." Melanie Weir/Business Insider3.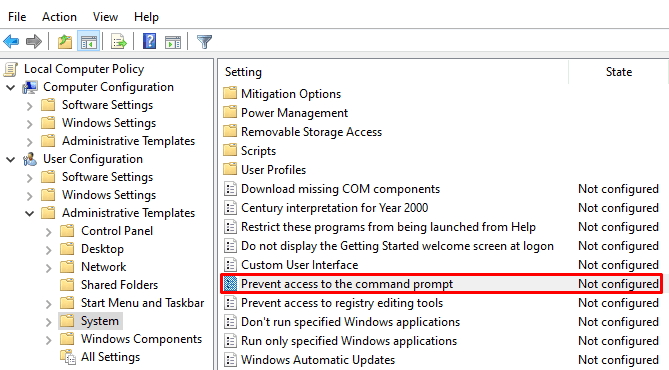 In the "Privacy" menu, tap the checkbox next to "Public," then tap "Done" in the upper right corner of the screen.
Melanie Weir
Freelance author
Melanie Weir is a freelance author for Insider, mainly focusing on the Tech Reference section, but occasionally contributing to Lifestyle and Entertainment topics as well. She is also a freelance writer for ScreenRant, and is the Lead Weekend News Editor at TheThings.com. In her spare time she writes plays for both stage and screen. She can be reached at [email protected], or through LinkedIn.
Read moreRead less
Insider Inc. receives a commission when you buy through our links.
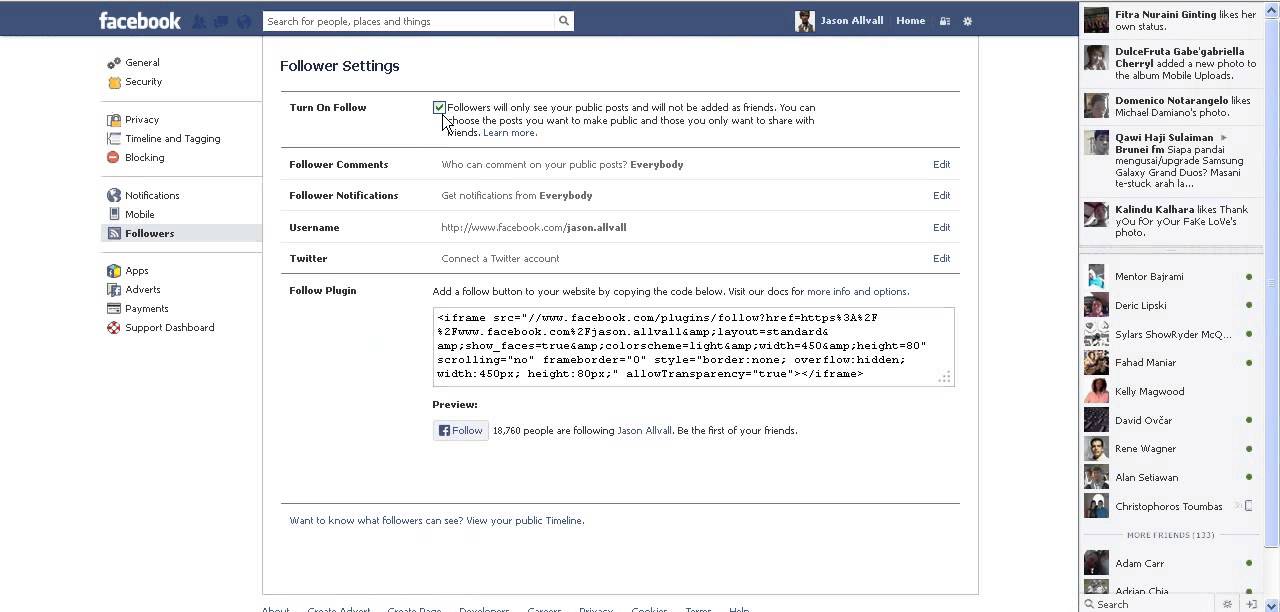
Specify who you want to see your posts
Being active on social media sites like Facebook or Instagram can be a rewarding way to stay in touch with friends and acquaintances.
Social media sites are made for sharing, but chances are you’ve seen this comment on someone else’s post: “Is it okay for me to share your post? Can you make it shareable?”
Table of Contents
This happens when a post hasn’t been made public. In other words, if the privacy settings on the original post are set to “Friends Only,” then that post will lack the Share button. Fortunately, adjusting the privacy settings to allow sharing on a Facebook post is easy, and we’ll show you how below.
There are two main ways to allow sharing on Facebook. You can either make a specific post shareable, or you can change your default Facebook timeline privacy settings so that all your future posts are made public.
First, let’s run through how to make a specific post shareable, either on a computer or on Facebook’s mobile app.
Setting your Facebook post’s audience to public will make your post shareable.
 Depending on your default settings, the audience for your post might already be set to public.
 Now you’re good to go. Anyone on Facebook will be able to view and share your post.
Setting your post’s audience to Public is just as easy on mobile.
If you want all your future posts on Facebook to be set to a public audience, you can change your Timeline’s default settings.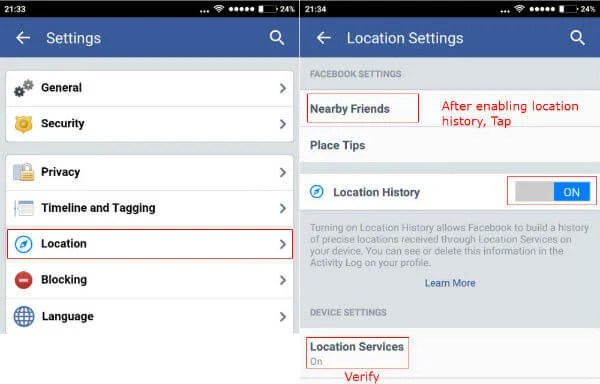 The easiest way to do that is to go through Facebook’s Privacy Checkup.
Facebook’s Privacy Checkup is easily-accessible on a desktop browser.
You can launch Facebook’s privacy checkup on mobile, too.
You may have noticed that there are multiple places where you can change your privacy settings on Facebook. It’s a good idea to review these settings from time to time, ensuring that your privacy settings are configured the way you want.
Now that you’ve made it easy for other people to share your Facebook posts, you’d better post something worth sharing!
Knowing that “video and animated content does far better than photos when it comes to social networks and the internet in general,” here’s an idea for you: Learn how to make your photos come alive with our article on 6 Ways To Animate Still Photos Online Or With App.
';document.getElementsByClassName("post-ad-top")[0].outerHTML='';tocEl.outerHTML=tocHTML+newHTML;}}catch(e){console.log(e)}
Maggie Marystone is a freelance technology writer, human rights worker, and storyteller based in Chicago. Read Maggie's Full Bio
Subscribe on YouTube!
Did you enjoy this tip? If so, check out our very own YouTube channel where we cover Windows, Mac, software, and apps, and have a bunch of troubleshooting tips and how-to videos. Click the button below to subscribe!
Subscribe
July 28, 2016 Work and study Technology
How to instantly reply to customers on Facebook*, what is the difference between auto-reply scenarios and how to show users that real people are talking to them? Fedor Zhukov, i-Media social media manager, tells.
Fedor Zhukov
Social media manager at i-Media online advertising agency.
When interacting with customers on Facebook* on behalf of a page, you may notice that you spend an indecent amount of time on it. At the same time, you have many other important things to do in community management: creating publications and posting them, launching ads, analytics, and so on. How to keep the user and develop the page?
Use auto-replies! With them, you will be able to communicate with the user, even if there is no device nearby with access to Facebook *. By enabling this feature, you will demonstrate to your customers that you are attentive to their requests. How to do it?
It is located in the page control panel above the header.
Location of the message section in the old Facebook interface*Location of the message section in the new Facebook interface* At the bottom of the section you will see an icon i next to the Out of Office button (you will need it later). After clicking on it, a window will appear. In it, select the “Answer Assistant” tab and click the “Configure Answer Assistant” button.
Alternate way: you can open the auto-replies panel through the page settings by selecting the "Messaging" section there.
First the button with the letter i, then the tab with the answer assistant, then the setting of the answer assistantThis item may be called differently: “Enable messages for offline status” or “Don't lose customers even when you are not at your computer or phone ". It depends on how often you communicate with users on behalf of the page.
How. Move the slider from "No" to "Yes" and you'll see an auto-reply template. Instead, you can write your own version by clicking on the "Edit" button.
Why. The page detects that you cannot reply to a message and sends this script when the Out of Office button is clicked in the message section.
How. The actions are the same: move the slider to the "Yes" position and work with the response template.
Why. The auto-reply from the previous step is sent when you do not have access to Facebook* and you have "Out of office" enabled. Here you can also set up automatic sending for cases when the social network is at your fingertips, but there is no way to reply to the message (accordingly, the "Away" mode is turned off).
What does the auto-reply section look like when you have access to Facebook* but can't replyHow. Select "Yes" on the function enable button, then you can change the response text.
Why. When a user wants to send a message to your page via Messenger, he will see not dry information about the company, but a greeting and a willingness to answer his questions.
How. In the messaging settings, move up from the auto-replies management. Click the "Edit" button and select the time during which you reply to messages.
Why. When a user visits a company's page, in the menu with the number of subscribers, he can see how quickly the company can respond to him.
An important point! You can set up this feature manually when you start actively chatting in messages. Until then, you won't find a response time editing feature in the answer assistant.
How the response time setting looks likeFacebook Auto-Replies* is a simple, professional tool that allows you to manage your time and keep in touch with your customers even when you can't answer them. I hope after this article you will find it easier to use it to successfully promote your Facebook pages*.
*Activities of Meta Platforms Inc. and its social networks Facebook and Instagram are prohibited in the territory of the Russian Federation.
Tools
Making Facebook Safer
Facebook is a popular social network. This article is about Facebook security-related settings.
A lot of people use Facebook not only for nostalgic virtual conversations and sharing photos from their summer cottages, but also for work. On Facebook, they find like-minded people, publish articles, read news, share plans, discuss joint projects and announce events.
To make Facebook safer, you can change how you use Facebook (and social media in general) as well as specific settings. Another article has been written about the principles. Let's talk about settings here.
Facebook developers like to change menu item names, headings, and other details much like the Moscow authorities like to change borders. What you see in the screenshots in this post may differ slightly from the current situation on facebook.com.
In the top horizontal Facebook menu on the right, click the down arrow. A dropdown menu will appear.
Select "Settings and privacy". A new menu will appear.
Select "Settings". By default, the "General" item will open.
Select "General" from the menu on the left.
To change the settings, click the "Change" links in the corresponding lines.
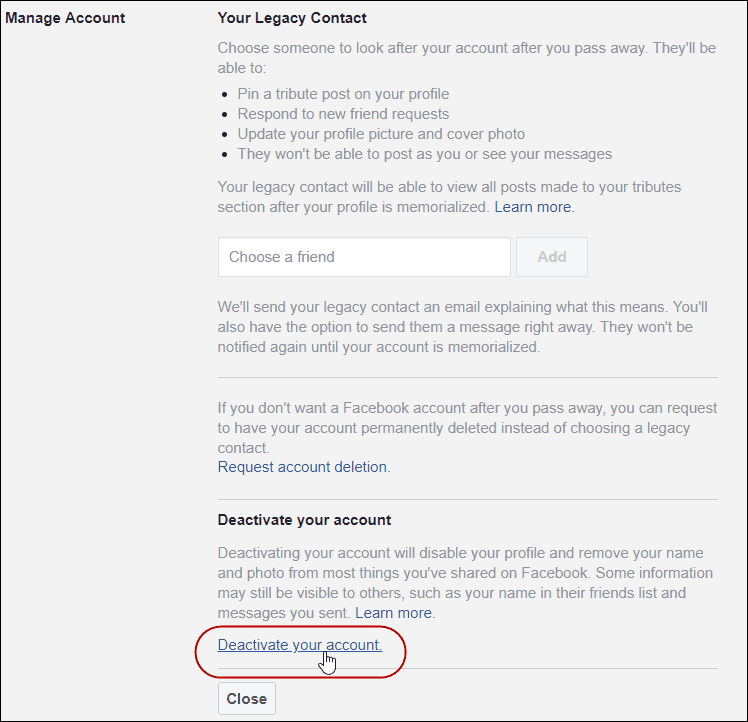
 In the event of a user's death, limited rights to his account can be transferred to one of his friends (the Guardian), whoever the account owner chooses ahead of time.
 In the general case , proof of identity is not required (and not recommended).
Select "Security and Login" from the menu on the left. A fairly large list of settings will open. Consider it from top to bottom, but skip the recommendations (first point). These are just selected security settings - part of what we are talking about in this material.
Where did you come from. Here you can see which devices have connected to your account. (Click "More" to see the full list). Is there an unusual device among these sessions? For example, the operating system is iOS, but you don't have an iPhone. Or a strange location? (Allow for VPNs and similar technologies if you use them.) If you find something unexpected, it may be that an attacker gained access to your account. You can always click the three-dot button at the end of the suspicious line and select "Logout" to close the session. Change your password as soon as possible. It is better to do this from a “clean” computer that is not infected with anything. Note that an attacker can also kick you out of Facebook. Therefore, if there are reasonable doubts, do not waste time.
This feature can also be useful if you logged into Facebook somewhere in a strange place (we don’t recommend doing this, but suddenly) and forgot to log out. Here you can terminate this session.
Password must be strong. (Learn more about password protection). Keep it in an equally safe place. For example, in the password manager Bitwarden or KeePassXC.
Saving login information simplifies the Facebook login process. Naturally, at the expense of safety.
With two-factor authentication , in addition to the password, you need to enter a special code to enter your account. A very useful option, we recommend enabling it. Do not use the SMS method, it is not particularly reliable. Better choose the "Authentication App" option: you will be able to enter the code from an application on your smartphone (without internet connection), such as andOTP, Google Authenticator or Authy. Do not forget one-time recovery codes as "insurance" in case the smartphone is not at hand (forgotten, seized, lost, stolen, out of order). Read more about two-factor authentication and password generators in a separate article.
Authorized logins. Frequent entry of additional code is tiring. You can make it so that some "trusted" devices (virtually) do without two-factor authentication. Use with caution and only in a safe environment. If some devices have already received a “trusted” status, you can see this in this paragraph and, if necessary, cancel it.
Application passwords. You can use a different password for each application installed on Facebook (if you have one).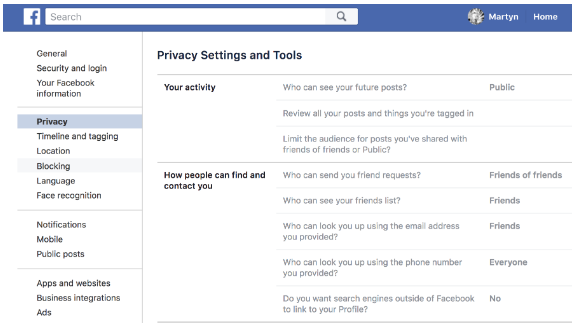 If you have two-factor authentication enabled, instead of waiting for a code, you can sign in to the app with the corresponding password. However, below we advise avoiding apps altogether.
Receive notifications of suspicious logins. Yes, it is better to have this feature enabled. Here are the possible ways to receive notifications. They complement, not exclude each other.
As for friends, I can hardly recommend this feature. It is better to invest in strong passwords and data backup than in such “crutches” that allow you to compensate for a forgotten password.
Encrypted notification emails. Basically, if you have a public encryption key (you can read more about public key encryption in a separate article), you can add it to your Facebook account. People will download your public key and use it to send you encrypted messages. You can also set up Facebook so that notifications from the social network are encrypted with your key. In my opinion, this is an excessive security measure.
Function restoring access to external accounts we do not recommend (as a general advice to avoid linking accounts wherever possible).
Finally, you can view recent Facebook messages, including those related to security. This might be helpful.
Of all the listed options, let's pay attention to three: they are most related to security. The first is viewing information.
Convenient access to everything related to your account: publications, comments, pages, groups, etc. In fact, only a redirect to other Facebook service pages occurs from this place. However, the section is very useful for organizing and organizing everything on Facebook. Here you can see everything at once and take action, for example, remove yourself from unnecessary groups, clear your search history, etc.
The second option is to download information.
And finally, account deactivation.
The name speaks for itself. There are situations when this cannot be avoided (also for security reasons).
Select "Privacy" from the left vertical menu. We skip the first "simplifies everything" section (our task in this material is to go through all the settings in more detail).
 In the fourth paragraph, you determine who will see what (whom) you are subscribed to. (Except for the people you follow: they see it anyway). Set the value to "Only Me".
 Or a public person, say, a well-known politician, writer, businessman. Or if we are talking about a corporate page that needs promotion and popularity. Otherwise, consider limiting to the maximum (as in the illustration).
 This already applies to Facebook Messenger rather than a social network. The points are not directly related to threats and security, so I will not give unequivocal recommendations. In my opinion, choosing "Chats" as the option is more convenient, since the alternative, the "Conversation Requests" folder is hidden in the Facebook menu, and I repeatedly skipped such requests. But it's up to you (as always).
The function makes sense if you want to “trigger” the appearance of duplicate accounts on Facebook (accounts with your face in the profile picture and your name in the title, created, as a rule, with bad intentions). But I'm turning this feature off because I don't want Facebook to recognize me.
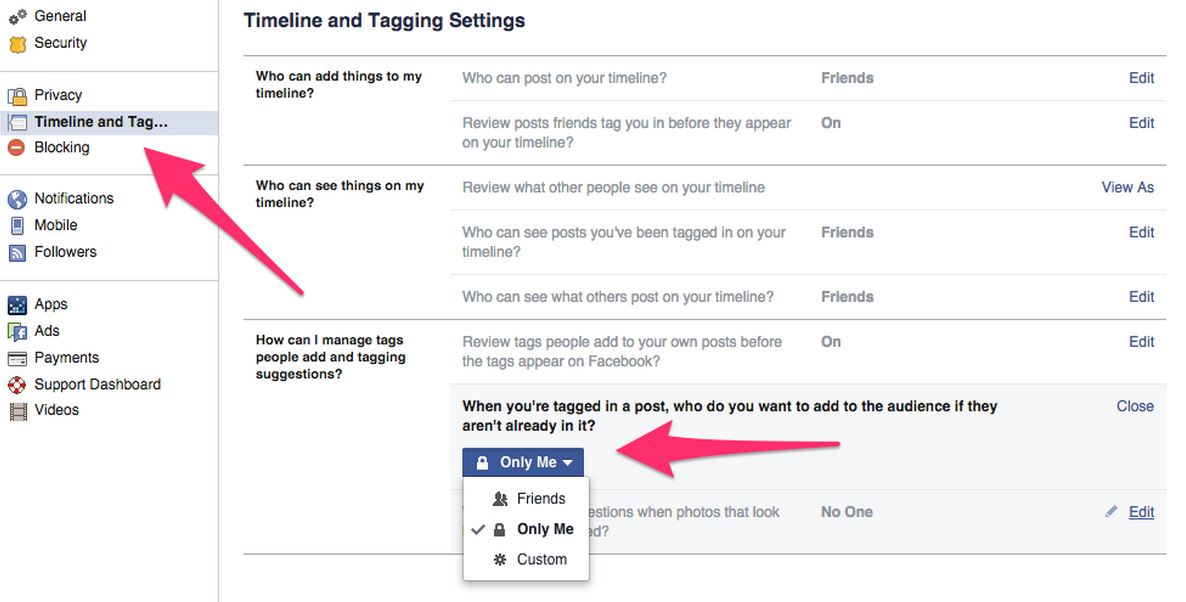
In the left menu, select the "Profile and labels" item.![]()
There are quite confusing and interdependent settings in this section.
 Please note that this filter does not work for the authors themselves and their friends, so I would not seriously count on it.
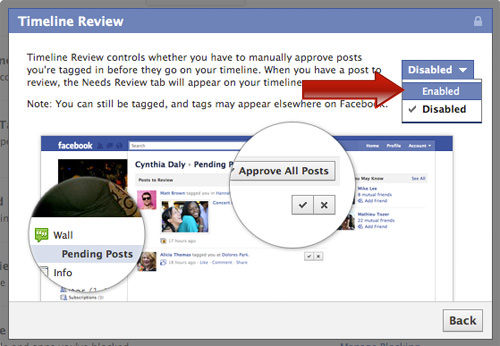
What are tags made by your friends? Let's explain with an example. Have you ever seen this message: "Vasya is tagged in Masha's photo"? If Vasya got a photo published in her profile on the car, this photo can be linked to Vasya's account and duplicated in his profile. It might make sense to keep both filters associated with tags included in the "Only me" position. Then the excessive activity of lovers of marking will not create risks for you.
The first and third points I prefer to keep under control. But the second item (for some reason Facebook decided to post it here) is not even a setting, you can't switch anything. Facebook has hidden an option here that allows you to look at your account through the eyes of a regular Facebook user (not a friend). Click the "View As" link if you'd like to see it. It may be useful to evaluate the results of adjustments.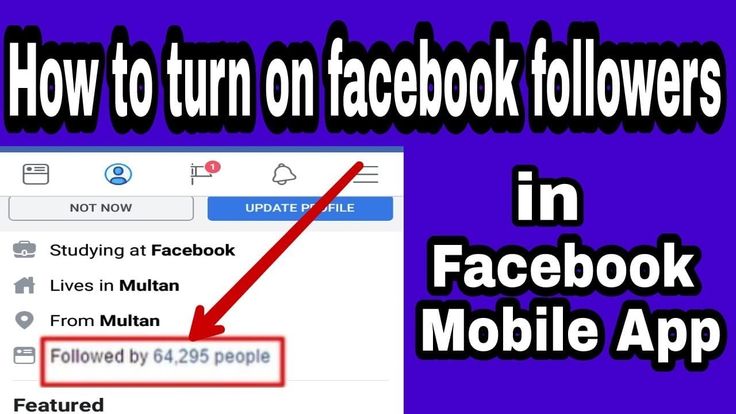
 This, despite the wording "Available to all", is not about public access to information. What this means is that you will be notified when someone shares, comments, or likes your post. Allows you to get more information.
 The remaining parameters do not directly affect security.
 That is, as far as Facebook allows, to block their access to you and your materials. (If you wish, you can unlock them later). It is better to block the villain directly from his page (in the profile header) in order to ensure that the namesake is not accidentally blocked. When you block a user, you stop seeing his profile and any posts, including comments, and he, accordingly, does not see yours.
 Under the blocked list there are a number of other possibilities:
 The same approach, but in relation to intrusive invitations to attend different meetings.
 This item is closely related to the mobile application on your smartphone. If it cannot use the geolocation features, the log in settings will be unavailable. "Geodata Log" is off, and good. I advise you not to add location data to a fair amount of personal data that users report to social networks.
This item is indirectly related to the security of the Facebook account. For example, if Facebook sends email notifications of all events, including likes and comments on your posts, it can clutter your inbox and cause some important emails to go unnoticed. To disable this feature:

Contrary to what is sometimes said and written, it is possible to use the Facebook mobile app on a smartphone and not have a phone number in the account settings. For security reasons, we may well refuse the theoretical possibility of changing the password from the mobile application, and even more so, we do not need the SMS service.
In the left column, select "Apps and Sites". A list of apps you have installed will open.
How did they get here? Once you became interested in a certain site, he offered to register, and as an alternative, "log in with Facebook." The second option seemed easier. "Login with Facebook" installs the application. The illustration below is an app for Airbnb, a popular travel booking service.
Applications are different - interesting, funny, useful. Applications have access to basic data of your Facebook account (for example, name, photo, gender). In addition, during installation, the application may ask for your permission to access certain information about you and your friends. Data can be different, for example, age, place of residence, education, circle of acquaintances, contacts. The application can tell your friends which country you have arrived in, where you are at the moment. It can look great (it's so nice to meet an old friend who suddenly finds himself in the same city). But do not forget that such "advertising" expands the possibilities of your ill-wishers.
In the following illustration, the Tripadvisor site (for travelers with information about hotels, restaurants, attractions, etc.) in response to an attempt to register by email offers (alternatively) to log in through Facebook:
If you are not logged into Facebook, you will receive an offer to enter the social network. If you are logged in, you will be asked to confirm:
Click the "Continue" button, in the next window "Skip".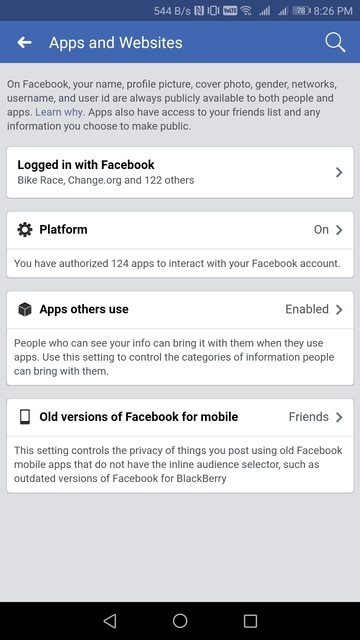 Next comes the question of access rights to your data.
You can click the "Change Permissions" link and deselect the items of your choice to avoid sharing such an impressive amount of information about yourself with the site. However, even in this case, basic information about your profile will be available to Tripadvisor and the accounts will be linked. The following illustration shows the Facebook settings item. Tripadvisor has been added to the already installed Airbnb application:
By clicking on the "Check" button, you can still check the permissions for each application. You can also remove the application from Facebook at any time (the "Delete" button).
For security reasons, I recommend:
Facebook is famous for more than just redesigning paragraphs and headlines. In this social network, some settings are not at all where you expect them to be.
You can reduce the amount of information given about yourself a little more, if you select the "Friends" item in the horizontal menu and press the button with three dots (yes! there are two of them side by side! choose the one below).
In the drop-down menu, select the only item "Edit privacy settings". In the small window that opens, there are only three switches.
(The picture says it all.)
Facebook chat requests are also in a somewhat unusual place. And they can lie quietly there until you guess to look there.