Instagram may need no introduction, but for the unfamiliar, it is a free social networking app that lets users capture and share photos and videos. Created by Kevin Systrom and Mike Krieger back in October 2010, Instagram quickly gained popularity, attracting more than 100 million active users by the time it was acquired by Facebook less than two years later for a cool $1 billion. Instagram has since swelled to more than 400 million users, making Instagram one of the top social networks.
Contents
To remain popular, the company continuously introduces new features — but this can also make its growing list of capabilities difficult to keep track of. Whether you’ve been addicted to Instagram for years now, or you’re brand new to the photo-sharing behemoth, these tips and tricks will help you master it.
Already have an account? Go ahead and skip this section. Otherwise, let’s start with the basics. To register for an Instagram account, simply open the app, tap Sign Up, and either sign in with your Facebook account or provide an email address and password. You’ll also need to come up with a unique username, or handle. This can be as simple as your actual name, or something more creative. If you’re joining instagram for professional purposes, it’s a good idea to use a handle that relates to what you do or to the theme of your account.
You can easily add a profile photo to the Instagram app from your mobile device. Go to your profile by tapping on your profile picture in the lower right, tap the blank circle by your name (this is where your profile photo will go), and either take a new picture or import one from your phone, Facebook, or Twitter.
In the Edit Profile menu, you can determine how you want your name displayed (real or pseudonym), change your Instagram handle, link to an external website (just one is allowed), and add a bio. You can also list private information like your phone number and gender, although these aren’t shown to the public. The nice thing is that Instagram does not require you to fill any of these fields, nor do you have to provide your full name if you don’t want to.
By now, a lot of your friends are probably already using Instagram, so you can go to your profile tab and select Find Friends in the Options setting (the gear icon in the upper-right). Here, you can search for friends that have connected their Facebook and Twitter accounts to Instagram. You can also search by name, username, or tag. You can also follow celebrities or people whose photos you admire. Following interesting people is a great way to get inspired, and it helps Instagram’s algorithms learn what you like and suggest photos and videos in the Discovery tab.
To post your first photo or video, simply tap on the camera icon in the middle of the bottom menu of the app. You can then either snap a photo, record a video, or choose one from your phone gallery. Once you choose the photo you want, hit Next. From there, you’ll be able to apply a filter or even edit the look of the photo manually. The app lets you crop, change exposure, boost the saturation, increase sharpness, add a vignette, and much more.
Hit Next again and you’ll be prompted to add a caption, tags (of other Instagram users), location, and any other social network (Facebook, Twitter, Tumblr, Flickr, or Swarm) where you would like to post a link to the Instagram post. When you’re ready to post, hit Share.
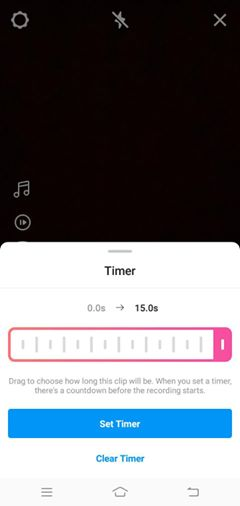
Sharing a video works much the same way, but you can also select the clip length (up to a minute) or compose a montage from multiple videos. You can also turn the sound off if you’re not fond of the background noise in your video.
Instagram offers a good selection of filters and editing tools to make your photos stand out and take them to the next level, or even rescue bad ones from the trash. If you’re feeling like going even more in depth, there are also plenty of photo-editing apps like VSCO, Filmborn, Snapseed, Aviary, and Adobe’s Photoshop Express and Spark Post (iOS versions linked, but you can also find them in the Google Play store). VSCO is particularly well known for its film-like presets, whereas something like Spark Post lets you make collages, add text and graphics, and more.
For years, Instagram only let you upload square photos. In August 2015, it finally lifted this restriction, much to the relief of photographers everywhere. Square is still the default, but you can now also upload in landscape and portrait orientations, although there are still some limitations on aspect ratio. To quickly pick the original aspect ratio, or closest acceptable ratio to it, simply tap the icon in the bottom-left corner of the photo.
One thing to note is that portrait-oriented photos will appear larger in the feed, since Instagram is a vertically-oriented app. For this reason, you may want to consider using it more often than square or landscape, and planning your shots accordingly.
Want to call attention to your mom, friend, dog, barista, or whoever else appears in your photo? Simply tap on Tag People beneath the caption field on the last editing page before sharing your photo. Next, tap on the person or object in the image that you want to tag and enter their name or Instagram username. You should see a list of suggestions as you type, but if for some reason you don’t see the person you’re looking for, Instagram makes it easy to search for people you know.
Forget to tag someone in a photo you already posted? No worries. Simply tap on the photo in your profile, tap the “…” button in the upper right to bring up the menu, select Edit, and then tap Tag People.
To mention a friend in your caption, type @ in front of their username (e. g., “Great article, @digitaltrends!”). Your friend will then receive a notification in their activity feed letting them know that you mentioned them. You can also mention people in comments.
Note: If you mention someone and they later change their Instagram handle, your mention will not automatically update and will no longer link to their profile. Tags, however, will update if a user changes their handle.
To like a photo or video on Instagram, simply double tap the photo or video, or you can tap the “heart” icon. If you liked a post by accident, just tap the icon again to unlike it.
Next to the heart icon is a text bubble icon, which is how you make a comment. There isn’t a limit to how much you can write, but for the sake of the Instagram community, we suggest keeping it brief.
The arrow icon that lies to right of the comment button will let you send the photo or video as a message to other users. Tap it, select who you want to send it to, and tap Send. The post will be shared in a private message, and is a good way to draw someone’s attention to content you think they’d like — just keep in mind, doing this too frequently is a good way to annoy people.
In February 2017, Instagram introduced the ability to post more than one photo at a time. Now, you can post up to 10 photos at once in an album. Albums show up as a single post in the feed, but your followers can swipe to see all of the photos.
To post multiple images at once, simply tap on more than one image when uploading from your device. Instagram will automatically create an inline, carousel-style album. While you can post up to 10 photos, you’re limited to a single caption for the entire album. What’s more, images must all be cropped to the same aspect ratio, so no mixing and matching of portrait, landscape, and square images.
When you first create your Instagram account, anyone can see your profile on Instagram. Your posts will only show up in the feeds of people who follow you, but anyone will be able to see them by navigating to your profile or if they search for a hashtag you’ve used.
If you would rather make your posts private so that only your followers can see them, period, Instagram lets you do this. Go to your profile, tap the three-dots icon to bring up account settings, and turn on the Private Account option.
Because Instagram is one of the most popular social apps, you may want to connect all of your social accounts to get the most out of it. You can choose to link your Twitter, Facebook, Tumblr, and Flickr accounts; there are also less-popular networks (in the United States, at least) that you can link to, including Ameba and VKontakte. To get your social accounts linked, go to the Profile Tab > Linked Accounts > Share Settings, then select which accounts you want to connect. Every time you upload a photo to Instagram, you’ll have the option to select which photos you want to share to each of the social networks. You can also choose to share your photos on Instagram only.
Did you take a photo that is absolutely amazing and you want to share it on your blog? Go to Instagram on the web and find the picture you want to share, click on the symbol shown as three dots, and choose the Embed option. You can copy and paste the code anywhere on the web to show off the photo you took. If your content is set as private on Instagram, you won’t be able to share the photo.
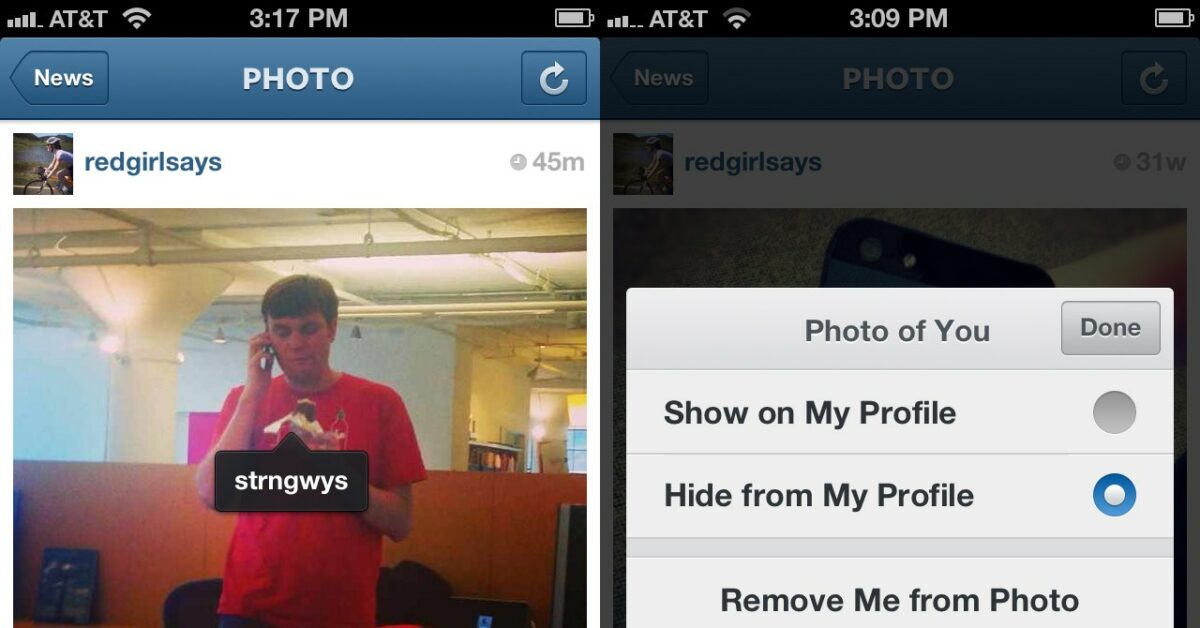
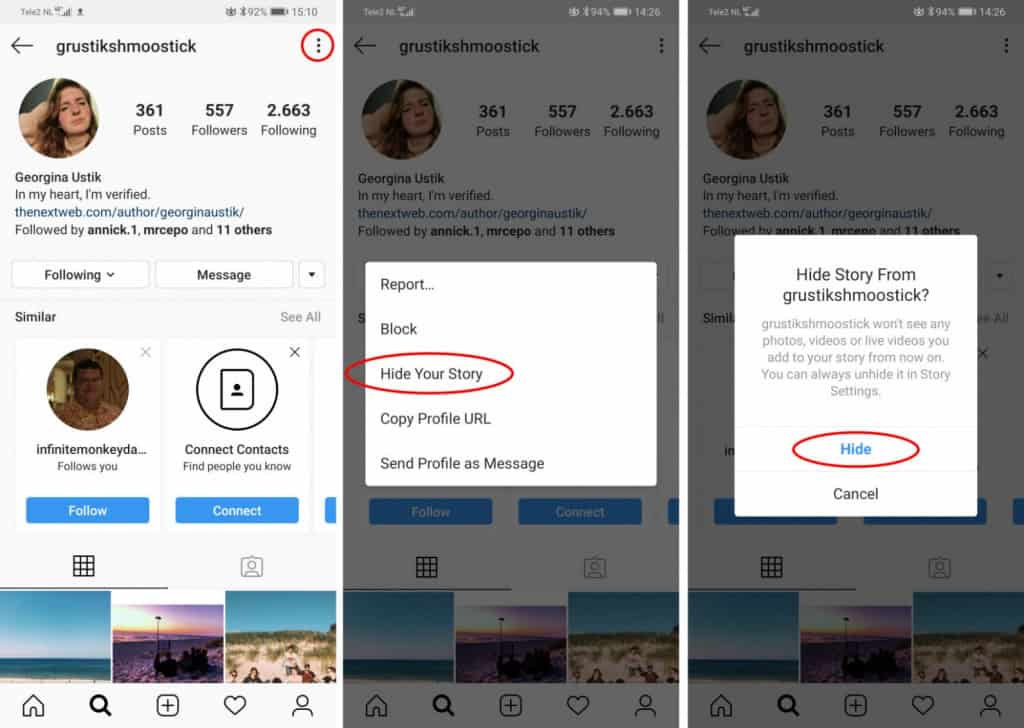
If one of your friends tags you in a photo, it will show up in the Photos of You section on your profile page. When you come across a tagged photo of yourself that you don’t like, you can choose to hide it. To remove a single photo, tap on the embarrassing photo and you will see your Instagram handle. Tap on your handle and you’ll instantly see a menu, then select Hide from My Profile or Remove Me from Photo (found in More Options).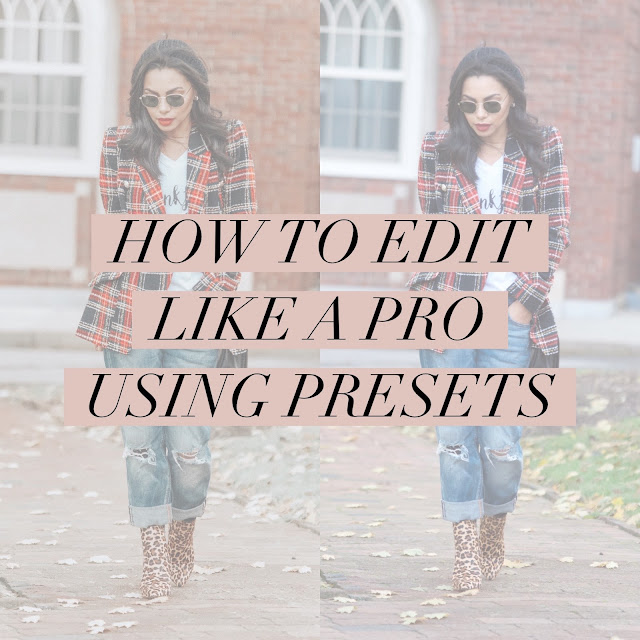
At the top-right of the Instagram homepage is an icon that looks like a drawer. Tapping on this will take you to the Direct menu where you will find your private messages with other Instagram users. While Instagram is better known for photo sharing, it has a messaging function which lets you send notes, photos, or videos that aren’t meant for public viewing. To compose a new message, tap the cross icon in the upper-right of the Direct menu, choose Send Photo or Video or Send Message; the former lets you pick content from your library, while the latter lets you chit-chat with another Instagrammer.
Adding hashtags (#) is a great way to get new followers and share your photos with more people. Choosing the right tags will help you connect with other people who have the same interests on Instagram, but it’s important to make sure that you use tags that describe your photo. For example, if you take a picture of a Volkswagen Bus, you can use the hashtags #vwbus and #volkswagen.
A nice feature is that when you type the hashtag, Instagram will display similar tags as well as how many posts there are. Choosing a popular tag is never a bad idea, but you may also want to find more targeted and specific tags where your photo may be more likely to stand out from the crowd.
To access your Instagram account on the web, you can go to Instagram.com and log in in with your Instagram username or password. The website works well for viewing posts and grabbing embed codes for your blog or website, but you still can’t post from it. You can do some basic tasks, however, like search for and follow other users, and edit your profile.
You can easily gain thousands of new followers each day by getting featured. Unfortunately, Instagram doesn’t really share how they choose users, but if you get added to their suggested users list, you’ll get tons of exposure. If you do get added to the suggested users list, you’ll get to stay there for at least one week.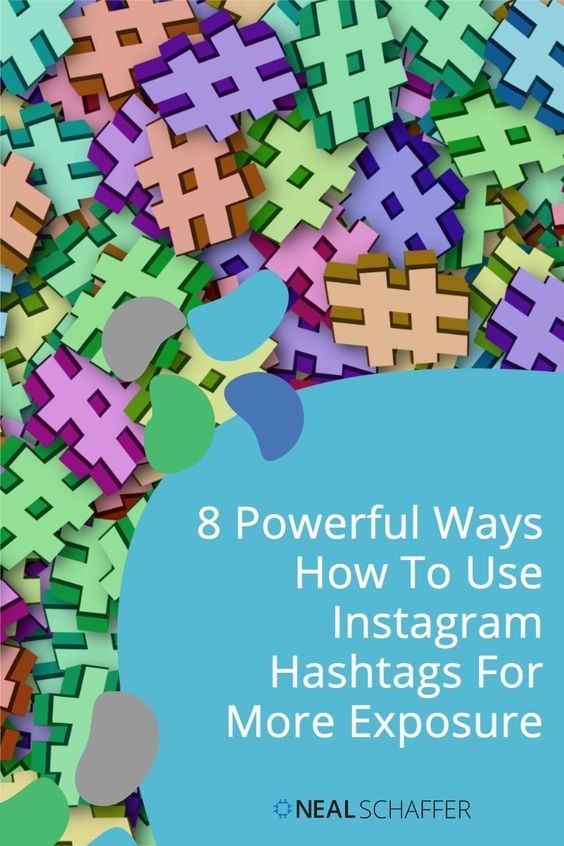 To have a good chance of getting on the list, make sure that your photos have a consistent and identifiable niche or style that will get you noticed by other Instagram users.
Instagram doesn’t natively support GIF files, but third party apps allow you to convert GIFs into short movies, which Instagram does support. GifShare is one such app, which lets you can search for GIFs or upload from your camera roll. It also accepts MP4, MOV, MPG, and M4V video formats. You can download GifShare from the App Store, or use any of these Android alternatives. Another iOS option is Giphy Cam.
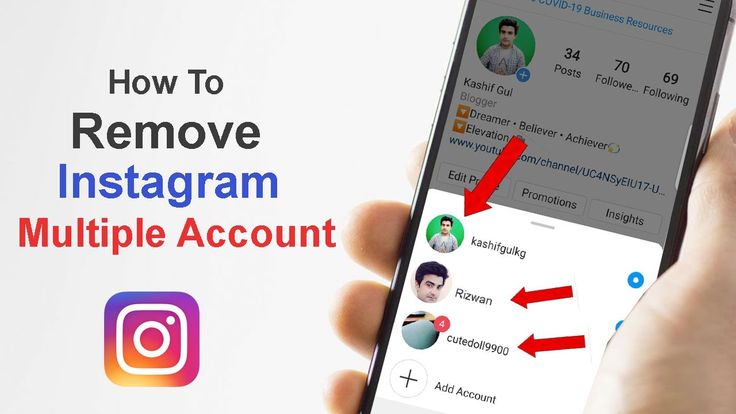
Thankfully, the dark ages of being limited to a single Instagram account are no more. Instagram added the much-needed ability to manage multiple accounts in February 2016, much to the delight of those who’ve been hankering for an easier way to give their beloved puggle an account of its own. People can now manage up to five accounts at a time.
To add an additional account, simply go to your profile settings page and tap the gear icon or the three dots in the upper-right corner of the screen. Scroll down and select the “Add Account” option and create a unique username and password for the new account. To switch between Instagram accounts on the fly, go to your profile page, select your username and choose the account you wish to switch to from the pull-down menu. Your profile picture will then reflect the active account, and remind you which handle your currently signed in to. This prevents you from inadvertently positing on behalf of said Puggle (or vice versa).
Borders used to be all the rage on Instagram, but they’ve kind of fallen out of vogue. The option is still there if you want it, however — but you do have to apply a filter first. Upload the photo you want to add a border to, tap Next in the upper-right corner, tap the filter you want to apply twice, and then tap the border icon — the latter is located on the right side of the filter intensity slider.
If you decide not to add a border to your photo, tap X to cancel and save your changes. Adding a border gives your photo that retro feel, but you can’t apply it to a non-filtered photo. Fortunately, you can lower the intensity slider to essentially remove the effect of the filter from your photo if you don’t like it. Each filter has its own border, so be sure to check out a few before deciding on one.
Boomerang takes a burst of photos (up to 20 frames), which are then combined into a creative video that plays forward and backward — sort of like an animated GIF. The video is saved in the camera roll, and you can select either the Instagram or Facebook button to post. With Layout, you can create a collage of multiple photos into one. You can easily reposition the photos and resize the boxes. This is useful if you want to group a set of images that’s tied to a particular event or activity, for example. According to Instagram, some 20 percent of users had been utilizing third-party collage apps prior to Layout’s release.
When you post a photo, you will notice two icons at the bottom-right corner of an image: One that’s an infinite loop, and another of what looks like a cube with different shaped compartments within it. The former takes you to Instagram’s Boomerang app, while the other takes you to Instagram’s Layout app. To use these two photo apps, you will need to download them, as they function as independent apps.
There is also a third app, called Hyperlapse (iOS only), that lets you create time-lapse-like videos. After you shoot a video (up to 45 minutes long), you can then adjust the playback speed — from a slow 1x to super-fast 12x. Hyperlapse’s main trick is that it uses the accelerometer data from your phone to produce liquid-smooth footage. As with the other apps, the video is saved in the camera roll and can be shared to Instagram or Facebook.
These apps don’t require Instagram, and you can use the photos and videos for other applications. And while they aren’t as popular as the native Instagram app, they can add some creative flair to your account.
Rather than continuously tagging the same recycled memes again and again, it’s sometimes refreshing to find more original accounts to follow. Thankfully, the Activity button — aka, the heart at the bottom of your Instagram homepage — allows you to see not only who likes one of your posts and when a friend has tagged you, but also what posts have been liked by the people you follow. Simply select the Following option at the top of the screen and let the Insta-creeping begin.
Instagram’s infamous sorting algorithm aims to show you content you care about first, but if you play favorites with you friends (we’re not judging), you can turn on notifications to receive an alert when selected people post new content. To activate this feature, go to the follower’s profile page, tap the three-dot icon in the upper-right, and select Turn on Post Notifications. Now you’ll never miss a butt shot from Kim Kardashian (who has the third most popular Instagram account).
Taking a page — almost verbatim — out of Snapchat’s book, Instagram’s relatively new Stories offer a means of sharing moments from your life that may not qualify for their own posts on your profile.
Much like Snapchat Stories, Instagram’s feature lets you share still photos, videos, and other content with your followers. It also offers the same add-on functionality as Snapchat, allowing you to add creative text and filters, many of which can be tweaked to customize your post.
When you open Instagram, you’ll see your story and the stories of your followers at the top of the page, represented by their profiles pictures with a colorful ring around them. Simply tap one to view it. You can add to your own story by tapping the camera icon in the upper left.
Keeping with the ephemeral theme, Instagram Stories only stick around for 24 hours. After 24 hours, they are saved in your private archives. If you want a story to remain visible for longer than 24 hours, you can select it from the archive (tap the icon that looks like a clock on the top of your profile page) and choose to add it to your Highlights. Highlights remain featured on your profile page indefinitely, but highlighted stories don’t remain viewable in your primary, 24-hour story.
If Stories just aren’t immediate enough for you, you can also live-stream video on Instagram. Getting into Instagram Live is as simple as posting a story. From your main feed, bring up the Stories camera and swipe to the “Live” option. Assuming all permissions for camera and microphone access have already been granted, it’s as simple as pressing record.
To help get your stream a little boost, Instagram will send a notification to select friends to let them know you’ve gone live. Instagram also lets you go live with a friend in split-screen setup, and live broadcasts can be added back to your story after the fact, giving more of your followers a chance to see them.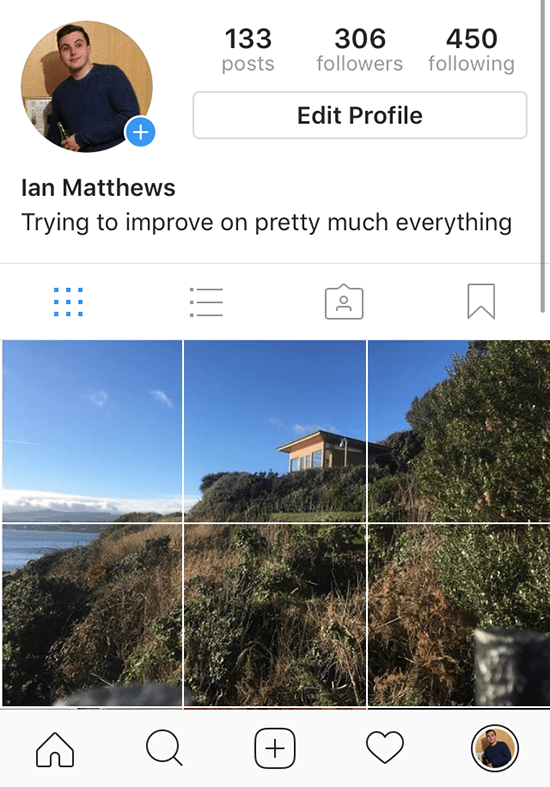
Still here? Congratulations! You now have all the tools at your disposal to grow your Instagram following and become the next social media sensation. But we can only show you the door; you’re the one that has to walk through it.
So you’re running paid search and display ads through Google, you’re advertising on Facebook, LinkedIn, Twitter, and even some niche industry-related social sites. Perhaps you’re even running some guerilla advertising campaigns, or commercials through NPR. But for some strange reason, you dismissed Instagram, unsure if it would yield ROI.
Well, I’m here to inform you that today is not the day to ignore Instagram! While Instagram may be younger, with fewer users, than its parent company Facebook, Instagram is the breakout star of the family who everyone wants to sit next to at the Thanksgiving table. Instagram provides a platform to tell visual stories through various ad formats, and many advertisers have seen this channel yielding higher ROI in comparison to their other advertising campaigns.
Today Instagram has 800 million active users, according to Statista, and the rate of rapid growth it has seen since 2013 is pretty astounding. Just check out the graph below.
But with so many active folks scrolling through their feeds at all hours of the day, how in the world can a little business like yours stand out?
This is where Instagram advertising comes into play. Similar to Facebook, with popularity comes clutter, and breaking through that clutter organically to make a real impact can feel nearly impossible.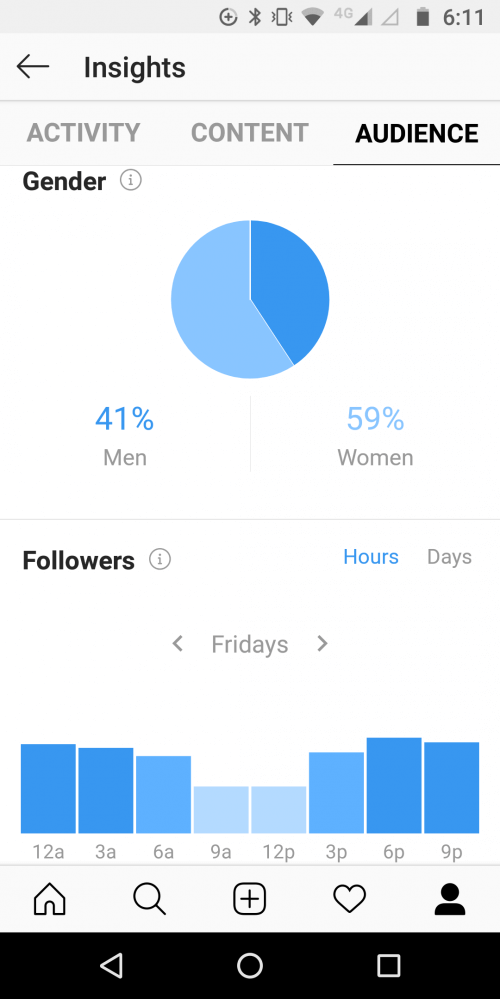 To focus on the right people, at the right time, with the right message and imagery, Instagram ads are your powerful vehicle to do just that…
In this guide you’ll learn everything you need to know to get started with an Instagram advertising campaign.
<<Short on time? Get our free All-Star Playbook to Online Advertising, to read later.>>
Instagram advertising is method of paying to post sponsored content on the Instagram platform to reach a larger and more targeted audience. While there are many reasons a business or individual may decide to advertise, Instagram advertising is often utilized to grow brand exposure, website traffic, generate new leads, and move current leads down the funnel (and hopefully towards converting).
Since Instagram is such a visual platform, text ads are not a thing here. Rather you need an image, set of images, or video (which can be accompanied by text) to reach your audience with Instagram ads.
The exciting part? Instagram advertising works! In March 2017, over 120 million Instagrammers visited a website, got directions, called, emailed, or direct messaged to learn about a business based on an Instagram ad. According to Instagram, 60% of people say they discover new products on the platform, and 75% of Instagrammers take action after being inspired by a post.
Similar to Facebook ads, throwing some money behind a post will lead to more exposure for your brand, as well as more control over who can see your post.
For more fun facts about Instagram, check out this post.
This leads to the obvious question: Who is on Instagram? Is it just teenagers taking selfies? Or 20-somethings looking for recipes? What about older populations? Are they “gramming” their grandchildren?
Unfortunately for all you marketers targeting the grandparent demographic, Instagram does tend to skew towards a more youthful audience, with the largest percentage of users falling in the age range of 18-29 (55%), then between 30-49 years-old (28%). Only 11% of Instagram users are between the ages of 50-64, and just 4% are adults over 65.
According to Hootsuite, the majority of Instagram users live in urban areas (32%), 28% of users live in the suburbs, and 18% of users in the country. While there are more women on Instagram than men, the gender gap is not as large as it once was.
If this doesn’t sound like the audience you’re targeting, you still should not dismiss the social network as a useless opportunity. Similar to what happened with Facebook, more and more adults over 34 will likely be hopping on the Instagram bandwagon as the platform continues to grow. Also, if you are working with the 4% of adults over 65, you can always target that demographic directly…
Via Jenn’s Trends
Similar to many other social advertising platforms, Instagram gives you the granular control to target specific genders, age ranges, locations, interests, behaviors, and more. You can even target a custom or lookalike audience so you’re showing ads only to your direct list of leads or those who have a similar makeup.
What advertisers should really latch onto is the fact that Instagram uses Facebook’s demographic data to serve up ads to the appropriate parties. This makes the tool super valuable for advertisers looking to target a niche audience, because Facebook already has a thorough history and thorough demographic targeting options.
Instagram advertising can be especially powerful if you’re in a visual or creative industry, such as the restaurant business or craft marketing.
This is a tricky question to answer, as costs are based on a variety of factors, and as you may have suspected these factors are not all revealed to us by the platform. The model is based on CPC (cost-per-click) and CPM’s (cost per impressions), and prices are determined according to Instagram’s ad auction.
“The cost of Instagram ads are influenced by many factors — everything from your audience to your ad feedback,” says Andrew Tate from AdEspresso. “There’s a lot that goes into understanding how to advertise on Instagram.”
AdEspresso recently dug into $100 million worth of Instagram ad spend in 2017, and found that the average cost per click (CPC) for Instagram ads in Q3 ranged between $0.70 and $0.80. While this is a helpful benchmark it will of course vary depending upon the auction, audience, competition, time of day, day of week, etc.
Some advertisers find that Instagram ads often have higher engagement, but this can cost them. According to Keith Baumwald, founder of Leverag Consulting, Instagram ads costs are slightly higher in cost than Facebook ads. Baumwald claims that since the ads are so highly targeted you could end up paying as high as $5 a CPM.
On the bright side, advertisers do have control over how their budgets are allocated. For instance, you can choose between a daily budget to limit the amount spend per day or a lifetime budget where you would set up your ads to run for a length of time until the budget is depleted.
Other ways to control your Instagram ad spend include setting your ad schedule (for instance, you can specify certain hours of the day you want your ads to run), setting your ad delivery method (there are three options: link clicks, impressions, and daily unique reach), as well as setting your bid amount (manual vs. automatic).
Learning the ins and outs of a new advertising platform might seem overwhelming at first. The good news here is that if you’re advertising on Facebook, there isn’t much to learn. In fact, Instagram ads can be configured right through Facebook Ad Manager.
If you’re not advertising on Facebook, don’t fret. We’ll walk you through the process below, and there is also the option to create some simple ads directly within the Instagram app.
Advertisers who are more advanced or running a relatively large ad set can also chose to configure their ads through Power Editor or Facebook’s Marketing API.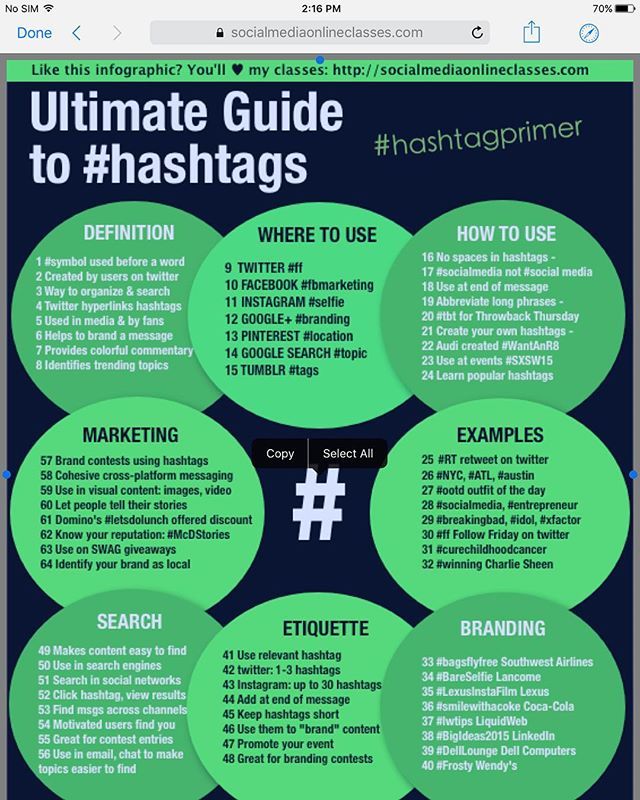 Instagram Partners is also available for businesses who need to buy and manage multiple ads, manage a large community, and deliver content at scale.
For this post, we’ll focus on creating ads through Facebook Ad Manager, which is the most common method due to its ease-of-use and the ability to customize these ads to a higher degree than what is possible within the app itself. While configuring Instagram ads is not overly complex, there are quite a few steps to be aware of. Starting with…
To navigate to ad manager within Facebook, simply follow this link, assuming you’re logged in to the appropriate Facebook account.
Note: There is no specific Ad Manager for Instagram; Instagram ads are managed through the Facebook Ads UI.
Now for the fun part, choosing your campaign goal. Luckily, the goals are named in a self-explanatory manner. Need more traffic? Select the traffic goal. Looking to increase brand awareness? Choose the brand awareness goal. You get the gist.
One thing to be aware of is that Instagram ads only work with the following goals:
While these goals are intuitive, some come along with a few additional configuration steps, which I’ll run through for you.
Brand awareness: Take an extra-long lunch. No extra steps here! This is the most standard goal that will try to show your ads to more potential people likely to be interested. How does Instagram determine this? It’s a secret, but this goal will likely expose some new and relevant folks to your brand.
Reach: If reach is what you’re looking for (as in maximizing how many people see your ads) then you’ll just need to be sure to select your Instagram account when creating the ad itself. It’s also worth noting that if you’re looking to run an Instagram Story ad “reach” is currently the only objective you can chose. The cool thing about this goal is that you can take advantage of Facebook’s split testing feature, which allows you to split test two ads to see which one yields more installs. NOTE: Split testing is also available for Traffic, App Installs, Video Views, Lead Generation, and Conversion goals.
Traffic: If you’re looking to send more people to your website or app store to download your app, this is the appropriate goal for you. The only additional steps you’ll need to take is choosing between those two options, then enter the URL of choice, and let the traffic jam in!
Engagement: Who doesn’t want more likes, shares, and overall engagement? If your goal is engagement, one thing to note is that you currently can only pay to play for “post engagement” on Instagram. Facebook will allow you to pay for “page engagement” and “event responses,” but this is not currently available to Instagram.
App Installs: If your main goal is app installs, you’ve come to the right place. To configure this you’ll need to choose your app from the app store during set-up.
Video Views: Videos are often an investment of time and money, so not promoting your video on Instagram would be like buying a plane ticket to Hawaii, and leaving it in your desk. Luckily, this goal is very straightforward, and doesn’t require additional setup steps.
Lead Generation: Who doesn’t want more leads? If that is your main goal this objective is for you. Just note that lead generation ads do not provide all of the same pre-filled fields as Facebook. Instagram currently only supports email, full name, phone number, and gender. These ads also have more of a barrier than Facebook lead generation ads, since when leads click to open the ad they’ll need to click through to fill out their information. On Facebook, leads can fill out their information without all the additional clicking. The other set-up piece is that you’ll need to create a lead form when creating your ad. If you’re interested in learning more about lead ads check out this post.
Conversions: Last, but certainly not least, we have conversions. This goal allows you to drive your leads to take action and convert on your website or within your app. The additional set-up here requires you to configure either a Facebook pixel or app event based on the website or app you’re looking to promote; this will allow you to track conversions.
Now that you’ve selected your objective, you need to target the appropriate audience to get your ads in front of the right people. This is the true beauty of Instagram ads since you’ll be using Facebook’s depth of demographic knowledge to reach the right people.
If you’ve done this for Facebook ads before you likely already have several audiences built, and are quite familiar with the process. If you’re new to this process here’s a run-down of your targeting options, which you can layer to get a precisely targeted audience. (For instance if you want to target women, in New York, between the ages of 19 and 65, who are interested in yoga and health food, you can do just that!)
Location: Whether you want to target a country, region, state, city, zip code, exclude or include certain places, location targeting will allow you to do all of this and more.
Age: Allows you to target ranges from age 13 to 65+
Gender: Choose between all, men, or women
Languages: Facebook recommends leaving this blank unless the language you’re targeting is not common to the location your targeting.
Demographics: Under “Detailed Targeting” you’ll find demographics, which has several sub-categories with even more sub-categories under those. For instance, you can target “Demographics” > “Home” > “Home Ownership” > “Renters.”
Interests: Interests is also under “Detailed Targeting” with multiple sub-categories to dig into. For instance, if you’re looking for people interested in distilled beverages, science fiction movies, and aviation, those options are available for you!
Behaviors: And yet another “Detailed Targeting” option with multiple sub-categories to explore. Whether it be purchasing behaviors, job roles, anniversaries, or other behaviors the options seem endless.
Connections: Here you’ll be able to target people connected to your page, app, or event.
Custom Audience: Custom audiences let you upload your own list of contacts allowing you to target leads already in your pipeline or customers who you’re looking to upsell.
Lookalike Audience: If your custom audience is tapped to their potential, create a lookalike audience. This will allow Instagram to find people who have similar traits to your other audiences.
Once you’ve configured your audience, Facebook will also provide you with a guide to how specific or broad your audience is (like the one below).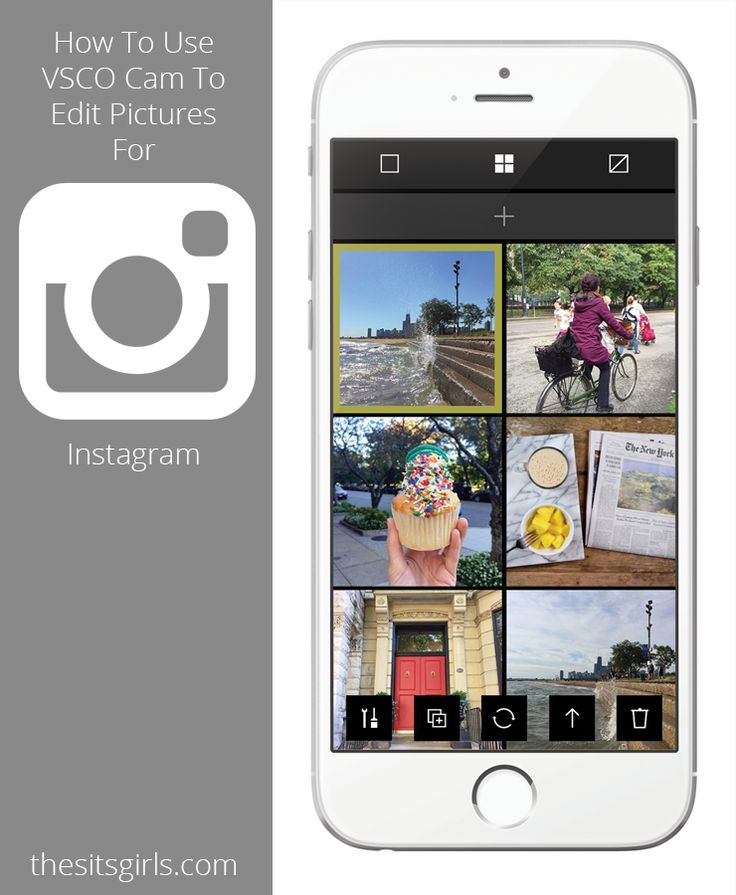
This is an important tool to pay attention to, because you want to strike a balance of your audience not being too huge (since it’s likely not targeted enough), but also not being too specific (in the red zone), since there may not be many people (if any) to reach with so many layered targets.
Now that you’re targeting your ideal demographic, it’s time to choose your placements! This is critical if your goal for a campaign is to only show ads on Instagram. If you choose to ignore this step, Facebook will allow your ads to appear on both platforms.
This isn’t necessarily a negative thing, but if you have content that you’ve created specifically for Instagram, you should select “Edit Placements” here.
From here you can specify Instagram as a placement, as well as if you’d like these ads to appear in the feed and/or the stories section of the platform.
If you are familiar with how budgets work through Facebook, AdWords, and other digital advertising platforms, this step should not be overly challenging for you. If not, then take a deep breath; while you might not know exactly where to set your daily or lifetime budget when running your first Instagram ad campaign, this comes with trial and error, as well as experience. And the good thing is you have the control to pause or stop your campaign at any time if you feel your budget is not being properly allocated.
So should you go daily or lifetime? While I typically lean towards daily budgets since it guarantees your budget won’t be spent too quickly, lifetime budgets allow you to schedule your ad delivery, so there are pluses and minuses to both options. I would also advise exploring the advanced options pictured below. For instance, if you bid manually you’ll have the control to decide how much each lead is worth to you.
As mentioned above, you can also run an ad schedule to target specific times of day and days of the week when you know your audience is most active on the platform. This is a super valuable way to optimize your budget.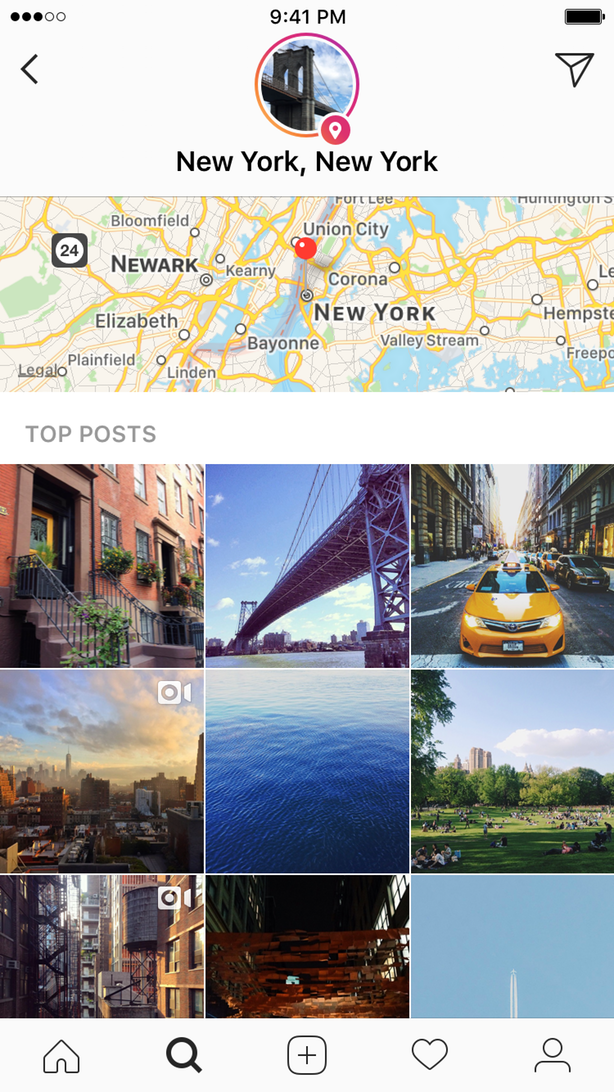 As a reminder, this is only available for those using a lifetime budget.
Now it is time to create your Instagram ad!
Hopefully after taking the steps above you already have some content in mind for the ad you are looking to promote. This part of the set-up may look different depending upon your campaign objective, but you’ll always have a few ad format options to choose from. So as a next step, let’s discuss the various ad formats available.
If you are a bad decision-maker, you may want to brace yourself. Instagram has six ad formats to choose from. (This is way fewer than Facebook!) Two of those are for Instagram stories, which appear at the top of the feed in a manner similar to Snapchats. The other four are formats designed for the Instagram feed, which are more commonly used by advertisers.
This is your most standard ad format, and likely the one you see most often scrolling through your own feed. These ads are single images that will appear as a native experience as your target lead is scrolling through their feed. The lovely thing about these ads is that they don’t feel like ads, especially when done well.
Here are some additional details to be aware of:
Technical Requirements
Supported Objectives
Supported Call-to-Action Buttons
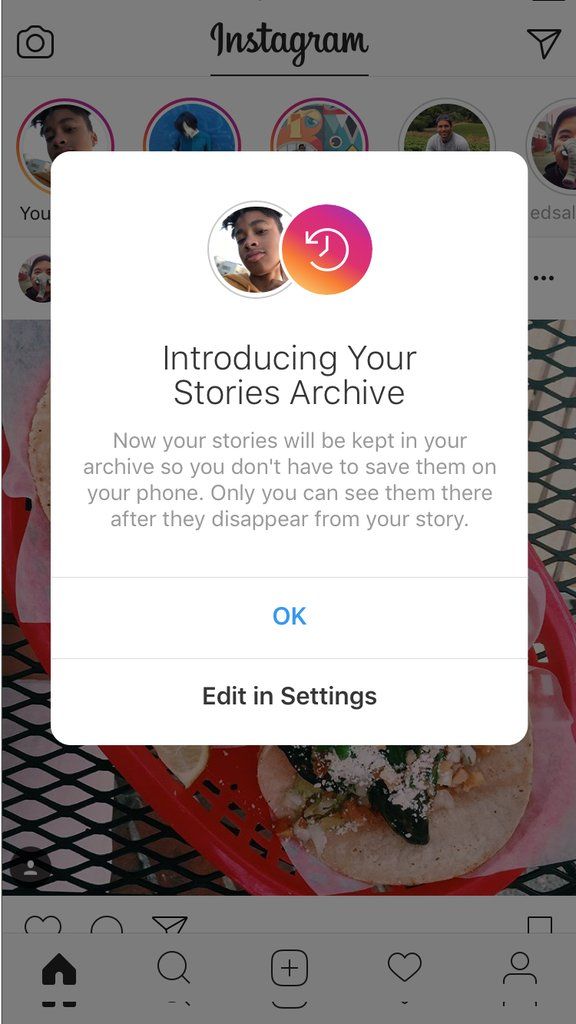 Image Story Ads
Same concept as above, but these are for Instagram stories! Instagram Story ads details below:
Technical Requirements
Supported Objectives
Supported Call-to-Action Buttons
Bring your ad to life with a video! If you’ve put the time in to make a quality video, then you should absolutely be promoting it through your Instagram feed.
While most video files are supported by Instagram, they recommend using H.264 compression, square pixels, fixed frame rate, progressive scan, and stereo AAC audio compression at 128kbps+ (PRO TIP: if your video is not meeting these requirement you can always run it through the video transcoder, Handbrake, to make these adjustments).
Technical Requirements
Supported Objectives
Supported Call-to-Action Buttons
This is another great place to run video ads, because stories are where users often expect to see videos, so the “selling” part of advertising doesn’t feel as forced. The recommended video specs for uploading are the same as listed above, and here are some additional details to keep in mind!
Technical Requirements
Supported Objectives
Supported Call-to-Action Buttons
Next we have carousel feed ads. How fun are these! This format allows you to show a series of scrollable images rather than just one single image.
This ad type is great for very visual brands, like those in the food industry, furniture sellers, clothing options, vacation destinations, car dealerships, etc. But they’re not only for “sexy” businesses; they can also work to humanize your brand or show off your culture by showing the people behind your software or financial company.
The carousel format allows you to choose from up to 10 images within a single ad, each with its own link. Video is also an option for these ads.
Technical Requirements
Supported Objectives
Supported Call-to-Action Buttons
 Canvas Story Ads
And last, but definitely not least, we have the newest addition to the ad format family, Canvas ads. There ads are truly immersive, allowing advertising to create a 360 VR experience within their story. They’re only supported via mobile devices, and extremely customizable for the advertiser, but you will need some technical chops. These ads work with image, video, and carousel. Check out this guide to learn more about Canvas ads.
Technical Requirements
Supported Objectives
Supported Call-to-Action Buttons
Now that you’ve got the basic principles of Instagram advertising down, it is time to get the highest ROI possible by following these Instagram best practices to create great Instagram ads.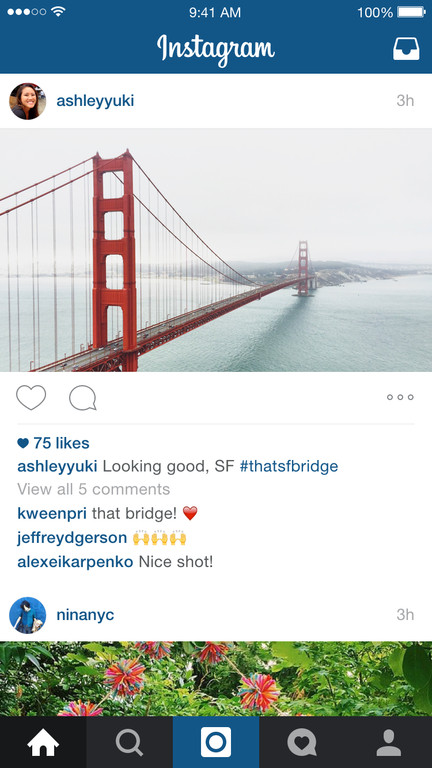
Whether it be a funny goof, an emotional video, or just an intriguing image showing off your culture, if your Instagram post doesn’t feel humanized then you will not reach your engagement potential.
People use Instagram to be entertained, amused, or amazed. Whether it’s while you’re on the train to work or when you are unwinding after a long day of work, no one is looking to hop on Instagram to see a boring corporate advertisement. This is why appealing to emotions is always the way to go. Check out this fun post from Shape Magazine as a perfect example.
What works with one social media platform won’t necessarily work with another. For instance, your business likely wouldn’t promote the same content through LinkedIn as they would through Twitter, as the audience is typically in a different state of mind.
The same goes for Instagram. Put yourself in your target buyer’s shoes and be aware of where they are. On Instagram, do you think your lead is likely to download and read your 40 page e-book? Probably not. Ensure your ads do not feel overly sales-driven because this isn’t typically what Instagram is used for.
But don’t just hashtag #food or #love. Get more creative, and do some user research to see which hashtags are more likely to be searched for by your audience. Also, don’t overdo it with hashtags. This can make your post look a bit sloppy and desperate.
The ideal number? TrackMaven analyzed 65,000 posts and found that 9 hashtags is the ideal number for highest post engagement. They also found that longer hashtags often perform better.
Promoting a contest or giveaway is by far one of the most effective ways to reach your goals faster with Instagram advertising. Why? Because people love competition and free stuff! What better way to get your audience excited about your brand?
If you need some help with how to go about this, check out this awesome post on how to run an Instagram giveaway from WordStream’s very own Dan Shewan.
I spoke a bit about this during the budgeting step of Instagram ad-set up, but using the ad-schedule feature (which is only available with lifetime budgeting) is a great way to get people at the right time.
Via CoSchedule
If you know your audience well, this shouldn’t be too hard to determine, but trial and error can also work here. Think about your vertical. If you’re an online retailer, when do people typically shop for clothing online? Or if you’re a car dealership, what days of the week do you see the highest spike in website traffic? Asking these questions is a good place to start.
Without further ado, set forth and advertise on Instagram! This is one platform you should not ignore, and this guide should provide you with enough resources to become insta-famous.
Looking for more help? Check out:
This article will be completely devoted to the question of how to use Instagram on your phone.
Instagram is one of the hottest and most popular apps on the web. It combines social media, photo uploads and portability, which is why so many people love it.
The main purpose of Instagram is to upload photos, real photos with friends, taken on the go. Read our introduction to Instagram if you want a comprehensive description of this app.
Now that you have learned about the existence of this service and its popularity - how to start using it? It's a bit tricky compared to other popular social networks since Instagram is the first mobile social network, but we'll help you.
Look at the photo and you will learn how to use Instagram and how to make all the settings in just a few minutes.
Contents
The very first thing you should do is get your iOS or Android mobile device. The Instagram app currently only runs on these two mobile operating systems, with a Windows Phone version expected soon.
If you don't have an iOS or Android device (or Windows Phone), unfortunately you won't be able to use Instagram this time. Only very limited access is possible through the regular network, and you will need a compatible mobile device to actually use the service.
The next step is to download the official Instagram app from the iTunes App Store for iOS devices or Google Play for Android devices.
To do this, simply open Google Play or the App Store on your mobile device and search for "Instagram". The first result should be the official Instagram app.
Download it and install it.
You can now start by creating your free Instagram user account. To do this, click the "Register" button.
Instagram will ask you to follow a few steps to create your account. First you will need to choose a username and password.
At this stage or later, you can upload a photo to your profile and connect to your friends on Facebook or Vkontakte. Also, to create an account, Instagram will ask for your email address, name and phone number (optional).
Click the "Done" button in the upper right corner to confirm that the information entered is correct. The Instagram app will then ask if you want to connect with your social media friends, if you haven't already, or people in your contact list. You can click the "Next" or "Skip" button if you want to skip this step.
Finally, the Instagram app will show some popular users and photo thumbnails to invite you to follow them. You can click the Follow button to subscribe, then click the Done button.
Your Instagram account is now fully set up.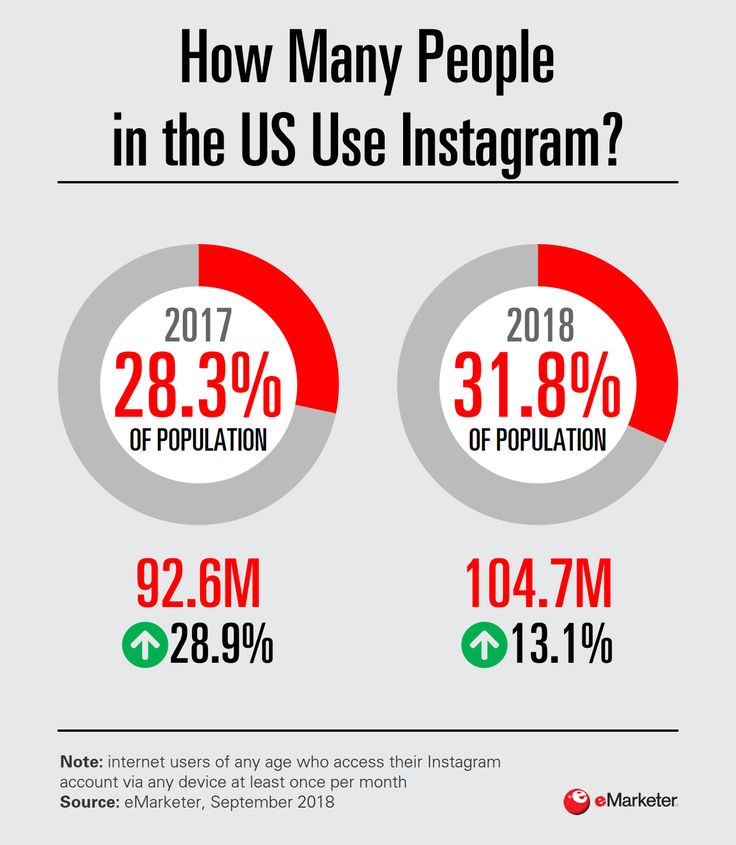 Now it's time to learn how to navigate the app using the menu icons located at the bottom of the screen.
There are five menu icons that allow you to view different parts of Instagram: home, explore, take a photo, activity, and your profile.
 In it, you can also access and change any personal settings.
Now you can start taking your own photos and post them on Instagram. There are two ways to do this: directly through the application or uploading a photo from the Gallery or another folder.
Once you select a photo, you can choose to post it as is or use one or more filters.
When you're done editing your photo, click Next.
It's time to fill in the details of your photo.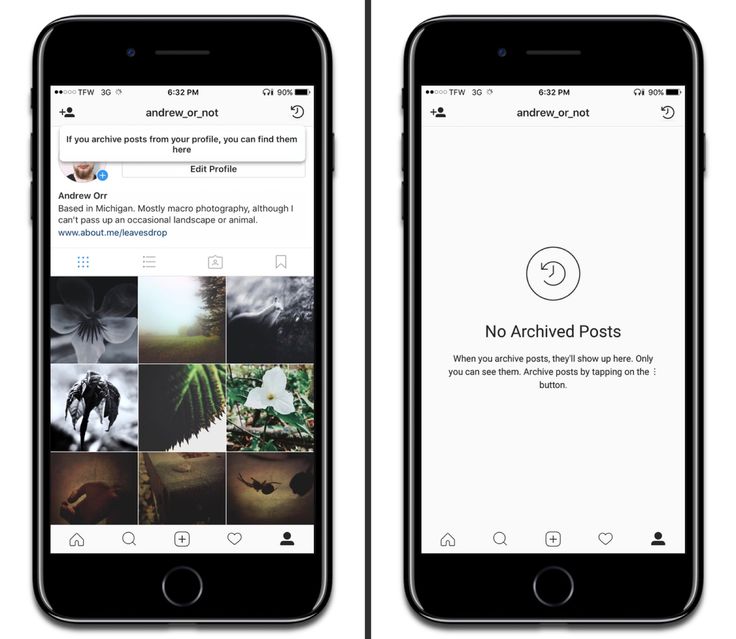 This is not required, but it is recommended that you at least add a description of the photo for your followers.
 You can turn off auto posting at any time by clicking on any social network icon so that it turns gray (off) instead of blue (on).
 When you're done, click the Share button. Your photo will be posted on Instagram.
Communication is one of the best parts of Instagram. You can interact through "likes" or comments on users' photos.
If you want to find a specific user and a specific tag, you can use the search bar in the Explore tab.
Click the search bar and enter a word, label, or username. You will be shown a list of results.
This feature is especially useful for finding friends or viewing photos of topics that interest you.
As with all social networks and applications, data protection is very important. Here are some basic tips to further secure your Instagram account.
Change your user type from "Public" to "Private": By default, all Instagram photos are public and can be viewed by everyone. If you change this setting, only authorized followers will be able to see your photos. This can be done by going to the profile tab, selecting "Edit Your Profile" and then clicking on the "Photos are Private" button located at the bottom.
Deleting a photo: On any of your photos, you can click on the three dots icon to delete it after posting. This does not guarantee that none of your followers will see it in their Instagram feeds.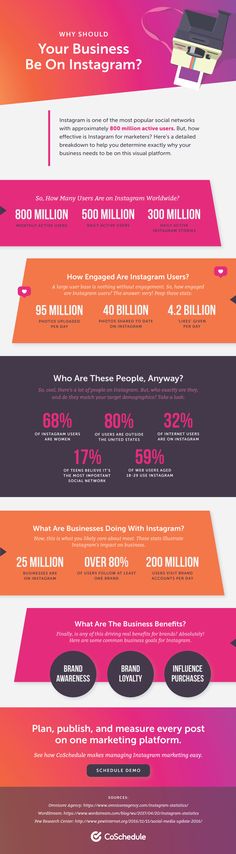
Report photos: If you think another user's photo is inappropriate for Instagram, you can click the three-dot button below that photo and select "Report Inappropriate" if you think it should be removed.
Block user: If you want to block a specific user from following or viewing your profile, click on the icon in the upper right corner of their Instagram profile and select "Block User". You can also report spam by selecting "Report for Spam" if you think this user is spreading it. You can also easily unblock someone on Instagram.
Editing settings: In addition to all this, you can edit your preferences by going to the user profile and clicking on the settings button in the upper right corner. You can also edit other personal information, such as your avatar, email address or password, in the "Edit Your Profile" section.
 ru
ru Lawyer Pavel Nevolnichenko explained how legal it is to use Instagram after the blocking Every day it becomes more and more difficult to get into the social network. Part of the audience decided not to suffer and abandoned their accounts, the other is looking for new ways to circumvent the bans.
At the same time, rumors are multiplying on the net that those who continue to use Instagram will face criminal charges for extremism and financing of such organizations. Is this true and should we be afraid of punishment for publishing stories with coffee and cats? We deal with the lawyer Pavel Nevolnichenko. Watch his video commentary.
Recall that on March 11, 2022, the Prosecutor General’s Office of the Russian Federation filed an application with the court recognizing Meta, which owns WhatsApp, Facebook and Instagram, as an extremist organization. In its demands, the agency refers to the fact that calls for violence are being disseminated in social networks in connection with the special operation conducted by the RF Armed Forces in Ukraine.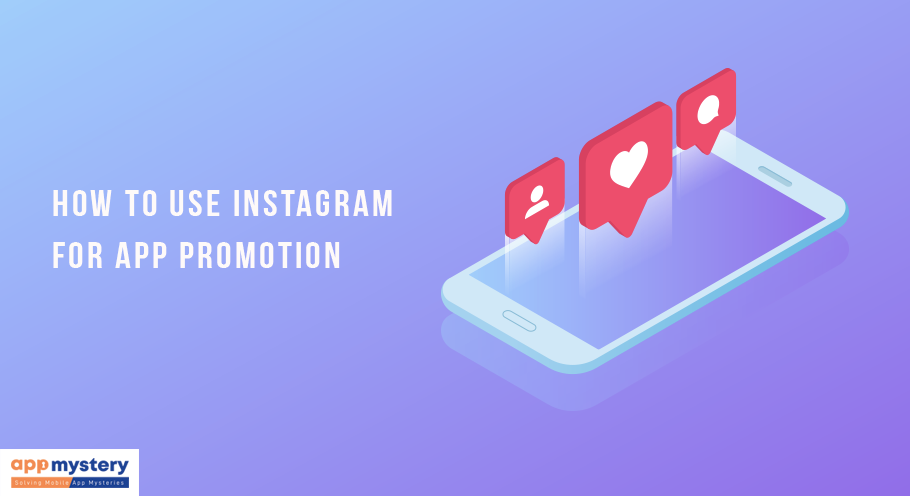 Facebook is already blocked in Russia due to "discrimination against Russian media".
news from the story
Subscribe to important news about the special operation in Ukraine
The case was launched very quickly: on March 16, he was appointed to trial, and on March 16, he had a conversation with the participants in the process. The meeting will take place on March 21, at which, as lawyers expect, the court recognizes Meta as an extremist organization.
Roskomnadzor began blocking Instagram for Russian users at 00:00 on March 14, providing for a 48-hour transition period, “since it will take time for active Instagram users to transfer their photos and videos to other social networks, to notify their contacts and subscribers.” Now the social network in Russia works stably only for those who use VPN services.
Earlier, the head of Instagram, Adam Mosseri, said that 80 million users in Russia would remain without communication on the social network.