It appears that Facebook has changed the procedure for going to a page’s activity log. Now when you follow the instructions provided by Facebook, you are taken to your personal activity log rather than the page’s activity log. This is causing hours of frustration for users. I have submitted questions on Facebook and researched but I haven’t yet solved this issue. If you do, please share and I will update for everyone else who is having this issue.
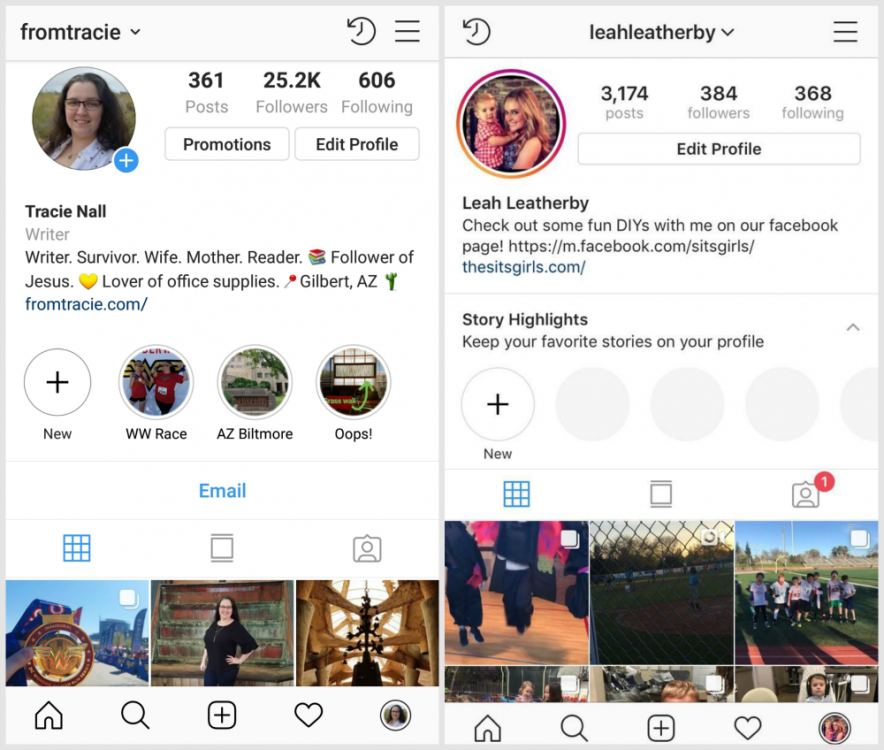
When people go to your company Facebook page, they have the option of putting up a post. It will show up on the right column under “visitor posts.”
Great! People can easily interact with your company and add to the content on your page. Except that you might not realize that the posts are there and they might not be something you want on your page.
This is an often overlooked feature on Facebook company pages. It’s easy to miss because it’s off to the side and not always visible. It’s easy to manage, but only if you know where to find how to control what’s happening. The steps are outlined below. But first, you want to think through how you want to handle these Visitor Posts.
It should be noted that a “Visitor Post” is different than when someone tags your company in a post they put on their page. In that case, the person writes on the post on their own wall and puts the “@” symbol ahead of your company name. You will get a notice in your feed and can like or share that post, but it doesn’t appear in the “Visitor Post” feed.
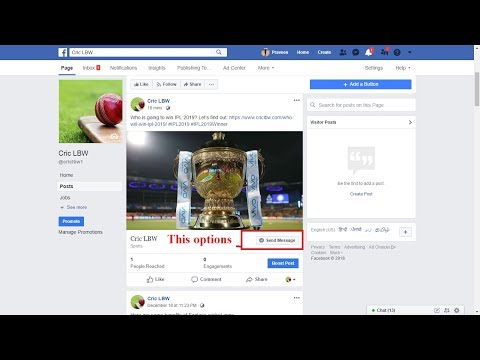
Visitor Posts appear on the right on your page. Hint: If you don’t see them, click on “Posts” in the left column and they should appear.
Visitor posts appear on the right column. HINT: If you don’t see them, try clicking on Posts in the far left column.
How do you want to handle posts? It’s a good idea to set a policy so that you and anyone working on the page will know how to respond. The question is how much time do you have to manage posts and what’s the likelihood of someone putting up something you don’t want?
Here are the instructions for setting up your visitor posts regardless of how you want to handle them:
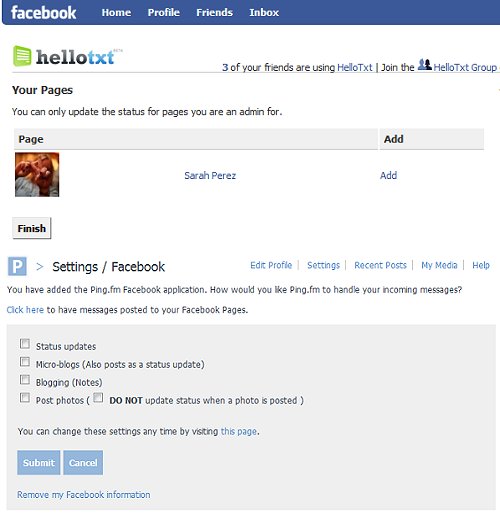
Go to settings.
Click on Visitor Posts. You will have the option to allow visitors to the Page to publish posts, review posts, or disable posts entirely. If you’ve disabled posts, you are done.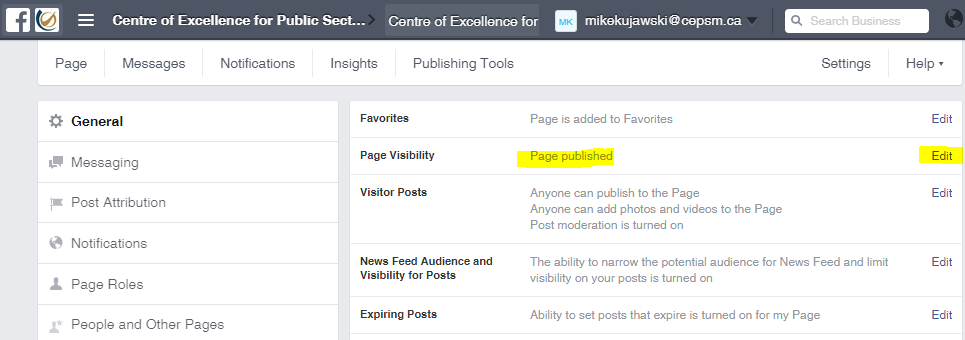 You are mostly done if you’ve allowed posts. You just need to keep an eye on them when they come on the page. Make sure they’re in line with what you want on the page. Keep in mind that if you don’t like one, you can delete it from the page.
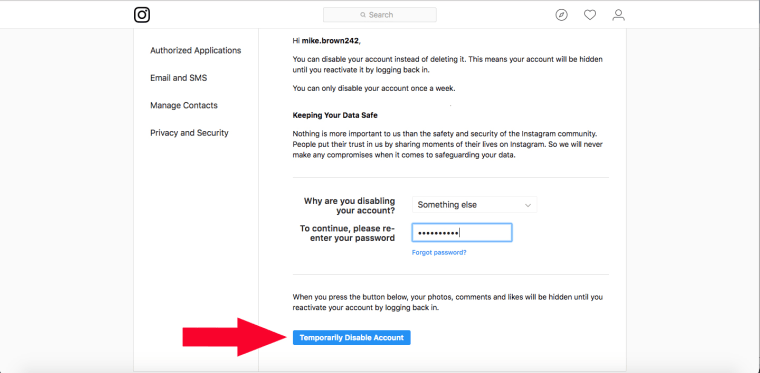
If you are going to review posts. You will need to take a few additional steps. You will get a notification when a visitor post comes in that you need to go to the Activity Log. This is under settings, at the bottom of the left column.
From the Activity Log page, click on “Other’s Posts to Your Page” in the left column.
When the posts come up, go to the top right corner and select to approve.
Want your Social Media strategy to do more for your business? Contact us now to set up a free consultation.
Your Facebook Business age is a pillar for your digital marketing campaign while providing a stage to interact directly with your audience. A significant trust builder for the business is the allowance for visitor posts on the Business Page. It fetches you some quality user-generated content and provides a clear public image of your firm.
Throughout this piece, you’ll learn how to see visitor posts on your Facebook Business Page and troubleshoot any issues you encounter.
Table of Contents
If you have admin access to a Facebook Business Page, you can control what your visitors post on it. In addition to comments, you can allow your audience to share photos and videos on your page, even moderating them according to specific parameters.
You can use the following method to control visitor posts on your Facebook Business Page:
You may not see visitor posts directly on your page’s timeline. Although there is a separate section for them, there might be other reasons why they’re not immediately apparent. You can view them through any of the below-mentioned methods.
Your Facebook Business Page has a separate section for visitor posts. You can view it by clicking Visitor Posts in the Posts tab. From here, you can share any relevant posts to the timeline and respond to any comments, should you desire.
If you’ve allowed reviews for the visitor posts on your Facebook Business Page, maybe they’ve not been published as they are pending a check from the admin, editor, or moderator. In that case, you can go to the “Others’ posts to your timeline” section in the “Activity log.”
Here, you can select the “Allowed on Page” option for the posts you want to display on your page. If you wish, you can reject any unsuitable content without notifying the post creator.
Recently, Facebook and Meta have come under heavy fire regarding content regulation on their platforms. As such, the company can be much more proactive in removing any posts that violate their community standards, even those on your Facebook Business Page, without your permission.
Furthermore, Facebook is also more reactive towards reported posts. If any of your visitors have been reported, Facebook can remove their posts after notifying you. Posts flagged with keywords that you set or as per the Facebook Content Policy for moderating material may disappear without your knowledge.
So, you should check in with your editors and moderators to see whether any changes to the page settings have a hand in removing the posts.
And that’s all about how to see visitor posts on Facebook Business Page. While the social media platform updates its services daily, there can still be issues with the relevant data being visible.
Although, how you can examine guest posts without affecting your Business Page shows that it is definitely on the right path.
Facebook makes it convenient to review visitor posts and approve them for publishing. You can do so with the following method.
1. Open your Facebook Business Page, go to settings, and the “Activity Log” from the menu on the left pane.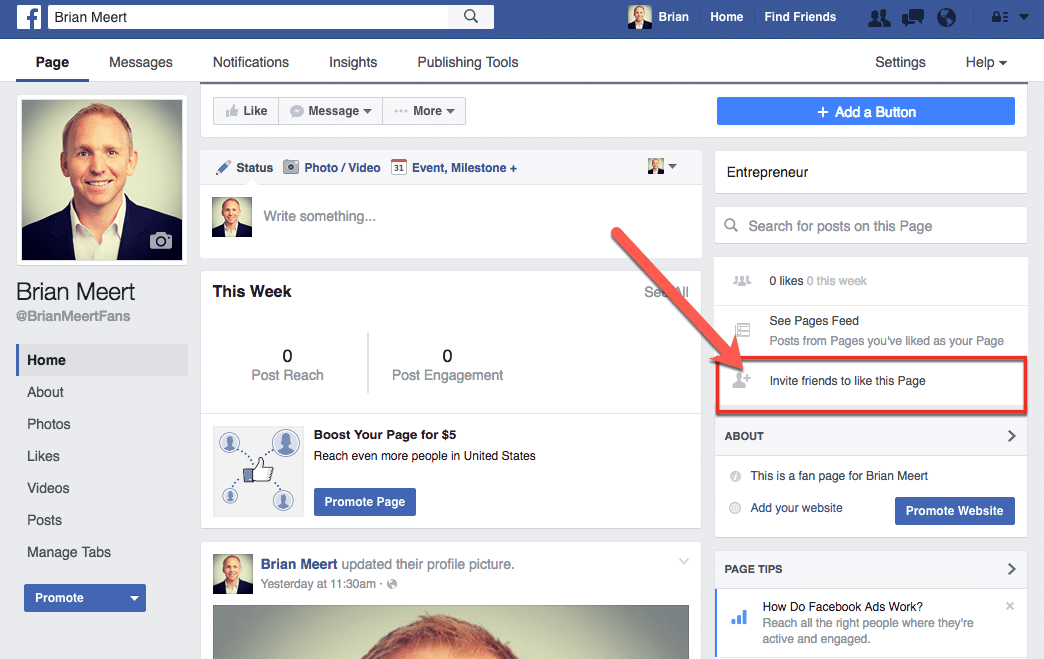
2. Select “Others’ posts to your timeline” from the menu.
3. Browse through the available posts pending a review. If you wish to approve any of them, click on the gray icon next to it and choose “Allowed on Page.”
Refresh your Facebook Business Page timeline, and you shall see the post you approved. It will display as per the time of approval, but the date on the post will be when it was initially created.
To prevent specific visitors from creating visitor posts, you need to ban them from your Facebook Page. You can utilize the method described below for that.
1. Open your Facebook Business Page and select “Settings” in the left navigation.
2. Select “People and other Pages.”
3. Select “Banned people and Pages” from the dropdown menu.
4. Add the people you would like to ban from your page.
The importance of a good first impression cannot be underestimated. Many companies are aware of this and attract customers by welcoming them first. For this reason, Facebook has added a small feature to recreate this experience on Facebook pages. In this article, you'll learn about the Facebook page welcome message, how it works, and how to create your own. In addition, we will provide some examples of Facebook Messenger welcome messages for different occasions.
The Facebook Messenger Welcome Message is an automated, personalized greeting that Facebook users can create for their Facebook pages. From the visitor side, these notifications can be found in Facebook messages and in the Messenger app.
Welcome message for Facebook page customersFacebook welcome messages have certain restrictions. For example, Facebook page administrators can only create one welcome message. And Facebook page visitors can only see it the first time they visit a business page before any message is sent.
Last but not least, the welcome text is limited to 160 characters. However, having a welcome message for your Facebook page has important benefits:
We've already talked about what this feature is and why it's useful. Now that you're familiar with it, we'll take a look at a few examples of Facebook Messenger welcome messages that you can use on your Facebook page.
There are several ways to write a greeting for a Facebook page. While you can't go wrong writing a generic greeting, injecting some creativity into your greeting will help you achieve your business goals better.
Facebook Messenger Greetings for Different Purposes We've identified five types of Facebook Messenger greetings examples that can help a business engage with customers and encourage them to take the desired action.![]()
This type of Facebook Welcome message is intended to show consideration for Facebook page visitors and invite them to share their requests. Standard greetings like the ones below are the default choice for many companies.
Some companies redirect Facebook conversations to help desk. Welcome messages such as the following provide page visitors with expectations regarding agent availability or support response times.
 "
" People tend to use social media in their free time, which makes them more likely to engage in activities that require some time and thought, such as shopping. This creates a great opportunity for businesses to announce promotions in Facebook welcome messages.

Some page visitors want to be contacted by your company, so your Facebook business page is a good place to collect customer data. This can be done using a message to collect customer data, as shown below.
Adding a touch of seasonal flair to your welcome message will make your company look more human and likeable. Also, some activities are affected by seasonal events, so it's always a good idea to keep customers up to date.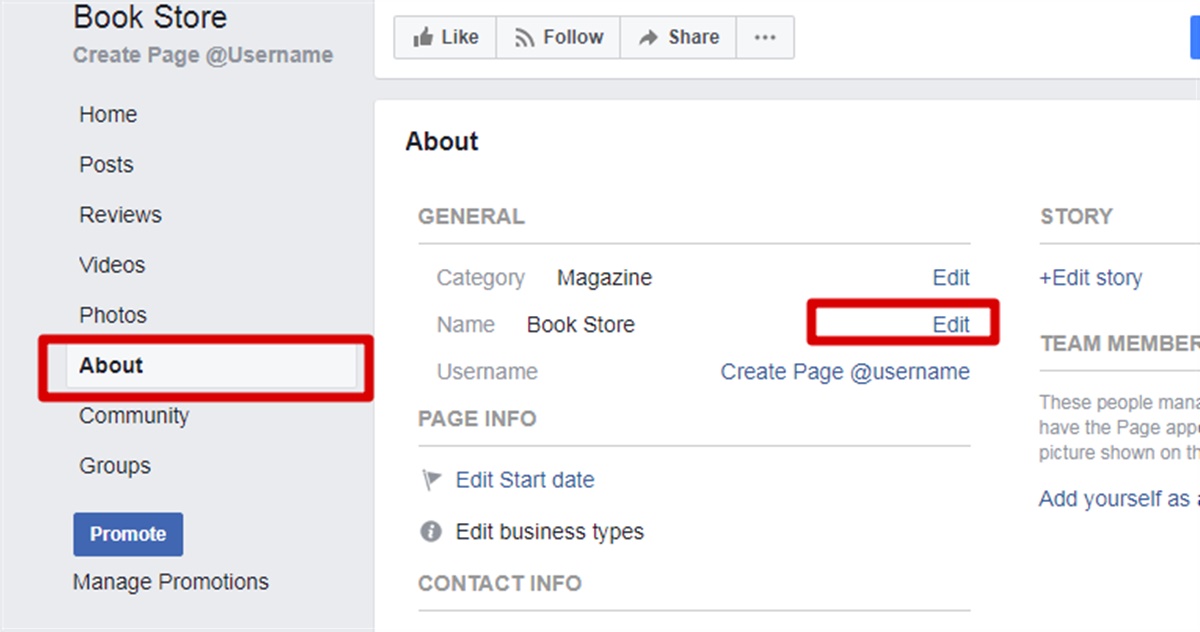
You now have a nice selection of Facebook Messenger welcome message examples. Let's move on to the next section where you'll learn how to create your own.0003
Before starting the step-by-step process, here are some tips that will help you create a Facebook Messenger Welcome Message.
While email messages are usually formal, instant messaging channels such as Facebook Messenger require a simpler and more direct tone. Here are four tips on how to write effective welcome messages for your Facebook page.
With these tips in mind, let's walk you through the process of creating a welcome message for your Facebook business page.
To set up a Facebook Messenger Welcome Message, you need to be a Facebook Page Administrator.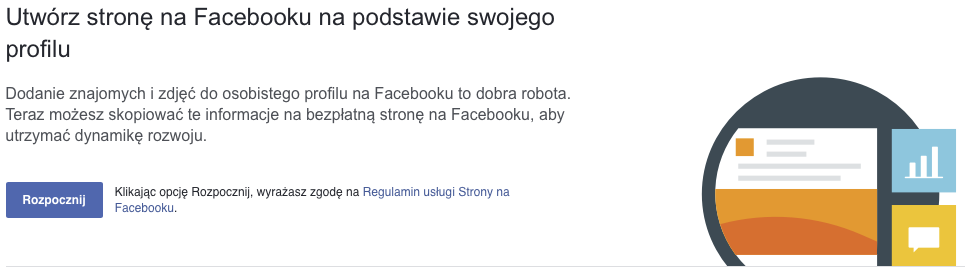 If you meet this condition, follow these steps:
1. Go to your Facebook business page.
Start by opening your Facebook business page2. Click Settings in the menu to the left of your Page.
Find Settings at the bottom of the menu3. Select Messaging in the left column.
Click on Messages4. Turn on the toggle switch next to Show greeting .
You will find the switch bar under " Starting a conversation in Messenger ".5. Click Edit, edit the greeting, and then click Save.
Compose your message and save your changes.The image above shows some of the customization options supported by Facebook greetings, such as including a recipient name or a link to a Facebook page.
For those looking for a more advanced welcome message customization, we recommend using an automation builder like respond.io offers.0003
 io
io Respond.io workflows offer a new world of possibilities for Facebook Messenger welcome messages. To get started, you need to link your Facebook page to your respond.io account.
As mentioned, Facebook welcome messages are sent the first time you visit your page. This, together with the Meta transfer protocol, limits the possibilities a bit.
Choosing your Facebook page as the main application has an important disadvantage. You will only be able to reply to Facebook Messenger conversations through respond.io 24 hours after you send your welcome message.
For this reason, we recommend using respond.io as your primary application, as you will be able to respond to messages without waiting, as well as benefit from more flexible and advanced automation.
In the workflow designer, you can create an automatic welcome message that will be sent every time a Facebook Messenger contact starts a conversation with you. Start by selecting Open Conversation as the trigger and then send the message.
Then select a Facebook Messenger channel and customize your welcome message with text, files, images, or even Facebook Message Tags. If you choose the latter option, remember that they should only be used in very specific cases.
A welcome message is sent when opening a Facebook Messenger conversationThe customization options don't stop there. If you want high-interest messages addressed personally to Facebook Messenger contacts, be sure to include dynamic variables in the body of the message.
After the welcome message, there are many ways you can develop your workflow. For example, Conversations can be routed to the right team using a variety of methods. For more information on this topic, here is our guide to workflow routing.
After routing calls, it is important that they get to the right agent. There are several ways to automatically assign conversations to agents. Consider agent availability when designing your assignment strategy.
Workflow combining welcome messages, date and time steps, and agent assignment stepsBy default, Facebook messages have a 24-hour messaging window. However, respond.io users can extend it up to 7 days using the Human Agent tag. This tag is useful for agents who are away for a while or who need extra time to respond to complex queries.
In summary, Facebook welcome messages are easy to set up and can make a great impression on your Facebook page visitors. Use them in conjunction with respond.io workflows to improve the customer experience.
You have reached the end of this article. Did you find it useful? If so, here are other quick read articles you might be interested in:
Meta Platforms Inc. , which owns the social networks Facebook and Instagram, was recognized as an extremist organization by a court decision dated March 21, 2022, and its activities in Russia are prohibited.
Facebook is the largest social network in the world. According to 2021 data, it is in the top 10 most popular in Russia: Brand Analytics counted 2.9 million active authors on the site. In total, according to Statista.com, almost 3 billion people use the social network, which is more than a third of the world's population. If you are targeting an international or adult solvent audience in major cities, Facebook Ads Cabinet will help you reach them.
Contents:
For a quick start
How Facebook advertising works
Opening an ad account
If you need a new ad account
Setting up a campaign
Setting up an ad group
Creating an ad
Moderation
Payment
For those who want to figure out which ad Facebook determines
show
Campaign goals
Monitor campaign performance
Facebook Pixel
Loaded audience
Catalog
Bid management and budget optimization
Watching records
Automatic rules
Dynamic creatives
Rules for the site
We summarize
Read also:
Guide for the launch of advertising
from the creation of an advertising cabinet to launching an announcement in VKontakte
1
How Facebook advertising works
Facebook Ads manager allows you to advertise goods or services to users who fit the given characteristics: they live in the right location, are interested in certain topics, lead a suitable lifestyle. Thanks to this, you can show your ad not to everyone in a row, but only to those who are most likely to be interested in the offer.
Facebook has wide ad placement settings. You can run ads not only within this social network and in Messenger, but also on Instagram and in applications that are connected to Facebook's Audience Network. You can choose exactly where you want to place ads on each of the sites, for example, show them in the main Facebook and Instagram feeds, but not show them in Stories.
Facebook Advertising Account allows you to fine-tune the audience for advertising. Install the Facebook pixel on your website to show ads to those who have visited product pages or added them to the cart. If you have a customer base, for example, their email addresses, you can upload them to your advertising account and show them ads on social network pages. This will help make advertising more accurate: work with the most interested audience. Let's explore these possibilities in more detail.
In this material, we will first go from the first hit in the advertising account to the launch of the ad. And then we will analyze the subtleties: retargeting, optimization, goals, working with statistics.
To run your first ad, you need:
Set up an ad account.
Create a campaign and select a target.
Set up the audience and placements for the ad group.
Place an ad.
Pass moderation.
Let's take a look at the steps. We will launch advertising on Facebook together with entrepreneurs - Ivan, Olga and Alexey. Ivan is the author of an online course, Olga is the owner of a beauty salon, Alexey sells home plants through an online store. For advertising, they use different settings, this will help to pay attention to the details of the Facebook account.
Opening an advertising account
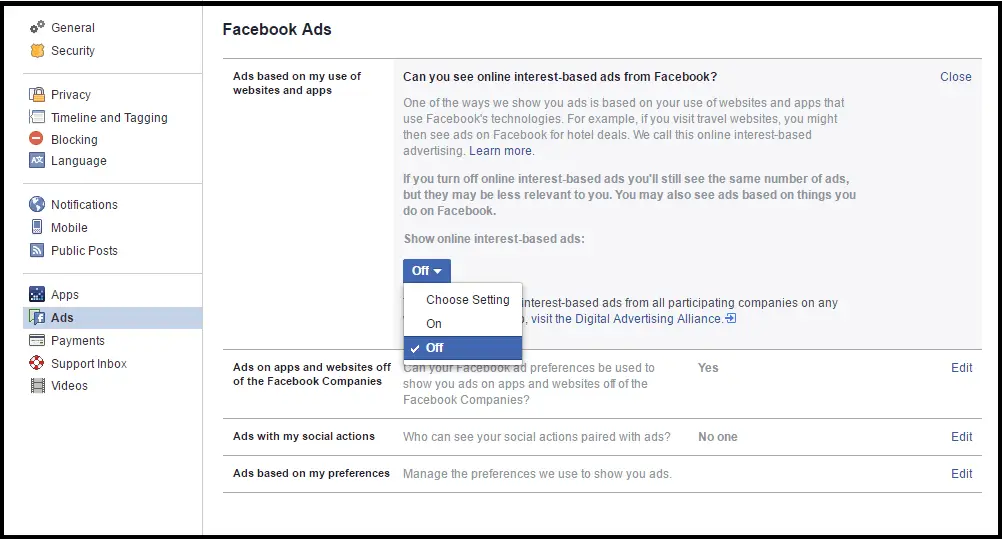
The instruction will be in the interface in Russian. If you have Facebook in English, you can change the language: Settings → Language and region → Facebook language → Edit.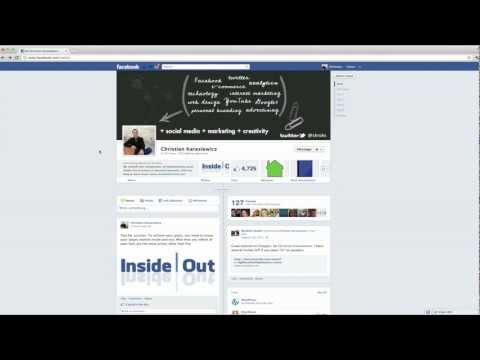
Please note: Facebook is constantly experimenting with the interface, the location of the buttons and the text on them may change. For example, your profile photo may not be on the right in the top menu, but to the left, then the menu will be opened by clicking not on the avatar, but on the icon with the down arrow. Do not be alarmed if the picture on your screen is slightly different from the screenshots in the article.
We want to show the general principles by which Facebook advertising works. They do not depend on the location of the buttons or the text on them.
If you have not tried running ads on Facebook before, then click on your avatar in the upper right corner → "Advertise" link → "Create ad" in the upper right corner. Facebook will ask you to create a page, for this you just need to specify the name and category.
Then click Create Page → Create Ad. On the new page in the lower left corner, click on "Go to Ads Manager" and accept the non-discrimination policy.
You will find yourself in the interface for creating an advertising campaign. Let's launch the first ad from here and finish setting up the account along the way.
If you have already tried running ads, then click on the Plus sign in the top menu → Create Ads → Go to Ads Manager.
You can go to Ads Manager in the future via a direct link
Facebook will show ads on behalf of the page you just created. This means that the user will see its name and avatar in the feed. So it's better to add a brand logo, your photo or product image, and make the name clear.
In addition, the user may immediately open the page, and if it is completely empty, this may confuse or disappoint him. We recommend adding information about the company and at least a couple of posts about your products.
If you decide to change the information about the page, click on the “Pages” item in the left menu, a list of pages that you manage will open:
If you need a new advertising account
. For example, in one you plan to pay for advertising with a bank card, and in the other - using PayPal. Or you want to manage different projects in different accounts, each of which has its own pixel. Facebook allows you to do this, and you don’t have to re-register on the social network.
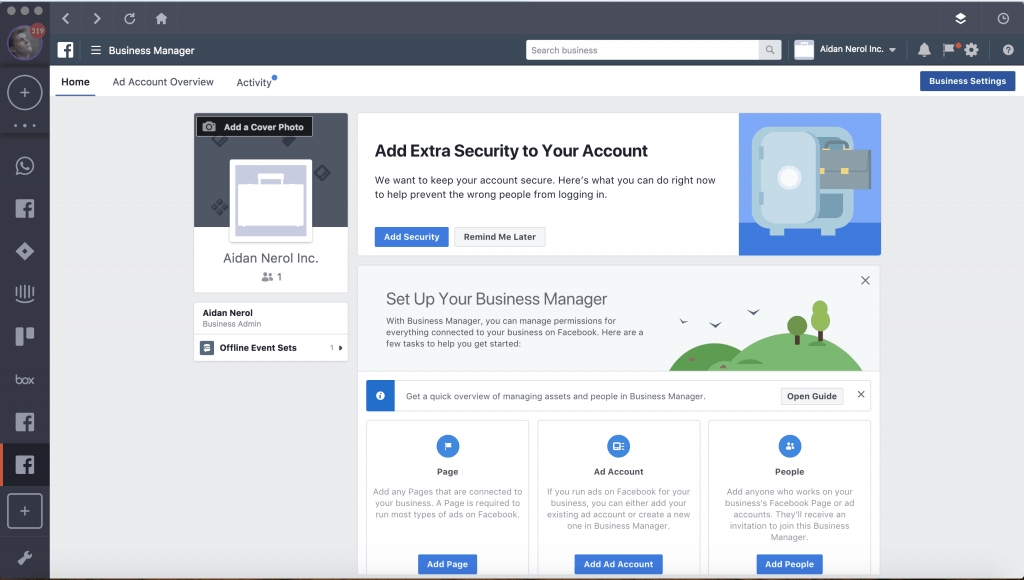
To create a new ad account, you need Business Manager, an ad collaboration tool. You can create up to 5 additional accounts using Business Manager. The number is individual: if you have recently registered on the social network and have not yet launched advertising, you can create only one additional account. The more you spend on advertising, the more accounts you can add.
Instructions from Facebook on how to create a Business Manager and add a new account to it.
Setting up the campaign
The first thing to do to launch the campaign is to set up the goal. Decide what you want to achieve from the company. There are three types of goals: awareness, consideration, and conversion.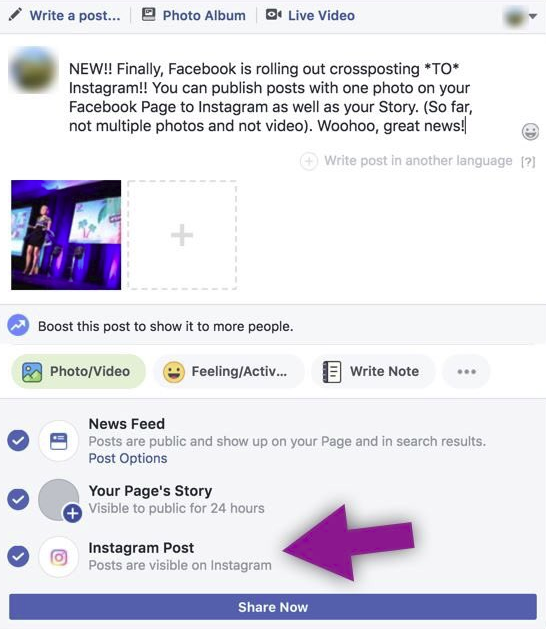
How to choose a campaign objective
A visibility objective suggests that you want to introduce your audience to a company, product, or service. For example, you announce a new product or enter a new market. In this case, the goal is not to sell immediately, but to talk about the product.
A goal from the “consideration” group is a way to reinforce interest in an offer. For example, if you want to attract people to a site or application, to interest the materials that you publish on your page.
A goal from the "conversion" group helps to persuade users to take a targeted action: register on the site or add a product to the cart.
These goals can be thought of as stages in a funnel. Customers first learn about your offer for the first time, then they want to learn more and, as a result, buy. Facebook will help you set up ads for potential customers at every stage.
Flowers from Alexey's shop are a product of impulsive demand. It is important for an entrepreneur to attract a client to a landing page and try to sell immediately before the wow effect has evaporated. For the first campaign, Alexey uses the "Traffic" objective from the Consideration group, but in the future he will switch to "Conversions".
Olga is actively developing her Facebook page, which helps her retain loyal customers. The salon often appears in their feed with beautiful photos, so they remember it when it comes time for procedures. Olga uses the Engagement objective from the Consideration group to drive more audience to her page.
Ivan knows that his course is rarely paid during the first visit to the landing page, he needs to do a few warm-up touches first. Therefore, he sets up the first campaign in order to get maximum coverage.
Click Continue.
On the next screen, add the name of the campaign. It is better to use something recognizable so that you can later distinguish them in the list from each other. For example, "Traffic to the site - Moscow - interests", and not "Advertising 12-03-2021".
Choose whether you plan to run an A/B test. In this case, Facebook will offer to create two variations of the ad that will differ in design, placements, ad delivery method, or audiences.
Select whether you plan to optimize the budget at the campaign level. If not, then the optimization will be at the ad group level. We will also analyze this point in the second part.
Working with bids and budget optimization
Setting up ad group
There can be multiple ad groups within a campaign. For example, you launched an advertisement for a new product and want to show it to different segments of the target audience: some ads for residents of large cities, others for residents of regions. Then you create two ad groups in the campaign. Ads in the same group have the same target audience, placements, and total budget.
Add a name for the ad group and indicate where we want to get traffic: to the website, to the application, to Messenger or WhatsApp.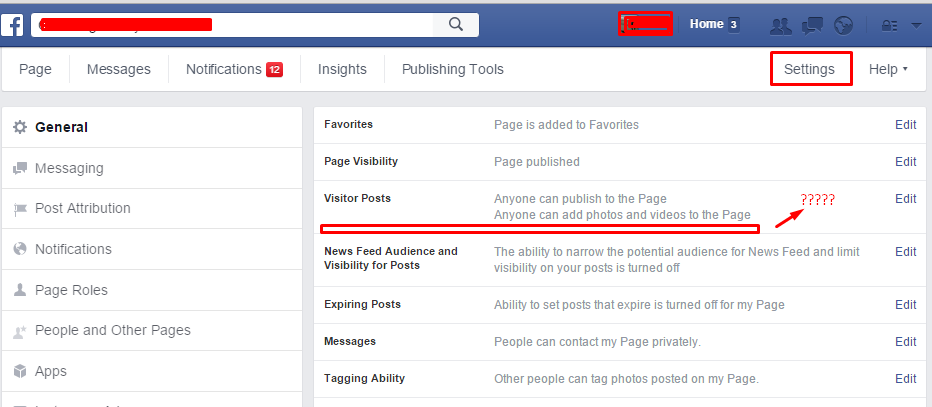 This is necessary to set up ad impressions - Facebook will select those users who are most likely to take the desired action: go to the site, download the application or write to you.
You can create dynamic creatives for an ad set, where the content of the ads will change to appeal to different users. You can also prepare a special offer - a promotion that users can save and use in the future. For example, a promotional code for the next purchase.
Dynamic creatives
In the "Budget and schedule" field, specify the budget for the day or the budget for the entire duration of the campaign. A daily budget is fine if you have a perpetual ad and want to constantly spend a steady amount on it. If you have specific start and end dates for your campaign, it's best to use a lifetime budget. Facebook in this case will spend the funds evenly throughout the campaign.
Alexey and Anna are always happy to meet new clients, so they have constant campaigns and there is a daily budget limit. Oleg knows the dates of the new stream, so he set a budget for the entire duration of the campaign and chose the date when the ads will turn off.
Setting up the audience. If you have already created audiences, for example, uploaded a list of customers, you can select them at this step. We'll talk more about saved audiences later.
Specify the geography, age and gender of potential customers. For geography, you can specify additional parameters, for example, select only those who permanently live in this territory and exclude travelers. You can specify the names of settlements or specify points on the map and the radius around them.
Detailed targeting allows you to specify audience interests, behaviors, and specific demographics. For example, you can select small business owners, those who actively shop on Facebook, have traveled recently, or are interested in politics and business.
Click Edit to open a row for additional settings. You can start entering parameters in text and the system will tell you if it finds something suitable. For example, type "Music" and you'll see many interests related to music. Or click View to open a list of possible options.
Below you can specify the desired connections of the target audience with your page, application or event. For example, you can choose to only show ads to friends of people who have used your app, or not show ads to your followers. To do this, click "Show advanced options" → "Links" → "Edit" and select the appropriate option.
Aleksey set up ads for women from Moscow of the target age who are interested in gardening.
Olga attracts those who live near the salon, so she set up the audience by geography.
Ivan is looking for students who live in large cities and are interested in management.
Click Save Audience if you want to use the same settings in the future. In the pop-up window, add the name of the audience and click "Save".
When setting up an audience, you can use the information that the Facebook pixel collects on your site or upload your own customer base. More on this in the second part.
Facebook Pixel
Loaded Audience
Selecting placements. If you leave "Automatic", then Facebook will select the sites on which to show ads. If you know exactly where you want to show ads, select "Manually select places" and check the boxes in the places you are interested in:
Specify the budget: select the key action, set the reference price. We determine how much we are willing to spend on advertising and on what schedule we want to show it.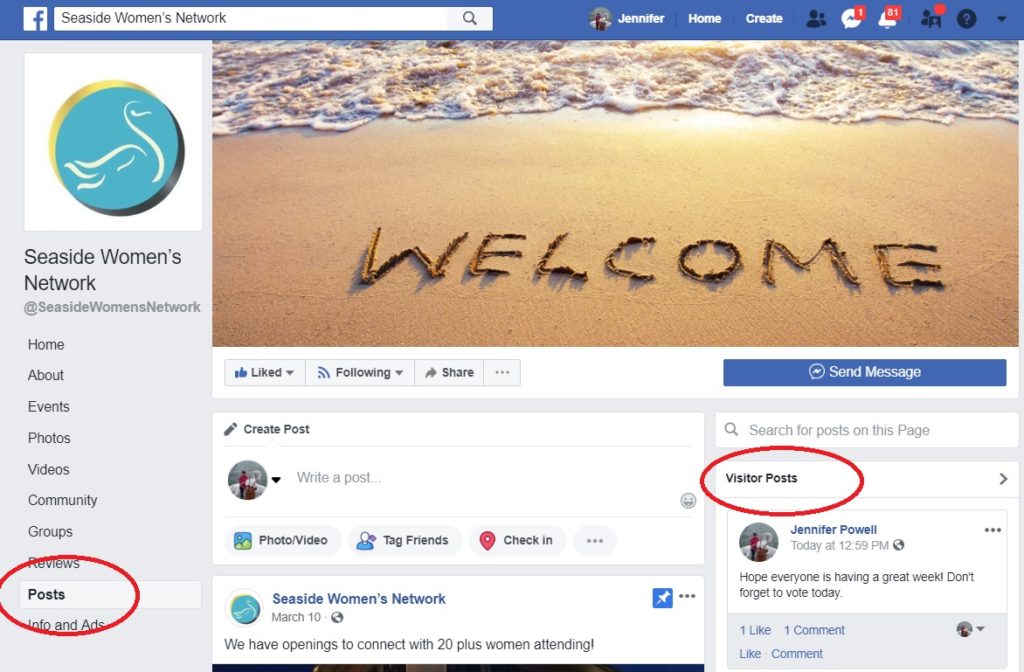
In the "Optimize for displaying ads" field, select the main action that we want to achieve: viewing an ad, clicking on a link, or viewing a page. Facebook will show ads to users who are more likely to take that particular action.
The benchmark price is the average cost you are willing to pay for a target action. For example, you expect that a click will cost you no more than 15 rubles, then you can put 15 in this field. If you don’t know, you can leave the field empty, conduct a small test and estimate how much the desired result will cost you.
If you set a price limit, you can choose between two bid strategies: Price Limit or Bid Limit. By default, the first option is used, it helps to get the most targeted actions. We will tell you more about this later.
Working with bids and optimizing the budget
In Advanced settings, you can set when you will pay - after each impression or each click on an ad. And also specify the schedule by which you want to show the ad, for example, only on weekdays during business hours. Some of the advanced options depend on other ad settings and may not be active.
For example, you can only set a schedule if you have set a budget for the entire duration of the campaign. If you have a new account, then Facebook may limit the payment after a click: it usually becomes available when you spend the first 10 dollars on advertising. This amount is individual for each account and depends, among other things, on the exchange rate.
Click Next.
Designing an ad
One ad group can have several creatives with different text, different formats, or different images. Over time, we can keep only the most profitable ones.
Select ad format: gallery, single image or video, selection.
 A convenient format if you want to advertise several products from the store.
 Instant Experience can be used for both Gallery and Single Image or Video. Then, when you click on the link, the mini-page that you create will open.
For a test run, let's focus on the "Single image or video" format.
Let's add media objects, text and a link. Click the "Add media file" button, upload a suitable image or picture.
Please note that multiple images can be uploaded for a single ad: square for feed, vertical for Stories, and rectangular for banner ads and search promotion. To do this, upload several images, then click on one of them. The "Recommended aspect ratio" field will appear in the right part of the window, activate it and replace images for different sites. To do this, click on the button with two arrows next to the format, and then select the desired image.
Add up to five options for body text and titles for the ad, a description for the link, the link itself, select a call to action on the button. The recommended length of the text is 125 characters, the title is 40 characters.
If you're targeting an international audience, you can translate your ad yourself or have Facebook do it. This feature is only available if the ad has the same title and body text options.
In the right part of the window, you can immediately see how the ad will look in different places. If you have uploaded square, rectangular and vertical images, you will immediately see how the ad adapts to different formats.
Ivan chose the "Single image or video" format for advertising. Alexey - Gallery. Olga uses the Engagement objective, so the system prompted her to select one of the posts in her group to promote it.
Here's what their ads look like:
Click Publish.
If you are running Facebook ads for the first time, the system will ask you for the country of your account, the currency in which you will pay for ads, and the time zone. In the next window, select a payment method. Here you can also enter the TIN, but this is optional. In the next window, you need to enter the card details, the system will write off and return 100 rubles.
Your account is fully set up and the first ad campaign has been moderated.
Moderation
When your ad passes moderation, you will receive a notification. The campaign's status will change from "Pending" to "Active" if everything is fine with the campaign, or to "Errors in ad groups" if there are problems.
Site Rules
If your ad didn't pass moderation, go to the "Ad Groups" tab and hover over the group's status to see where it's having trouble. Or go directly to the "Ads" tab - the problematic one will have the "Rejected" status. Next, we will analyze the rules due to which an ad may not pass moderation.
Payment
Advertising on Facebook is turned off "on credit": the system first shows ads, and then issues an invoice and debits money. At the same time, for each user, it determines its own account threshold. For new accounts, the starting limit is usually between $2 and $25 in local currency terms. In Russia, the initial threshold is usually 125₽, 600₽ or 1290₽, but it may be different for your account.
If you want to increase or decrease the threshold, click on the menu in the upper left corner and go to the "Billing" section. Click "Payment Settings" in the upper right corner. In the new window, click "Manage" and enter a new billing threshold. Facebook will tell you what range your personal limit can be. In this case, even if you specify a high threshold, at first the bills will still be for small amounts. This is necessary for the social network to be convinced of your solvency.
Facebook does not automatically include VAT in advertising costs. If you have specified Russia as the country, the system will charge 20% in excess of the cost. That is, if you received clicks for 10,000 rubles, the system will write off an additional 2,000 rubles.
Facebook Ads Manager is a flexible but complex tool with a lot of possibilities. If you understand them, you can significantly increase the effectiveness of advertising campaigns. Let's analyze some of them.
How Facebook decides which ad to show
When you run an ad on Facebook, you describe the people you want to show the ad to. For example, men from Moscow aged 20 to 30 who are interested in sports. Many other advertisers are competing for the attention of these same people. When one of the eligible users opens Facebook, Instagram or Messenger, the system chooses which of all possible ads - yours and competitors - to show him. To do this, she holds an auction.
Facebook strives to show not the ad that will simply earn more, but the one that will bring the greatest benefit to all participants: the system, the advertiser, and the user. Therefore, ads are evaluated according to three criteria: bid, action frequency prediction, and ad quality. As a result, the user sees the ad that gets the highest score based on the sum of the criteria.
Campaign Goals
The system stores information about the behavior of billions of users and can try to predict how they will react to your ad. Some users are more likely to be involved in event advertising, others are more likely to be involved in advertising, after which you need to write in WhatsApp or Messenger, still others in videos or galleries, and still others are willing to interact with Instant Experience. This data helps Facebook determine which users are more likely to be interested in the ad, and which ones are better off not showing it.
The first step in creating an advertising campaign is to choose its goal. Based on this goal and information about users, the system will choose who to show the ad to. It will also affect some settings in the next steps.
There are 11 goals in total, they are divided into 3 blocks:
The Awareness block is suitable for outreach campaigns when it is important for you to reach as many users as possible, but sales are not a priority.
In practice, these two goals are very close and you can use "Span".
The Consideration block is suitable for campaigns in which you want to increase interest in the product: to attract traffic, engage groups in publications, or invite to chat.
The "Conversions" block is aimed at more specific goals - leads and sales.
 To use it, you must first create a product catalog.
 Tracking the effectiveness of the campaign
Campaign launched, Facebook shows your ad to users. Now we need to evaluate whether the ad is working effectively. To do this, monitor ad metrics and ad quality scores in the campaign list, or use automatic rules.
Automatic rules
Ad metrics are the number of impressions and results. From them, you can understand whether Facebook often shows it and whether it interests the audience.
If your ad doesn't get even hundreds of impressions in an hour, then either you've set up a too narrow audience or you're losing most of the auctions. Try to expand the audience - remove some of the restrictions or add parameters. If you are just trying out Facebook advertising, we recommend working with an audience of 50,000 or more people. If the audience is wide enough, increase the reference price by 2-3 ₽.
If your ad is quickly gaining thousands of impressions, your audience is probably too wide or you are winning most of the auctions. This is not bad if you have a reach campaign and your goal is a large number of impressions. But if you rely on clicks and conversions, then a wide audience can be dangerous: you may be showing ads to a large number of uninterested people. If you are sure that the audience size is optimal, then lower the control cost per target action.
To evaluate whether an ad is achieving its goal, look at the number of results. “Result” is the action that you set up your ad for, such as a click, conversion, like. If the number of impressions grows, and the "Results" remain at zero, then the ad is not of interest to users.
By default, the ad account does not show the clickability of the ad, but this parameter can be added. Scroll down to the last column of statistics on the page and click on the small plus icon → "Add more columns . ..". In the new window, check the "Clicks to Impressions Ratio" box and save. Now the statistics will display CTR - click-through rate - the percentage of clicks on the link from all impressions.
Click-through rates vary across niches, for example, ads for clothing or cosmetics get clicked on average more than ads for jobs or personal services. Focus on the average CTR corridor: from 0.5% to 1.5%. If your ad gets clicked much less often, then it looks like you made a mistake with the audience or unsuccessfully designed the ad: users do not want to interact with it.
It is worth comparing not only ads, but also groups of ads. Their main difference is that they are tuned to different audiences. And if one ad group performs significantly better than another, it means that more successful audience parameters have been chosen for it.
When you launch a new ad, Facebook first learns which people and where to show ads to get the most clicks, conversions, or app installs. Let's say you run ads for men and women over 18. It may turn out that women actively respond to the announcement, while men do not. Then the system will start showing the ad more often to the more active segment and less often to uninterested users. This process is called the "learning phase".
During training, the performance of the ad is unstable, the cost per action has not yet become optimal. This is not scary: the system continues to look for a suitable segment and placement sites. As a rule, after 50 results, the indicators stabilize, and until this time it is better not to rush to conclusions. Here's what Facebook recommends during the learning phase:
Quality score is Facebook's internal criteria by which it compares ads to each other. There are three of them: Quality Score, Engagement Rate Score, and Conversion Rate Score. For each criterion, one of three ratings is given: Above average, Average or Below average. The ratings will appear when the ad has been shown at least 500 times.
These indicators are approximate and relative: they do not say whether your ad is good or bad. But from them you can understand how it compares with the advertising of other products for the same audience. If your ad was below average on these criteria, you probably didn't reach the audience well or didn't communicate your unique advantage well.
This quality rating also affects the number of auctions you win. The higher the quality, the higher the overall ad score and the more likely the ad will be shown.
The final result of advertising is the main metric by which it is worth evaluating its effectiveness. After all, a small business is looking to make money from ads, not just get a lot of likes or clicks to a site. To make sure your ad is working, monitor the conversion to the final action.
We talked about this in more detail in the instructions for launching advertising on Vkontakte.
If you have several advertising campaigns in different advertising accounts, then you can compare their effectiveness using UTM tags. These are special parameters in the links that will show in the site statistics where the users came from who performed the target action. Tags will help you notice if more traffic is coming from some ad network or campaign, but there are no targeted actions - purchases or requests - at all.
Tilda's free UTM tag generator
How to track UTM tags in Tilda's interface
Facebook Pixel
The ad pixel is a small script. It collects information about users who visited your site and sends information to the advertising account: which pages the user opened, which buttons he clicked and filled out forms. This information can be used to trigger retargeting.
Retargeting is advertising that catches up with users who have been to your site. They are already familiar with your products or services, so advertising can be more effective.
Retargeting works automatically. The user flipped through your site, the pixel transmitted this information to the advertising account. If you have an active advertising campaign for the audience that the pixel collects, then this user will see it when they go to Facebook.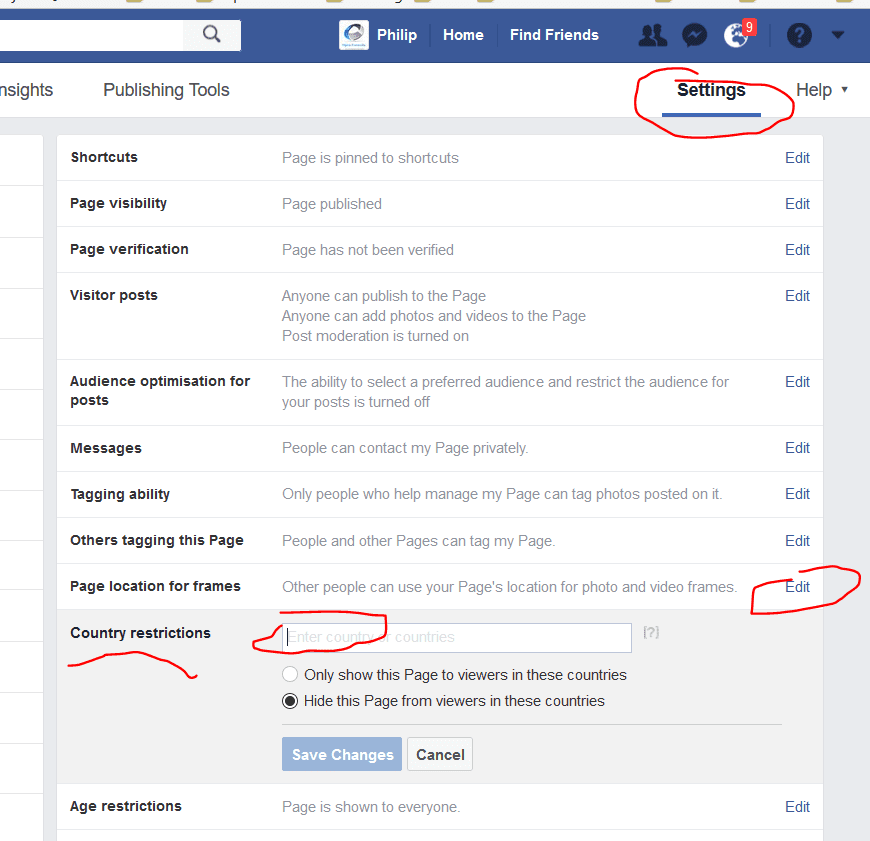
The pixel can collect information not only about visits, but also about specific actions. For example, to remember which product the visitor added to the cart. If he does not pay for the order and leaves the site, you can show him an ad and remind him that the product is still waiting in the cart.
Set the pixel. Click on the menu button in the top left corner, scroll down and go to the Events Manager. Click "Connect Data Source", select "Internet" → "Facebook Pixel". Set a name and specify the site where you will place the pixel. Copy the code from the next window and paste it between the
and tags on your site.If you have a site on Tilda, follow these instructions.
As soon as you install the pixel, a notification will appear in your account. After about 20 minutes, the first events collected by the pixel will begin to be displayed here. Provided that during this time someone visits the site.
Set up events.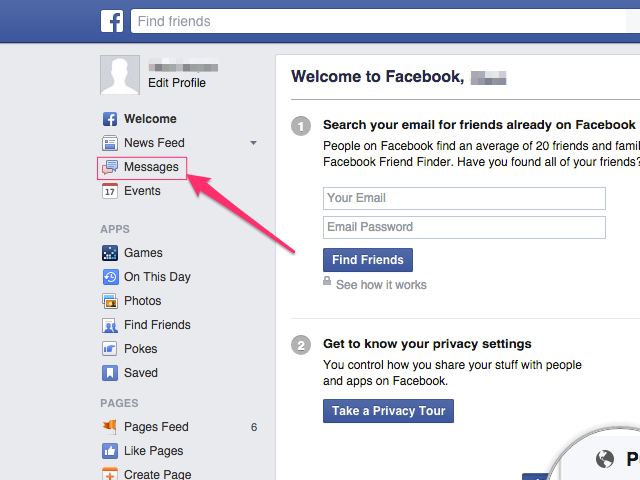 The Facebook pixel collects information about everyone who has visited your site. But in order to use all the capabilities of the pixel, we recommend adding your own events that the pixel needs to capture: page transitions, link clicks, form fillings. This way you can make your ads more flexible.
There are two ways to set up events: use the Facebook setup tool or add events using code. The first one is better if you don't want to burden developers. The second is if you have a large site and automatically markup it will be faster than adding all the events one by one through the Facebook tool.
Set up an "Add to Cart" event using Facebook's automatic tool.
In the upper right corner, click "Add event" → "From the new site". In the new window, select "Use the event setup tool", enter the site address and click "Open site". Make sure you don't have pop-ups blocked, otherwise the site won't open.
The site will open in a new tab with the Facebook events widget on top. We want to assign an event when a button with the text "Add to Cart" is clicked, which is located in the product card. Open the card, click on the "Track new button" widget and select our button. In the widget, specify that when clicked, the "Add to Cart" event occurs. Click "Finish Setup". A new one will appear in the list of events - Add to cart.
If you prefer to work manually and want to add events by code, use the instructions from Facebook
If you have a site on Tilda, then information about visiting pages and filling out forms is already in your pixel - Tilda configures these events automatically.
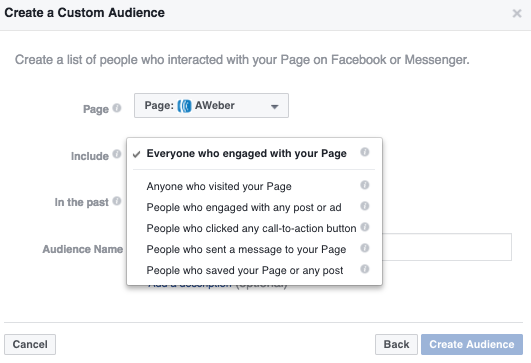
Creating an audience. Now the Facebook pixel collects not only information about visits, but also about certain user actions on the site. You can use this to target ads to them. To do this, you need to create an audience.
Let's say we want to run an ad for everyone who puts a product in their cart. Click "Create" → "Create Custom Audience". Change "All site visitors" to the AddToCart event we created in the last step.
Let's say that after paying, customers land on the /checkout page. We can show ads only to those who put the product in the cart, but did not pay, that is, did not get to the /checkout page. Click "Exclude people", select "People who visited certain web pages" and enter the page address in the field after payment. It turns out that we created an audience of everyone who added the product to the cart, and excluded those who paid from it. Add a name to the audience and save.
This audience can now be used when creating an ad set. In the settings of the "Audience" section in the "Create a new audience" tab, click on the "Custom audience" field and select the audience that you created there.
Run an ad with this audience. Now, when a site user adds a product to the cart and forgets to pay, he will automatically be in the right audience and start receiving ads.
Loaded audience
If you have a database of email addresses or phone numbers of your customers, you can upload it to your Facebook advertising account. The system will check if these addresses and phone numbers are associated with some users and will create an audience from them. You can also run ads for this audience.
Open the menu and go to the "Audiences" section. Click "Create Audience" → "Custom Audience" → "List of Clients". Facebook will ask you to create a new company - Business Manager. Click "Create a new company" and on the new page - "Create an account". We fill out the form.
When you have a company account, you can upload your database. Go back to "Audiences" → "Create Audience" → "Custom Audience" → "Client List". Upload the file and wait for it to be processed. This audience is now available for advertising.
Catalog
The Catalog function allows you to upload your assortment to your Facebook advertising account in order to use it when creating ads. This is convenient if you have a lot of positions: you don’t have to add an image, description, and price of the product separately for each ad - you just need to do it once.
The catalog also requires a Business Manager account, which we set up when we uploaded our audiences.
Go to the menu, scroll to the item Commerce Manager → click "Create catalog" → select the category to which the products belong. Click "View catalog".
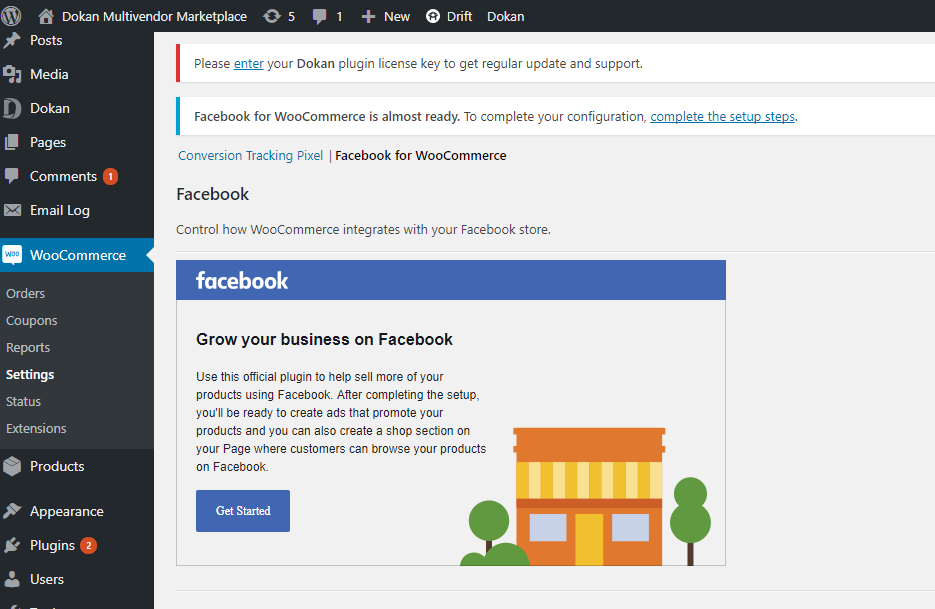
Opening a directory. In the right panel, select "Products" → "Add Products". Select the way to upload products to the catalog. If you are using the Shopify, BigCommerce, Magento, OpenCart, or WooCommerce platform, select "Use Partner Platform".
 If you have an online store on Tilda, you can automatically transfer the list of products from your catalog to your Facebook advertising account.
 One of the features of the catalog is dynamic advertising. To run it, let's connect a pixel to the catalog.
Facebook Pixel
Select "Events" in the left menu and connect our pixel.
Go to the "Advertising" section and click "Create Ad" in the "Dynamic Ads" section. Fill in the information about the campaign and the ad group, select "Catalogue sales" as the goal.
On the ad group setup screen, we choose to whom we want to show ads: only to those who interacted with our site, or also to people who are similar to them in behavior and interests.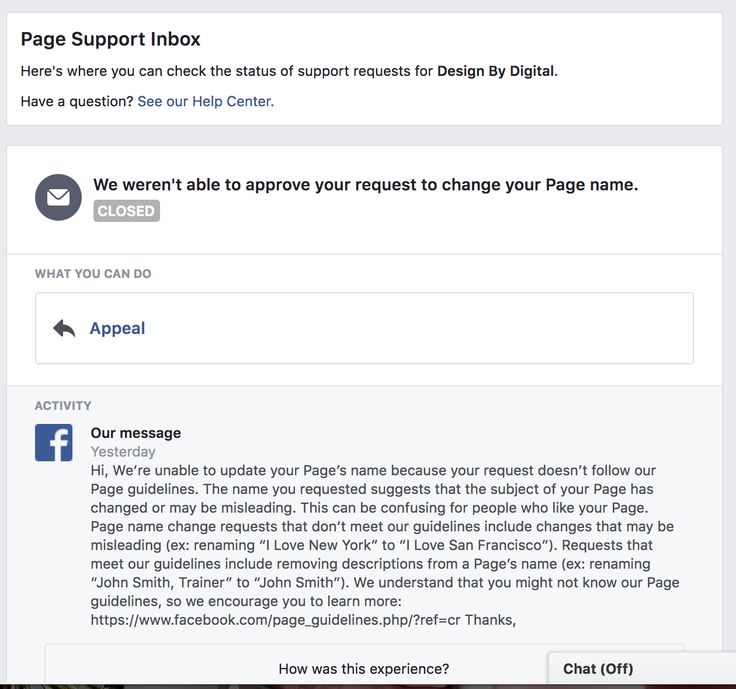 In the second case, the audience will be wider, but less warmed up.
Here we select after which action we want to show the user an ad: when he just looked at the product, added it to the cart and did not pay, or bought something, and we want to offer him an additional product. For these rules to work correctly, you must have pixel events configured.
The ad setup screen will load a carousel of catalog items. You can add a different version of the text to the post or additional options in the title, such as a price. Post an ad at the end.
Now users will see exactly the products they were interested in in advertisements.
Working with bids and optimizing the budget
Immediately after launch, the Facebook advertising system provides 4 main strategies for managing the cost of a target action - how much you are willing to pay for a click, conversion or other result: the minimum price, the cap price, the cap bid and the target price.
For price cap, bid cap, and target price, you can set a target price for the cost of an action that you are counting on. The control price is not equal to your auction bid, if you set a price of 10₽ per click, it does not mean that you will pay 100₽ for 10 clicks. How much you actually pay depends on the strategy you choose.
Let's take an example to understand how different strategies work. Let's say our budget is 1000 rubles, we want to get as many clicks as possible. At the same time, we expect that we will pay about 20 rubles per click, this is our reference price. Let's assume that the system sees the following placements: 10 placements with a click of 10₽, 10 placements with a click of 18₽, 10 placements with a click of 22₽, 10 placements with a click of 50₽.
Here are the results we get, depending on the strategy:
The floor price assumes that Facebook will look for the cheapest placements, while focusing on spending the entire budget for the day or duration of the campaign. The disadvantage of this strategy is that you will not be able to set the price you are targeting. Because of this, the result may turn out to be expensive - because there were no cheaper options, and the task of the system is to spend the entire budget.
In our case, the system first uses all placements at 10₽, then all at 18₽, then all at 22₽, and then a few more at 50₽ until the total budget runs out. We will get more clicks, but the cost will be higher than what we expected.
Lowest price strategy: most results, spent all budget, high CPC (cost per click)
Price limit strategy assumes that the system will start by looking for the cheapest placements. When they run out, they will switch to more expensive ones, and so on, until the average cost of placements becomes approximately equal to the control rate. It turns out that some placements will cost more than the control rate, but due to the fact that others cost less.
In our example, the system first uses all placements of 10 rubles. The average cost per click will be 10₽, but our benchmark bid is 20₽, so this is a signal to the system that you can look for more expensive placements. She uses all available placements at 18₽, the average cost per click will rise to 14₽, which means that more expensive placements at 22₽ can be used. When they finish, a click will still be cheaper than 20₽ on average, so the system will be able to use several more 50₽ placements:
Price limit strategy: optimal number of results, CPC is close to the control price
Bid limit strategy means that at the beginning the system will also look for the cheapest placements, but in each auction it will bid no higher than the control price.
In our example, it will turn out that the system uses all placements of 10 rubles and 18 rubles. Placements at ₽22 will not be used - this is more expensive than the reference price. It turns out that we will save money, but we will get few clicks.
Cap bid strategy: lowest CPC, spent the least amount of budget but least clicks
In the case of a target price strategy, the system will look for placements whose cost is close to the control bid - within ±10% of it. In this case, you can best predict costs, but risk missing out on cheaper placements.
In our example, the system uses placements of 18₽ and 22₽. As a result, we will pay as much per click as we planned, but there will not be very many clicks.
Target price: less results, CPC close to target price
Let's put the results together and see what happens with each of the strategies. Recall that the system sees 10 $10 click placements, 10 $18 click placements, 10 $22 click placements, 10 $50 click placements:
lead to high costs. The cap price will help you get more results while staying within the benchmark price. A bid cap is a way to control your bid in each auction: you won't overspend, but you may miss out on profitable placements. The target price is suitable if you want to predict the budget and the result very accurately.
Not all strategies are available for some targets. For example, the target price strategy is not available for the Traffic and Reach goals.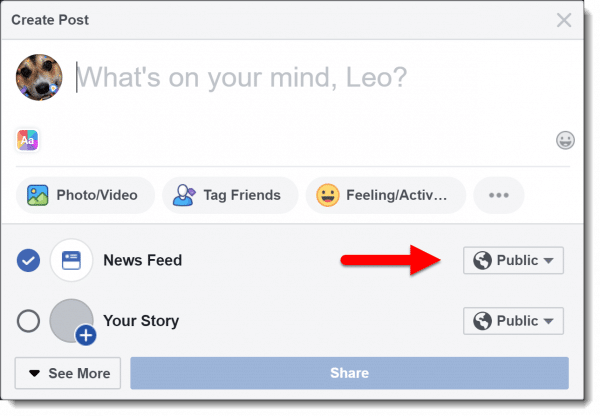 There is also no price cap available for Reach.
You can set the strategy both at the ad group level and at the campaign level. In the first case, the system will distribute the budget of one group among all its ads. If at the same time the entire ad group works inefficiently, then the budget for it will still be spent. If you optimize the budget at the level of the entire campaign, then the system will redirect the budget from a less successful campaign to a more effective one.
Post promotion
If you are an active Facebook community, you can promote the posts you post there. For an advertising post, you can add a button to go to the site, in Messenger or WhatsApp, otherwise it will look like a regular post in the user's feed.
To run this ad, click "Promote Post" in the bottom corner of the desired post. In the pop-up window, set up the button options, audience, placements, and budget. At the end, click Promote Post.
Setting up an audience works the same way as when creating a regular ad. You can either select a user by parameters, or select one of the audiences that you created earlier.
Automatic Rules
Over time, you may end up with dozens of campaigns, ad groups, and ads themselves. Monitoring their effectiveness manually is inconvenient - it takes a lot of time, and it's easy to miss something. Facebook has automatic rules for this task.
With this tool, you can create rules that will automatically fire when certain events occur. For example, disable the ad if the conversion becomes more expensive than 500₽. Or increase your daily budget if your cost per conversion is less than $300 to get more results. In this case, the system will automatically execute the rule when the condition occurs. You don’t have to constantly monitor ads and campaigns.
To set up automatic rules, click on the menu button and scroll to "Automatic rules", click "Create rule" in the upper left corner.
The rule can be applied to all campaigns, ad group or ads. You can disable or enable a campaign, group or ad, send a notification in the Facebook interface and email when a specified event occurs, increase or decrease the daily or total budget.
Let's say we want to disable the ad if the cost per result is more than 500₽. Select "All active ads" → "Disable ad" → Cost per result is more than 500₽.
Please note that in this case, Facebook will automatically add the condition “Impressions for the entire period > 8000”. This is due to the fact that with a small number of impressions, the statistics may be inaccurate and it is inappropriate to include the rule.
Rules can be combined. For example, disable the ad if less than three days have passed since the launch and the price of the result has risen above 500 rubles. Let's add the condition "Cost for results > 500₽" and "Hours since creation > 72". The meaning of this rule is as follows: for example, at launch, we are ready for the price of the result to grow, but we hope that during the first five days it will not exceed 500 rubles. If the result for the ad reached this value after three days, then it should be disabled.
You can also set up rules to turn off all ads at the right time. Let's say that on Monday, May 18, your course stream starts and you need to turn off all ads at 22:00 on May 17. Doing it manually for a long time, and you can forget, saves the rule:
Dynamic creatives
Facebook allows you to run ads with dynamic creatives. You upload several versions of images, headings and text, and the system shows them in different combinations. Users see different creative options and react differently, which helps the system choose the most effective options.
Dynamic creatives have limitations: the ad format can only be "Single image or video" and you can't direct customers to Messenger or WhatsApp - only to the site or app. They also cannot be translated into other languages: if you want to run an ad in multiple countries, you will have to create a separate ad for each language.
To create a dynamic creative, in the ad group settings window, enable the "Dynamic creatives" option. Then, when designing your ad, upload multiple images or videos and add up to 5 options for body text, title, and link description.
Site Rules
Facebook is zealous about its advertising policy. Here are a few rules to consider and recommendations that will help you pass moderation without any difficulties:
Facebook evaluates not only the advertisement itself, but also the page or application to which it leads. If the landing page does not comply with the ad or social media rules, the ad will be disapproved.
It is forbidden to make references to the user's personal characteristics in advertising. That is, you cannot indicate gender, race, religion, orientation, or age. For example, the ad "Counseling for depression" will be moderated, and "Tormented by depression? Seek help" - no, because it potentially refers to a characteristic of a person.
Advertising must comply with local laws. You cannot advertise tobacco products, prescription drugs, weapons, microcredit, and network marketing. Advertising of online pharmacies or cryptocurrencies is possible only with the prior written permission of Facebook.
The ad must not contain clickbait, aggression or misleading statements. Discrimination, threats, fraud and profanity are unacceptable.
Sexually provocative content is prohibited in advertising. Images of nudity may not be used, even if nudity is only implied. The same goes for photographs of people in obscene poses or images with obscene overtones.
Facebook is also picky about the spelling of its name. You can only write Facebook - with a capital letter and in Latin, in the same font and size as the rest of the text. The only exception is when facebook is part of the site address.
Read the detailed rules for advertising on Facebook.
Facebook advertising account allows you to run ads on the social network platform, as well as on Instagram, the Messenger application and on the Audience Network. You can specify the parameters of the audience to which you want to show the ad, and the system will find them on its sites.
Launching an advertising campaign consists of three steps: setting up a campaign, setting up an ad group, and designing an ad. One campaign can have multiple groups, and one group can have multiple ads. When setting up a campaign, we select its goal, when setting up a group - the audience and placements, when designing an ad, we add media files, texts, links.
Advertising works on the principle of an auction. The system takes the bid for each ad as a basis, evaluates the quality of the ad, and predicts the likelihood that the user will interact with it. As a result, each ad receives an overall value score. The user sees the ad with the highest overall value.
Facebook allows you to work with your audience flexibly. You can customize it according to the internal parameters of the network: demographics, interests, and behavior. You can upload your customer base or automatically gather website visitors into an audience using a pixel.
Facebook Pixel is a script that collects information about your website visitors. You can send information about button clicks, page transitions, and other actions to a pixel. This information is used to create more personalized ads.
You can upload a product catalog to your Facebook account and use it in conjunction with a pixel for dynamic ads. For example, show ads for other products to those who bought something, or show the user a product that he put in the cart but did not pay for.
Facebook allows you to manage your budget at the campaign level and at the ad group level. There are several bidding strategies that determine how you spend your budget, how many targeted results you get, and how accurately you can predict ad spend.
You can set up dynamic creatives on Facebook. If you don’t know which image or call to action will work best for your audience, trust the system: upload several options, Facebook will show them to users in different combinations and choose the most effective ones.