The new
live locationfeature introduced by
Facebooklets you share your live location in Messenger.
Advertisement
This is a simple-to-use feature that can let you share with your friends where you are right now. Available both for iOS and Android, you can also use this feature to send pinned location, which means any other location you wish to share.
Sharing location on Facebook lets your contacts and friends discover where you are. Sharing live location lets you coordinate with friends and tell people how far are you from them especially while you are on travels. You can share live location either with a single person or with a group of users.
There are two topics related to sharing location on Facebook: sharing any location and sharing your current location. Here is how you can do them on your iOS and Android.
Sharing a pinned location on Facebook Messenger
Advertisement
It is possible to send any location on Facebook Messenger by pinning it. You can either pin a nearby location you see on the map or you can search for the location you wish to send on the Facebook Messenger.
How to send a pinned location on iOS
To send a pinned location that is near you, follow these steps:
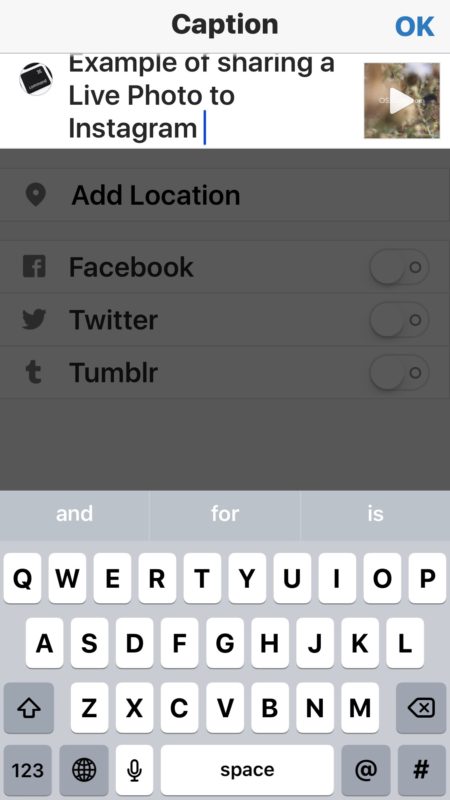
Open a conversation.
Tap the plus sign > Location. If you can’t find this option, tap right arrow and plus sign
In the bottom right, tap on location .
Advertisement
Now you need to drag the map in a way the red pin will be on the location that you will want to send.
Tap on Send Pin Location.
How to search for a location on iOS?
Open a conversation you wish to work with.
Tap on plus sign > location. If you can’t find this option, tap right arrow and plus sign.
Advertisement
In the bottom right, tap on location
Now make use of the search bar you will find above the map to search for the location you wish to share. Once you find the location, tap on right arrow to send it.
How to send a pinned location on Android
To send a pinned location that is near you on Android, follow these steps:
Open a conversation.
Advertisement
Tap plus sign > Location. If you can’t find this option, tap right arrow and plus sign.
In the top right, tap on location.
Now you need to drag the map in a way the red pin will be on the location that you will want to send.
Tap on Send Pin Location.
How to search for a location on Android?
Advertisement
Open a conversation you wish to work with.
Tap on plus sign > location. If you can’t find this option, tap right arrow and plus sign.
Tap location > search option.
Now make use of the search bar on the map to search for the location you wish to share. Once you find the location, tap on send sign to send it.
How to send your current location on Facebook messenger?
Advertisement
Open a conversation you wish to work with.
Tap on plus sign that is found next to the text box. If you can’t find this option, tap right arrow and plus sign.
Tap on Location.
Now tap on Share Live Location.
Skip to content
Viewing this site in
EnglishPortugeseGermanFrenchJapaneseKoreanSpanish (LTAM)Spanish (ES)
Você está visualizando este site em
InglêsPortuguêsAlemãoFrancêsJaponêsCoreanoEspanhol (LTAM)Espanhol (ES)
Diese Seite anzeigen auf
EnglischPortugiesischDeutschFranzösischJapanischKoreanischSpanisch (LTAM)Spanisch (ES)
Vous consultez ce site en
AnglaisPortugaisAllemandFrançaisJaponaisCoréenEspagnol (LTAM)Espagnol (ES)
このサイトを次の言語で表示
英語ポルトガル語ドイツ語フランス語日本語韓国語スペイン語 (LTAM)スペイン語 (ES)
다음 언어로 표시 중
영어포르투갈어독일어프랑스어일본어한국어스페인어 (LTAM)스페인어 (ES)
Este sitio se está viendo en
InglésPortuguésAlemánFrancésJaponésCoreanoEspañol (LTAM)Español (ES)
Este sitio se está viendo en
InglésPortuguésAlemánFrancésJaponésCoreanoEspañol (LTAM)Español (ES)
Messenger
By Selena Wang, Product Manager, Messenger
Today we’re excited to announce a new way to share your location in Messenger. Our new Live Location feature makes it simple and seamless for you to choose to share where you are with your friends and family. This is rolling out globally and is available on both iOS and Android.
We’ve been testing this for a little while, and people tell us that Live Location is helpful when trying to coordinate with friends, telling people how close you are when you’re on your way to an appointment, or even sharing where you are with your roommate when you’re on your way home at night. You can share your Live Location with a group of friends in Messenger or just with one person — it’s up to you!
How It Works
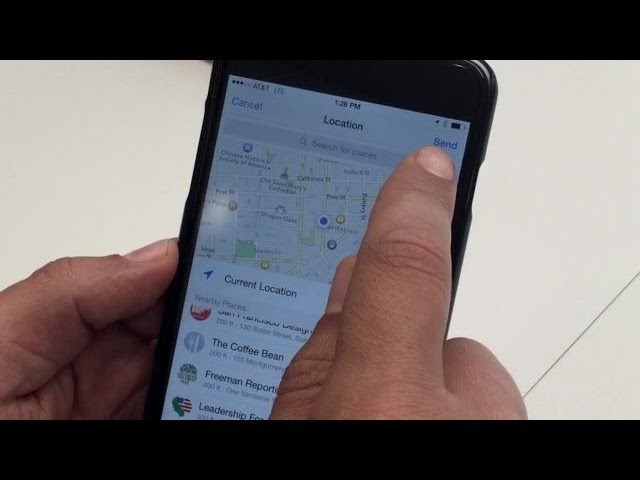
It’s still possible to share a static point on a map, too. For example, if you want to tell a friend which coffee shop to meet you at, tap the location pin or the More icon, and then instead of choosing Share Live Location, tap the red pin in the upper right hand corner. From there, you can search for a place to share, or you can drag and drop the pin on the map. Then, tap Send.
Sharing your location in a Messenger conversation — either continuously for an hour with Live Location or as a static point — is completely optional. You are always in control. For additional information and instructions on sending or sharing a location in Messenger, please visit the Help Center.
Downloads
Every year, mobile devices are becoming more and more firmly established in our lives. Along with them comes the term "geolocation" or location determination. Facebook is not far behind in this matter and has also added such a feature to its platform. It is available to all users. The social network does not distinguish between personal and commercial accounts.
Contents:
First of all, let's look at how to enable geolocation in the mobile application. Geoservice is able to work in the main and background modes. The inclusion is carried out in different ways. It all depends on the operating system of the device.
The smartphone application can now determine the location if the service is active. The user can allow or restrict access to Facebook in geolocation when he is not using the application. This is the so-called background geolocation.
Setting background geolocation on Facebook on smartphones running on Android:
To restrict the application's access to location on an iPhone, you need to:
If you do not want the Facebook application to determine your geodata on android, then you need:

Currently, Facebook only determines the location of users who have installed the mobile version of the application on their smartphones. Location access can be enabled or disabled at any time.
Any person has the right to independently decide what information about him or her will be available to other users. The introduction of a new feature in Facebook allows you to expand the connections between people. They see who is nearby, and there is a desire to communicate live.
List of geolocation features:
Advantages of geolocation for business:
Facebook allows its users to create new geolocations and share them with their friends. The function of adding a geotag to already published posts is also available.
 Among them, you need to choose the right one.
Sometimes a situation may arise when you need to edit the location, change it or delete it. To do this, you need to click on the cross next to the name of the specified place and select a new name. You can leave this field blank if you wish. After all edits, click on the "Save" button.
Some users are faced with a situation where all attempts to add a location to the post do not give a positive result.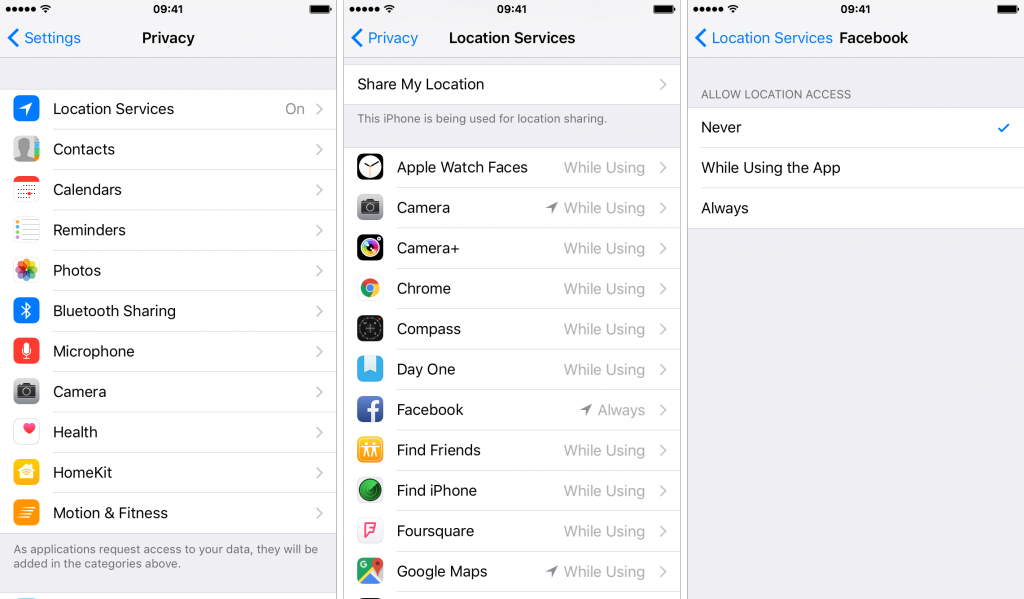 In this case, you need to add new geodata on Facebook. The procedure on Android and iOS is the same:
The new location will be available to everyone if they come in to add it to their posts.
In order for people to take full advantage of all the possibilities that geolocation gives them, Facebook developers have come up with a special Local feature for smartphones. It works if location is enabled on the device.
Its main task is to obtain information about recommended events that take place nearby. The function analyzes the visits of the user's friends and gives him a list of options. If a person turns on Local, then he will always know about all the events that are planned near him.
To activate it, you need:
This feature is available in the Facebook app. You can also install it separately by downloading the Local program for free in PlayMarket and AppStore. Available here:
Any business owner who promotes it on Facebook can give their customers the right to mark their visit, leave comments and recommend to friends. At the page registration stage, you need to select its category: company, brand or product. Creators of groups or personal accounts do not have these settings.
Procedure:
After that, all your customers will be able to mark all visits to the page, as well as recommend it to their friends list.
Business page owners need to properly design their page. This is the main condition for successful store promotion on Facebook. If there are offline points of sale (shops, service points), then their location must be marked on the map. To add geodata from other points of the company in the network, you need to go to the business manager. This program is available on a computer in the web version of Facebook.
Important information :
 All local pages will be designed similarly to the main one;
Social networks
0 810 3 minutes to read
The world has made impressive progress in terms of progress technological what can be observed. One of the most popular tools recently due to insecurity and people's need for virtual browsing has been options to send and share your location using various webmail tools.
Google and Facebook have reached an agreement to launch a new free service. With this service, users will be able to send and receive the locations of other users without leaving their mobile phone and in real time.
Similarly, among the localization options that we can find on all platforms messenger , Facebook on is the one that offers special and direct follow-up in case the person who sent it feels threatened.
This web functionality is complemented by a great service that we can find using Google maps , which also hits Facebook Messenger .
Facebook is one of the most popular social networks in the world. Its users are looking for a means of communication and meetings with their families and relatives in their web spaces. For this reason, the fact that they included the ability to share a person's location in real time was as important as it was successful.
If you want to share your real-time position and provide that position to another user, it is important that you know that you must take into account a number of steps and conditions which are very easy to understand and accept.
To access this option you can simply enter the conversation and in the options bar you will find a button that says " join . Once you click on it, you just have to go to the option " Location of And you can see what you can do with it.
When you click on it, you can send your real-time location to the person in the chat who will be available for 60 minutes
After 60 minutes the contact will no longer know the location If you want the transfer to be sent just repeat the previous steps sent to the user you selected, all you have to do is click the button button » Stop sharing To stop real time position. In the chat, you will see that an alert pop-up will open, telling both users that location sharing has completely stopped. You can also delete a chat or conversation if you prefer.
If you are looking to share a specific location with a contact group or a person in particular, this is possible thanks to the communication tools offered by Facebook Messenger.