It's easy to share a business page on Facebook — whether you do so online or on the mobile app.
Business pages are designed to be viewed and shared by friends on timelines, in groups and events, or via private message. To share a company or organization's page using any of these options, click the "Share" button with an arrow found below the page's header photo.
Sharing on the mobile app looks about the same, though options are condensed due to limited space. Tap the three dots to open the page's menu, where you can then draft a post. Choose to share on your timeline or to another location with the option at the top of the screen.
Here's how to do both.
1. Navigate to the business page you'd like the share.
2. Click the "Share" button with the arrow found underneath the header photo.
Find a page you'd like to share. Marissa Perino/Business Insider3. This will open a pop-up. Add text if you'd like in the "Say something about this…" section. You can also tag friends, note your location, or add a reaction by clicking the appropriate icon in the bottom left corner.
4. You can also select who you would like to share the page with by clicking the blue button at the top. Sharing to your timeline is the default, but you can also choose to share to a friend's timeline, a group, or an event instead. Or, you can opt to simply share in a private message.
 For example, you can set the post so that all your public friends can see it except for a few people.
5. Click "Post" when you're ready.
How to share a business page on Facebook on the mobile app1. Find the business page you wish to share.
2. Tap the three dots menu.
Open the menu on the page. Marissa Perino/Business Insider3. This will open a pop-up. Tap "Write Post" to begin sharing.
4. This will open a draft. You can tap to change where you are sharing the page at the top. (Options include your timeline, a group, an event, or private message.)
Share a page on the app. Marissa Perino/Business Insider5. Tap the blue "Post" option in the upper right hand corner when you're done.
Marissa Perino
Marissa Perino is a former editorial intern covering executive lifestyle. She previously worked at Cold Lips in London and Creative Nonfiction in Pittsburgh. She studied journalism and communications at the University of Pittsburgh, along with creative writing. Find her on Twitter: @mlperino.
Read moreRead less
OR
Post to your Fan page and share to your personal page?
And how do you share in the first place?
I’ve been getting these questions A LOT recently, so I decided to take a break from my ‘What I Learned From Going to Facebook Series’ to address this.
To answer this, here’s a few things you should know…
 (I wrote a blog post all about that HERE.)
With all that in mind, I believe it is best to first post to your Fan Page and then share to other places, such as your personal page, a Facebook Group, or another Fan Page you manage.
Sharing this way will help you get more reach and engagement on your Fan Page since it’s the original content and is a great, subtle way to say to your friends – “Hey, here’s my Fan Page. Check it out!” without blatantly saying “Check out my Fan Page.”
So with that, here’s how to share it.
1. Make sure you are interacting on Facebook as your Personal Page. Sometimes we end up interacting as our business page, which can make things trickier.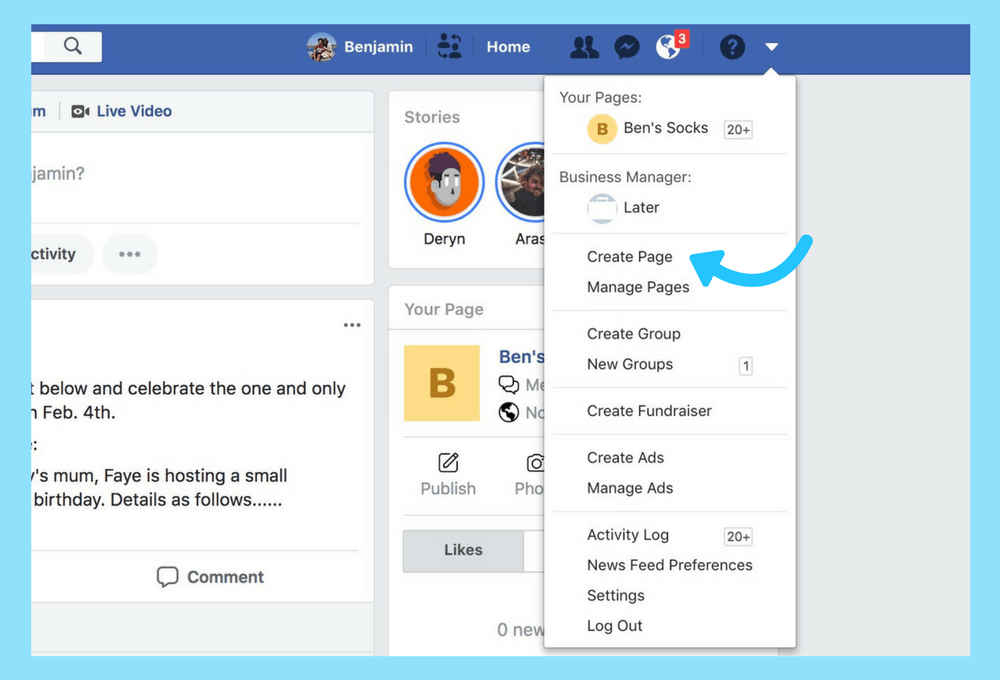 To check this, select the downward arrow in the top right corner.
2. When you select the downward arrow, if you are interacting as your page, it will show you here.
3. Go to you Fan Page and either write the post you plan to share or scroll through to find the post you’d like to share.
4. Find the post you want to share.
5. On an unrelated note: If you select the downward arrow at the top of the post, you can pin this post to the top of your page, edit, or delete the post.
6. Next to the ‘like,’ ‘comment,’ and ‘share’ tabs, look at the icon on the right. This shows if you are interacting as your Business Page or your Personal Page. In this case, I’m interacting as my Business Page.
7. Select the downward arrow next to the icon to switch to interact as your Personal Page.
8. Now that you are interacting as your personal page, select ‘Share.’
9. Select ‘Share’ again. You can choose ‘Share Post Now. ’ If you do this, it will share to your Personal Page with no additional text. Personally, I like to include some additional text.
10. It’s automatically set up to share to your Personal Page. To access your other choices, select the downward arrow next to the words ‘Share to your own Timeline.’
11. From here, you can ‘Share on your own Timeline’ (your Personal Page), ‘Share on a friends Timeline,’ ‘Share in a group,’ ‘Share on a Page you manage,’ or ‘Share in a private message.’
12. Usually I’m not going to share something business related on a friend’s Timeline unless it’s specific to something we have talked about. Typically I reserve this for sharing things like articles about The Walking Dead. 😛
13. To share in a group, like my Fun with Marketing Mastermind, start typing in the name of the group, then select it once it shows up.
14. To share on a page you manage, usually you’ll want to make sure you’re posting to the page you manage as the page you manage. To change who you are posting as, select the downward arrow next to where it says ‘Posting as…’
15. In this case I wanted to share my post to my Personal Page, so I kept it on ‘Share on your own Timeline,’ add text, and hit ‘Post.’
16. And here’s how my post looks on my Personal Page.
Do you use this strategy? Have you noticed a change in your reach? Let me know in the comments below or in my Facebook Group HERE.
Help Center
Using Facebook
Home Page
We are updating the mobile version of Facebook.com. More
Depending on the privacy settings of a post (for example, if it's shared with friends), the Share feature may not be available to you.
To share a post from Feed:
Mobile Classic
Click the icon below the post.
Select where you want to post your post. Depending on your publishing privacy settings, you might see the following options:
Share now
Publication
Send in the message
Share in the group
to share on page
If you clicked to share your people who will be visible to the people who will be visible. publication, use the audience selector tool.
Optionally enter a message, tag friends, add your location, action or feeling.
Click Publish.
New version for mobile browser
Click the icon below the post.
Select where you want to post your post. Depending on your publishing privacy settings, you might see the following options:
Share on Facebook
Share on a friend's timeline
Share to a group
Share to a Page
Send in a message
If you clicked Share on Facebook and want to choose the people who see your post, use the Audience Picker.
Optionally enter a message, tag friends, add your location, action or feeling.
Click Publish.
Note. You can't share a post with people who weren't originally part of its audience (for example, a post set to "Friends" can't be made "Public"). 9| Facebook Help Center
Help Center
Using Facebook
Pages
Posting
We're updating the mobile version of Facebook. com. More
General Information
Only a person who has:
Facebook level access to the Page in the new version can like or comment on another Page's post.
Admin, editor, or moderator rights for the Classic Page.
New version of Pages
To like or comment on another Page's post for your Page:
Click the icon in the top right corner of the Facebook window, and then select your name.
Click Switch Profile at the top right of the screen and select the desired Page.
Navigate to the desired Page post. Here you can:
Click Like to like it.
Click Comment , write a comment and click the icon to send it.
Classic Pages
To like or comment on another Page's post for your Page:
Click the icon in the upper right corner of the Facebook window.
Click Pages.
Navigate to the desired Page post.
Click on your profile photo in the lower right corner of the post.
Select the Page on behalf of which you want to perform the action.
Like or comment on the post.
Note. A person's profile and a Page are not the same thing. A page can represent a brand, company, or initiative. You can post, like, or comment on another Page as your own, but you can't do so on a person's profile.
To post to your Page in multiple languages, sign in to Facebook on your computer.
You must be an administrator of your Page to create a post in multiple languages. People viewing your post will see it in the language that best matches their language settings.
How do I allow publications in multiple languages?
First make sure you can post in multiple languages:
On the menu to the left of the Ribbon, click Pages.
Go to your Page.
Click Settings on the left side of the Page.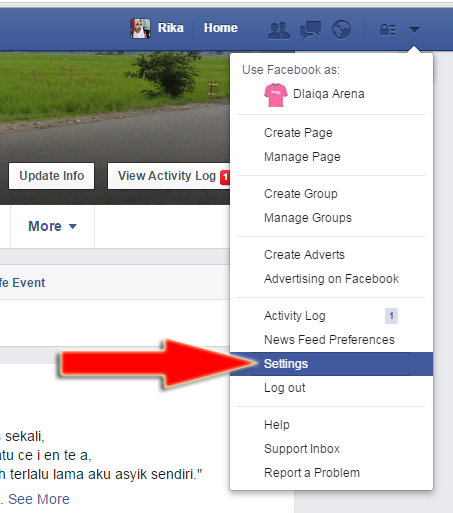
In the General section, click Publications in different languages.
Select the Allow people who manage this Page to post in multiple languages check box.
Click Save Changes.
How do I create publications in multiple languages?
To create a post in multiple languages for your Page:
Post at the top of your Page's timeline. The language in which you created the post will be the default language for the post.
Click Publish in Another Language > Select and then select a language.
Click Publish in Another Language to create a publication in another language, or select Publish.
Note. People whose primary language is not included in the secondary language will see the post in their default language. For example, if your post's default language is English, and your secondary languages are Spanish and French, then people whose primary language is German will see your post in English.
The Pages you manage may be using the new version. More.
New version of Pages
To share a photo on your Page:
Click the icon in the top right corner of the Facebook window, then select your name.
Click Switch Profile at the top right of the screen and select the desired Page.
At the top of your Feed or Page, click Photos.
Take a new photo or upload an existing one from your phone's gallery.
Optionally add a caption or location, or click Feelings/Actions to indicate what you are feeling or doing right now.
Click PUBLISH.
Posted photos will be added to the corresponding page tab.
Classic Pages
To share a photo on your Page:
Click the icon in the top right corner of the Facebook window.
Select Pages.
Go to your Page and click Photo.
Select a photo from your phone's gallery.
Add a caption, if desired, and click Publish.
Posted photos will be added to the corresponding page tab.
When you share a link from your Page, you can add a preview of your post. It can contain up to 10 images with descriptions and unique landing page URLs.
Classic Pages
To share a link from your Page:
Classic Mobile
New Mobile
New Pages
Classic Mobile
a new version. More.
Classic Pages
A Page administrator or editor can pin posts to the top of a Page. If you pin a post:
The post will move to the top of your Page's timeline.
An icon appears on the publication.
To pin a post to the top of a Page:
Click the icon in the top right corner of the Facebook window.
Select Pages and go to your Page.
Navigate to the desired post on the Page.
Click in the upper right corner of the publication.
Select Pin on top.
New version Pages
If you have access to the Page at the Facebook level, you can pin and unpin posts at the top of the Page.
To pin a post
Click the icon in the upper right corner of the Facebook window.
Click your profile.
Click Switch Profile at the top of the screen and select the desired Page.
Click the icon in the top right corner of the Facebook window. Go to your Page.
Find the desired publication and click the icon in its upper right corner.
Click Attach Post.
To unpin a post:
Click the icon in the top right corner of the Facebook window.
Click your profile.
Click Switch Profile at the top of the screen and select the desired Page.
Click the icon in the top right corner of the Facebook window. Go to your Page.
Scroll down to the Pinned Post section. Click in the upper right corner of the post you want to unpin.
Click Unpin Post.
You can let your customers know about a discount or promotion by creating an offer on your Page. People will be able to take advantage of the offer online or in store (depending on where you provide it).
To create an offer on a Page:
On the menu to the left of the Ribbon, click Pages.
Go to your Page.
Select Offer next to Create.
Click Create Offer.
Add a description of the offer. By default, the offer is valid for a week, but you can change the duration.
Add a photo and indicate how people can use the offer (Online or In store). Optionally, you can add a promo code or terms of use.
Click Publish.
Visibility and Editing
Pages you manage may use the new version. More.
There are two ways to control who can see your Facebook Page's posts.
Set the Audience Restricted setting to limit the number of people who can see your post.
Enable targeting in the feed. This makes the selected audience more likely to see your post in the feed.
If your Page has fewer than 5,000 likes, make sure you turn on audience optimization for your Page's posts.
On the menu to the left of the Ribbon, click Pages.
Go to your Page.
Select Settings from the menu on the left side of the page.
In the General section, click Audience optimization for posts.
Check the box next to Enable feed targeting and the ability to limit the audience of your posts.
Click Save Changes.
Restricting the audience of a post
By restricting the audience of a post, you control who can see it based on age and location. Your post on your Page and elsewhere on Facebook will only be visible to people who are part of the audience you choose.
To limit the audience of a post:
Click the icon before posting.
Click Restricted Audiences at the top of the screen, and then select the age and location of the people you want to share the post with.
Click Save.
Note. If someone shares your post, it will only be seen by people who are part of the audience you select.
Feed Targeting
You can target specific audiences. Then people who meet the selected criteria are more likely to see your post in their Feeds. Unlike limiting the audience of a post, Feed targeting doesn't let you control who can see a post on your Page or elsewhere on Facebook.
To use feed targeting:
Click the icon before posting.
In the Targeting section of the Feed, enter criteria for the people you want to reach in the Feed.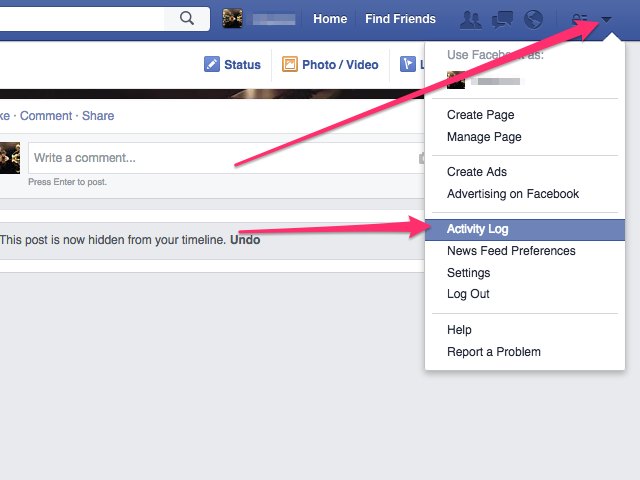
Click Save.
The Pages you manage may use the new version. More.
You can remove posts that have been shared from your Facebook Page by deleting them. A deleted post will permanently disappear from your Page and activity log.
You can delete Page posts if you have admin, editor, or moderator rights on the Page in the classic version, or Facebook or task-level access to the Page in the new version.
Classic mobile version
New mobile version
Pages you manage may use the new version. More.
The name of the author of the post appears next to Posted under your Page title. In a Page comment, the name of the person who left it appears below it, next to the Commented text. Only people who help manage your Page can see this information.
Note. This information is only visible on posts and comments created after February 20, 2014.
The Pages you manage may use the new version. More.
The instructions here are for managing Classic and New Pages with Facebook level access. People in the new version of Pages with issue-level access can edit posts in the Meta Business Suite.
Page posts can be edited by admins, editors, and people with Facebook or task-level access to the Page.
Posts that have previously been promoted or are currently being used in advertising campaigns cannot be edited.
Classic Mobile
The instructions below are for classic Pages. To edit a post or view its edit history in the new version of Pages, sign in to Facebook on your computer.
To edit a Page post:
Click the icon in the upper right corner of the post.
Click Edit Post.
Edit the post and click Save.
To see a list of the people who edited your Page's post:
Other admins and editors of your Page can make changes to posts.
To see who edited a post:
Navigate to the post and click the icon.
Select View edit history.
Here you will see a history of all edits, including changes made before the publication was posted.
All people who see the post can also see a history of all changes made since the post was posted. Only people on your Page can see who made the changes.
New Mobile Browser Version
The instructions here apply to managing Classic and New Pages with Facebook level access.
To edit a Page post:
Click the icon in the upper right corner of the post.
Click Edit Post.
Edit the post and click Done.
To view a post's edit history, log in to Facebook from a computer.
All people who see the post can also see a history of all changes made since the post was posted. Only people on your Page can see who made the changes.
To choose when your Page's post will stop showing in News Feed, sign in to Facebook on a computer.
To choose a date and time when your Page's post will stop showing in News Feed:
On the menu to the left of News Feed, click Pages.
Go to your Page.
Select Publishing Tools in the left column.
Click Create Post in the upper left corner of the screen.
Create a publication.
Click Share Now and select Schedule.
If you want to publish immediately, turn off the Publish option.
Turn on End Distribution in News Feed, and then select a date and time when your post will stop showing in News Feed.
Click Publish or Schedule and then Schedule Publish.
Note. When this post stops showing in the News Feed, it will still be on your Page's timeline.
Drafts and planned publications.
In the Meta Business Suite mobile app, you can create, edit, view, and post draft Page posts.
In the Meta Business Suite mobile app, you can schedule posts for your Page.
The Pages you manage may use the new version. More.
If you have admin or editor rights to a Page in the classic version, or access to the Page at the Facebook or task level in the new version, you can change the date posted on the Page to an earlier date.
To change the date a Page was posted, sign in to Facebook on a computer.
Once you've signed in to Facebook on your computer, follow the steps below.
New version of Pages
To change the publication date on a Page:
Sign in to Facebook and click on your profile photo in the upper right corner of the screen.
Click All Profiles and select the Page you want to switch to.
Go to your Page by clicking on its name in the menu on the left side of the screen.
Find the desired publication and click the icon in its upper right corner.
In the menu, click Edit date.
Select a new publication date and time, and then click Done.
The earliest date available for publication is 1 January 1905. You cannot change the date of a promoted post or mark it as a past date.
Classic Pages
To change the publication date on a Page:
On the menu to the left of the Feed, click Pages.
Go to your Page.
Navigate to a post on the Page's timeline.
Click the icon in the upper right corner of the post.
Select Change date.
Select the date (year, month, day, and hour) for which this post will appear on the Page's timeline.
Click Save.
The earliest date available for publication is 1 January 1905. You cannot change the date of a promoted post or mark it as a past date.
You can also specify a past date for the new post so that it appears in the Page timeline for an older period.
To change the publication date to a past date:
On the menu to the left of the Feed, click Pages.
Go to your Page.
Click Publishing Tools.
Click Create and select Share Now and then from the drop-down menu, Change date to past.
Select a date (year, month, and day) in the past for which this post will appear on the Page's timeline.
Click Change Date to Past and then Schedule Post.
The new post date must be no earlier than the Page creation date. Learn more about scheduling posts.
Events
Pages can only create public events.
Mobile Classic
This feature is not available in Mobile Classic.
New version for mobile browser
To create an event from your Page:
Click the icon in the upper right corner of the Facebook window.
Click Pages and go to your Page.
Select Events and then Create Event.
Scroll down and click Get notified about suspicious logins.
Add event details and click Create.
Learn more about how to edit an event.
You can add public events hosted by other people and Pages to your Page. Once you add an event to your Page, it will appear in the Events tab on the left side of your Page.
Adding an event
To add another person or Page's event to your Page:
On the menu to the left of the Feed, click Events.
Go to the event.
Click the icon and select Add to Page...
Select a Page and click Add Event.
Deleting an event
To remove another person's or Page's event from your Page:
On the menu to the left of the Feed, click Pages.
Go to your Page and click Events in the menu on the left side of the screen.
Move the cursor over the desired event and click the x in its upper right corner.
Troubleshooting
If you don't see the option to add an event to a Page, it could be because:
An event has multiple date or time options. Recurring events cannot be added to a Page.
This is a private event. Only public events can be added to the Page.
If you can't add an event to your Page, you can ask to be co-hosted.
A page is a place where a company, brand, or public figure can connect with their fans on Facebook. If you don't have a Page, you can post a video from your personal profile.
To add a video to your Page, sign in to Facebook on your computer, or open the Facebook app for Android, iPhone, or iPad.
To edit a video on your Page, sign in to Facebook on your computer.
You can add subtitles to your Page's video to reach a wider audience. You can auto-create and edit them, write them yourself, or upload a SUBRIP (.srt) file.
To add subtitles to videos on your Page:
On the menu to the left of the Feed, click Pages.
Go to your Page.
Click Video at the top of the Page timeline and select a video from your computer.
Once it's uploaded, click Video Options in the column on the right side of the screen and select Add captions.
When the video is loaded, choose how you want to create subtitles: automatically, manually or using a SUBRIP (.srt) file.
Click Next and then Publish.
If you choose to upload a .srt file, check its name and format.
To add subtitles to an already posted video, find the post in your Page's timeline, tap the icon in the upper right corner of the screen, select Edit Post, and follow the steps above.
Note. Subtitles are automatically shown to people who watch videos on your Page without sound. In order for subtitles to be shown in the video with sound, they must be turned on. People see subtitles in their preferred language of choice.
To set an expiration date for videos on a Page:
On the menu to the left of the Feed, click Pages.
Go to your Page.
Add a video to the top of your Page timeline.
Enter a title for the video, click Next, and select Schedule.
Check the box next to Expiry date.
Select the date and time until which your video will be shown.
If you want to delete a publication after it expires, select the check box next to Delete publication. Permanently delete a post and its statistics at the scheduled time.
Click Schedule.
You can set an expiration date for a video you've already posted to your Page. For this:
In the menu to the left of the Ribbon, click Pages.