The Beginner's Guide to Facebook Advertising
Chapter 1
Writing by Massimo Chieruzzi
In our first chapter on Facebook advertising, we’ll talk about setting up your Facebook Business Manager account and Facebook Ads Manager account.
In this chapter, we will also be covering
By the end of this chapter, you should have everything set up and ready to start making Facebook ads to market your products or services.
Business Manager is a tool designed to be your primary hub on Facebook to manage all of your Facebook Pages and ad accounts.
With Business Manager, you can:
To open a Facebook Business Manager account, you first need to sign up for a personal Facebook account.
Source
After that, fill in the details in the pop-up window and press Submit.
Source
Before you can create a campaign, your Business Manager must manage at least one Facebook Page.
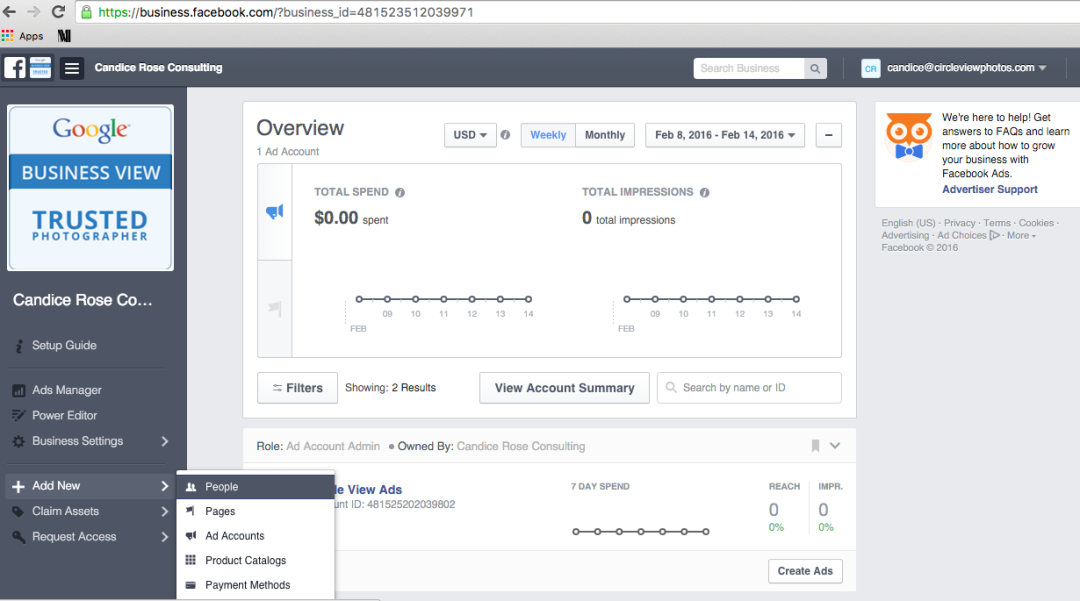
To add a Facebook Page to your Business Manager, go to the Business Manager homepage, click More Tools on the sidebar and select Business Settings.
Source
Click Pages under Accounts, then select Add.
You can pick one of three options:
Pick whichever applies to you and follow the prompts, and your Facebook Page should be added to your Business Manager.
Lastly, you’ll want to create or add a Facebook Ad account that will be associated with your Business Account.
Start at the Business Settings screen of your Business Manager. Click Ad Accounts under the Accounts section of the sidebar.
Click the blue Add button.
From the drop-down menu, you can choose Add an Ad Account (an existing account you’ve already opened), Request Access to an Ad Account or Create a New Ad Account.
Choose the best option for your situation and follow the prompts.
Before we move on from setting up your Business Manager, it’s important to assign roles in your Business Manager account. Users can take on one of two main roles: Admin and Employee.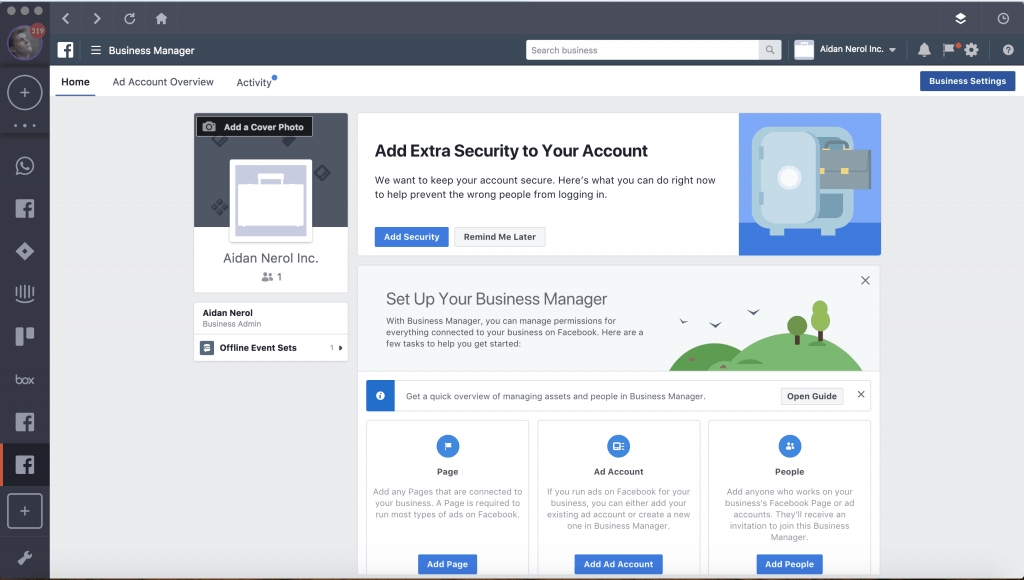
Here’s a quick overview of these two roles and the permissions they have:
There are also different roles for Facebook ad accounts you can manage and edit in the Business Manager.
With your roles all set up, you’re nearly ready to start advertising.
It’s time to add your payment method so you can move forward with creating a Facebook ad campaign.
Head to the Payment Settings page by clicking Ad Account Settings and selecting Payment Settings from the sidebar.
Source
On this page, you can:
To add a new payment method to your ad account:

Source
As you start advertising more and more, we suggest that you add a secondary payment method. This prevents Facebook from stopping all of your campaigns should your primary card expire, reach the monthly limit or be blocked for whatever other reason.
If you need additional help, here’s a Facebook guide that explains what payment options are available in which countries.
Editing your payment optionsIf you want to make changes to your Facebook advertising payments, you can do it on the same page by clicking the three dots beside your payment option and selecting Edit.
Source
If you have entered multiple payment options, you can choose your primary from this screen as well.
You cannot delete your primary source, so you’ll need to make another option for your primary source before removing your current primary payment method.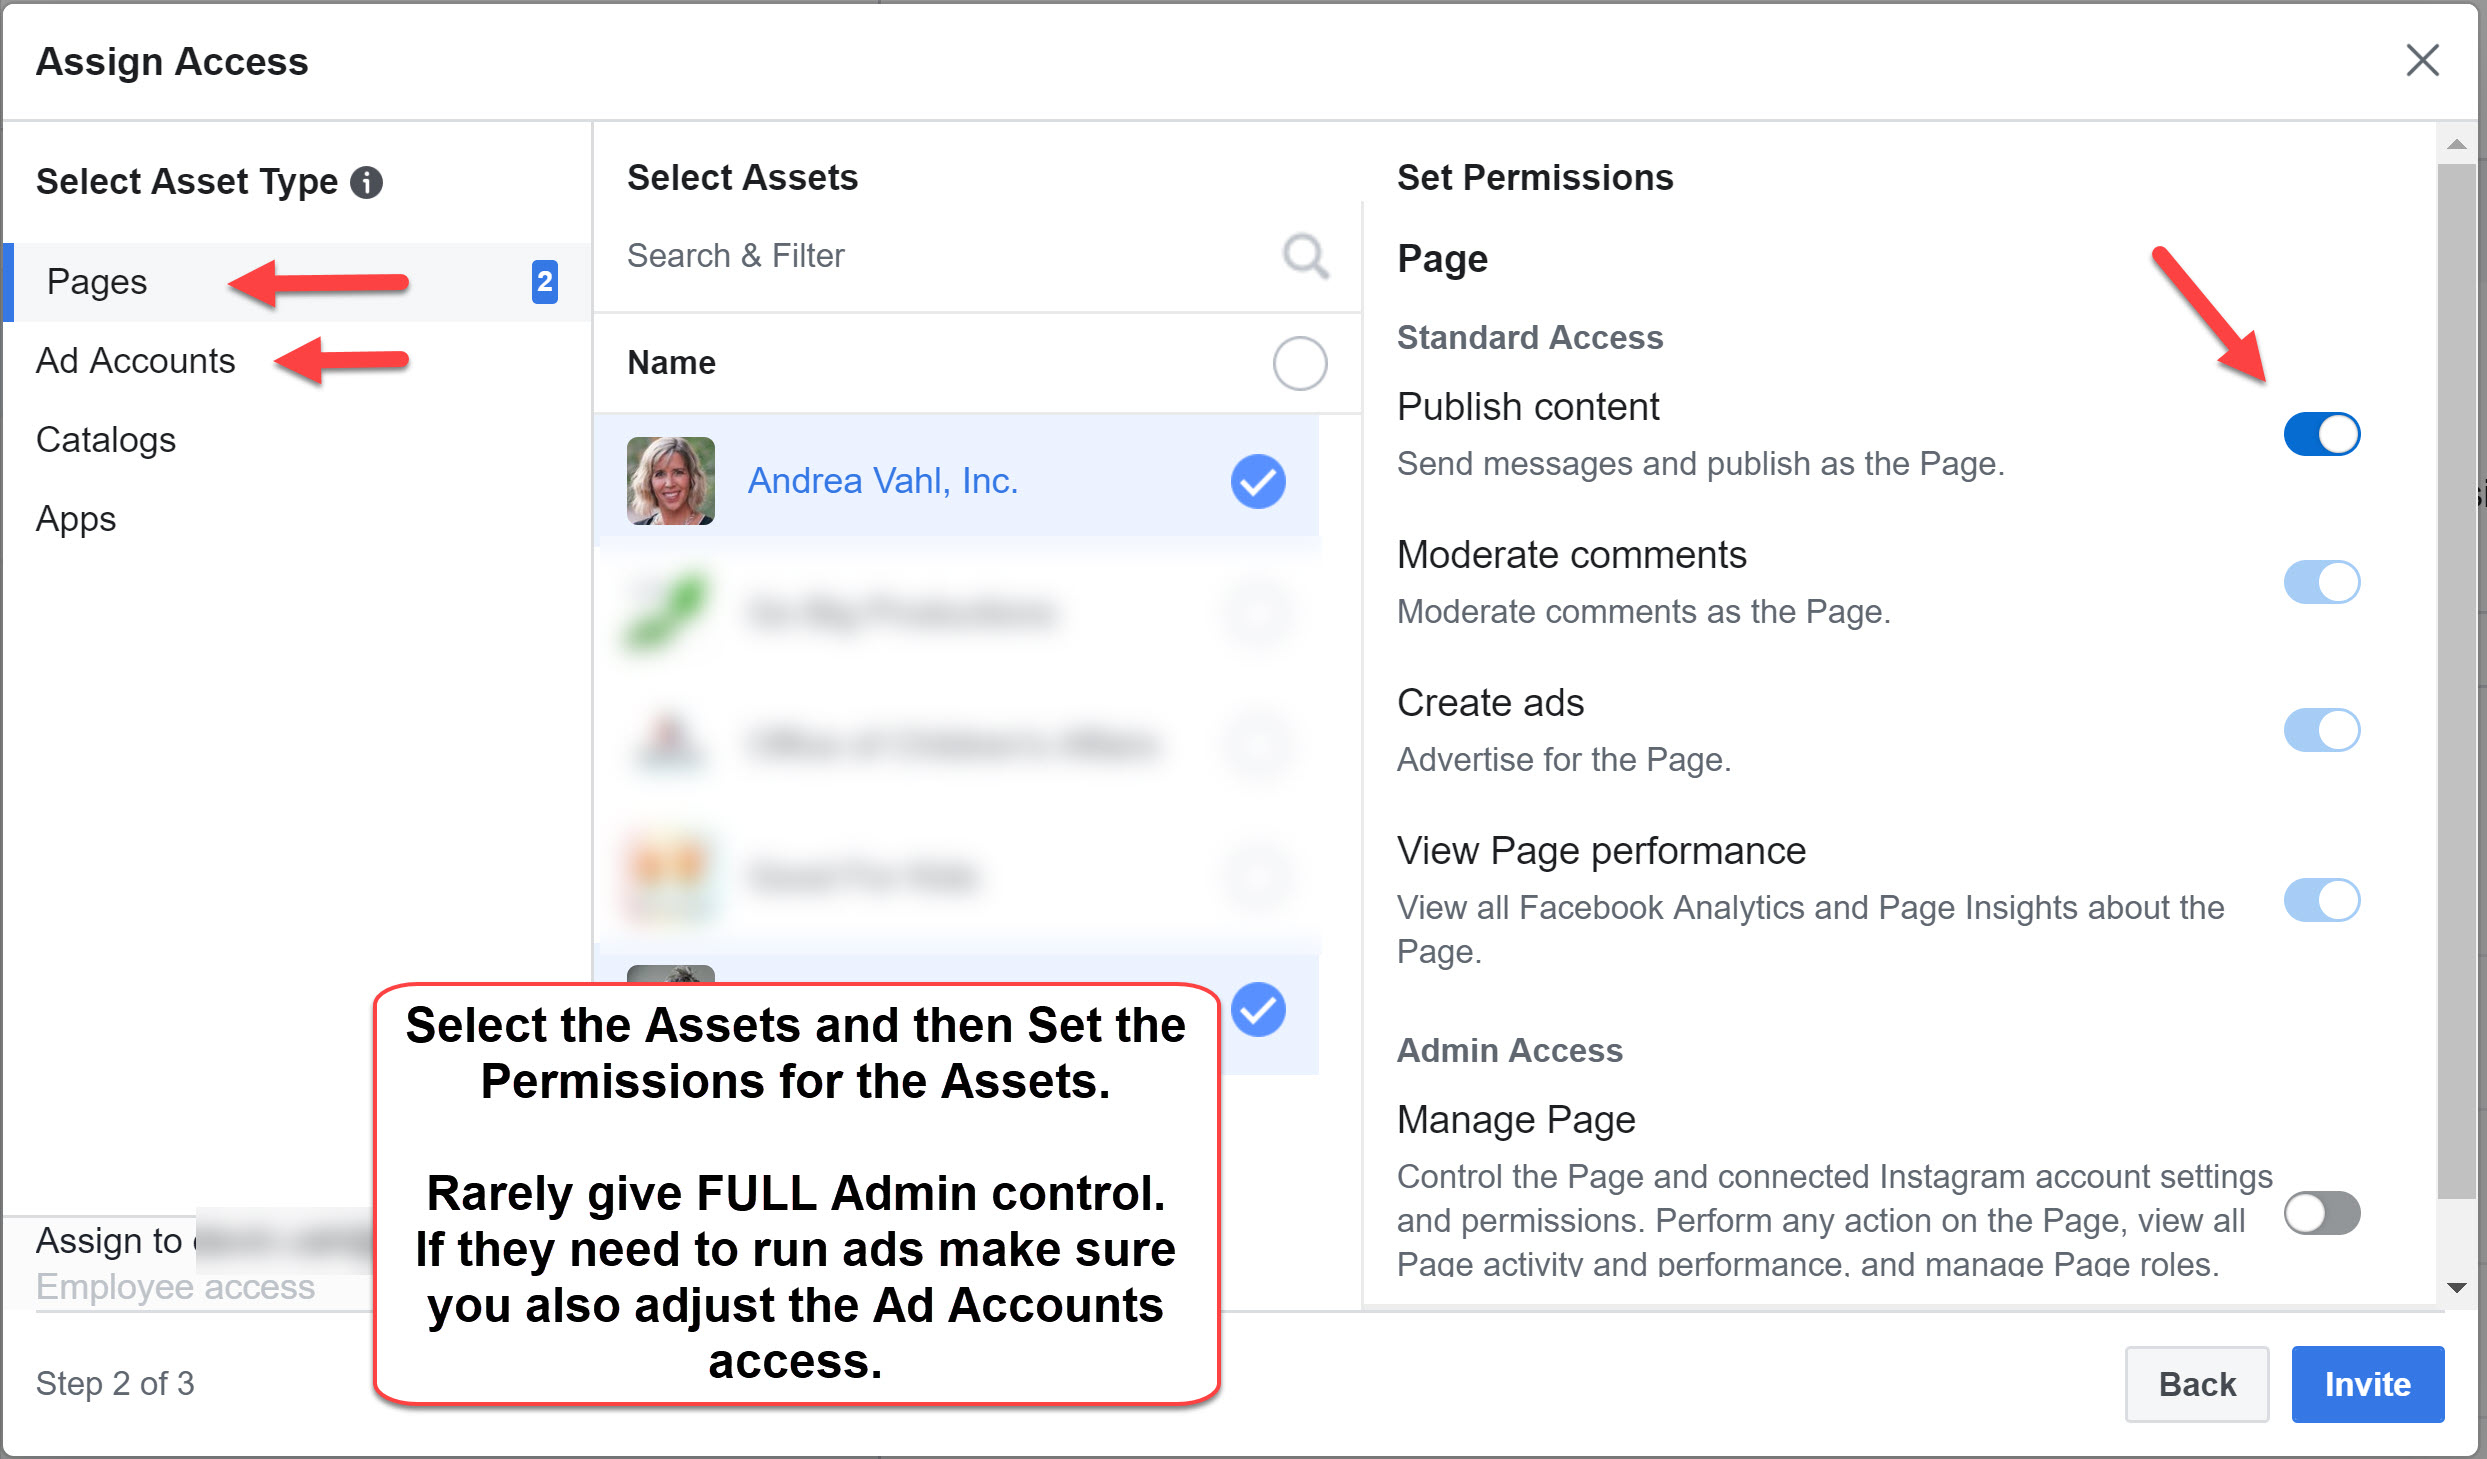
Billing on Facebook is determined by how you choose to pay for your ads. The many payment options are divided into two camps:
Manual payments are essentially pay-as-you-go and are relatively easy to understand, as you are billed every day for whatever you spend that day on ads.
Automatic payments are slightly more complicated.
With automatic payments, you can expect a bill from Facebook on two occasions:
The billing threshold amount varies based on your billing history. When you start, this threshold will be pretty low (usually $25), and you’ll be billed every time you spend $25 in Facebook Ads.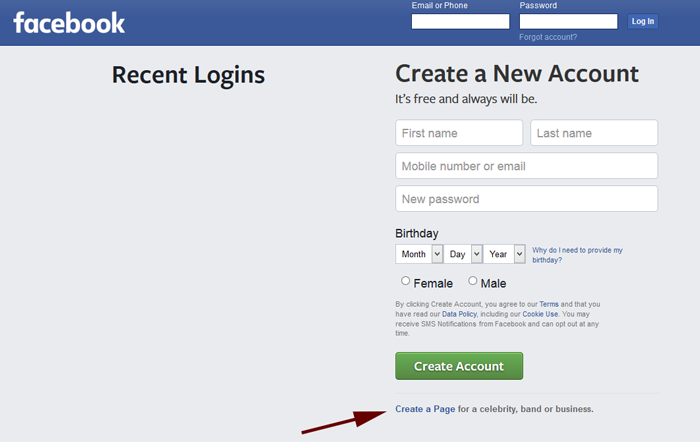 As you keep spending and your payments are correctly processed, your threshold will be automatically increased.
If you still have a balance at the end of the month, but your billing threshold has not been met, you will be billed for that amount to clear your balance for the start of the month.
Setting up the account spending limitYou can control your total ad costs by setting an ad account spending limit. Your ads will pause when you reach the limit you’ve set and won’t run again until you increase or remove that limit.
You can add an account spending limit by clicking the 3-dot icon beside Account Spending Limit.
Fill in how much you want your spending limited to and click Save.
Ad account spending limits are especially useful when working with agencies when you want to be sure your consultant or agency won’t be able to spend more than you’ve planned across all of your campaigns. Don’t set it too low, or you’ll have to update it often. Remember that each time the limit is reached, all of your accounts will be paused for at least 15 minutes.
Whether you like it or not, your Facebook Advertising account will have some limits. It’s better to get to know them from the beginning.
Here are the limits of Facebook Ads Manager:
Once you reach any of these limits, all you’ll have to do is delete old campaigns and their ads to make room for new ones.
Facebook notifications are an excellent way to stay in touch with your campaigns. However, they can also flood your inbox quickly, so you may want to change the frequency of email notifications you receive from Facebook to fit your needs.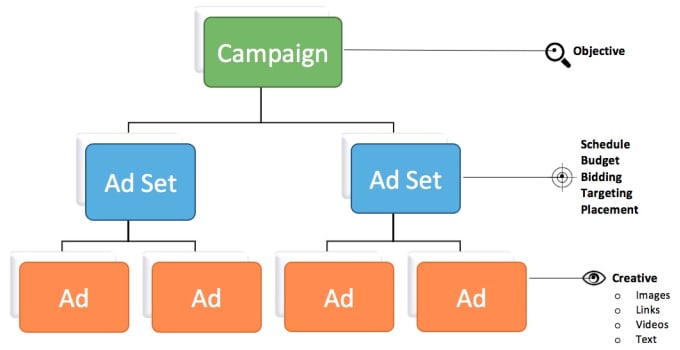
Source
Set up your notifications so that you’ll get the most important notifications via email, while the others can just be Facebook notifications that will appear when you log in to your Business Manager. That way, you’ll never miss anything when it comes to your Facebook ads.
Once you have been creating ads for a while, you may wish to collaborate with another person, such as a freelancer, an ad agency or an employee. This is where roles come into play. If you want to add new users and admins to your Facebook advertising account, navigate to the Ad Accounts tab in the Ad Account Settings page.
Source
Click Add People, and then fill in the name of the person you want to add and the role they will be assigned.
Source
With your team members all here, you’re set to get started with Facebook ads.
Your Facebook ad account is finally ready and waiting for you to set up those first campaigns!
Proceed to Chapter 2 to learn how to set up your first Facebook advertising campaign in the Facebook Ads Manager.
Start Index Chapter 2Do you want to start promoting your brand on Facebook?
Excellent choice!
Facebook is nowadays undoubtedly the most popular social media platform and one of the biggest advertising platforms out there.
Feel like you don’t know where to start?
We’ve got you covered!
We’re going to provide you with a comprehensive guide that includes all you need to know to set up your Facebook advertising account, launch your first advertising campaign, and even troubleshoot any issues you may encounter.
But before we start talking about an ad account, you need to set up a Facebook Business Manager account, and we’ll tell you why.
What is Facebook Business Manager?Facebook Business Manager is a free tool used to manage all your Facebook business assets: ad accounts, business pages, Instagram account, and Meta pixel.
If you have a team working on your Facebook assets together, you can manage everyone’s permissions using your own Business Manager.
There are two kinds of permissions you can grant in the Business Manager: admin access and employee access.
Employees can only view settings for the business and be assigned to assets. However, admins can also add and remove employees and partners, change settings for the business, and add assets.
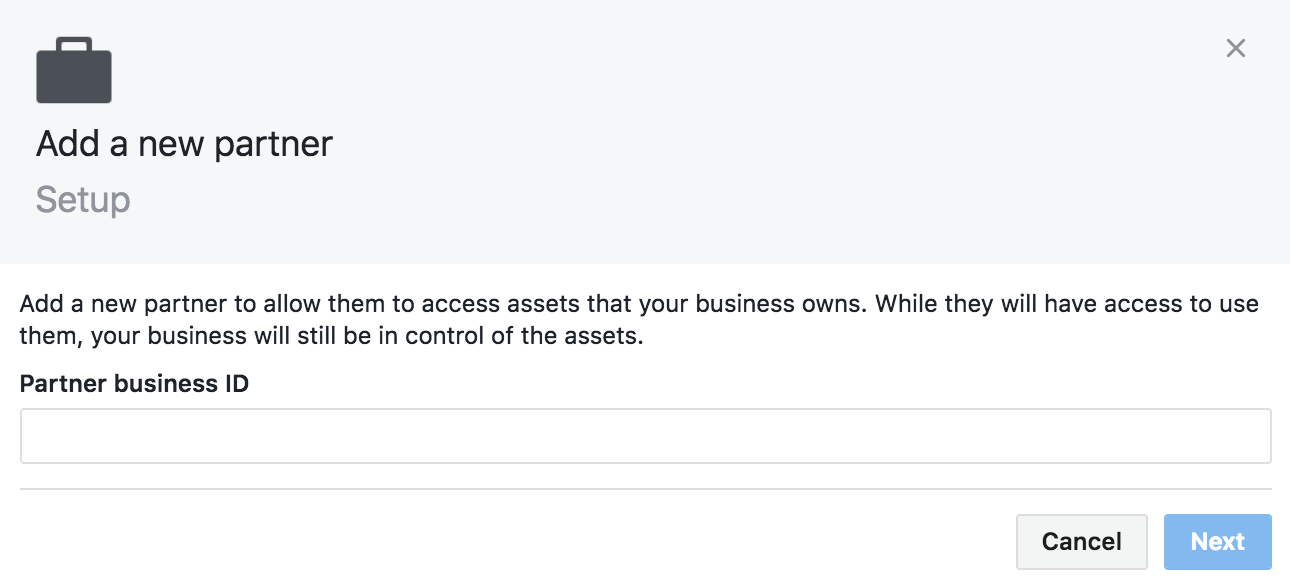
Moreover, if you hire an agency or a media buyer to manage your Facebook ads, you can grant them access to your Business Manager account so they can have all the permissions they need.
If you wish to learn more about all the various capabilities of the Facebook Business Manager, you can read our article.
Note that to create a Facebook Business Manager account you must have a personal profile on Facebook.
How to create a Business Manager account?Now, if you want to start running ad campaigns on Facebook, which is what we’re here for, you need to connect your Facebook page to the Business Manager.
How to add Facebook pages to Business Manager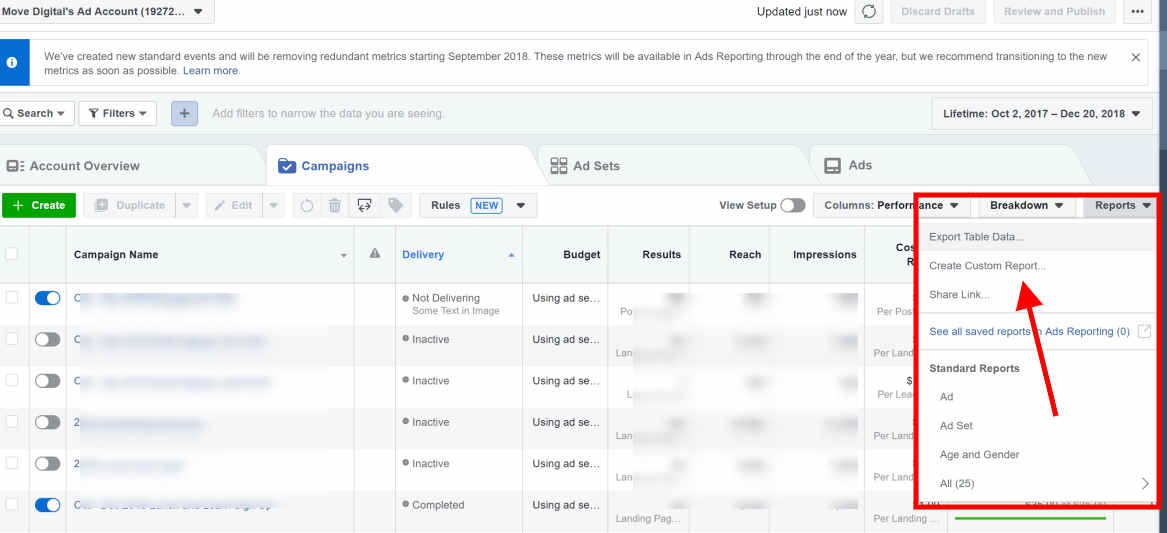
That wasn’t too hard, right?
And here we are at the part you wanted to reach - creating and setting up your Facebook ad account!
How to create a new ad account on Facebook Business Manager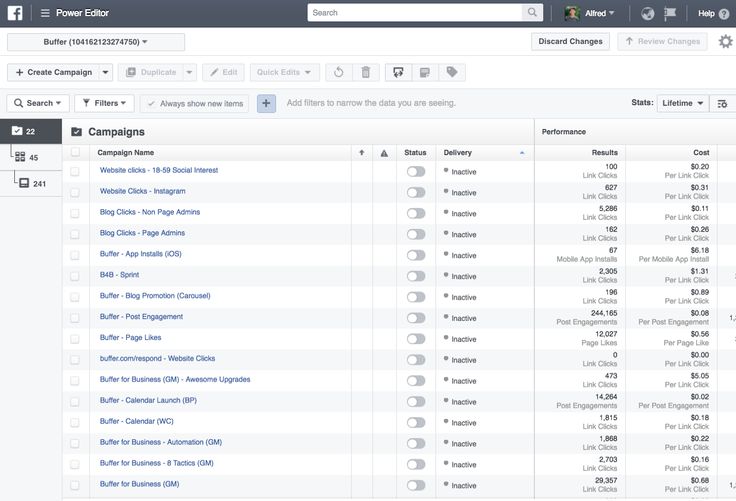 Pay close attention when selecting your billing currency and time zone, as you will not be able to change them once you’ve created your ad account. If you change any of these two parameters, you’ll need to create a new account.
 Congratulations! You have a brand new Facebook advertising account!
Before you can launch your first Facebook campaign, you need to set up your ad account, which includes adding a payment method. However, you only need to do it once, unless you want to change it or create a new account.
Let’s learn how to do this and what else you can do to set up your advertising account in the most convenient way for you.
#1 How to add a new payment method to your Facebook ad account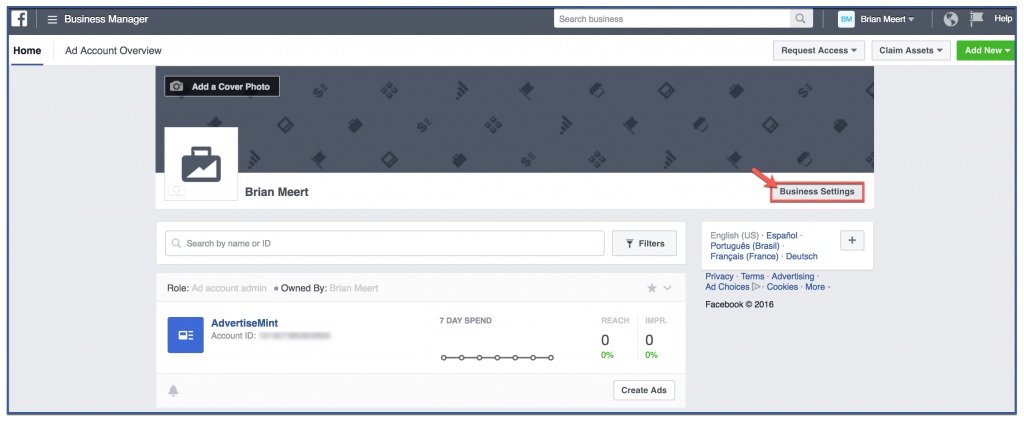 Here you can add a new payment method, edit your existing methods, set your spending limit, and view your next bill.
Pro Tip: Add at least one secondary payment method!Why? If you only have one payment method set up in your account and it fails for some reason - credit card blocked, expired, reached the monthly limit, etc. - all your campaigns will automatically stop running until you settle your balance. This can be a very big issue if you’re running multiple campaigns with high spending or promoting a big sale, such as a Black Friday/Cyber Monday sale for instance. Moreover, this will harm the learning done on your campaigns and might hinder their performance even after you restart them.#2 How to edit payment methodsHowever, if you have at least one valid secondary payment method in your account, Facebook will automatically start billing it in case your primary method fails. This way, you can maintain your Facebook advertising activity.
Once you’ve set up your payment methods, you can edit your payment options and select which one will be your primary method. Note that you can not delete your primary method. Hence, you must make another payment option your primary one before deleting a primary method.
#3 What is the billing threshold?Facebook will bill your account every time you reach your billing threshold and at the end of your monthly billing period for any leftover costs.
Your billing threshold is usually automatically set to $25 in the beginning. Then, it will be automatically raised to $50, $250, $500, and finally, $750 as you keep spending and your payments are correctly processed.
The billing threshold does not affect your Facebook ad campaigns, of course. It just determines when you will be charged. The higher your threshold, the fewer invoices you’ll need to deal with. You can also manage your billing threshold from the Facebook Ads Manager.
Facebook allows you to avoid overspending by setting an account spending limit. Once you reach this limit, all your ads will automatically pause and you won’t be charged anymore until you increase or remove the limit.
This is especially useful if you have an agency or a media buyer who manages your account for you and you’ve given them a limited budget. However, you don’t want to set this limit too low, or you’d need to update it very often.
Furthermore, every time you hit the limit, your ads will be paused for at least 15 minutes. This may be especially disadvantageous if you’re promoting a big sale or a time-sensitive offer.
To set your account spending limit, just go to "Payment Settings" and click “Set Your Account Spending Limit” (In the section below “Payment Methods”).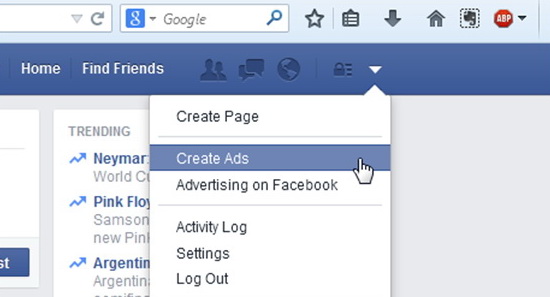 Then, enter the desired amount and click “Set Limit”.
It’s important to know Facebook’s limits that are related to your ad account, even though you won’t reach any of them at first.
But, if you’ve reached any of these limits, all you have to do is delete some of your old campaigns and you’ll be able to relaunch new ones. Your deleted assets will be archived, and you’re allowed to archive up to 100,000 assets.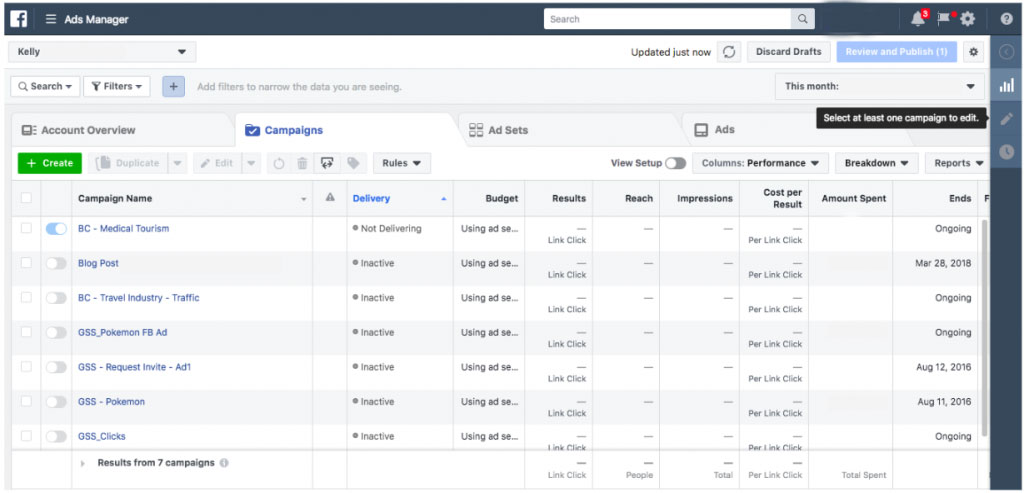 If you have a big business and you spend a lot on Facebook ads, you can request to have an assigned Facebook Account Manager. In this case, your limits will be much higher.
As a Facebook advertiser, you want to be notified of everything that’s going on in your account, right?
Nevertheless, you don’t want to flood your email with Facebook notifications. So, you better set your Facebook ad account email notification frequency to fit your needs.
How to set your Facebook ad account notifications
The last thing we’re going to discuss before launching your first campaigns is adding people to your ad account and granting them the necessary permissions.
This is very useful if you have other team members working on your ad account. It allows you to grant every team member the access they need for effective collaboration.
In the past, Facebook has defined three possible ad account roles: admin, advertiser, or analyst. Analysts could only see ad account reports. Advertisers could also create and edit ads. Admins were able to manage Facebook ad account settings, payment methods, and account spending limits, add people and assign ad account roles.
However, nowadays you can set specific permissions for each user added to your account.
How to set permissions to users in your Facebook ad account

That’s it - you’re ready to launch your first Facebook ad campaign!
How to create Facebook adsThe tool which will help you launch and manage your ads is the Facebook Ads Manager.
It allows you to create Facebook ad campaigns, manage your bids, select target audiences, optimize your campaigns, monitor performance, and A/B test your campaigns. You can easily access your Facebook Ad Manager from the Business Manager using the left-side menu.
Now let's learn how to set up Facebook ads in the Ads Manager.
1. Create a new Facebook ad campaignIn the Facebook Ads Manager, go to the “Campaigns” tab, and click on the green “Create” button.
2. Select your campaign objective
You should select your campaign objective according to your business goals.
The available objectives are Brand Awareness, Reach, Traffic, Engagement, App Installs, Video Views, Lead Generation, Messages, Conversions, Catalog Sales, and Store Traffic.
This selection will affect your available ad formats and bidding options.
For now, as you have no data and no Meta pixel on your website yet, we can start with “Brand Awareness” or “Reach”. However, after you gather enough data, we recommend selecting “Conversions” as your campaign objective.
3. Name your campaignNext, you should select a name for your campaign. It is very important to give it an indicative name for efficient reporting, especially if you plan on launching multiple campaigns in the future.
Your campaign name can include your target audience and location, your creative type, the date range in which it will be running, etc. If you advertise for a client, it’s also important to include their name there, of course.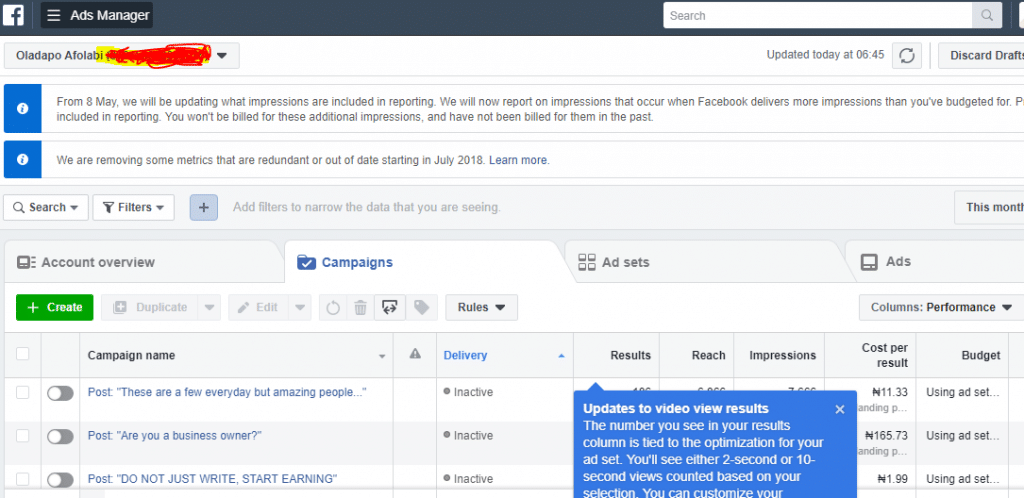
Having a well-defined method for campaign naming is crucial and will save you time and effort later on.
4. Set up your budget and biddingFacebook lets you select between two different methods to define your campaign budget:
For a start, it’s best to define a daily budget and run your campaign continuously without an end date so you can have more control over it.
Furthermore, instead of setting your budget at the campaign level and selecting campaign budget optimization (CBO), you can also set up your budget on the ad-set level (ABO) if you want.
Regarding bidding, it is recommended to start with automatic, which is the default option. This tells Facebook to make sure you spend all your budget and find the bids with the lowest cost per conversion. It's best to stick to automatic bidding until you understand the benchmarks for your objective costs.
Afterward, and especially if you want to scale your account, you can optimize your bids manually. By setting Cost Control using cost or bid cap, you can tell Facebook exactly how much you're willing to spend per bid. This can drive more conversions compared to automatic bidding, but the costs might be higher as well.
The difference between cost and bid cap is the flexibility. A cost cap sets a flexible limit on your bids, which means that Facebook is allowed to slightly exceed the limit you set in order to get you more conversions, as long as your average bid value remains around your cost cap. However, a bid cap is much more strict, and Facebook may not exceed it at all.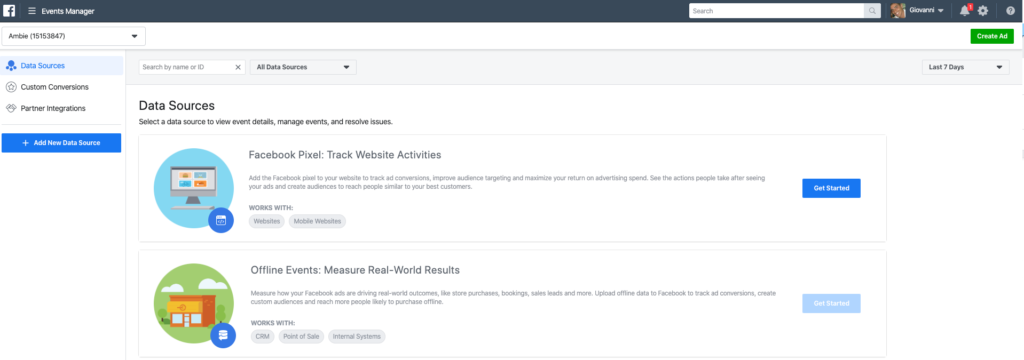
An efficient manually bidding strategy may drive better overall results than automatic bidding, so you should try it once you accumulate enough data. Madgicx's Bid Optimization tool can help you set up the perfect bid testing experiment and find the best bids for your top-performing ad sets.
How much will your ads cost?
Now you can easily calculate the cost of your next campaign with the FREE Facebook Ad Cost Calculator!
Just type in your revenue goal, product price, CPM, CTR, and CPA, and the calculator will tell you how much you should spend.
After you've set up your budget and bidding method, you'll need to select your Facebook ads start date. This is done at the ad-set level and may differ between ad sets within the same campaign.
If you have a time-sensitive offer, like a Black Friday sale, you can even set an end date. Facebook even allows you to set the exact time on which your Facebook ad set will start and finish.
The default Facebook ads start date is immediate. So, don't forget to change it if your offer is not yet relevant or if you have any other reason to start it later.
For instance, if you are managing a client's account, you may need to wait for their approval before you launch the ad set. Alternatively, if your target audience is in a different time zone than you, you may want to adjust the start date and time.
This leads me to the next point - launch time optimization. After you gather some experience and figure out the best days and times for you to run your ads, you can set automated rules that will turn your ad sets on and off according to your average ROAS at specific times.
This is something you can easily do using Madgicx's Custom Automation Tactics. Our platform shows you exactly which times are your most profitable. It can be based on ROAS or another key metric. For example, you can pause your ads during weekends and turn them on again at the beginning of the week.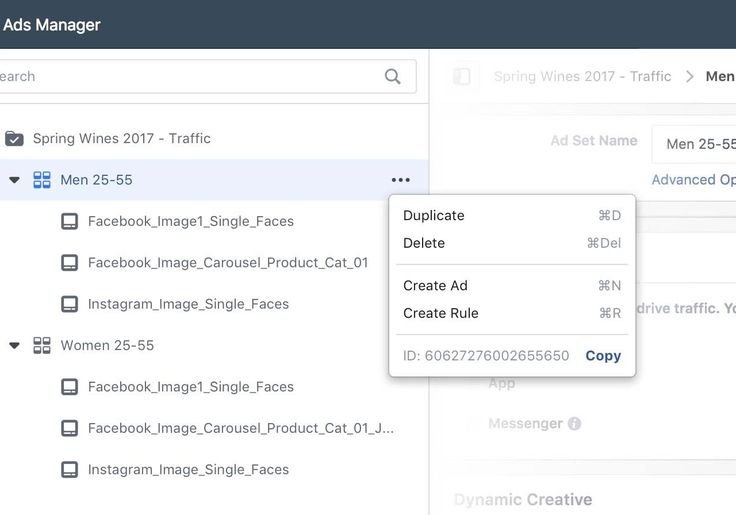 This would save you money and help you squeeze more revenue out of the same advertising budget.
The placements available are dictated by your campaign objective. You can select them manually, or let Facebook select the optimal placements for you, using the default “Automatic Placements”.Facebook placements:
Instagram placements:
Messenger placements:
Audience Network placements:
If you are launching your first campaign and have no data to rely on yet, we definitely recommend using automatic placements.
However, if you already have some data, you should check your ad performance on every placement and target your most profitable ones.
At Madgicx, we use our Smart Filters to analyze ad performance based on different parameters, including platforms and placements.
7. Select your target audienceIt’s no secret that selecting the right target audience is one of the most important factors in a campaign’s success.
You can either select one of your saved audiences or create a new one when launching a new campaign.
Facebook offers you various targeting possibilities, such as interests, behaviors, demographics, locations, and even targeting your page fans.
In addition, if you have already installed the Meta pixel on your website, you can create custom audiences based on visitor activity on your website and lookalike audiences based on them.
Other useful custom audiences can be created using a customer list, targeting people who engaged with your videos, and more.
At this stage, Facebook will also inform you of your estimated daily reach and overall potential reach and let you know whether your audience is too specific, too broad, or just about the right size.
We’ve reached the final stage of your campaign creation - the ads themselves.
Here you can select between creating new ads and using an existing Facebook page post.
Based on your placement selection, you can select the ad format you wish to use. It could be Carousel, Single Image or Video, etc.
Then, you’ll need to upload your ad creative. Open the “Add Media” drop-down menu and select whether you wish to add an image or a video.
Note that every placement and format has different specs and sizes.
Pro Tip: If you don’t have enough resources to create videos yourself, you can utilize Facebook’s Video Creation Kit to turn your images into a video.
Another thing we’d recommend is setting up the URL parameters in a way that will help you track your ad attribution efficiently.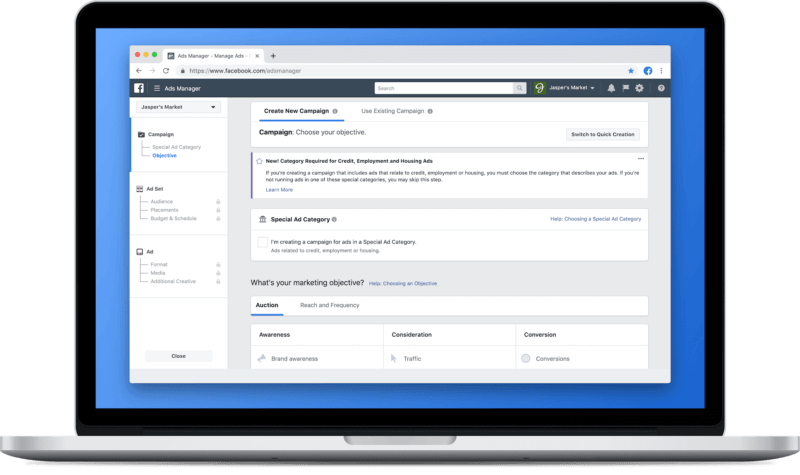
Now you can write your ad copy, check out your ad’s preview, and launch your first campaign!
Use the Meta pixel for better tracking and targetingIf you plan to reach your audience with products and services based on their preferences, you must implement a Meta pixel on your website.
The Meta pixel is a snippet of tracking code you generate from your Facebook advertising account and implement on the header section of your website.
It captures specific actions visitors perform on your site. This provides you with data and insights to help you refine your Facebook and Instagram advertising campaigns to maximize performance.
You can then use the data your Meta pixel records to show your ads to different audience segments based on their actions on your site. After creating custom audiences based on your data, you can use them to create lookalike audiences to acquire new customers.
To utilize this optimization solution to its full potential, the first thing you need to do is create a Meta pixel and install it on your website.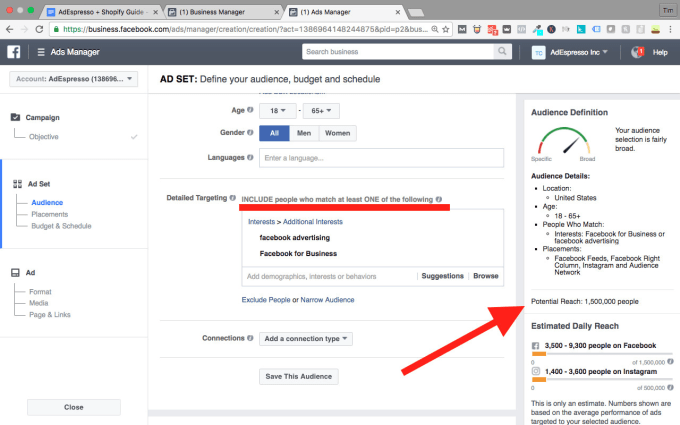
Then, you need to set up the events you want your pixel to track.
Lastly, you can start using your pixel data for audience targeting.
Facebook ad account troubleshootingThere are a few common errors that may occur when you try to create a new ad account or work with your existing one in the Facebook Ad Manager.
The first one is reaching your ad account maximum. As we’ve already mentioned, every business has a limited number of Facebook ad accounts it can create. If you’ve reached your limit and you wish to create more accounts, contact Facebook, or ideally your Facebook representative, and ask them for help.
But the issue we’ll focus on is the second and most common one - Account Disabled. This issue shouldn’t scare you either and we’re going to discuss it thoroughly.
Facebook ad account disabledIt can happen even to the best Facebook advertisers, so don’t feel so bad.
The most important thing is - don’t panic!
Why was your Facebook ad account disabled?
When you launch an ad, Facebook reviews it and considers all of its characteristics. It reviews your content (copy and creative), targeting settings, positioning, and the webpage (or webpages) it links to.
All of your ads must comply with Facebook’s Advertising Policies and Community Standards. Hence, you should read them carefully to check whether you’ve violated any of Facebook’s rules.
Another reason might be users’ reports about your business page, ads, or any other type of content you’ve posted.
How do I reactivate a Facebook ad account that has been disabled?Go to the Facebook Business Help Center and select one of two methods: chat with a Facebook representative or fill in a form.Live chat with a representative
 This will help the representative better understand your issue.
Fill in a form
There are two available forms you can fill in to restore your disabled account:
After your account will be reviewed by Facebook, you will receive a message to your Help Center support inbox.
Billing Option Not AvailableSome Facebook users have reported having encountered the following notification: "Billing option not available: ad accounts owned by businesses new to Facebook products can choose this option to pay for ads after several weeks of following our policies.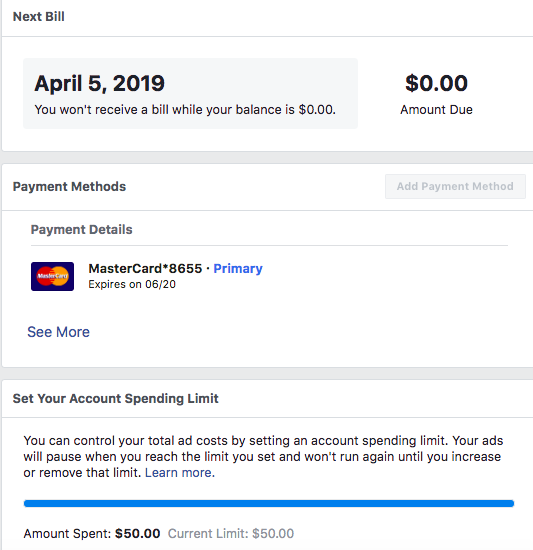 (#2446404)."
But why does this happen and how to solve it?
This issue is usually caused when a user asks to be charged by anything other than impressions. This selection is done at the ad set level (under "Optimization & Delivery").
The default option is charging by impressions, and Facebook requires that new ad accounts will spend at least $10 getting charged by impressions before they change the way they are charged.
Once you fulfill this condition, you may be charged by link clicks (on Traffic and App Installs campaigns) or ThruPlay (on Video Views campaigns), for example.
Summing upYou’ve learned how to create a Business Manager account, how to connect your Facebook page, and how to create a new ad account.
Moreover, now you know everything about setting up your ad account. Also, you've launched your first ad campaign from the Facebook Ad Manager.
Well done!
In addition, we also gave you some helpful information in case your ad account is disabled.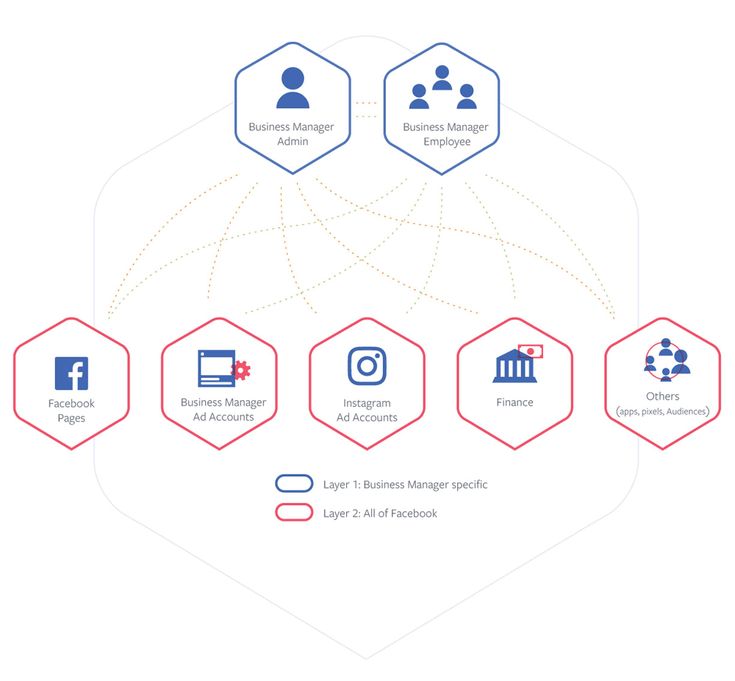
We hope this guide was helpful and wish you happy and successful Facebook advertising.
Advertising on Facebook, at first glance, is quite difficult to set up. In this article, we will consider the features and structure of personal and agency advertising accounts on Facebook in order to facilitate the process of attracting a target audience from this social network.
The first thing to consider is the difference between a personal ad account and an agency account.
Shortly after you create a business page on Facebook, you will be prompted to start promoting it. By default, a personal advertising account will be used, to which you can link your bank card, from which funds will be debited as the advertising budget is spent. You can also create an account with a prepaid budget.
Agent account (Business Manager) is a more powerful, professional tool that allows you to: 1.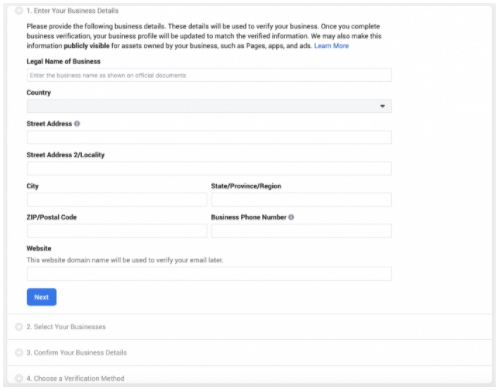 Manage advertising on Facebook and Instagram 2. Delegate access rights to Facebook pages and Instagram profiles, as well as advertising to several participants 3. Control access 4. Request access to the pages and advertising accounts of your clients.
As a rule, agencies are registered in Business Manager for more convenient management of Facebook and Instagram resources.
For example, if one person maintains the page, and another person manages advertising, then they will be given the appropriate access and each of them will be able to do only their work. The page editor will only be able to make posts, while the advertiser will be able to set up ads. The administrator can do both.
This is especially convenient when it is necessary to give the client access to view statistics on advertising campaigns, but in such a way that he cannot manage them. This allows us to avoid many misunderstandings in practice.
In order to set up a personal advertising account on Facebook, just click on the "create ads" link.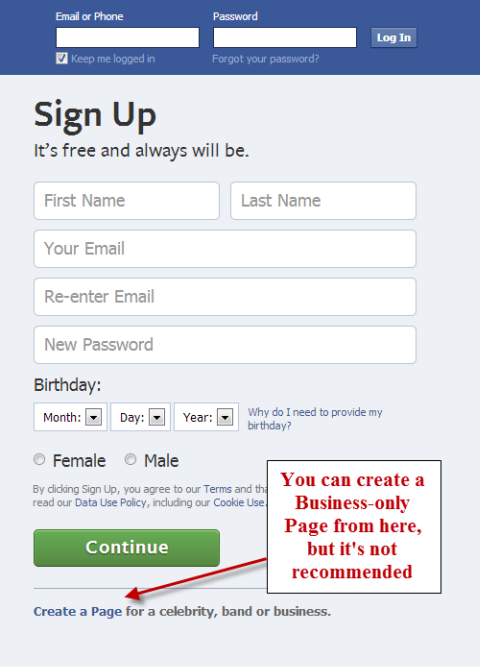
In a few seconds, an ad account will be created and loaded, and you can start setting up your ads.
The first thing to do after logging in is to set up an account. To do this, click on the gear in the upper right corner.
On the page that appears, you can make some settings. First we see the ad account ID (it is assigned automatically). The name of the advertising account can be written at your discretion, you can simply put the name. Also here you will be asked to select the purpose of advertising activities, select the country in which you will advertise, currency, and also indicate whether you are a representative of an agency that buys advertising on behalf of the advertiser or not.
In the "Ad account roles" field there is an "Add People" button that allows you to grant access to manage your personal ad account to other Facebook users.
At the top left there are a few more important settings: 1. Pages - when clicked, a list of pages you administer on Facebook will be displayed which you can advertise 2. Payment methods - here you can link your card or PayPal 3. Notifications - here you can configure which ones notifications from Facebook you want to receive.
In the same place, a little higher, there is another menu item "Settings", by opening which you will get access to all advertising tools. They allow you to customize advertising, analyze its effectiveness, create and save audiences, etc.
We will describe how to work with each of these tools in separate articles.
To start using Business Manager, go to https://business.facebook.com. Click the "Create an account" button and add the name of your company in the window that appears, then the "Continue" button. In the next window, you need to enter your name and a valid email address.
Next, we will look at the most requested features and their location in the agent account. To access them, you need to click the gear in the upper right corner.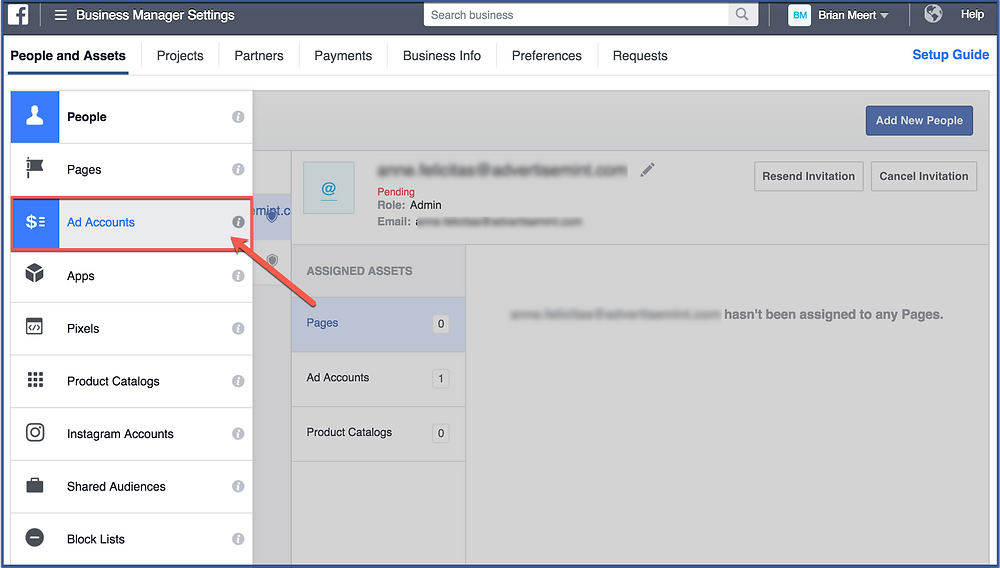
The "People" section allows you to add participants to the advertising account (using the "Add new people" button) and give them access rights to the necessary pages and advertising accounts, to do this, select the desired employee in the left block and click the "Assign resources" button. This will allow you to distribute the rights to manage pages and advertising accounts.
You can also change access levels or delete employees altogether.
The “Pages” section allows you to request access to the business pages of the clients whose services you are going to promote. When requested, they receive a notification to confirm access. If you are already the administrator of the required business page, then it will be added to Business Manager automatically.
Here you can link your agency advertising account to the client's projects, create a new advertising account with a certain replenishment method, or request access to the client's advertising account if he replenishes the budget from his side.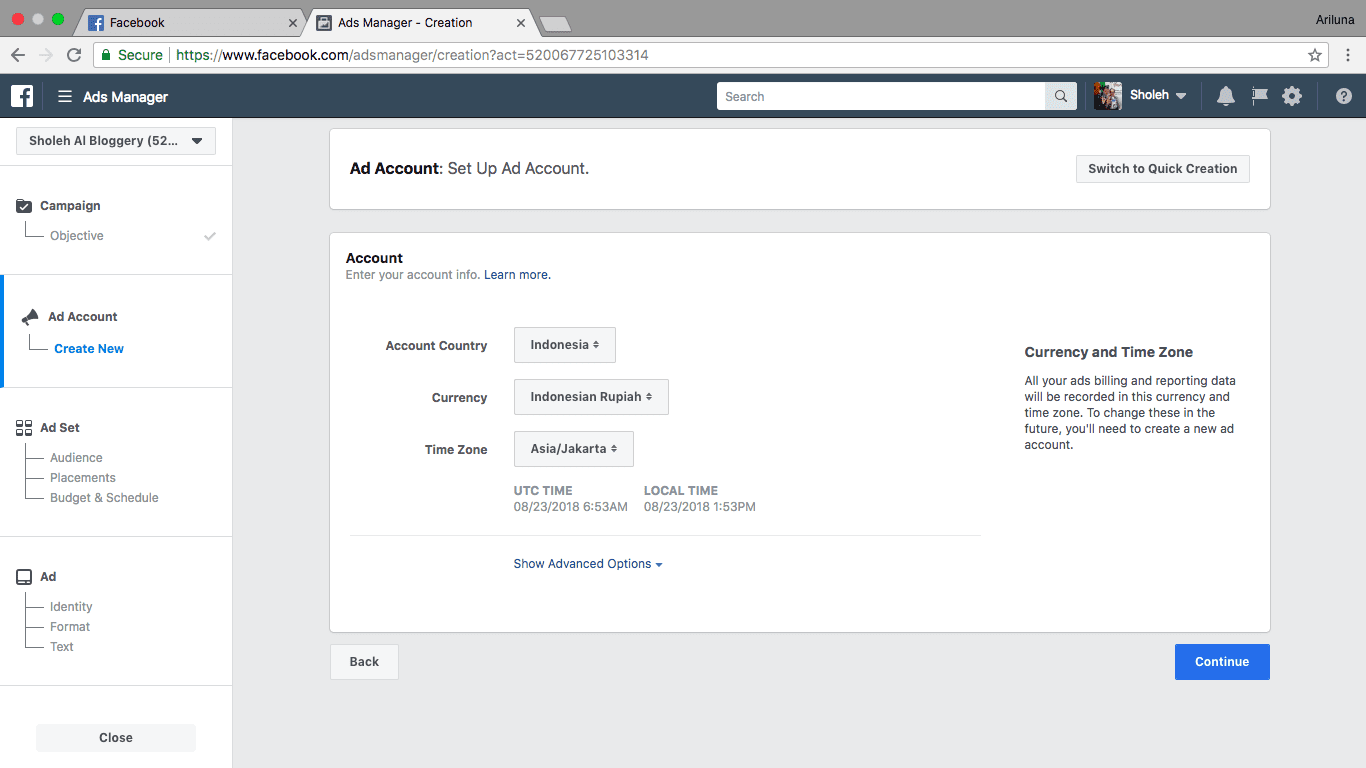
This section allows you to create a pixel to work with Facebook retargeting codes. Once posted, the code generated in this section will check all site visitors for a Facebook account and add them to a private database, which can then be used to launch advertising campaigns.
Here you can add a client account, link it to a Facebook business page, and combine it into one project.
Here it is very convenient to group all available resources by projects: Add a FB business page, Instagram account and assign an advertising account for their promotion. This will allow FB to understand which company you are promoting and when setting up advertising campaigns, exactly those profiles and pages that are needed will be used. The list of projects is on the left, and the list of resources available to you for this project is on the right.
Case study. Usually, the link between a business page and a company account on Instagram is done in the settings of the business page itself, that is, without using a business manager.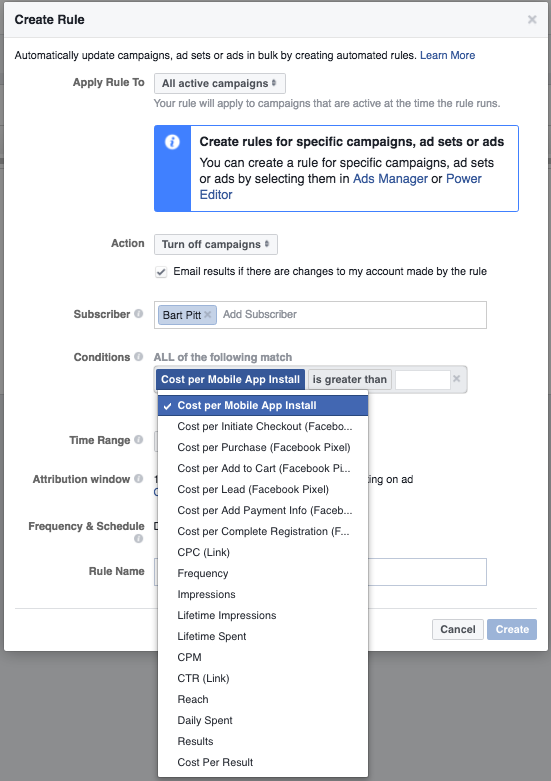 Also, setting up such a link helps set up a business account on Instagram, which requires this same link.
There are cases when a client comes to the promotion after ordering advertising from other contractors and, for example, the Instagram profile is linked to the wrong brand page on FB, from which we advertise, and relinking is impossible due to loss password from the admin page. This is where the ability to create projects in the business manager will be very useful.
Here you can set up payment systems from which advertising will be paid for the main advertising account of the company.
In future articles, we will take a closer look at working in a business manager.
Contents
 1.2 Budget selection at campaign level
 In this article, we will not only take a detailed look at the process of setting up Facebook ads from the technical side, but also analyze how this knowledge can be applied to create acquisition and retention campaigns. Let's take a look at Facebook Ads Manager first.
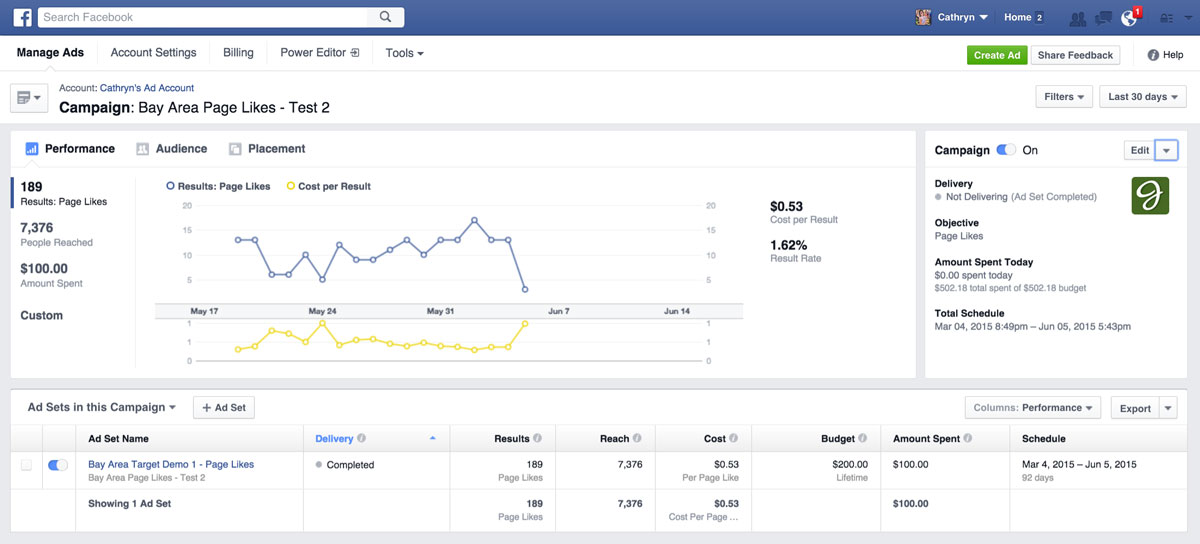
Ads Manager is a free tool from Facebook with which you can create and manage ads and measure the effectiveness of their results.
In the advertising account you can create, view and edit advertising campaigns, ad groups and ads. You can use Ads Manager on both desktop and mobile devices. Please note that not all ad objectives and features are available when creating campaigns on mobile devices.
You can promote posts using the "Promote Post" button below the posts on the business page, but you will have less targeting options if you do so. We recommend launching and maintaining advertising campaigns using the advertising account in the desktop version.
You can access Facebook Ads Manager using one of 3 methods:
Advertising campaigns can be run from a personal account. Thus, you can create only one advertising account and, accordingly, only one Facebook Pixel. To create more than one account and more flexible management of all pixels, pages, applications, we recommend using Facebook Business Manager.
Facebook Business Manager is a tool for managing all Facebook resources and sharing them with other users. In Business Manager, you can manage apps, pages, and ad accounts. You also have the ability to upload product catalogs, create posts, add payment methods, and more. For efficient management of all projects, you can create multiple cabinets.
Find out more: Facebook Business Manager: full overview of features and capabilities
If you are creating an ad on Facebook for the first time, you will also create an ad account.
To create it, you will need to specify its name, the company that will control it, time zone, payment method and currency.
Account currency is the currency used in the ad account for billing. Facebook writes that it regularly adds new payment methods. The Ukrainian hryvnia is not yet available, but the supported currencies are the Russian ruble, euro and US dollar. Once every 60 days, you can change the currency to pay for ads on Facebook, provided that you do not have a current balance. But when you change the currency, you will have a new advertising account created. In some countries (such as Brazil, Nigeria, and Venezuela), the ad account's company country must match the currency.
By creating an ad account in Business Manager, you'll have your campaigns, ads, and billing information all in one place. You can also share it with other people so they can manage your ads.
To prevent your advertising account from being blocked by the Facebook administration, it is enough to follow the advertising rules, which you can read here.
Now let's take a closer look at the functionality of the advertising account.
1. Top navigation bar
Here you will find sections such as "Audiences" and "Analytics", you can set up reporting and set automatic rules, edit settings and much more.
2. Search and filters
The search will help you find the campaigns, groups or ads you need, and the filter will leave those campaigns that you plan to analyze using specific metrics: the names and goals of advertising campaigns, gender and geography of the audience, recent changes etc.
3. Button to create an advertising campaign
With this button you will start the process of creating a new advertising campaign, which we will describe in detail in the next section.
4. Ad account overview
Here you will find general information about your ad account, such as: reach or amount spent on all ads created, a detailed breakdown of the amount you spent on ads in the last 7 days, and any spending limits that you have set for the account.
5. Overview of advertising campaigns
In this tab, you can create and manage advertising campaigns: duplicate and edit existing campaigns, set up columns, and split the results according to the required metrics.
6. Overview of ad groups
Here you can create new ad groups within an existing campaign, edit, duplicate and view results.
7. Overview of ads
In this tab you can create new ads within an existing group, edit, duplicate ads, view their results.
8. Columns
Select one of the columns with the metrics you need or customize them yourself.
9. Campaign Breakdown
Here you can break down existing campaigns based on factors such as age, gender or placement.
10. Date Range
With this feature, you can set a specific date range so that advertisements are shown only for a certain period of time.
11. Campaign results
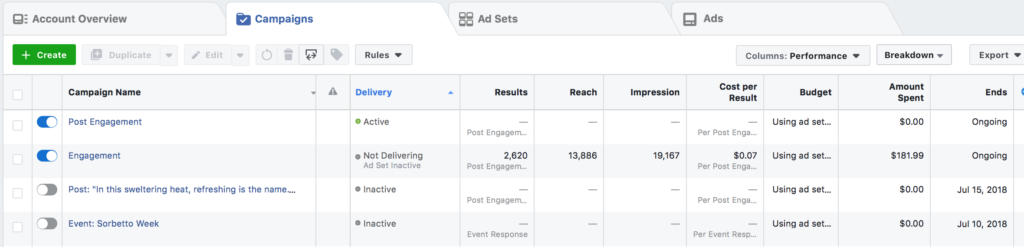
Here you will see the results of your active and inactive campaigns according to the selected columns.
Reports
Create standard or custom reports, export performance data as Excel or CSV files, and share reports with users who work with your ad account.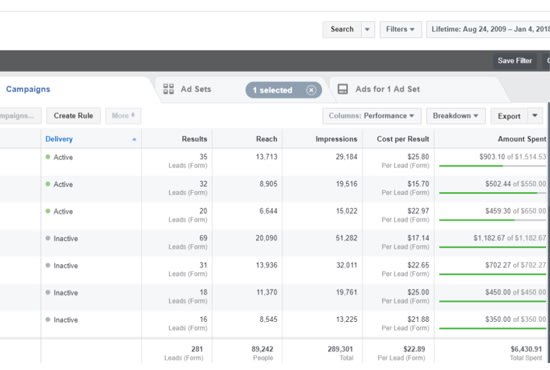 You can also filter out those campaigns that you want to pay special attention to. If you need to send them to colleagues or a client, you can create a shortened link.
As we mentioned in the first section, you can start creating an ad campaign in Ads Manager using the "Create" button.
At the campaign level, you can name the campaign, define the budget, purchase type and select the advertising objective. Let's take a closer look at target selection.
The first step is to select a target. It is chosen according to your tasks - what you want to achieve. Choosing the right target will help you get the most effective results.
What are the goals?
The target list is subject to change. If you have a new ad account or use its functionality infrequently, you may have fewer options. With its active use and taking into account many other aspects, you will probably be the first to receive all updates to the advertising account.
The goal you choose is also your way of optimizing. If you select the "Traffic" goal, the algorithm is optimized for those users who are more likely to click on the site, if "Application Installs" - for those who are more likely to download the application.
A little test of practical understanding: Let's say you've posted a blog post and published it on your business page. You want to promote it to increase the reading of the article.
What advertising goal will you choose?
If you select Engagement, you will get interactions: ads will be optimized for those who like, share, comment, and make any other interactions. This means that if 9 out of 10 interactions are likes, then with this chosen goal, you will get a lot of likes for the article, but not transitions to the site.
If you want to get readers, then you should stop at the "Traffic" goal. In this case, the algorithm will be optimized for those users who click on the article.
If you want blog subscribers, for example, then your goal is Conversion. It will allow you to optimize impressions for those who subscribe to your blog. To do this, you need to use Facebook Pixel. About what a pixel is and why you need it, read our article.
⇨ The target is selected for optimization, but it is important to understand what you need to optimize for.
Another situation is also possible - adjacent goals with the same result.
For example, your task is to get leads. These can be collected through goals such as Lead Generation and Conversion. What to choose in this case? Let's simulate:
First, let's look at the cost per conversion:
↳ Lead Generation goal — $1. Goal "Conversion" - $3.
In this case, it is logical to choose the Lead Generation goal.
Next, we proceed to the analysis of the validity of leads:
↳ "Lead generation" - 10%, a valid lead will be $10. The “Conversion” goal is 50%, a valid lead will be $6.
Lead Generation loses in cost per valid lead.
But the analysis does not stop there, if you control the unit economy and end-to-end analytics.
The average check for valid leads through the Lead Generation objective, for example, may be higher, but CLV lower. Then, if we measure the average check and we have a one-time purchase, then perhaps the goal of "Lead Generation" can be more cost-effective. In any case, measure everything in terms of money.
If you're measuring results by taking into account the total amount of revenue for a customer, then you should stick with the Conversions goal.
⇨ The main point of your campaigns is profitability. Therefore, it is important to test the goals and see the results for different metrics.
Budget is the amount of money you will spend to show ads to people. It is also a price control tool.
By setting the budget at the campaign level, the system spends it automatically on the best results among all ad groups within the campaign.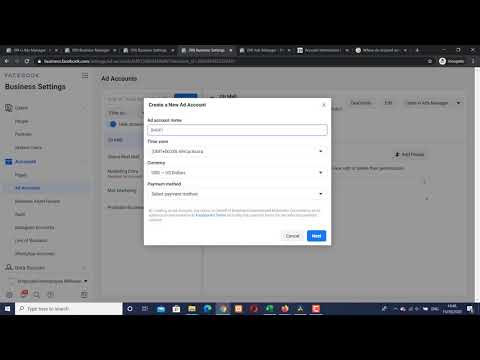
But the best results for the system may not necessarily be the best for you. Let's imagine that you have created several personas, and the results in groups of some persons are more expensive than the results in others. In this case, the system will spend the budget on the group with cheaper results. But after analyzing the groups, you can see that the cheaper groups have much lower CLVs. To manage this, set a budget at the ad group level.
For example, select the "Conversions" goal at the campaign level and start creating an ad group and give it a name. Next, select the place where you want to drive traffic - website, application, Messenger or WhatsApp. Having determined the required entry point, the system will request clarification. For example, if you select "Website", the system will ask you to select a Pixel with events to track and optimize for conversions.
Next, Facebook suggests creating dynamic creatives or offers.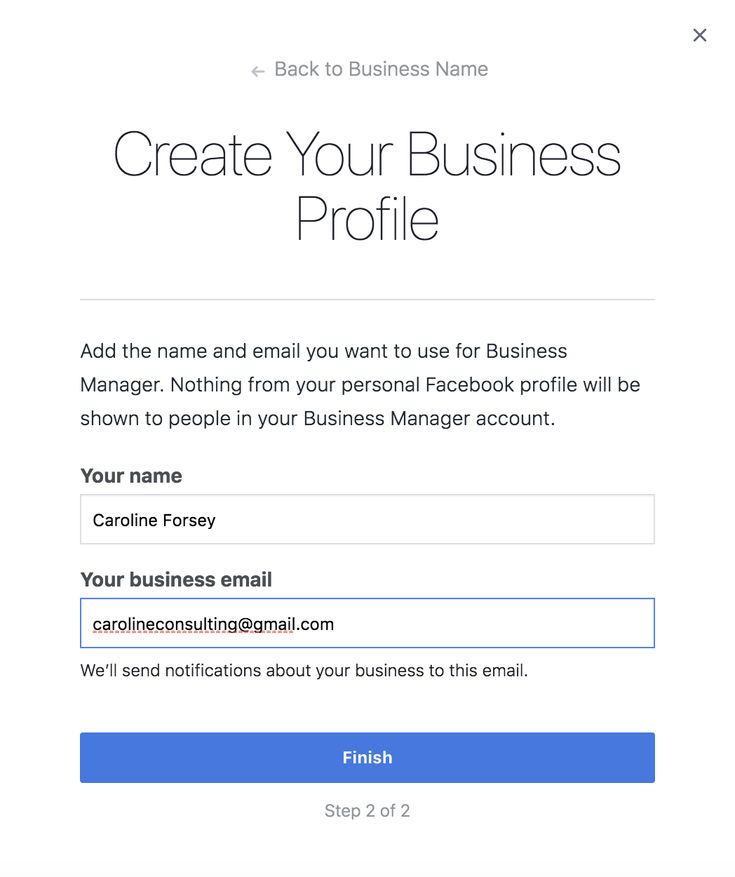
You just need to upload images, headlines and other creatives, and the system will automatically create combinations, selecting several components (for example, images, videos, headlines, descriptions, etc.) for a given audience. You can read more about them here.
Offers are discounts that you offer Facebook users to encourage them to make a purchase online and/or offline. When a person sees your offer in the feed, a person can not only like it and leave a comment, but also save it in the Offers tab. Facebook will remind the person of the saved offer up to three times, depending on their personal notification settings.
Here you define how much you want to spend and set the period for which the ad will be displayed. The budget can be set daily or immediately for the entire duration of the advertising campaign. If you select "daily budget" your bid can be correlated throughout the week, and if you select "lifetime budget" - throughout the entire period.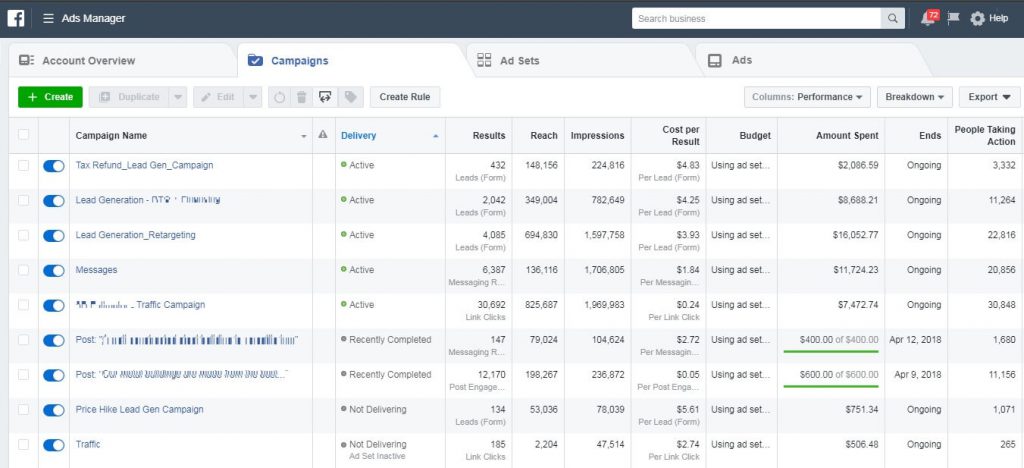 You can also set an end date for your campaign, which will be disabled automatically.
Next, we move on to choosing the target audience: create a new one or use the saved one.
When you create a new audience, you include or exclude the collected audience lists for retargeting or look-alike audiences.
You can also specify socio-demographic (social) targeting:
Creating multiple ad groups and using detailed targeting in them can lead to audience saturation. This issue can occur if you are targeting with different conditions by including and don't use exclusions. For example, the same user can simultaneously be included in an interest group and in a group who visited the site. How to prevent the problem of audience attrition in advance, read our article “Audience satiety: How to avoid early and correct it in time”.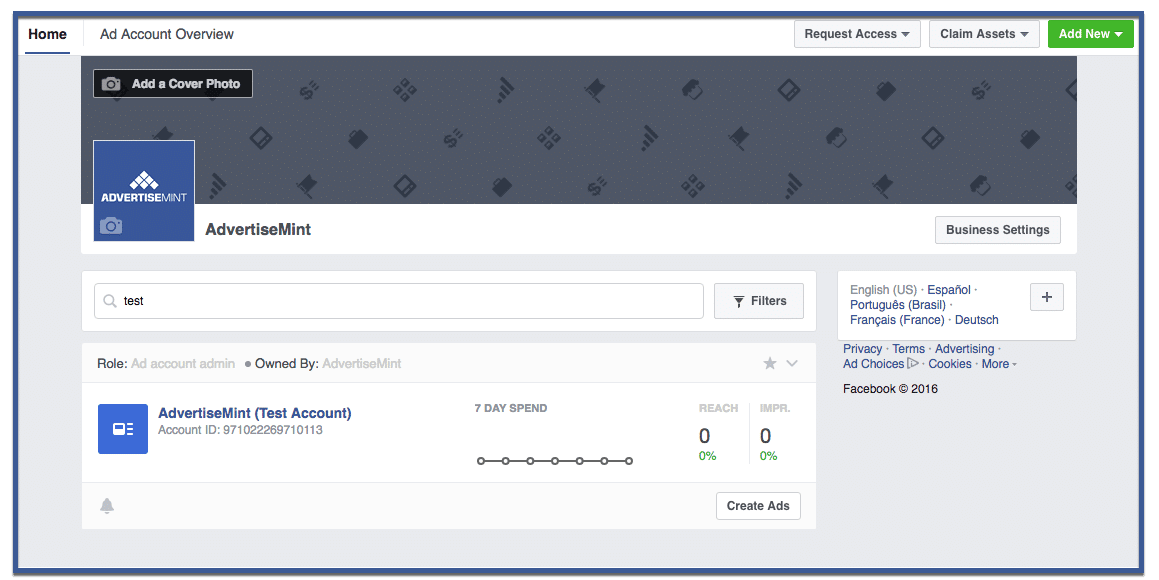
You have the option to include, exclude, or target friends of users who follow your business page or use your mobile app. You can also include or exclude people who checked in to the event.
Placements include 2 categories: device types and platforms.
In device types, you can select desktop and/or phone to select the devices on which ads will be displayed. On the platforms, you define the ad zone (location) where your ad will be shown - on Facebook, Instagram, Audience Network or Messenger. When editing placements, you can select not only certain devices and platforms, but also configure additional settings.
Platforms and device types can be separated into different ad groups for content customization and testing. But we recommend combining them for more effective optimization. However, it is important to see how ads will look on all devices beforehand at the ad level.
Next, let's move on to choosing the option to optimize ad display.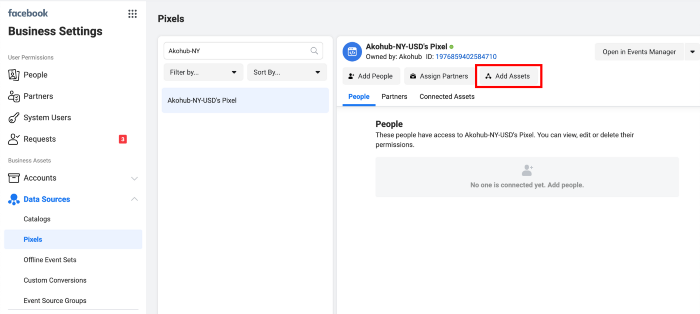 It will help the system understand how to deliver your ad. If you select "Conversions", the algorithm will select the audience that is more likely to make the specified conversion on the website. Delivery options depend on which advertising objective you are using.
When creating a Facebook ad campaign with the Conversions ad objective, you can choose the following types of bids to optimize: your ads with different intensity to all users from your targeting. "Impressions" - with a frequency of up to 4 per day, "Daily reach among unique users" - up to 1 per day.
One of the important steps in setting up an advertising campaign is choosing a bid strategy.
In order for the right audience to see your ad, you must win an auction with other advertisers. In the Facebook auction, the ad with the highest "total value" wins. The total value is not the amount you are willing to pay to display your ads. When determining this indicator, 3 factors are taken into account:
The rate is how much you are willing to spend. It controls the cost per result in case the auction wins and the impression is completed.
There are 2 bid strategies: Low Price and Target Price. Read more about them in our article How to Choose a Facebook Bid Strategy.
This parameter determines how fast your ad will be shown. You can use standard mode or set up accelerated impressions to get results faster. In the second case, your bid will be raised in order to get a higher place in the auction and get more impressions.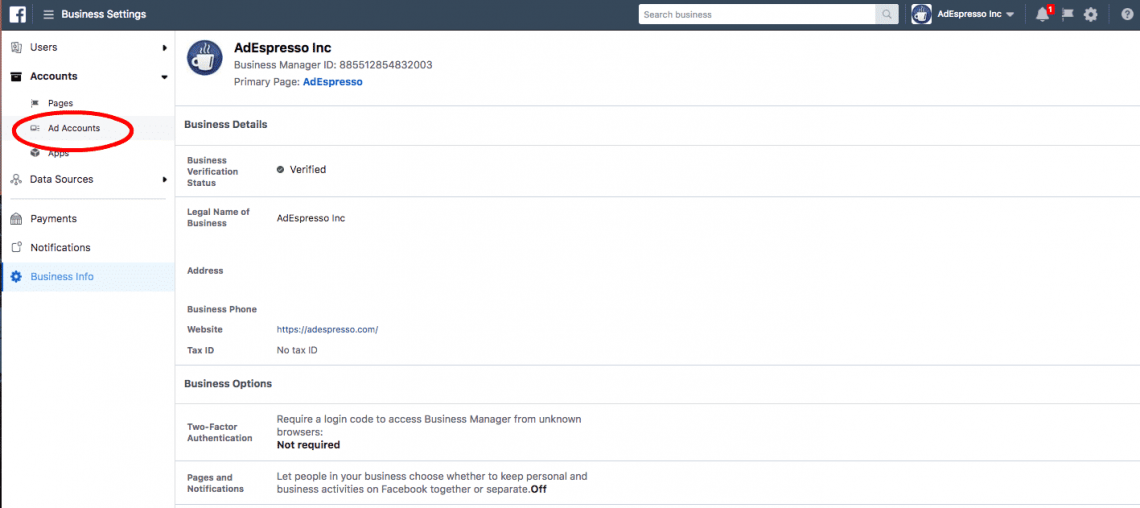
Let's start creating an ad creative.
First you need to choose from which page the advertisement will be shown. If you have specified Instagram as one of the placements, you must also specify the desired account here.
Facebook offers several ad formats to choose from. Choose the appropriate format depending on the purpose of promotion and content.
Upload your own photos or use stock. On the right, you can find the image parameters recommended by the social network for the best selection of pictures. You can create up to 6 ads at the same time. You can find all the recommendations from Facebook on creating creatives in the "Creative Center" section.
All ad settings occur on the left side of the page. On the right is a preview of your creative in different placements.
Next, you fill in the required fields: title, text, link to the site, call to action, etc.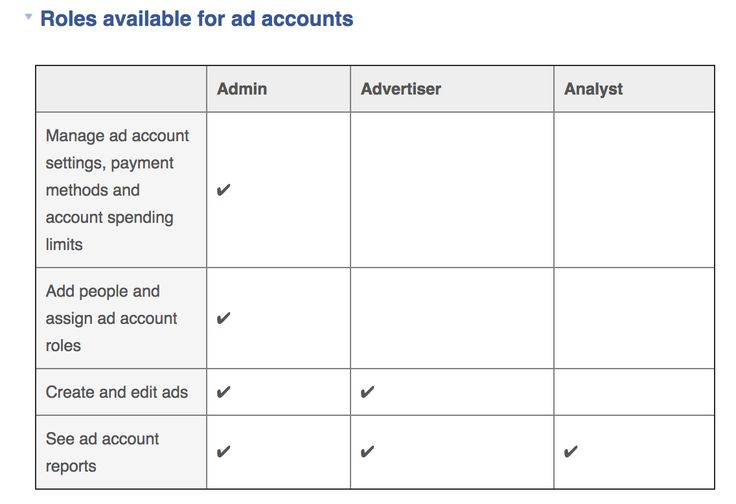
When the ad is ready, click the "Confirm" button and your advertising campaign will be sent for moderation.
It is important to remember that the effectiveness of an advertising campaign is determined by the communication in your creatives - the settings only correlate the cost per result. The target audience makes decisions according to what they see in the advertisement.
We have analyzed the creation and setup of an advertising campaign from A to Z. But how to apply this knowledge correctly and get effective results?
If you have a website or mobile app, before launching an acquisition campaign, start by setting up a retargeting campaign.
For this you need:
Why start with retargeting? While you are setting up an advertising campaign for a cold audience, you will be able to start communicating with existing traffic.
Retention (retargeting campaigns) is a system promotion. And its task is to reach all relevant users/visitors and lead them to the final goal. At the same time, each stage of the funnel needs to be improved by increasing the Conversion Rate. In the case of acquisition campaigns, it is important to test in order to find the most profitable cost for achieving the goal.
If you are sure that your audience is of high quality, then the percentage of the target audience tends to 100. In this case, you do not need to worry about the type of delivery and optimization of the advertising campaign. In this case, the goal is to reach everyone. Choose the Reach objective to reach everyone in your sample and get a lower CPM.
If someone has already worked with the sample before you and you are not sure about its quality, then stop at the “Traffic” goal and optimize for clicks to reach only those who are more likely to want to receive your offer.
If the audience is of poor quality, then select the "Conversions" goal and optimize for conversions. You will lose volume, but at the same time you will not spend money on inappropriate impressions.
To be sure that you have chosen the right goal, we recommend testing and analyzing the results. The selection of an advertising goal for retargeting is the search for the ratio of the optimal price per result to the number of results received.
If you're getting sales for, say, $10 per unit for the "Conversions" ad objective, but your KPI is $15, try switching to the "Traffic" ad objective. The cost per result will likely fall while still being within the KPIs, but sales volumes may rise as more people see your ad.
If you don't plan on active promotion, it's definitely worth launching retargeting campaigns.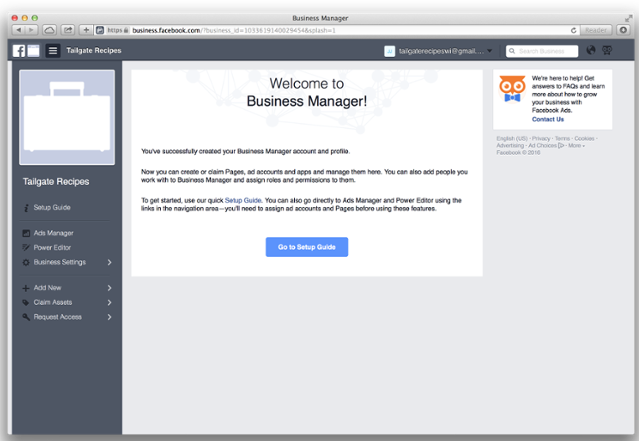 This will help you reach the entire loyal audience and lead the funnel to the result for a penny. Most of the spending is always on acquisition campaigns. If you don't have enough budget, run only retargeting campaigns.
Planning and implementing acquisition campaigns is completely different from retention campaigns.
The first stage is testing. Persons are created, a number of messages for each of them, a list of target groups, and saved audiences (targeting combinations) are loaded. Additionally, saved audiences are created based on data, and not only on portraits of the target audience (lookalike audiences from the database, lookalike audiences from events, etc.).
When testing is in progress, you need to move on to stabilizing the results and optimizing them. How to do this, we described in detail in the guide “Optimizing and scaling Facebook advertising campaigns”.
With the help of this article, you will be able to create and set up an advertising campaign without any experience with Facebook Ads Manager.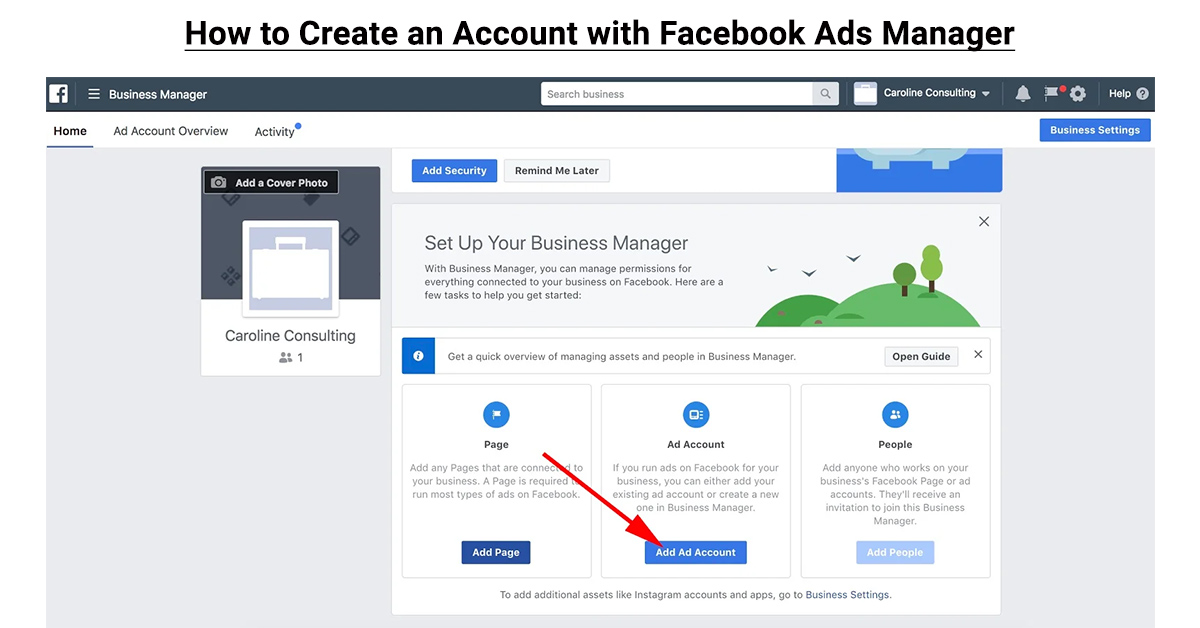 In the process of improving your skills, you will understand how you can manage the settings to get more effective results from communication with the audience.
Important points that we would like to summarize: