Free Download
Category: iOS Data Recovery
3 mins read
Your Viber account no doubt contains a lot of memorable photos that you may want to save to your Camera Roll so you can share on other applications. If a friend on Viber has sent you a particularly memorable or important photo and you are wondering how you can save it to your iPhone's camera roll, you've come to the right place. This article will share with you two different ways to save photos from Viber on iPhone, even you are using iOS 12/13/14/15/16 on your iPhone. Read on to find out how to do it.
In this article:
To save Viber Photos to your Camera Roll, you have to turn on the option in Viber. Follow these simple steps to do it.
Step 1: Open the Viber app and then tap on "More" from the menu at the bottom.
Step 2: Tap on "Settings" and then "Media" and switch on "Save to Gallery".
Step 3: Now head on over to the Settings app on your iPhone at tap on Privacy > Photos and the make sure that Viber is turned ON.
All your photos should now appear on your camera roll automatically.
A better way to keep your photos safe is to save them to your computer. As a matter of fact, we have a solution that allows you to not only save your Viber photos to your computer but all your messages and call history as well. This is a good way to have a backup of your Viber activity just in case you lose some of the messages.
This solution comes in form of an iPhone data transfer tool known as iMyFone D-Back that also comes in handy when you want to backup all your Viber messages and their attachments to your computer. Some of its features include the following.
Key Features:

Try It Free
Here's how to use iMyFone D-Back to save your Viber messages and their attachments to your computer. The steps work for iOS 16, also.
Step 1: Download and install the program to your computer and then launch it. On the main window, click on "Recover from iOS device" and then click "Start" to begin.
Connect the iPhone to the computer using USB cables and then click "Next" once the program recognizes the device.
In the next window, select "Viber" and then click "Next." to start the scan process.
When the scanning process is complete, select the Viber messages and their attachments that you want to save to your computer and then click "Recover" to choose a location.
iMyFone D-back is a highly recommended data recovery software that helps you easily recover all the deleted viber data from iPhone. It can help you recover or save photos from viber in one-click. Just download iMyFone D-Back to save all your Viber data including photos, messages, call history to your computer! The latest iOS 16 can be supported, also!
Try It Free
(Click to rate this post)
Generally rated 5 (256 participated)
Rated successfully!
You have already rated this article, please do not repeat scoring!
Home > iOS Data Recovery > Two Ways to Save Photos from Viber on iPhone

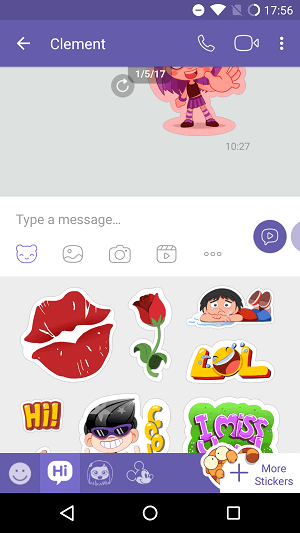
Follow the steps below to automatically save received Viber photos to Camera Roll:
1. Open your Viber app.
2. Tap the three dots at the bottom right corner of your screen. It’s the More icon.
3. Choose the cogwheel button or the Settings tab.
4. Look for the Media option. Tap it to go to the next menu.
5. The settings regarding all your Media files will be found here. Whether for your photos, voice messages, and other media content. At the upper part, you will see the Save to Gallery tab. Swipe right the button or just tap it to enable the said option. The button should turn into color purple indicating that the feature is activated.
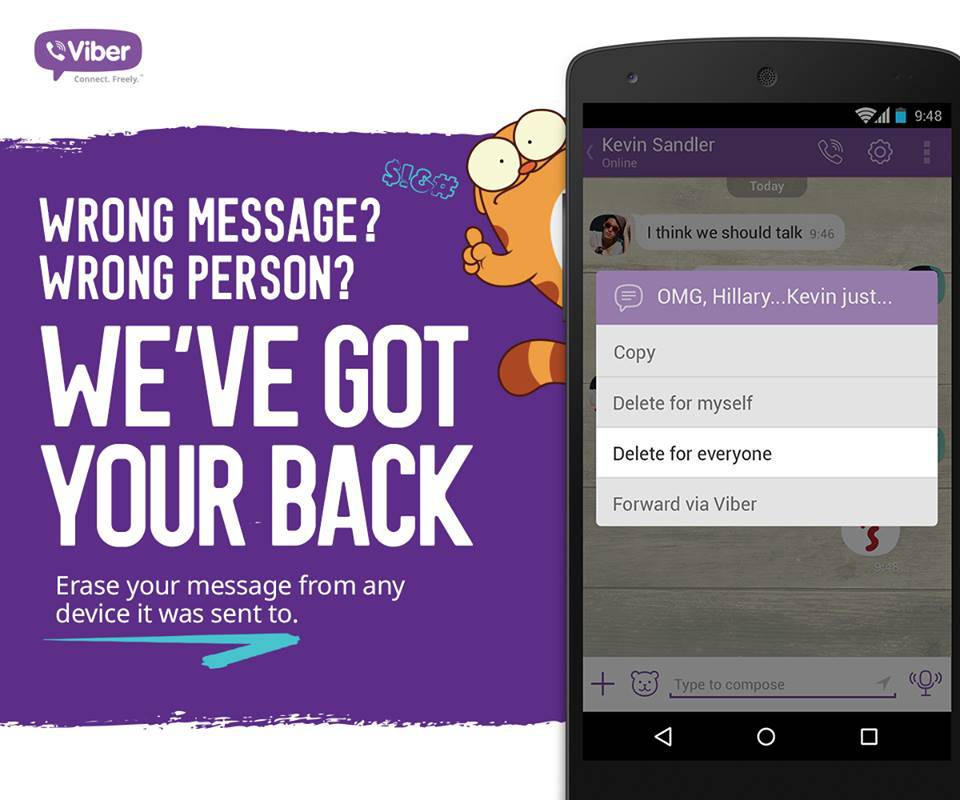
If you’re in a group chat that sends photos regularly, your phone storage might get in trouble. The best option is to sort and save photos manually. All you have to do is open the image. Then tap the share button. If you’re not familiar with this button, it’s the square icon with arrow up. After that, a pop-up window will appear. Choose the Save to Gallery tab. And that’s it.
Q: Will this method only save images? How about those video messages?
A: Even though it says only photo messages, videos are also included. If you’re not connected to a Wifi connection, it might take a lot of your data allocation. Consider manually saving your photos and videos.
Q: Does it carry the same image quality of the photo?
A: You may send and receive images on Viber up to 250 KB. It’s being compressed for easy downloading and saving. But, you can still view the picture as clearly as it should. If you’re in a data mode and having an issue about the downloading of the photo, check your settings. Be sure to disable the Restrict Data Usage menu.
Q: Will the pictures that have been saved to my camera roll stay in my chat history?
A: The Viber app keeps downloaded media files in your conversation. Even if the photos or videos had been already saved to your camera roll or photo gallery. Unless you’re subscribed to delete your media files through the Keep Media option. Which will automatically remove files older the time you set.
Q: Why it’s not working on my phone? What’s the problem?
A: The problem might come in many different aspects. First, make sure you’re using the latest Viber application. You can easily update your app in your Google app store or App store for IOS. Second, enable the Auto download photos if you’re using your cellular data. Next, check your storage. You might not have enough space to download those photos. And lastly, your app might be infected by a bug. This can break or damage a photo.You may try to delete and reinstall the app.
If you plan to save your photos using the manual process, make sure to turn off the Save to Gallery options as it will keep downloading and saving your received photos to your Camera Roll. To make the most of this feature, it’s recommended to use a wireless connection because media files like photos and videos consume huge data amount.
You just learned how to save Viber photos to Camera Roll. If you have questions about any of the steps above, let us know in the comments.
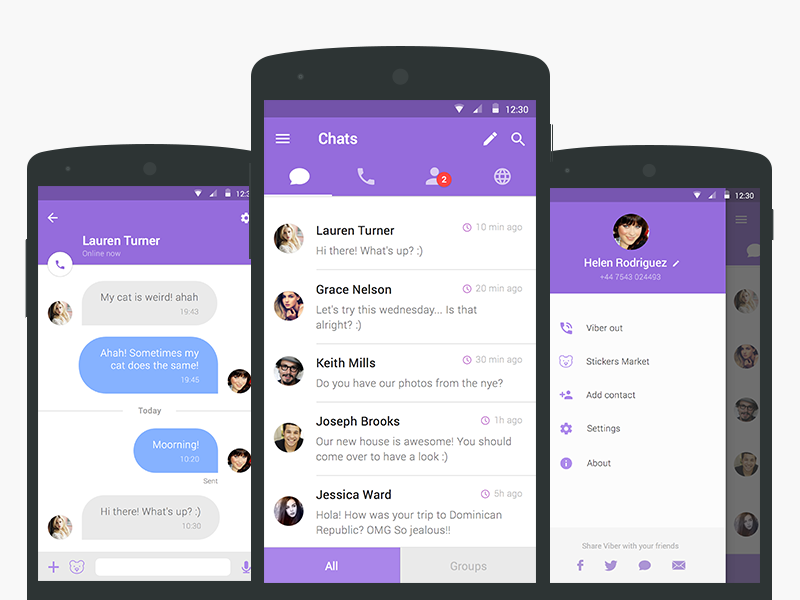
Viber is a mobile application known to everyone through which you can communicate with your friends who also have this application installed. The main advantage of Viber is its free use, where calls, messages and file sharing are available to you in unlimited quantities. Viber is not tied to your location, so by communicating with people from another country or another mobile operator, you also save money on cellular communications. And this is not all the advantages of the Viber mobile application. 9Ol000 applications are free calls and sending messages, all users can also exchange files of various formats. These files include:0003
The most important thing is that when exchanging photos and other files through Viber, the original quality is not lost.
To send media files, just click on the gallery icon at the bottom of the text window and select the object of interest. After that, it is immediately sent to the desired contact. This feature is absolutely free and does not set a limit on the number of files sent. You can select up to 20 files from the gallery at a time and send them in one message. Your interlocutor, having received photos or other files, can save them on his phone and vice versa.
If a photo has been sent to you, you can set the save function on the Android OS in two modes: save only the objects you select manually or save all sent files to the smartphone's gallery.
Save photos manually with ViberThis method is suitable for those who do not want to litter their phone and save all sent photos on the device. Using the manual function, you can select only photos that are important to you and leave them on your phone, either in a separate folder called “Viber”, or in a common folder with all photos. To perform this action, you need:
Saved photos can be edited, sent to other users or modified using additional programs.
If you don't want to miss anything, you can set up the auto-save feature for photos on your phone. To do this:
After that, re-enter the application to update its settings, and in the future, all photos sent to you will be saved on your phone in the "Viber Images" folder.
If you like the photo that is set on the profile of one of the contacts, you also have the option to save it to your phone. However, you will have to work a little here, since you won’t be able to do it directly through Viber:

Choose the contact photo you need and then just hold your finger on it for a few seconds. When the photo is highlighted, a toolbar will appear on the screen where you need to click on the list of available functions (vertical three dots). In the options presented, select "Copy", and then the folder in which you want to save the photo. The best option is a folder on the memory card "DCIM".
Now let's look at some of the difficulties that you may encounter when setting up Viber and saving photos: .
It can be replaced by another option "Auto download over Wi-Fi" and "Auto download over GSM network". Activate these two items. It all depends on the installed version of the program on the phone, but you can still determine the meaning of the option by the name.
In this case, tactics change. After selecting, you need a photo with a contact, select the "Share" button on the toolbar and then click "Save to Favorites". A snapshot of the contact will automatically appear in the gallery, in the Favorites folder.
There may be two reasons for this - you made the settings incorrectly or your mobile device simply ran out of free memory, so you will need to clear the storage.
If mobile Internet traffic is limited by the network operator, then it is better to turn off the “Auto download over GSM network” option so as not to exceed the limit.

Most often, problems arise when setting up autosave. Users complain that not all photos are displayed in the gallery. This happens due to slow Internet, most often through a cellular network. There is an exit. After connecting to Wi-Fi, try to update this function and double-check if it works. Most often, these violations are eliminated.
Posted by Updated by
Viber is a great communication tool. With it, you can save information about your life, work, leave evidence of negotiations, important moments in business, correspondence with loved ones. The choice of storage option depends on the type of information. How to save photos from viber to gallery? Understanding this is not always easy, and therefore on the road.![]() Like real navigators, we will guide you through the labyrinth of viber features.
Like real navigators, we will guide you through the labyrinth of viber features.
Article plan:
In the messenger settings there is an option to autosave received photos. When selected, her photos will be automatically saved in the gallery. You can see photos, pictures as soon as you enter the viewer.
There is a "save as" option in the PC version of the messenger.
You can use it as follows:
The possibility of automatic saving also exists for videos. You can configure the function by going to the settings in the "media data".
To view saved files:
On the PC, the user has the ability to set the file saving address himself.
Viber allows you to leave not only media files, but also regular correspondence. One way is to take a screenshot of your phone or computer. On a smartphone, it will automatically be saved in the gallery. On a PC, the resulting image can be opened with any graphic editor, select the location where it will be stored.
However, there are more convenient ways:
 On iPhones, iPads, dialogs are saved on iCloud. The backup option is not available on PC;
 These methods allow you to leave only text messages in memory, media files will be lost.
The situation is different with saving groups, public chats after reinstalling the viber, installing its updates, changing the smartphone.
Your profile in general chats, correspondence will be saved automatically. Immediately after the messenger is reinstalled, you can resume using the possibilities of group dialogues in full.