- Your business can reach large audiences. Facebook is considered one of the “Big Four” of social media.
With a platform regularly attracting so many people, it’s a well-worth shot at giving your brand more exposure and prospects.
When setting up a paid Facebook ad, there are a lot of boxes to be checked.
Are you targeting the right people? Did you choose the right bidding model for your ad? Are you running the right type of ad? If we're being honest, it can get a little confusing.
To help simplify the process for you, we're breaking down the step-by-step process of running an ad on Facebook. And to make it even better, we put together a checklist to help you keep all of your campaign details straight.
With this resource in hand, let’s dive in to help you build the right ad for the right audience on this expansive platform.
With more than 2.9 billion people using Facebook every month, and nearly 1.9 billion users every day, Facebook offers a unique opportunity for marketers to augment their organic efforts.
The trouble is, with both an investment of time and money on the line, there's not much room for oversight. To capitalize on this platform’s audience and effectively create and run Facebook ads, you must first learn Facebook Ads Manager.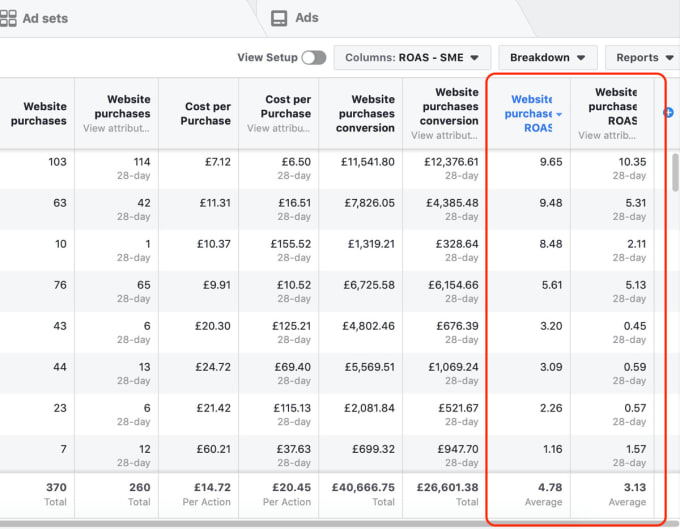
Facebook's Ad Manager is a sophisticated dashboard that provides users with an overview of all their campaigns.
Facebook Ads Manager features, otherwise labeled Ads Center features, are divided into four parts:

Featured Resource
To use the Facebook Ads Manager, you'll need a Facebook Business Page (learn how to set one up here).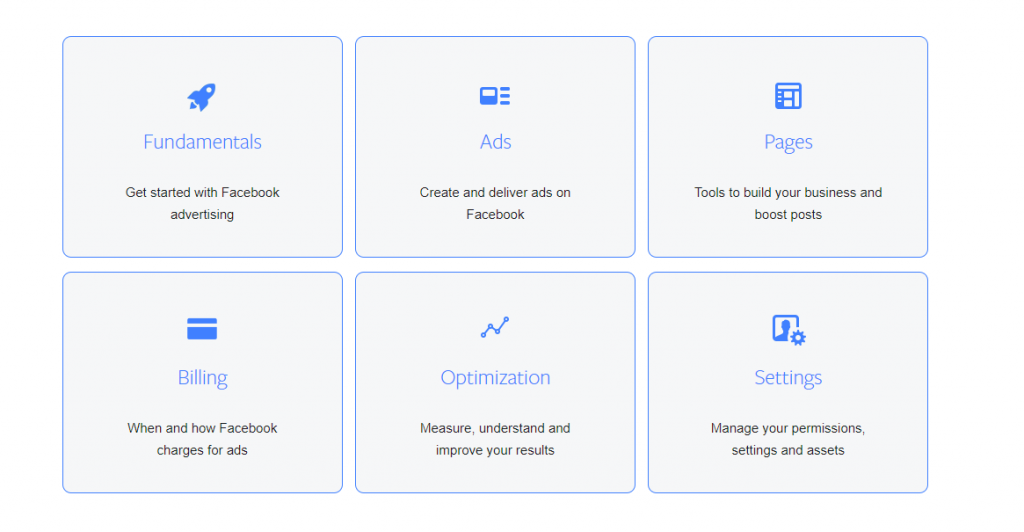 This is because you can't run ads through personal profiles.
Then, follow these steps:
Once set up, the Ads Manager becomes the control center for your Facebook ads.
Once you log into the Ads Manager, you'll see a performance dashboard where all of your campaigns, ad sets, and ads will be listed including the results they've driven for your Facebook page. Unless you've already created an ad for your Facebook page, this dashboard will be empty.
To create a new campaign, ad set, or ad through the Facebook Ad Manager, tab over to the type of ad you want to create and click the green "Create" button to far left of these ad types, as shown below. You can see from this screenshot that we're currently set to create a New Campaign.
Facebook's Ads Manager, like many social media advertising networks, is designed with your campaign objective in mind. Before getting started, Ads Manager will prompt you to choose an objective for your campaign:
There are 11 different objectives to choose from. The list includes everything from general brand awareness, to getting installs of your app, to increasing traffic to your online store.
By choosing one of these objectives, you're giving Facebook a better idea of what you'd like to do so they can present you with the best-suited ad options. As shown in the screenshot above, Facebook's ad options include:
Let's say, for sake of this blog post, you're looking to drive more traffic to your website. When you select this option, Facebook will prompt you to enter the URL you're looking to promote. If you're using marketing automation software, be sure to create a unique tracking URL with UTM parameters for this to ensure that you'll be able to keep track of traffic and conversions from this ad. For HubSpot customers, this can be done using the Tracking URL Builder.
Once selected, Facebook will then display the ad option that makes the most sense in terms of achieving this objective.
Don't forget to download the Facebook Ads Checklist and save it for Facebook ad campaign best practices.
Your next step is to configure your target audience — you can do this for each ad set that belongs to the same campaign. If you're just starting out with paid advertising on Facebook, it's likely that you'll have to experiment with several different targeting options until you reach an audience that fits just right.
To help you narrow your focus, Facebook's targeting criteria are accompanied by an audience definition gauge. This tool — located to the right of the audience targeting fields — takes all of your selected properties into consideration in order to come up with a potential reach number.
If you're wavering between choosing a specific audience over a broad one, consider your objective. If you're looking to drive traffic, you'll probably want to focus on the type of people you know will be interested in your offering. However, if you're looking to build brand awareness or promote a widely appealing offer, feel free to focus on a more general audience.
Facebook's built-in targeting is vast, including options such as:
You also have the option to select a Custom Audience — this allows you to target people on Facebook who are in your company's contact database, visited a page on your website that has a tracking pixel, or use your app or game. To learn more about how to set up a Custom Audience on Facebook, check out these instructions. (And for more on the specifics of these criteria, visit this Facebook targeting resource.)
Once you find a group that responds well to your ads, Facebook allows you to save these audiences to be used again later — so you may not need to dive into this step once you've been running Facebook ads for a while.
Facebook allows you to set either a daily budget or a lifetime budget. Here's how they differ from each other:
The cost of advertising on Facebook isn’t bound to a set price, but instead differs on the scope and type of bidding model and strategy your business uses. These numbers are based on approximate rates derived from a 2020-2021 AdEspresso study on Facebook Ads Cost.
| Bidding Model | Average Facebook Advertising Cost |
| Cost-per click (CPC) | $1.00 |
| Cost-per-like (CPL) | $1.07 |
| Cost-per-download (CPA) | $5.47 |
| Cost-per-thousand-impressions (CPM) | $7.19 |
| Bidding Types | Bid Strategy |
| Spend-Based Bidding Based on spending full budget for most value possible | Highest Volume: Reach as many prospects as possible. Highest Value: Using the budget to maximize high-value sales over quantity. |
| Goal-Based Bidding Based on the value you want to achieve | Cost Per Result: Strive to keep costs amount to the cost per purchase to stay profitable, but not guaranteed to adhere fully. Return On Ad Spend: Aim to keep ad spend average to a ROAS control, but not guaranteed to adhere fully. |
| Manual Bidding Based on how much you can bid dynamically | Bid Cap: Setting a maximum bid across auctions; good for advertisers who understand predicted conversion rates. |
Once your model and strategy are determined, you can further specify your budgeting and turn to the advanced options — this option is linked at the bottom of the screenshot shown above. This section allows you to specify a few things:
Choose whether or not your want your campaign to run immediately and continuously or if you want to customize the start and end dates. You can also set parameters so that your ads only run during specific hours and days of the week.
Choose whether or not you want to bid for your objective, clicks, or impressions. (This will alter how your ad is displayed and paid for.) By doing so, you'll pay for your ad to be shown to people within your target audience that are more likely to complete your desired action, but Facebook will control what your maximum bid is.
If you don't want Facebook to set optimal bids for you, you'll want to opt for manual bidding. This option awards you full control over how much you're willing to pay per action completed. However, Facebook will provide a suggested bid based on other advertisers' behavior to give you a sense of what you should shoot for.
Delivery type falls under two categories: standard and accelerated. Standard delivery will show your ads throughout the day, while accelerated delivery helps you reach an audience quickly for time-sensitive ads (Note: this option requires manual bid pricing).
What do you want your ad to look like? It all depends on your original objective.
If you're looking to increase the number of clicks to your website, Facebook's Ad Manager will suggest the Clicks to Website ad options. Makes sense, right?
This ad option is broken down into two formats: Links and Carousels. Essentially, this means that you can either display a single image ad (Links) or a multi-image ad (Carousel) with three to five scrolling images at no additional cost.
A Links ad will be displayed like this:
A Carousel ad will be displayed like this:
Once you decide between the two, you'll need to upload your creative assets. It's important to note that for each type of ad, Facebook requires users to adhere to certain design criteria.
For single image ads, Facebook asks that users adhere to the following design recommendations:
For multi-image ads — also known as Carousel Ads — Facebook provides the following design recommendations:
Remember that these are the ad options for the "Traffic" objective.
If you selected "boost your posts," you'd be presented with different ad options like the Page Post Engagement: Photo ad. This ad has a unique set of design recommendations. To explore all of the ad options and their design specifics, refer to this resource.
Once you select an ad type, the Ads Manager will prompt you to identify how you'd like to display your ad. The options they provide are as follows: Desktop News Feed, Mobile News Feed, and Desktop Right Column.
Here's how each ad would appear:
Be aware if your ad isn't associated with a Facebook page, you'll only be able to run Desktop Right Column ads. To leverage all three display locations, you can learn how to create a Facebook Page here.
Once your ads are running, you'll want to keep an eye on how they're doing. To see their results, you'll want to look in two places: the Facebook Ad Manager and your marketing software.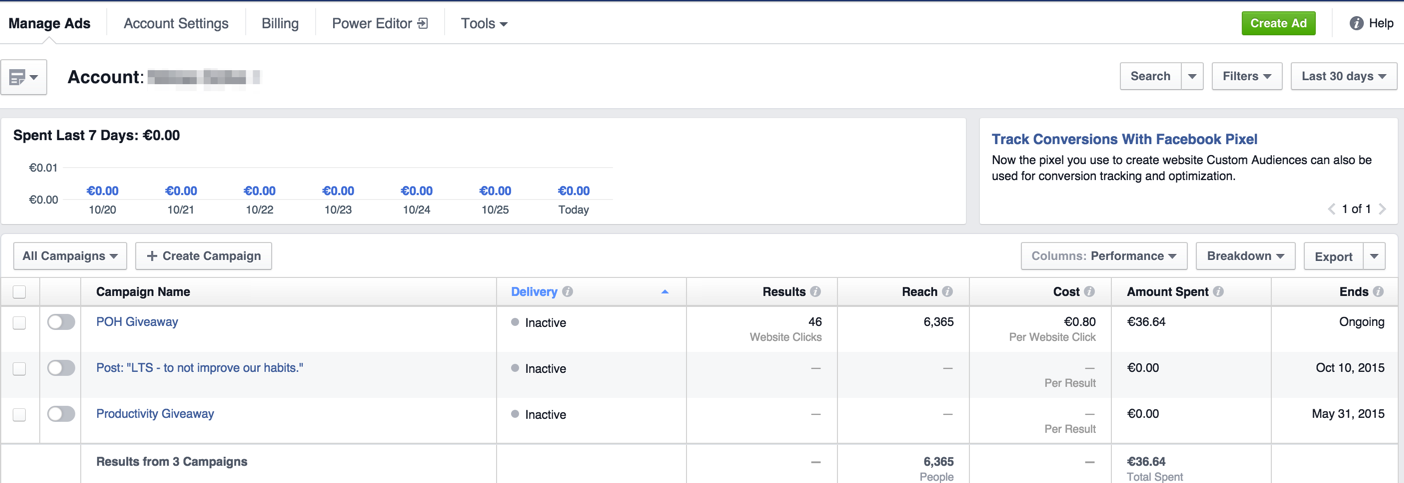
According to Facebook, here are some of the key metrics to look for (and their definitions):
 Can be further customized to include metrics like start date, end date, ad set name, ad ID, delivery, bid and objective
Regardless of which of these metrics you use to measure the success of your advertising efforts, you can find the data in the Ads Manager.
You can receive custom reports via email as well. Here's how to set it up:
While there are certainly a lot of details to keep straight when planning a paid Facebook ad, it's important that you don't lose sight of the big picture. Reporting on clicks and conversions from Facebook is important. However, if you're using URLs with specific UTM codes, you have an opportunity to measure your ads' full-funnel effectiveness using your marketing software.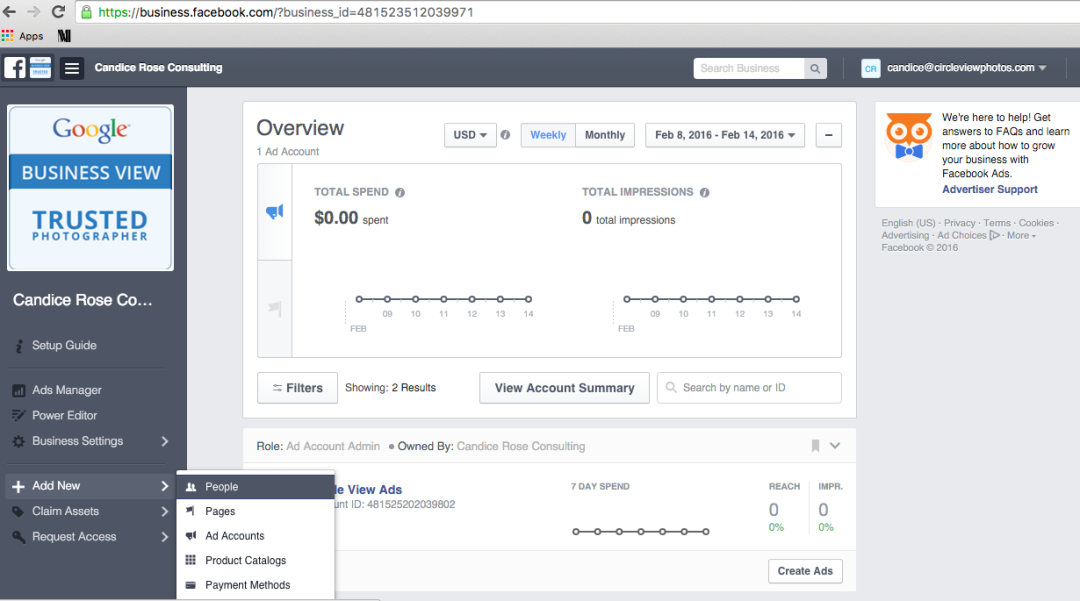
Tracking URLs will help your marketing software keep track of how many leads, or better yet, how many customers you've gained from your advertising efforts. This information is useful in determining the ROI of this source, and can also be used to inform your overall Facebook marketing strategy.
If you're a HubSpot customer using our ads tool, this process is already taken care of for you. You can also create unique tracking codes for your Facebook campaign by navigating to the Tracking URL Builder on the Reports Home page. All you'll need to do is plug in the URL, attach a campaign, and choose the source you want the URL to be attributed to in your Sources Report. Once your ad launches and you start getting traffic and conversions on your website, you'll be able to easily track how many visits, contacts, and customers you're generating.
Now that you know how to set up an ad, it's time to create one of your own so that you can spread brand awareness on Facebook and generate traffic and leads from your ideal prospects on the platform.
Editor's note: This post was originally published in September 2019 and has been updated for comprehensiveness.
Topics: Facebook Advertising Ad Management
If you’re running Facebook ads for clients, even if it’s just one client, there’s a right way and a wrong (very wrong) way to do it.
The wrong way is to use your own personal Facebook profile ad account to manage someone else’s Facebook ads. The very wrong way is to use your credit card to pay for ads and bill the client after, leaving you on the hook if they don’t pay.
In this guide, I’ll show you the right way to manage Facebook ads for clients, the same methods professionals with years of experience use to offer better service and limit their risk as much as possible.
Facebook has a tool called Business Manager that lets people invite guests to access and manage their Facebook Page and ad accounts, all while keeping billing information and other sensitive data separate and secure.
If you are the one managing Facebook ads for a client, you should request from the client to be invited to their Business Manager as an advertiser. If they don’t have Business Manager set up yet, ask them to have the owner of the business set up Business Manager (see below) before you do any ad management services for them.
Once they set up Business Manager, they can assign people a variety of user roles including admin roles for accessing billing information, managing accounts, making changes to assets, and inviting others to the Business Manager.
You don’t want access to things you don’t need so don’t request admin access which will open you up to unnecessary risk. Ask for employee access and then the appropriate access levels for the Facebook Page and ad account you will be working on.
Using the client’s ad account is considered a best practice for many reasons.
Some people doing work for clients believe that the ads they make and the campaigns they set up for their clients are their property and if the client quits, they don’t get to keep the ad creatives or intellectual property.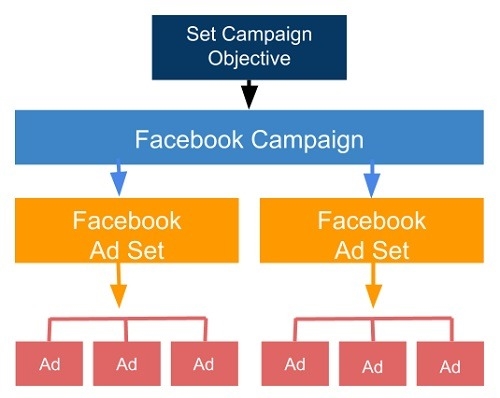 This is the wrong way to go about it and could have legal implications depending on your local laws. Instead, make sure you charge an appropriate fee for your services and consider a length of time obligation in your service agreement.
If your client needs help setting up Business Manager, I recommend jumping on a video call and having them share their screen so you can walk them through each step. Remember, they will have to be the ones who create the Business Manager on their account so they are the owner.
First, your client needs a personal Facebook account to start, then the process is simple: they need to go to the Facebook Business Manager page and click the Create Account button, then they must enter the name of their business and email address.
Then your client will need to add an ad account to their Business Manager. Once the ad account is added, it’s permanently moved to Business Manager.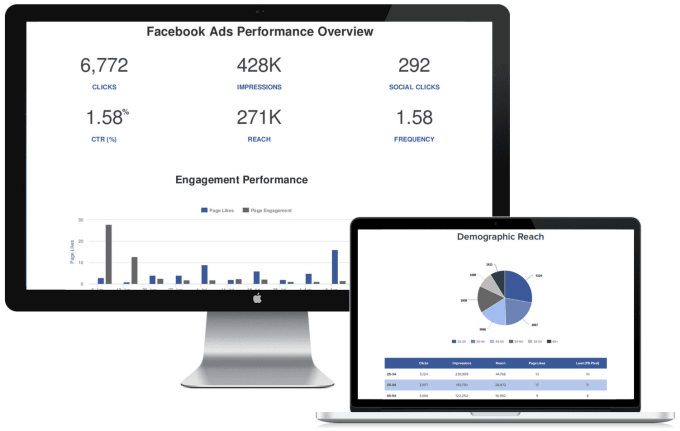
To add a new ad account, the client needs to head to Business Settings in Business Manager, click on Accounts, and then click on Add Accounts. They should see a dropdown menu with three options, one of which being to add a new account. Then proceed to complete the process.
To add people to Business Manager, the client needs to go to Business Settings, click Add People, and type the email address of the person they want to invite. Lastly, your client will have to click Next and select the role they want to assign. Remember to also have them give you access to the appropriate Facebook Page and ad account.
Here you can see I've been assigned access to the Revealbot page and the Revealbot ad account with permission to manage campaigns, view performance, and manage creative hub mockups, but without admin accessIf your client can’t add the current ad account to his Business Manager, they may not have confirmed their payment method yet. Business Manager also has an ad account limit. The number of accounts allowed is dependent on how much your client spent on Facebook ads. The bigger their budget, the more ad accounts your client will be allowed to own.
One of the biggest mistakes I see people new at managing Facebook ads for clients make is spending too much time on a client’s ad account. They want to make sure they are successful and are willing to go above and beyond to achieve it, but it often leads to burnout and more stress.
There’s a better way to manage Facebook ads for clients than checking their ad account every 30 minutes or putting in late nights making adjustments to get clients the best results. Instead, take advantage of Facebook’s automated rules which can automate basic tasks like pausing and starting campaigns at certain times of the day and week or turn off unprofitable ads before they waste too much budget.
It’s possible to automate much more using Revealbot’s automated rules, which compared to Facebook’s automated rules, allows you to write much more flexible and dynamic rule conditions. This means you can automate most of your ad management routine allowing you the time to just focus on making ad creatives.
With Revealbot automation for Facebook ads, you can essentially clone yourself and make automations that replicate your manual ad management routine. Revealbot rules can run every 15 minutes around the clock and perform actions as soon as certain criteria are met. The power of automations is it’s working 24/7, never takes a break, and never slacks off so use that your advantage to offer better Facebook ad services to your clients.
Take on more clients without hiring more people
Use Revealbot's Facebook ad automation to handle all your ad account management
Sign up free
✓ 14-day free trial ✓ No credit card required ✓ Cancel anytime
For example, here's a Revealbot automation that will prevent you from wasting budget by pausing ad sets with a ROAS below 1 after spending half the daily budget - all done automatically without you having to keep a close eye on your clients' ads.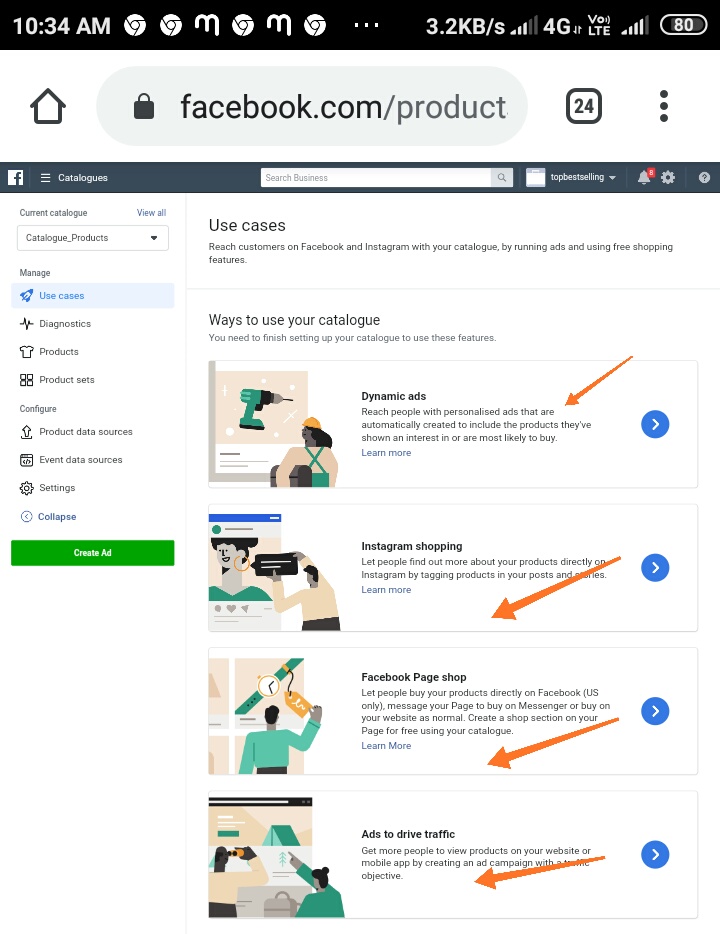
You can start a free trial and get the above automated rule by clicking the Revealbot Strategy below:
And if you want to learn more, here’s some essential Revealbot automated rules you should set up to save you time, save your client’s budget, and scale your client’s budget profitably.
Some clients want to know everything down to the very last detail, others just want a high-level update every month. The second kind of client is not a problem, but the first one is. Those types of clients can take up a lot of admin time you didn’t expect to spend, dragging down your pay per hour.
That’s why it’s important to set expectations before signing a contract or agree to work. Here’s a list of items you should establish and agree upon with your clients before starting work:
The answer to these questions may affect the price you want to charge for your services, so make sure all these topics are cleared up and established before sending a proposal and signing a contract.
In regards to goal setting, look at your client’s website, products, and offers and see if there are any red flags that might hurt the performance of their Facebook ad campaigns and provide some recommendations if necessary on their website design that might be hurting their conversion rates for your campaigns.
Remember to underpromise. You may be confident in your abilities based on your past experiences, but you’ll also want some cushion for the unexpected.
My biggest piece of advice when managing Facebook ads for clients is to always, and I mean always, ask for creatives from your clients far before you need them.
If you have to rely on the client to provide the creative, you never want to be stuck waiting for them to provide creatives while your current creatives are already suffering from ad fatigue. Not only do you never know for sure when the client will provide the creative, but you also never know if you need to send it back for revisions or have to wait for approval on any changes or copy you make on your end.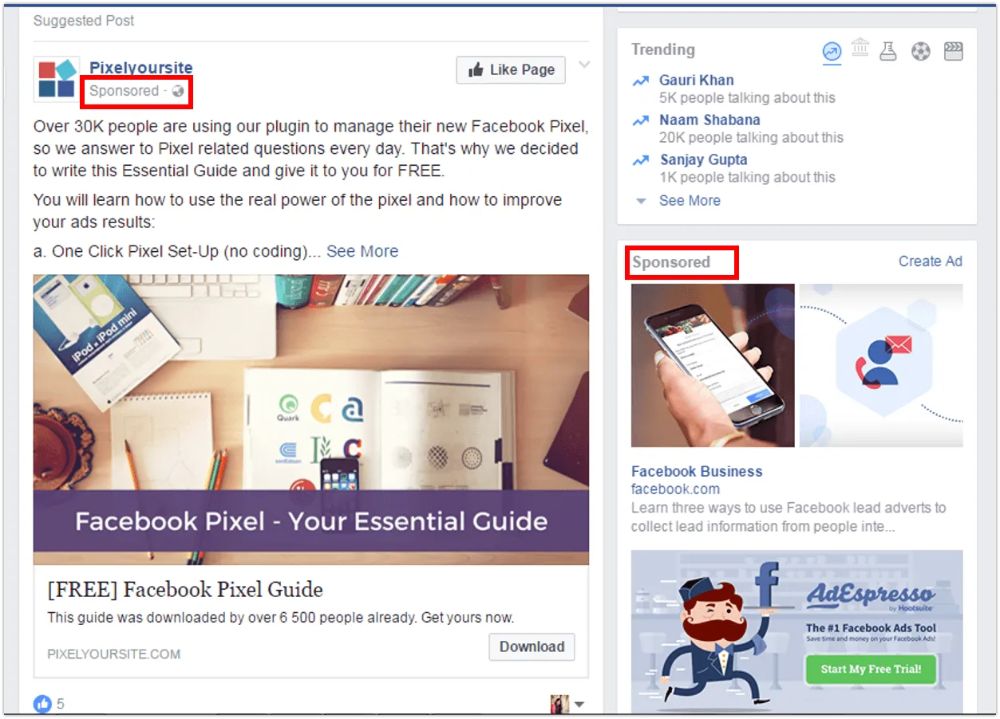
Then, you’re going to have to wait up to 24 hours for Facebook to approve an ad and start delivery. And during the busy times like Black Friday and the holidays, when many advertisers are running much higher volume than usual, it could take even longer to get your ads approved.
Lastly, your ads could be rejected due to some violation of Facebook’s guidelines, whether legitimately or not, so if you have the time, upload your ads into Ads Manager ahead of time to make sure they’re good to go.
By getting ad creatives from clients and preparing them for launch ahead of time, you can both be more confident in reaching your goals and also increase the client’s confidence in you through great communication and project management skills.
The most important thing to consider when managing Facebook ads for clients, other than actual performance, is how you provide reports to clients and how often.
Reporting is a vital component of building trust with your clients, but it can also be a huge time sink.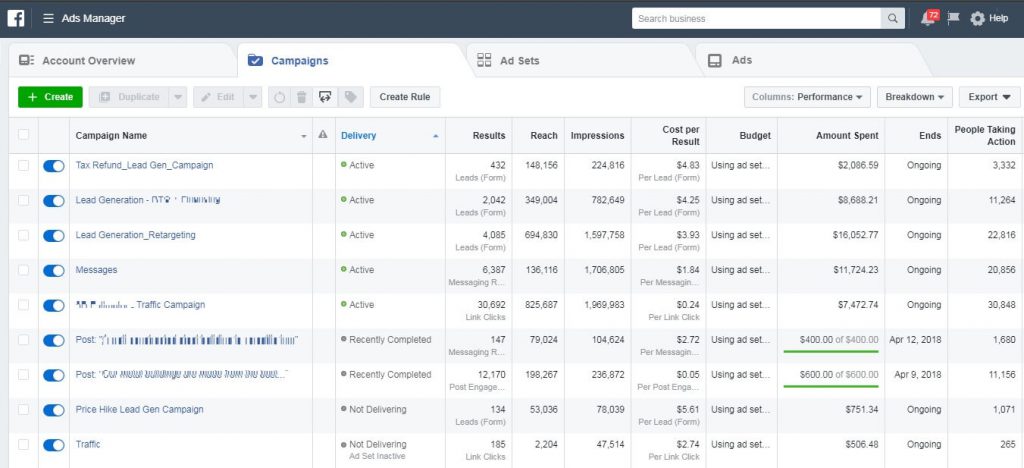 I recommend automating reporting as much as possible and sending them to clients weekly.
Here’s three ways you can quickly make Facebook ad reports for clients. The first, is to create reports in Ads Manager by customizing the columns you want to show to clients and then exporting the views when sending a report. Another option is to use Google Data Studio to report on Facebook ad performance through Google Analytics. A third option is to use Revealbot’s Facebook ad reporting tool, which not only can make beautiful reports clients will love, but it can also automatically send the reports to your clients on the schedule you choose.
Example of a report made in RevealbotCheck out our full guide on Facebook ads reporting to learn how to set up each one of the options for client reporting.
Also, most clients aren’t sure about what metrics matter the most, so it’s your job to set expectations with regard to what metrics they can expect to see improvements in.
In your Facebook Ad Reports, you should at least report on the following:
Adjust the metrics based on the type of businesses you’re running ads for and any particular metrics the client may have mentioned they liked to see.
The last thing I’ll mention about managing Facebook ads for clients and specifically about reporting, is sending your client any learnings that they could apply to other parts of their business. You’re going to be discovering what approaches to creatives work the best, what copy works the best, what audiences work the best and more. This is valuable information the client will really appreciate receiving from their engagement with you, which means they’re more likely to keep using your services.
On March 4, 2022, Roskomnadzor decided to block Facebook, and on March 11, 2022, it decided to block Instagram. If you are in Russia, most likely, both social networks are currently unavailable to you.
But we have some useful resources for you.
(For those who have social networks working - the text of the article is below, under the list of links)
Telegram:
How to start a channel in Telegram
5 ways to monetize Telegram
How to make stickers for Telegram: step by step guide
VKontakte:
How to create a group or public "VKontakte": the most complete guide
Promotion of VKontakte: a large selection of tips and services
VKontakte targeting: a complete setup guide
Odnoklassniki:
Is Odnoklassniki social network useful for business?
"Yandex.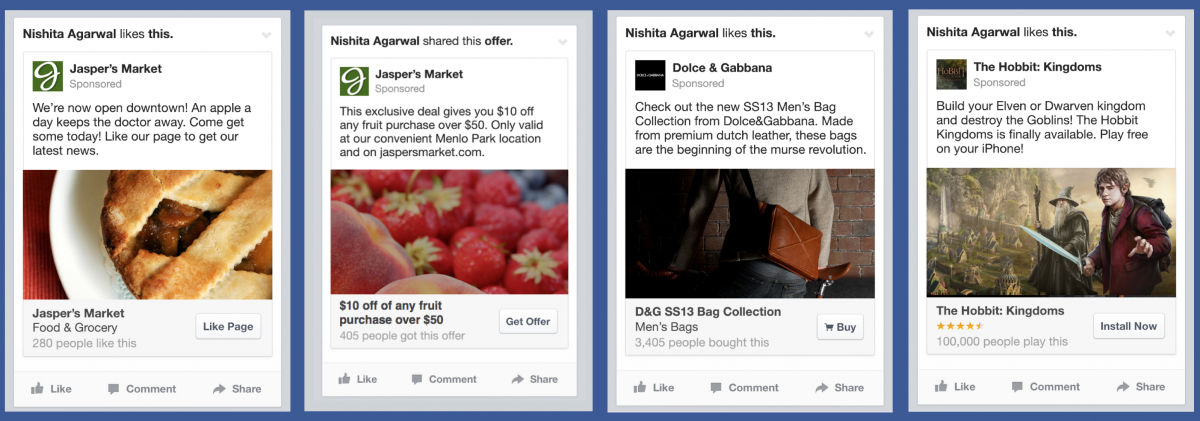 Zen":
Zen":
Channel on "Yandex.Zen" for small businesses: how it is useful
How to write a selling article for advertising in Zen
8 myths about Yandex.Zen for business
Updated by Daria Rakova
According to Hootsuite data for Q1 2021, Facebook is the most popular platform in the world. For Russia, this is not entirely fair: we are overtaken by YouTube, WhatsApp, VKontakte, Instagram, Odnoklassniki and even Viber.
In Russia, Facebook is in 7th place. Source: Datareportal
However, this does not mean that the social network should be ignored: the Russian Facebook audience at the beginning of 2021 was almost 9 million unique users.
Source: Datareportal
It's fair to say that Facebook is a very effective traffic and lead generation channel, and every marketer should be aware of its advertising opportunities.
You can create an advertising campaign on Facebook in 2 ways:
 The easiest way to run ads in a few clicks.
 Initially, this article was supposed to be a guide to both methods, but the amount of information turned out to be such that it was decided to split it into 2 parts. In the first part, we will analyze the process of creating ads on the company page. And how to set up ads using Ads Manager - read the second part of the guide.
So, you have a business page, you are actively promoting it and want to try running an ad. Go to your page, select the desired post or create a new one, and in the lower right corner you will see the "Promote Post" button.
You will see a window where you can set up your advertising campaign.
The first thing you should pay attention to is the audience. By default, Facebook will set the targeting audience to the settings you chose when you created the page. You can use them, but for accuracy it's better to set up the audience yourself, so click on the "Create a new audience" button.
Give your audience a clear name so as not to get confused in the future, indicate the gender, age, geographic location of users, as well as their interests. To set interests, click Detailed Targeting.
You will have access to demographic and thematic interests, as well as behavior patterns - those who have taken certain actions online, those who have recently returned from travel, etc. get the most out of them. For example, you can set up ads not only within one city, but also for those users who are within a certain radius of it. To do this, first enter the name of the place, and then move the slider to increase the ad display radius.
Click the Save button to finish creating the audience. The next step is to set a budget and an expiration date for the ad. You can set the number of days the ad will be active, or an end date.
Next, you need to decide on ad placements: launching from the page allows you to select Facebook as a placement, as well as Instagram and Facebook Messenger.
Facebook will also offer to set up a pixel to analyze the results of advertising. This is a special technology that allows you to track the actions of people on the site - for example, when they added something to the cart - and record these results. For pixel policies, see the Facebook policies.
The last thing you need to do is enter the details of the card from which money for advertising will be charged.
Please note that when paying with PayPal, credit and debit cards, the money will not be debited immediately after the ad is displayed, but automatically when the costs reach a certain level - the billing threshold. What exactly is not written in the rules.
Select and customize the option that suits you best. If everything went well, your publication will go to the moderation queue. Facebook is pretty strict about promoted content, so it's best to read the advertising policies beforehand.
If the promoted post does not violate any of the rules, then it should be moderated fairly quickly - within 10-20 minutes. Congratulations - you've just launched your first Facebook ad campaign.
How to unblock Facebook: life hacks from a targetologist
We looked at the simple post promotion example to get the basics across, but you can create other types of ads right from the page.
Go to your page and click on the "Promote" button, which is located directly under the cover.
You will see a window for selecting the type of advertisement. There are several options for ads that can be created on the page, as well as automatic ads that Facebook itself will run - this is the first tab.
To set up automatic advertising, you will need to answer a few questions about the audience - where is it located, what is it interested in.
Then the final page will open, on which Facebook has already calculated the budget, identified interests and set other parameters. It remains only to pay.
Also here, on the main screen, there are two buttons that will send you to the promotion of the publication, which is described in the previous section:
Everything else - unique types of advertising with their own characteristics. Let's break them down.
This option is for those who want to redirect users to their website or landing page. In the post creation window, you need to specify the URL of your site or page, add an image, its title, and call-to-action text.
You can go beyond one image: Facebook allows up to 5 images per post. To add more images, click Select Media File. Each image can have a unique title. Here's what it looks like in action:
You can also use videos instead of images. To do this, click "Editing Options" and select a video instead of a photo. The video can be taken from the Facebook or Instagram page, as well as downloaded from a computer.
The last step is to select the call to action button. It appears in the lower right corner of the post and leads to the page you linked to.
The settings for the audience, budget, and duration of the campaign are the same as those already described above, so let's move on to the next type of advertising.
Advertising settings here are identical to the methods described above. Only the phone number associated with your profile will automatically pull up:
Please note that if a Russian number is linked to the page, and you are going to run ads in another country, an error warning will appear:
 Promote the application
 Application advertising is similar to advertising from the previous sections, but instead of a website and a phone number, you need to add a link to your application and write its name here. The target button is "Install".
Due to the new privacy settings in iOS 14 and 14.5, setting up ads for iPhone users with the updated version is not so easy. To set up app install ads, track changes and results, you will need to install Apple's SKAdNetwork in Facebook Events Manager.
A fairly standard type of ad that is used for one purpose - to attract subscribers to the page. What you need to know:

To convert an image to a video, click Edit Options:
You will see video options for advertising:
Everything is the same as in the previous sections, only the target button will be "Send message". Only an image can be selected as a creative, but it can be converted to video as described above.
Leads are users who have given you information about themselves. Facebook has a special tool for collecting such information - contact forms. This type of ad is slightly different from the previous ones and looks different too.
To create such a form, you need to:
Here you can add a question that requires a free answer, specify the language and add a link to the privacy policy:
Audience and payment settings are the same as in the previous sections.
These were all types of ads that can be created using the "Promote" button.
At the very beginning of the article, the process of creating a simple advertising publication directly on the page is described. Through the same form with which you make all the entries on the page, you can launch several more types of campaigns. Let's break them down.
These are the last 3 types of ads that can be launched directly from the page without resorting to the Ads Manager. To create an offer, event or job, click on the 3 dots on your page in the "Create" section:
Offers are created and published for free, and people will be notified when the offer expires.
In the window that appears, you need to set the appearance of the publication, as well as the conditions of the special offer. You can choose the type and percentage of the discount, the description of the offer, its validity period and the method of receipt (get it online via a link or at the company's physical address).
You can also add a button ("Save" or "Send message"), terms and conditions and a discount promo code to the offer, as well as configure its promotion.
The offer will be shown on the page in the side menu on the left:
For example, let's take an offer that can be obtained on the site by entering a special code:
When you click on the promo code text, it will be automatically copied to the clipboard. Clicking on "Go to the store" will open the specified site.
Click on the "Promote" button to launch an advertisement for the offer. Audience, budget and expiration settings are standard - moving on.
The action is created from the same section as the offer. First you need to choose the type of event - offline or online.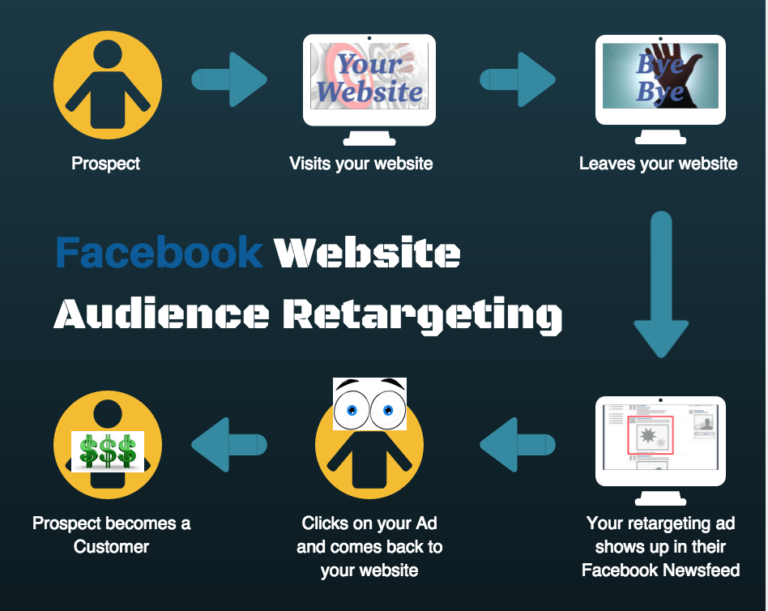
In the new window, fill in all the necessary information: name, date, description and other conditions.
You also need to specify the location of the event so that Facebook automatically sets the time zone and category (subject) of the event:
Further, the setting for offline and online events looks different: for an online event, you need to specify a link. For an event that will take place on the Internet, you can create a live broadcast on Facebook Live, specify an external link or other conditions for participation:
For an offline event, you must specify the address and, if the event is paid, the method of purchasing tickets, their cost:
You can provide a link to a site where participants can buy tickets
You can then change the event cover and adjust other settings such as co-hosts and attendee permissions.
When everything is published, click on the "Promote Event" button to run the ad.
Before creating an event, read the Facebook Pages, Groups, and Events Policies.
How to hold a webinar: from preparation to the final
On the page, you can also configure the display of vacancies:0003
Here you can choose a photo and indicate the most important points:
This is what a posted job looks like:
She can also be promoted:
We've covered all the types of promotional posts that you can create right from the page without the help of Ads Manager. It’s not enough to launch an ad – you also need to be able to track its effectiveness. For such publications, this can also be done directly on the page.
When an ad is created, it is sent for moderation, and you will be shown how much money will be spent, including tax:
If all the rules are followed, the publication is approved fairly quickly. For example, this test campaign was approved in an hour. And even while the ad is not completed, you can see the results. To do this, click on view results next to the promoted post on the page.
Here you can see information about the ad (start and end dates, deadline, goal, etc.). There is also a summary of the main metrics - reach (the number of unique users who saw your post), interactions with the post and the cost of each interaction. Here are the user actions that are taken into account when calculating the number of interactions and their cost:

Also here you can see information about the audience, ad placements and countries / cities where it is shown.
And below on this page you can see the budget - how much money was spent, how much is left and when the funds will be debited from the card.
Based on all this data, you can draw conclusions about the effectiveness of the promoted publication, as well as decide whether to stop the show (if the ad is not effective), increase the budget, or leave everything as it is.
How to promote on Facebook: a complete step-by-step guide to page promotion
As you can see, there is nothing complicated about this, and you can run a simple ad in a matter of minutes. But if you are serious about getting into Facebook promotion, you will have to master a more advanced tool for creating advertising campaigns on this network - Ads Manager, which is described in the next part of the guide.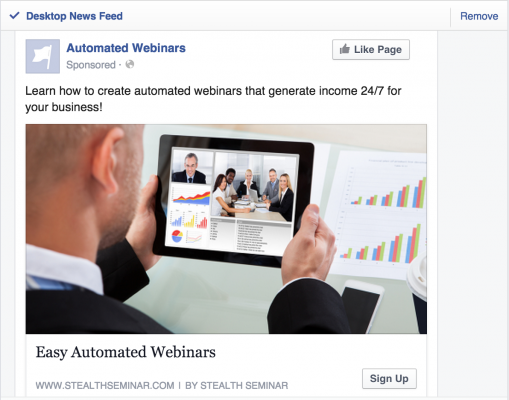
What is your preferred way to advertise on Facebook? Share your experience in the comments.
On March 4, 2022, Roskomnadzor decided to block Facebook, and on March 11, 2022, it decided to block Instagram. If you are in Russia, most likely, both social networks are currently unavailable to you.
But we have some useful resources for you.
(For those who have social networks working - the text of the article is below, under the list of links)
Telegram:
How to start a channel in Telegram
5 ways to monetize Telegram
How to make stickers for Telegram: step by step guide
VKontakte:
How to create a group or public "VKontakte": the most complete guide
Promotion of VKontakte: a large selection of tips and services
VKontakte targeting: a complete setup guide
Odnoklassniki:
Is Odnoklassniki social network useful for business?
"Yandex. Zen":
Zen":
Channel on "Yandex.Zen" for small businesses: how it is useful
How to write a selling article for advertising in Zen
8 myths about Yandex.Zen for business
Article update — Daria Rakova
In part of the first part of this tutorial, we covered the basics of creating ads directly on your Facebook page. The advantages of this method include the fact that your first advertising publication can be launched in 5 minutes, and all settings are simple and intuitive. Of the minuses - insufficient flexibility of settings. Today we'll walk through the process of creating and managing campaigns in Ads Manager, Facebook's main ad creation tool.
To go to the Ads Manager interface, go to Facebook, on the left panel click on "Business Suite", and from there go to the "More tools" tab and select Ads Manager:
On the main screen Ads Manager you will find all ads:
Before you get started, you need to understand how Facebook ad accounts work.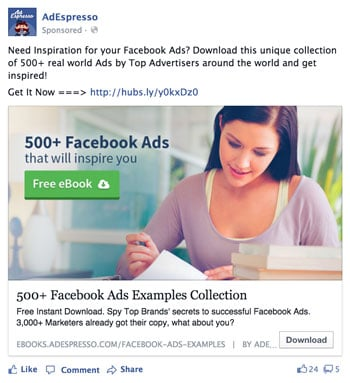 They consist of three levels:
The process of creating an advertisement can be conditionally divided into five stages:
Let's consider each stage separately.
To choose a suitable goal, you must understand what results you want to achieve. The goal of an ad is the action you want viewers to take after viewing the ad. That's what Facebook says.
There are 11 types of goals in Facebook Ads Manager. The algorithm for working with each goal is approximately the same, so we will only consider the differences.
Awareness is the first interaction users have with your brand. At this stage, nothing will be bought from you yet, but you will be known and possibly remembered.
For advertising with the goal "Reach" , you will need to select the page that will be advertised:
This is the second stage in the sales funnel - people already know about you, so you need to try to engage the audience in a dialogue and prepare for the next stage - conversions.
For ads with the goal "Traffic" , you will need to choose where the flow of people will be directed: to the site, to the application, to Facebook Messenger or to Whatsapp:
For an ad with objective "Engagement" , you will need to select the type of reactions to the content you want to receive:
For goal "Install application" you will need to enter the name of the application or its exact URL:
In order to promote your application (mobile or desktop), you must first register it on the Facebook developers website
Advertising type 9 will help you set up contact with people0070 Lead Generation . It allows you to create forms for communicating with the audience:
And for people to write to you, select the target "Messages" and define the communication channel:
This is the last stage of the sales funnel on the Internet - the client is already yours, he is ready to buy a product or service.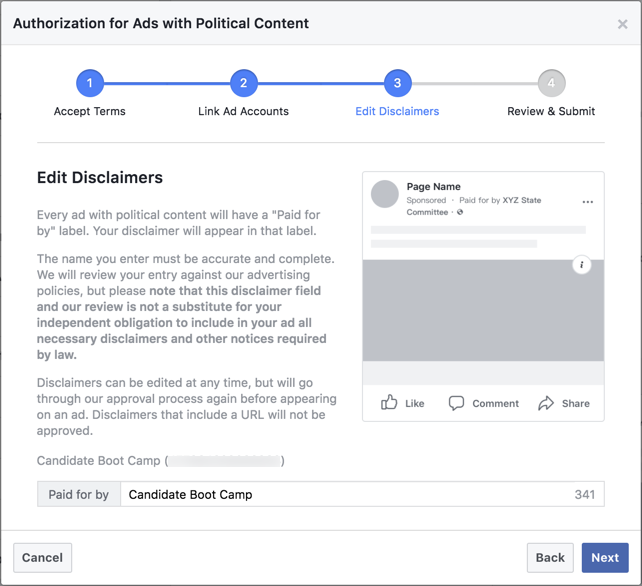 It is important here to make interaction with the brand user-friendly.
In ads of type "Conversions" , you can specify an event that should happen:
For "Catalogue Sales" , you first need to create a catalog with products in Commerce Manager:
Read more about the catalog in Business Manager rules
In order to direct the flow of customers to a point of sale, you must first add an address to the page, and then select the goal "Place traffic" . Here you can also set up special conditions for working during COVID-19:
When target is selected, adjust advanced ad campaign settings and click "Next" to go to specific ads:
Enter the name of the campaign, the goal and indicate if the advertisement is related to credits. Here you can also conduct preliminary A / B testing of advertising and set a budget spending limit
Now you need to set a budget and a display schedule , select an audience , placements and create the ad itself .
The budget can be set either daily or for the entire duration of the advertising campaign. Choose the first option if you do not want to spend more than a certain amount per day.
In the "Schedule" item, you can specify whether you want to start showing ads continuously on the same day, or set a schedule for starting and ending the campaign.
Choose the Lifetime Budget option if you want to let Facebook plan your daily expenses.
If you have chosen a daily budget, please note that the specified amount will not be final. Facebook may spend more on certain days and less on the following days to bring your average spending closer to the budget you set.
The next step is setting up the audience. You can use the previously created audience . To do this, click "Use a saved audience".
You can also create a new audience based on location and demographics.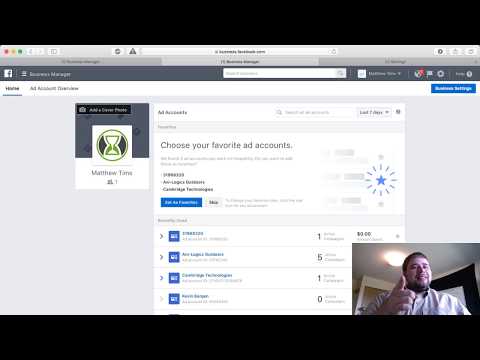 Change your gender settings only if you are promoting male-only or female-only products or services.
With fine-grained targeting settings, you can create a unique audience based on interests, interactions with other sites, marital status, education, political opinions, and more. You can add or remove these people from the audience. All detailed targeting settings are divided into three categories:
To narrow the audience further, add languages or exclude certain categories of people from the audience:
You can also create a audience that looks like your followers, or an audience that interacted with your page.
To create a Lookalike Audience , you need to specify two parameters:

How to create a Look-alike audience for targeting on Facebook and Instagram
To create a custom audience , you need to choose which source to take people from:
To get people from site , you must first install the Facebook pixel:
The Facebook pixel is an analogue of the retargeting code in contextual advertising systems.
You will see a window for creating a pixel. Choose who exactly you want to show ads to: all visitors to the site, visitors to certain pages and sections, or those who have spent a certain amount of time on the site.
You can read more about installing and configuring a pixel here
If you want to show ads to people who have already interacted with your app , you need to select "app actions" from the menu, set the name and description of the audience, and specify the app registered in your Facebook Developers account.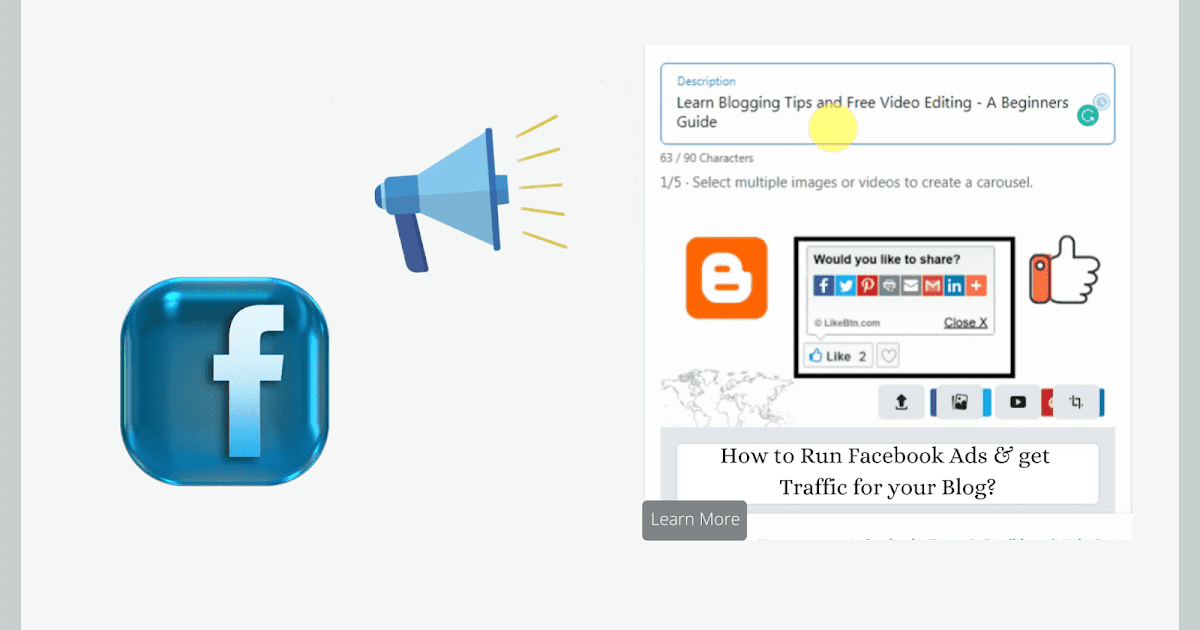
To retarget offline events (purchases and store visits), they must first be created in Events Manager. You can read more about offline events in the Facebook policies.
You can also create audiences based on people who have interacted with you in some way on Facebook - through Page, video, lead generation forms, product catalog, advertisements, Instant Experience and events , or through Instagram . The algorithm for creating such audiences is approximately the same. You need to select a source, set retention (the number of days people will stay in the audience after they interact with your content), and include/exclude people.
Once you've configured all the necessary settings, give your ad set a name and check the 'audience definition' box on the right to double-check your settings and find out your estimated daily reach.
Facebook allows you to post paid posts on its website (in the news feed or in the column to the right of it), on Instagram, and on the Audience Network, which is a network of Facebook partner resources (for example, sites or applications).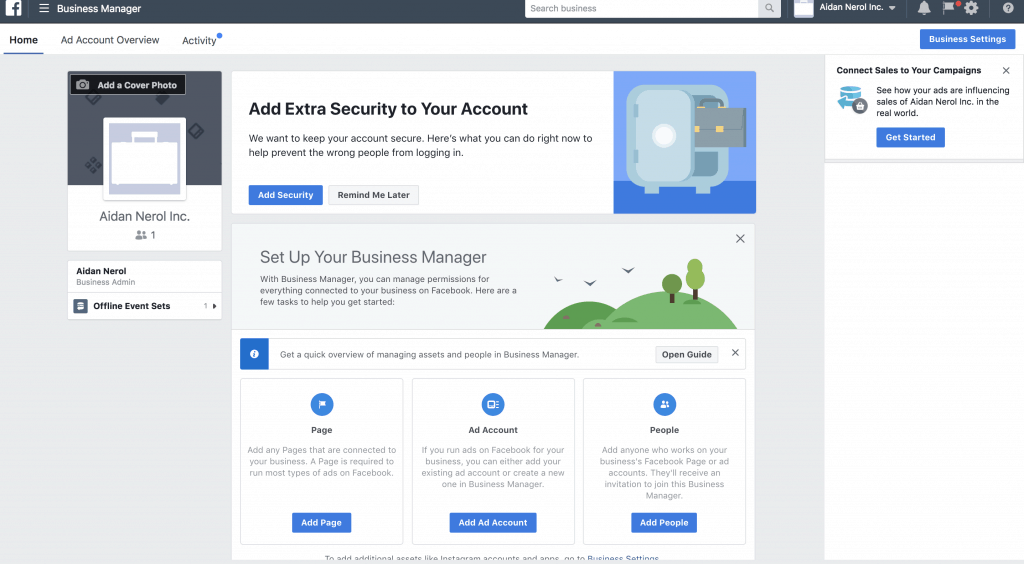
You can allow Facebook to display ads on all resources at once by selecting the "Automatic placements" item, or specify them manually. You can also choose whether to show posts to PC users only, mobile users only, or everyone.
A little lower in the same window you will find advanced options where you can include in the audience only people using a specific mobile OS (accurate to a specific device model and OS version), as well as those who logged into Facebook using Wi-Fi.
To create an ad, you need to add an image/video, select the publication format (single photo/video, carousel, selection) and write text:
When everything is ready, click "Publish" - the ad will first be sent for moderation, and then it will be published.
In addition to advanced settings for audience, budget and everything else, Ads Manager has another very useful feature - creating new ad groups and ads themselves within a campaign. Remember the ad account hierarchy? This is what we are talking about.
To add a new ad group, go to the Ads Manager interface, select the desired account (if you have more than one) and then an existing campaign.
By the way, if you have ever launched an ad directly from a Facebook page, then these publications will also be displayed in the list, and will have names like Publication "publication name".
A newly launched ad campaign will always have only one ad group - the one you created with the campaign. All you have to do is click on the "Create Ad Set" button.
If you want to add another announcement to the group, then the algorithm of actions will be almost the same. Go to the Ads Manager interface, select the desired campaign, ad group and click the "Create ad" button.
Audience, budget, schedule, and placement options will not be available because These are ad group settings. You will only have to create the publication itself.
You can view the statistics of all advertising campaigns directly in the Ads Manager interface. To the right of the list of campaigns, you can see quick performance summaries:
Click on the "Columns" button on the right to change the report type. The default type is "performance", but you can choose any other available:
Click on the Breakdown button and select one of the menu options to have Ads Manager not only show the campaign summary, but also break it down according to the selected criteria:
Finally, select "Reports" - "Export table data" to share the report with another administrator (a unique link to this report is generated), or to export the summary in .xls or .csv formats:
To view more detailed statistics, select a specific ad group or individual ad, click "View Charts" and you will see a visualization of the data.