Home »
Misc »
How to rename a photo album on facebook
How to rename a photo album on facebook
How to Rename Albums on iPhone to Organize Your Photos App
- You can rename photo albums on your iPhone to keep your Photos app organized and easy to use.
- Naming and renaming an album through the Photos app is simple and can be done in a few steps.
- Visit Business Insider's homepage for more stories.
Apple gives its users many ways to organize their files, messages, calendars, and pictures. The iPhone's Photos app is a perfect example of that — you can create albums and slideshows out of existing pictures and videos without leaving the app.
If you have a lot of albums in your iPhone's Photos app and need help deciphering this wedding from that wedding, the renaming feature comes in handy.
Check out the products mentioned in this article:
iPhone 11 (From $699.99 at Best Buy)
How to rename an album on iPhone using the Photos app 1.![]() Launch the Photos app from your iPhone's home screen, the icon depicting a color wheel.
Launch the Photos app from your iPhone's home screen, the icon depicting a color wheel.
2. If not already selected, tap "Albums" from the bottom menu bar.
3. At the top of the screen, tap "See All" to the right of "My Albums."
Scroll to find your albums and tap "See All." Meira Gebel/Business Insider 4. Next, select "Edit" from the top right-hand corner of the screen.
To rename, first select "Edit." Meira Gebel/Business Insider 5. Then, tap the text of the album you want to rename, not the album itself.
Tap the name of the album. Meira Gebel/Business Insider 6. Use your keyboard to erase the album's existing name by using the backspace button.
7. Type in the new name.
Use your keyboard to erase the album's existing name. Meira Gebel/Business Insider 8. Once you've typed the new name for the album, tap "Done" in the upper right-hand corner.
Once you've typed in the new name, tap "Done." Meira Gebel/Business Insider 9. To complete the rename, tap "Done" one more time.
To complete, select "Done" one more time. Meira Gebel/Business Insider How to flip a picture on your iPhone using the Photos app in iOS 13, or a third-party app
How to track an iPhone using a Find My app or iCloud's website, and locate it even when its battery is dead
How to go live on Facebook from your computer or mobile device
How to log into iCloud on your iPhone with an Apple ID, to access and manage your iCloud account
Meira Gebel
Meira Gebel is a freelance reporter based in Portland, Oregon. She writes about business, culture, and technology for Insider. Her work has been featured in Digital Trends, Willamette Week, USA Today, and more. She is a graduate of Columbia Journalism School and San Francisco State University. Feel free to reach out to her on Twitter, where she can be found most of the time, @MeiraGebel.
Read moreRead less
Insider Inc. receives a commission when you buy through our links.
Wix Photo Albums: Managing Photo Albums in the Wix Owner App | Help Center
Using the Wix Owner app, you can manage all your photo albums on the go. You can easily rename galleries, reorder images, delete images and change the title and description of your images.
In the article, learn more about:
- Adding photo albums on the Wix Owner app
- Managing photo albums on the Wix Owner app
To add photo albums on the Wix Owner app:
- Go to your site in the Wix Owner app.
- Tap Manage at the bottom right.
- Tap Photo Albums.
- Tap Create Album.
- Tap Add Cover Photo to add or change the album's cover image.
- Tap Album name to give your album a name.
- Tap More info to add any relevant info about the album.
- Tap to add either a Business name or Logo to your album.
- Tap Save.
To manage your photo albums on the Wix Owner app:
- Go to your site in the Wix Owner app.
- Tap Manage at the bottom right.
- Tap Photo Albums.
- Choose to manage Albums or view albums store Orders.
- Tap the Show More icon on the relevant album.
- Tap Manage Album.
- Choose what you want to manage:
Album Info
- Tap the Image icon to add or change the album's cover image.
- Tap Album name to give your album a name or change it to a new one.
- Tap More info to add any relevant info about the album.
- Tap Save.
Galleries
- Tap the Show More icon .
- Choose to manage media or rename your photo album:
- Manage Media:
- Tap, hold and drag the image to reorder the images in your album gallery.
- Tap on an image to add a title and description to that image.
- Tap Save.
- Rename:
- Tap Rename to add a gallery name.
- Tap the Display toggle to enable or disable it:
- Enabled: Your gallery is visible to visitors.
- Disabled: Your gallery is hidden from visitors.
- Tap Save.
Privacy and Permissions
- Tap the Download photos toggle to enable or disable it:
- Enabled: Images in your album gallery can be downloaded.
- Disabled: Images in your album gallery cannot be downloaded.
- Tap the Love photos toggle to enable or disable it:
- Enabled: A heart icon is displayed, so visitors can indicate which photos they love.
- Disabled: A heart icon is not displayed.
- Tap the Share photos icon to enable or disable it:
- Enabled: Visitors can share your photos across social media.
- Disabled: Visitors cannot share your photos across social media.
- Tap Save.
Album Settings
- Tap the Display on my site toggle to enable or disable it:
- Enabled: The album is visible on your site.

- Disabled: The album is not visible on your site.
- Tap Save.
Managing Facebook profile photo albums
Editing and deleting albums
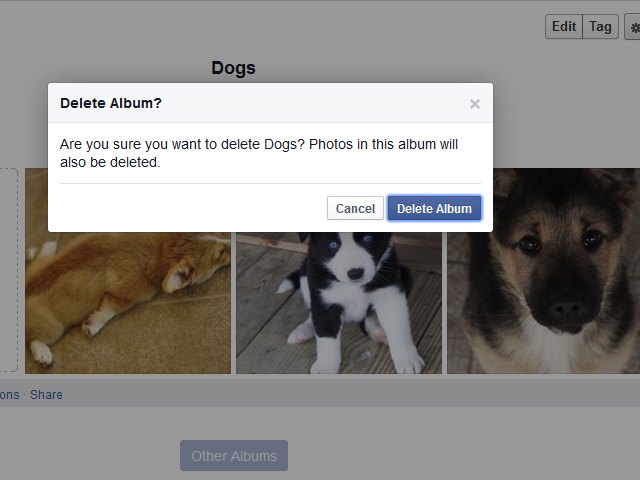
How to delete a photo album
Some albums (such as Profile Photos) cannot be deleted, but you can delete photos from these albums. Deleting an album also removes the photos from the album. You will not be able to recover a deleted album.
To delete album :
- Go to your profile and select Photos .
- Click Albums and select the album you want to delete.
- Click the gear button in the upper right corner and select Delete Album.
- Press to confirm.
How to transfer a photo or video from one album to another
To transfer a photo or video to another album, go to Facebook from a computer (laptop). Currently, on mobile devices, you cannot transfer photos or videos from one album to another.
Transfer photos between albums
To transfer photos or videos from one album to another:
- Log in to Facebook on your computer.
- Go to your profile and select Photos of .
- Select Albums .
- Go to the album containing the photos you want to move.
- Position the cursor on the photo and press the edit button.
- Select item Move to another album and move the photo or video to the album selected from the drop-down menu.
- Select item Move photo .
Move photo from timeline to album
If there is a (first time) photo (or video) on your profile feed that you want to move to another album:
- Go to www.facebook.com on your computer.
- Click on your name in the upper left corner to go to your profile.
- Find the photo you want to transfer by scrolling through the feed or activity log.
- Click to open the picture.
- Press button Parameters in the lower right corner.
- Select Move to another album and move the photo or video to the album selected from the drop-down menu.
Note : You cannot move photos that are in background photo album or profile .
How to add photos to an existing album
You can only add items to albums that you have created, and collaborative albums in which you are a collaborator of . Live videos cannot be added to an album.
To add a photo or video to an album:
- Go to your profile and select Photos .
- Select the album you want to add items to.
- Click the +Add photo/video button.
- Select the desired photos or videos and click Open.
- Click the Publish button.
Album privacy settings control who can see your post.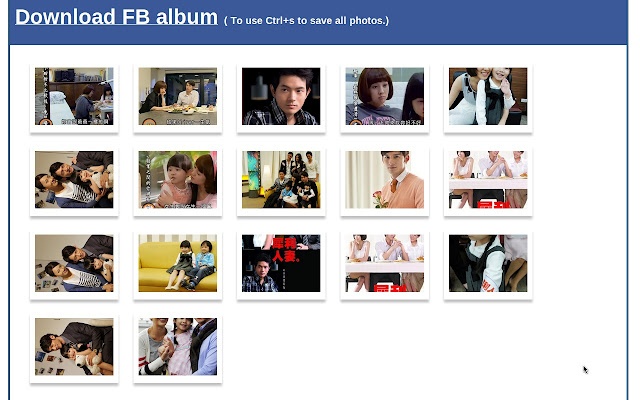 To change a post's privacy settings, first change the album's privacy settings. You can add a photo to an album after it has been published.
Note : A maximum of 1000 photos can be added to one album.
How to share photos with people who don't use Facebook
You can get a link to share your photos and albums with people who don't use Facebook.
To get a link to the album:
- Go to your profile and click the button Photo .
- Select Albums .
- Click on the name of the album you want to share.
- Click on the gear icon in the upper right corner and select item Get reference .
To get a link to a specific photo:
- Go to your profile and click the Photo button.
- Click Your photos .
- Select the photo you want to share.
- Place the cursor on the photo and press the button Parameters in the lower right corner.
- Select Get Link .
Copy the link to send it to your friends who don't use Facebook. Remember that every person who receives the link will have access to the contents of the album.
Note : You can only share links to pictures you add yourself and from albums you create. You cannot post links to automatically generated albums (e.g. profile photos, phone photos).
How to save a photo to your phone or computer
To save the photo on your computer:
- Click on photo
- Position the cursor over the photo and click Options .
- Click the Download button.
Facebook Shared Albums
How to Create a Shared Album
To create a Shared Album:
- Go to the album you created.
- Click the Add collaborator button in the upper left corner.
- Enter the first and last names of the collaborators you want to add, and then select an audience.
- Click the Save button.
When collaborators are assigned to a shared album, they can add photos and videos, tag photos, edit the album, and add new collaborators. Collaborators can only edit and delete uploaded photos. The owner of the album can delete photos of other collaborators. If a collaborator is removed, they will have the option to remove photos added to the collaborative album from the level of their activity diary.
How to leave a shared album
To leave a shared album you have been added to:
- Go to the album.
- Click on the gear icon in the upper right corner
- Select Leave Album
Viewing a shared album may become unavailable. It depends on its privacy settings. Photos or videos you've posted in a shared album will remain there when you leave the album. After you leave a shared album, you will no longer be able to remove photos and videos from it.
How to limit the visibility of a shared album on Facebook
Only the person who created the shared album can configure its privacy settings. To set the privacy settings for the shared album you are creating:
- Go to the shared album.
- Click the Edit button in the upper right corner.
- Click under the heading Privacy to select one of the following options:
- Collaborators only : Only added users can view photos.
- Friends of collaborators : Only collaborators, friends of collaborators, tagged persons and friends of tagged people can view photos.
- Public : photos can be seen by everyone
- Click the Done button in the upper right corner
Remember that if you tag someone in a photo, it will be available to the tagged person and their friends.
How to remove a member from a shared album
You can only remove collaborators from a shared album that you have created. To remove a member from a shared album:
- Go to the album.
- Click the Edit button in the upper right corner.

- In the Collaborators section of the album, click on the x next to the name of the collaborator you want to remove.
- Click the Save button in the upper right corner.
Removed collaborators will not be able to add photos and videos to the shared album. Depending on the privacy settings of a shared album, remote collaborators may not be able to access the contents of the shared album.
Privacy settings for photo albums
Privacy settings for photo albums
To change the privacy settings for published photo albums:
- Go to your profile and select Photo .
- Select Albums .
- Select the album for which you want to change the privacy settings.
- Click the Edit button.
- Select who can view this album from the drop-down menu under Privacy .
Only the person who created the album can change the privacy settings.
Privacy settings for individual photos
You can change the privacy settings for individual images in most albums, including Profile Photos and Cover Photos, but not all albums support this feature.
To set the privacy for the selected photo:
- Click on the photo to enlarge it.
- Press the menu button in the upper right corner next to the photo date.
- Select the recipient group to which you want to share the photo.
Please note that some photos, such as the current profile photo and the home page background image, all have a public status.
Delete Facebook photo on profile page - change or remove
Gigabytes of multimedia content such as photos and videos are posted daily on social networks. Alas, quite often users, when uploading such content, forget one golden rule: what appeared on the Internet remains in it forever. Therefore, quite often questions arise about how to delete photos on Facebook.
Content:
- Quick and permanent
- Change profile picture
- Profile photo (ava)
- Cover photo
- Delete photos in private messages
- Delete photos in feed and publications
- Delete albums
Quick and permanent
and immediately from everywhere. However, the photos posted in the personal profile are collected in a special section, from where, if desired, the images can be easily deleted.
How to do it:
- Open your profile by clicking on the avatar at the top of the page.
- In the "Photos" section, you will see three segments: photos you have published, albums, and photos in which you have been tagged by other users.
- Click on the pencil icon at the top of the photo and select Delete.
- In the mobile application, the "Delete" option can be exited by clicking on the three dots.
Change avatar
Profile photo (ava)
Some users complain about this problem: on Facebook, you can change or edit your profile picture, but supposedly you can't delete it. In fact, there is no problem here, and you can delete the photo used as an avatar. To do this, do the following:
- By clicking on the profile picture at the top of the page, enter the profile.
- In the "Photos" section, enter the "Albums" segment.
- From there - to the album "Profile photo".
- Find the image you want to delete, click the ellipsis and take action.
To change the main photo, you need to click on the camera image above the profile picture.
You will see a menu with which you can add a new picture, edit an existing one or add a frame. Video avatars are available for mobile applications.
Cover photo
The image used as the cover is removed in the same way as the image used for the avatar. In the albums, find "Covers" and perform the same steps there.
Deleting photos in personal correspondence
Erroneously or recklessly sent photos can be completely deleted (so that they are erased both for you and the recipient) only within 10 minutes after sending the message. After that, nothing can be changed, no matter how much you want it to be. Therefore, if you find an abnormal situation, do not waste a second.
To delete a photo in the messenger app for mobile devices, do the following:
- Long press on the sent picture.
- When the "basket" appears at the bottom of the screen, press it, and then - "Cancel sending".
- Confirm your action.
To delete a photo in the messenger in the desktop version of Facebook, do the following:
- Move the cursor over the sent picture.
- Select the delete command, and then "Everyone".
Messages sent more than 10 minutes ago can only be deleted from your history. The recipient will retain both messages and other content attached to them, including images. If the recipient has already seen the photo sent to him within ten minutes, there is only one thing left: to contact the person with a personal request to delete this message. And the rest depends on your relationship with this user and on his personal qualities.
Delete photos in the feed and publications
Delete a post with photos that you yourself posted somewhere on Facebook is quite real. If we are talking about fresh and relatively fresh publications, then they can be found in the social network feed. If a lot of time has passed since the publication of the publication, then you can find it in the chronicle.
Deletion in progress as follows:
- Log into your profile.
- Open the Chronicle there.
- Find the desired publication there, click on the three dots and delete it.
- You can also, if you wish, not delete the entire post, but delete only the image. To do this, click on the three dots located in the upper right corner and enter the "Edit" option. By clicking on the cross on the photos, remove them from the post.
- If you work in the mobile version of the social network, then there is no Chronicle section. The posts are in chronological order.
- If it's a post posted on another user's timeline, the post can be found using the activity log. Press ∇, then "Settings and Privacy" and you will find this log.
- If a material with photos you don't want is posted by another user, then the only way to remove the entire post or photos is to ask the user who posted the content. The only thing you can do is remove the tag if the person has tagged you in the photo.
By the way, the marks are easy to remove. To do this, click on the three dots located in the upper right corner, and then click on the "Unmark" command.
Deleting albums
Photo albums are a very popular way to post and store photographic content on Facebook. Albums are easy to organize and, if necessary, find the right photo.
The user can delete both individual photos and the entire album from his album. For this you need:
- In your profile, go to the "Photos" section, and from there - to "Albums".
- Find the desired album, where and delete the photo: press the ellipsis, and then the delete command.