Facebook likely knows more about your friends than you think. Credit: Getty Images/iStockphoto / ipopba
> Tech
I was scrolling through Instagram recently when I noticed something strange: the app was suggesting friends based on who was in my phone's contact list, even though I had long ago disabled contacts syncing in the app.
As it turns out, it's not just me. If you've ever granted Facebook access to your contacts, the company likely knows a lot more about your friends than you think.
Facebook positions contacts syncing as a matter of convenience, a feature that makes it easier to find people you already know on its services. But the reality is that it's also another way the company subtly (or sometimes not so subtly) uses your personal information (and that of your friends') in ways that aren't always clear.
It might make sense when you first download Messenger, for example, to sync your contact list so you can't chat with friends. You might not realize that you're not only giving Facebook permission to match you with friends, but to upload a list of everyone you know and use that information to show you ads.
Worse yet, once you've shared your contact list with one Facebook service, there's nothing stopping that information from following you around throughout other Facebook-owned apps, as I recently discovered. An Instagram spokesperson confirmed that because I had once shared my contact information with Messenger, Instagram could also use that data to suggest friends for me to follow. And, per the app's privacy policy, this information can also be used to serve me advertisements. Convenient, right?
However, it is possible to get Facebook out of your contacts, if you know which settings to check. Here's how to disable contacts syncing in Facebook, Messenger, and Instagram (and remember to check these settings on all your devices — just in case.)
Credit: screenshot / facebook
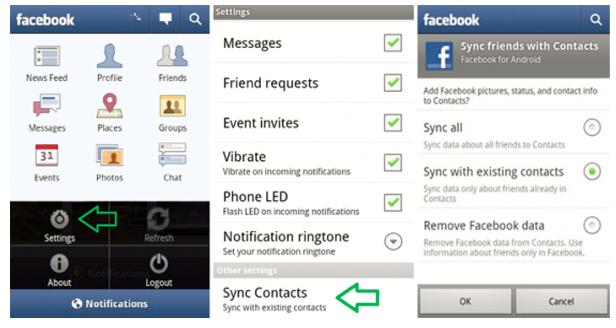
In the Facebook app, go to your settings and scroll all the way down to "media and contacts. " Select "upload contacts," and make sure the option is disabled.
Check the Messenger app's settings menu. Credit: screenshot / messenger
In the Messenger app, tap on your profile photo in the upper left corner of the app, then scroll down to "people." Make sure "upload contacts" is set to "off." It should like the image below.
Toggle the "contacts" option to "off." Credit: screenshot / messenger
Bonus: While you're at it, check the "sync Instagram" setting, and make sure that is also disabled,
Credit: screenshot / instagram
From your profile, tap the menu that looks like three lines and select "settings." Select "account," "contacts syncing," and make sure the option is not enabled. It should like the image above.
Now that's you've changed your contacts syncing settings, you're not quite done. That's because simply disabling syncing doesn't remove any contacts that have been previously uploaded to Facebook.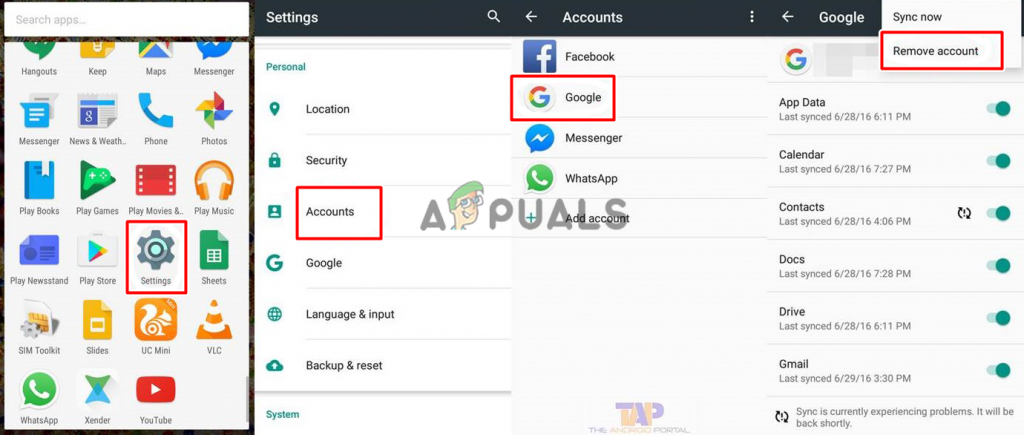 You can check to see if your contacts have been previously uploaded to Facebook by clicking on this link. And you can do the same for Messenger here.
If you do see a contacts list on either page – and you likely will — you can remove it by selecting "delete all contacts."
(opens in a new tab)
Karissa was Mashable's Senior Tech Reporter, and is based in San Francisco. She covers social media platforms, Silicon Valley, and the many ways technology is changing our lives. Her work has also appeared in Wired, Macworld, Popular Mechanics, and The Wirecutter. In her free time, she enjoys snowboarding and watching too many cat videos on Instagram. Follow her on Twitter @karissabe.
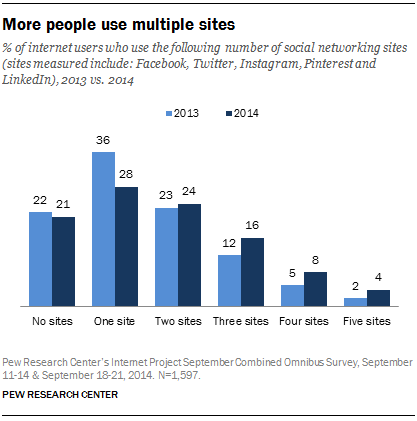
'Damn this nepo baby article is crazy!'
By Elena Cavender
A step-by-step guide to sharing your memories on IG.
By Christianna Silva
How do you look effortlessly authentic in an inauthentic world?
By Shivani Dubey
I don't want to watch your raw diet!
By Christianna Silva
"Are you guys ready for a very strange and thrilling Christmas scam. .....?"
By Meera Navlakha
Stuck on "Wordle" #552? Here are some tips and tricks to help you solve it.
By Mashable Team
The Muskian traits of one Miles Bron.
By Tim Marcin
Whoops, didn’t mean to buy that battle pass, did I? Or that llama!
By Jonathan Tully
The ban was a desperate attempt to crush competition, and a middle finger to the people who make the platform interesting.
By Elizabeth de Luna
But would banning TikTok mean your data is any safer?
By Mike Pearl
By signing up to the Mashable newsletter you agree to receive electronic communications from Mashable that may sometimes include advertisements or sponsored content.
How to
ByJagdish Purohit
Android is a great mobile operating system, it provides so many conveniences that I have lost count. But I can certainly turn off some features which don’t fancy my liking. This article will teach you how to remove Facebook contacts from phonebook with ease. Many people are not aware that Android phone book can actually pull contacts from other apps as well. This is a pretty great feature if you need to find someone’s contact information in a hurry.
While this contact synchronization feature can work great with messaging apps like Whatsapp or video chat apps like Skype, it cannot work amazingly with social media. If you have limited number of people added on your Facebook account then you won’t really need to remove Facebook Contacts from phonebook at all.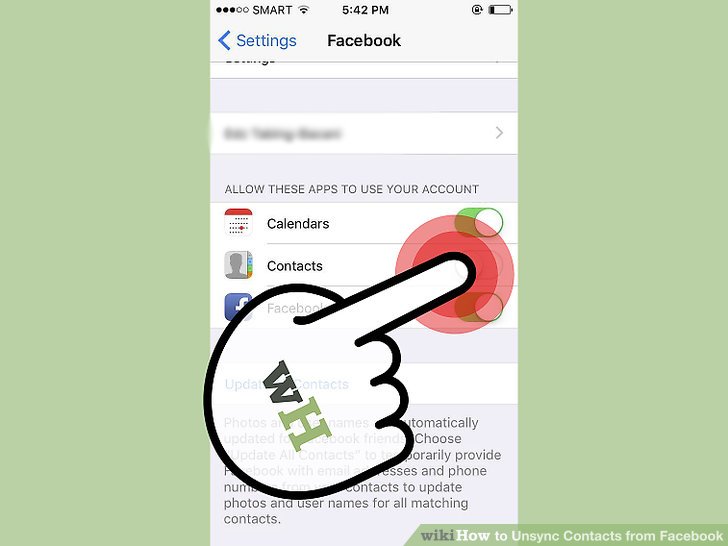 But if you are popular and have a large following on Facebook the managing thousands of useless contacts in your phonebook can be a hassle.
I personally only prefer the contacts which have phone numbers attached to them. This is why Whatsapp contacts are the best ones to sync with your Android device. If you have already synced the contacts and feel that your phonebook feels a bit crowded, this guide will be really helpful to you. Although if you have less than 100 friends on Facebook, I recommend that you merge the contacts with your existing ones. This will give you updated profile pictures automatically and you can retain the phone numbers too. I have done this and wouldn’t be any happier. Combine this with the Google’s awesome contacts backup service and you have a complete phonebook all the time.
First off you will need to find the Facebook app. If you are regular user like me, it should be easy to locate.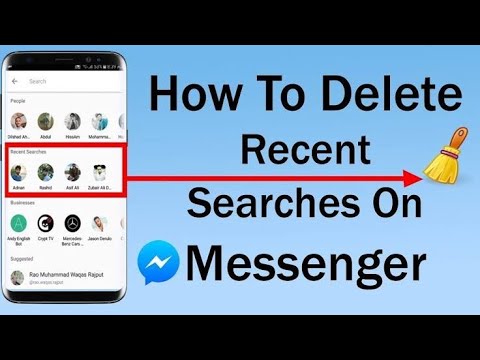 I keep it on one of the docks on my home screen. I have attached a screenshot of the icon in case you have forgotten.
Tap on the app and you are ready to go.
Now there are several ways to enter the app’s settings. But the easiest one can be accessed simply by pressing the menu button/key on your phone. If you are using on screen buttons then you will need to tap that.
A pop up menu will appear with several options. You simply need to select the settings and that’s about it.
The app will launch the settings screen.
The latest update of Facebook has placed the contacts synchronization option right at the end of the list. If you are using a large device with high resolution you should be able to see it on the bottom of the screen. Scroll down right to the end if that is not visible.
Tap on that and a new screen will come up. Simply select the last option called “Don’t Sync” to remove Facebook contacts from Phonebook. This is it you are done, the app will no longer sync contacts to your phonebook automatically.
Now the above method will prevent the app from adding new contacts to your phonebook. But the ones which were synced will already be there on the device. In order to not see them, follow this simple process. Go to the contacts and launch them.
Now I don’t know how your Android contact app will look but mine looks like the screenshot above. Tap on the menu button and a menu will slide on screen. Simply select settings from there.
Tap on contacts. This will take you to a large menu with a lot of accounts. Simply uncheck the Facebook one and you will remove Facebook contacts from contact book. Go back into the contacts main screen and see if you can see any unwanted contacts or not.
I hope that the how to remove Facebook contacts from phonebook guide will help you get rid of boring contacts. I will be making short guides like this which can solve one particular issue with ease. I’m a pretty straightforward guy so expect to the point guides in the future. If you are facing any issue with your Android device, kindly send a comment with your device name and Android version, I will try my best to find a solution.
Jagdish Purohit
Jagdish is an Android troubleshooter who loves talking tech and discussing technology's impact on humanity. He is passionate about writing and fond of technology—with a zeal for Android problem-solving. When Jag isn't writing or discussing tech and marketing, he'll be smashing cricket balls or shooting hoops on the basketball court.
BySam
Whenever you want to stream content from your phone to a bigger screen, let’s say a TV, a Chromecast may be a lifesaver. Basically, it…
Read More How to Turn Your Google Chromecast into Digital Signage Player? (Ultimate Guide)Continue
Help Center
Using Facebook
Facebook Mobile Apps
We are updating the Facebook.com website for mobile browsers. More
You can only manage the continuous download of contacts in the Facebook app for Android, iPhone and iPad, and the Facebook Lite app.
If you turn on continuous upload, the contacts on your phone or tablet will be automatically uploaded to Facebook each time you sign in to your account. nine0003
Enable or disable continuous download of contacts in the Facebook application
Android
Click the icon in the upper right corner of the Facebook window.
Scroll down and select Settings & Privacy and then Settings.
Scroll down to the Permissions section and click Download Contacts.
Touch Continuous download of contacts to turn this setting on or off.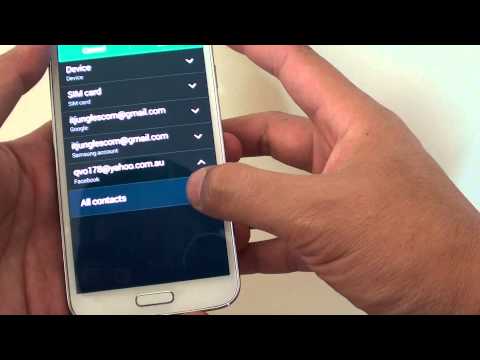
iPhone
Click the icon in the lower right corner of the Facebook window. nine0003
Scroll down and select Settings & Privacy and then Settings.
Scroll down to the Permissions section and click Download Contacts.
Click Load Contacts to turn this setting on or off.
Click the icon in the lower right corner of the Facebook window.
Scroll down and select Settings & Privacy and then Settings.
Scroll down to the Permissions section and click Download Contacts.
Click Download Contacts to turn this setting on or off.
Facebook Lite
Click the icon in the upper right corner of the Facebook window.
Scroll down and click Settings.
Scroll down to the Permissions section and click Download Contacts.
Then click Download Contacts to turn this setting on or off.
Other mobile devices
Continuous download of contacts is only available on iPhone, iPad and Android devices. Learn how to download contacts or delete contacts downloaded from your mobile device. nine0003
Notes
If you disable downloading contacts in the Facebook app, downloading contacts in the Messenger app is not automatically disabled. Learn more about managing contact uploads in Messenger.
If you use the Facebook app on more than one phone or tablet, you will need to turn off continuous downloading of contacts on each of them.
Viewing and deleting downloaded contacts
You can view or delete downloaded contacts on the Manage invitations and imported contacts page. nine0003
Learn more about uploading contacts for people who don't use Meta products.
Was the article helpful?
How do I upload contacts from my mobile phone or other Facebook accounts?
Upload contacts to Facebook
How do I delete uploaded contacts in the Facebook Lite app?
Where is the Facebook support inbox?
How do I delete contacts uploaded to Facebook?
© 2022 Meta
Information
Confidentiality
Conditions and Rules
Advertising preferences
Vacancies
COOKIE
Creation
Create page
Information that can be automatically transferred from a mobile phone to Facebook - contacts and profile data. Contacts are automatically synced with Messenger, Facebook's instant messaging service to find your friends registered with the social network, and profile data is transferred from the application and third-party services to log in. Then you need to have a separate discussion about the photos, which are no longer automatically synced to Facebook, but can be easily organized and shared with friends through Moments, a Facebook application entirely dedicated to photos. nine0003
In short, synchronization features are certainly useful, but they can also pose a potential privacy risk. In today's guide, I want to explain the best way to pick them up and how to remove the sync from facebook stop uploading contacts, personal data and photos on the social network. It's not hard, try it!
Index
Let's start by viewing how to disable synchronization with Facebook As for contacts from the address book.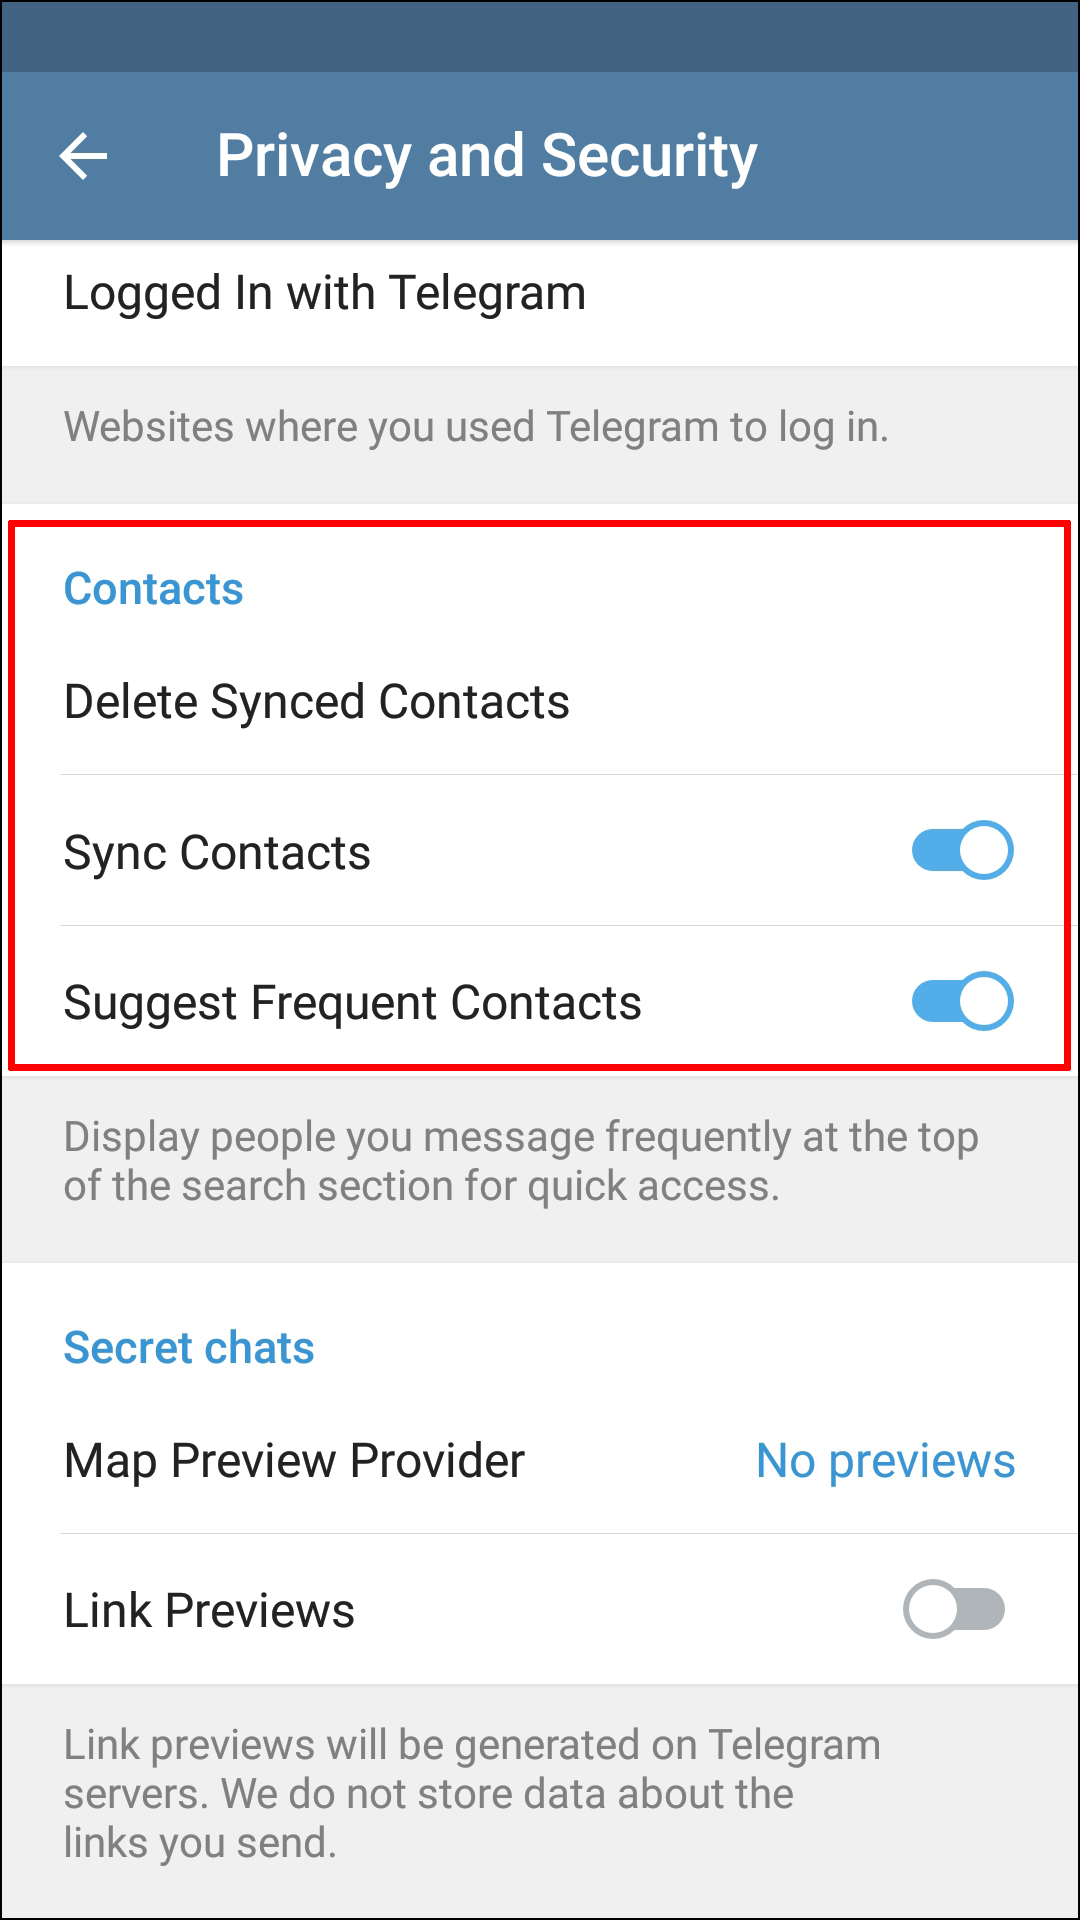 In this case, the first step you need to take is to launch the application. facebook messenger and go to your settings by clicking the gear icon located in the upper right corner (in Android) or the configuration button is located in the lower right corner (in iPhone).
On the screen that opens, select the option Synced contacts and first press the button Stop sync and then in delete to apply the changes. Note: Turning off contact sync will also remove the names of friends that Messenger has previously imported from the phonebook!
Now, if you want to delete the names and phone numbers of all your contacts previously saved on Facebook, launch the social networking application (not Messenger) and press the ≡ button, which on iPhone is located in the lower right corner, and on Android it is located in the upper left corner. nine0003
Scroll up and down the screen that opens and select the element Centro de servicio , then click on the search bar at the top and search for the terms eliminare contatti , Then select the wording How do I delete contacts imported to Facebook? and click on the link Manage invitations and imported contacts found on the page that opens.
A list of all contacts imported to Facebook will be displayed. To delete some of them, check the box next to their names and press the button Delete selected is located at the bottom of the screen. To delete imported contacts from Facebook Messenger only, select the link To access contacts that you have imported to Messenger, go here and click the button Delete all get rid of it.
If you prefer to work from a PC connected to this Facebook page, select the contacts you want to remove from Facebook and click Delete selected which is at the top.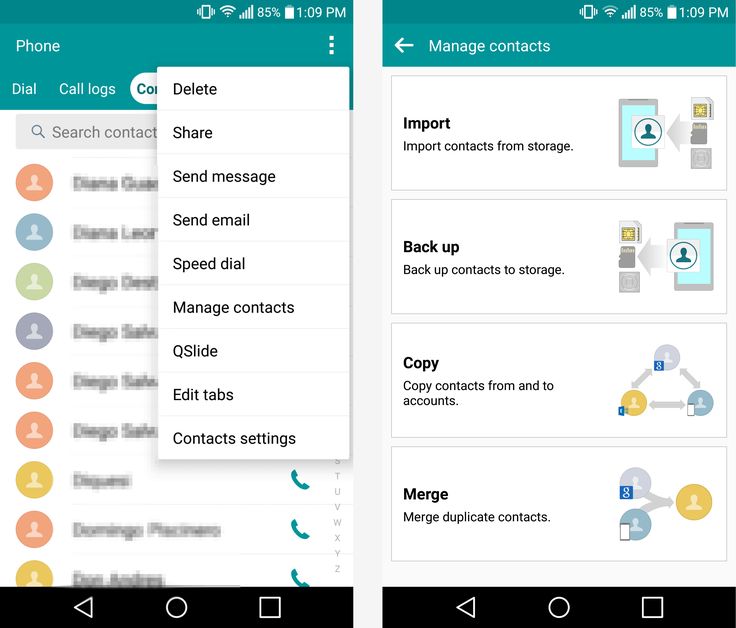 If you want to delete all contacts at once, click on the item Delete all contacts.
To manage contacts synced with Messenger and possibly delete them, first click on View the contacts you have uploaded to Messenger and then on the button Delete all found on the page that opens.
Have you linked your Facebook account to a third party online service or application? This is now a very common practice, used to save time and to access services or applications without using the classic username/password combination, but it should not be abused. Before you sign in to a service or app and give you access to your personal information, we recommend that you verify that it's trustworthy. At the same time, it's a good idea to remove the data sync between Facebook and apps or services you no longer use. nine0003
To remove the synchronization between Facebook and an online service or application, launch the social network's official application on your mobile phone, press the ≡ button, and select the account settings article from the menu that opens. Then go up Application > Sign in with Facebook , select the application or service you want to remove from your Facebook account and click on the button Delete App which is at the bottom of the screen that opens. nine0003 If you prefer to operate from your computer, you can configure the settings related to applications and services by connecting to the main page of the social network by clicking on the arrow icon located in the blue bar (top right) and selecting the nine0110
At this point, you will be shown a complete list of applications and services connected to your Facebook account. Then find the application or service that will be disconnected from your personal profile, and first click [[ X] located next to its icon, and then the button delete to complete the operation.
As mentioned above, photo syncing can no longer be done through the official Facebook app - you must now trust Facebook Moments , Application for Android and iOS It automatically organizes photos based on the people in them and/or the time they were taken, and makes it easy to share them with friends.
If you don't want to take the risk of posting photos to your Facebook profile voluntarily (by casually clicking the share button for a group of photos prepared by Moments), uninstall the app from your smartphone or turn off automatic photo search. system roll. nine0003
To disable automatic photo search on Android or iOS, launch Facebook Moments and tap the icon first. bell and then in that gear (upper right corner). In the screen that opens, select the element Device folders and uncheck all folders (the one associated with the roll is called Number ).
If you want to remove Facebook Moments from your mobile phone instead of , but you don't know how to do it, follow these simple steps. nine0003