As one of the most popular social media apps, Instagram constantly keeps coming up with new ways to share snippets of your life with others. One of the major breakthroughs over the years has been the release of Stories, adopted from Snapchat.
The core of Instagram Stories is the ability to share photos or videos that can only be viewed for 24 hours, after which they disappear forever. This eases the burden of having to create permanent content of the highest quality and incentivizes people to share more.
Furthermore, instead of forcing users to choose the best photo for their Story or regular feed post, Instagram has also allowed them to share a post with multiple photos, so they can tell their story in the best way possible.
Let’s review how you can share multiple photos in one Instagram post or Story as well as how to add images or video to an existing Instagram Story and a few other tips and tricks.
When you upload multiple images to Instagram, you not only tell a better story but also save time, increase engagement, and maintain clear theme separation in your overall narrative.
There are a few ways to add multiple photos or upload multiple videos to Instagram. You can do so from your phone or Mac, both using the official Instagram app or leveraging the extra functionality of third-party alternatives.
When you want to add multiple photos in one Instagram Story, your instructions might differ based on what version of Instagram you’re using and whether you’re trying to do that on iPhone or Mac.
Historically, the way to upload multiple images to Instagram Stories has been the following:
Instagram has recently removed the Select Multiple option on the iPhone (still there on Android). However, the functionality still exists — you just need to tap and hold any of your images for it to appear.
There also are a variety of situations where posting Stories from your Mac would be much more preferable, especially if you tend to edit your photos with macOS software. As you might know, there’s no official Instagram client for Mac. But there’s Grids, and it’s just as good.
Grids is a fully-functional Instagram experience for Mac that lets you like, comment, follow, search, explore and, most importantly, post just like you would do with your phone. You can post single or multiple photos or videos to your regular feed and even post Stories. Besides, Grids features a beautiful customizable design, which lets you send direct messages and use separate accounts at once.
Using a carousel in your Instagram feed opens a ton of possibilities for a new kind of storytelling. But posting multiple photos to your Stories can bring your creativity to a whole new level.
Luckily, it’s very easy to learn how to add images or video to an existing Instagram Story:
Instagram is changing the functionality of its app so frequently that it’s sometimes difficult to catch up. One of the newer Instagram features that you might not have tried yet is called Instagram Layout.
Basically, you can use the Instagram Layout tool to create custom collages of your favorite photos and post them as Stories.
Here’s how to use it:
Alternatively, you can use the sticker functionality instead:
 g. text or music)
Sometimes, instead of adding multiple photographs to Stories, you want to create a carousel in your feed instead. How do you do that? It turns out, it’s even easier to do:
This process works in the official Instagram iPhone app, but what if you want to share on Mac instead? Here, once again, the Instagram Mac client, Grids, will help you.
Grids integrates the whole posting process, from choosing high-quality photos and videos to editing how they look and adding captions. You can post multiple photos and videos too, as well as add emojis and hashtags.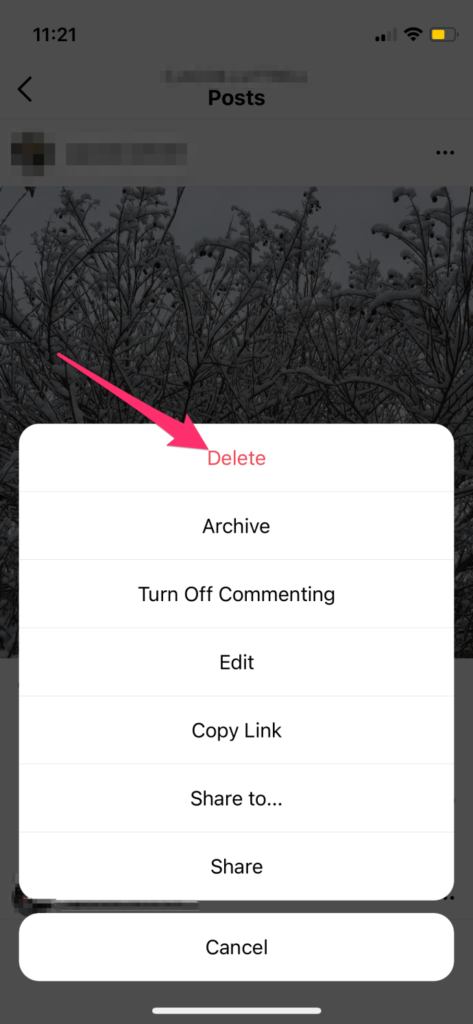 What’s more, Grids is the only app that allows you to post Stories from Mac.
Long time ago, when Instagram used to be all squares, every photo was automatically cropped to fit the default ratio. Today, there are no longer ratio restrictions. However, if you try to upload multiple images to Instagram, all the photos in the batch will be cropped to the ratio of the first one, which might not necessarily be what you want.
Luckily, it’s easy to change:
In addition to all the information shared above, there are a few questions that tend to come up over and over again, and which we should clarify.
A: The current limit for an Instagram carousel is 10 photos.
A: Although you can add extra photos to an Instagram Story, you can’t do so with posts, since they are meant to be more permanent. Your only way out here is to delete the post and resubmit it again with the correct number of images.
A: The multiple photo workflow described above might not yet be available everywhere in the world. So, depending on where you live, you might get it at a later date. Try keeping your Instagram app updated to the latest version and watch out for it.
As you can see, there are indeed many ways to post multiple pictures on Instagram, both from your iPhone, in the official Instagram app, and from your Mac using a full-featured app like Grids.
Best of all, Grids is available to you absolutely free for seven days through the trial of Setapp, a platform with more than 220 outstanding Mac and iPhone apps for everything from creating beautiful color palettes (Aquarelo) to turning images into icons (Image2icon). Try every Setapp app at no cost today and expand your collection of favorites!
By: Jenn Herman and Eric Butow and Corey Walker and
Updated: 09-01-2021
From The Book: Instagram For Business For Dummies
Explore Book Buy On Amazon
You don’t need to have one Instagram post for each photo. Instead, you can add as many as ten photos in your Camera Roll (or Gallery if you use an Android smartphone) to a single post.
The select multiple icon in the viewer is blue and the other viewer icons have disappeared.
If you select a photo but then decide that you don’t want to include it, just tap the thumbnail photo. The order of your photos will change if you selected more than two photos. To deselect all photos, tap the blue select multiple icon in the lower-right corner of the viewer.
The most recently selected photo appears in the viewer.
To reorder the photos, you have to deselect them and then reselect them in the correct order. (Yes, this is something Instagram needs to work on.) For example, suppose you select five photos and want to move photos 3 and 4 to positions 4 and 5, respectively. First deselect photos 3 and 4. At this point, the former photo 5 becomes photo 3. Then select the former photo 3, which becomes photo 4, and then select the former photo 4, which becomes photo 5.
The filter name appears above the filter thumbnail image.
A row of filter types appears below the photo. Swipe from right to left in the row to view all the filters. To apply a filter to all photos in the group, tap the thumbnail image under the filter name.
At the right side of the screen, you see part of the next photo in your photo group. To see the other photos, swipe left. To add another photo to your post, swipe to the end of the row, tap the + icon, and then select the photo from the Camera Roll screen.

In the New Post screen, you can write a caption, tag people, add a location, share your photo on other social networks, and turn commenting on and off.
You can't write a caption for each photo when you have multiple photos in your post. So when you write your description, the caption should describe all your photos, not just one.
When you've finished editing your photos, it's time to share them. Tap Share in the upper-right corner of the New Post screen.Jenn Herman, a social media consultant and world-renowned Instagram expert, pens a top-rated social media blog, Jenn's Trends.
Corey Walker offers social media strategy, content, ad management, and analytics focused on Instagram and Facebook.
Eric Butow provides website design, online marketing, and technical documentation services to businesses.
John Sonmez is a software developer and the author of two best-selling books, The Complete Software Developer's Career Guide and Soft Skills: The Software Developer's Life Manual. He is also the founder of the Simple Programmer blog and YouTube channel. Eric Butow is the owner of Butow Communications Group (BCG), which offers website design, online marketing, and technical documentation services for businesses. He is the author of 32 computer and user experience books.
Jenn Herman, a social media consultant and world-renowned Instagram expert, pens a top-rated social media blog, Jenn's Trends.
Corey Walker offers social media strategy, content, ad management, and analytics focused on Instagram and Facebook.
Eric Butow provides website design, online marketing, and technical documentation services to businesses.
Greetings, friends! 🙋🏻 Today we will talk with you about how to create a new type of post on Instagram, where several photos and / or videos are uploaded at once in one row. Please note that this is not an ordinary collage, where several photos are displayed in one picture, and not an Instagram story, namely new post type . Such posts are still called "carousel" or slider , since the user can "scroll" photos and videos in a circle.
Previously, this feature was available only for promotional publications, but now all users can use the slider for free.
I’ll add right away that you can create such posts manually from your profile or do it through auto-posting programs on Instagram. Instaplus is the only service we have so far that allows you to publish carousel posts from your computer.
By the way, in the Instagram search, slider posts are marked with a small icon with several squares, which means that there will be several photos in this post.
Now let's see what needs to be done to upload up to 10 photos and videos in one post to Instagram.
Step 1. To upload multiple images and videos in one post on Instagram, you need to click on the " + " symbol at the bottom of the screen, which means " create a new post ".
Click on the "+" icon to create a new post on Instagram Step 2. If the new option has already been activated for you, then you will see on the screen an icon with several squares , which you need to click to create a publication with photos and videos next to it.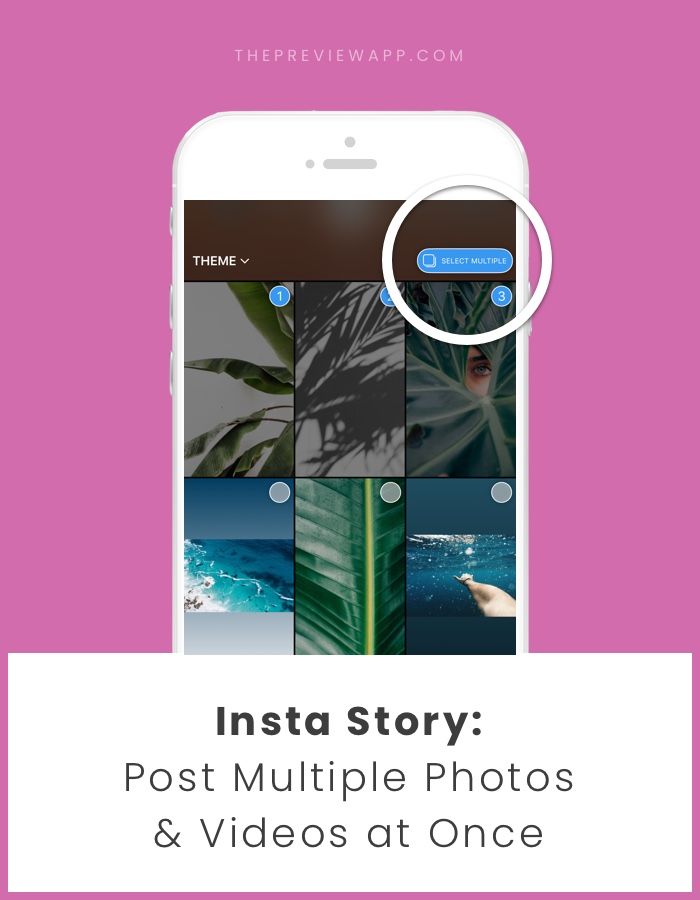
Step 3. After you have clicked on the icon with several photos, you will select from the gallery of your mobile device up to 10 photos and / or video that you want to upload to the post.
Please note that Instagram will show you the numbers on the files you select. These numbers indicate the order in which the photos appear in the carousel. At this stage, you can change the numbers as much as you like until you are satisfied with the chosen order.
Select the photo and/or video that you want to publish in the slider, as well as the order in which they appear in the postOnce you have decided on the photo and video for your carousel, click on the "Next" button , which is located in the upper right corner of the screen.
Step 4. In the next step you can edit the photos and add filters .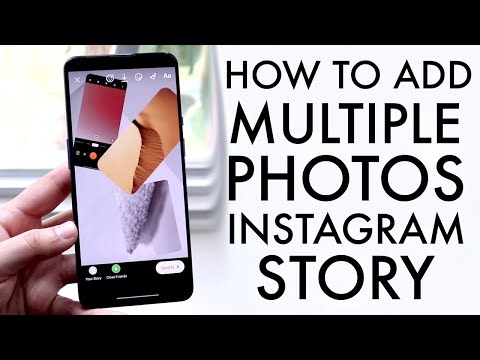 It's a bit inconvenient, but if you select one of the filters on this particular screen, it is automatically applied to all photos.
However, you also have the opportunity to select different filters for individual photos . To do this, you need to select a specific photo by clicking on it. Notice that on the right you can see a “piece” of the next photo in the slider, so to move between photos, just scroll through them with your finger. Once you have selected a photo, you can edit it and add a filter to it without changing the rest of the images in the carousel.
Step 5. Here, on this screen, you can also change the order in which photos are displayed in the post. In order to change the display order of your photos, long-click on the image . Once you have the trash can icon at the very top of the screen, you can move the desired image left and right to put it in the right place.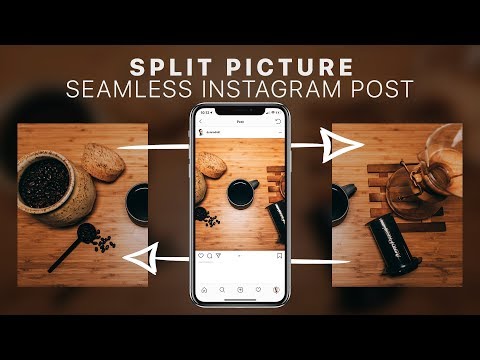
When you're done editing your media, click on the "Next" button which is in the top right corner of the screen.
Step 6. Next, on the next screen, you can add a caption to any of the photos. The photo to which the test is being added is visible on the right. To select the next photo, click on the photo.
Click on the photo to enlargePlease note that Instagram allows you to tag different users on different photos, add different geotags, which is very convenient! 👌🏻
Tag the users you want in the photo and click on the "Done" button.Step 7. Well, actually, that's it! If you are satisfied with the work done, then just click on the " Share " button and your post will go to the feeds of subscribers ☺️
For those who prefer instructions in video format, I share with you a video from Instagram itself.
Instagram does nothing for nothing, so the emergence of a new posting format is not an accident either.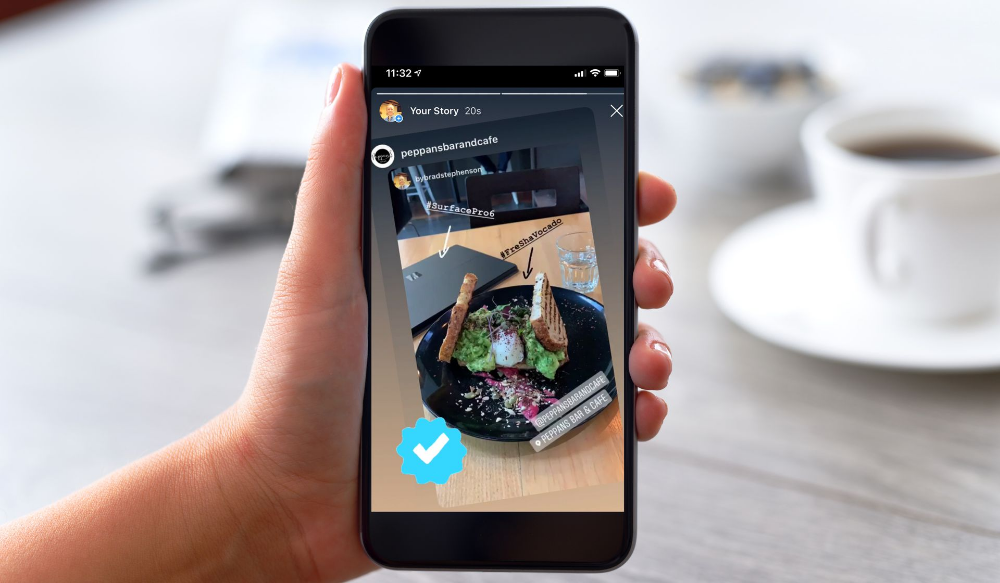
Instagram has already managed to “offload” the news feed a bit with the help of stories, where users upload temporary photos that are not saved in their profile gallery. But sometimes you really want to add several images united by one topic, but so that they remain in the profile, right?
So that you don't bombard your subscribers with, say, ten photos from a cool concert in a row, now there is an opportunity to make photo sliders. Agree that it is very convenient!
Let's look at a few examples of how Instagram users are already using the new format.
As I mentioned above, in order not to bore subscribers with a series of photos and videos from some event where you attend or organize, why not combine the best photos in one post?
This is how you show everything you want, without the risk of being branded as a "spammer" and getting a response.
Whatever position you are in, a seller, a buyer, an Instagram blogger, sometimes you want to show some product, so to speak, with your face, or just show off a new phone or a new thing in front of your audience. Again, in order not to take five photos of one dress from all angles, it’s better to “stuff” the whole thing into a convenient slider, and there the subscriber will decide for himself how many photos to view. And you feel good, and the subscriber is not a burden 🙂
And one more living example.
Publication from ✂Flowers Minsk/ FLOWERSJULI🌿 (@flowers_juli)
Want to share with readers a step-by-step photo tutorial on how to make an apple pie, make a wreath of fresh flowers or use a mobile application? Then why not do it in the form of a "carousel"? The slider, in my opinion, is a very convenient format for conveying visual information about how something is being done. Don't forget also that you can upload both photos and videos to the carousel.
And here's another example of step by step instructions from Photoshop, which shows how you can creatively combine two photos into one. Here it is interesting and useful for the user to look, and the product is presented for the way 🙂
Posted by Adobe Photoshop (@photoshop)
As for any news, the post-carousel will come in handy again. You can add both a separate story about an event and a group of news to the news slider. What's more, many Instagram profiles that post interviews to their accounts can now "split" those interviews into multiple parts. Such content will be even more readable and interesting, thanks to several photos or even video inclusions.
The Instagram carousel post is also great for posting testimonials. For example, you can add a photo of the client, and write in the text the review sent to you. Don't forget to also tag this person in the photo to make the review more believable and alive.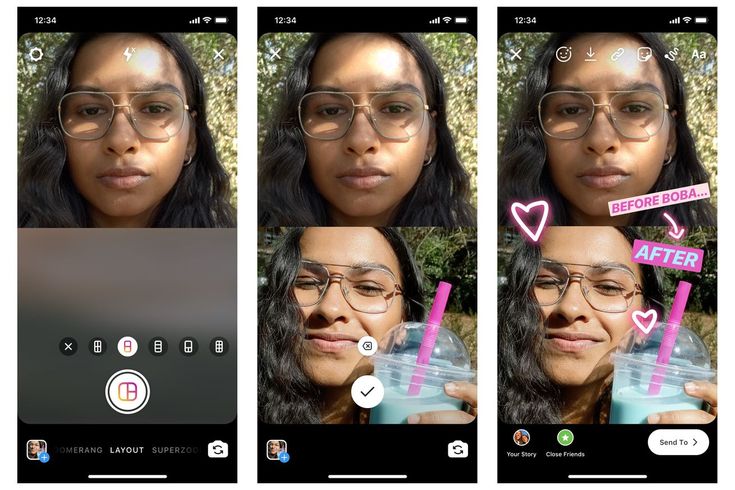
If you, for example, conduct training sessions and master classes, then why not post the successful work of your participants in the slider? I think that it will be interesting both for those who attended your event, and for those who are just planning to learn from you.
Actually, there are countless ideas for using the new post carousel feature. So, try it, friends, experiment, and get tons of interested subscribers to your profiles!
I wish you a great mood! 😃
Girls, look what I found on Ali Since you joined Instagram , all you do is post photos of all the places you visit. To let your followers know where you've been, use a special feature available on the photographic social network: geotag . However, the last time you tried to add a location to one of your posts, you couldn't use any geotag because it doesn't seem to "exist" on Instagram. Do you want to understand how you can solve the problem? Well, in that case, I'm happy to report that you found the right item at the right time. In the following paragraphs, I will explain in detail to you how to create a place on instagram .
For a few years now, Instagram hasn't allowed you to create personalized places, so you can only add a place to your posts using the ones that already exist (and are usually offered by the social network itself when you're about to post a new photo). However, you can get around this limitation by creating a new position on Facebook (the social network that Instagram belongs to) and use it to geotag your Instagram posts. How? I'll explain to you right away.
Sit back, take as much time as you need to read the information in the following paragraphs, and most importantly, put into practice the suggestions I will give you. You see: adding custom places to Instagram will be a very simple operation. I wish you good reading and, above all, have a good time!
Postcode
As mentioned above, when to add a place to Instagram it turns out to be "non-existent", you must first create a new location on Facebook . At the time of writing this article, the "Create Place" feature is only available on the official Facebook app for Android e iOS. If you haven't installed the Facebook app on your device yet, download it immediately using the links I just provided, and once the download is complete, follow the steps listed below.
Para crear tu lugar, primero inicia la aplicación de Facebook en tu dispositivo (para que quede claro, la que tiene el ícono con la "f" sobre fondo azul) y, en el cuadro donde se te pide Qué estás pensando?, toca el elemento Registrarse (abajo a la derecha, está marcado con un marcador de posición rojo).
How to restore numbers from a SIM card?
In the menu that appears on the screen, you should see places that are nearby (if you have enabled geolocation on your device). Now in box search Write put your name that "doesn't exist" on Instagram (not even on Facebook) and press voice Add "[nome del luogo]" to start creating it.
On the following screens, enter the category of the place affiliation (e.g. City , Leisure , Campus Building , etc.), indicate your geographic location by entering the name of the city in the field Search city and after entering all descriptive information that concerns you ( ZIP CODE , talk to etc.), touch the object create (upper right) to complete the procedure.
After completing this preliminary operation, you can finally add the Facebook space you created to your Instagram posts; read on to find out how.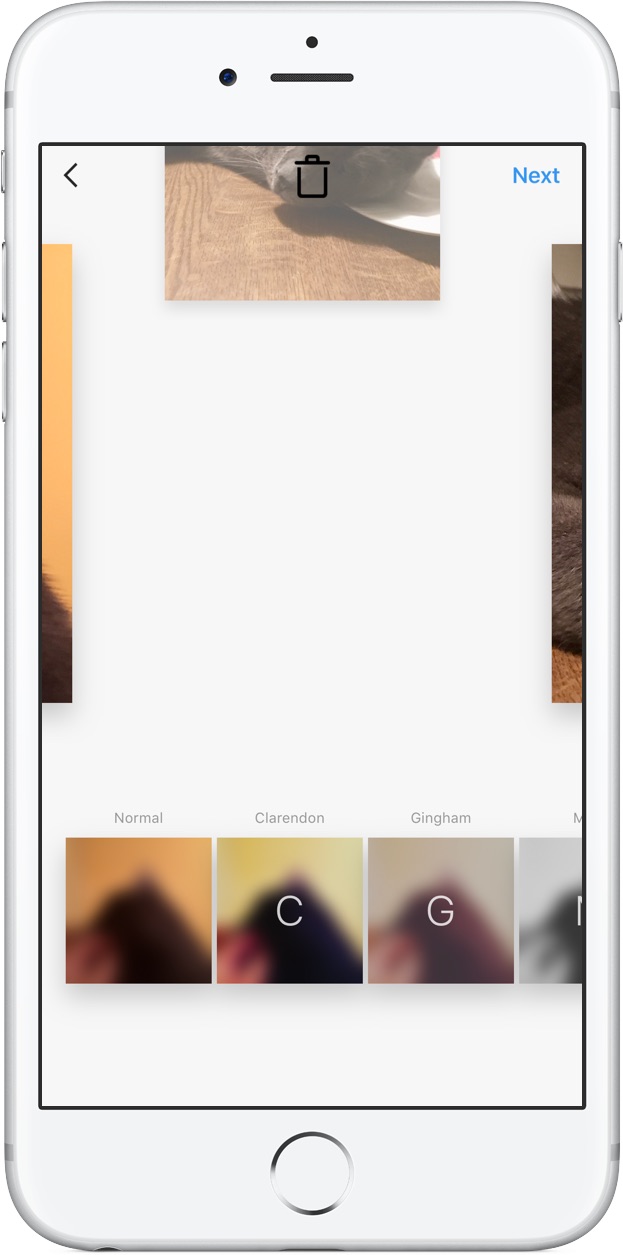
Note: The place you created will not be visible until a few hours after registering on Facebook. So if you don't see it right away, don't be alarmed and wait a few hours. If you can't see the new place you created, even after several hours of waiting, contact Facebook to report the problem to the social network staff.
Now it's finally time add the place you created on Facebook to Instagram . It's very easy to do: just use the "Add Place" feature that Instagram provides to its users. If you've never used this feature and therefore don't know how to proceed, read on.
The first thing you need to do to geotag your Instagram post is launch the popular photo social network app on your device (which can be Android or iOS). Then touch symbol (+) which appears in the center of the screen and starts the procedure for publishing a new photo.
On the next screen, find the content you want to post, tap on its preview, and click on the item Venga located in the top right corner. If desired, apply one of the many filters available on Instagram (or retouch the photo by touching the element edit and choosing one of the options that appear on the screen) and once you are satisfied with the result, click on element Venga which is in the top right corner to continue.
Now you need to describe the content you are going to post with hashtags, tag people and, above all, add a geotag to indicate the location where the picture you are going to post was taken. To use this last feature, press the symbol (>) located at the entrance Add place and in the menu that appears on the screen, enter the field search the name of the place you want to use in your message.![]() If you have successfully created a place on Facebook by following the instructions I gave you above, you should have no problem adding the created place to your post by clicking on its name.
If you have successfully created a place on Facebook by following the instructions I gave you above, you should have no problem adding the created place to your post by clicking on its name.
Now publish the entire post with a custom "geotag" by clicking the Share item located in the top right corner, and let your followers know exactly where you've been.
Have you seen that creating a place on Instagram is not so difficult? Now you know how to behave when you can't find a place for your posts: first you have to create it on Facebook and then use it on Instagram.
Did you encounter a problem with any of the steps I have listed in this guide? In this case, I invite you to visit Instagram Help Center thanks to which you can solve your problems and doubts about how to create a place on instagram . The Instagram Help Center has many helpful articles that you can easily find by typing your problem in the search box. How can we help you? which is on top.
Alternatively, you can find the answer to your question in the problem categories listed on the left: Using Instagram , Account Administration , Help with troubleshooting and access ; Privacy & Security Center o Instagram for Businesses . In your case, you can find useful information by going to Using Instagram > Share Photos and Videos > Upload Posts and Add Places .
If you still can't solve your problems or concerns, contact Facebook for help. You can be sure that the operator you contact will be able to provide you with the assistance you need.
Oh... almost forgot! If you have problems using Instagram, read the guide in which I illustrate in detail how this social network works: I am sure that thanks to the information you will find in the article I have just linked to you, you will be able to resolve all your doubts.