DIY Video Studio is supported by its readers. Please assume links on this site are affiliate links or ads, and that I get commissions for purchases made through these links. As an Amazon Associate, I earn from qualifying purchases. Thank you if you use any of the links.
Table of Contents
In this article I’m going to show you exactly how to make a vertical video for Instagram.
It’s the method I’ve used for making vertical videos for Instagram, YouTube, and Vimeo for my business clients. The same method works for all these sites. So whichever social media platform you’re uploading to, this is a super-easy guide to get you going.
As a bonus, I’ve included a how-to video at the end of the article that will walk you through the steps.
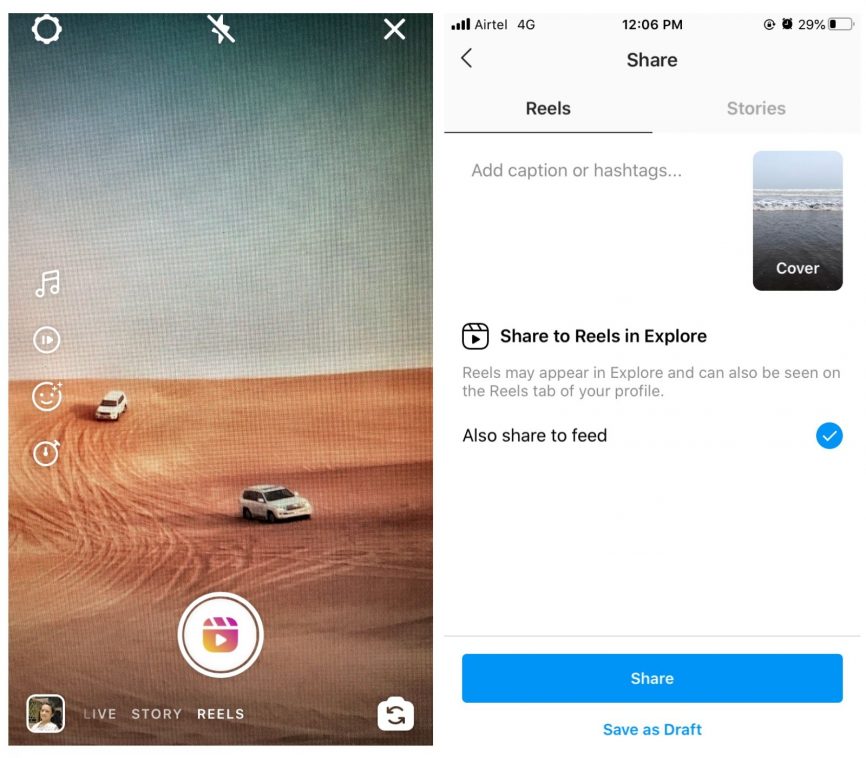
IGTV’s upload requirements for vertical video are as follows.
Your video should be an MP4 file of up to 650MB (for video under 10mins). Have an aspect ratio of 9:16. And a frame rate of 30fps.
So, the first thing to do is make sure your camera’s frame rate is correct.
If you live in North America, you probably won’t have to change anything, since you probably are already shooting at 30fps.
If you live in a country where the video standard is PAL, you’ll need to go into your camera’s settings and choose NTSC and select a frame rate of 30fps.
The second thing I want you to do is to keep all the pixels you record with your camera. So that means shooting in portrait mode.
If you record horizontally, or in landscape mode, you will have to scale and crop your clip when you bring it into your video editor. That will lower the image quality and waste the potential of your camera’s sensor.
Step 2 is really easy. Turn your camera through 90-degrees.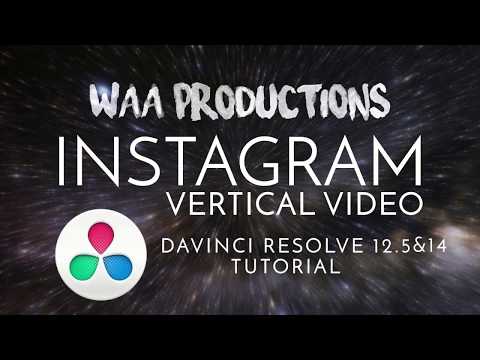
Looking through the viewfinder, or at the digital display, your video immediately looks vertical.
You can frame your image just the way it will appear in the final video and you won’t lose any precious pixels because you won’t need to crop the side of your video.
There is one slight problem though.
Unlike vertical video that you shoot on your smartphone, your portrait mode video from your video, DSLR or mirrorless camera will play flipped on to its side when watched on your computer or mobile device.
Don’t worry. I’m about to sort that out for you by showing you how to rotate a video and save it in Premiere Pro.
Although I’m using Adobe Premiere Pro the principle is the same for other video editing apps.
Whatever your video editor, the aim is to go from a vertical video that’s on its side and rotate it 90-degrees counterclockwise. The result is a vertical video you can upload to Instagram’s IGTV.
STEP 3: Create a new sequence in Premiere ProStart by doing what you always do when starting a new project in Adobe Premiere.
Create a New Project and give it a name. Then save it in the folder of your choice. You’re now ready to create a new sequence.
Click on File > New > Sequence, or use the keyboard shortcut of Ctrl + N. Under Sequence Presets in the New Sequence Window, choose the DSLR 1080p30 preset. Then at the bottom of the screen give the sequence a name.
The DSLR 1080p30 preset is just a starting point. So at the top of the window click on “Settings“.
Currently, the Frame size is 1920 x 1080, with an aspect ratio of 16:9. That’s the normal horizontal video frame.
You need to reverse these numbers. Click in the boxes and change the horizontal value to 1080, and the vertical value to 1920. The aspect ratio will automatically change to 9:16.
Next, click the Save Preset button at the bottom left of the window.![]() The Save Sequence Preset window will open.
The Save Sequence Preset window will open.
Give the preset a name of your choice. In the screenshot, I have named the preset “Full HD Vertical Video“. You can then click on OK.
Your new preset will appear in the Custom folder of your Sequence Presets list.
Make sure your new present selected, then click OK to create your new Vertical sequence.
You can see below the monitor window no longer has its familiar widescreen appearance. Instead, you have a tall and narrow frame that is the shape required for Instagram or IGTV vertical video.
I will assume you have already imported your video footage. So you can now add the clip(s) to the sequence timeline.
Drag your clip from the project window to the start of the sequence timeline. All simple stuff.
When you drag your clip to the timeline it will appear to be on its side.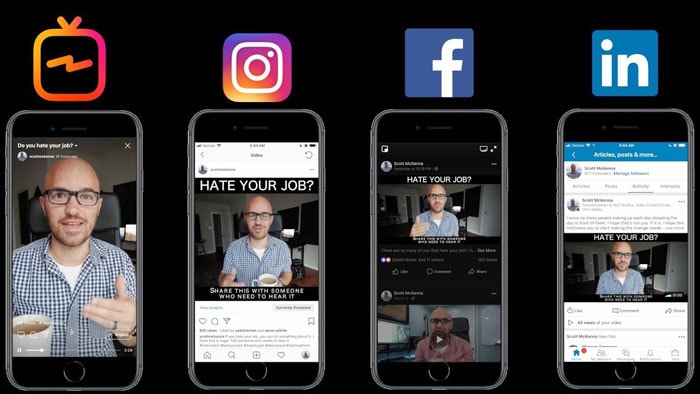 Because the sequence is only 1080 pixels wide, the clip will also appear square. To correct the clip orientation, you need to rotate the clip.
Under the Video Effects, change the Rotation to -90 degrees (or 90 degrees if you shot your portrait mode footage the other way round).
Your clip should now be vertical and does not require any cropping (see the image below). You can now proceed and edit your vertical video.
When you have finished your editing go ahead and Export your video.
However, you can speed up your future workflow if you first create an export preset.
Click on File > Export > Media. When the Export Settings window opens changed the settings as required. For instance, the file format, the bitrate encoding, target and max bitrates.
Once you have made your changes to the settings, the preset name will change to “Custom”.
Click on the Save Preset button to the right of the preset name and the “Choose Name” panel will open.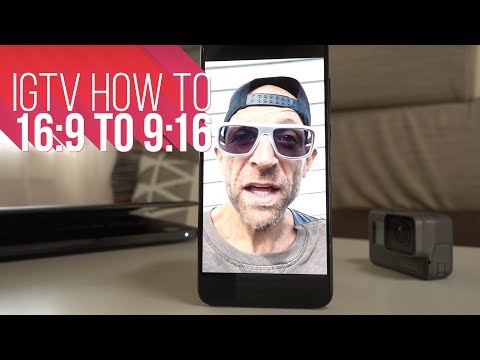 Enter an Export Preset name, such as “Vertical Video 30fps”, and click OK.
The preset name will change from “Custom” to “Vertical Video 30fps“.
You’re now at the last step of exporting your video.
At the bottom right of the Export Settings window either click the Queue button to send your video to Media Encoder or click Export to export directly from Premiere Pro.
You’re now done.
You will have learned how to make a vertical video for Instagram. Plus, you will also have learned how to create a sequence in premiere pro, how to save it as a preset, and how to create and save a vertical video export preset.
Well done!
Your video should now be truly vertical and ready to upload to Instagram TV, Facebook, YouTube, and Vimeo. You can see one of my vertical videos below.
I did say right at the start that if you want to watch me walk through those steps again, you can watch my YouTube video. So here it is.
If you’ve found this article helpful, please share it with someone you think might also find it useful. Better still, share it on your social media accounts.
Tosh Lubek runs an audio and video production business in the UK and has been using the Canon EOS R since it was released in the Autumn of 2018 and the Canon EOS R6 in 2020. He has used both cameras to shoot TV commercials broadcast on Sky TV, promotional business videos, videos of events and functions, and YouTube creator content. He has also won several international awards for his advertising and promotional work. You can meet him by visiting his “video booth” at HashTag Business Events across the country.
How to Prevent Glare on Glasses in Zoom Instantly with a PlexiCam
If you wear glasses, you will know it can be a struggle to deal with glare on your lenses during Zoom calls. It can be frustrating for others when your video light is reflected straight into your...
Continue Reading
link to Has the Canon LP-E6N Camera Battery Been Discontinued?Has the Canon LP-E6N Camera Battery Been Discontinued?
If you’re looking for a Canon LP-E6N battery, you’ll need to look for an LP-E6NH battery instead. Why is that?
Continue Reading
As more and more people flock to Instagram’s newest offering, a question we’ve been getting a lot this week is how to create and edit vertical video for IGTV.
It’s easy enough to understand why people are asking it. Vertical video is definitely a recent phenomenon — brought into the mainstream by apps like Instagram and Snapchat.
And while Instagram users have had some time to practice their video-taking chops thanks to Instagram Stories, creating high-quality vertical video for IGTV can be surprisingly difficult to do!
No need to worry. From video shooting tips to finding the right editing software for your needs, the following post covers everything you need to create stunning vertical videos that are sure to wow your followers!
Note: a lot of the tips in this post also apply to creating and editing vertical videos for Instagram Stories, so feel free to use them as you like.
Before we get into the nitty-gritty of actually shooting and editing vertical video for IGTV, let’s take a quick look at IGTV’s technical specs:
Video format: MP4
Length: 15 seconds to 10 minutes for smaller accounts; 15 seconds to 60 minutes for larger and verified accounts
Size: 650MB for videos less than 10 minutes; 3.6GB for videos up to 60 minutes
Orientation: vertical (also known as portrait)
Aspect ratio: a minimum of 4:5 and a maximum of 9:16
Probably the hardest thing to get right when shooting vertical video for IGTV is aspect ratio, which is the ratio of width to height of your video.
The reason it can be hard to get right is because unless your video is shot on a smartphone (which will usually record in 9:16 if shot vertically), you may need to edit or crop your video in post-production to get the right aspect ratio for IGTV. We’ll discuss this a little more below.
How to Shoot Vertical Video for IGTVYou have a few options when it comes to shooting vertical video for IGTV. Here they are ranked in order of difficulty:
Option #1: Shoot Vertical Video on Your SmartphoneMost smartphones made in the last 5-6 years have a screen aspect ratio of 16:9 — and the same is true for most online video platforms like YouTube and Vimeo. (Note: this could change in the future as more smartphones adopt a screen aspect ratio of 18:9, like the iPhone X and Samsung Galaxy Note 8).
So hands-down the easiest way to shoot vertical video for IGTV is to record a video with your smartphone while holding it vertically. That way, your video will have an aspect ratio of 9:16, which is perfect for IGTV!
Option #2: Shoot Vertical Video on Your CameraA second option is to rotate your camera 90 degrees so that it shoots vertical video instead of horizontal.
Just keep in mind that most DSLRs today use an aspect ratio of 3:2, while most compact digital cameras (point-and-shoots) use 4:3. So even though rotating your camera 90 degrees will produce a vertical video, you may have to edit the aspect ratio in post-production to fit IGTV’s specs.
Option #3: Shoot Horizontal Video and Edit in Post-ProductionA third (and more difficult!) option is to shoot a horizontal video on your smartphone or camera, and then edit the aspect ratio afterward with a software like Premiere Pro, Filmora, or iMovie.
The reason this option’s more difficult is because you have to be a lot more mindful when framing your shot. Converting a horizontal video into a vertical one requires cropping the left and right side of the video, so you have to make sure that the subject of your video centered the entire time!
That being said, according to Mashable’s creative director, Jeff Petriello, shooting horizontally and then cropping to vertical may produce higher-quality videos overall, especially when your video is shot on a 4K camera.
If you don’t have $300 laying around to buy Final Cut Pro, there are some free (or cheaper) options out there for editing your vertical videos. The following section looks at how to do it on both desktop and mobile:
Option #1: Edit Your Vertical Video on DesktopThe first step is to download iMovie onto your Mac (don’t worry, it’s free!).
Next, create a new project in iMovie and upload your vertical video.
You then have to rotate your clip 90 degrees so that it’s horizontal (otherwise, iMovie will add black borders to the sides of your video). To do this, click the crop button and then rotate either left or right.
Now you can make your edits, whether that’s adding titles, backgrounds, transitions, or anything else!
Once you’re done editing your clip, click the export button in the top-right corner of the screen, and save as a file.
Now open the video in QuickTime, click Edit in the menu bar at the top of your screen, and then rotate either left or right so your video is vertical once again.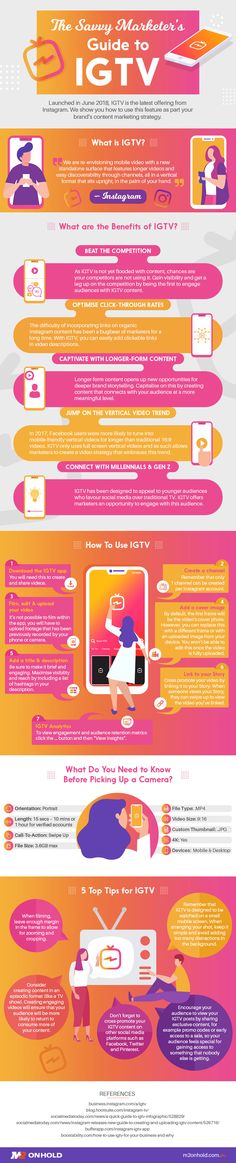
And there you have it! You can now upload your vertical video to your smartphone and share it with the IGTV app, or use the desktop version of IGTV to share your vertical video!
If you’re using a Windows computer and can’t use iMovie, some other options include OpenShot, VideoPad, and Movie Maker.
Option #2: Edit Your Vertical Video on MobileWhen it comes to editing vertical video on mobile, you have a few different options depending on your operating system. The following section looks at how to do it on iOS (with RFV and iMovie mobile), but if you’re an Android user, you can achieve the same effect with Google’s Photo app and Perfect Video.
The first step is to download RFV (Rotate & Flip Video) on the App Store.
Once you’ve downloaded the app, open your vertical video and then rotate it 90 degrees.
Now tap “Save” and your new rotated video should save to your Camera Roll. (Note: this same thing can be done on Android by using Google’s Photo app).
Next, open (or download) iMovie, create a project and upload your clip.
Now that you’re in iMovie, you can trim your video, add filters, slow it down or speed it up, and a ton of other features!
Just keep in mind that titles can’t be rotated on the mobile version of iMovie. So if you want to add any text to your vertical video, you’ll have to use Canva or a different software to create stills and then attach those to your clip.
Once you’re done editing, export the video to your Camera Roll, re-open it with RFV, and rotate it back to vertical.
And that’s it! You can now upload your edited vertical video to your IGTV channel!
As we mentioned above, there are tons of other free video editing apps out there for Android, including PerfectVideo, VideoShow, and ActionDirector.
Now that you know how to create stunning vertical videos for IGTV, it’s time to put these tips into practice! Let us know what you think of IGTV in the comments! Or if you have any of your own tips on creating and editing vertical video for IGTV, please feel free to share!
Later is the #1 Marketing Platform for Instagram. Schedule posts, plan your feed, and analyze your performance – for free!
If you shoot Instagram videos with a digital camera instead of a smartphone, you will most likely need to edit them on your computer before posting. And if you need to save the same file in several formats - for example, for the feed and for stories - cropping can take a lot of time.
To make it easier, we've prepared detailed instructions on what Instagram video sizes are considered optimal, how different aspect ratios look in the feed, and how to quickly save an Instagram video in the correct size and format.
We use VSDC as the editing software. It is a free video editor for Windows that is suitable for both simple operations such as trimming and adding audio, as well as for more complex tasks such as creating a picture-in-picture effect, color correction, and working with sound.
Looking for a convenient and free video editor for PC?
Download VSDC
VSDC has special video export profiles for Instagram and other social networks in the required size. This means that you can automatically apply the optimal settings for each social platform, and adjust them if necessary.
We will show how this works in detail below. But first, let's talk about the optimal video size for Instagram.
The answer to this question depends on what type of post you are planning. Currently, you can post on Instagram:
The general requirements for any video on Instagram are as follows: MP4 format, H.264 codec, 30 frames per second - maximum frequency, resolution - 1080 pixels wide. Lower quality videos - 600 pixels wide - are allowed, however, you should understand that on a visual platform like Instagram, you should always strive for maximum image quality.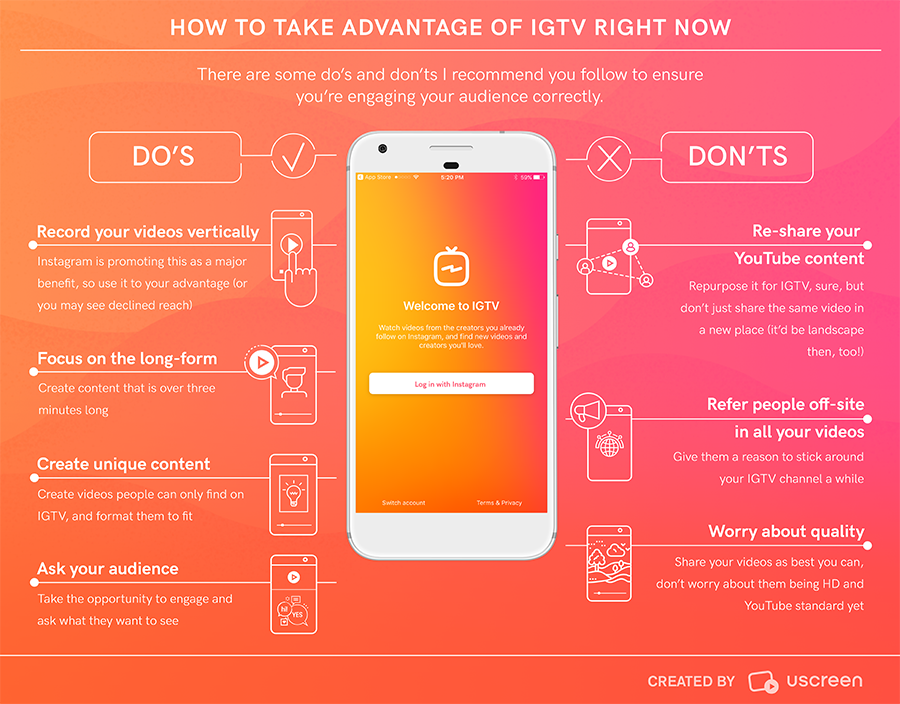
Let's move on to the aspect ratio of the video for Instagram. Here you have several options.
If your video for is a regular post in feed , you can choose any aspect ratio between 1.91:1 (horizontal video) and 4:5 (portrait/vertical mode). Naturally, if your goal is to draw attention to the publication as much as possible, we advise you to choose the second option, because it takes up much more space on the smartphone screen. The recommended settings for vertical video on Instagram are 1080 x 1350 and 864 x 1080 pixels. However, if you shot the original video in a non-portrait mode, it will be difficult to apply the optimal aspect ratio. In such cases, it is worth using square videos with a standard 1:1 ratio. The optimal resolution here would be 1080 x 1080 pixels.
The best video resolution for Instagram Stories is 1080 x 1920 pixels. And, of course, for maximum organicity, shoot video initially in portrait mode.
Finally, if you're editing a video for IGTV , you can save both a 9:16 vertical video and a 16:9 horizontal video. It is worth remembering that when an IGTV video is viewed in the feed, it is loaded in portrait mode, so it is again recommended to shoot vertically for optimal results.
After you have finished editing, you can save the video in the desired format and size as follows:
To change any of the video parameters - width, height or frame rate - use the "Change profile" option, this button is located below the preview window. If you need to create and save your own video export profile, see this guide.
If your video is longer than allowed, you can quickly split it into parts and post sequentially to the carousel or stories. The easiest way to do this is with cropping markers:
Saving videos in the optimal size for Instagram is not difficult if you use a program with preset export options. Maintaining maximum quality, however, can be more difficult. We recommend that you try the following tips:
Questions about video size settings for Instagram? Write to us on the Facebook page or send an email to This email address is being protected from spambots. You need JavaScript enabled to view it..
Download Free
Video Editor
You can learn more about the program on the product description page Free Video Editor
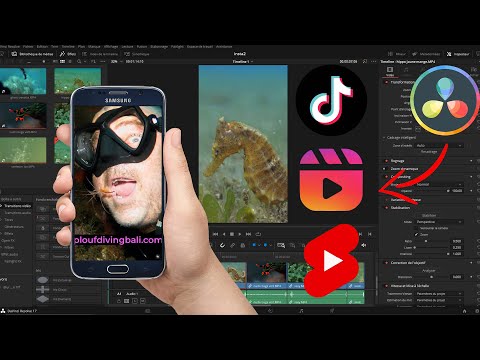
To create and edit vertical video for Instagram and TikTok, there are 2 ways in 2020. The first is to shoot and process clips on a smartphone. The second is to use video editing software.
Both paths have their pros and cons.
When processing video on a smartphone, you don't have to think about how to make the clip vertical. But in mobile editors there is a minimum of settings and editing tools. This is easily explained - the emphasis is on social interaction, content, and secondarily on special effects, glitches and timing.
It's easier to fit the video on a PC and there are fewer restrictions, and this is an important advantage compared to editing clips on a smartphone. The downside is that even at the end of 2020, not all editing software has settings for exporting videos in vertical format.
Among the software there are pleasant exceptions, where it is possible to export video in 9x16 format, ideal for viewing on most smartphones. For example, Filmora 9.
To make a vertical video for Instagram and TikTok, open Filmora 9. In the project settings (located in the "File" section of the main menu of the program), set the aspect ratio to 9x16 (portrait). Add a photo, video, audio, mount a clip or edit individual elements before publishing. After check the project settings and click on the "Export" button. When exporting, select MP4, specify where to save the clip, and set the video settings manually.
Vertical videos for Instagram and TikTok are best saved as MP4.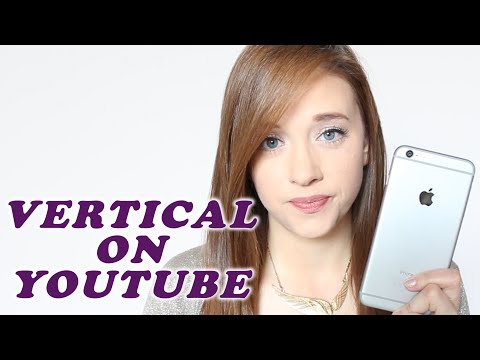 To create vertical videos for Instagram and TikTok in Filmora 9, first set the aspect ratio to 9x16.
 Check settings before saving vertical video.
In Filmora 9, the settings do not change depending on whether you select the horizontal or vertical orientation of the clip. Therefore, by clicking on any resolution in the "Settings", you will save the clip with a horizontal orientation!
How to avoid this?
Adjust the video manually, making sure that the number on the right of the selected resolution is greater than on the left (this is the main difference in vertical video).
There are 2 ways to change the resolution so that the vertical video is saved without problems and on the first try.
First: set new parameters in the "Settings" of the "Export" section. Go to the "Resolution" section, then either set the settings from scratch, click on the "Custom" item in the list of resolutions, or use the appropriate resolution in the drop-down list, then go to the "Custom" section and change the resolution values manually.Vertical video can only be saved if the aspect ratio is set correctly.For example change 4096x2160 by 2160x4096 by copying numbers from one field.
Second: click on the monitor icon in the right corner in the center of the screen. Hovering over the icon will display the inscription "Quality and Preview Screen Settings". Click on it and on the very first item in the drop-down menu "Change Project Aspect Ratio". In this section, you can immediately specify the resolution, taking into account the vertical orientation of the video. After that, when exporting, you can not change the settings - the parameters that you specified will be used.
Icon with video quality settings. Vertical video for Instagram and TikTok can be prepared in advance for export.An important nuance: if you specify a new video format (for example, instead of MP4 you click on AVI, iPhone or Android), the resolution settings will disappear and you will need to set them again.
Now let's talk about presetting the clip for Instagram and TikTok.
If you use photos and videos in landscape format, you can place them in the clip in 2 ways.
The first is to rotate 90 degrees clockwise or counterclockwise. This can be done by clicking on the arrow next to the image in the editor, or by right-clicking on the media files located on the timeline, selecting "Rotate 90 Clockwise/Counterclockwise" from the drop-down menu.
The second is to center photos and videos by adding a blurred background or black box as a background. Can be placed both vertically and horizontally. You can also add subtitles to fill in the empty space.
Vertical video can be made with or without frames.Finally, the most important tip: you can use the power of editing software and smartphone applications to make beautiful videos! Add audio from your TikTok music collection, use stickers, hashtags, and whatever your heart desires to achieve better reach!
Therefore, it is not so important where and how to make a vertical video for Instagram and TikTok.