How to make telegram bot using python
Create a Telegram Bot using Python
|
Create Telegram Bot Using Python Tutorial with Examples
Introduction
For engaging conversations, the automated chatbot is really beneficial. On platforms such as Facebook, Google, and others, we can develop chatbots. In this tutorial, we will learn about how we can create a Telegram chatbot and use it to prepare text messages with rich responses.
Here we learn how we can get different types of responses from the bot such as:
- Text
- Image
- Video
- Document
- Audio
- Poll
- Quick reply Buttons
- Buttons with the links
Steps to create a Telegram Bot
Follow the below instructions to make a Telegram chatbot.
Step 1: Open your telegram account and in the search bar type “BotFather”.
Step 2: Click on the “BotFather” and Click on the “Start” button.
Step 3: Type “/newbot”.
Step 4: Type your unique bot name.
Step 5: Now type a unique username for your bot.
Remember: username must end in ‘bot’. E.g. ‘Tetris_bot’ or ‘Tetrisbot’.
Step 6: After giving a unique username you will get a message like the below. it contains a token to access the HTTP API. Keep your token secure and store it safely.
Step 7: Creating a flask app for the webhook response.
First of all, you will need to install python and flask on your computer.
$ pip install Flask
from flask import Flask app = Flask(__name__) @app.route('/') def index(): return "<h2>Welcome!</h2>" if __name__ == '__main__': app.run(threaded=True)Run this code to check whether the flask app is running correctly or not. When you run the code you will get the link for the server like “http://127.0.0.1:5000/” click on that link you will be redirected to the webpage where you will see the response “Welcome!”
Step 8: NGROK setup.
Go to the Ngrok and type the command “ngrok http 5000” after running this command you will get the links.
From that Ngrok links copy the HTTPS link and paste it to your browser. You will see the response “Welcome!” same as the previous step.
Step 9: Setup webhook.
Now you will need to set the webhook for the telegram bot.
You can do it by running the link in your browser.
https://api.telegram.org/bot<Your Bot Token>/setWebhook?url=<URL that you got from Ngrok>
After running the link in your web browser you will get the response shown in the bellow image.
Step 10: Get JSON response.
Now we will need to get the JSON response from the telegram bot for any text that we write to the bot.
Now open VS Code and add the following code and run it on the same Ngrok link on which you had run the previous code.
from flask import Flask from flask import request from flask import Response import requests app = Flask(__name__) @app.route('/', methods=['GET', 'POST']) def index(): if request.method == 'POST': msg = request.get_json() print(msg) return Response('ok', status=200) else: return "<h2>Welcome!</h2>" if __name__ == '__main__': app.run(debug=True)
In BotFather where you get the token for your Telegram chatbot, you can also file the URL to redirect to your Telegram bot.
After that click on the Start Bot to start the chat with the bot. Then type any message that you want such as “test bot” or anything you want.
After writing “test bot” to your bot now go to the Vscode you will file the following JSON in your terminal.
Here we can see that the message that we have written to the telegram bot we can get at the backend in text.
Step 11: send the text message from the bot.
We will write the code to get the response for the “hi” message from the user and if anything other than “hi” is imputed then response with “from webhook”.
You can also add an extra parameter in send message for that you can follow the Documentation.
from flask import Flask from flask import request from flask import Response import requests TOKEN = "<Your Bot Token>" app = Flask(__name__) def parse_message(message): print("message-->",message) chat_id = message['message']['chat']['id'] txt = message['message']['text'] print("chat_id-->", chat_id) print("txt-->", txt) return chat_id,txt def tel_send_message(chat_id, text): url = f'https://api.telegram.org/bot{TOKEN}/sendMessage' payload = { 'chat_id': chat_id, 'text': text } r = requests.post(url,json=payload) return r @app.route('/', methods=['GET', 'POST']) def index(): if request.method == 'POST': msg = request.get_json() chat_id,txt = parse_message(msg) if txt == "hi": tel_send_message(chat_id,"Hello!!") else: tel_send_message(chat_id,'from webhook') return Response('ok', status=200) else: return "<h2>Welcome!</h2>" if __name__ == '__main__': app.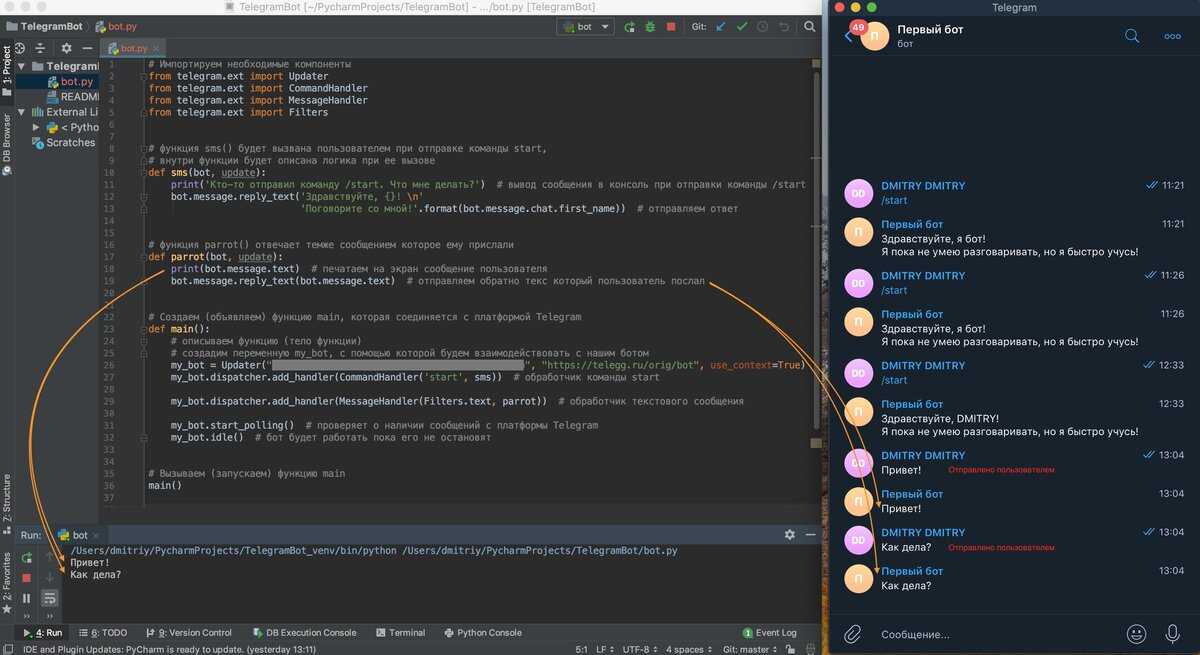 run(debug=True)
We will get the below response in the Telegram Bot.
Step 12: Get the Image.
Now we can also get the image from the telegram bot.
By adding the function for sending images in the code.
For more parameters, you can follow the Documentation.
from flask import Flask from flask import request from flask import Response import requests TOKEN = "<Your Bot Token>" app = Flask(__name__) def tel_parse_message(message): print("message-->",message) try: chat_id = message['message']['chat']['id'] txt = message['message']['text'] print("chat_id-->", chat_id) print("txt-->", txt) return chat_id,txt except: print("NO text found-->>") def tel_send_message(chat_id, text): url = f'https://api.telegram.org/bot{TOKEN}/sendMessage' payload = { 'chat_id': chat_id, 'text': text } r = requests. post(url,json=payload) return r def tel_send_image(chat_id): url = f'https://api.telegram.org/bot{TOKEN}/sendPhoto' payload = { 'chat_id': chat_id, 'photo': "https://raw.githubusercontent.com/fbsamples/original-coast-clothing/main/public/styles/male-work.jpg", 'caption': "This is a sample image" } r = requests.post(url, json=payload) return r @ app.route('/', methods=['GET', 'POST']) def index(): if request.method == 'POST': msg = request.get_json() try: chat_id, txt = tel_parse_message(msg) if txt == "hi": tel_send_message(chat_id,"Hello, world!") elif txt == "image": tel_send_image(chat_id) else: tel_send_message(chat_id, 'from webhook') except: print("from index-->") return Response('ok', status=200) else: return "<h2>Welcome!</h2>" if __name__ == '__main__': app.
![]() run(threaded=True)
run(threaded=True)Here is the response that you will get from the telegram.
Step 13: Get Audio.
Similar way you can send audio to the telegram. For more parameters, you can follow the Documentation.
def tel_send_audio(chat_id): url = f'https://api.telegram.org/bot{TOKEN}/sendAudio' payload = { 'chat_id': chat_id, "audio": "http://www.largesound.com/ashborytour/sound/brobob.mp3", } r = requests.post(url, json=payload) return rAdd this code to your index function.
elif txt == "audio": tel_send_audio(chat_id)
Step 14: Get Video.
Add the code to get the video to the telegram. To add more parameters you can follow the Documentation.
def tel_send_video(chat_id): url = f'https://api.telegram.org/bot{TOKEN}/sendVideo' payload = { 'chat_id': chat_id, "video": "https://www.appsloveworld.com/wp-content/uploads/2018/10/640.mp4", } r = requests.![]() post(url, json=payload) return r
post(url, json=payload) return rAdd this code to your index function.
elif txt == "video": tel_send_video(chat_id)
You will get the following response in your telegram like this.
Step 15: Get the File.
Add the code to get the File to the telegram. To add more parameters you can follow the Documentation.
def tel_send_document(chat_id): url = f'https://api.telegram.org/bot{TOKEN}/sendDocument' payload = { 'chat_id': chat_id, "document": "http://www.africau.edu/images/default/sample.pdf", } r = requests.post(url, json=payload) return rAdd this code to your index function.
elif txt == "file": tel_send_document(chat_id)
You will get the following response in your telegram like this.
Step 16: Get a Poll.
Add the code to get the Poll to the telegram. To add more parameters you can follow the Documentation.
def tel_send_poll(chat_id): url = f'https://api.telegram.org/bot{TOKEN}/sendPoll' payload = { 'chat_id': chat_id, "question": "In which direction does the sun rise?", "options": json.dumps(["North", "South", "East", "West"]), "is_anonymous": False, "type": "quiz", "correct_option_id": 2 } r = requests.post(url, json=payload) return r
Add this code to your index function.
elif txt == "poll": tel_send_poll(chat_id)
You will get the following response in your telegram like this.
Step 17: Get Button.
Add the code to get the Button to the telegram bot.
def tel_send_button(chat_id): url = f'https://api.telegram.org/bot{TOKEN}/sendMessage' payload = { 'chat_id': chat_id, 'text': "What is this?", 'reply_markup': {'keyboard': [[{'text': 'supa'}, {'text': 'mario'}]]} } r = requests.post(url, json=payload) return rAdd this code to your index function.
elif txt == "button": tel_send_button(chat_id)
You will get the following response in your telegram like this.
Step 18: Get the Inline Button.
Add the code to get the Inline Button to the telegram.
def tel_send_inlinebutton(chat_id): url = f'https://api.telegram.org/bot{TOKEN}/sendMessage' payload = { 'chat_id': chat_id, 'text': "What is this?", 'reply_markup': { "inline_keyboard": [[ { "text": "A", "callback_data": "ic_A" }, { "text": "B", "callback_data": "ic_B" }] ] } } r = requests.post(url, json=payload) return rAdd this code to your index function.
elif txt == "inline": tel_send_inlinebutton(chat_id)
You will get the following response in your telegram.
Step 19: Get the Inline Button URL.
Add the code to get the Inline Button to the telegram.
def tel_send_inlineurl(chat_id): url = f'https://api.telegram.org/bot{TOKEN}/sendMessage' payload = { 'chat_id': chat_id, 'text': "Which link would you like to visit?", 'reply_markup': { "inline_keyboard": [ [ {"text": "google", "url": "http://www.google.com/"}, {"text": "youtube", "url": "http://www.youtube.com/"} ] ] } } r = requests.post(url, json=payload) return rAdd this code to your index function.
elif txt == "inlineurl": tel_send_inlineurl(chat_id)
You will get the following response in your telegram like this.
For more information, you can follow the Telegram Bot Api Documentation.
Step 20: Share the image with the bot and get it on the server-side.
First of all, we will share the image to the bot and see what type of JSON we are receiving on our server-side.
As we can see that we are receiving a file id for the file which we are sending to the telegram bot. Now, we will get that file id for the image.
def tel_parse_get_message(message): print("message-->",message) try: g_chat_id = message['message']['chat']['id'] g_file_id = message['message']['photo'][0]['file_id'] print("g_chat_id-->", g_chat_id) print("g_image_id-->", g_file_id) return g_file_id except: print("NO file found found-->>")Now by calling the given function in the index function, we can get the chat id and file id printed.
file_id = tel_parse_get_message(msg)
We will receive the response below.
Now we will use the file id which we get for the image to get the file path for the image which is stored on the telegram server.
For that we will have to redirect to another URL and pass our file id to it for that we had created a function.
def tel_upload_file(file_id): url = f'https://api.telegram.org/bot{TOKEN}/getFile?file_id={file_id}' a = requests.post(url) json_resp = json.loads(a.content) print("a-->",a) print("json_resp-->",json_resp) file_pathh = json_resp['result']['file_path'] print("file_path-->", file_pathh) url_1 = f'https://api.telegram.org/file/bot{TOKEN}/{file_pathh}' b = requests.get(url_1) file_content = b.content with open(file_pathh, "wb") as f: f.write(file_content)
We also need to call the function which we have created.
file_id = tel_parse_get_message(msg) tel_upload_file(file_id)
Here in the function first we are trying to get our file path for the image that we had shared from a JSON.
After getting the file path we are trying to get the file from the telegram server by redirecting the file path to the “url_1”.
From “url_1” we are trying to save the file to our computer.
On the server-side, you will see the print and JSON like this.
Here is the directory where we are writing our code. We need to create a folder named “photos” so that we can get the image that we send to the bot directly in our system.
Step 21: Now we will try to add a video to the telegram bot.
When we send the video to the bot then we are receiving different types of JSON. So we need to extract the file id from it.
It can be done with the help of the following code.
def tel_parse_get_message(message): print("message-->",message) print("1") try: g_chat_id = message['message']['chat']['id'] g_file_id = message['message']['photo'][0]['file_id'] print("g_chat_id-->", g_chat_id) print("g_image_id-->", g_file_id) return g_file_id except: try: g_chat_id = message['message']['chat']['id'] g_file_id = message['message']['video']['file_id'] print("g_chat_id-->", g_chat_id) print("g_video_id-->", g_file_id) return g_file_id except: print("NO file found found-->>")Now here also in a similar way, we will extract the file id and pass it to the function and get the file path and store the video on our server-side.
To store the video, we will need to create the folder name “videos” in which we can store the video.
Step 22: Now in a similar way we can do it for audio and files.
For storing the audio we need to create a folder named “music”.
For storing the documents we need to create a folder named “documents”.
Here in a similar way, we need to extract the file id and pass it to the file_upload function.
def tel_parse_get_message(message): print("message-->",message) try: g_chat_id = message['message']['chat']['id'] g_file_id = message['message']['photo'][0]['file_id'] print("g_chat_id-->", g_chat_id) print("g_image_id-->", g_file_id) return g_file_id except: try: g_chat_id = message['message']['chat']['id'] g_file_id = message['message']['video']['file_id'] print("g_chat_id-->", g_chat_id) print("g_video_id-->", g_file_id) return g_file_id except: try: g_chat_id = message['message']['chat']['id'] g_file_id = message['message']['audio']['file_id'] print("g_chat_id-->", g_chat_id) print("g_audio_id-->", g_file_id) return g_file_id except: try: g_chat_id = message['message']['chat']['id'] g_file_id = message['message']['document']['file_id'] print("g_chat_id-->", g_chat_id) print("g_file_id-->", g_file_id) return g_file_id except: print("NO file found found-->>")Step 23: As we have tried to store the image, video, audio, and file at our server-side and also done the code to get the different types of responses through the telegram bot.
You can also refer to the full code on our Github repository and test it to get the various responses through the telegram bot and send files to the server-side.
We have learned how we can get the text response from the bot and also the different types of files. After that, we have also seen how we can get the files that we send to the bot on our server-side.
Now you can have your bot work the way you want—go ahead and create the next big thing!
Hope you had fun building your first Telegram bot. If you face any difficulty then do let us know in the comment.
We have already created a blog post series where we have provided a tutorial on how to create a chatbot for different platforms. You can explore these blogs and learn how you can set different kinds of rich responses which can increase user engagement on your chatbot.
Facebook Messanger: Create Facebook Messenger Bot Using Python Tutorial With Examples
Slack: Create Slack Bot Using Python Tutorial With Examples
Discord: Create Discord Bot Using Python Tutorial With Examples
Also, check out our other tutorials to learn how to build a ChatGPT chatbot on different platforms.
WhatsApp with ChatGPT: Build An Automated, AI-Powered WhatsApp Chatbot With ChatGPT Using Flask
Facebook Messenger with ChatGPT: Build An Automated, AI-Powered Facebook Messenger Chatbot With ChatGPT Using Flask
Slack Chatbot with ChatGPT: Build An Automated, AI-Powered Slack Chatbot With ChatGPT Using Flask
Telegram Bot with ChatGPT: Build An Automated, AI-Powered Telegram Chatbot With ChatGPT Using Flask
How to write a Telegram bot in Python - Tproger
In this tutorial, we will analyze the process of creating a simple bot reminder, the only task of which is to remind the user of important things. This is a basic design that can be complicated and modified to suit your needs.
The instruction is suitable for beginners who know Python at a basic level, have tried to write code and have a code editor installed on their computer.
First step: project preparation and environment deployment
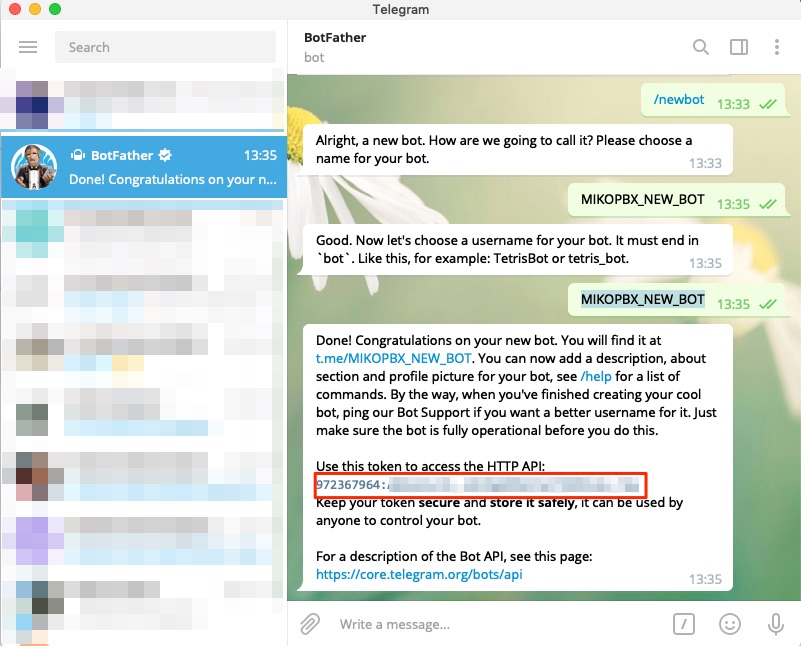
Let's find BotFather in the Telegram search - the official messenger bot that creates and manages other bots. In the interface, select / start, then - / newbot, and then set the name and address. In this tutorial, these will be Elbrus Reminder and elbrus_reminder_bot, respectively.
After that, BotFather will send a message with a token and a link to the bot:
The token must be stored in a safe place - it gives control over the bot. and, as a result, allows access to user data.
Close Telegram for a while and create a folder with the project name on the computer: for example, reminder_bot. Let's open the folder in the development environment and create a working file with a clear name - bot.py.
Let's open a code editor terminal and create a new environment for the project. In the development environment, use the command python -m venv .venv to create a folder with the environment .venv .
If the environment was not activated automatically, you can do it manually by specifying the path to the activation file in the format source . , where venv/bin/activate
source is a Bash programming language command. Another option is to restart the development environment. It works for Visual Studio Code, but you must first accept the editor's suggestion to bind the environment to the project folder immediately after creating the environment.
The practice of creating a new environment for each project allows you to increase the security and stability of the project - in the environment you can use only those libraries and their versions that are required in the project. If additional features appear in the project, all changes will be stored in this environment. At the same time, it will be isolated from other environments and projects - this will increase the security of the project.
The second stage: we include libraries
The project is created and the environment is ready: it's time to move on to writing code. According to good manners, first of all, through import , we add several pre-installed Python libraries. When creating a bot, we will need
logging and time , which are responsible for determining the time and logging messages.
import time import logging
Next, let's add the aiogram asynchronous library, on the basis of which the bot will work. It, for example, determines which message has arrived, how it should be processed, and which ports are needed. First, install it through the terminal with the command pip install aiogram , and in the code editor write the following:
from aiogram import Bot, Dispatcher, executor, types
From this library, we need only separate modules and classes - all its features will not be useful for creating a basic version of the bot. Therefore, instead of a single import, the command from {} import {} was used.
Once the libraries are imported, let's create variables with the bot's token and the message it will send to the user. You can replace this message with any other that you need. These are static variables, so their names are in capslock:
TOKEN = "your BotFather token will go here" MSG = "Did you code today, {}?" It is better to load tokens, keys and other data for setting up a project in a more secure way (for example, by creating environment variables or configuration files). But in this case, we will do everything in one file for clarity, and we will analyze examples of safer work with such variables in the following posts.
Now let's create an instance of the Bot class, passing our token as an argument, and an instance of the Dispatcher (dp) class, which will receive 9 as an argument0019 bot . As a result, we get a binding of an object of class bot with a key that is associated with the bot, and a dispatcher that is associated with this bot:
bot = Bot(token=TOKEN) dp = Dispatcher(bot=bot)
The next step is to add a construct called a decorator ( massage_handler ) — it helps to get the desired functionality from the dispatcher. As an argument, we write the commands that the decorator processes - in this case, this is the command
/start , which starts the bot.
@dp.message_handler(commands=['start'])
Under the decorator, we write a function that will process the command /start and determine the logic according to which the bot will work. Since we are working with an asynchronous library, the function must also be asynchronous. To do this, before specifying def , add the keyword async :
async def start_handler(message: types.Message):
The function welcomes the user and processes the message that he sends in response. From the message, you can get information about the user who sent it, the time it was sent, and its ID.
Create a variable and store in it user id :
user_id = message.from_user.id
Then we get the short and full username from the message:
user_name = message.from_user.first_name user_full_name = message.from_user.full_name
In order to display information about the user in the logs, we pass the ID and full name as text, and also use the capabilities of the library time to determine the time when the user wrote:
logging.info(f'{user_id} {user_full_name}{time.asctime()}') Here we step aside and check the correct operation of the module time . You can do this in the terminal: for this we will write import time , and then - time.asctime
Let's go back to the code. Since the function we are using is asynchronous, instead of the usual return for functions, we use await :
await message.reply(f"Hi, {user_full_name}!") There are several ways to reply to a user in the bot - in this case, we use reply. Above, in variable MSG , we set the standard message: "Did you program today, {}?". Let's set the frequency of reminders: seven times every seven days (60x60x24 - the number of seconds in one day) from the moment the /start command was sent to the bot from the user:
for i in range(7): await asyncio.sleep(60*60*24)
Next, set up sending a message with the username in the same loop:
await bot.send_message(user_id, MSG.format(user_name))
Third stage: final
Let's move on to the final part: at the end of the script, we will write a few lines. They may seem strange to a beginner, but this is a common practice that many programmers resort to when developing. In this line we check if the variable is equal to __name__ line "__main__" . This condition will always be True if we run this file as a python script via terminal:
if __name__ == '__main__':
Now we make our bot available on the network:
executor.start_polling(dp)
Saving the file. We start the bot in the terminal opened in the project folder using the command python bot. . py
Let's go back to BotFather and follow the link we received along with the token. Click "Start" - you're done, the bot, written in less than 30 lines, works.
This is how its entire code looks like:
import time import logging import asyncio from aiogram import Bot, Dispatcher, executor, types TOKEN = "your stock token @BotFather will be here" MSG = "Did you code today, {}?" logging.basicConfig(level=logging.INFO) bot = Bot(token=TOKEN) dp = Dispatcher(bot=bot) @dp.message_handler(commands=["start"]) async def start_handler(message: types.Message): user_id = message.from_user.id user_name = message.from_user.first_name user_full_name = message.from_user.full_name logging.info(f'{user_id} {user_full_name} {time.asctime()}') await message.reply(f"Hello {user_full_name}!") for i in range(7): await asyncio.sleep(60*60*24) await bot.send_message(user_id, MSG.format(user_name)) if __name__ == "__main__": executor.![]() start_polling(dp)
start_polling(dp) Next time we will tell you in detail how to write such a bot in the JavaScript programming language. Subscribe so you don't miss out.
how to write from scratch on your own, how to register and test it, examples
Telegram is used by more than five hundred million people around the world. Companies with its help simplify the order of goods or services, give advice. To do this, use bots - automatic programs. They are written in different programming languages. Consider how to create a bot in the most popular language in February 2022 - Python.
Install a Python interpreter
Python is a dynamically typed, interpreted language. Programs written in it are not compiled into executable files. Therefore, to run Python programs, install its interpreter.
🖥️ Windows
- Go to the official Python download page.
Select the latest version of Python
- Scroll down the pages and download the Windows Installer.
Select 64-bit
- Open the installer and check the box, click Install Now.
Check the box before installing Add Python to PATH
- Then open the cmd.exe command line and install the virtual environment using the command
pip install virtualenv
❗ Calling the interpreter on the Windows command line is different from other operating systems. Use command py instead of python3.
🖥️ Linux
If you are using Linux, you probably already have Python installed. To check, open a terminal with the command:
python3 --version
If you see something like Python 3.x.x , then Python is there. Otherwise, use the installed package manager. Basically it's apt. Enter the command:
sudo apt install python3
Install the virtual environment with the command:
sudo apt install python3-venv
🖥️ MacOS
MacBooks often already have Python too. Open a terminal and check with the command:
python3 --version
The Python 3.x.x response, not an error, also confirms that Python is installed. If not, use the brew package manager. Enter the command:
brew install python3
Install the package to create the virtual environment:
pip install virtualenv
Create the project and virtual environment folders
Open a Linux or MacOS terminal, Windows command line. Navigate to the directory where you want to create the bot project. Sequentially
enter commands:
mkdir myBot cd myBot python3 -m venv env #
or if you are using Windows:
py -m venv env #
These commands will create a myBot project folder inside the current working directory. And in it - a folder with a virtual environment.
Activate environment, select and install libraries
To activate the virtual environment on MacOS or Linux, use the command
source ./env/bin/activate
AND the command
source.\env\bin\activate.bat
for Windows.
Different libraries are used to create bots. Most popular: python-telegram-bot synchronous, aiogram asynchronous.
Asynchrony allows you to be distracted from tasks and not wait for input from the user, so we will use the aiogram library. Documentation on it is on docs.aiogram.
Use the Python package manager (pip). To install the aiogram library, enter the command:
pip install aiogram
Register the bot and get the API key
Open telegram and find the @BotFather bot. It is needed to create and manage other bots.
Click Run.
Enter the /newbot command and the bot's display name
Now enter the bot's nickname. It must be unique, with the word bot at the end. When the username passes validation, you will receive a message with an API key.
Don't share the received token with anyone
Sample bots
🤖 Echobot
First, create some files in the project folder.
Handlers.py will store functions - message and command handlers, main.py is needed to run
Write code in main.py:
from aiogram import Bot, Dispatcher, executor import handlers API_TOKEN = 'insert your token here' # instantiate the bot and dispatcher bot = Bot(token=API_TOKEN) dp = Dispatcher(bot) # run the program if __name__ == '__main__': # indication skip_updates=True # skip commands # who sent # before the bot starts executor.start_polling(dp, skip_updates=True)
Line by line:
from aiogram import Bot, Dispatcher, executor import handlers
Here, from the aiogram library, we import the Bot classes, Dispatcher is a class that registers which commands / messages and which function to respond to. And executor - it starts the bot and executes the functions registered in the dispatcher. On the second line, we import the handlers.py module - handlers are stored in it.
Then declare a variable into which to insert the token from @BotFather. Create an instance of the bot class, pass the token to it. And an instance of the dispatcher, pass the newly created bot to it.
Next, open the handlers.py file and write a couple of commands in it that will process requests:
from aiogram import types # function that handles the /start command async def start(message: types.Message): await message.answer("Hi!\nWrite me something!") # function that responds to the message # text async def echo(message: types.Message): await message.answer("Yourself: " + message.text) Here we import types from the aiogram module, with the help of which we convert the message text or files into a data structure. It can be Message - message, Audio - audio recording, Animation - animation.
Next, define asynchronous functions to process /start commands and respond to messages.
Register these functions in the manager. To do this, in the main.py file, add before starting the program:
# register functions dp.register_message_handler(h.start, commands=["start"]) dp.register_message_handler(h.echo)
As a result, the main.py file looks like this:
from aiogram import Bot, Dispatcher, executor import handlers API_TOKEN = 'insert your token here' # create a bot and dispatcher bot = Bot(token=API_TOKEN) dp = Dispatcher(bot) # register functions dp.register_message_handler(handlers.start, commands=["start"]) dp.register_message_handler(handlers.echo) # run the program if __name__ == '__main__': # indication skip_updates=True # skip commands # who sent # before the bot starts executor.start_polling(dp, skip_updates=True)
Type python3 main.py or py main.py on Windows into a terminal to check if it works. Open a telegram bot and run it
🤖 Cryptobot
To write a cryptobot that will report the current price of BTC, LTC and DASH, use the free SoChain API service. You will also need an additional library to create asynchronous aiohttp requests, but it is installed along with aiogram.
Create a new utils.py module. Add the URL of the API service to it. To get the price, use the Get Prices method. It returns a json object with price data from multiple sources. So write a function that calculates the mean:
BASE_URL = "https://sochain.com/api/v2/" # API URL # function to calculate the price def calculate_price(data): prices = [float(entity["price"]) for entity in data["data"]["prices"]] return f"{(sum(prices) / len(prices)):.2f} USD" Next, open the handlers.py file and write the code:
from aiogram import types # import aiohttp library import aiohttp # import all data from utils from utils import * # command handler /start async def start(message: types.Message): await message.answer("Hi!\nMessage me the acronym for a cryptocurrency to get the current price") # command handler /help async def help(message: types.Message): await message.answer("Available networks:\n" + "\n".join(networks)) # price request handler async def get_price(message: types.![]() Message): session = aiohttp.ClientSession() # create a GET request for the url assigned to the get_price method async with session.get(BASE_URL + f"get_price/{message.text}/USD") as resp: # get response in json format data = await resp.json() # if request status is successful if data["status"] == "success": # calculate the price and send it to the user price = calculate_price(data) await message.answer(price) else: # report that an error has occurred await message.answer("An error occurred")
Message): session = aiohttp.ClientSession() # create a GET request for the url assigned to the get_price method async with session.get(BASE_URL + f"get_price/{message.text}/USD") as resp: # get response in json format data = await resp.json() # if request status is successful if data["status"] == "success": # calculate the price and send it to the user price = calculate_price(data) await message.answer(price) else: # report that an error has occurred await message.answer("An error occurred") Now modify main.py file: register functions. Then test the bot:
from aiogram import Bot, Dispatcher, executor import handlers API_TOKEN = 'insert your token here' bot = Bot(token=API_TOKEN) dp = Dispatcher(bot) dp.register_message_handler(handlers.start, commands=["start"]) dp.register_message_handler(handlers.help, commands=["help"]) dp.register_message_handler(handlers.get_price) if __name__ == '__main__': executor.start_polling(dp, skip_updates=True)
When the user specifies an unsupported ETH network, the bot will return the price of bitcoin, because this is how the API service is designed. If it doesn't recognize the network, it uses BTC
To fix the error, create a keyboard that returns the desired values. Write a special Middleware class: it describes checks before and after request processing. Or check the occurrence inside the function. The last option is simpler and easier.
If a user submits an unsupported cryptonet acronym, you will let them know. To do this, define the list of supported networks in the utils.py file:
networks = ["BTC", "LTC", "DASH"] # <-- supported networks BASE_URL = "https://sochain.com/api/v2/" # API URL def calculate_price(data): prices = [float(entity["price"]) for entity in data["data"]["prices"]] return f"{(sum(prices) / len(prices)):.2f} USD" Now edit the cryptocurrency price function in the handlers. py file. To do this, add a network entry check to the list of supported:
async def get_price(message: types.Message): network = message.text.upper() # uppercase the message # do a check for an occurrence if network not in networks: await message.answer("You specified an unsupported cryptocurrency") return session = aiohttp.ClientSession() async with session.get(BASE_URL + f"get_price/{message.text}/USD") as resp: data = await resp.json() if data["status"] == "success": price = calculate_price(data) await message.answer(price) else: await message.answer("An error occurred") When the user specifies an unsupported ETH network, the bot will report it
All files code
utils.py
networks = ["BTC", "LTC", "DASH"] # supported networks BASE_URL = "https://sochain.com/api/v2/" # API URL def calculate_price(data): prices = [float(entity["price"]) for entity in data["data"]["prices"]] return f"{(sum(prices) / len(prices)):.![]() 2f} USD"
2f} USD" handlers.py
import aiohttp from aiogram import types from utils import * async def start(message: types.Message): await message.answer("Hi!\nMessage me the acronym for a cryptocurrency to get the current price") async def help(message: types.Message): await message.answer("Available networks:\n" + "\n".join(networks)) async def get_price(message: types.Message): network = message.text.upper() if network not in networks: await message.answer("You specified an unsupported cryptocurrency") return session = aiohttp.ClientSession() async with session.get(BASE_URL + f"get_price/{message.text}/USD") as resp: data = await resp.json() if data["status"] == "success": price = calculate_price(data) await message.answer(price) else: await message.answer("An error occurred") main.py
from aiogram import Bot, Dispatcher, executor import handlers API_TOKEN = 'insert your token here' bot = Bot(token=API_TOKEN) dp = Dispatcher(bot) dp.register_message_handler(handlers.start, commands=["start"]) dp.register_message_handler(handlers.help, commands=["help"]) dp.register_message_handler(handlers.get_price) if __name__ == '__main__': executor.start_polling(dp, skip_updates=True)
Webinars
The main thing about the Python telegram bot
- To create a bot, install the Python interpreter. On Linux and MacOS, it often already exists.
- Create a folder with the myBot project, in it - a folder with the environment, activate it, install the aiogram library. It allows requests to be processed even if you are waiting for the user to enter information.
- Register a bot and manage its settings with @BotFather.
At the Skypro online university, we train the profession of a Python developer in 10 months. You will learn how to write clean code, servers for a store, application, service or game, develop a complex service architecture. Complete practical tasks with real tools and make four portfolio projects.

 message.reply_text(
 message.reply_text(
 message.reply_text(
 dispatcher.add_handler(CommandHandler(
 text, unknown_text))