Log in
June 6, 2022
Updated August 25, 2022
The Sensitive Content Control has only two options for teens: “Standard” and “Less.” New teens on Instagram under 16 years old will be defaulted into the “Less” state. For teens already on Instagram, we will send a prompt encouraging them to select the “Less” experience.
This will make it more difficult for young people to come across potentially sensitive content or accounts in Search, Explore, Hashtag Pages, Reels, Feed Recommendations and Suggested Accounts.
In addition, we are testing a new way to encourage teens to update their safety and privacy settings. We’ll show prompts asking teens to review their settings including: controlling who can reshare their content, who can message and contact them, what content they can see and how they can manage their time spent on Instagram.
These updates are some of the ways we are working to protect teens on Instagram.
- - -
We’re continuously developing controls to help people personalize their experience on Instagram. Last summer, we launched the Sensitive Content Control so people could choose how much or how little sensitive content to see in Explore from accounts they don’t follow. Today, we’re announcing updates to this control.
Starting today, the Sensitive Content Control will cover all surfaces where we make recommendations. In addition to Explore, you will now be able to control the amount of sensitive content and accounts you see in Search, Reels, Accounts You Might Follow, Hashtag Pages and In-Feed Recommendations. With this update, we’re also applying the technology we use to enforce our Recommendation Guidelines to Instagram's recommendations on Search and Hashtag pages. This update will be available to everyone in the coming weeks.
The Sensitive Content Control has three options, which we’ve renamed from when we first introduced the control to help explain what each option does. The three options are: “More”, “Standard” and “Less”.
“Standard” is the default state, and will prevent people from seeing some sensitive content and accounts. “More” enables people to see more sensitive content and accounts, whereas “Less” means they see less of this content than the default state. For people under the age of 18, the “More” option is unavailable.
To view your Sensitive Content Control:
There are additional tools we offer that can help you shape your Instagram experience, including Comment Control, Restrict, Block and Mute. Our hope is to provide more tools over time and make Instagram work better for you. For more information about Instagram’s Sensitive Content Control, you can visit the Instagram Help Center.
RELATED ARTICLES
#PRODUCT
#ANNOUNCEMENTS
More ways to connect on Instagram
#CREATORS
#PRODUCT
#ANNOUNCEMENTS
#BUSINESS
Bringing Digital Collectibles to More People
#PRODUCT
#ANNOUNCEMENTS
Introducing New Ways to Collaborate and Create with Reels
').appendTo("#quiz_small_affiliate_placeholder"),$('
').insertBefore(".youmightalsolike"),$('
').insertBefore("#quiz_container"),$('
').insertBefore("#newsletter_block_main"),la(!0),c=document.getElementsByClassName( "scrolltomarker"),a=0;a
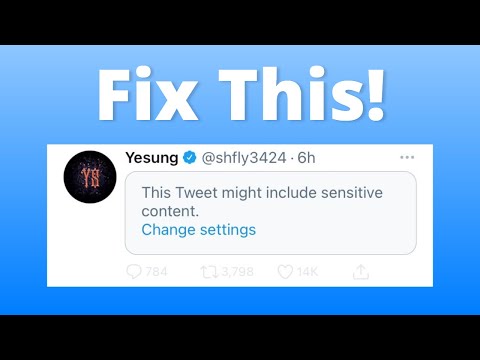
If you've been using Instagram lately, you've likely noticed blurred-out posts marked as "Sensitive Content. " This usually means that someone has reported the post (or that the algorithm thinks it's a sensitive subject) but the content doesn't violate Instagram's policies. Instead of removing posts like this, Instagram marks them as sensitive and gives users the option to click through to the actual post. Although you can't apply a "Sensitive Content" option to your own posts, there are ways you can share potentially-upsetting material in a similarly-considerate way. This wikiHow shows you how to use a warning image to share sensitive photos or videos on Instagram without upsetting your followers.
Part 1
1
Open Instagram on your phone or tablet. Although you could just type something like "this post contains sensitive content" in your post's caption, it's likely that nobody will see it until they've already seen the photo or video. One way to allow followers to choose whether they want to see something or not is to create a slideshow-type post, with the first image(s) in the post displaying a warning. Then, viewers can decide whether they want to swipe left to see the sensitive content.
2
Tap the profile icon. It's the outline of a person's head and shoulders at the bottom-right corner. An easy way to create your warning image is to use the Instagram Story editor, so that's what we'll be doing.
Advertisement
3
Tap the +. It's in the upper-right corner of the app.
4
Tap STORY on the menu. This opens the Story editor.
5
Tap Aa. This allows you to start entering text.
6
Enter your text.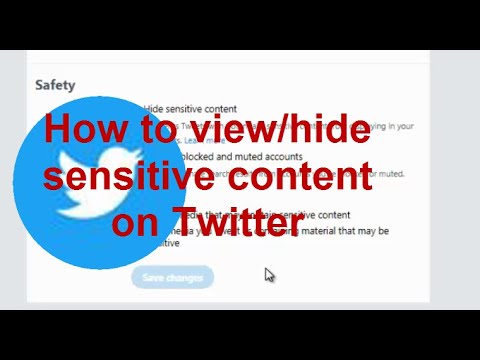 For example, you could create an image that says "Sensitive Content—swipe left to see it," or "Trigger Warning," followed by a clean/safe description of the content you're sharing. To start typing, tap TAP TO TYPE.
7
Tap Next. This saves your text and displays a preview.
8
Adjust your image. Now you can adjust the size of the text even further by placing two fingers over the text and pushing outward (to increase it) or inward (to make it smaller). You can also tap the circle at the top to change the background color, add drawings, stickers, etc.
9
Tap the Download button to save your image to your phone or tablet. It's the arrow pointing downward at the top of the screen. Once your image is saved, you can tap the X at the top-left to close the editor, and then tap X at the top-right to return to your feed.

Advertisement
Part 2
1
Create an Instagram post. Now that you have a warning image, you can create a gallery post. Start by opening the Instagram app and tapping the + at the top of the screen.
2
Tap the two overlapping squares below the preview image. This gives you the option to share more than one image and/or video in a single post. After tapping this option, small circles will appear at the top corners of each photo in your gallery.
3
Tap the images you want to share in the order you want them to appear. As you tap images, a number will appear at each image's corner. This number determines the order they'll be shown. You'll definitely want the warning image to be number one (and any other warning images should follow that one). After adding the warning images, add the sensitive content you want to share.
4
Tap Next. It's at the top-right corner.
5
Add filters/edits and tap Next. If you want, you can add any of Instagram's filters to the selected images/videos. Choosing a filter from the bottom will apply it to all images in the gallery you're sharing, but you can double-tap an individual photo to change its filter alone.
6
Enter a caption. The caption is another great place to add a warning about the sensitive content you're sharing. You can type some thoughts about why sharing this sensitive content is important to you, and why people should (or shouldn't) swipe left to view it.
7
Tap Share to share your post. Once your post is live, you'll see it in action. Swiping left across the first image will proceed to the next one, and so on.
Advertisement
Search
Add New Question
Ask a Question
200 characters left
Include your email address to get a message when this question is answered.
Submit
Advertisement
To report a post as sensitive, tap the three dots above the post, select Report, and then follow the on-screen instructions.[1] X Research source
⧼thumbs_response⧽
Helpful 0 Not Helpful 0
Any post that can offend anyone can be marked as sensitive content and blurred. This may happen due to Instagram's automatic algorithm, or because enough people have reported it.
⧼thumbs_response⧽
Helpful 0 Not Helpful 0
Submit
Thanks for submitting a tip for review!
Advertisement
Article SummaryX
1.Create a "sensitive content warning" image in the Story editor.
2.Save the image to your phone or tablet.
3.Create a new Instagram post.
4.Tap the Gallery option (two overlapping squares).
5.Tap the warning image(s) first, followed by the sensitive one(s).
6.Share the post.
Did this summary help you?
In other languages
If you've been using Instagram lately, you've likely noticed blurred-out posts marked as "Sensitive Content." This usually means that someone has reported the post (or that the algorithm thinks it's a sensitive subject) but the content doesn't violate Instagram's policies. Instead of removing posts like this, Instagram marks them as sensitive and gives users the option to click through to the actual post. Although you can't apply a "Sensitive Content" option to your own posts, there are ways you can share potentially-upsetting material in a similarly-considerate way. This wikiHow shows you how to use a warning image to share sensitive photos or videos on Instagram without upsetting your followers.
Thanks to all authors for creating a page that has been read 172,437 times.
Advertisement
The Collab feature on Instagram* is another way to collaborate with brands and bloggers, or simply make a collab post with a friend or family member.
We tell you how to set up the function, about its advantages and the purposes of introducing it into the social network.
A feature known as “Collab” or “Invite a Collaborator” was tested in early 2021 in several countries, including the UK and India, and launched worldwide in October. Collaborative posts are now available for any open account. nine0003
Collab allows you to share posts and videos on Instagram* with another person so that no one has to duplicate content. Both authors of the post will be listed, and the post will collect total likes, views, and comments.
Collaboration posts can be used by media personalities to announce collaborations, influencers to interact with brands, and ordinary users to post a video about a vacation with their best friend.
For example, Kourtney Kardashian and her fiancé Travis Barker used this feature on Halloween to show couples' costumes from Tim Burton's Edward Scissorhands. nine0003 At the top right, you can see that the post has two authors, kourtneykardash and travisbarker. Click on the accounts and find that both users have the post, with the same engagement rates
The feature is very easy to use after a little practice.
To make a joint post, click on the plus in the upper right corner or bottom center of the screen. You will be taken to the creation menu. Next, follow the usual steps to create a post or rils. When you go to the menu where you can add a signature, click "Tag people" - a separate screen will open. nine0003
Next to the "Add tag" option, you will see the "Invite collaborator" function. Click and then find the account of the person you would like to invite to create a joint post.
You need to know what a collaborator's username looks like in order to search for it.Multiple users can be selected, up to a maximum of 20. Note that 20 is the total number of participants. It includes both co-authors and people you simply tag in a post. You can tag 10 people and 10 co-authors, or 20 co-authors and no one else. nine0003
In the process, you will see a pop-up message "If [co-author name] accepts the invitation, this person will be credited as the author of your publication and it will be made available to their subscribers."
This means that you cannot unilaterally designate someone as a co-author of a joint publication. You can only invite a person to cooperate, and he can accept or decline the invitation.
By the way, if you were invited to become a co-author, and in the future you want to remove yourself from this post, just go to the post menu and click "Stop sharing" Have you added all the co-authors you wanted? Click the "Done" button in the upper right corner of the screen to save the settings, then publish as usual.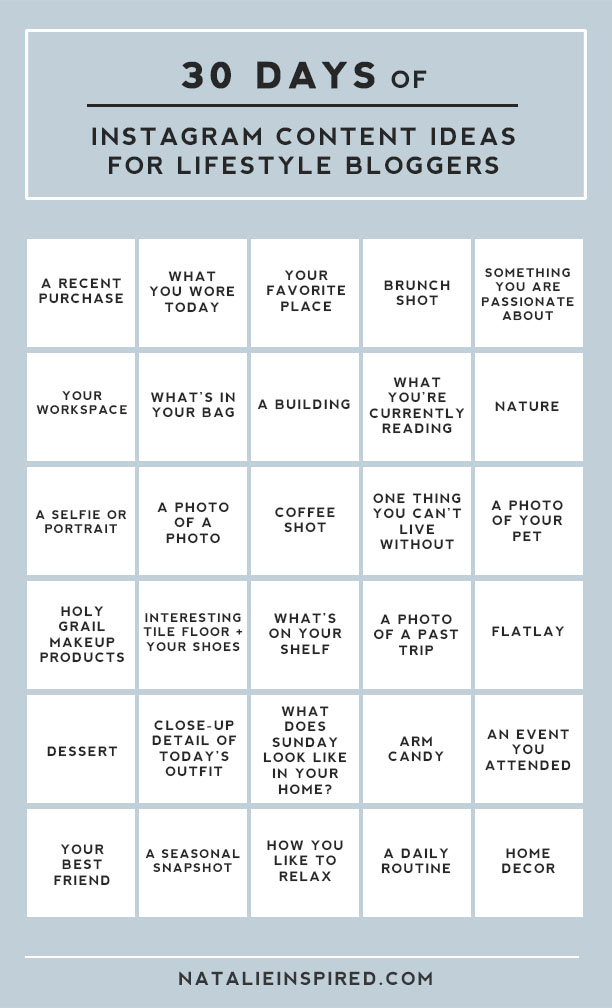
To recap:
For Reels co-publishing, the process is the same - record and edit as usual. Check Preview that everything looks correct, then click Next to get to the sharing options. On this page, click on "Tag People" to access the "Invite Collaborator" tag, and follow the outline. nine0003
Read also: How to check Instagram* for cheating: instructions.
Collab is a great feature to reach new, relevant audiences, but you have to make sure the content works for all collaborator channels. For example, you sell high-quality coffee makers, and the co-author sells great coffee. Co-authoring a post is a good idea, as the audience is interested in both.
Several clear advantages for joint posts on Instagram*:
But consider the inconvenience : a joint post will be placed in the profile grids of both authors. This can be awkward when scheduling your posts in the same style. Consider the aesthetics and layout of both accounts before co-writing something.
Instagram co-authorship* is for general posting, not co-creation.
Duets on TikTok allow you to record your own video along with the original based on another user's video.
A diction lesson is an example of a TikTok video created specifically for duets. Any user can take it as a template and complete the task by filling in the pauses after the speaker's wordsDuets on TikTok and co-authorship on Instagram* introduce the creator of the video to a new audience, which is usually not very good on Instagram*. This is not my opinion, the thought was voiced by the head of the social network Adam Mosseri. nine0003
Instagram* is a platform where brands and influencers can stay connected to audiences they have built elsewhere. It's getting harder and harder to use Instagram* to acquire followers from scratch.
This is a problem for Mosseri, who wants Instagram* to be just as good at getting new creators noticed as TikTok.
Adam Mosseri, Head of Instagram*
“Instagram* is much better at helping content creators who have already made a name for themselves on the platform. TikTok is better at identifying new and young talents, and, first of all, helping them to open up. nine0003
And we want to be really good at it. Historically, we have paid less attention to this, but I am pushing my teams in every possible way to ensure that this “boy” (Collab) becomes better.
Mosseri acknowledges TikTok's ability to create social media stars, which he believes Instagram should also have*. Collaborative posts compensate for one of the main weaknesses of Instagram * and allow you to attract followers without an existing audience.
Theoretically, the function of joint posts will help to identify smaller accounts, but for this, there must be connections - promoted accounts with which they could begin to cooperate. nine0003
Content creators who don't have good connections or a large audience won't benefit much from collaborative posts, but this is a step towards Mosseri's goal of doing more with this "boy", Collab.
It can be concluded that the company plans to develop and improve joint positions.
The delayed posting service SMMplanner works in a similar way: it constantly adds new functionality and improves the existing one. Now this is a whole set of SMM tools with analytics, photo and video editors, a reposter from Instagram * and the site's RSS feed to all popular social networks and various other features. nine0003
Register here - to test all the features you will have 14 days of free access to the professional plan instead of the standard week. Then choose any of the PRO plans or the free version, depending on your needs.
Instagram Stories has quickly become a highly requested feature not only for ordinary users but also for business accounts. More and more brands are turning to Instagram Stories. As with Snapchat, Instagram Stories also has certain restrictions that make content planning more difficult for marketers, and the most important of these is the posting of photos and videos taken only in the last 24 hours. nine0003
Everyone strives to create a good Instagram Stories, but how do you combine this with content that was filmed much earlier? As it turned out, not everything is so sad, and we bring to your attention as many as 3 ways to get around this limitation, with which you can post photos and videos to your Instagram Stories that were taken much earlier than 24 hours.
Instagram marketing forces you to make decisions such as whether to post often or rarely, and the adequacy of the chosen choice in a given situation affects the level of sales, traffic and the number of followers. In Instagram Stories, you can show your creative potential to the maximum and in any quantity, without the risk of losing your audience. nine0003
True, as we said, Instagram Stories can only publish content created in the last 24 hours, which means that photos and videos taken before 24 hours simply will not be displayed in the image viewer, which makes it very difficult to pre-prepare Stories.
How nice it would be if we could prepare a bunch of photos and videos on Monday to publish in a week! Fortunately, this is possible, and in several ways. How to do it, read on:
The easiest and most affordable way for most people is to simply take a screenshot of an old photo by pressing the Home and Sleep buttons at the same time. It turns out that the screenshot is completely “new”, which means you can upload it to your Instagram Story.
The second option is to use a third party application to edit the metadata of your photos and videos, or to keep an updated version of your videos.
Metadata editing with Pixelgarde. nine0003
Metadata in your photos and videos is information that describes the lens aperture, focal length, camera shutter speed, ISO speed, flash or not, and of course the date the photo or video was taken. By changing the metadata on a photo or video, you can trick Instagram into believing it was taken within the last 24 hours.
The easiest way to do this is to download the free Pixelgarde app, which lets you add, remove, or change the geotag, dates, time of day, and other metadata in your photos and videos. Pixelgarde has a free watermarked version of their app, but if you want to get rid of it, you can update the app for just 1.9$9
You can then open the Instagram app and select a photo or video to post to your story! It should be noted that this application may behave incorrectly from time to time.
Download the free iMovie app on your iPhone (or Video Show on Android). Click "Create Project" and then "Video" to view photos and videos saved on your smartphone. Select the video you plan to post to your Instagram story and click "Create Movie". nine0003
You can edit the video in this window (add a filter or theme, music and transitions) or just save the video to your library by selecting Done and then clicking the export button and choosing Save Video.